Introduction
Please visit this page to see all Pre-Configured ready to use API connectors which you can use in SSIS API Source / SSIS API Destination OR API ODBC Driver (for non-SSIS Apps such as Excel, Power BI, Informatica).
 In this post, you will learn How to write/update Google Sheet in SSIS. We will use drag and drop REST API connectors from SSIS PowerPack. No need to download any SDK or learn programming languages (e.g. JAVA, C#, Ruby, Python) when you use SSIS PowerPack Connectors. We will use the Google Drive API and Google Sheet API to write and update Google Spreadsheet in a few clicks (using OAuth 2.0 connection in SSIS).
In this tutorial, we will use the REST API Task to call some API. We will use the OAuth connection along the REST API Task to write / update data to Google Spreadsheet.
Prerequisites
Before we perform the steps listed in this article, you will need to make sure the following prerequisites are met:
- SSIS designer installed. Sometimes it is referred to as BIDS or SSDT (download it from Microsoft site).
- Basic knowledge of SSIS package development using Microsoft SQL Server Integration Services.
- Make sure ZappySys SSIS PowerPack is installed (download it).
- Credentials of Google API.
Component Mention in this article
Create a Google API Project
The first step to access any Google API is to create an API Project in Google Console. If you don’t want to go through this then Skip this Step-1 and in the next section select the Default OAuth App option on OAth Connection Manager (This is the easiest option for now unless you want to use your own OAuth App).
Check this article for step-by-step instructions. When you follow these instructions make sure you enable Google Sheet API.
Create OAuth Connection Manager in SSIS
Once you create a Google API project and obtained a Client ID and Client Secret your next step is to create OAuth Connection Manager in SSIS. ZappySys OAuth connection manager comes with many predefined OAuth Providers (e.g. Facebook, Twitter, Google, etc) but you can also define custom OAuth settings for any OAuth enabled API.
To create SSIS OAuth 2.0 Connection for Google API perform the following steps.
- Download and Install SSIS PowerPack.
- Create a new SSIS Package.
- Right-click in Connection Manager Area and Click “New Connection”.
- When prompted select ZS-OAUTH connection type, On the OAuth Connection Manager Select Provider=Google.
- Click here to create credentials. Then select the “Use Custom OAuth App” option and enter your ClientID, ClientSecret.
- In the Scopes enter below scopes (or click Select Scopes). This will allow read/write access to Drive Files or Sheet (E.g. Reading file content / Export file to CSV). You can use the Scope browser to see many other available permissions. For more information click here.
12345https://www.googleapis.com/auth/drivehttps://www.googleapis.com/auth/drive.filehttps://www.googleapis.com/auth/drive.readonlyhttps://www.googleapis.com/auth/spreadsheetshttps://www.googleapis.com/auth/spreadsheets.readonly - Click on the Generate Token button.
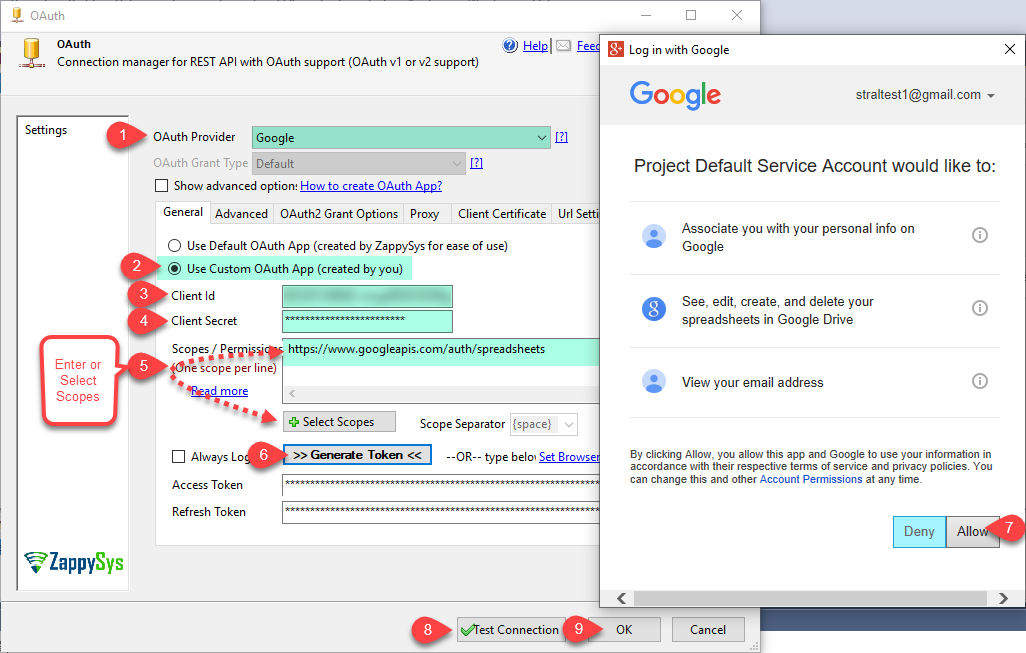
SSIS OAuth Connection Manager – Access Google Drive API using OAuth 2.0
- You will see UI as below… Click Allow (You may have to scroll to see that button sometimes).
- Click on Test Connection to see the connection is working and click on the OK button to save configure setting UI.
Find Google Sheet ID for API calls
Before we can write or update Sheet data in SSIS we need to know Google Driver File ID. We will use this ID in the next few sections.
The easiest way to find File ID is to look at the URL like below. If you need to know ID at runtime dynamically then refer to the last section.
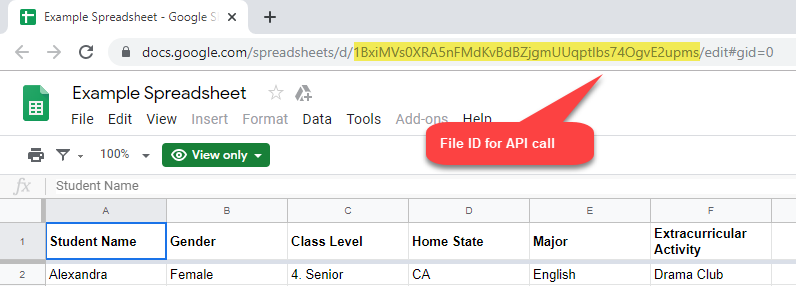
Get Google Drive File ID for API call (Sheet ID)
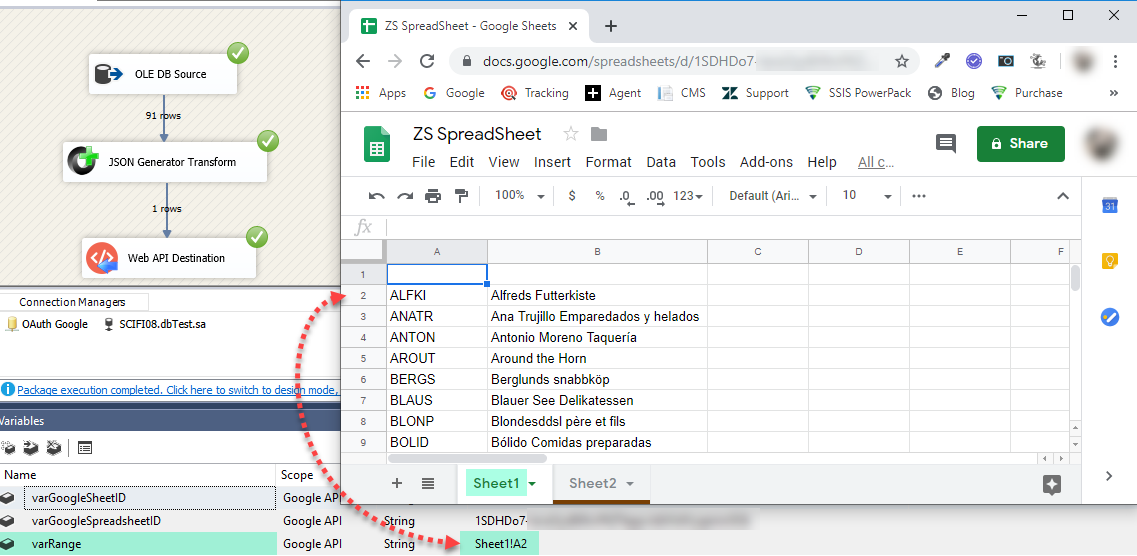
Create Variables to make dynamic URL
- Here, we are going to make a Dynamic URL value.
- In Visual Studio Project Right Click on Design Panel, Select Variables.
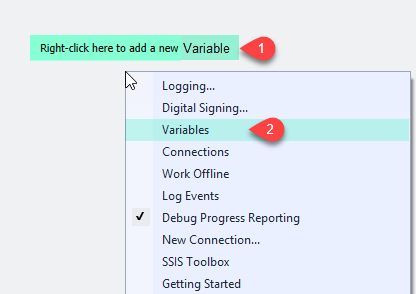
Create Variables
- Let’s Create Variables with correct DataType and Value. In variable “varRange” set only the starting point(Sheet1!A2) of data if you don’t know the ending point and leave the first-row for giving header row later or click here.

Write SQL Server data to Google Spreadsheet
Now let’s look at a real-world example. How to write data from SQL Server table or other source and send to Google Sheet using Web API Destination.
- Drag and Drop SSIS Data Flow Task from SSIS Toolbox.
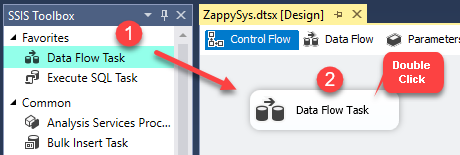
Dragging and dropping Data Flow Task into Control Flow
- Double click on the Data Flow task to see the Data Flow designer surface.
- Here, In Visual Studio, drag and drop the OLE DB Source, JSON Generator Transform and Web API Destination in the design surface and join the components with the blue arrow.
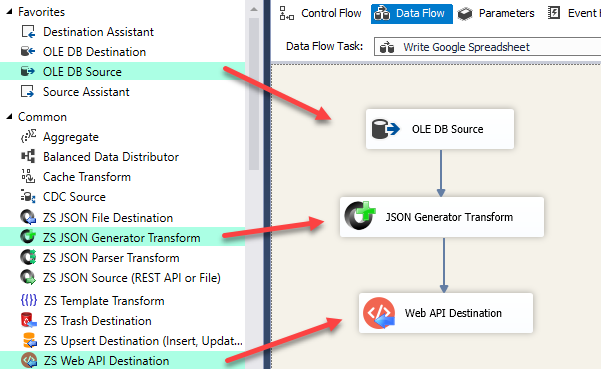
Drag and Drop OLE DB Source, JSON Generator Transform, and Web API Destination
- Here, you can use our Free ZS Dummy Data Source too. Click here for more information.
- But, we are going through OLE DB Source so we need OLEDB Connection.
Create OLE DB Connection
- Lets, create the OLE DB Connection.
- Let’s, Right-click on Connection Managers Panel to Create OLEDB Connection, so you can use Source and Context Menu will appear, Select New OLEDB Connection from the Context Menu.
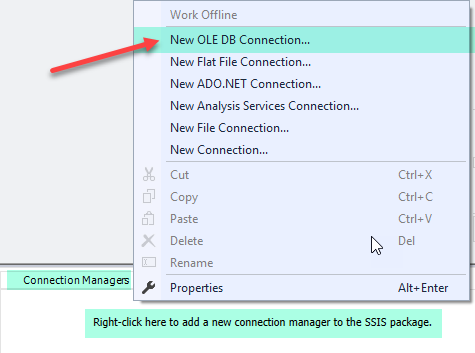
Create OLE DB Connection
- Now, click on New Button to create Connection.
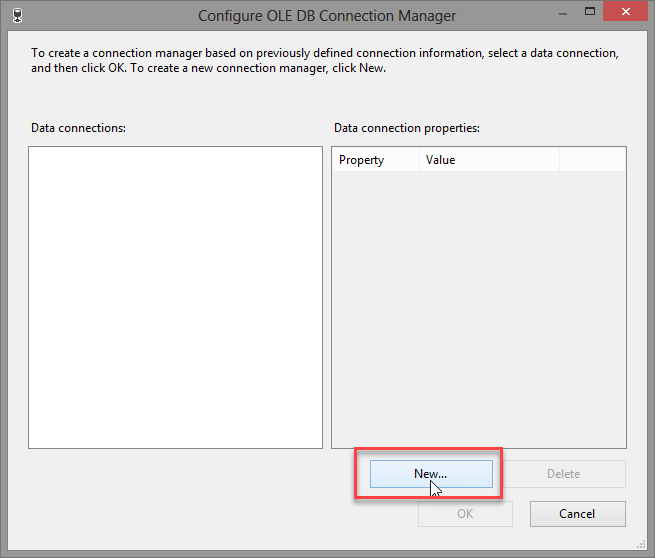
Create New Connection
- Let’s Configure Connection Manager, just Follow steps one by one as we have created.
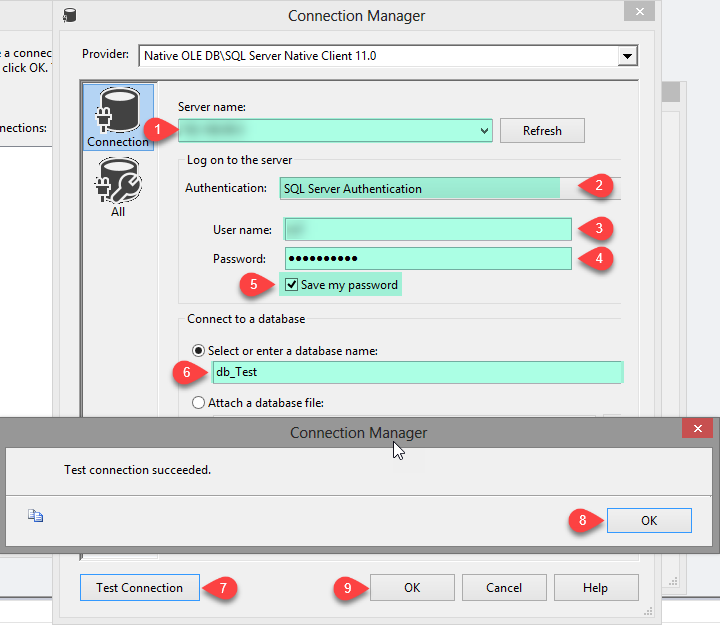
Configure OLE DB Connection
- Click on Test Connection to see correct configure it.
- Click on the OK button to save connection configure setting UI.
Configure JSON Generator Transform
- Double click on JSON Generator Transform to configure it.
- Set Output Mode to Single Dataset Array. Right-click on Mappings, select Add Static Element then enter Name: “range” and Select variable we have created for value.
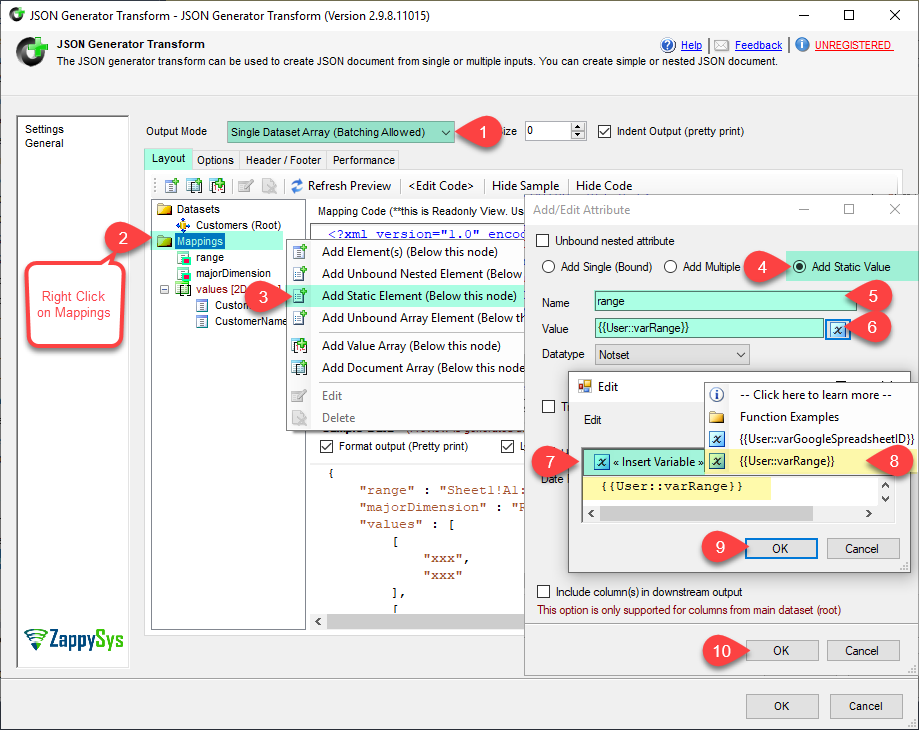
Configure JSON Generator Transform – Add Static Value
- Again, Right-click on Mappings, select Add Static Element then enter Name: “majorDimension” and Value: “ROWS“.
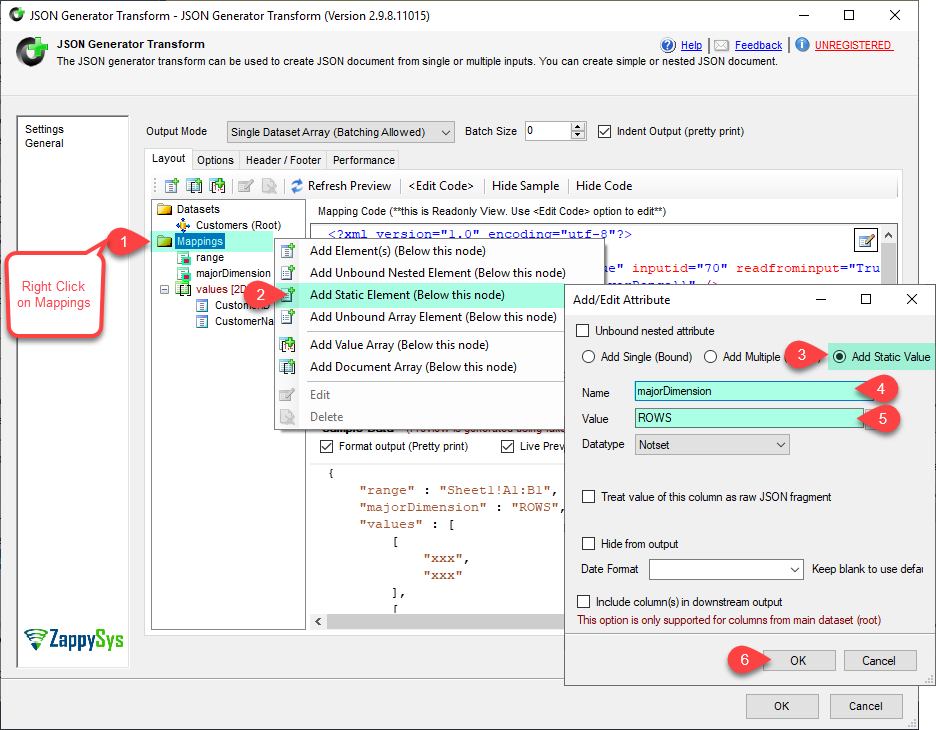
Configure JSON Generator Transform – Add Static Value
- Now, Right-click on Mappings, select Add Document Array, Check to Treat as 2D array option and enter Element Name as “values“.
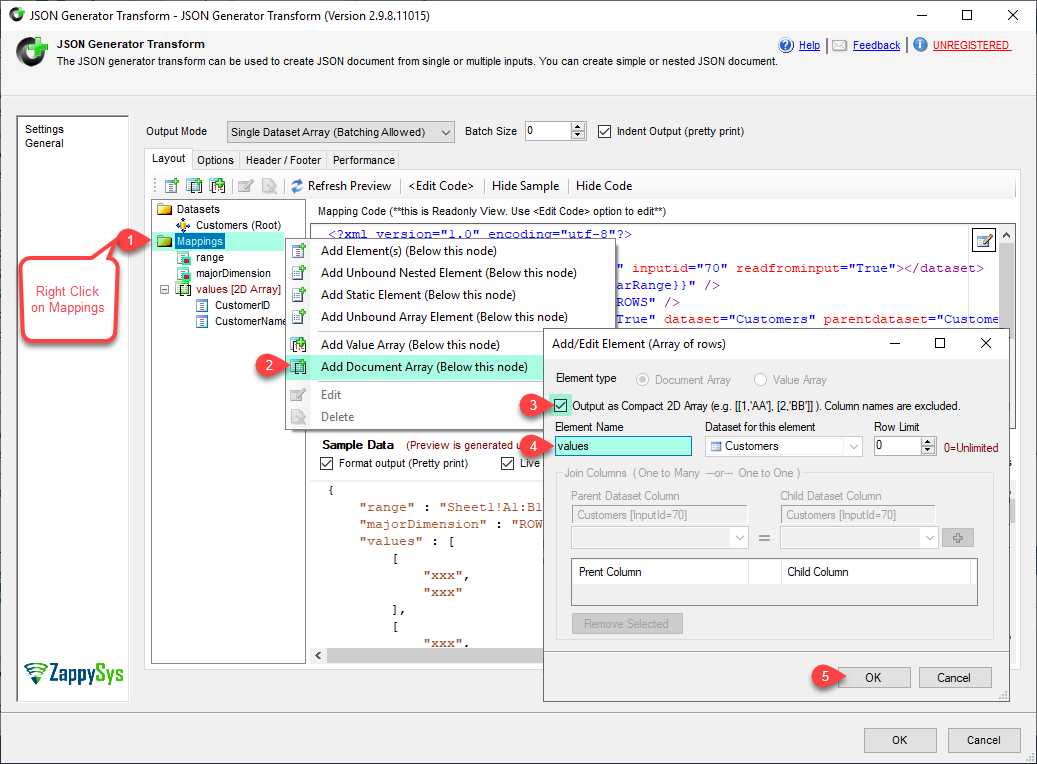
Configure JSON Generator Transform – Add Document Array
- Then, right-click on Document Array, select Add elements > Select Add Multiple Columns and check on columns you like to add.
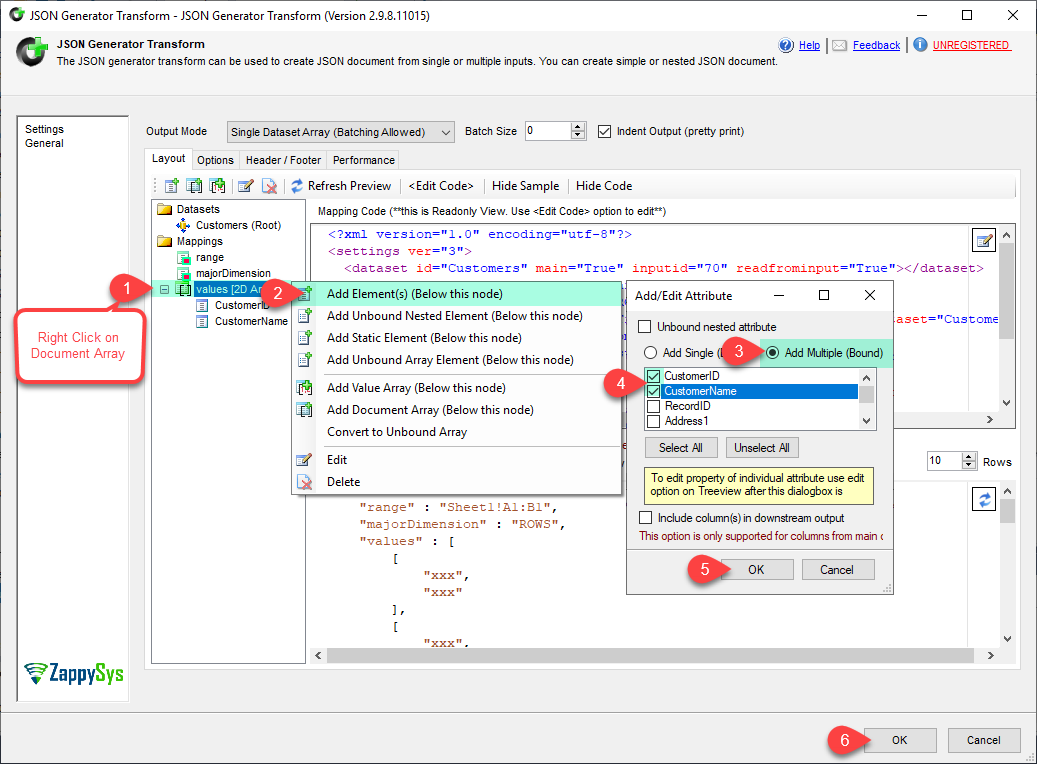
Configure JSON Generator Transform – Add Element
- Click on the OK button to save JSON Generator Transform configure setting UI.
Configure Web API Destination
- Double click on Web API Destination to configure it.
- Select the OAuth connection manager created in an earlier section (Assuming you had all scopes with write permission).
- In the Setting tab,
- In URL, Generate Dynamic URL like below. Change Sheet ID, Range designator(including Sheet name) and API URL Parameters as per your need.
Example URL without variables (some part masked with xxxxxxxx):1https://sheets.googleapis.com/v4/spreadsheets/{{User::varGoogleSpreadsheetID}}/values/{{User::varRange}}:{{User::varSpreadsheetValues}}?valueInputOption={{User::varValueInputOption}}
1https://sheets.googleapis.com/v4/spreadsheets/1tuGO3_-2JlSmyiHwX6xxxxxxxxCHrORJc/values/Sheet1!A2:B4:append?valueInputOption=USER_ENTERED - Change Request Method to POST.
- Select JSON Generator variable into Body (Request Data) or you can select Input column for Body (JSON Generator Output).
- Set application/JSON to Body Content-type.
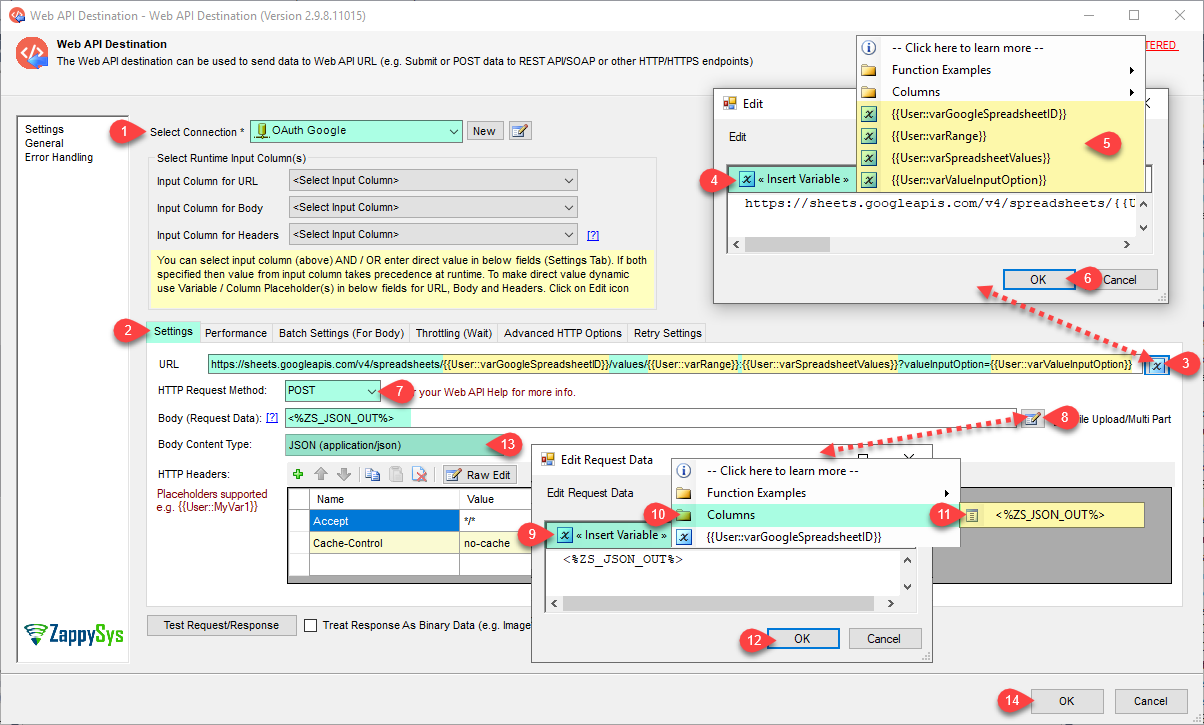
Configure Web API Destination
- In URL, Generate Dynamic URL like below. Change Sheet ID, Range designator(including Sheet name) and API URL Parameters as per your need.
- Click on the OK button to save Web API Destination configure setting UI.
- That’s all, You are ready to Run or Execute Task and verify data into Google spreadsheet. Now update header row values for click here.
Run or Execute Package and verify data into Google Spreadsheet
Append data to Google SpreadSheet using REST API Task
Now let’s look at how to write to Google SpreadSheet. To write multiple rows in a single request. Also, check this link to learn more.
For more information, you can see the example here. For parameter, detail review this API documentation.
You can use SSIS REST API Task or Web API Destination to achieve the Spreadsheet write scenario. For a simple example, let’s use the REST API Task.
- Drag and Drop ZS REST API Task on the control flow designer.
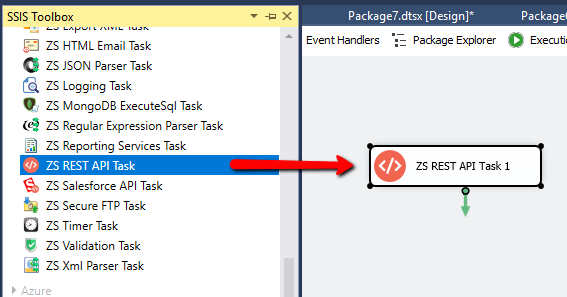
Drag and Drop REST API Task
- Double click on ZS REST API Task to configure it.
- In the Request Settings tab,
- set Request URL Access Mode to Url from a connection. Select OAuth Connection from the dropdown (Same connection we created in the previous section).
- Enter the URL below. Change Sheet ID, Range designator(including Sheet name) and API URL Parameters as per your need.
Example URL without variables (some part masked with xxxxxxxx):1https://sheets.googleapis.com/v4/spreadsheets/{{User::varGoogleSpreadsheetID}}/values/{{User::varRange}}:{{User::varSpreadsheetValues}}?valueInputOption={{User::varValueInputOption}}
1https://sheets.googleapis.com/v4/spreadsheets/1tuGO3_-2JlSmyiHwX6xxxxxxxxCHrORJc/values/Sheet1!A1:append?valueInputOption=USER_ENTERED - Change Request Method to POST.
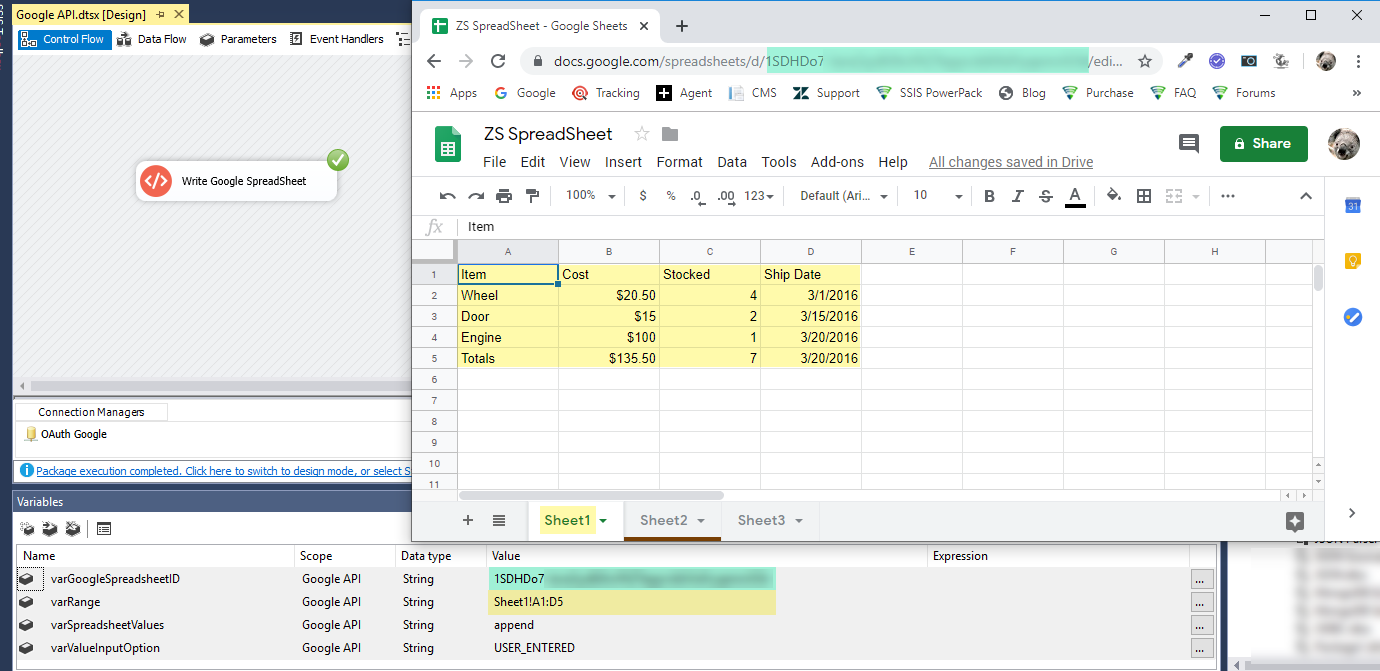
- Enter Request Body as below
Note: For example purpose, we included header line in data cells but in the real-world header may already exist in the sheet.1234567891011{"range": "{{User::varRange}}","majorDimension": "ROWS","values": [["Item", "Cost", "Stocked", "Ship Date"],["Wheel", "$20.50", "4", "3/1/2016"],["Door", "$15", "2", "3/15/2016"],["Engine", "$100", "1", "3/20/2016"],["Totals", "=SUM(B2:B4)", "=SUM(C2:C4)", "=MAX(D2:D4)"]]} - Change Request Content type to application/JSON.

Write data to Google SpreadSheet using REST API Task (OAuth 2.0 Connection)
- Click on the OK button to save REST API Task configure setting UI.
- That’s all, You are ready to Run or Execute Task and verify data into Google spreadsheet.
Execute REST API Task and verify Google Spreadsheet data
Update Google Sheet Cells
Now let’s look at the below example of updating multiple cells in google Spreadsheet. For more information, you can see the example here. For parameter, detail review this API documentation.
You can use SSIS REST API Task or Web API Destination to achieve the Spreadsheet Update scenario. For a simple example, let’s use the REST API Task.
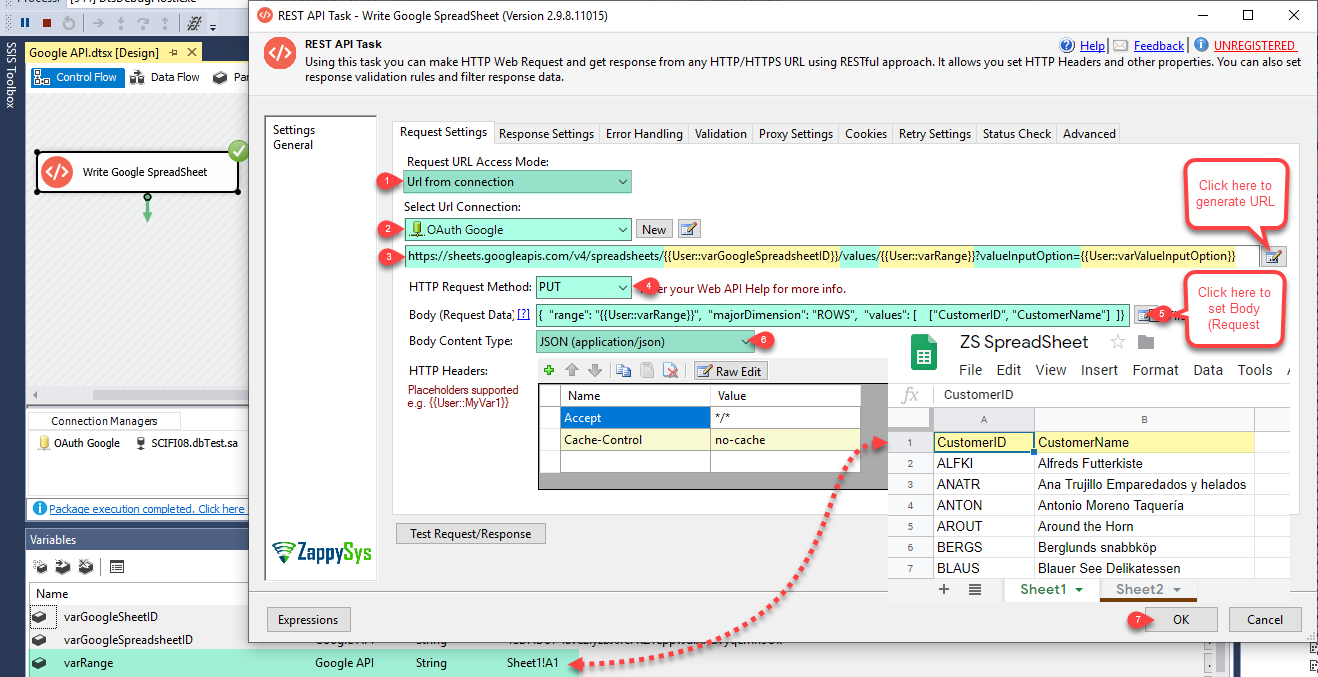
Update Google Sheet header cells manually
- Drag and drop ZS REST API Tasks on the control flow designer.
- Double click on the First REST API Task to configure it.
- In the Request Settings tab,
- Enter the URL below. Change Range designator(including Sheet name: Sheet1!A1) and API URL Parameters as per your need.
Example URL without variables (some part masked with xxxxxxxx):1https://sheets.googleapis.com/v4/spreadsheets/{{User::varGoogleSpreadsheetID}}/values/{{User::varRange}}?valueInputOption={{User::varValueInputOption}}
1https://sheets.googleapis.com/v4/spreadsheets/1tuGO3_-2JlSmyiHwX6xxxxxxxxCHrORJc/values/Sheet1!A1?valueInputOption=USER_ENTERED - Change Request Method to PUT.
- Enter Request Body as below
1234567{"range": "{{User::varRange}}","majorDimension": "ROWS","values": [["CustomerID", "CustomerName"]]}
- Enter the URL below. Change Range designator(including Sheet name: Sheet1!A1) and API URL Parameters as per your need.
- Click on the OK button to save REST API Task configure setting UI.
- That’s all, You are ready to Run or Execute Task and verify data into Google spreadsheet.
Single Range (Set Values for multiple cells)
- Follow the previous section(write data to Google Spreadsheet) to update sheet data.
- In the Request Settings tab,
- Enter the URL below. Change Sheet ID, Range designator(including Sheet name) and API URL Parameters as per your need.
Example URL without variables (some part masked with xxxxxxxx):1https://sheets.googleapis.com/v4/spreadsheets/{{User::varGoogleSpreadsheetID}}/values/{{User::varRange}}?valueInputOption={{User::varValueInputOption}}
1https://sheets.googleapis.com/v4/spreadsheets/1tuGO3_-2JlSmyiHwX6xxxxxxxxCHrORJc/values/Sheet1!A2:B4?valueInputOption=USER_ENTERED - Change Request Method to PUT.
- Enter Request Body as below
12345678{"range": "{{User::varRange}}","majorDimension": "ROWS","values": [["Laptop", "$2000.50"],["Mobile", "$1150"]]}
- Enter the URL below. Change Sheet ID, Range designator(including Sheet name) and API URL Parameters as per your need.
- That’s all, click on the Test Request/Response button and verify data into Google spreadsheet.
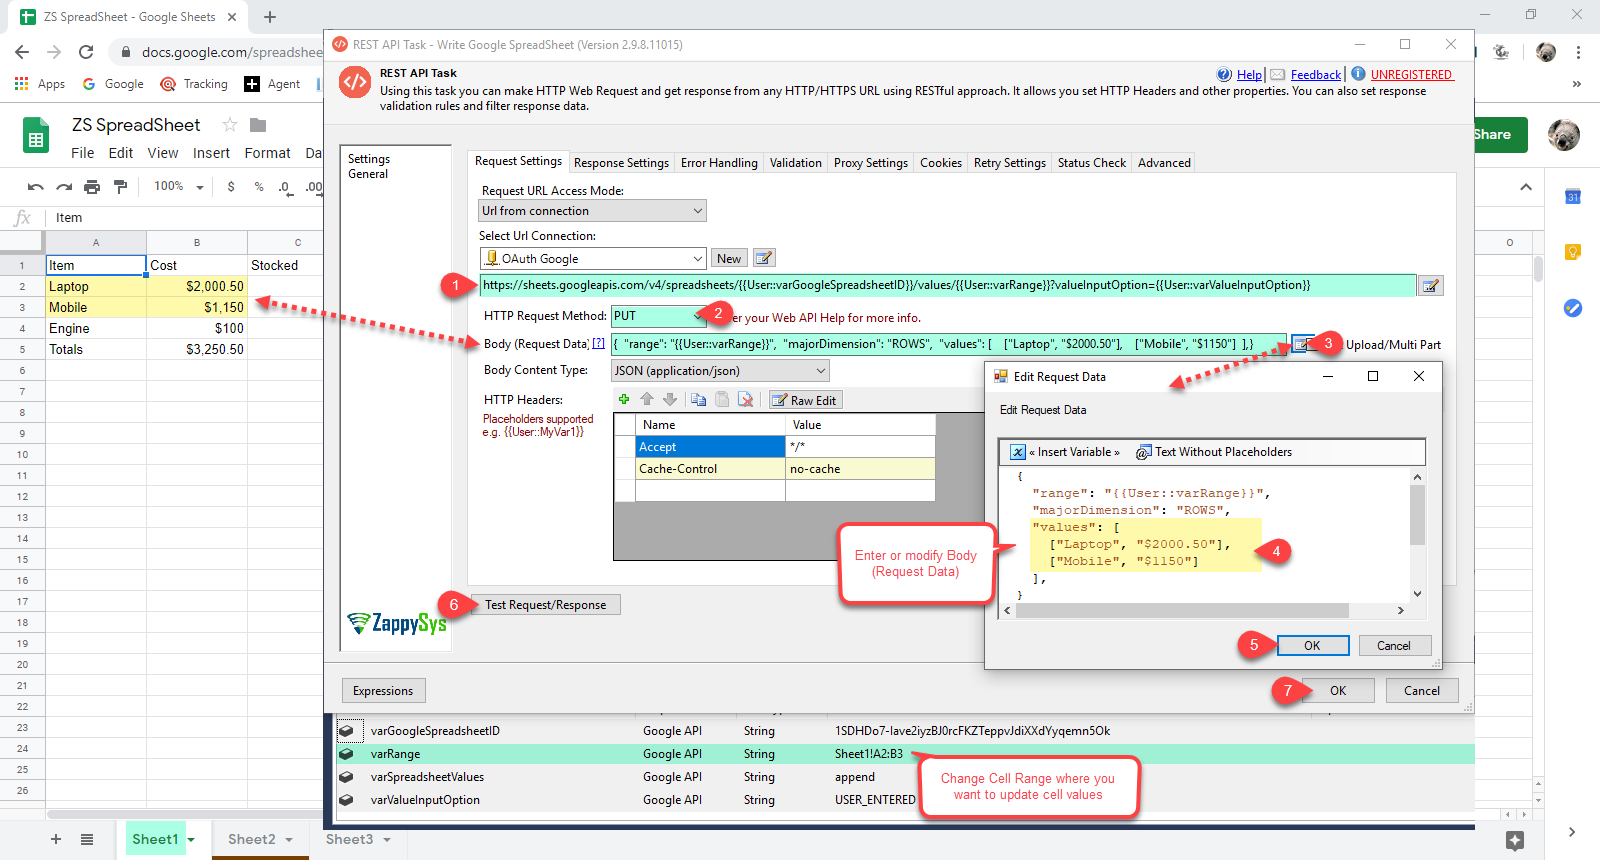
Calling Google Sheet API to Update Multiple Cell Values
Clear data to Google SpreadSheet using REST API Task
Clear a sheet of all values while preserving formats
Lets clear a sheet of all values by REST API Task, Before processed we need sheet Id. So let’s get the SheetId by API Call. For more information about click here.
- Drag and Drop two ZS REST API Tasks on the control flow designer and rename(Get Sheet ID and Clear Google Sheet of all values) it.
- Double click on the First REST API(Get Sheet ID) Task to configure it.
- In the Request Settings tab,
- Enter the URL below. Change Sheet ID and API URL Parameters as per your need.
Example URL without variables (some part masked with xxxxxxxx):1https://sheets.googleapis.com/v4/spreadsheets/{{User::varGoogleSpreadsheetID}}
1https://sheets.googleapis.com/v4/spreadsheets/1tuGO3_-2JlSmyiHwX6xxxxxxxxCHrORJc - Change Request Method to GET.
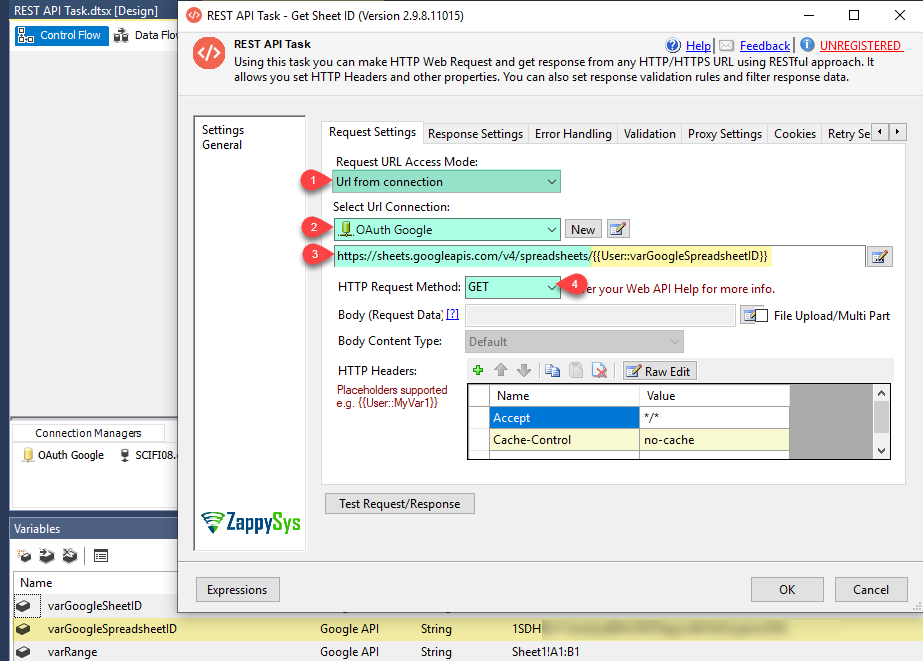 REST API Task – Get Google Sheet ID
- Enter the URL below. Change Sheet ID and API URL Parameters as per your need.
- Now go to Response Settings Tab, Select Response content Type Json and Write Response Content Filter Expression. Check on Save Response Content. Select Save Mode to Variable and Create a New variable or select it.
Example of Response Content Filter Expression for the first Sheet :
1$.sheets.[0].properties.sheetId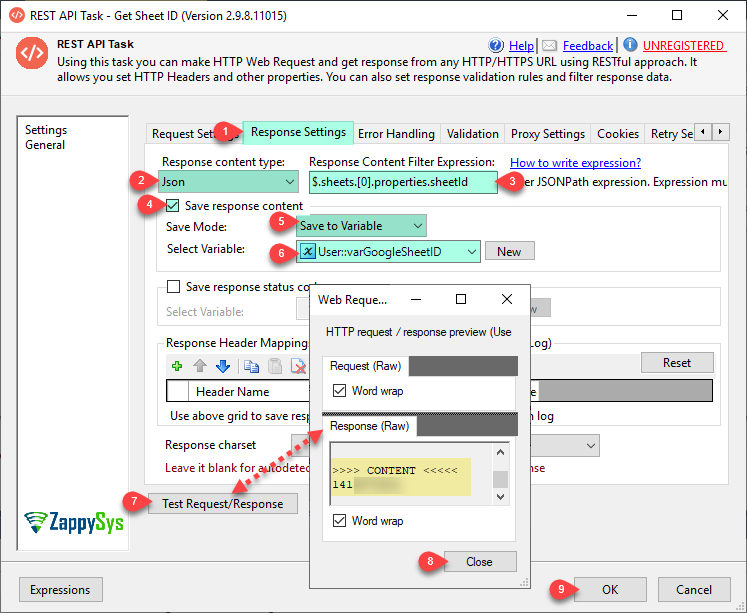
REST API Task – Save Google Sheet ID into Variable
- Now, click on the Test Request/Response to check configures are ok.
- Click on the OK button to save REST API Task configure setting UI.
- Double click on the second REST API(Clear Google Sheet of all values) Task to configure it.
- In the Request Settings tab,
- Enter the URL below. Change Sheet ID and API URL Parameters as per your need.
Example URL without variables (some part masked with xxxxxxxx):1https://sheets.googleapis.com/v4/spreadsheets/{{User::varGoogleSpreadsheetID}}:batchUpdate
1https://sheets.googleapis.com/v4/spreadsheets/1tuGO3_-2JlSmyiHwX6xxxxxxxxCHrORJc:batchUpdate - Change Request Method to POST. Enter Request Body as below and change a variable parameter as per your need.
123456789101112{"requests": [{"updateCells": {"range": {"sheetId": {{User::varGoogleSheetID}}},"fields": "userEnteredValue"}}]} - Change Request Content type to application/JSON.
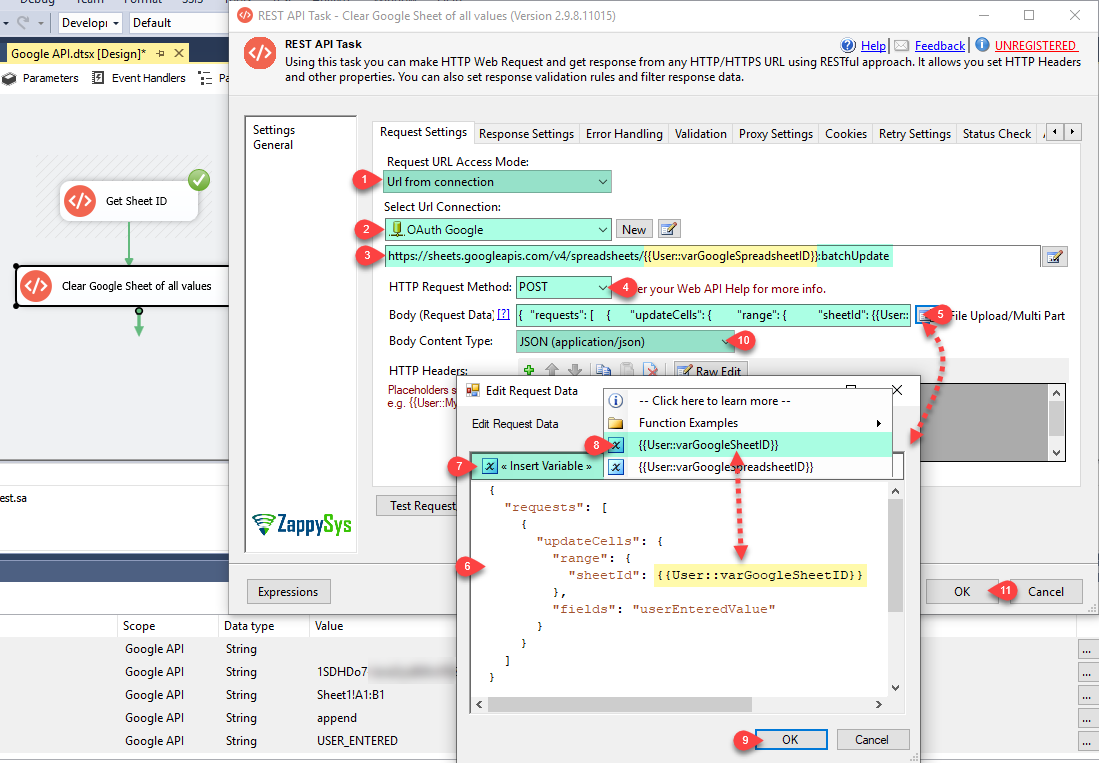
REST API Task Configure – Clear sheet of all values
- Enter the URL below. Change Sheet ID and API URL Parameters as per your need.
- Click on the OK button to save REST API Task configure setting UI.
- That’s all, You are ready to Run or Execute Task and verify data into Google spreadsheet.
Clears range cell values from a spreadsheet
- Double click on REST API Task to configure it. Then, follow the way just like the previous section configures REST API Task.
- Here you need to set the value of Variable “varSpreadsheetValues” to “clear” or you can change it directly in URL append to clear and value of variable “varRange” (Change cell range and sheet name) as per your need. For more information about it click here.
- Enter the URL below. Change Sheet ID, Range designator(including Sheet name) and API URL Parameters as per your need.
Example URL without variables (some part masked with xxxxxxxx):1https://sheets.googleapis.com/v4/spreadsheets/{{User::varGoogleSpreadsheetID}}/values/{{User::varRange}}:{{User::varSpreadsheetValues}}?valueInputOption={{User::varValueInputOption}}
1https://sheets.googleapis.com/v4/spreadsheets/1tuGO3_-2JlSmyiHwX6xxxxxxxxCHrORJc/values/Sheet1!A2:B4:clear?valueInputOption=USER_ENTERED
- Enter the URL below. Change Sheet ID, Range designator(including Sheet name) and API URL Parameters as per your need.
- Change Request Method to POST.
- Enter Request Body as below
1{} - Change Request Content type to application/JSON.
- That’s all, click on the Test Request/Response button and verify data into Google spreadsheet.
Conclusion
Google Drive API and Google Sheets API provide a great way to automate file-related functionality. However, to call Google API you have to use the SDK / coding approach (e.g. C#, Java, Python, Ruby). Luckily ZappySys SSIS PowerPack provides a great way to integrate any Google API call via simple drag and drop approach without coding. Try out yourself see how long it takes to call virtually any REST API.
References
Finally, you can use the following links for more information: