Introduction
 In our previous blog, we saw how to read/write Azure Blob Storage Files in SSIS (CSV, JSON, XML Format files). Now in this blog, we will see how to Read/Write Azure Table Storage data in SSIS. To illustrate, we will use ZappySys SSIS PowerPack, which includes several tasks to import/export data from multiples sources to multiple destinations like flat files, Azure, AWS, databases, Office files and more. They are Coding free, drag and drop high-performance suite of Custom SSIS Components and SSIS Tasks. If you like to perform other operations on Azure Blob Storage Files (e.g. Download, Upload, Create, Delete) then check these articles.
Component Mentioned in this article
Prerequisite
- First, you will need to have SSIS installed
- Secondly, make sure to have SSDT
- Download and install Microsoft Azure Storage Emulator
- Download and install Microsoft Azure Storage Explorer
- Finally, do not forget to install ZappySys SSIS PowerPack
NOTE: If you want to use Live account (Azure Blob Storage) then you can skip Step #3
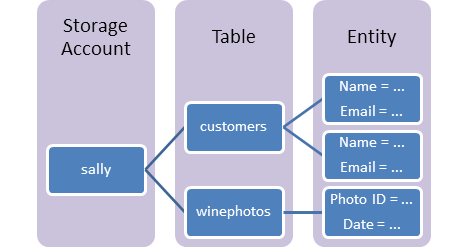
What is Azure Table Storage?
Azure Table storage stores large amounts of structured data. The service is a NoSQL datastore which accepts authenticated calls from inside and outside the Azure cloud. Azure tables are ideal for storing structured, non-relational data. Common uses of Table storage include:
Microsoft Azure Table Storage Introduction
- Storing TBs of structured data capable of serving web-scale applications
- Storing datasets that don’t require complex joins, foreign keys, or stored procedures and can be denormalized for fast access
- Quickly querying data using a clustered index
- Accessing data using the OData protocol and LINQ queries with WCF Data Service .NET Libraries
You can use Table storage to store and query huge sets of structured, non-relational data, and your tables will scale as demand increases.
Getting Started
In order to start, we will show several examples. Zappysys includes an SSIS Azure Table Storage Source. Here we are showing you is, how to Read/Write Azure Table Storage data in SSIS.
You can connect to your Azure Storage Account by entering your storage account credentials. Here I am showing an example of the use of the local Azure Storage Emulator.
Setup Azure Storage client tools and Create Table
- Once you have downloaded and installed a storage emulator You can launch Microsoft Azure Storage Emulator from its Physical location or from the desktop or start menu shortcut.

Azure Storage Emulator Physical Location
- If you can see the below-attached Command Prompt screen after Emulator started. Then you can proceed to start Microsoft Azure Storage Explorer as the Azure Storage Emulator is started successfully.
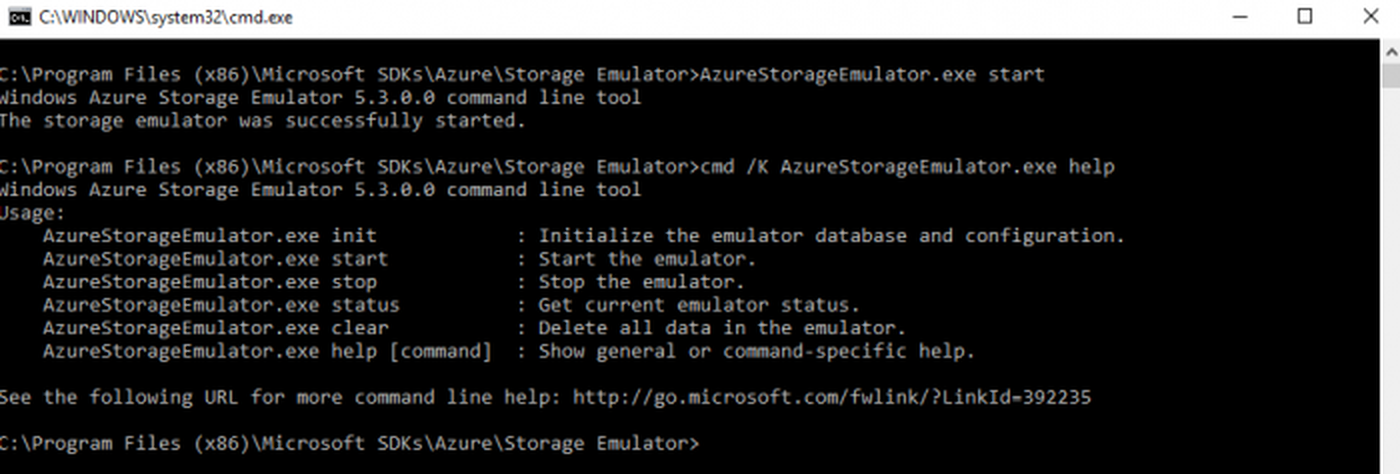
Command Prompt Screen after Microsoft Azure Storage Emulator Started
- Now, you have to download and install Microsoft Azure Storage Explorer and then you can launch Microsoft Azure Storage Explorer from its Physical location or from the desktop or start menu shortcut.

Microsoft Azure Storage Explorer Location.
- If you don’t have Azure Storage account then it’s easy to get FREE Trial Azure Storage account or use your MSDN to get credit each month which will be more than enough for real testing. If you prefer to avoid all this hassle then Microsoft provides another great way to test Azure Storage functionality is totally offline mode on your local machine. You can just download Azure Storage Emulator and start testing.
- Click here to learn more about how to configure Azure Storage Emulator for Testing and Development purposes. In order to connect to Azure Storage Service from SSIS, you will need Storage AccountName and an AccessKey. Ask your SysAdmin or responsible person to provide that information to you. Here are sample Account Name and Access Key(this is just example key which may differ in your case)
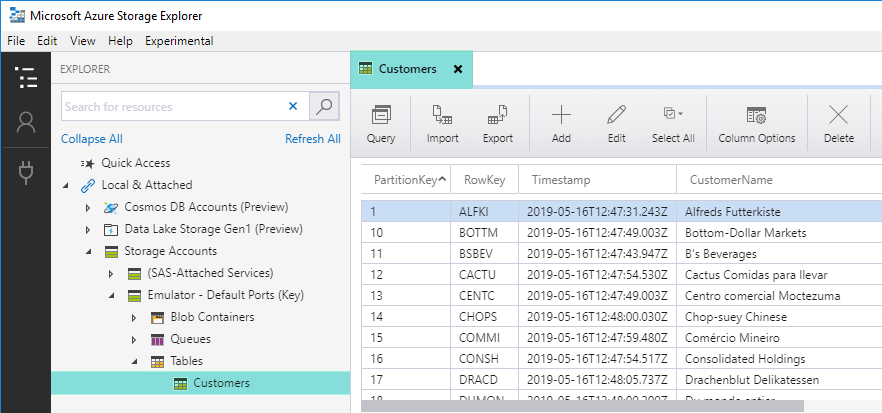
12Account Name: mystorageaccountAccess Key: Eby8vdM02xNOcqFlqUwJPLlmEtlCDXJ1OUzFT50uSRZ6IFsuFq2UVErCz4I6tq/K1SZFPTOtr/KBHBeksoGMGw== - For Creating a Tables, First of all, you need to go to Microsoft Storage Explorer Window. Then you can go through like this way (Storage Accounts –> Emulator – Default Ports(Key) –> Tables. Right-click on Tables and Select Create Table and put your table name you want.
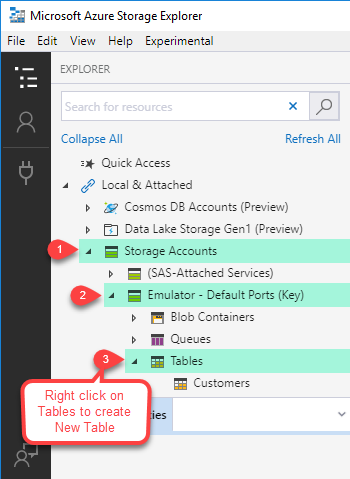
Create Tables in Azure Table Storage Emulator
Write data using ZS Azure Table Storage Destination
In this tutorial, you will learn how to write data into Azure Table Storage. You can use ZS DummyData Source for practice it(In this case it’s from SQL Server Source). So, Let’s start with an example. In this SSIS we will write data into Azure Table Storage using ZS Azure Table Storage Destination.
- Once you have created Azure Storage Table and you got valid Account Name and AccessKey (for the local emulator you don’t need this) you may proceed to create a new SSIS package. In BIDS/SSDT create new SSIS package
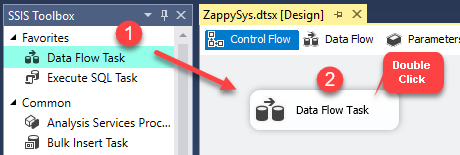
- From the SSIS toolbox drag and drop Data Flow Task on the control flow designer surface.

Drag and Drop SSIS Data Flow Task from SSIS Toolbox
- Double click on the DataFlow task to see DataFlow designer surface.
- Here, In Visual Studio, drag and drop the OLE DB Source and Azure Table Storage Destination in the design surface and join the components with the blue arrow.

SSIS Azure Table Storage Destination – Drag and Drop
- Now, we need two connection, OLE DB Connection, and Azure Storage Connection. Click here to create Azure Storage Connection.
How to create OLE DB Connection
- Let’s, Right-click on Connection Managers Panel to Create OLE DB Connection, so you can use Source and Context Menu will appear, Select New OLE DB Connection from the Context Menu.
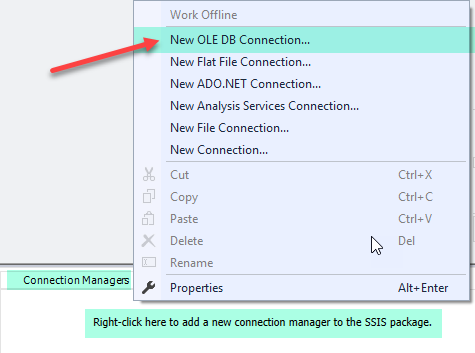
OLE DB Connection – Create New Connection
- Now, click on New Button to create Connection.
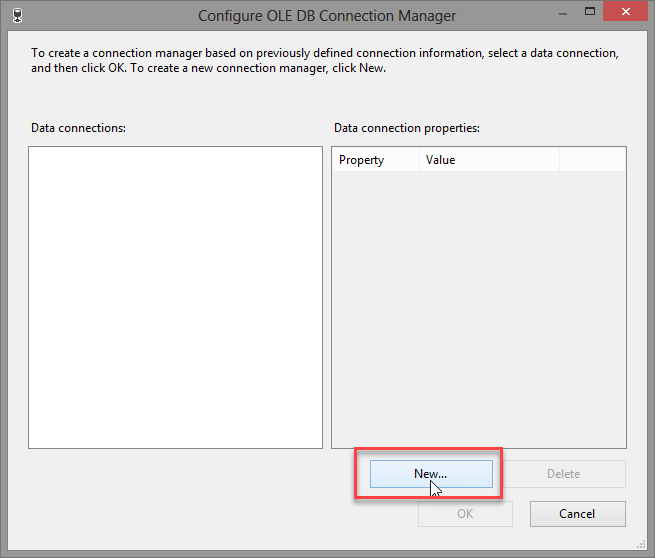
OLE DB Connection – Create New Connection
- Let’s Configure Connection Manager, just Follow steps one by one as we have created.
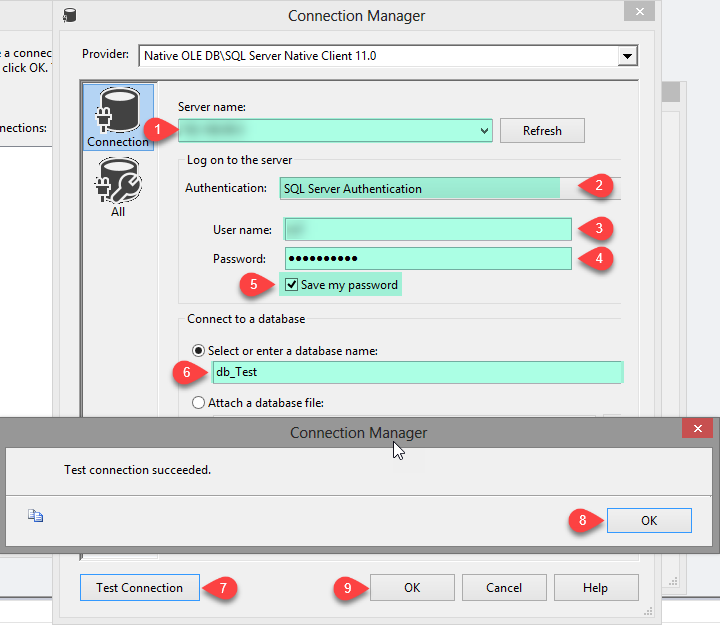
OLE DB Connection – Configure Connection
- Click on the OK button to save configure Setting UI.
Write data into Azure Storage Table in SSIS
- Double click on OLE DB Source for configure it.
- Let’s Configure in Connection Manager, just follow the below image steps.
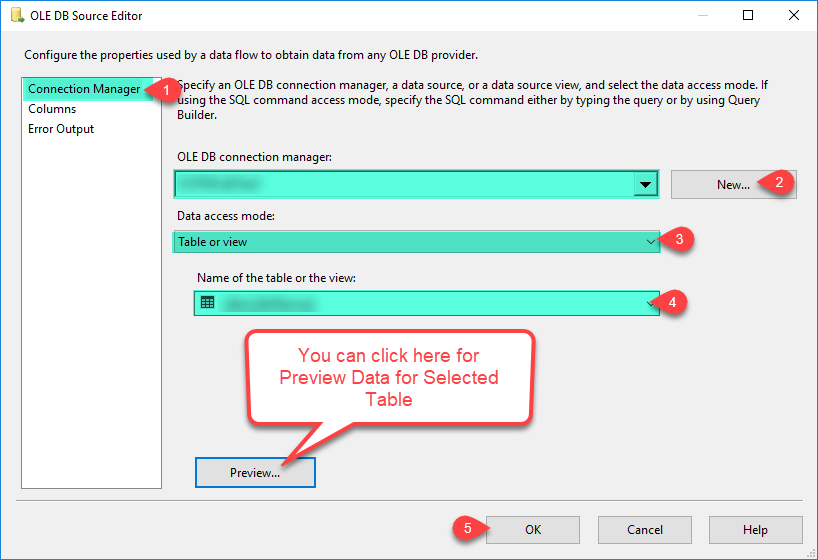
OLE DB Source – Configure
- Click OK to Save OLE DB Source Editor UI Settings.
- Now double click Azure Table Storage Destination to configure it.
- On [Connection Manager] tab select Azure Storage Connection manager.
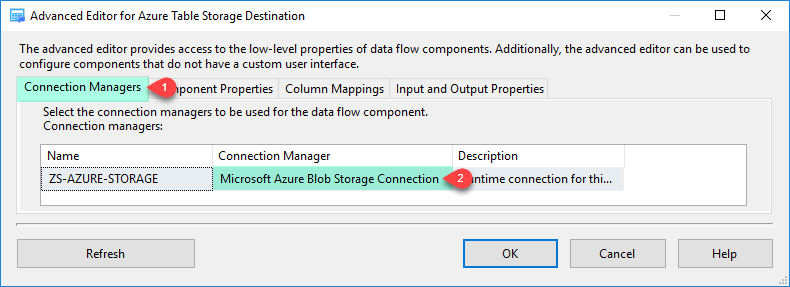
ZS Azure Table Storage Destination – Connection Manager
- Click on [Component Properties] tab and select AccessMode=Table and Pick destination Table from the Tables dropdown list.
If you choose Reload option then target table is first truncated before inserting records so be careful with Reload option.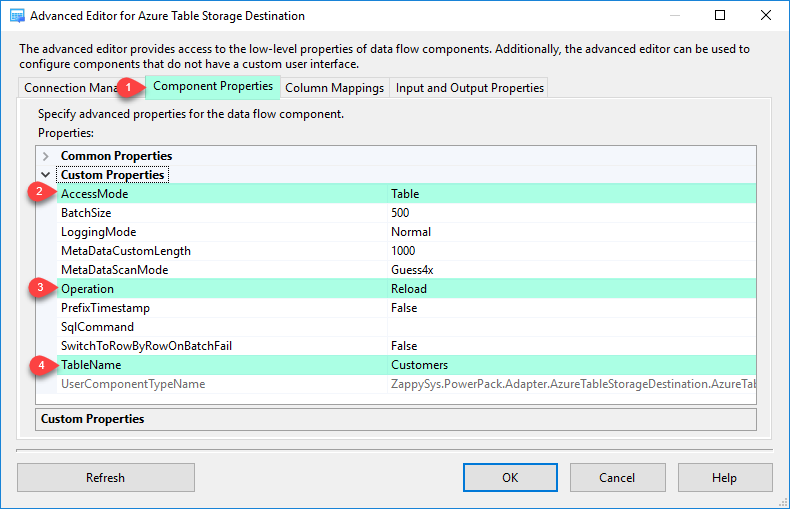
ZS Azure Table Storage Destination – Component Properties
- Click on [Mappings] tab and verify mapping. Drop CustomerID and RecordID mappings and reconnect as shown below. This is just to make sure PrimaryKey columns are mapped.
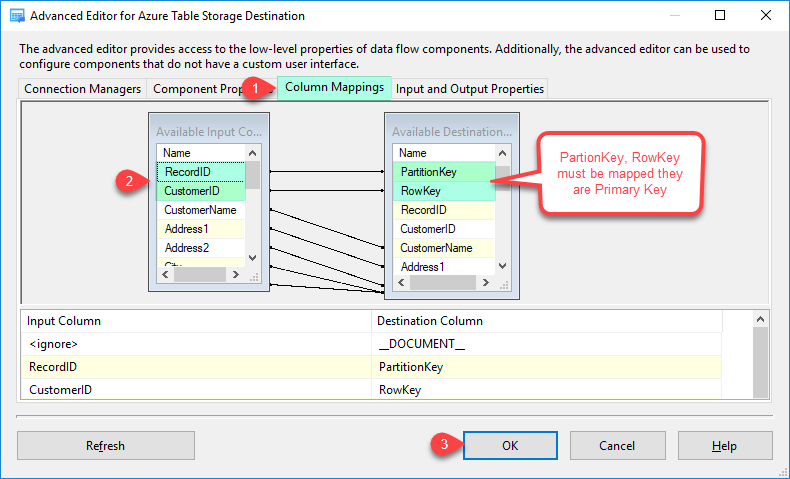
ZS Azure Table Storage Destination – Column Mappings
- Click OK to save settings.
- Execute the package and verify the target data.
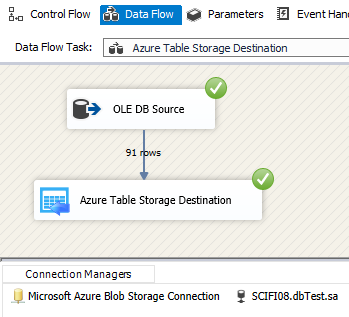
ZS Azure Table Storage Destination – Execute the Package
ZS Azure Table Storage – Verify Customers Table Data
Read data using ZS Azure Table Storage Source
In this tutorial, you will learn how to read data from Azure Table Storage in SSIS using the ZS Azure Table Storage Source adapter. In this SSIS we will read data with SQL Query and Table Mode. So Let’s begin it.
- You may proceed to create a new SSIS package. In BIDS/SSDT create a new SSIS package.
- From the SSIS toolbox drag and drop Data Flow Task on the control flow designer surface.
SSIS Data Flow Task – Drag and Drop
- Double click on the DataFlow task to see DataFlow designer surface.
- From the SSIS toolbox drag and drop Azure Table Storage Source on the data flow designer surface.

ZS Azure Table Storage Source – Drag and Drop
- Now, we need an Azure Storage connection. Click here to Create Connection.
Extract data with Query Mode
- Here, we are getting data using Query Mode with Dynamic expression value.
- Lets, create a Variable with correct DataType and Value, use the following image.
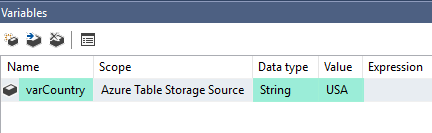
SSIS Variables – Create Variable and Store Value
- Double click Azure Table Storage Source to configure it.
- Select the connection we have created before, set AccessMode to Query. You can use the following SQL Query and select Variable. Click here for more Azure Table Storage Query Examples.
12SELECT * FROM CustomersWHERE Country = '{{User::varCountry}}'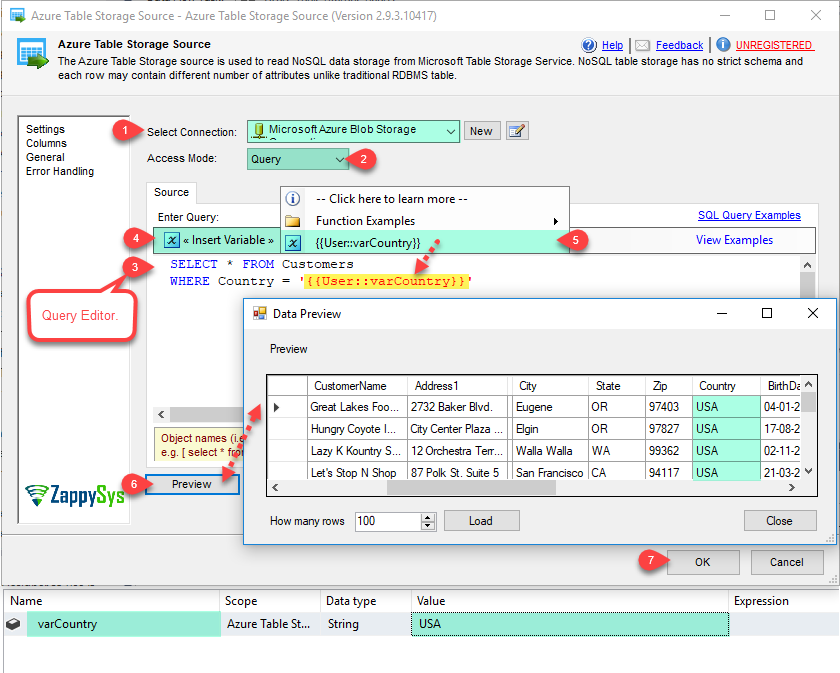
ZS Azure Table Storage Source – Configure Query Mode
- Click on the Preview button to see Data Preview and OK button to save configure setting UI.
- From the SSIS toolbox drag and drop Trash Destination on the data flow designer surface.
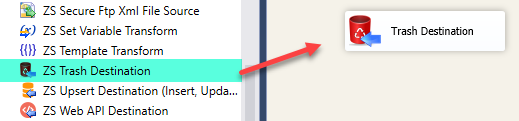
ZS Trash Destination – Drag and Drop
- Now single click on the Azure Table Storage Source, once you see the blue arrow from the source … connect it to Trash Destination.
- Double click on ZS Trash Destination to Configure it.
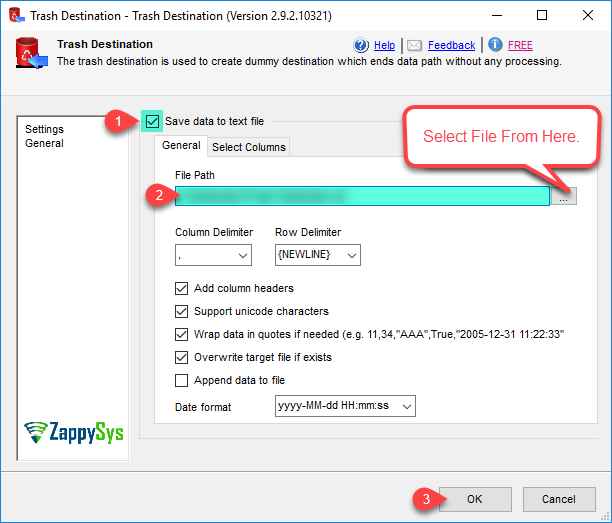
ZS Trash Destination – Configure
- Click on the OK button to save Trash Destination configure setting UI.
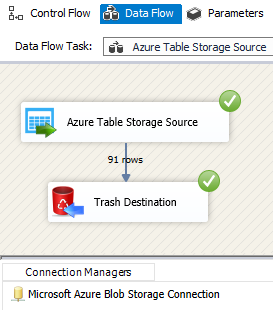
- Execute the package and verify source data in the data viewer.
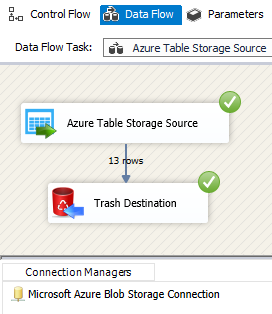
SSIS ZS Azure Table Storage Source – Execute the Package
Extract data with Table Mode
- So, Double click Azure Table Storage Source to configure it.
- In the Azure Table Storage Source, Select the connection we have created, set AccessMode to Table and Select Table from the Tables dropdown.
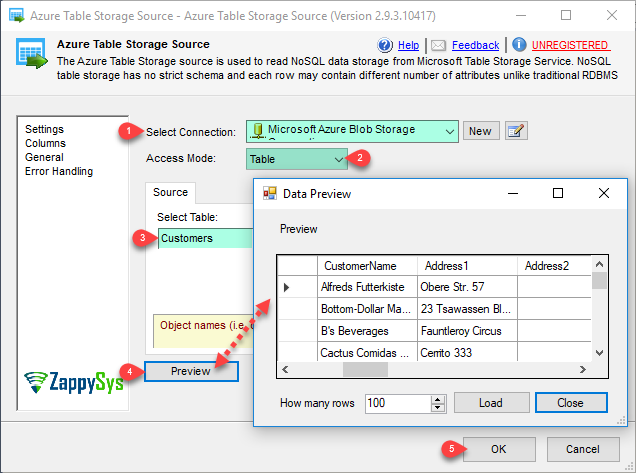
SSIS ZS Azure Table Source – Configure Table Mode
- Click on the Preview button to see Data Preview and OK button to save configure setting UI.
- From the SSIS toolbox drag and drop Trash Destination on the data flow designer surface.
ZS Trash Destination – Drag and Drop
- Now single click on the Azure Table Storage Source, once you see the blue arrow from the source … connect it to Trash Destination.
- Double click on ZS Trash Destination to Configure it.
ZS Trash Destination – Configure
- Click on the OK button to save Trash Destination configure setting UI.
- In the last, Execute the package and verify source data in the data viewer.
ZS Azure Table Storage Source – Execute the Package
Conclusion
After all, In this blog, we learned how to write data in Azure Table Storage in SSIS. We used the Azure Table Storage Destination for write and Azure Table Storage Source to read data from Microsoft Azure Table Storage using Query and Table mode. You can download SSIS PowerPack here to try many other scenarios not discussed in this blog along with 70+ other components.
References
There are a few details you should use the following links for more information: