Introduction
![]() ZappySys provide high-performance drag and drop connectors for Amazon Redshift Integration. In our previous post we saw how to bulk load SQL data into Redshift using S3 staging technique (COPY command). Now in this post, you will see How to Read / Write Amazon Redshift Data in SSIS Data flow without need for S3 Staging. We will use ZS Amazon Redshift components (Source / Destination). If you need to Upsert / delete data from Redshift Table then use Upsert Destination (Not discussed in this article).
ZappySys provide high-performance drag and drop connectors for Amazon Redshift Integration. In our previous post we saw how to bulk load SQL data into Redshift using S3 staging technique (COPY command). Now in this post, you will see How to Read / Write Amazon Redshift Data in SSIS Data flow without need for S3 Staging. We will use ZS Amazon Redshift components (Source / Destination). If you need to Upsert / delete data from Redshift Table then use Upsert Destination (Not discussed in this article).
ZappySys developed many AWS related components but in this article, we will look at 2 Components for Amazon Redshift Integration Scenarios (Read and Write). We will discuss how to use SSIS Amazon Redshift Source and SSIS Amazon Redshift Destination. Amazon Redshift Source connector supports familiar SQL Like query language so any DBA or SQL user can learn it in no time. ZappySys developed a highly sophisticated engine to turn your SQL Query into native Amazon Redshift query. Load query at runtime from the variables or Direct value.
Prerequisite
Before we perform the steps listed in this article, you will need to make sure the following prerequisites are met:
- First, you will need to have SSIS installed
- Secondly, make sure to have SSDT
- Thirdly, You have obtained Amazon Redshift Credential.
- Finally, do not forget to install ZappySys SSIS PowerPack.
Component Mention in this article
What is Amazon Redshift
Before we talk How to Read / Write Amazon Redshift Data in SSIS lets talk what is Amazon Redshift (or sometimes referred to as AWS Redshift). Amazon Redshift is a Cloud-based Data warehouse service. This type of system also referred to as MPP (Massively Parallel Processing). Amazon Redshift uses a highly modified version of PostgreSQL Engine behind the scene. Amazon Redshift provides the advantage of Scale as you go, at a very low cost compared to onsite dedicated hardware/software approach. In this article, we will try to learn How to Read / Write Amazon Redshift Data in SSIS.
Getting Started
In order to start, we will show several examples. ZappySys includes an Amazon Redshift Source and Destination, that will help you How to Read / Write Amazon Redshift Data in SSIS. You can connect to your Amazon Redshift Account by entering credentials.
SSIS Amazon Redshift Source Connector can be used to read data from Amazon Redshift. You can use a simple Table mode or write custom SQL Query to extract desired data. You can use multiple modes (i.e. Table or Query) to read data from the Amazon Redshift Database. Support for data preview and max rows and Dynamic query (using SSIS Variable placeholder e.g. select * from mytable where id='{{User:: MyVar}}’).
SSIS Amazon Redshift Destination can be used to bulk insert a large number of records to Amazon Redshift storage from any data source using SSIS. Amazon Redshift is a cloud-based Data Warehouse service from Amazon AWS. Here, you can bulk Insert, Update and Delete Amazon Redshift data and supporting the batch size.
Click here to see Amazon Redshift related articles.
Write Data using Amazon Redshift Destination in SSIS
Overview
In this tutorial, you will learn how to write data in Amazon Redshift Database. You can use ZS DummyData Source for practice it or select suitable ZS Source Adapter (In this case it’s from SQL Server Source). So, Let’s start with an example. In this SSIS we will write data into Amazon Redshift Database using ZS Amazon Redshift Destination.
How to write data into Amazon Redshift Table
- In order to connect to the Amazon Redshift Database from SSIS, you will need credentials. Ask your SysAdmin or responsible person to provide that you.
- For this sample exercise, we will create a table in Redshift.
123456789101112CREATE TABLE public."tbl_pg_Customers"("RecordID" character varying(50) NOT NULL,"CustomerID" character varying(50),"CustomerName" character varying(50),"Address1" character varying(50),"City" character varying(50),"State" character varying(50),"Zip" character varying(50),"Country" character varying(50),PRIMARY KEY ("RecordID")); - Once you have created a Table, you may proceed to create a new SSIS package. In BIDS/SSDT create a new SSIS package.
- In your SSIS toolbox, you should see many new Icons starting with “ZS” (i.e. ZappySys). If you don’t see them then check this.
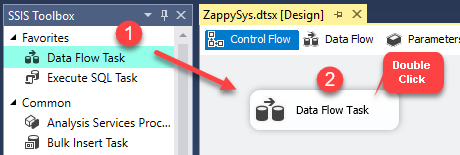
- Now, Drag and Drop SSIS Data Flow Task from SSIS Toolbox.

Drag and Drop SSIS Data Flow Task from SSIS Toolbox
- Double click on the Data Flow Task to see Data flow designer surface.
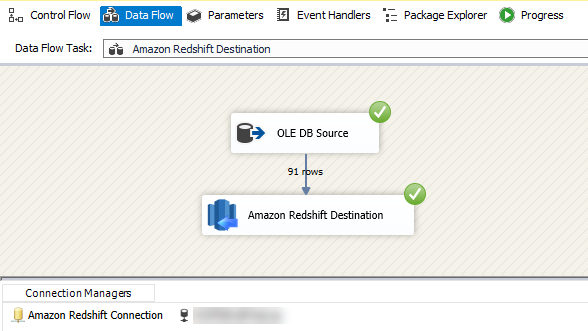
- Here, In Visual Studio, Drag and Drop the OLE DB Source and Amazon Redshift Destination in the design surface and join the components with the blue arrow.
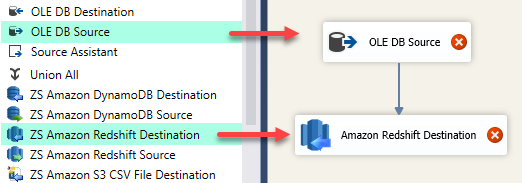
SSIS OLE DB Source and Amazon Redshift Destination – Drag and Drop
- Now, we need OLE DB Connection and Amazon Redshift Connection. Click here for Create Amazon Redshift Connection.
How to Create an OLE DB Connection.
- Let’s, Right-click on Connection Managers Panel to Create OLEDB Connection, so you can use Source and Context Menu will appear, Select New OLEDB Connection from the Context Menu.
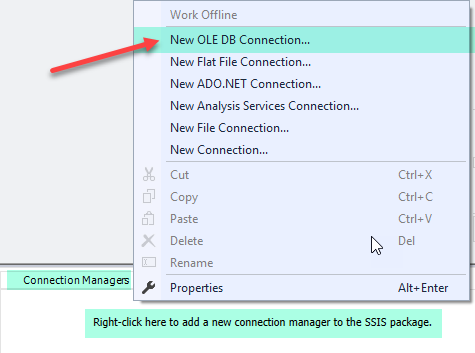
SSIS OLE DB Connection – Create Connection
- Now click on the New button to create a connection.
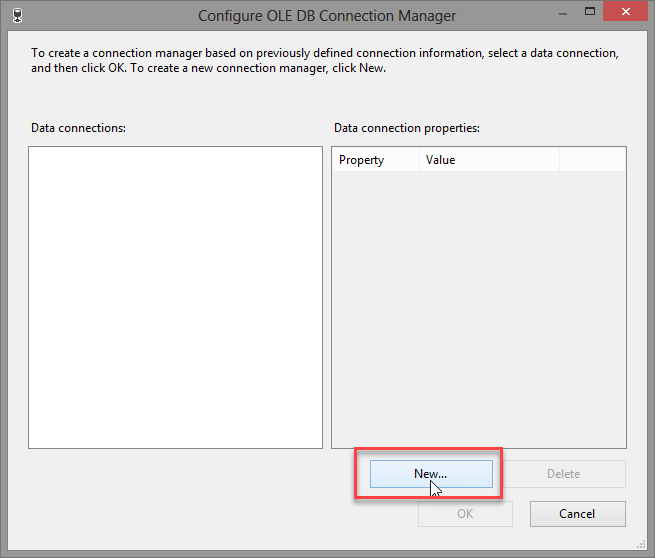
SSIS OLE DB Connection – Create New Connection
- Let’s configure connection Manager, just follow the steps one as we have created in following the image.
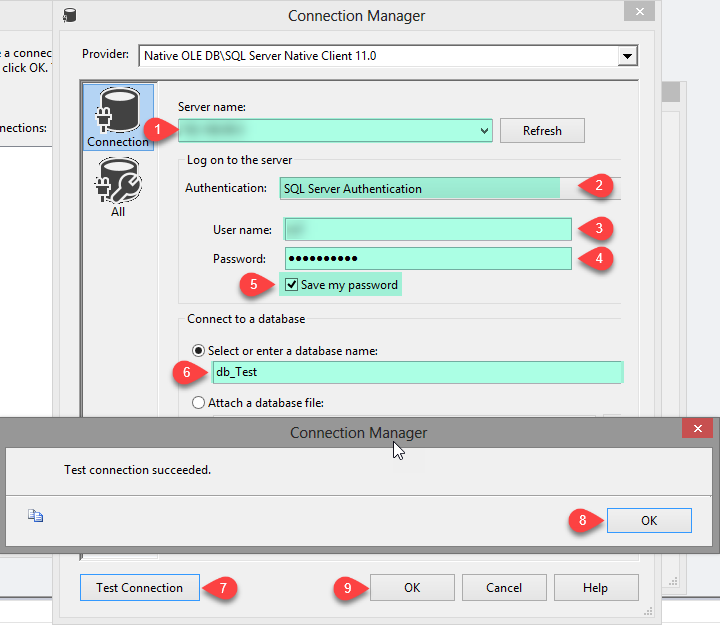
SSIS OLE DB Connection – Configure Connection
- After all, Click on OK button to save configure setting UI.
Configure SSIS ZS Amazon Redshift Destination
- Double click on OLE DB Source for configure it.
- Let’s Configure in Connection Manager, just follow below image steps.
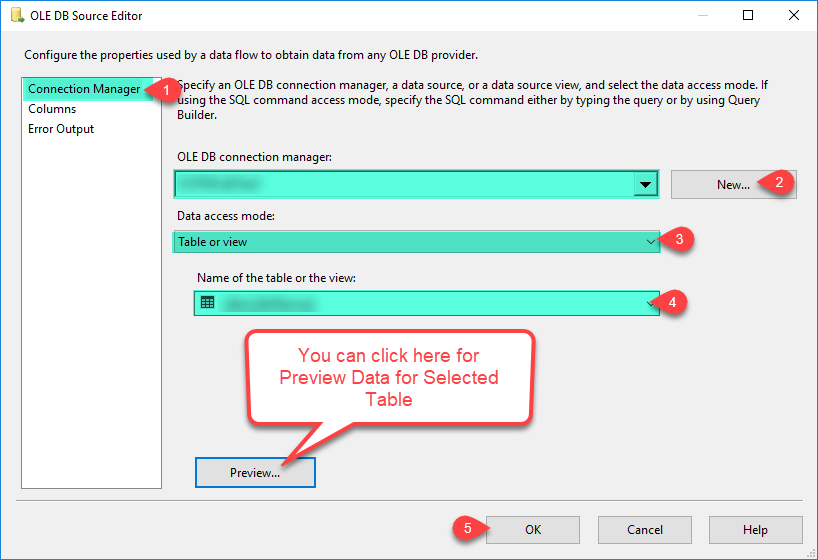
SSIS OLE DB Source – Configure Source Editors
- Click OK to save OLE DB Source Editor UI settings.
- Now double click on Amazon Redshift Destination to configure it. In the [Connection Manager] tab Select Amazon Redshift Connection.
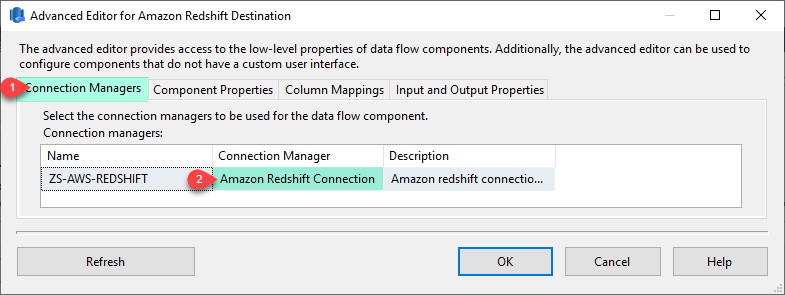
SSIS Amazon Redshift Destination – Connection Manager
- Click on [Component Properties] tab and Pick the Destination Table from Tables dropdown list.
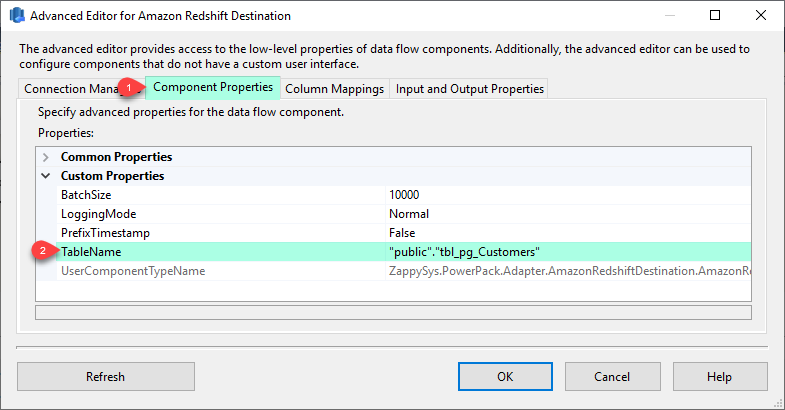
SSIS Amazon Redshift Destination – Component Properties
- Click on [Column mappings] tab and verify mapping. If the target table is new Table and it’s empty then all input columns will be automatically mapped as shown below. If the table is an existing table with some data then you can manually pick a mapping column by dragging it from source list to target list.

SSIS Amazon Redshift Destination – Column Mappings
- Execute the package and verify that the data is saved.
SSIS Amazon Redshift Destination – Run or Execute Package
Read Data using Amazon Redshift Source in SSIS
Overview
In this tutorial, you will learn how to read data from Amazon Redshift in SSIS using ZS Amazon Redshift Source adapter. In this SSIS we will read data with SQL Query and Table Mode. So Let’s begin it.
How to Read data from Amazon Redshift Table
- You may proceed to create a new SSIS package. In BIDS/SSDT create a new SSIS package.
- From the SSIS toolbox drag and drop Data Flow Task on the control flow designer surface.
SSIS Data Flow Task – Drag and Drop
- Double click on the Data Flow Task to see the Data Flow design surface.
- From the SSIS Toolbox, Drag and Drop Amazon Redshift Source in the data flow designer surface.
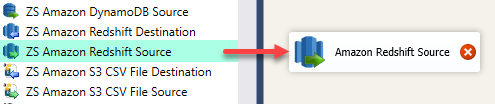
SSIS Amazon Redshift Source – Drag and Drop
- Now, We need Amazon Redshift Connection. Click here for creating Amazon Redshift Connection.
Configure SSIS ZS Amazon Redshift Source – Query Mode
- Here, we are getting data using Query Mode with dynamic expression value.
- Let’s Create Variables, In Visual Studio Right Click on Design Panel, Select Variables.
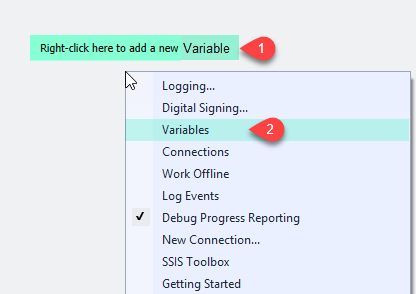
SSIS Create Variables
- Make sure correct DataType and Value, use the following image.
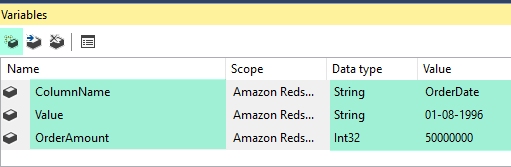
SSIS Created Variables with Value
- Double click on Amazon Redshift Source to configure it.
- Select the connection we have created before, set AccessMode to Query and use the following SQL Query(You can replace table or column name) and insert Variables we have created before.
123SELECT * FROM "public"."tbl_pg_Orders"WHERE "CustomerID" like '%R%' AND "OrderAmount" > '{{User::OrderAmount}}' AND"{{User::ColumnName}}" = '{{User::Value}}'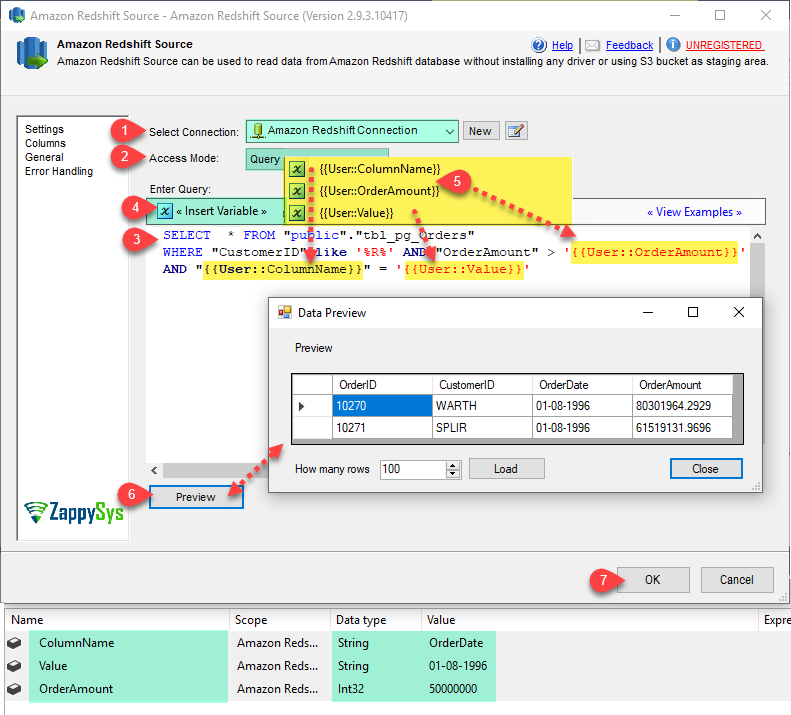
SSIS Amazon Redshift Source – Configure with SQL Query Mode
- Click on Preview button to see Data Preview and OK button to save configure setting UI.
- Here, you can use any of our suitable ZS Destination Adapter.
- From the SSIS toolbox drag and drop Trash Destination on the Data Flow designer surface.
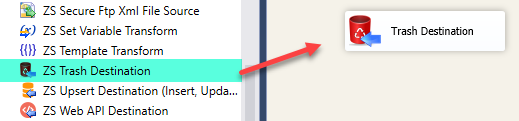
SSIS Trash Destination – Drag and Drop
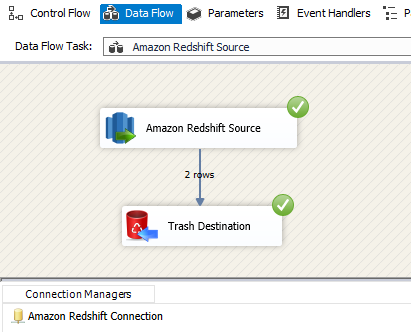
- Now single click on the Amazon Redshift Source, once you see the blue arrow from the source…connect it to Trash Destination.
- Double click on Trash Destination to Configure it.
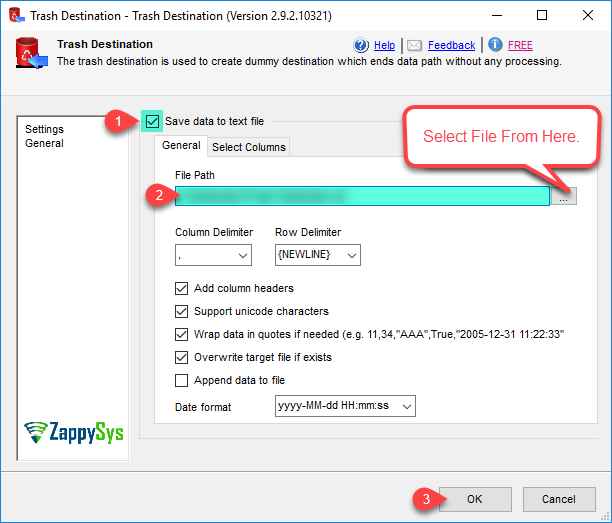
SSIS Trash Destination – Configure
- Click on OK button to save Trash Destination configure setting UI.
- That’s all, just Run or Execute the package and verify data.
SSIS Amazon Redshift Source – Run or Execute the Package
Configure SSIS ZS Amazon Redshift Source – Table Mode
- Double click on Amazon Redshift Source to configure it.
- Select the connection we have created before. Set Access Mode to Table and Select Table from table Drop down list.
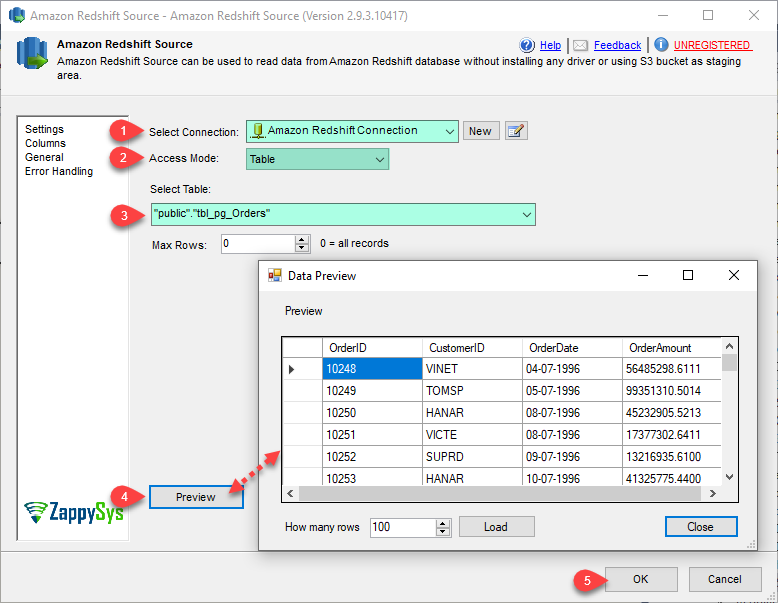
SSIS Amazon Redshift Source – Configure with Table Mode
- Click on Preview button to see Data Preview and OK button to save Amazon Redshift Source configure setting UI.
- From the SSIS toolbox, Drag and Drop Trash Destination on the Data flow designer surface.
SSIS Trash Destination – Drag and Drop
- Now single click on the Amazon Redshift Source, once you see the blue arrow from a source… connect it to Trash Destination.
- Double click on ZS Trash Destination to configure it.
SSIS Trash Destination – Configure
- Click on OK button to save Trash Destination configure setting UI.
- That’s all, just run or execute your package and see data.
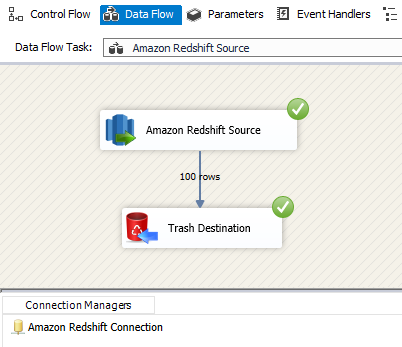
SSIS Amazon Redshift Source – Run or Execute Package
Conclusion
In this blog, we learn How to Read / Write Amazon Redshift Data in SSIS. We used Amazon Redshift Destination for write data and Amazon Redshift Source to read data. You can download SSIS PowerPack here to try many other scenarios not discussed in this blog along with 70+ other components.
References
Finally, you can use the following links for more information: