Introduction
![]() If you need to upload files from SSIS to SharePoint Online, the ZappySys SharePoint Online Connector for SSIS gives you a direct way to configure the connection, authenticate, and send files without building the API calls from scratch.
If you need to upload files from SSIS to SharePoint Online, the ZappySys SharePoint Online Connector for SSIS gives you a direct way to configure the connection, authenticate, and send files without building the API calls from scratch.
This guide shows how to upload one file or multiple files to SharePoint Online using SSIS, API Source, and supporting SSIS components.
Prerequisites
Before we perform the steps listed in this article, you will need to make sure the following prerequisites are met:- SSIS designer installed. Sometimes it is referred to as BIDS or SSDT (download it from the Microsoft site).
- Basic knowledge of SSIS package development using Microsoft SQL Server Integration Services.
- Make sure ZappySys SSIS PowerPack is installed (download it, if you haven't already).
- (Optional step). Read this article, if you are planning to deploy packages to a server and schedule their execution later.
In this section, you will configure the SharePoint Online Connector in API Source and use it to upload files to SharePoint Online.
- Begin by opening Visual Studio and creating a new project.
- Select Integration Service Project and in the new project window set the appropriate name and location for the project. Click OK.
- In the new SSIS project screen you will find the following:
- SSIS ToolBox on the left sidebar
- Solution Explorer and Property Window on the right bar
- Control flow, data flow, event Handlers, Package Explorer in tab windows
- Connection Manager Window at the bottom
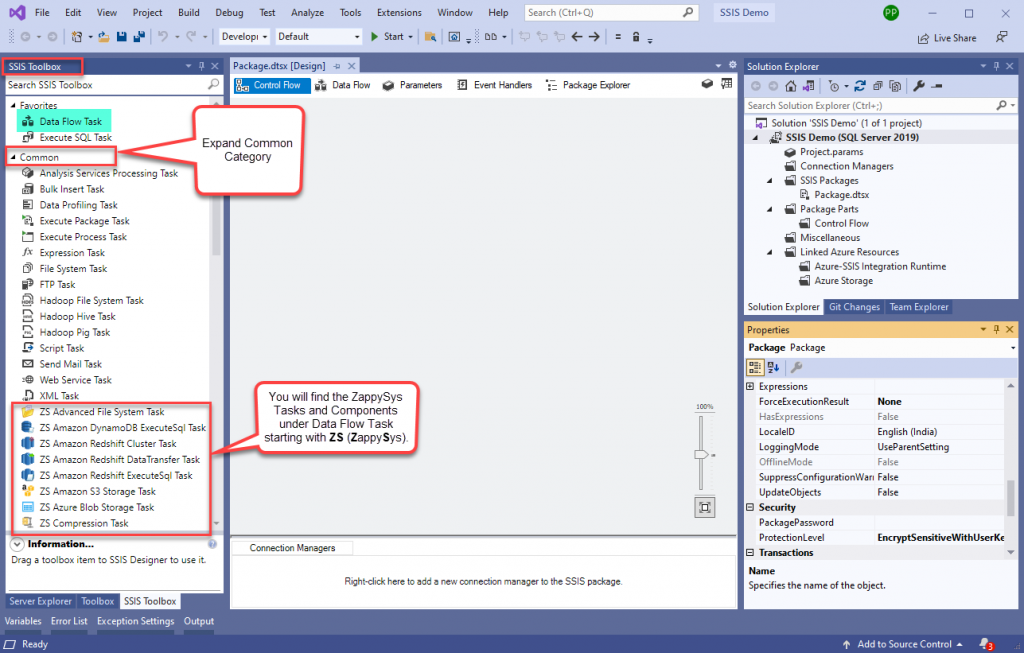
SSIS Toolbox – ZappySys Tasks
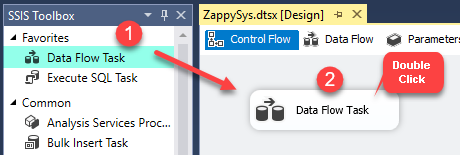
NOTE: If you don’t see ZappySys SSIS PowerPack Task or Components in the SSIS Toolbox, please refer to this help link. - Drag and drop the SSIS Data Flow Task from the SSIS Toolbox. Double-click on the Data Flow Task to see the Data Flow Designer.
- From the SSIS Toolbox, drag and drop API Source (Predefined Templates) onto the Data Flow Designer surface, then double-click it to edit it:

- Select New Connection to create a new connection:

- Use a preinstalled SharePoint Online Connector from the Popular Connector List or press the Search Online radio button to download SharePoint Online Connector. Once downloaded simply use it in the configuration:
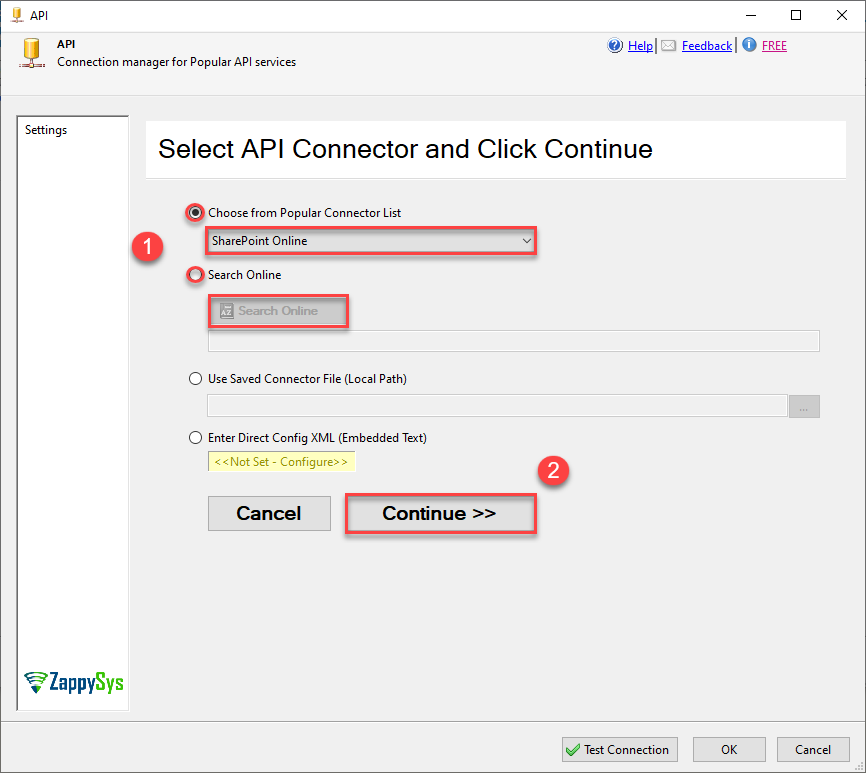
SSIS ZS API Connection Manager – Select SharePoint Online Connector
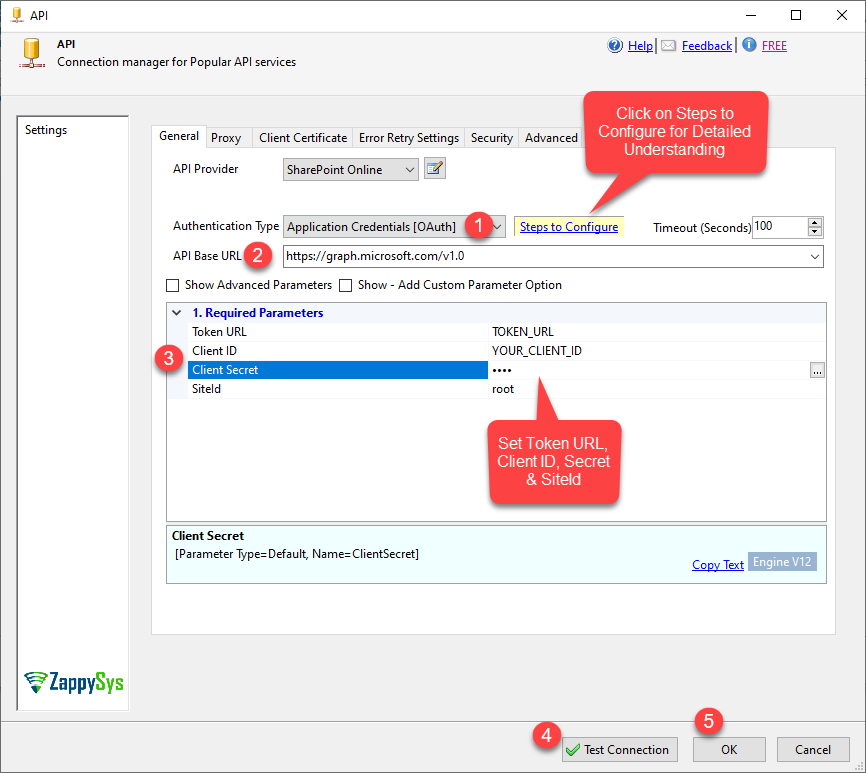
- Select the desired authentication type. Then choose the API Base URL. In most cases, the default value is correct. Fill in the required parameters and add optional parameters only when needed.
- After configuring the required properties in API Connection Manager, click Test Connection to confirm that the connection works.
Use the Steps to Configure link to help set the required parameters.

SSIS ZS API Connection Manager – Generate Token – SharePoint Online with User Credentials
Use the Steps to Configure link to help set the required parameters.
SSIS API Source – Generate Token – SharePoint Online with Application Credentials
In the API Source Component, we’ve chosen the API Connection Manager. Next, we need to configure the remaining properties of the component to upload a local file to SharePoint Online.
- Choose the Upload file endpoint from the “Select Table/Endpoint” dropdown menu.
- Select the desired Drive ID from the DriveId drop-down.
- Specify the desired source file path for the file being uploaded by setting the DiskFilePath parameter.
- Specify the desired Target Path by setting the SharePointFilePath parameter.
Please refer to the sample screenshot below.
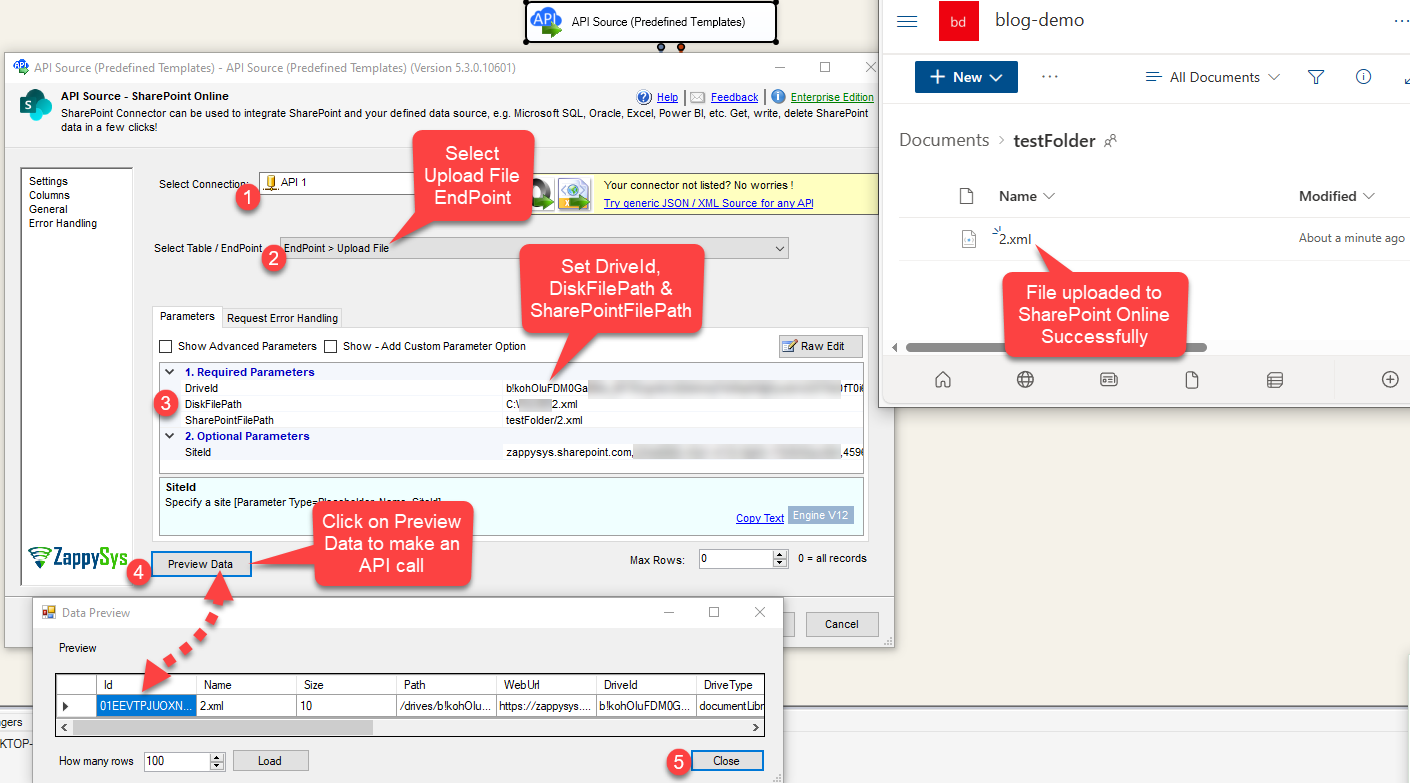
SSIS API Source – SharePoint Online – Upload Single File
After configuring the properties above, click Preview Data to test the API call. At this point, the SharePoint Online Connector is ready to upload a local file from SSIS.
In the API Source Component, we’ve selected the API Connection Manager. Next, we need to configure the remaining properties of the component to upload multiple files to SharePoint Online. Additionally, we should utilize a Foreach Loop Container to iterate through each file one by one in a loop.
- Create 3 SSIS variables as described below.
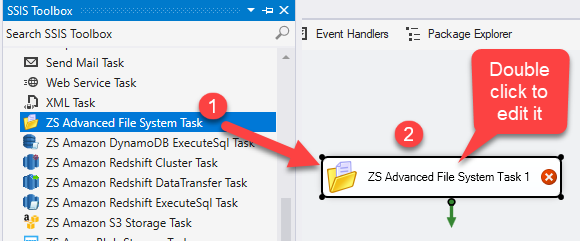
Variable Name Datatype Value varFileLists Object System.Object varFileName String fake.extension varFullFilePath String C:/fake/fake.extension - Go to Control Flow, From the SSIS toolbox drag and drop ZS Advanced File System Task on the control flow designer surface, and double click on it to edit it:
- Select the “Get file list as ADO.NET Data Table” action from the Action drop-down menu. Set the file path in the Path textbox. Choose the variable (Object type) where you want to store the file list, and then click the OK button to save the settings.

SSIS Advanced File System Task – Get file list as ADO.net Data Table
- Now, drag and drop the “Foreach Loop Container” from the SSIS Toolbox and connect it with the “ZS Advanced File System Task.” Double-click on the “Foreach Loop Container” to edit its properties.
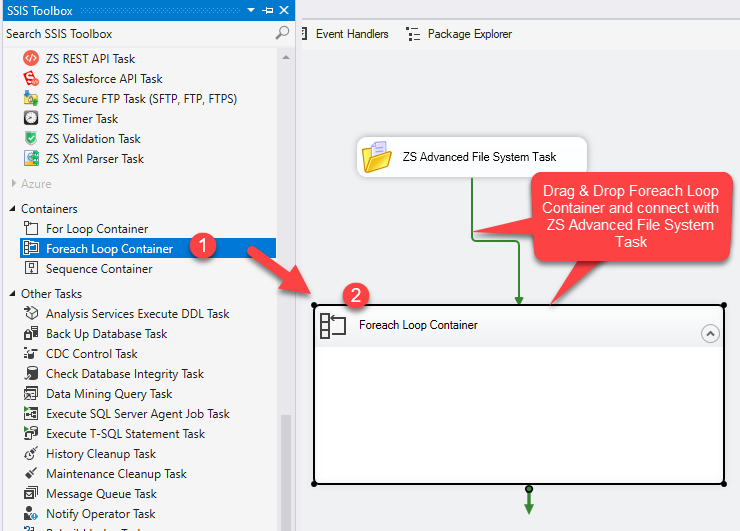
SSIS Foreach Loop Container – Drag & Drop
- In the Foreach Loop Editor’s “Collection” tab, choose the Enumerator as “Foreach ADO Enumerator.” In the “ADO object source variable” field, select your SSIS object-typed variable. Select the “Rows in the first table” radio option.
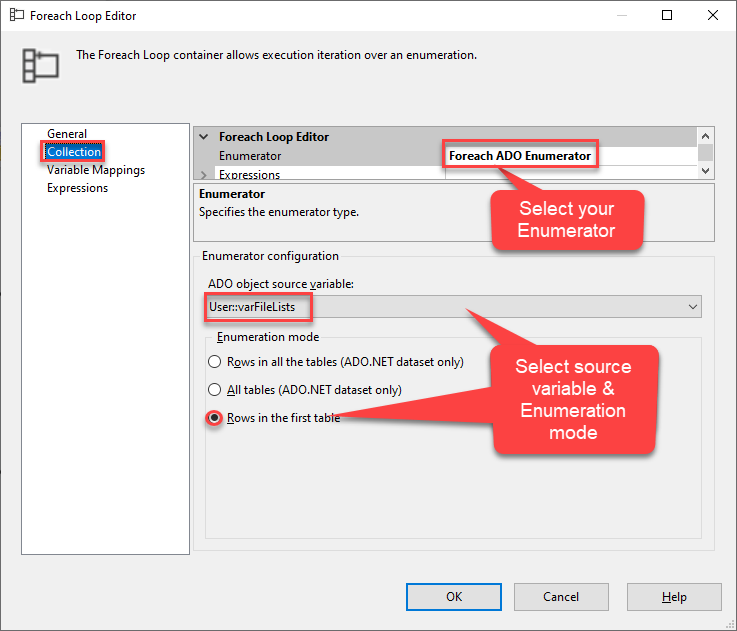
SSIS Foreach Loop Editor – Collection – Select Variable & Enumeration mode
- In the Foreach Loop Editor’s “Variable Mappings” tab, select the variables that you want to map to the values from the collection, and then click the “OK” button to save your selections.
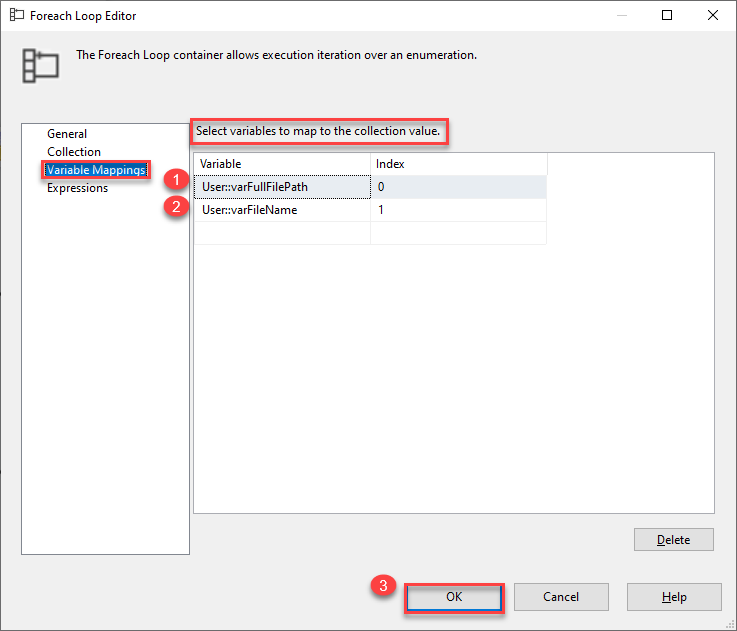
SSIS Foreach Loop Editor – Variable Mappings
- Inside the Foreach Loop Container, drag and drop the Data Flow Task, and then rename it according to your preference.

SSIS Data Flow Task – Drag & Drop inside Foreach Loop Container
- Double-click on the Data Flow Task to see the Data Flow Designer, From the SSIS Toolbox, drag and drop API Source (Predefined Templates) onto the Data Flow Designer surface, then double-click it to edit it:
- Double-click on the API Source component to configure it for uploading multiple files to SharePoint Online.
- Choose the Upload file endpoint from the “Select Table/Endpoint” dropdown menu.
- Set the SharePointFilePath parameter to the SSIS variable that contains the file name, such as varFileName.
- Set the DiskFilePath parameter to the SSIS variable that contains the local file path, such as varFullFilePath.
When configuring the SSIS variable directly in the Raw Edit, JSON may become invalid due to the requirement of slashes within the local file path. To address this, we use a JSONENC Placeholder Function for proper escaping.
<<{{User::varUserFullFilePath}},FUN_JSONENC>> - If you wish to upload the local file to a specific folder in SharePoint Online, please set the folderName in the SharePointFilePath parameter.
Please refer to the sample screenshot below.

SSIS API Source – SharePoint Online – Upload Multiple files configuration
To configure dynamic filenames and file paths, you can set variables. Click on “Raw Edit,” and in the “Edit Parameters” popup, you can use SSIS variables, as shown in the above image.
Once you have configured all the mentioned properties above, please click on the “Preview Data” button to initiate the API call.
After that, execute the SSIS package and confirm that the files are uploaded to SharePoint Online. The screenshot below shows a sample result.
Multiple files uploaded on SharePoint Online using SSIS
You have now configured the SharePoint Online Connector to upload multiple files from SSIS.

Conclusion
In this guide, you learned how to connect to SharePoint Online using SSIS API Connection Manager and upload one or many files using the SSIS API Source component, SSIS ZS Advanced File System Task, Foreach Loop Container, and SSIS variables.
Frequently Asked Questions
Yes. You can use a Foreach Loop Container with SSIS variables and ZS Advanced File System Task to iterate through a file list and upload files one by one.
The simplest approach is to use the SharePoint Online Connector for SSIS, because it provides ready-made authentication and upload endpoints inside the ZappySys connector interface.
Which component uploads the files
The upload action is configured in API Source by selecting the Upload file endpoint and setting values such as DriveId, DiskFilePath, and SharePointFilePath.
Next step
If you want to build this workflow in your own SSIS package, download SSIS PowerPack and review the SharePoint Online Connector guide.