How to integrate Shopify using Talend Studio

Learn how to quickly and efficiently connect Shopify with Talend Studio for smooth data access.
Read and write Shopify data effortlessly. Integrate, manage, and automate customers, orders, products, and inventory — almost no coding required. You can do it all using the high-performance Shopify ODBC Driver (powered by Shopify Connector for ZappySys API Driver). We'll walk you through the entire setup.
Ready to dive in? Download the product to jump right in, or follow the step-by-step guide below to see how it works.
Create data source in ZappySys Data Gateway
In this section we will create a data source for Shopify in the Data Gateway. Let's follow these steps to accomplish that:
-
Download and install ODBC PowerPack (if you haven't already).
-
Search for
gatewayin the Windows Start Menu and open ZappySys Data Gateway Configuration:
-
Go to the Users tab and follow these steps to add a Data Gateway user:
- Click the Add button
-
In the Login field enter a username, e.g.,
john - Then enter a Password
- Check the Is Administrator checkbox
- Click OK to save

-
Now we are ready to add a data source:
- Click the Add button
- Give the Data source a name (have it handy for later)
- Then select Native - ZappySys API Driver
- Finally, click OK
ShopifyDSNZappySys API Driver
-
When the Configuration window appears give your data source a name if you haven't done that already, then select "Shopify" from the list of Popular Connectors. If "Shopify" is not present in the list, then click "Search Online" and download it. Then set the path to the location where you downloaded it. Finally, click Continue >> to proceed with configuring the DSN:
ShopifyDSNShopify
-
Select your authentication scenario below to expand connection configuration steps to:
- Configure the authentication in Shopify.
- Enter those details into the ZappySys API Driver data source configuration.
Shopify authentication
Method: Admin API Access Token (Recommended for Single-Store Connections)
This method uses a permanent Admin API Access Token generated from a "Custom App" within your Shopify Admin. This is the simplest way to connect if you are only integrating with your own store.
Quick Setup Summary:
- Log in to your Shopify Admin and click Settings (the gear icon in the bottom left).
- Select Apps from the left-side settings menu.
- Click the Develop apps button at the top right of the page.
- Open your app (or create a new one) and configure the necessary Admin API access scopes.
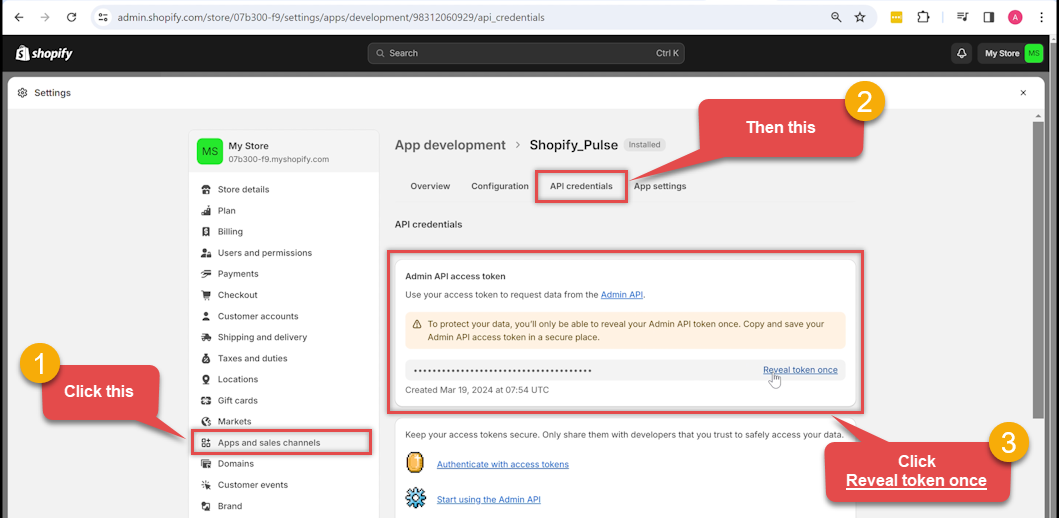
- Click Install app. Once installed, navigate to the API credentials tab.
Important: Your Admin API access token (shpat_xxx) is only revealed once. Please copy and store it securely immediately after clicking "Reveal token once."
Note: If you are using the Shopify Dev Dashboard (via a Partner Account), you must use the OAuth Authorization Code Grant method, as those apps do not issue permanent 'shpat' tokens.
Video Tutorial: How to Get Admin API Access Token in Shopify?
Part 1: Create and Configure the Shopify App
- Visit https://accounts.shopify.com and log into your Shopify store account.
- After logging in, select the store you wish to connect to.
- Select Settings (gear icon in the lower-left corner) to launch the Settings screen.
- On the left menu panel, select Apps. (Note: Sales channels are now managed in a separate menu item).
- On the Apps page, select Develop apps (near the top right of the screen).
Note: If this is your first time accessing this section, you may need to click "Allow custom app development" to proceed. - On the App development screen, select Create an app.
- Give the app a name (e.g., "ZappySys Connector"), select the appropriate developer from the drop-down, and select Create app.
- Click Configure Admin API scopes.
- In the Admin API access scopes screen, select the checkboxes based on which features you plan to use:
- For Customers:
read_customers,write_customers - For Orders:
read_orders,write_orders - For Products:
read_products,write_products - For Inventory:
read_inventory,write_inventory - For Locations:
read_locations - For Payouts/Analytics:
read_all_ordersorread_analytics
Important: If you select fewer scopes than required, some connector features will not work. To ensure full functionality, select both read and write permissions for the resources you need to access.
- For Customers:
- After selecting your scopes, click Save at the top or bottom of the page.
- Install the app by clicking the Install app button (upper-right corner). If prompted, confirm by selecting Install.
Part 2: Get Admin API Access Token
- Once the app is installed, you will be taken to the API credentials tab.
- Look for the Admin API access token section. Select Reveal token once to show the token (it starts with
shpat_). IMPORTANT: Copy and save this token immediately in a secure location. You cannot view it again after leaving this page.
Note: You may also see an API Key or Secret Key in this section; these are not required for this specific authentication method. Use only the Admin API access token.
Part 3: Configure the ZappySys Connector
- Open the ZappySys connector configuration screen.
- Enter Subdomain: Enter the unique subdomain of your Shopify store into the Subdomain parameter textbox.
How to find your Subdomain:
If you use a custom domain (e.g.,
www.my-store.com), you must still use your internal Shopify subdomain:- Method 1 (Admin URL): While logged into Shopify, check your browser address bar.
- If the URL is
admin.shopify.com/store/my-unique-slug, your subdomain is my-unique-slug. - If the URL is
my-unique-slug.myshopify.com/admin, your subdomain is my-unique-slug.
- If the URL is
- Method 2 (Domains Setting): Go to Settings > Domains. Look for the "Primary domain for the online store" or the fallback domain ending in
.myshopify.com. The part before the dots is your subdomain.
- Method 1 (Admin URL): While logged into Shopify, check your browser address bar.
- Enter Access Token: Paste the
shpat_xxxtoken you saved in Step 14 into the Admin API Access Token textbox.
Tip: Click the ellipses (...) button inside the textbox to open a larger dialog for easier pasting. - Click Test Connection to verify the settings.
- If the test is successful, click OK to save the configuration.
API Connection Manager configuration
Just perform these simple steps to finish authentication configuration:
-
Set Authentication Type to
Admin Access Token (Custom App) [Http] - Optional step. Modify API Base URL if needed (in most cases default will work).
- Fill in all the required parameters and set optional parameters if needed.
- Finally, hit OK button:
ShopifyDSNShopifyAdmin Access Token (Custom App) [Http]https://[$Subdomain$].myshopify.com/admin/api/2025-01Required Parameters Sub-domain Fill-in the parameter... Admin API Access Token Fill-in the parameter... Optional Parameters RetryMode RetryWhenStatusCodeMatch RetryStatusCodeList 429 RetryCountMax 5 RetryMultiplyWaitTime True  Find full details in the Shopify Connector authentication reference.
Shopify authentication
Authenticate using OAuth 2.0 Authorization Code Flow (3-legged). Use this for apps built in the Dev Dashboard (https://dev.shopify.com). This is the primary OAuth flow supported for public apps and apps created in the Dev Dashboard.
Method: OAuth Authorization Code Grant (3-Legged)
This method is for apps built in the Shopify Dev Dashboard. Use this if you are a Partner or developer building a multi-store integration.
Note: If you are connecting to your own single store, the Admin Access Token method is significantly simpler. Use this OAuth method only if your integration specifically requires a Client ID and Secret.
Part 1: Create and Configure App in Dev Dashboard
- Log in to the Shopify Dev Dashboard using your Partner account.
- Click Apps in the left menu, then click Create app.
- Select Start from Dev Dashboard (manual setup) and give your app a name.
- Step 1: Configure Scopes and URLs via "Versions"
- Click the Versions tab at the top of the app screen.
- Click Create version (or edit the Draft).
- In the URLs section, enter
https://zappysys.com/oauthinto Allowed redirection URL(s). - Select your Admin API scopes based on which features you plan to use:
- For Customers:
read_customers,write_customers - For Orders:
read_orders,write_orders - For Products:
read_products,write_products - For Inventory:
read_inventory,write_inventory - For Locations:
read_locations - For Payouts/Analytics:
read_all_ordersorread_analytics
Important: If you select fewer scopes than required, some connector features will not work. To ensure full functionality, select both read and write permissions for the resources you need to access.
- For Customers:
- Click Release (top right). Note: Settings only become active once a version is Released.
- Step 2: Set Distribution Method
- Click Distribution in the left-side menu.
- Select Custom Distribution.
- Enter your Shopify store URL (e.g.,
your-store.myshopify.com) and click Generate link. - Action Required: Copy the generated install link, open it in your browser, and follow the prompts to install/unlock the app for your store. You must complete this step before testing the connection in ZappySys.
Part 2: Get Client Credentials
- Click on Settings in the left-side navigation of your app.
- In the Client credentials section, copy the Client ID and Client Secret (click the eye icon to reveal).
Part 3: Configure the ZappySys Connector
- Open the ZappySys connector and select OAuth Authorization Code Grant (3-legged).
- Subdomain: Enter your store handle (the part before
.myshopify.com). - Client ID / Secret: Paste the credentials from Steps 6 and 7.
- Redirect URI: Enter
https://zappysys.com/oauth. - Click Test Connection. You will be prompted to authorize the app in your browser.
Note on Tokens: Successful authorization generates an "Offline" Access Token (starting with
shpca_). This token does not expire and does not require a refresh token.Troubleshooting: If you see "App no longer available," ensure you have completed the Distribution step and followed the Install Link in Step 5 to unlock the app for your store.
API Connection Manager configuration
Just perform these simple steps to finish authentication configuration:
-
Set Authentication Type to
OAuth Authorization Code Grant (3-legged) - RECOMMENDED [OAuth] - Optional step. Modify API Base URL if needed (in most cases default will work).
- Fill in all the required parameters and set optional parameters if needed.
- Press Generate Token button to generate the tokens.
- Finally, hit OK button:
ShopifyDSNShopifyOAuth Authorization Code Grant (3-legged) - RECOMMENDED [OAuth]https://[$Subdomain$].myshopify.com/admin/api/2025-01Required Parameters Redirect URI (***Must match App Settings***) Fill-in the parameter...  Find full details in the Shopify Connector authentication reference.
 -
Once the data source connection has been configured, it's time to configure the SQL query. Select the Preview tab and then click Query Builder button to configure the SQL query:
 ZappySys API Driver - ShopifyRead and write Shopify data effortlessly. Integrate, manage, and automate customers, orders, products, and inventory — almost no coding required.ShopifyDSN
-
Start by selecting the Table or Endpoint you are interested in and then configure the parameters. This will generate a query that we will use in Talend Studio to retrieve data from Shopify. Hit OK button to use this query in the next step.
SELECT * FROM Products Some parameters configured in this window will be passed to the Shopify API, e.g. filtering parameters. It means that filtering will be done on the server side (instead of the client side), enabling you to get only the meaningful data
much faster . -
Now hit Preview Data button to preview the data using the generated SQL query. If you are satisfied with the result, use this query in Talend Studio:
ZappySys API Driver - ShopifyRead and write Shopify data effortlessly. Integrate, manage, and automate customers, orders, products, and inventory — almost no coding required.ShopifyDSNSELECT * FROM Products You can also access data quickly from the tables dropdown by selecting <Select table>.A
WHEREclause,LIMITkeyword will be performed on the client side, meaning that thewhole result set will be retrieved from the Shopify API first, and only then the filtering will be applied to the data. If possible, it is recommended to use parameters in Query Builder to filter the data on the server side (in Shopify servers). -
Click OK to finish creating the data source.
-
Once done, go to the Network Settings tab and Add a firewall rule for inbound traffic:
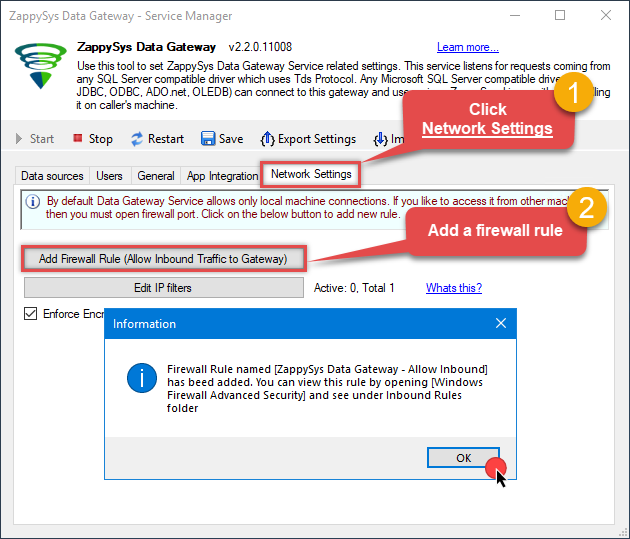
- This will initially allow all inbound traffic.
- Click Edit IP filters to restrict access to specific IP addresses or ranges.
-
Crucial Step: After creating or modifying the data source, you must:
- Click the Save button to persist your changes.
- Hit Yes when prompted to restart the Data Gateway service.
This ensures all changes are properly applied:
 Skipping this step may cause the new settings to fail, preventing you from connecting to the data source.
Read Shopify data in Talend Studio
To read Shopify data in Talend Studio, we'll need to complete several steps. Let's get through them all right away!
Create connection for input
- First of all, open Talend Studio
-
Create a new connection:

-
Select Microsoft SQL Server connection:

-
Name your connection:

-
Fill-in connection parameters and then click Test connection:
ShopifyDSN

-
If the List of modules not installed for this operation window shows up, then download and install all of them:
 Review and accept all additional module license agreements during the process
 -
Finally, you should see a successful connection test result at the end:

Add input
-
Once we have a connection to ZappySys Data Gateway created, we can proceed by creating a job:

-
Simply drag and drop ZappySys Data Gateway connection onto the job:

-
Then create an input based on ZappySys Data Gateway connection:

-
Continue by configuring a SQL query and click Guess schema button:

-
Finish by configuring the schema, for example:

Add output
We are ready to add an output. From Palette drag and drop a tFileOutputDelimited output and connect it to the input:
Run the job
Finally, run the job and integrate your Shopify data:
Explore supported Shopify Connector actions
Got a specific use case in mind? We've mapped out exactly how to perform a variety of essential Shopify operations directly in Talend Studio, so you don't have to figure out the setup from scratch. Check out the step-by-step guides below:
- Create a Customer
- Create a Location
- Create a Product
- Create a Product Variant
- Create an Order
- Delete a Customer
- Delete a Location
- Delete a product
- Delete a product variant
- Delete an Order
- Get Customer
- Get Customers
- Get Inventory Item
- Get Inventory Items
- Get Inventory Levels
- Get Location
- Get Locations
- Get Order
- Get Order Items
- Get Orders
- Get Orders Count
- Get Payouts
- Get Product
- Get Product Variants
- Get Products
- Get Products Count
- Insert Inventory Levels
- Update a Customer
- Update a Location
- Update a Product
- Update a Product Variant
- Update an Order
- Update Inventory Item
- Update Inventory Levels
- Make Generic REST API Request
- Make Generic REST API Request (Bulk Write)
Conclusion
In this article we showed you how to connect to Shopify in Talend Studio and integrate data without writing complex code — all of this was powered by Shopify ODBC Driver.
Download ODBC PowerPack now or ping us via chat if you have any questions or are looking for a specific feature (you can also reach out to us by submitting a ticket):


 Connector")


 Connector")


 Connector")


 Connector")


