Zoom Connector for Talend Studio
Zoom Connector can be used to integrate Zoom REST API in your App / BI Tools. You can read/write data about Meetings, Invite, Users, Accounts and more.
In this article you will learn how to quickly and efficiently integrate Zoom data in Talend Studio without coding. We will use high-performance Zoom Connector to easily connect to Zoom and then access the data inside Talend Studio.
Let's follow the steps below to see how we can accomplish that!
Zoom Connector for Talend Studio is based on ZappySys API Driver which is part of ODBC PowerPack. It is a collection of high-performance ODBC drivers that enable you to integrate data in SQL Server, SSIS, a programming language, or any other ODBC-compatible application. ODBC PowerPack supports various file formats, sources and destinations, including REST/SOAP API, SFTP/FTP, storage services, and plain files, to mention a few.
Create Data Source in Data Gateway based on ZappySys API Driver
In this section we will create a data source for Zoom in Data Gateway. Let's follow these steps to accomplish that:
-
Download and install ODBC PowerPack.
-
Search for
gatewayin Windows Start Menu and open ZappySys Data Gateway Configuration: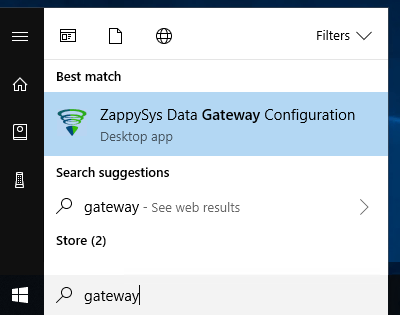
-
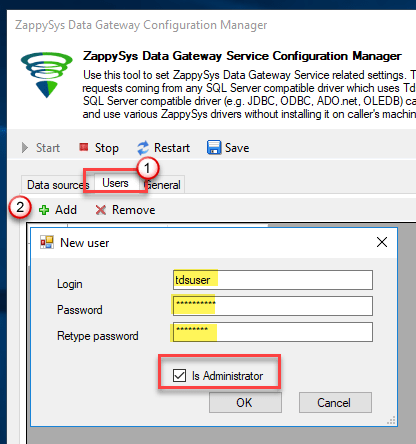
Go to Users tab and follow these steps to add a Data Gateway user:
- Click Add button
-
In Login field enter username, e.g.,
john - Then enter a Password
- Check Is Administrator checkbox
- Click OK to save
-
Now we are ready to add a data source:
- Click Add button
- Give Datasource a name (have it handy for later)
- Then select Native - ZappySys API Driver
- Finally, click OK
ZoomDSNZappySys API Driver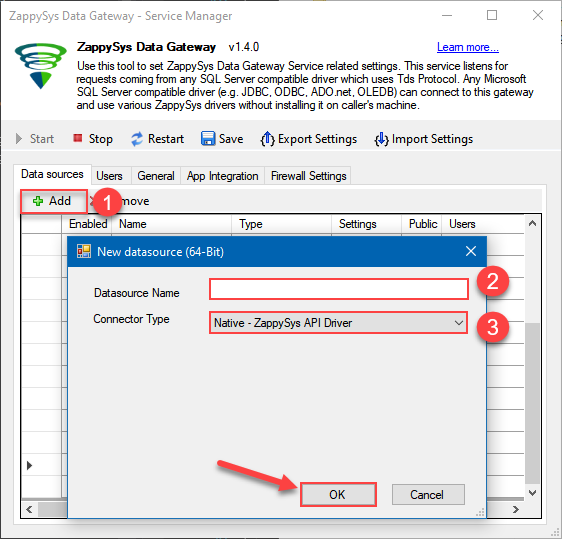
-
When the Configuration window appears give your data source a name if you haven't done that already, then select "Zoom" from the list of Popular Connectors. If "Zoom" is not present in the list, then click "Search Online" and download it. Then set the path to the location where you downloaded it. Finally, click Continue >> to proceed with configuring the DSN:
ZoomDSNZoom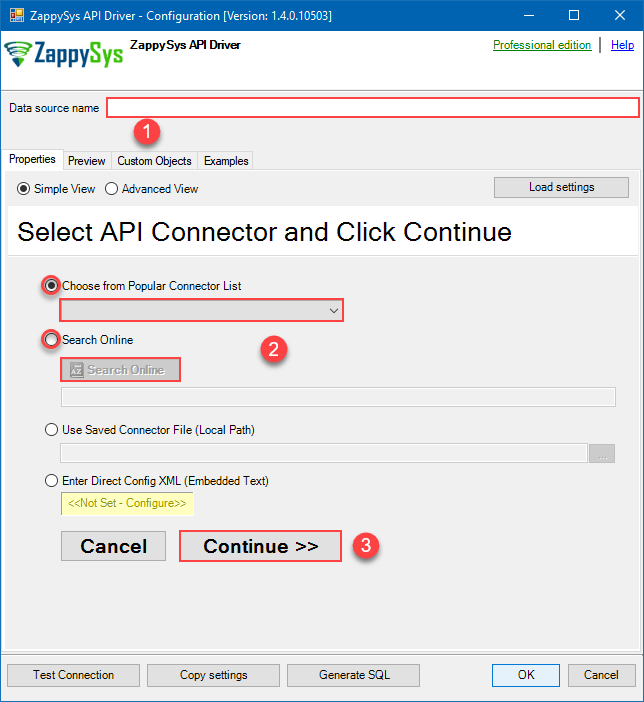
-
Now it's time to configure the Connection Manager. Select Authentication Type, e.g. Token Authentication. Then select API Base URL (in most cases, the default one is the right one). More info is available in the Authentication section.
Zoom authentication
OAuth App must be created under Admin Console > Channel > API > Settings. [API reference]
Follow the steps below to create a Zoom OAuth app and obtain the required credentials (Client ID and Client Secret):
- Go to the Zoom App Marketplace and sign in with your Zoom account.
- From the top navigation bar, open the Develop dropdown and select Build App.
- In the What kind of app are you creating window, select General App, click the Create button.
- Enter a name for your app and select the app type.
(E.g. Zoom-General App) - Click Create to continue.
- In the Redirect URL for OAuth field, enter the following URI and add it to the allow list:
https://zappysys.com/oauth/ - Copy your Client ID and Client Secret, then paste them into the ZappySys API Component/Driver UI under the required parameters.
- From the Scopes window, please add the appropriate Granular scopes. You can search for the scopes listed below and enable them as needed.
Scope Levels:- User-Level: Grants access only to the authenticated user’s data. Suitable for apps where users connect with their own Zoom account.
- Admin-Level: Grants access to data across all users in the account, provided the user has admin permissions. Best for organization-wide apps.
- Master-Level: Grants access at the highest level, typically for apps that need full account control (including sub-accounts). Requires Master Account credentials.
Recommended Scopes:
User-Level- user:read:settings
- meeting:read:list_meetings
- meeting:read:meeting
- meeting:read:list_registrants
- meeting:read:past_meeting
- meeting:read:list_registration_questions
- webinar:read:list_webinars
- webinar:read:webinar
- webinar:read:list_registrants
- report:read:user
- user:read:settings:admin
- user:write:user:admin
- meeting:read:list_meetings:admin
- meeting:read:meeting:admin
- meeting:read:list_registrants:admin
- meeting:read:past_meeting:admin
- meeting:read:list_registration_questions:admin
- user:read:list_users:admin
- webinar:read:list_webinars:admin
- webinar:read:webinar:admin
- webinar:read:list_registrants:admin
- report:read:user:admin
- user:read:settings:master
- meeting:read:list_meetings:master
- meeting:read:meeting:master
- meeting:read:list_registrants:master
- user:read:list_users:master
- webinar:read:list_webinars:master
- webinar:read:webinar:master
- webinar:read:list_registrants:master
- report:read:user:master
- That’s it! After adding the scopes, click Continue to complete the process.
- In the ZappySys API Component/Driver UI, enter your Zoom app Client ID and Client Secret, then click Generate Token to obtain the access tokens.
- You’re done!
API Connection Manager configuration
Just perform these simple steps to finish authentication configuration:
-
Set Authentication Type to
User Credentials (Access Your Data) [OAuth] - Optional step. Modify API Base URL if needed (in most cases default will work).
- Fill in all the required parameters and set optional parameters if needed.
- Press Generate Token button to generate the tokens.
- Finally, hit OK button:
ZoomDSNZoomUser Credentials (Access Your Data) [OAuth]https://api.zoom.us/v2Required Parameters Client Id Fill-in the parameter... Client Secret Fill-in the parameter... Redirect Url Fill-in the parameter... Token Url Fill-in the parameter... Authorization Url Fill-in the parameter... Optional Parameters Retry Mode RetryWhenStatusCodeMatch Retry Status Code 429 Retry Count Max 5 Retry Multiply Wait Time True 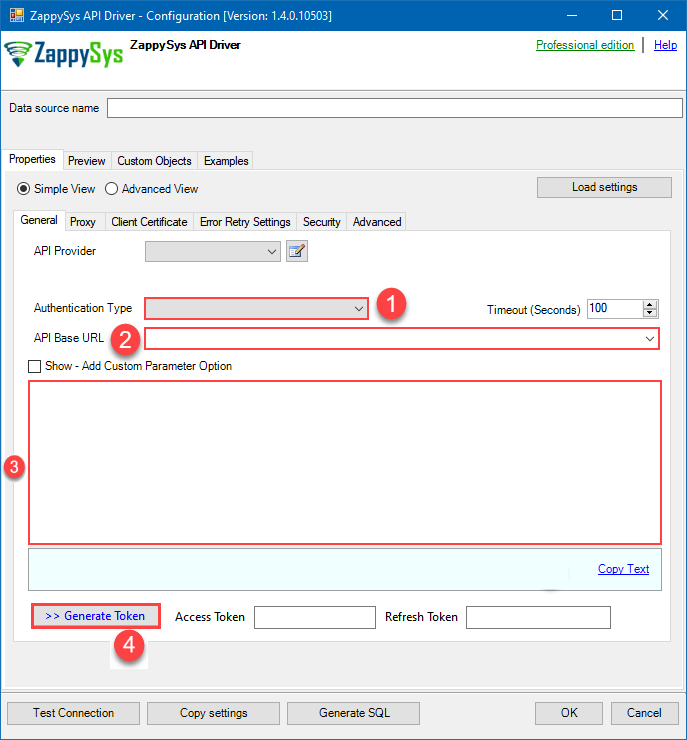
Zoom authentication
Server-to-Server OAuth authentication method that lets applications access the Zoom API directly without user login or consent, using a Client ID and Secret to generate short-lived tokens. [API reference]
Follow the steps below to create a Zoom OAuth app and obtain the required credentials (Client ID and Client Secret):
- Go to the Zoom App Marketplace and sign in with your Zoom account.
- From the top navigation bar, open the Develop dropdown and select Build App.
- In the What kind of app are you creating window, select Server to Server OAuth App, click the Create button.
- Enter a name for your app and select the app type.
(E.g. Basic OAuth App) - Click Create to continue.
- Copy your Account ID, Client ID, and Client Secret, then paste them into the ZappySys API Component/Driver UI under the required parameters.
- In the Information window, enter the company name, developer name, and email address, then click Continue.
- From the Scopes window, please add the appropriate Granular scopes. You can search for the scopes listed below and enable them as needed.
Scope Levels:- Admin-Level: Grants access to data across all users in the account, provided the user has admin permissions. Best for organization-wide apps.
- Master-Level: Grants access at the highest level, typically for apps that need full account control (including sub-accounts). Requires Master Account credentials.
Recommended Scopes:
Admin-Level- user:read:settings:admin
- user:write:user:admin
- meeting:read:list_meetings:admin
- meeting:read:meeting:admin
- meeting:read:list_registrants:admin
- meeting:read:past_meeting:admin
- meeting:read:list_registration_questions:admin
- user:read:list_users:admin
- webinar:read:list_webinars:admin
- webinar:read:webinar:admin
- webinar:read:list_registrants:admin
- report:read:user:admin
- user:read:settings:master
- meeting:read:list_meetings:master
- meeting:read:meeting:master
- meeting:read:list_registrants:master
- user:read:list_users:master
- webinar:read:list_webinars:master
- webinar:read:webinar:master
- webinar:read:list_registrants:master
- report:read:user:master
- That’s it! After adding the scopes, click Continue to complete the process.
- In the ZappySys API Component/Driver UI, enter your Zoom app Account ID, Client ID, and Client Secret, then click Test Connection.
- You’re done!
API Connection Manager configuration
Just perform these simple steps to finish authentication configuration:
-
Set Authentication Type to
App Credentials (Access Account Level Data) [OAuth] - Optional step. Modify API Base URL if needed (in most cases default will work).
- Fill in all the required parameters and set optional parameters if needed.
- Finally, hit OK button:
ZoomDSNZoomApp Credentials (Access Account Level Data) [OAuth]https://api.zoom.us/v2Required Parameters Account Id Fill-in the parameter... Client Id Fill-in the parameter... Client Secret Fill-in the parameter... Token Url Fill-in the parameter... Optional Parameters Retry Mode RetryWhenStatusCodeMatch Retry Status Code 429 Retry Count Max 5 Retry Multiply Wait Time True 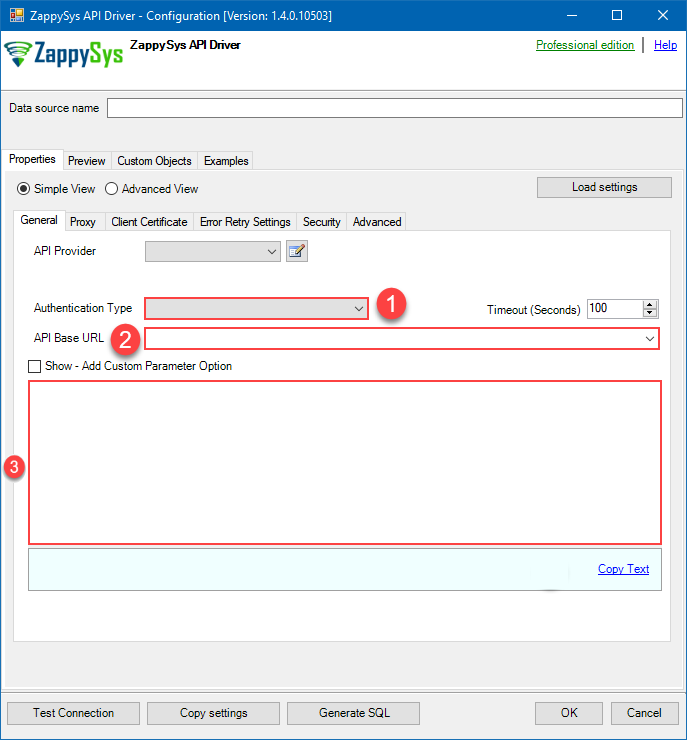
Zoom authentication
OAuth App must be created under Admin Console > Channel > API > Settings. [API reference]
Perform the following steps to get the Zoom OAuth credentials (i.e. Client ID and Client Secret)
- Go to Zoom Marketplace Portal and sign in there.
- Once you successfully login then select "Build App" option from Develop dropdown from top left on the page.
- Click on Create button of OAuth panel section of page.
- Enter the name for your application and choose app type (Recommneded "Account-Level App") option for your API
- Then proceed with clicking Create button.
- In Redirect URL for OAuth enter this https://zappysys.com/oauth/ as Redirect URI and add it to allow lists.
- Copy Client ID and Client Secret here and paste it into Connection Manager Required Paramters section in respective place holders
- Add appropiate scopes from the Scopes menu option to the right side of page for your API as below :
NOTE: If you need to read/write data for all users (not just 'me') then add
:adminsuffix in the scope (e.g.meeting:read:admin)- meeting:read
- meeting:write
- user:read
- user:write
- user_info:read
- meeting:read
- chat_channel:read
- chat_channel:write
- chat_contact:read
- chat_message:read
- chat_message:write
- contact:read
- pac:read
- pac:write
- phone:read
- phone:write
- phone_call_control:read
- phone_call_control:write
- phone_call_log:read
- phone_call_log:write
- phone_e911:read
- phone_recording:read
- phone_recording:write
- phone_sms:read
- phone_sms:write
- phone_voicemail:read
- phone_voicemail:write
- recording:read
- recording:write
- tsp:read
- tsp:write
- user:read
- user:write
- user_info:read
- user_zak:read
- webinar:read
- webinar:write
- report:read:user
- Click Generate Token button on Connection Manager UI to generate tokens.
- That's it!
API Connection Manager configuration
Just perform these simple steps to finish authentication configuration:
-
Set Authentication Type to
User Credentials (Access Your Data) - With Legacy Scopes [OAuth] - Optional step. Modify API Base URL if needed (in most cases default will work).
- Fill in all the required parameters and set optional parameters if needed.
- Press Generate Token button to generate the tokens.
- Finally, hit OK button:
ZoomDSNZoomUser Credentials (Access Your Data) - With Legacy Scopes [OAuth]https://api.zoom.us/v2Required Parameters ClientId Fill-in the parameter... ClientSecret Fill-in the parameter... RedirectUrl Fill-in the parameter... TokenUrl Fill-in the parameter... AuthorizationUrl Fill-in the parameter... Optional Parameters Scope RetryMode RetryWhenStatusCodeMatch RetryStatusCodeList 429 RetryCountMax 5 RetryMultiplyWaitTime True 
-
Once the data source connection has been configured, it's time to configure the SQL query. Select the Preview tab and then click Query Builder button to configure the SQL query:
ZappySys API Driver - ZoomZoom Connector can be used to integrate Zoom REST API in your App / BI Tools. You can read/write data about Meetings, Invite, Users, Accounts and more.ZoomDSN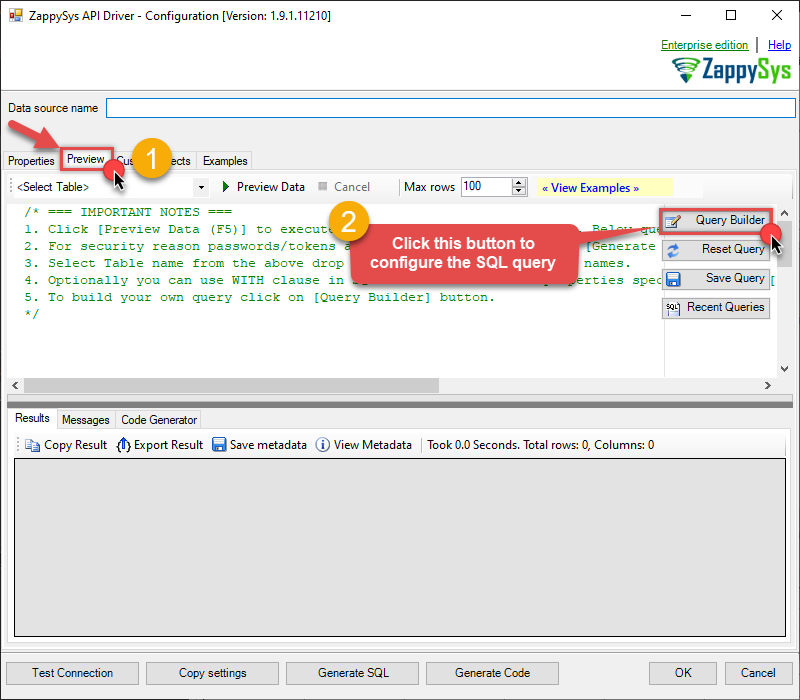
-
Start by selecting the Table or Endpoint you are interested in and then configure the parameters. This will generate a query that we will use in Talend Studio to retrieve data from Zoom. Hit OK button to use this query in the next step.
SELECT * FROM Meetings WITH( UserId ='me' -- enter user id or email ) --You can get UserId by selecting from 'list_users' endpoint and also this value available as dropdown value for UserId parameter.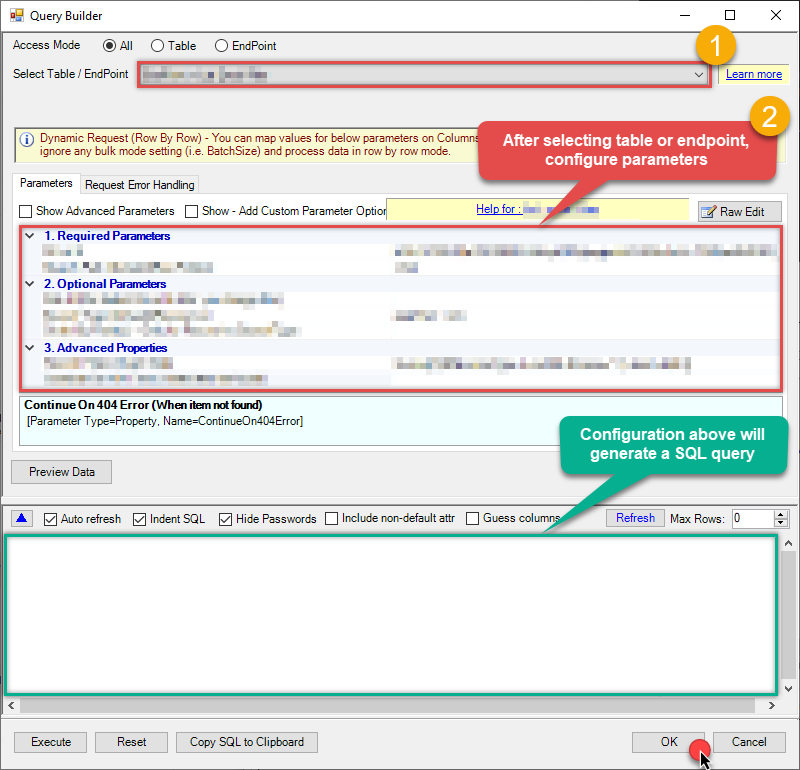 Some parameters configured in this window will be passed to the Zoom API, e.g. filtering parameters. It means that filtering will be done on the server side (instead of the client side), enabling you to get only the meaningful data
much faster . -
Now hit Preview Data button to preview the data using the generated SQL query. If you are satisfied with the result, use this query in Talend Studio:
ZappySys API Driver - ZoomZoom Connector can be used to integrate Zoom REST API in your App / BI Tools. You can read/write data about Meetings, Invite, Users, Accounts and more.ZoomDSNSELECT * FROM Meetings WITH( UserId ='me' -- enter user id or email ) --You can get UserId by selecting from 'list_users' endpoint and also this value available as dropdown value for UserId parameter.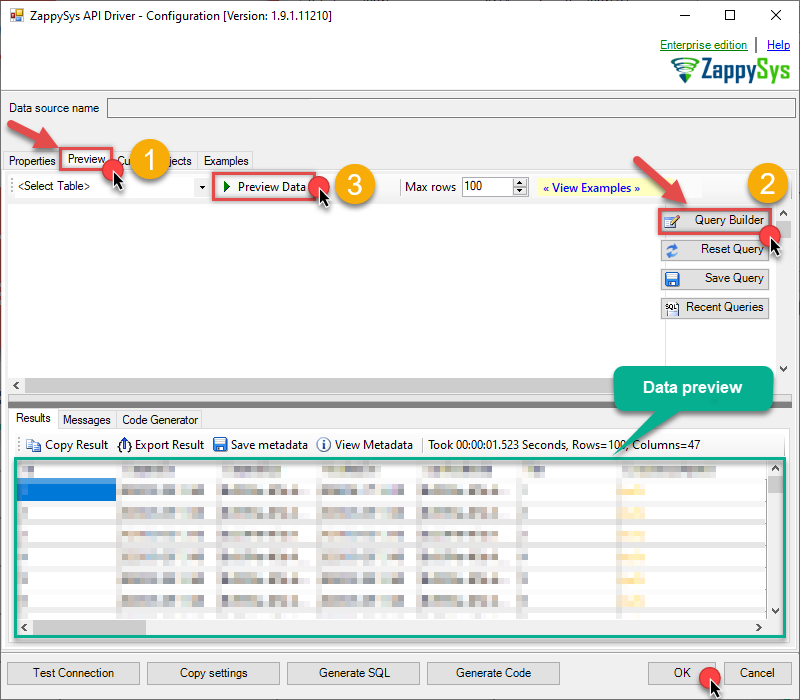 You can also access data quickly from the tables dropdown by selecting <Select table>.A
WHEREclause,LIMITkeyword will be performed on the client side, meaning that thewhole result set will be retrieved from the Zoom API first, and only then the filtering will be applied to the data. If possible, it is recommended to use parameters in Query Builder to filter the data on the server side (in Zoom servers). -
Click OK to finish creating the data source.
-
Very important step. Now, after creating or modifying the data source make sure you:
- Click the Save button to persist your changes.
- Hit Yes, once asked if you want to restart the Data Gateway service.
This will ensure all changes are properly applied:
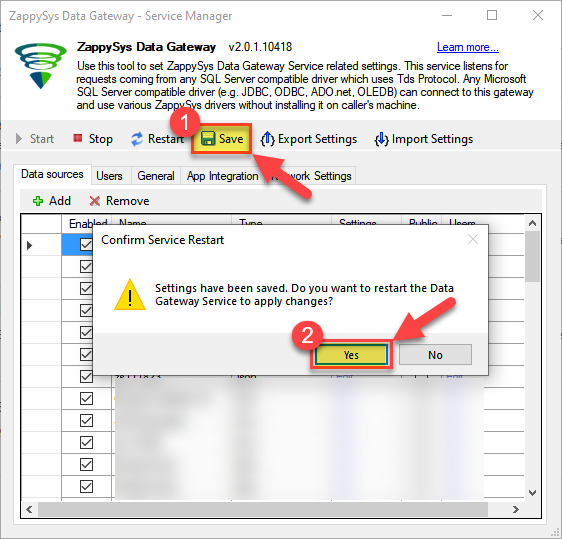 Skipping this step may result in the new settings not taking effect and, therefore you will not be able to connect to the data source.
Read Zoom data in Talend Studio
To read Zoom data in Talend Studio, we'll need to complete several steps. Let's get through them all right away!
Create connection for input
- First of all, open Talend Studio
-
Create a new connection:
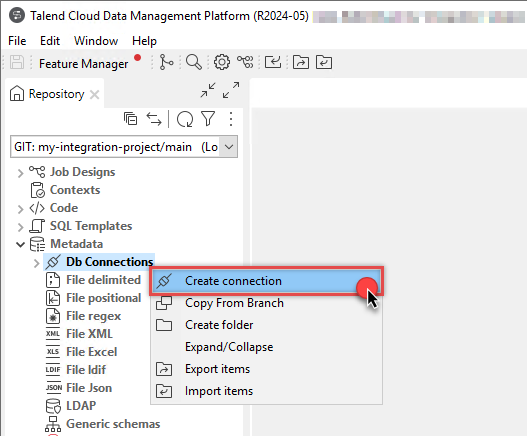
-
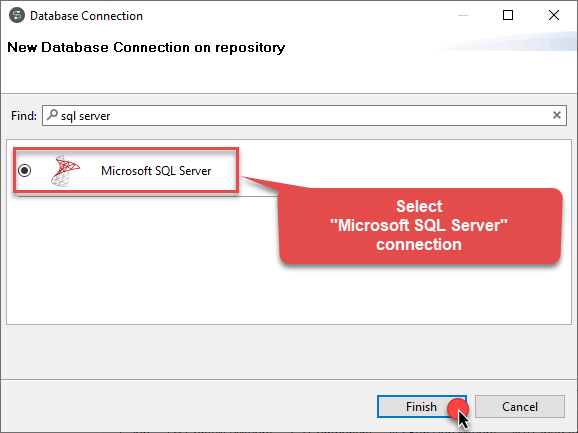
Select Microsoft SQL Server connection:
-
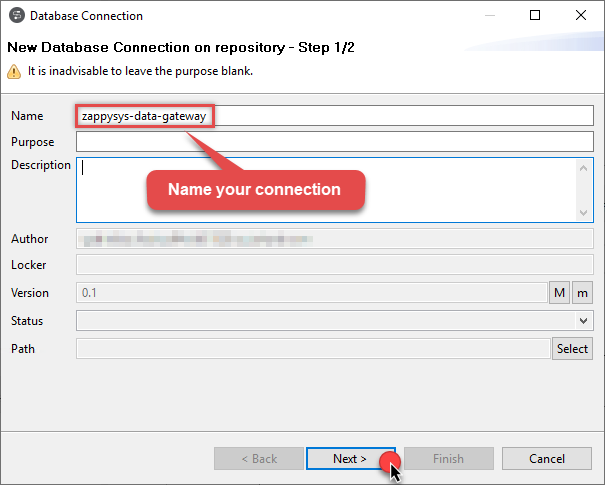
Name your connection:
-
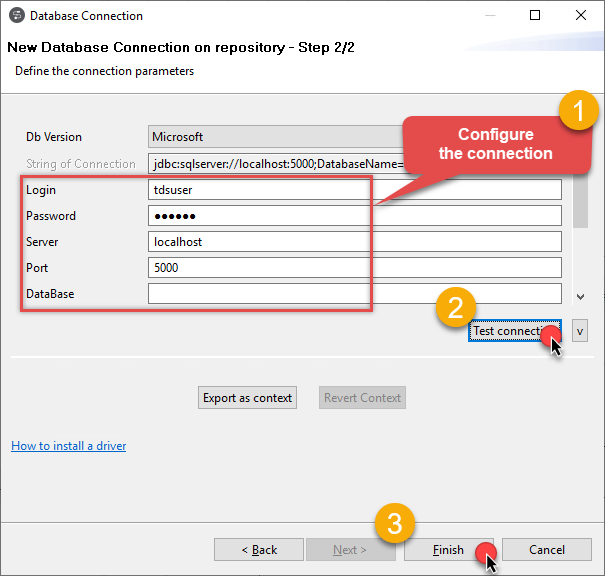
Fill-in connection parameters and then click Test connection:
ZoomDSN
-
If the List of modules not installed for this operation window shows up, then download and install all of them:
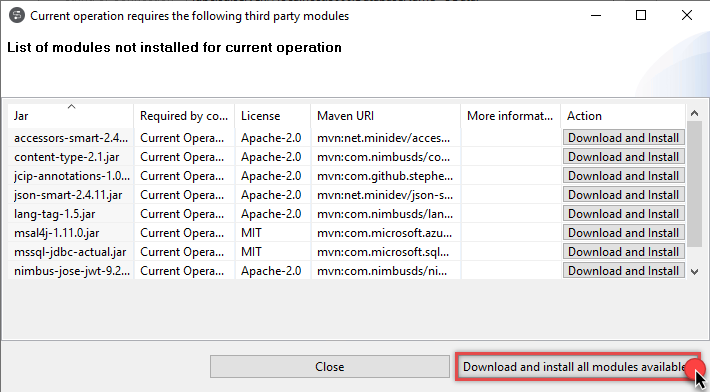 Review and accept all additional module license agreements during the process
 -
Finally, you should see a successful connection test result at the end:

Add input
-
Once we have a connection to ZappySys Data Gateway created, we can proceed by creating a job:
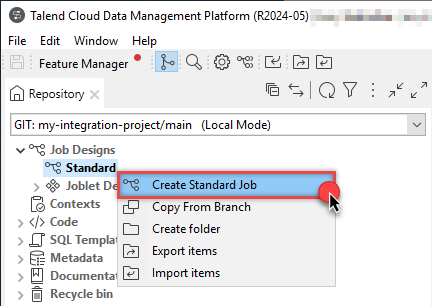
-
Simply drag and drop ZappySys Data Gateway connection onto the job:
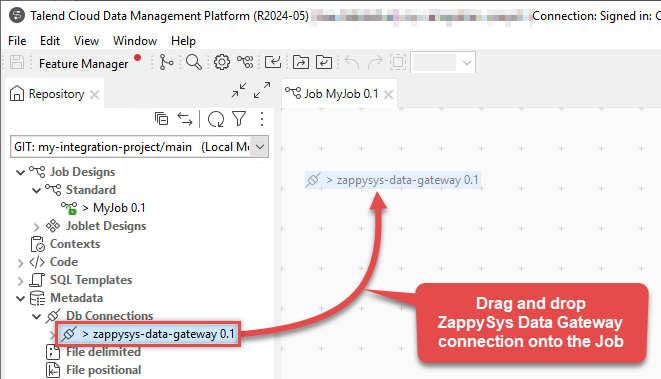
-
Then create an input based on ZappySys Data Gateway connection:
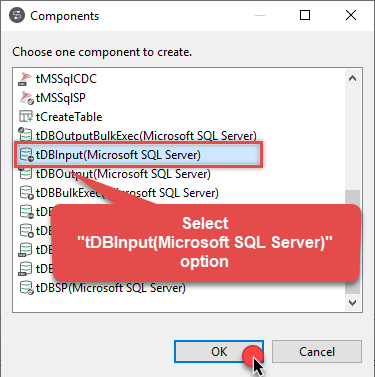
-
Continue by configuring a SQL query and click Guess schema button:
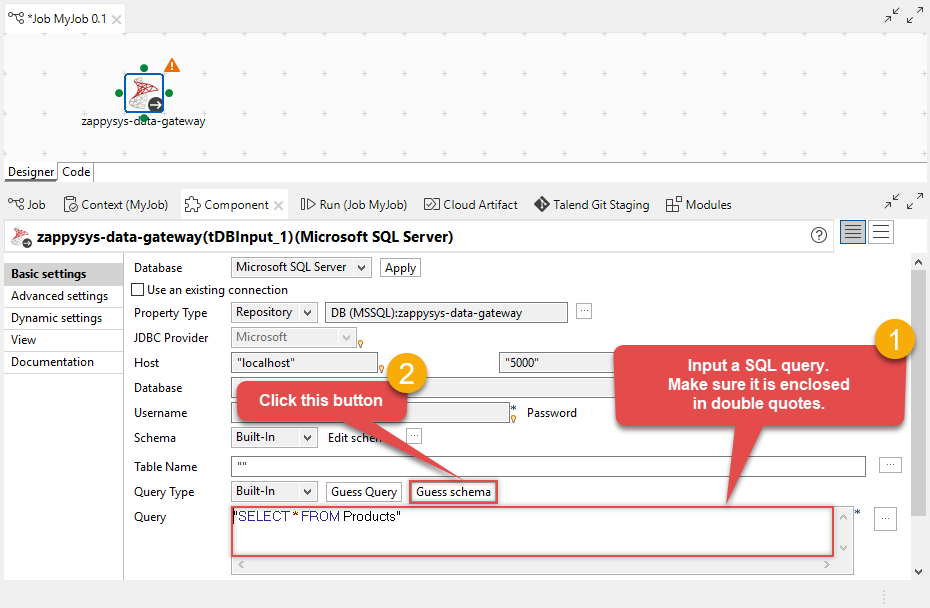
-
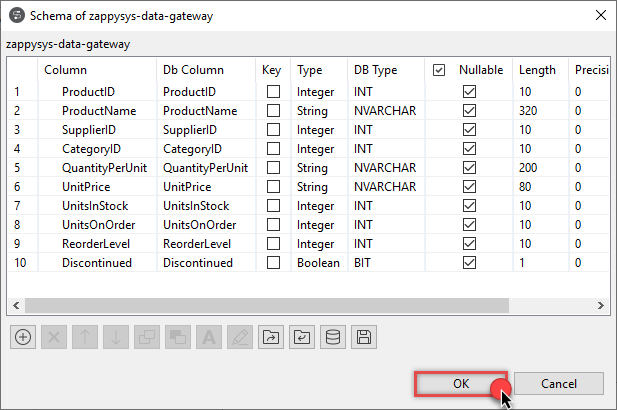
Finish by configuring the schema, for example:
Add output
We are ready to add an output. From Palette drag and drop a tFileOutputDelimited output and connect it to the input: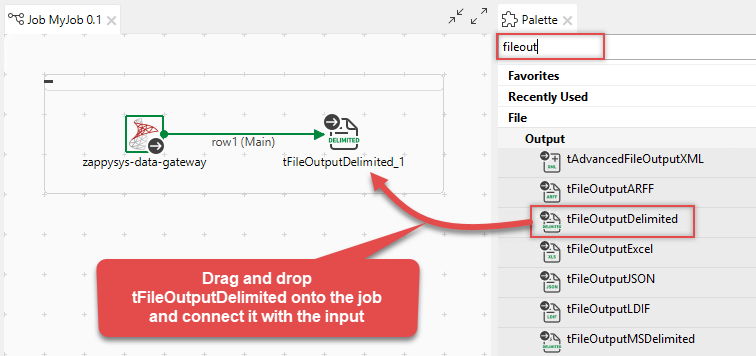
Run the job
Finally, run the job and integrate your Zoom data: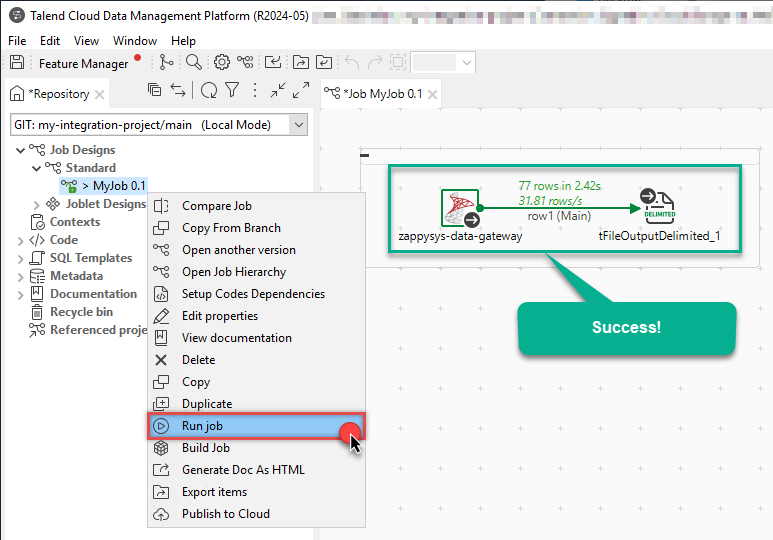
Actions supported by Zoom Connector
Learn how to perform common Zoom actions directly in Talend Studio with these how-to guides:
- GET Current User (Me)
- Get Meeting By Id
- GET Settings
- Get Webinar Settings
- Get Webinar Settings By Id
- List Meeting Registrants
- List Meetings
- List Meetings (All Users)
- List Past Meetings (All Users)
- List Registration Questions
- List Users
- List Webinar Registrants
- List Webinars
- Past Meeting
- Make Generic API Request
- Make Generic API Request (Bulk Write)
Conclusion
In this article we showed you how to connect to Zoom in Talend Studio and integrate data without any coding, saving you time and effort.
We encourage you to download Zoom Connector for Talend Studio and see how easy it is to use it for yourself or your team.
If you have any questions, feel free to contact ZappySys support team. You can also open a live chat immediately by clicking on the chat icon below.
Download Zoom Connector for Talend Studio Documentation


