Python Shopify Connector

In this article you will learn how to integrate Shopify data to Python (live / bi-directional connection to Shopify). Shopify Connector can be used to integrate Shopify REST API in your App / BI Tools. You can read/write data about Customers, Orders, OrderItems, Products and more..

Using Shopify Connector you will be able to connect, read, and write data from within Python. Follow the steps below to see how we would accomplish that.

Download  Help File  Buy 

Create ODBC Data Source (DSN) based on ZappySys API Driver

To get data from Shopify using Python we first need to create a DSN (Data Source) which will access data from Shopify. We will later be able to read data using Python. Perform these steps:

  1. Install ZappySys ODBC PowerPack.

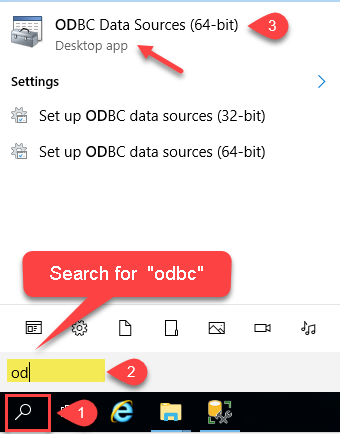
  2. Open ODBC Data Sources (x64):
    Open ODBC Data Source

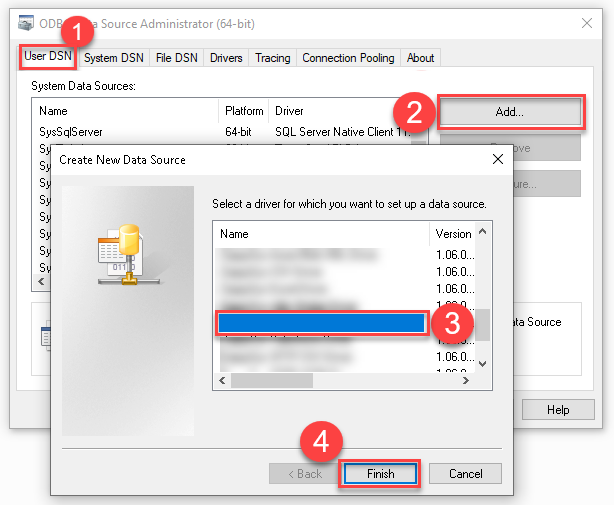
  3. Create a User Data Source (User DSN) based on ZappySys API Driver

    ZappySys API Driver
    Create new System DSN for ZappySys API Driver
    You should create a System DSN (instead of a User DSN) if the client application is launched under a Windows System Account, e.g. as a Windows Service. If the client application is 32-bit (x86) running with a System DSN, use ODBC Data Sources (32-bit) instead of the 64-bit version.
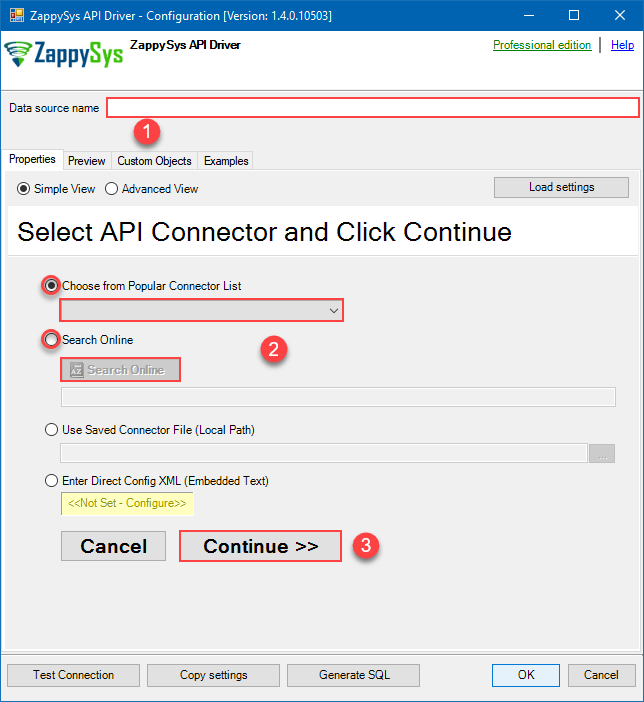
  4. When the Configuration window appears give your data source a name if you haven't done that already, then select "Shopify" from the list of Popular Connectors. If "Shopify" is not present in the list, then click "Search Online" and download it. Then set the path to the location where you downloaded it. Finally, click Continue >> to proceed with configuring the DSN:

    ShopifyDSN
    Shopify
    ODBC DSN Template Selection

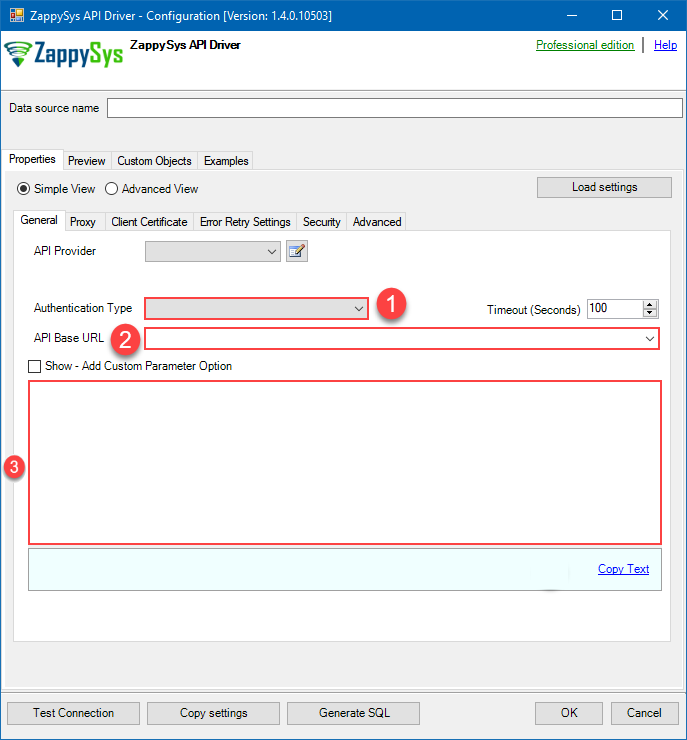
  5. Now it's time to configure the Connection Manager. Select Authentication Type, e.g. Token Authentication. Then select API Base URL (in most cases, the default one is the right one). More info is available in the Authentication section.

    Steps to get Shopify Credentials : Access Token [Http]
    Setting up your Shopify store account for API access involves creating an "app" for your store. The "app" is installed into the Shopify account and configured with the appropriate access levels for your data integration needs.
    1. Visit https://accounts.shopify.com and log into your Shopify store account.
    2. After logging in, select the store to connect to with the ZappySys Shopify Connector.
    3. Select the Settings link (usually in the lower-left corner) to launch the Settings screen.
    4. On the left menu panel, select Apps and sales channels.
    5. On the Apps and sales channels screen, select Develop apps (near the top of the screen).
    6. On the App development screen, select Create an app (near the upper-right corner of the screen).
    7. Give the app that will be used to provide Shopify API access a name, select the appropriate developer from the App developer drop-down, and then select Create app.
    8. Select Configure Admin API scopes and the Admin API access scopes screen will appear.
    9. In the Admin API access scopes screen, select every access scope checkbox that applies to your integration needs. It is generally not a good idea to allow more access than what is needed in order to fulfill your integration needs.
      • To enable the reading of customer information, select read_customers.
      • To enable the writing of customer information, select write_customers.
      • To enable the reading of inventory item information, select read_inventory.
      • To enable the writing of inventory item information, select write_inventory.
      • To enable the reading of order information, select read_orders.
      • To enable the writing of order information, select write_orders.
      After selecting all applicable access scopes, select Save.
    10. Install the app by selecting the Install app button (near the upper-right corner of the screen). If any other prompts for installation appears, select Install.
    11. After the app is installed, the Admin API access token will be available in the API credentials tab of the page. It can only be revealed ONCE for security purposes. Select Reveal token once to show the new Admin API access token. SAVE THE ADMIN API ACCESS TOKEN IN A SAFE PLACE WHERE YOU HAVE IT CONFIDENTIAL, SECURE, AND NOT ACCESSIBLE TO UNAUTHORIZED INDIVIDUALS. The Admin API access token will be needed in this process later.
    12. In the ZappySys connector API screen, enter the subdomain of your Shopify store into the Subdomain parameter textbox. For example, if your Shopify URL is https://acmetoys.myshopify.com, the subdomain would be acmetoys.
    13. In the same screen, enter the Admin API access token saved from step 11 above into the Admin API Access Token textbox. In order to edit the text in this field, select the ellipses (...) button that appears when the textbox is clicked and edit the access token with the dialog box that appears.
    14. Select the Test Connection button at the bottom of the window to verify proper connectivity with the Shopify store.
    15. If the connection test succeeds, select OK.

    Fill in all required parameters and set optional parameters if needed:

    ShopifyDSN
    Shopify
    Access Token [Http]
    https://[$Subdomain$].myshopify.com/admin/api/2023-01
    Required Parameters
    Sub-domain Fill in the parameter...
    Admin API Access Token Fill in the parameter...
    Optional Parameters
    RetryMode Fill in the parameter...
    RetryStatusCodeList Fill in the parameter...
    RetryCountMax Fill in the parameter...
    RetryMultiplyWaitTime Fill in the parameter...
    ODBC DSN HTTP Connection Configuration

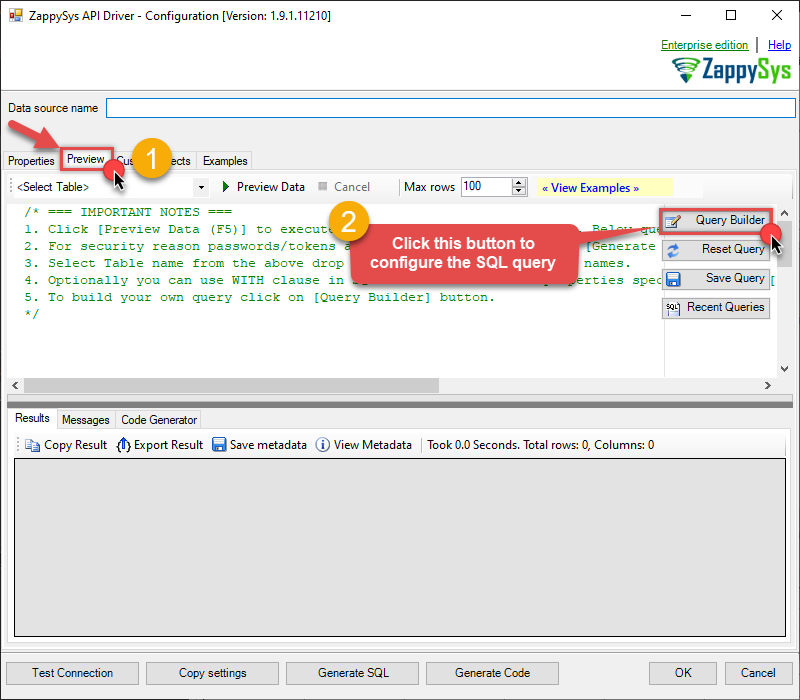
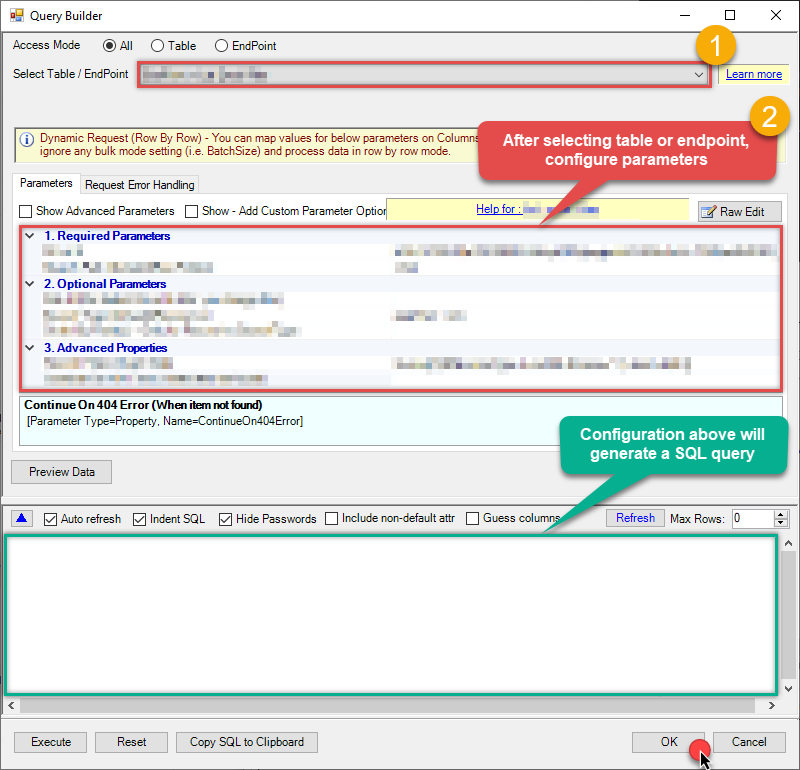
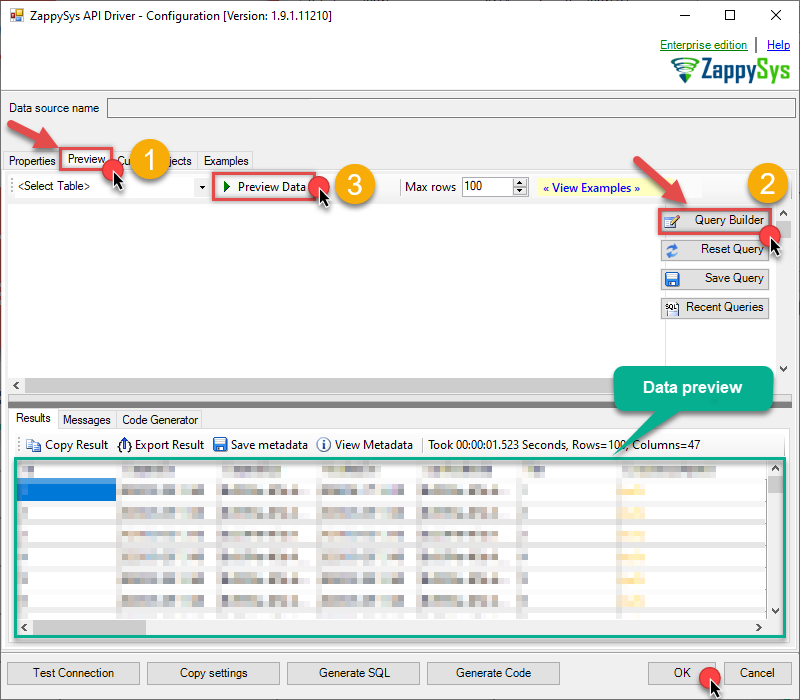
  6. Once the data source has been configured, you can preview data. Select the Preview tab and use settings similar to the following to preview data:
    ODBC ZappySys Data Source Preview

  7. Click OK to finish creating the data source.

Read data in Python from the DSN

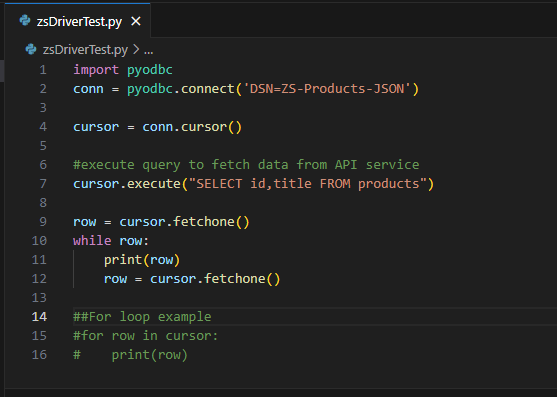
  1. Python code to get the data:

    ShopifyDSN')
    Python code to get the data from ZappySys DSN

  2. When you run the code it will make the API call and read the data:
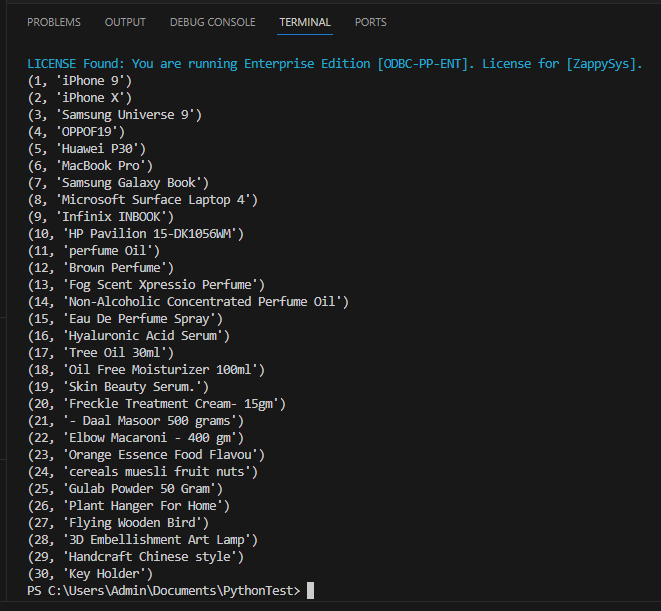
    Python - Extracted data from ZappySys DSN

  3. Here is Python program's code in text format:

    
        import pyodbc
        conn = pyodbc.connect('DSN=ShopifyDSN')
    
        cursor = conn.cursor()
    
        #execute query to fetch data from API service
        cursor.execute("SELECT id,title FROM products")
    
        row = cursor.fetchone()
        while row:
            print(row)
            row = cursor.fetchone()
    
        ##For loop example
        #for row in cursor:
        #    print(row)
    

  4. If you want to avoid to be dependent on a DSN name and creating multiple DSNs for each platform (x86, x64), then you can use a fully qualified connection string. Simply go to your DSN and copy the Connection String . Then in your Python code use Connection String when initializing OdbcConnection object, for example:

    conn = pyodbc.connect('DRIVER={ZappySys API Driver};ServiceUrl=https://yourservices.provider.com/api/xxxx....;AuthName=Http;')
    How to get ZappySys Driver Connection String?

    Please follow the instructions below to retrieve the connection string for the ZappySys driver.

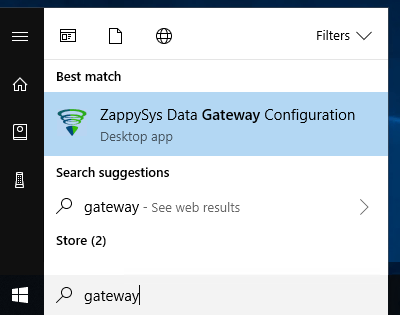
    1. Click on the Windows Start menu.

    2. In the search bar, type ODBC and press Enter.

    3. From the search results, choose ODBC Data Sources or ODBC Data Sources (32-bit) or a similar option depending on your system architecture and ODBC driver configuration.

    4. Choose your data source from the list, then click on the Configure button.
    5. After opening the Data Source UI, you should copy the connection string to a Notepad or text file for reference.
    6. Click on Copy Connection String button.
      When you click 'Copy Connection String,' you may encounter the following option:
      Choose the third option All Settings to copy everything and click on OK button.
      zappysys-data-source-copy-connectionstring
      zappysys-data-source-copy-connectionstring

    That's it connection string has been successfully copied.

How to install `pyodbc` in the Python?

You would need to install pyodbc in Python if you intend to establish connections to databases that support ODBC (Open Database Connectivity). This module facilitates communication between Python applications and various database management systems, enabling you to perform operations such as querying, retrieving data, and managing databases. Here's how you can install pyodbc in Python:

Installation Steps:

  1. Ensure you have Python installed on your system. If not, download it from the official Python website and follow the installation instructions.

  2. Open your terminal or command prompt.

  3. Use the following command to install pyodbc using pip, the Python package installer:

    python -m pip install "pyodbc"

    Make sure you have a stable internet connection and the necessary permissions to install Python packages.
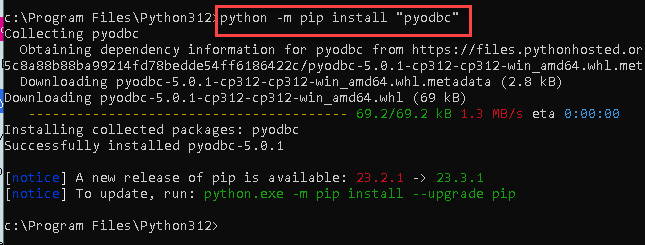

    Python - pip install pyodbc

Reasons to Install:

  • If pyodbc is not installed, your Python script will generate the following error:
    "ModuleNotFoundError: No module named 'pyodbc'"
    .
  • Database Connectivity: pyodbc allows Python to connect to various databases that support ODBC, such as Microsoft SQL Server, PostgreSQL, MySQL, and more.

  • Data Operations: It facilitates the execution of SQL queries, retrieval of data, and other database operations from within Python scripts.

  • Cross-Platform Support: pyodbc is designed to work across different operating systems, including Windows, macOS, and various Linux distributions.

  • Simplicity and Efficiency: The module provides an intuitive interface for managing database transactions and connections, simplifying the process of working with databases in Python.

By installing pyodbc, you can seamlessly integrate your Python applications with a wide range of ODBC-supported databases, enabling efficient and effective data management and analysis.

Create Custom Store Procedure in ZappySys Driver

You can create procedures to encapsulate custom logic and then only pass handful parameters rather than long SQL to execute your API call.

Steps to create Custom Store Procedure in ZappySys Driver. You can insert Placeholders anywhere inside Procedure Body. Read more about placeholders here

  1. Go to Custom Objects Tab and Click on Add button and Select Add Procedure:
    ZappySys Driver - Add Store Procedure

  2. Enter the desired Procedure name and click on OK:
    ZappySys Driver - Add Store Procedure Name

  3. Select the created Store Procedure and write the your desired store procedure and Save it and it will create the custom store procedure in the ZappySys Driver:
    Here is an example stored procedure for ZappySys Driver. You can insert Placeholders anywhere inside Procedure Body. Read more about placeholders here

    CREATE PROCEDURE [usp_get_orders]
        @fromdate = '<<yyyy-MM-dd,FUN_TODAY>>'
     AS
        SELECT * FROM Orders where OrderDate >= '<@fromdate>';
    

    ZappySys Driver - Create Custom Store Procedure

  4. That's it now go to Preview Tab and Execute your Store Procedure using Exec Command. In this example it will extract the orders from the date 1996-01-01:

    Exec usp_get_orders '1996-01-01';

    ZappySys Driver - Execute Custom Store Procedure

  5. Let's generate the SQL Server Query Code to make the API call using store procedure. Go to Code Generator Tab, select language as SQL Server and click on Generate button the generate the code.
    As we already created the linked server for this Data Source, in that you just need to copy the Select Query and need to use the linked server name which we have apply on the place of [MY_API_SERVICE] placeholder.

    SELECT * FROM OPENQUERY([MY_API_SERVICE], 'EXEC usp_get_orders @fromdate=''1996-07-30''')

    ZappySys Driver - Generate SQL Server Query

  6. Now go to SQL served and execute that query and it will make the API call using store procedure and provide you the response.
    ZappySys Driver - Generate SQL Server Query

Create Custom Virtual Table in ZappySys Driver

ZappySys API Drivers support flexible Query language so you can override Default Properties you configured on Data Source such as URL, Body. This way you don't have to create multiple Data Sources if you like to read data from multiple EndPoints. However not every application support supplying custom SQL to driver so you can only select Table from list returned from driver.

If you're dealing with Microsoft Access and need to import data from an SQL query, it's important to note that Access doesn't allow direct import of SQL queries. Instead, you can create custom objects (Virtual Tables) to handle the import process.

Many applications like MS Access, Informatica Designer wont give you option to specify custom SQL when you import Objects. In such case Virtual Table is very useful. You can create many Virtual Tables on the same Data Source (e.g. If you have 50 URLs with slight variations you can create virtual tables with just URL as Parameter setting.

  1. Go to Custom Objects Tab and Click on Add button and Select Add Table:
    ZappySys Driver - Add Table

  2. Enter the desired Table name and click on OK:
    ZappySys Driver - Add Table Name

  3. And it will open the New Query Window Click on Cancel to close that window and go to Custom Objects Tab.

  4. Select the created table, Select Text Type AS SQL and write the your desired SQL Query and Save it and it will create the custom table in the ZappySys Driver:
    Here is an example SQL query for ZappySys Driver. You can insert Placeholders also. Read more about placeholders here

    SELECT
      "ShipCountry",
      "OrderID",
      "CustomerID",
      "EmployeeID",
      "OrderDate",
      "RequiredDate",
      "ShippedDate",
      "ShipVia",
      "Freight",
      "ShipName",
      "ShipAddress",
      "ShipCity",
      "ShipRegion",
      "ShipPostalCode"
    FROM "Orders"
    Where "ShipCountry"='USA'

    ZappySys Driver - Create Custom Table

  5. That's it now go to Preview Tab and Execute your custom virtual table query. In this example it will extract the orders for the USA Shipping Country only:

    SELECT * FROM "vt__usa_orders_only"

    ZappySys Driver - Execute Custom Virtual Table Query

  6. Let's generate the SQL Server Query Code to make the API call using store procedure. Go to Code Generator Tab, select language as SQL Server and click on Generate button the generate the code.
    As we already created the linked server for this Data Source, in that you just need to copy the Select Query and need to use the linked server name which we have apply on the place of [MY_API_SERVICE] placeholder.

    SELECT * FROM OPENQUERY([MY_API_SERVICE], 'EXEC [usp_get_orders] ''1996-01-01''')

    ZappySys Driver - Generate SQL Server Query

  7. Now go to SQL served and execute that query and it will make the API call using store procedure and provide you the response.
    ZappySys Driver - Generate SQL Server Query

Conclusion

In this article we discussed how to connect to Shopify in Python and integrate data without any coding. Click here to Download Shopify Connector for Python and try yourself see how easy it is. If you still have any question(s) then ask here or simply click on live chat icon below and ask our expert (see bottom-right corner of this page).

Download Shopify Connector for Python Documentation 

Actions supported by Shopify Connector

Shopify Connector support following actions for REST API integration. If some actions are not listed below then you can easily edit Connector file and enhance out of the box functionality.
 Get Customers
Gets a list of customers.    [Read more...]
Parameter Description
Customer Id(s) - Comma separated Restrict results to records specified by a comma-separated list of IDs.
 Get Customer
Gets a specific customer.    [Read more...]
 Create a Customer
Creates a new customer.    [Read more...]
 Update a Customer
Updates an existing customer.    [Read more...]
 Delete a Customer
Deletes a specific customer.    [Read more...]
 Get Orders
Gets a list of orders by status, date and other search criteria. By default only Open orders returned. Change Status parameter to any to get all orders.    [Read more...]
Parameter Description
Order Id(s) - Comma separated Restrict results to records specified by a comma-separated list of IDs.
 Get Order
Gets a specific order.    [Read more...]
 Create an Order
Creates a new order.    [Read more...]
 Update an Order
Updates an existing order.    [Read more...]
 Delete an Order
Deletes a specific order.    [Read more...]
 Get Order Items
Gets a list of line items for all orders or the specified order(s).    [Read more...]
Parameter Description
Order Id(s) - Comma separated Restrict results to records specified by a comma-separated list of IDs.
 Get Products
Gets a list of products.    [Read more...]
Parameter Description
Product Id(s) - Comma separated Restrict results to records specified by a comma-separated list of IDs.
 Get Product
Gets a specific product.    [Read more...]
 Get Product Variants
Gets a list of products with their variants.    [Read more...]
Parameter Description
Product Id(s) - Comma separated Restrict results to records specified by a comma-separated list of IDs.
Since Product Id Restrict results created after the specified product ID.
Only Fields to Show Limit data retrieval to only the selected product-related fields.
Option Value
id id
title title
body_html body_html
vendor vendor
product_type product_type
created_at created_at
handle handle
updated_at updated_at
published_at published_at
template_suffix template_suffix
status status
published_scope published_scope
tags tags
admin_graphql_api_id admin_graphql_api_id
variants variants
options options
images images
image image
Created Before Restrict results to products created before a specified date. (format: 2014-04-25T16:15:47-04:00)
Created After Restrict results to products created after a specified date. (format: 2014-04-25T16:15:47-04:00)
Updated Before Restrict results to products last updated before a specified date. (format: 2014-04-25T16:15:47-04:00)
Updated After Restrict results to products last updated after a specified date. (format: 2014-04-25T16:15:47-04:00)
 Update a Product Variant
Updates an existing product variant.    [Read more...]
 Create a Product Variant
Creates a new product variant.    [Read more...]
Parameter Description
Product Id The ID of the product for which you like to create a new variant.
 Create a Product
Creates a new product.    [Read more...]
 Update a Product
Updates an existing product.    [Read more...]
 Delete a product
Deletes a specific product.    [Read more...]
 Delete a product variant
Deletes a specific product variant.    [Read more...]
 Get Payouts
Retrieves a list of all payouts ordered by payout date, with the most recent being first. Requires following permissions shopify_payments_payouts, shopify_payments for API Token.    [Read more...]
Parameter Description
Date (format: yyyy-MM-ddd) Filter the response to payouts made on the specified date.
Option Value
2023-12-31 2023-12-31
today today
yesterday yesterday
monthstart monthstart
monthend monthend
yearstart yearstart
yearend yearend
weekstart weekstart
weekend weekend
yearstart-1y yearstart-1y
yearend-1y yearend-1y
monthstart-1d monthstart-1d
monthend+1d monthend+1d
Date maximum (format: yyyy-MM-ddd) Filter the response to payouts made inclusively before the specified date.
Option Value
2023-12-31 2023-12-31
today today
yesterday yesterday
monthstart monthstart
monthend monthend
yearstart yearstart
yearend yearend
weekstart weekstart
weekend weekend
yearstart-1y yearstart-1y
yearend-1y yearend-1y
monthstart-1d monthstart-1d
monthend+1d monthend+1d
Date minimum(format: yyyy-MM-ddd) Filter the response to payouts made inclusively after the specified date.
Option Value
2023-12-31 2023-12-31
today today
yesterday yesterday
monthstart monthstart
monthend monthend
yearstart yearstart
yearend yearend
weekstart weekstart
weekend weekend
yearstart-1y yearstart-1y
yearend-1y yearend-1y
monthstart-1d monthstart-1d
monthend+1d monthend+1d
Payouts before this Id Filter the response to payouts made before the specified ID.
Payouts after this Id Filter the response to payouts made after the specified ID.
Status Filter the response to payouts made with the specified status.
Option Value
scheduled scheduled
in_transit in_transit
paid paid
failed failed
canceled canceled
 Get Locations
Gets a list of locations.    [Read more...]
 Get Location
Gets a specific location.    [Read more...]
Parameter Description
Location Id The ID of the location for which data should be read.
 Create a Location
Creates a new location.    [Read more...]
 Update a Location
Updates an existing location.    [Read more...]
 Delete a Location
Deletes a specific location.    [Read more...]
 Get Inventory Items
Gets a list of inventory items. Each Product Variant has Inventory Item Id .. Its one to one relationship with Product Variant and Inventory Item. Query get_product_variants to get InventoryItemId and use as Id in this endpoint.    [Read more...]
Parameter Description
Inventory Item Id(s) - Comma separated Restrict results to records specified by a comma-separated list of IDs.
 Get Inventory Levels
Gets inventory level for a specific location and inventory item.    [Read more...]
Parameter Description
inventory_item_ids Inventory Item Id(s) - Comma separated
location_ids Location Id(s) - Comma separated
Updated at or after Show inventory levels updated at or after date (format: 2019-03-19T01:21:44-04:00).
 Update Inventory Levels
   [Read more...]
Parameter Description
Action
Option Value
Adjusts the inventory level adjust
Connects an inventory item to a location connect
Sets the inventory level for an inventory item at a location set
 Insert Inventory Levels
   [Read more...]
Parameter Description
 Get Product
Gets a specific inventory item.    [Read more...]
Parameter Description
Inventory Item Id(s) - Comma separated Restrict results to records specified by a comma-separated list of IDs.
 Update Inventory Item
   [Read more...]
Parameter Description
Inventory Item Id
 Generic Request
This is generic endpoint. Use this endpoint when some actions are not implemented by connector. Just enter partial URL (Required), Body, Method, Header etc. Most parameters are optional except URL.    [Read more...]
Parameter Description
Url API URL goes here. You can enter full URL or Partial URL relative to Base URL. If it is full URL then domain name must be part of ServiceURL or part of TrustedDomains
Body Request Body content goes here
IsMultiPart Check this option if you want to upload file(s) (i.e. POST RAW file data) or send data using Multi-Part encoding method (i.e. Content-Type: multipart/form-data). Multi-Part request allows you to mix key/value and upload files in same request. On the other hand raw upload allows only single file upload (without any key/value) ==== Raw Upload (Content-Type: application/octet-stream) ===== To upload single file in raw mode check this option and specify full file path starting with @ sign in the Body (e.g. @c:\data\myfile.zip ) ==== Form-Data / Multipart Upload (Content-Type: multipart/form-data) ===== To treat your Request data as multi part fields you must specify key/value pairs separated by new lines into RequestData field (i.e. Body). Each key value pair is entered on new-line and key/value are separated using equal sign (=). Preceding and trailing spaces are ignored also blank lines are ignored. If field value has some any special character(s) then use escape sequence (e.g. For NewLine: \r\n, For Tab: \t, For at (@): \@). When value of any field starts with at sign (@) its automatically treated as File you want to upload. By default file content type is determined based on extension however you can supply content type manually for any field using this way [ YourFileFieldName.Content-Type=some-content-type ]. By default File Upload Field always includes Content-Type in the request (non file fields do not have content-type by default unless you supply manually). For some reason if you dont want to use Content-Type header in your request then supply blank Content-Type to exclude this header altogather [e.g. SomeFieldName.Content-Type= ]. In below example we have supplied Content-Type for file2 and SomeField1, all other fields are using default content-type. See below Example of uploading multiple files along with additional fields. If some API requires you to pass Content-Type: multipart/form-data rather than multipart/form-data then manually set Request Header => Content-Type: multipart/mixed (it must starts with multipart/ else will be ignored). file1=@c:\data\Myfile1.txt file2=@c:\data\Myfile2.json file2.Content-Type=application/json SomeField1=aaaaaaa SomeField1.Content-Type=text/plain SomeField2=12345 SomeFieldWithNewLineAndTab=This is line1\r\nThis is line2\r\nThis is \ttab \ttab \ttab SomeFieldStartingWithAtSign=\@MyTwitterHandle
Filter Enter filter to extract array from response. Example: $.rows[*] --OR-- $.customers[*].orders[*]. Check your response document and find out hierarchy you like to extract
Headers Headers for Request. To enter multiple headers use double pipe or new line after each {header-name}:{value} pair

Shopify Connector Examples for Python Connection

This page offers a collection of SQL examples designed for seamless integration with the ZappySys API ODBC Driver under ODBC Data Source (36/64) or ZappySys Data Gateway, enhancing your ability to connect and interact with Prebuilt Connectors effectively.

Get list of products    [Read more...]

SELECT * FROM Products

Get a specific product by its ID    [Read more...]

SELECT * FROM Products WITH Id=1111111111111

Get multiple specific products by their IDs    [Read more...]

SELECT * FROM Products WITH(ids='1111111111111,2222222222222,3333333333333')

Create a new product    [Read more...]

This example shows how to insert a new Shopify product. It also sets Variants

INSERT INTO Products 
(
	 Title
	,Status
	,BodyHtml
	,UrlHandle
	,Vendor
	,ProductType
	,Variants
	,Options
	,Tags
	,Metafields
	,Images	
	)
VALUES	
('Ice Cream'
,'draft'
,'<strong>Very yummy ice cream!</strong>'
,'ice-cream' 
,'Burton'
,'Snowboard' 

,'[
	{"price":10.5, "option1":"Chocolate","option2":"Small","sku":"ICE-CHO-SML","inventory_quantity":100},
	{"price":10.5, "option1":"Chocolate","option2":"Medium","sku":"ICE-CHO-MED","inventory_quantity":100},
	{"price":11.5, "option1":"Vanilla","option2":"Small","sku":"ICE-VNL-MED","inventory_quantity":210}
  ]'

--you must set variants and use atlease one value from the below list in option1, option2 or option3 in any variant entry else it will fail.  
,'[
	{"name":"Color","values":["Chocolate","Vanilla"]}, 
	{"name":"Size","values":["Small","Medium"]}
  ]' 

,'["Frozen","Seasonal","Dad''s Fav"]'

--adding metadata (custom fields) - metadata fields must be created before setting it 
--below are 2 system fields for SEO Title / SEO Description (you dont need to create them unlike custom metadata). These values appears on SEO section
,'[
	{"key":"title_tag","value":"Yum Ice Cream SEO Title", "namespace":"global","type":"single_line_text_field"}, 
	{"key":"description_tag","value":"Yum Ice Cream SEO description", "namespace":"global","type":"single_line_text_field"} 
  ]'

--first image becomes main image if you supply multiple images 
--upload multiple images from URL (set "src")
 , '[	
	{"src":"https://zappysys.com/images/tech/google-analytics-logo.png"},
	{"src":"https://zappysys.com/images/tech/web-api-logo.png"}
  ]'
--OR upload multiple local image files (set "attachment")
--, '[	
--	 {"attachment":"<<c:\temp\icecream_1.png,FUN_FILE_BASE64ENC>>"},
--	 {"attachment":"<<c:\temp\icecream_2.png,FUN_FILE_BASE64ENC>>"}
--  ]'  
  
)

Update an existing product    [Read more...]

This example shows how to update an existing product. Update product title, description (body html), images, variants and more

UPDATE Products
SET Title='Ice Cream - Updated'
 , Status='draft' --active, archived, draft  
 , BodyHtml='<strong>Very yummy ice cream - updated!</strong>'  
--first image becomes main image if you supply multiple images 
--upload multiple images from URL (set "src")
 , Images='[	
	{"src":"https://zappysys.com/images/tech/google-analytics-logo.png"},
	{"src":"https://zappysys.com/images/tech/web-api-logo.png"}
  ]'
--OR upload multiple local image files (set "attachment")
--, Images='[	
--	 {"attachment":"<<c:\temp\icecream_1.png,FUN_FILE_BASE64ENC>>"},
--	 {"attachment":"<<c:\temp\icecream_2.png,FUN_FILE_BASE64ENC>>"}
--  ]'

 , Variants='[
	{"price":20.5, "option1":"Chocolate","option2":"Small","sku":"ICE-CHO-SML","inventory_quantity":300},
	{"price":21.5, "option1":"Vanilla","option2":"Small","sku":"ICE-VNL-MED","inventory_quantity":110}
  ]'
, PublishedScope='global' --or web
, Vendor ='IceGlobal'
, ProductType ='Cold Food'
, Tags ='["Frozen","Seasonal","Dad''s Fav"]'
--Update SEO URL
 ,UrlHandle='ice-cream-51' 
--Update SEO title / description
, SEOTitle='Yum Ice Cream SEO Title-update'  
, SEODescription='Yum Ice Cream SEO description-update'  
Where Id=7348335771748

Delete an existing product    [Read more...]

This example shows how to delete an existing product.

DELETE FROM Products
Where Id=7348335771748

Get list of all product variants    [Read more...]

SELECT * FROM ProductVariants

Get all product variants by a specific product ID    [Read more...]

SELECT * FROM ProductVariants Where ProductId='1111111111111'

Get all product variants by multiple specific product IDs    [Read more...]

SELECT * FROM ProductVariants WITH(ids='1111111111111,2222222222222,3333333333333')

Create a new product variant    [Read more...]

This example shows how to create a new product variant.

INSERT INTO ProductVariants (ProductId, Option1, Option2,SKU,Price,CompareAtPrice,Position,Weight,WeightUnit,ImageId)
Values(7348335771748, 'Chocolate', 'Medium', 'ICE-CHO-MED', 195.5, 200.5, 3, 20.5, 'lb', 31900013854820)

Update product variant price, image, weight    [Read more...]

This example shows how to update product variant price, image, weight and other attributes.

Update ProductVariants 
SET  
	,Option1='Chocolate' 
	,Option2='Large'
	,SKU='ICE-CHO-SML'
	,Price=90.45
	,CompareAtPrice=100.45
	,Position=2
	,Weight=10.5
	,WeightUnit='lb'
	,ImageId=31900013854820  --use available images from Products table
Where Id=42564507992164

Delete an existing product variant    [Read more...]

This example shows how to delete an existing product variant by Variant Id.

DELETE FROM ProductVariants 
WHERE Id=31900013854820

Get list of customers    [Read more...]

SELECT * FROM Customers

Get a specific customer by its ID    [Read more...]

SELECT * FROM Customers Where Id=12345

Get multiple specific customers by their IDs    [Read more...]

SELECT * FROM Customers
WITH (ids='1111111111111,2222222222222,3333333333333')

Insert a new customer record    [Read more...]

INSERT INTO Customers
(FirstName, LastName, Email, Phone, Password, PasswordConfirmation, SendWelcomeEmail, MultipassIdentifier, Note, Tags, TaxExempt, TaxExemptions, DefaultAddressFirstName, DefaultAddressLastName, DefaultAddressCompany, DefaultAddressLine1, DefaultAddressLine2, DefaultAddressCity, DefaultAddressProvince, DefaultAddressCountry, DefaultAddressZip, DefaultAddressPhone, DefaultAddressName, DefaultAddressProvinceCode, DefaultAddressCountryCode, DefaultAddressCountryName)
VALUES
('John', 'Doe', 'john.doe@gmail.com', '7705553543', 'myNewP@ssword123', 'myNewP@ssword123', 1, null, 'This is a note on the customer account.', null, 0, null, 'John', 'Doe', 'John Doe Corp.', '123 Main Street', null, 'Atlanta', 'Georgia', 'United States', '30135', '7705553543', 'John Doe', 'GA', 'US', 'United States')

Insert a new customer record using RAW JSON Body (special column _rawdoc_)    [Read more...]

Sometimes you have need to INSERT or UPDATE certain arrtibutes for which input columns not defined. In this case you can supply entire BODY JSON as input using special column name _rawdoc_

INSERT INTO Customers(_rawdoc_)
VALUES('{"customer":{"first_name":"John","last_name":"Doe","email":"a.doe@gmail.com","phone":"7705553111"}}')

Insert customers in BULK (read from external MS SQL database)    [Read more...]

In this example we are reading customer Name, Email, Phone from external source system (Microsoft SQL Server) and sending it to Shopify. Your column name must match with Input columns of the table. See other BULK examples to learn more about reading from other systems using ODBC or OLEDB connection.

INSERT INTO Customers(FirstName, LastName, Email, Phone)
SOURCE('MSSQL'
  ,'Data Source=localhost;Initial Catalog=tempdb;Integrated Security=true'
  ,'select ''John'' as FirstName, ''Doe'' as LastName, ''a.doe@gmail.com'' as Email, ''7705553111'' as Phone'
)

Insert customers in BULK using RAW JSON Body (read from external MS SQL database)    [Read more...]

In this example we are reading customer Name, Email, Phone from external source system (Microsoft SQL Server) and sending it to Shopify. Your column name must match with Input columns of the table. See other BULK examples to learn more about reading from other systems using ODBC or OLEDB connection.

INSERT INTO Customers
SOURCE('MSSQL'
	,'Data Source=localhost;Initial Catalog=tempdb;Integrated Security=true'
	,'select ''{"customer":{"first_name":"Cust1","last_name":"Doe1","email":"a.doe@gmail.com","phone":"7705553111"}}'' as _rawdoc_
	 UNION 
	 select ''{"customer":{"first_name":"Cust2","last_name":"Doe2","email":"b.doe@gmail.com","phone":"7705553222"}}'' as _rawdoc_
	 '
	)

Update an existing customer record    [Read more...]

UPDATE Customers SET
  Email = 'john.doe2@gmail.com',
  Phone = '7705553445',
  Note= 'This is a new note that needed to be added later.'
  WHERE Id=1111111111111

Update an existing customer record using RAW JSON Body (special column _rawdoc_)    [Read more...]

Sometimes you have need to INSERT or UPDATE certain arrtibutes for which input columns not defined. In this case you can supply entire BODY JSON as input using special column name _rawdoc_

UPDATE Customers
SET _rawdoc_='{"customer":{"first_name":"John_new","last_name":"Doe_new","email":"a_new.doe@gmail.com","phone":"7705553111"}}'
WHERE Id=1111111111111

Update an existing customer record    [Read more...]

UPDATE Orders SET
  FulfillmentStatus = 'john.doe5@gmail.com',
  Phone = '7705553111',
  Note= 'This is a new note that needed to be added to the order later.'
WHERE Id=1111111111111

Update customers in BULK (read from external MS SQL database)    [Read more...]

In this example we are reading customer Ids, Email, Notes from external source system (Microsoft SQL Server) and sending it to Shopify. Your column name must match with Input columns of the table you trying to update. See other BULK examples to learn more about reading from other systems using ODBC or OLEDB connection.

UPDATE Customers
SOURCE('MSSQL'
 ,'Data Source=localhost;Initial Catalog=tempdb;Integrated Security=true'
 ,'select 111 as Id, ''a@a.com''Email , ''SOLD'' as Note,0 as [$$ContineOn404Error]
  UNION
  select 222 as Id, ''b@b.com''Email , ''SOLD'' as Note,0 as [$$ContineOn404Error]
  '
)

Delete a customer record    [Read more...]

DELETE Customers WHERE Id=1111111111111

Delete a customer record (throw error if not found)    [Read more...]

DELETE Customers WHERE Id=1111111111111 (ContineOn404Error=0)

Delete customers in BULK (read Id from external MS SQL database)    [Read more...]

In this example we are reading customer Ids from external source system (Microsoft SQL Server) and sending it to Shopify. See other BULK examples to learn more about reading from other systems using ODBC or OLEDB connection.

DELETE FROM Customers
SOURCE('MSSQL'
  ,'Data Source=localhost;Initial Catalog=tempdb;Integrated Security=true'
  ,'select 111 as Id,1 as [$$ContineOn404Error]
    UNION
    select 222 as Id,1 as [$$ContineOn404Error]
   '
)

Get all orders    [Read more...]

SELECT * FROM Orders

Get open orders    [Read more...]

SELECT * FROM Orders WITH (Status='open') --also try 'any', 'open', 'closed', 'cancelled'

Get a specific order by its ID    [Read more...]

SELECT * FROM Orders Where Id=1111111111111

Get multiple specific orders by their IDs    [Read more...]

SELECT * FROM Orders WITH(ids='1111111111111,2222222222222,3333333333333')

Delete an order record    [Read more...]

DELETE Orders WHERE Id=1111111111111

Delete an order record (throw error if not found)    [Read more...]

DELETE Orders WHERE Id=1111111111111 (ContineOn404Error=0)

Get line items for all orders    [Read more...]

SELECT * FROM OrderItems

Get line items for a specific order by the order ID    [Read more...]

SELECT * FROM OrderItems Where OrderId=1111111111111

Get line items for multiple specific orders by their order IDs    [Read more...]

SELECT * FROM OrderItems WITH(ids='1111111111111,2222222222222,3333333333333')

Insert a new order record    [Read more...]

INSERT INTO Orders (BillingAddressLine1, BillingAddressLine2, BillingAddressCity, BillingAddressCompany, BillingAddressCountry, BillingAddressFirstName, BillingAddressLastName, BillingAddressPhone, BillingAddressProvince, BillingAddressZip, BillingAddressName, BillingAddressProvinceCode, BillingAddressCountryCode, BuyerAcceptsMarketing, LineItems, CustomerId, Email, EstimatedTaxes, FinancialStatus, FulfillmentStatus, Name, Note, Phone, Currency, PresentmentCurrency, ProcessedAt, ReferringSite, ShippingAddressLine1, ShippingAddressLine2, ShippingAddressCity, ShippingAddressCompany, ShippingAddressCountry, ShippingAddressFirstName, ShippingAddressLastName, ShippingAddressPhone, ShippingAddressProvince, ShippingAddressZip, ShippingAddressName, ShippingAddressProvinceCode, ShippingAddressCountryCode, Tags, TaxesIncluded, TotalWeight, SendReceipt, SendFulfillmentReceipt)
VALUES
('123 Main Street', 'Suite #54', 'Memphis', 'Acme, Inc.', 'United States', 'John', 'Doe', '4045559876', 'Tennessee', '38101', 'John Doe', 'GA', 'US', 1, '[{"title":"Super Strong Glue","price":24.99,"grams":"100","quantity":1,"tax_lines":[{"price":13.5,"rate":0.06,"title":"State tax"}]}]', 5945175474276, 'johndoe2@gmail.com', 1, 'pending', null, '#40294', 'This order needs to be expedited, so register it in the system as so.', '4045559876', 'USD', 'USD', '2023-02-27T11:00:00', 'https://referringsite.com', '123 Main Street', 'Suite #54', 'Memphis', 'Acme, Inc.', 'United States', 'John', 'Doe', '4045559876', 'Tennessee', '38101', 'John Doe', 'GA', 'US', NULL, 1, 20, 1, 1)

Get inventory levels for all locations    [Read more...]

Query inventory levels for all locations. If you get URL Too long error then manually supply location ids in the query (see other example)

select * from InventoryLevels 
		--WITH(location_ids='43512280416356, 44648752676964, ..... upto 300 to 500 more - until you hit URL limit error')

Get inventory level for multiple item inventory id(s)    [Read more...]

If you get URL Too long error then reduce inventory_item ids in the query (approx 300-400 ids per call allowed)

select * from InventoryLevels WITH (inventory_item_ids='43512280416356, 44648752676964')

Get inventory level for specific location id(s) (i.e. Physcical Store / POS )    [Read more...]

If you get URL Too long error then reduce location ids in the query (approx 300-400 ids per call allowed)

select * from InventoryLevels WITH (location_ids='43512280416356, 44648752676964')

Get inventory level for specific inventory / location id(s)    [Read more...]

select * from InventoryLevels WITH (inventory_item_ids='43512280416356, 44648752676964' , location_ids='111100034, 111100055')

Adjust inventory level for a specific inventory / location id(s)    [Read more...]

Adjusts the inventory level of an inventory item at a single location

UPDATE InventoryLevels 
SET AvailableAdjustment=488, 
    LocationId=25801916516
WHERE InventoryItemId=43512276942948
WITH(
 Action='Adjust' --or set or connect
, ContineOn404Error=0 
)

Set / insert inventory with a specific inventory item and location id    [Read more...]

Sets the inventory level for an inventory item at a location. If the specified location is not connected, it will be automatically connected first. When connecting inventory items to locations

UPDATE InventoryLevels 
SET LocationId=25801916516
  ,Available=488 
WHERE InventoryItemId=43512276942948
WITH(
 Action='set' --or adjust or connect
, ContineOn404Error=0 
)

--OR--
/*
INSERT INTO InventoryLevels (InventoryItemId,LocationId,Available)
VALUES(43512276942948, 25801916516, 488)
--WITH( ContineOn404Error=0 )
*/

Connects an inventory item to a location    [Read more...]

Connects an inventory item to a location by creating an inventory level at that location.

UPDATE InventoryLevels 
SET LocationId=25801916516
WHERE InventoryItemId=43512276942948
WITH(
 Action='connect' --or adjust or set
, ContineOn404Error=0 
)

Set inventory with a specific inventory item and location id - generic API    [Read more...]

If you get URL Too long error then reduce location ids in the query (approx 300-400 ids per call allowed)

SELECT * FROM generic_request 
WITH (
    URL='/inventory_levels/set.json'
  --OR Use full URL
  --URL='https://MY-STORE-HERE.myshopify.com/admin/api/2023-01/inventory_levels/set.json'
  	
  , RequestMethod='POST'
  , Body='{"location_id":25801916516,"inventory_item_id":43512280416356,"available":42}' --needed if you call PUT, POST
  , Filter='$.inventory_level' --change table name here
  , Headers='Content-Type: application/json'
  , Meta='inventory_item_id:long; location_id:long; available:int; updated_at: datetime'
)

Get inventory item by id    [Read more...]

You can find Inventory Item Id in ProductVariants table. ProductVariant has One-to-One mapping with InventoryItems table

select * from InventoryItems Where Id=43512280416356

Get inventory item by id    [Read more...]

You can find Inventory Item Id in ProductVariants table. ProductVariant has One-to-One mapping with InventoryItems table

select * from InventoryItems Where Id=43512280416356

Get inventory items by multiple Ids    [Read more...]

Query multiple InventoryItems by Ids (Comma separated list). You can find Inventory Item Id in ProductVariants table. ProductVariant has One-to-One mapping with InventoryItems table

select * from InventoryItems WITH(Ids='43512280416356, 43512280449124')

Update an existing inventory item cost and other attributes    [Read more...]

UPDATE InventoryItems
SET Cost='25.55'
WHERE Id=43512280416356

Generic Query using Shopify admin GraphQL API    [Read more...]

This example shows how to invoke GraphQL query for very generic data read/write. For more information on GraphQL API visit this link https://shopify.dev/docs/api/admin/getting-started

SELECT * FROM generic_request 
WITH (
    URL='/graphql.json'
  --OR Use full URL
  --URL='https://MY-STORE-HERE.myshopify.com/admin/api/2023-10/graphql.json'
  
  , RequestMethod='POST'
  , Filter='$.data.products.nodes' --change table name here e.g. products
  , Headers='Content-Type: application/json'
  --change table name and columns below here e.g. products... and id, title etc
  -- change pagesize if needed (i.e. max 250)
  , Body='{
 "query" : "<<{
 
 products(first: 250 [$tag$])
 {
    nodes {
      id
      title
      createdAt
    }
    
    pageInfo {
      hasNextPage
      endCursor
    }
    
  }
  
},FUN_JSONENC>>"
}'
	, NextUrlAttributeOrExpr='$.data.products.pageInfo.endCursor' --change table name 
	, NextUrlEndIndicator='false'
	, StopIndicatorAttributeOrExpr='$.data.products.pageInfo.hasNextPage' --change table name 
	, UseConnection='True'
	, EnablePageTokenForBody='True'
	, HasDifferentNextPageInfo='True'
	, NextPageBodyPart='after: \"[$pagetoken$]\"'
	--Use metadata to speed up execution. To get Metadata Run query without Meta clause. 
	-- Then click View Metadata button found in Botttom Result Grid Toolbar. Get Compact format and paste below
	--, Meta='id:String(255); title:String(255); createdAt:DateTime; '
)

Generic Query using Shopify admin REST API    [Read more...]

This example shows how to invoke pretty much any REST API for generic data read/write. For more information on REST API visit this link https://shopify.dev/docs/api/admin/getting-started

SELECT * FROM generic_request 
WITH (
    URL='/products.json'
  --OR Use full URL
  --URL='https://MY-STORE-HERE.myshopify.com/admin/api/2023-01/products.json'
  	
  , RequestMethod='GET'
  , Body='{}' --needed if you call PUT, POST
  , Filter='$.products[*]' --change table name here
  , Headers='Content-Type: application/json'
  , PagingMode='ByResponseHeaderRfc5988'
  
  
  --Use metadata to speed up execution. To get Metadata Run query without Meta clause. 
  --Then click View Metadata button found in Botttom Result Grid Toolbar. Get Compact format and paste below
  , Meta='id:String(255); title:String(255); created_at:DateTime; '
)

Other App Integration scenarios for Shopify

Other Connectors for Python


Download Shopify Connector for Python Documentation 

  • How to connect Shopify in Python?

  • How to get Shopify data in Python?

  • How to read Shopify data in Python?

  • How to load Shopify data in Python?

  • How to import Shopify data in Python?

  • How to pull Shopify data in Python?

  • How to push data to Shopify in Python?

  • How to write data to Shopify in Python?

  • How to POST data to Shopify in Python?

  • Call Shopify API in Python

  • Consume Shopify API in Python

  • Shopify Python Automate

  • Shopify Python Integration

  • Integration Shopify in Python

  • Consume real-time Shopify data in Python

  • Consume realtime Shopify API data in Python

  • Shopify ODBC Driver | ODBC Driver for Shopify | ODBC Shopify Driver | SSIS Shopify Source | SSIS Shopify Destination

  • Connect Shopify in Python

  • Load Shopify in Python

  • Load Shopify data in Python

  • Read Shopify data in Python

  • Shopify API Call in Python