Shopify Connector for Azure Data Factory (SSIS)
Shopify Connector can be used to integrate Shopify REST API in your App / BI Tools. You can read/write data about Customers, Orders, OrderItems, Products and more.
In this article you will learn how to quickly and efficiently integrate Shopify data in Azure Data Factory (SSIS) without coding. We will use high-performance Shopify Connector to easily connect to Shopify and then access the data inside Azure Data Factory (SSIS).
Let's follow the steps below to see how we can accomplish that!
Shopify Connector for Azure Data Factory (SSIS) is based on ZappySys API Connector Framework which is a part of SSIS PowerPack. It is a collection of high-performance SSIS connectors that enable you to integrate data with virtually any data provider supported by SSIS, including SQL Server. SSIS PowerPack supports various file formats, sources and destinations, including REST/SOAP API, SFTP/FTP, storage services, and plain files, to mention a few (if you are new to SSIS and SSIS PowerPack, find out more on how to use them).
Prerequisites
Before we begin, make sure the following prerequisites are met:
- SSIS designer installed. Sometimes it is referred as BIDS or SSDT (download it from Microsoft).
- Basic knowledge of SSIS package development using Microsoft SQL Server Integration Services.
- SSIS PowerPack is installed (if you are new to SSIS PowerPack, then get started!).
Create SSIS package
First of all, create an SSIS package, which will connect to Shopify in SSIS. Once you do that, you are one step closer to deploying and running it in Azure-SSIS integration runtime in Azure Data Factory (ADF). Then simply proceed to the next step - creating and configuring Azure Blob Storage Container.
Prepare custom setup files for Azure-SSIS runtime
Now it's time to start preparing custom setup files for Azure-SSIS runtime. During Azure-SSIS runtime creation you can instruct ADF to perform a custom setup on a VM (Azure-SSIS node); i.e. to run the custom installer, copy files, execute PowerShell scripts, etc. In that case, your custom setup files are downloaded and run in the Azure-SSIS node (a VM) when you start the runtime. In this section we will prepare custom setup files so that you can run SSIS packages with SSIS PowerPack connectors inside in Azure-SSIS runtime.
Trial Users
Use the step below if you are a Trial User, when you did not purchase a license key. Proceed with these steps:
-
Download SSIS PowerPack trial installer.
Make sure you don't rename the installer and keep it named as SSISPowerPackSetup_64bit_Trial.msi.
- Create a text file and name it main.cmd (make it all lowercase, very important).
-
Copy and paste this script into it and save it:
set DIR=%CUSTOM_SETUP_SCRIPT_LOG_DIR%

echo Calling Step 1 : %TIME% >> "%DIR%\steps_log.txt"
dir /s /b > "%DIR%\file_list.txt"

echo Calling Step 2 : %TIME% >> "%DIR%\steps_log.txt"

::Install SSIS PowerPack
msiexec /i  "SSISPowerPackSetup_64bit_Trial.msi" ADDLOCAL=ALL /q  /L*V "%DIR%\powerpack_trial_install_log.txt"

echo Calling Step 3 : %TIME% >> "%DIR%\steps_log.txt"
dir "C:\Program Files\Microsoft SQL Server\*Zappy*.*"  /s /b >> "%DIR%\installed_files.txt"
dir "C:\Program Files (x86)\Microsoft SQL Server\*Zappy*.*"  /s /b >> "%DIR%\installed_files.txt"

echo DONE : %TIME% >> "%DIR%\steps_log.txt"

echo complete
This is the entry-point script that is executed when Azure-SSIS runtime is started. - At last! You are ready to upload these two files — main.cmd & SSISPowerPackSetup_64bit_Trial.msi — into your Azure Blob Storage container's folder, which we will do in the Upload custom setup files to Azure Blob Storage container step.
Paid Customers
Use the steps below if you are a Paid Customer, when you purchased a license. Proceed with these steps:
-
Download SSIS PowerPack paid installer.
Make sure you don't rename the installer and keep it named as SSISPowerPackSetup_64bit.msi.
- Have your SSIS PowerPack license key handy, we will need it in the below script.
- Create a text file and name it main.cmd (make it all lowercase, very important).
- Copy and paste the below script into it.
- Paste your license key by replacing parameter's
--registerargument with your real license key. -
Finally, save main.cmd:
set DIR=%CUSTOM_SETUP_SCRIPT_LOG_DIR%

echo Calling Step 1 : %TIME% >> "%DIR%\steps_log.txt"
dir /s /b > "%DIR%\file_list.txt"

echo Calling Step 2 : %TIME% >> "%DIR%\steps_log.txt"

::Install SSIS PowerPack
msiexec /i  "SSISPowerPackSetup_64bit.msi" ADDLOCAL=ALL /q  /L*V "%DIR%\powerpack_install_log.txt"

echo Calling Step 3 : %TIME% >> "%DIR%\steps_log.txt"

::Activate PowerPack license (Optional)
"C:\Program Files (x86)\ZappySys\SSIS PowerPack (64 bit)\LicenseManager.exe" -p SSISPowerPack --register "lgGAAO0-----REPLACE-WITH-YOUR-LICENSE-KEY-----czM=" --logfile "%DIR%\powerpack_register_log.txt"

::Show System Info
echo Calling Step 4 : %TIME% >> "%DIR%\steps_log.txt"
"C:\Program Files (x86)\ZappySys\SSIS PowerPack (64 bit)\LicenseManager.exe" -i -l "%DIR%\sysinfo_log.txt"

echo Calling Step 5 : %TIME% >> "%DIR%\steps_log.txt"
dir "C:\Program Files\Microsoft SQL Server\*Zappy*.*"  /s /b >> "%DIR%\installed_files.txt"
dir "C:\Program Files (x86)\Microsoft SQL Server\*Zappy*.*"  /s /b >> "%DIR%\installed_files.txt"

echo DONE : %TIME% >> "%DIR%\steps_log.txt"

echo complete
This is the entry-point script that is executed when Azure-SSIS runtime is started. - At last! You are ready to upload these two files — main.cmd & SSISPowerPackSetup_64bit.msi — into your Azure Blob Storage container's folder, which we will do in the Upload custom setup files to Azure Blob Storage container step.
Upload custom setup files to Azure Blob Storage container
Within Azure Blob Storage container we will store custom setup files we prepared in the previous step so that Azure-SSIS can use them in custom setup process. Just perform these very simple, but very important steps:
-
Create Azure Blob Storage container, if you haven't done it already
Make sure you create and use Azure Blob Storage container instead of Azure Data Lake Storage folder. Azure Data Lake Storage won't allow creating an SAS URI for the container, which is a crucial step in the process.
-
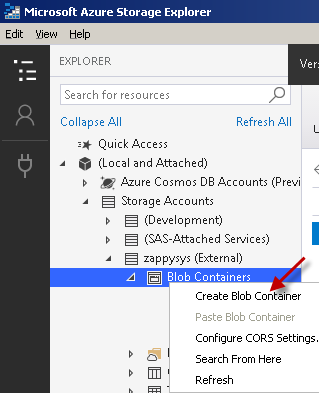
Find Blob Containers node, right-click on it and hit Create Blob Container option:
-
Upload the two custom setup files — main.cmd & the MSI installer — into your Azure Blob Storage container's folder:
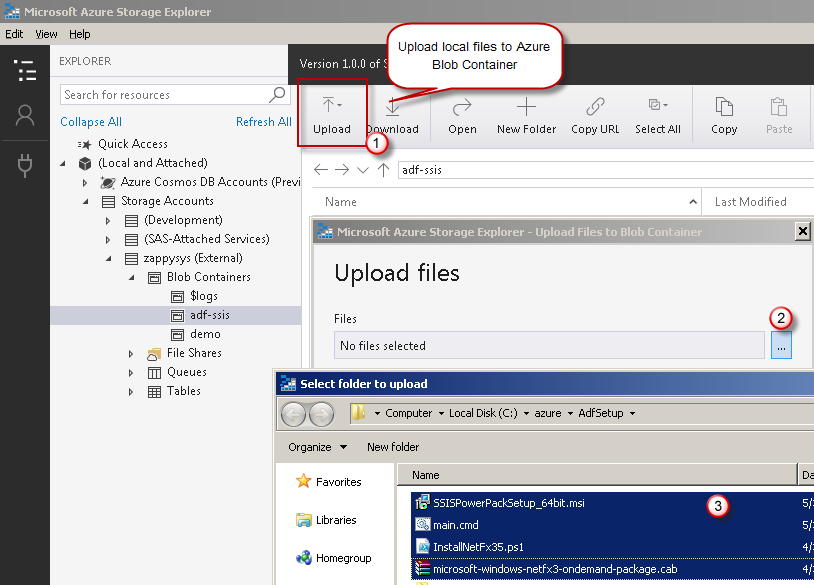
- It was easy, wasn't it? It's time we create an SAS URI in the next step.
Create SAS URI for Azure Blob Container
Once you have custom setup files prepared, it's time we generate an SAS URI. This SAS URI will be used by a new Azure-SSIS runtime to install SSIS PowerPack inside the runtime's node, a VM. Let's proceed together by performing the steps below:
- Install and launch Azure Storage Explorer.
-
Right-click on the Storage Accounts node and then hit Connect to Azure storage... menu item:
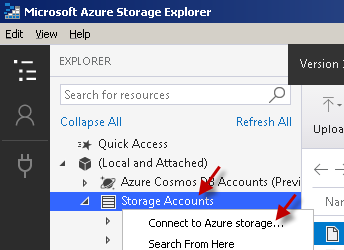
- Proceed by right-clicking on that container node and select Get Shared Access Signature... option.
-
Next, set the Expiry time field to a date far in the future.
If you restart Azure-SSIS runtime and your SAS URI is expired by that time, it will not start.
-
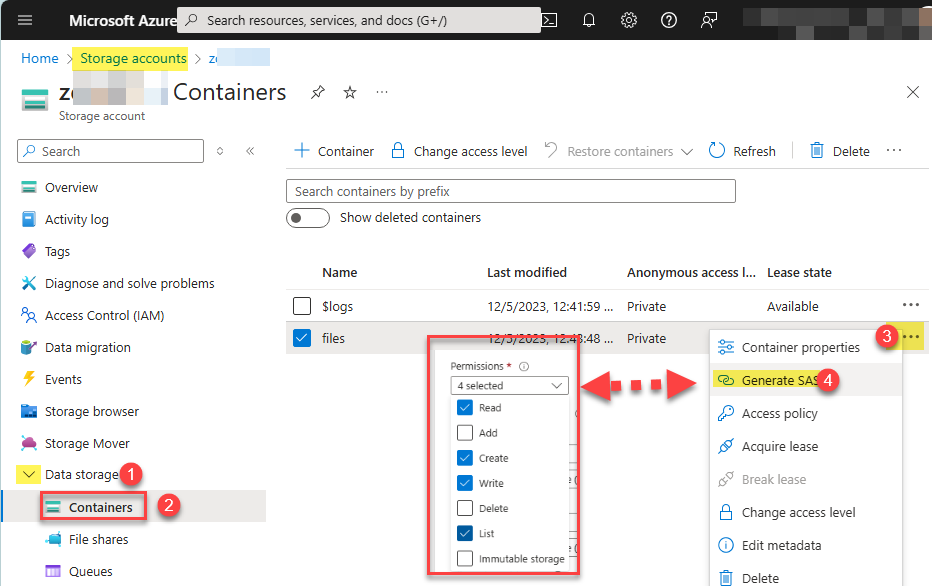
Select Read, Create, Write, and List permissions:
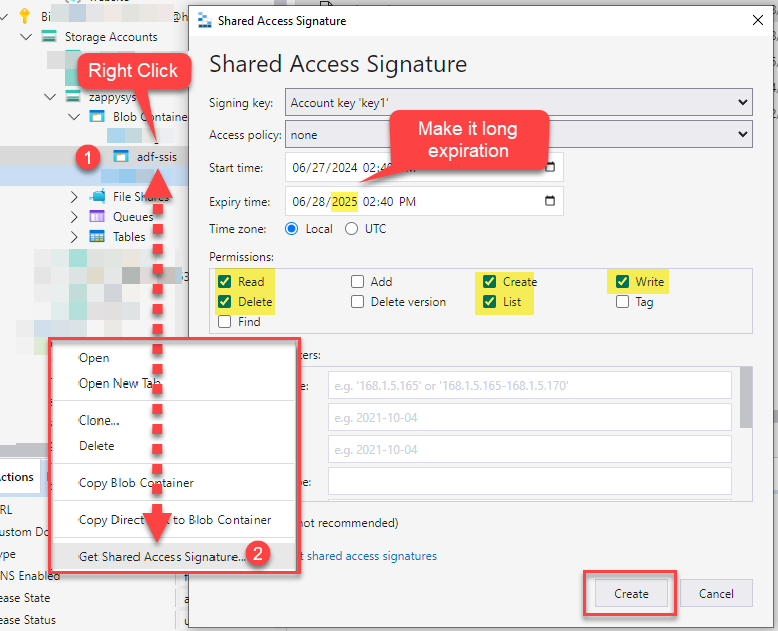 We also recommend to add Delete permission too to support future functionality.
 -
Copy SAS URL to the clipboard and save it for the next step:
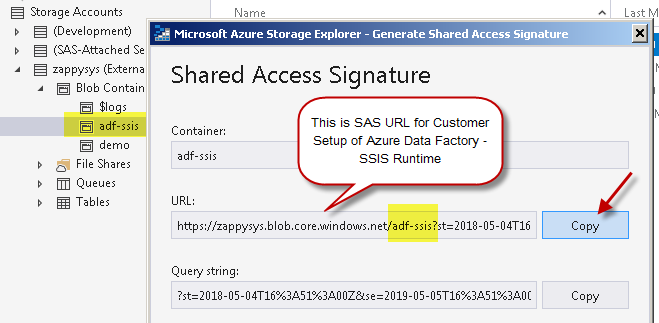 You can also generate and copy SAS URL from within Azure Portal itself:
Create Azure-SSIS integration runtime
Once you have the SAS URL we obtained in the previous step, we are ready to move on to create an Azure-SSIS runtime in Azure Data Factory:
- Firstly, perform the steps described in Create an Azure-SSIS integration runtime article in Azure Data Factory reference.
-
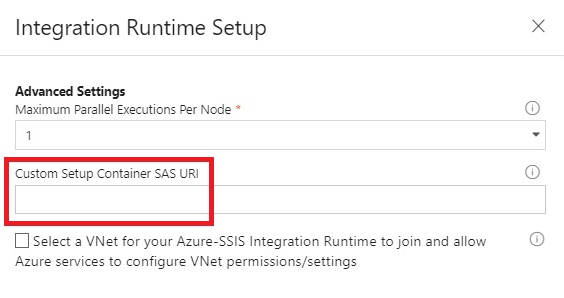
In Advanced settings page section, configure Custom setup container SAS URI you obtained in the previous step:
-
And you are done! That was quick! You can see your Azure-SSIS runtime up and running:

The custom setup script is executed only once — at the time an Azure-SSIS runtime is started.
It is also executed if you stop and start Azure-SSIS runtime again.
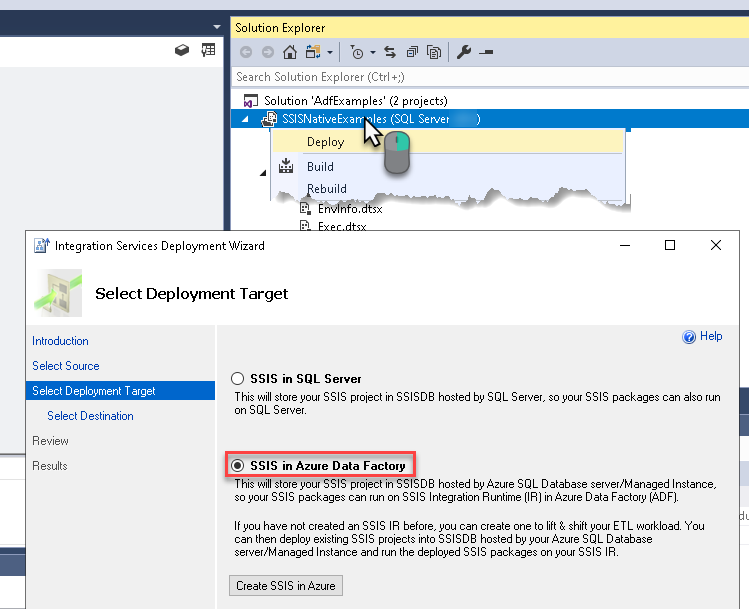
Deploy SSIS package in Visual Studio
We are ready to deploy the SSIS package to Azure-SSIS runtime. Once you do that, proceed to the next step for the grand finale!
Execute SSIS package in SQL Server Management Studio (SSMS)
After all hard work, we are ready to execute SSIS package in SQL Server Management Studio (SSMS):
- Connect to the SQL Server which is linked to your Azure-SSIS runtime and contains SSISDB database.
-
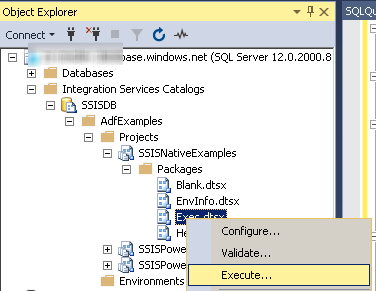
Navigate to Integration Services Catalog » Your Folder » Your Project » Your Package, right-click on it, and hit Execute...:
-
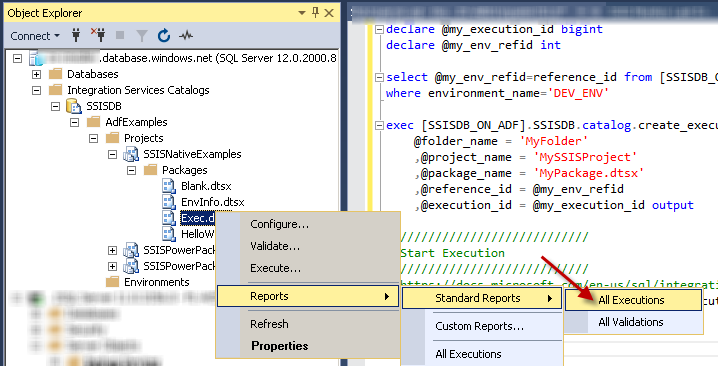
To view the status of the past execution, navigate to
Integration Services Catalog » Your Folder » Your Project » Your Package, right-click on it, and select Reports » Standard Reports » All Executions menu item:
Scenarios
Transferring SSIS PowerPack license
As an existing ZappySys customer, you might be using your SSIS PowerPack license in an Azure-SSIS Integration Runtime.
If you decide to move your SSIS package execution to a new machine, you will also need to transfer your license.
To accomplish this, perform the following steps:
-
Copy & paste this script into main.cmd we used in the previous step:
set DIR=%CUSTOM_SETUP_SCRIPT_LOG_DIR% echo Calling Step 1 : %TIME% >> "%DIR%\steps_log.txt" dir /s /b > "%DIR%\file_list.txt" echo Calling Step 2 : %TIME% >> "%DIR%\steps_log.txt" ::Install SSIS PowerPack msiexec /i "SSISPowerPackSetup_64bit.msi" ADDLOCAL=ALL /q /L*V "%DIR%\powerpack_install_log.txt" echo Calling Step 3 : %TIME% >> "%DIR%\steps_log.txt" ::De-Activate same license "C:\Program Files (x86)\ZappySys\SSIS PowerPack (64 bit)\LicenseManager.exe" -p SSISPowerPack --unregister --logfile "%DIR%\powerpack_un_register_log.txt" ::Show System Info echo Calling Step 4 : %TIME% >> "%DIR%\steps_log.txt" "C:\Program Files (x86)\ZappySys\SSIS PowerPack (64 bit)\LicenseManager.exe" -i -l "%DIR%\sysinfo_log.txt" echo Calling Step 5 : %TIME% >> "%DIR%\steps_log.txt" dir "C:\Program Files\Microsoft SQL Server\*Zappy*.*" /s /b >> "%DIR%\installed_files.txt" dir "C:\Program Files (x86)\Microsoft SQL Server\*Zappy*.*" /s /b >> "%DIR%\installed_files.txt" echo DONE : %TIME% >> "%DIR%\steps_log.txt" echo complete -
Start the Azure-SSIS runtime.
This will unregister your license on the original Azure-SSIS runtime. -
Check the
powerpack_un_register_log.txtlog file in Azure Blob Storage folder to make sure the license was deactivated successfully. -
Stop the Azure-SSIS runtime to deallocate resources in Azure.
-
You can now activate the license on another machine or Azure-SSIS runtime.
Actions supported by Shopify Connector
Learn how to perform common Shopify actions directly in Azure Data Factory (SSIS) with these how-to guides:
- Create a Customer
- Create a Location
- Create a Product
- Create a Product Variant
- Create an Order
- Delete a Customer
- Delete a Location
- Delete a product
- Delete a product variant
- Delete an Order
- Get Customer
- Get Customers
- Get Inventory Item
- Get Inventory Items
- Get Inventory Levels
- Get Location
- Get Locations
- Get Order
- Get Order Items
- Get Orders
- Get Orders Count
- Get Payouts
- Get Product
- Get Product Variants
- Get Products
- Get Products Count
- Insert Inventory Levels
- Update a Customer
- Update a Location
- Update a Product
- Update a Product Variant
- Update an Order
- Update Inventory Item
- Update Inventory Levels
- Make Generic API Request
- Make Generic API Request (Bulk Write)
Conclusion
In this article we showed you how to connect to Shopify in Azure Data Factory (SSIS) and integrate data without any coding, saving you time and effort.
We encourage you to download Shopify Connector for Azure Data Factory (SSIS) and see how easy it is to use it for yourself or your team.
If you have any questions, feel free to contact ZappySys support team. You can also open a live chat immediately by clicking on the chat icon below.
Download Shopify Connector for Azure Data Factory (SSIS) Documentation


