
Authentication Admin Access Token (Custom App)
Description
No description available [API reference]
Instructions
Method: Admin API Access Token (Recommended for Single-Store Connections)
This method uses a permanent Admin API Access Token generated from a "Custom App" within your Shopify Admin. This is the simplest way to connect if you are only integrating with your own store.
Quick Setup Summary:
- Log in to your Shopify Admin and click Settings (the gear icon in the bottom left).
- Select Apps from the left-side settings menu.
- Click the Develop apps button at the top right of the page.
- Open your app (or create a new one) and configure the necessary Admin API access scopes.
- Click Install app. Once installed, navigate to the API credentials tab.
Important: Your Admin API access token (shpat_xxx) is only revealed once. Please copy and store it securely immediately after clicking "Reveal token once."
Note: If you are using the Shopify Dev Dashboard (via a Partner Account), you must use the OAuth Authorization Code Grant method, as those apps do not issue permanent 'shpat' tokens.
Video Tutorial: How to Get Admin API Access Token in Shopify?
Part 1: Create and Configure the Shopify App
- Visit https://accounts.shopify.com and log into your Shopify store account.
- After logging in, select the store you wish to connect to.
- Select Settings (gear icon in the lower-left corner) to launch the Settings screen.
- On the left menu panel, select Apps. (Note: Sales channels are now managed in a separate menu item).
- On the Apps page, select Develop apps (near the top right of the screen).
Note: If this is your first time accessing this section, you may need to click "Allow custom app development" to proceed. - On the App development screen, select Create an app.
- Give the app a name (e.g., "ZappySys Connector"), select the appropriate developer from the drop-down, and select Create app.
- Click Configure Admin API scopes.
- In the Admin API access scopes screen, select the checkboxes based on which features you plan to use:
- For Customers:
read_customers,write_customers - For Orders:
read_orders,write_orders - For Products:
read_products,write_products - For Inventory:
read_inventory,write_inventory - For Locations:
read_locations - For Payouts/Analytics:
read_all_ordersorread_analytics
Important: If you select fewer scopes than required, some connector features will not work. To ensure full functionality, select both read and write permissions for the resources you need to access.
- For Customers:
- After selecting your scopes, click Save at the top or bottom of the page.
- Install the app by clicking the Install app button (upper-right corner). If prompted, confirm by selecting Install.
Part 2: Get Admin API Access Token
- Once the app is installed, you will be taken to the API credentials tab.
- Look for the Admin API access token section. Select Reveal token once to show the token (it starts with
shpat_). IMPORTANT: Copy and save this token immediately in a secure location. You cannot view it again after leaving this page.
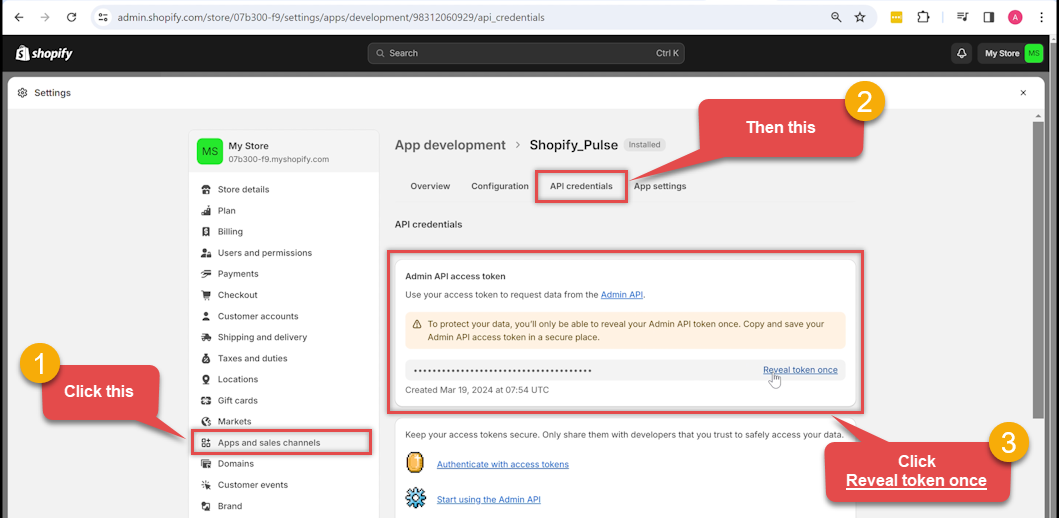
Note: You may also see an API Key or Secret Key in this section; these are not required for this specific authentication method. Use only the Admin API access token.
Part 3: Configure the ZappySys Connector
- Open the ZappySys connector configuration screen.
- Enter Subdomain: Enter the unique subdomain of your Shopify store into the Subdomain parameter textbox.
How to find your Subdomain:
If you use a custom domain (e.g.,
www.my-store.com), you must still use your internal Shopify subdomain:- Method 1 (Admin URL): While logged into Shopify, check your browser address bar.
- If the URL is
admin.shopify.com/store/my-unique-slug, your subdomain is my-unique-slug. - If the URL is
my-unique-slug.myshopify.com/admin, your subdomain is my-unique-slug.
- If the URL is
- Method 2 (Domains Setting): Go to Settings > Domains. Look for the "Primary domain for the online store" or the fallback domain ending in
.myshopify.com. The part before the dots is your subdomain.
- Method 1 (Admin URL): While logged into Shopify, check your browser address bar.
- Enter Access Token: Paste the
shpat_xxxtoken you saved in Step 14 into the Admin API Access Token textbox.
Tip: Click the ellipses (...) button inside the textbox to open a larger dialog for easier pasting. - Click Test Connection to verify the settings.
- If the test is successful, click OK to save the configuration.
Parameters
| Parameter | Required | Default value | Options |
|---|---|---|---|
|
Name:
Label: Sub-domain Your Shopify store sub-domain. Your sub-domain is the portion of the web address just before '.myshopify.com'. For example, the sub-domain for https://acmetoys.myshopify.com would be 'acmetoys'. |
YES | ||
|
Name:
Label: Admin API Access Token The Admin API Access Token obtained from your Shopify store account at https://accounts.shopify.com. |
YES | ||
|
Name:
Label: RetryMode |
RetryWhenStatusCodeMatch
|
||
|
Name:
Label: RetryStatusCodeList |
429
|
||
|
Name:
Label: RetryCountMax |
5
|
||
|
Name:
Label: RetryMultiplyWaitTime |
True
|