Introduction
 In our previous article, we saw how to get Office 365 data in Power BI. Now, let’s look at how to get Office 365 Mail Attachments using SSIS without any coding. Microsoft Graph API is a unified way to access many Microsoft services, including the Office 365 API. In this post, we will use the SSIS JSON/REST API Source Connector to retrieve the Outlook Messages list and its attachments.
Prerequisites
Before we perform the steps listed in this article, you will need to make sure the following prerequisites are met:- SSIS designer installed. Sometimes it is referred to as BIDS or SSDT (download it from the Microsoft site).
- Basic knowledge of SSIS package development using Microsoft SQL Server Integration Services.
- Make sure ZappySys SSIS PowerPack is installed (download it, if you haven't already).
- (Optional step). Read this article, if you are planning to deploy packages to a server and schedule their execution later.
Use Case of Microsoft Graph API
Here are some use cases for why you want to use the Microsoft Graph API
- Read/Write events from Outlook Calendar
- Send email / Read emails
- Get the list of files from OneDrive
- Upload/ Download files to OneDrive
- Read/Write Excel Sheet (Use range or a specific range of a specific sheet)
- Read the SharePoint Document library
- Search content from the SharePoint document library
- Get AD users for your Organization (AD Accounts)
- Update OneNote
- Track changes to Users, Events, Calendar Items using the delta API
Register Application (OAuth2 App for Graph API)
The first step to access any Office 365 API / Graph API is to register an OAuth App in the Azure Portal. After following these steps, you will get the following two items to use in the next section:
- Application Id
- Application Secret
In this section, you will learn how to register a custom app in Microsoft Azure portal that will allow access to the OneDrive. So, let's get started -
- Log into Microsoft Azure portal to register a custom app.
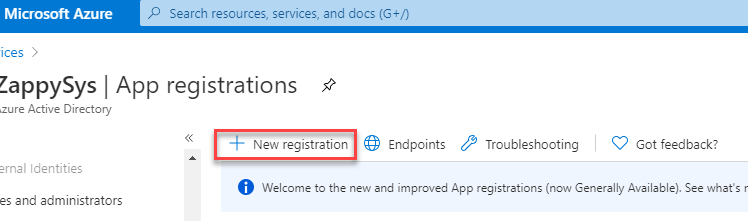
- Register a new application by clicking New Registration link.
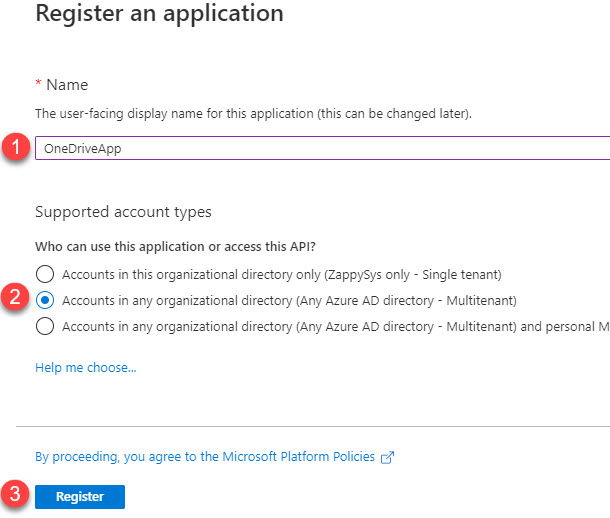
- Provide the name of the custom app and who can access the app in the organization.
- Go to the App overview and add a Redirect URL.

- Click on "Add a Platform" under Platform Configuration section and then select "Web" under Web applications
section to enter a Redirect URL.
https://zappysys.com/oauth

- Create a Client Secret key which will be used to Authenticate the custom Azure app.

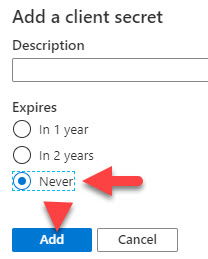
 Note - Take a note of Client Secret, it will be required while configuring OAuth connection in the SSIS later
 - Add API Permissions.

- Select following permissions from the Delegated Permissions section.
User.ReadBasic.All
Files.Read
offline_access

- Take a note of Client ID, it will be required while configuring OAuth connection in the SSIS later.

Step-By-Step to call the Microsoft Graph Rest API Using SSIS
Now, let’s look at examples to access your Outlook.com emails using SSIS. You can use the same techniques to call pretty much any Office 365 API.
Configure SSIS OAuth Connection for Graph REST API
The first step to access any Graph API is to configure an OAuth connection
- Open Visual Studio
- Open an existing SSIS Project or create a new one using File > New > Project > Choose “Integration Services Project” Type under Business Intelligence template category.
- Create Package
- Right-click inside the Connection Managers area and click New Connection…
- From the connection type list, select the ZS-OAUTH connection type.

Create a new SSIS OAuth API Connection Manager
- On the OAuth Connection Manager, configure the following options
- Select “Custom” from the Provider dropdown
- Select OAuth2 from the OAuth version
- Enter your Application Id and Secret Key (i.e., App Password) obtained in the previous section from here.
- Enter the following URL in the Authorization URL
1https://login.microsoftonline.com/common/oauth2/v2.0/authorize - Use the following URL in the token URL field
1https://login.microsoftonline.com/common/oauth2/v2.0/token - Enter the following Graph API Scopes (each scope must be entered on a new line).
123user.readmail.readoffline_accessNOTE: Always include the offline_access scope, which returns a refresh_token, which allows you to renew the token without going through the login process again. For more information about which scopes are needed, always refer to the API help page (e.g., if you want to read mail using this API, then you will see it says you can use Mail.Read or Mail.ReadWrite scope). - Go to the Advanced tab and enter the following URL in the Callback/Return URL (assuming the same URL used when you registered the App in the previous section)
1https://zappysys.com/oauth - Now go back to the first tab and click Generate Token. When prompted, log in using your Personal Microsoft Account or Work Account (Office 365 or AD login)
- After logging in, you will see the Accept option. Just click it. If things go right, then you will see the Access Token and Refresh Token fields populated.
- Once everything is configured, you can click Test Connection to verify the connection works.
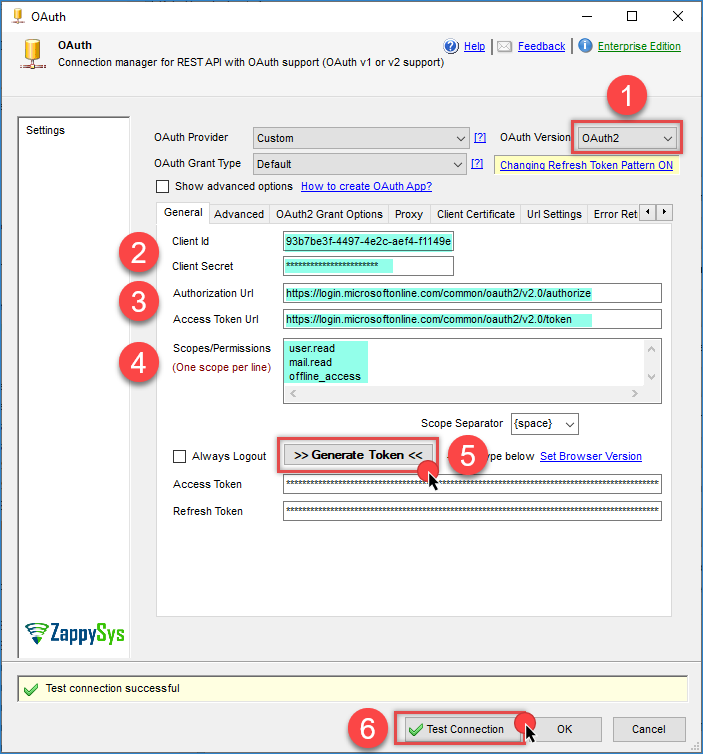
SSIS OAuth Connection Manager for Office 365 REST API Microsoft Graph API
Download the Messages Attachment Files from Outlook
Let’s start with an example. We use the SSIS JSON Source and Web API Destination components to make a call to the Microsoft Graph REST API.
- First of all, drag and drop the Data Flow Task from the SSIS Toolbox and double-click it to edit.
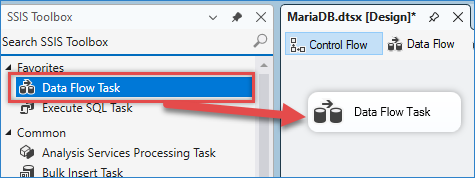
Drag and drop Data flow
- From the SSIS toolbox, drag and drop the JSON Source onto the Data Flow Designer surface.
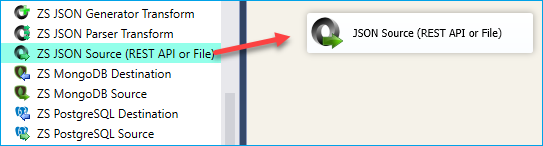
SSIS JSON Source – Drag and Drop
- Double-click the JSON Source, then enter the following URL to invoke the Messages API call with search options to retrieve emails with attachments.
Set the filter to1https://graph.microsoft.com/v1.0/me/messages?$select=sentDateTime,from,subject,hasAttachments&$search="hasAttachments:True"$.value[*]and click the preview.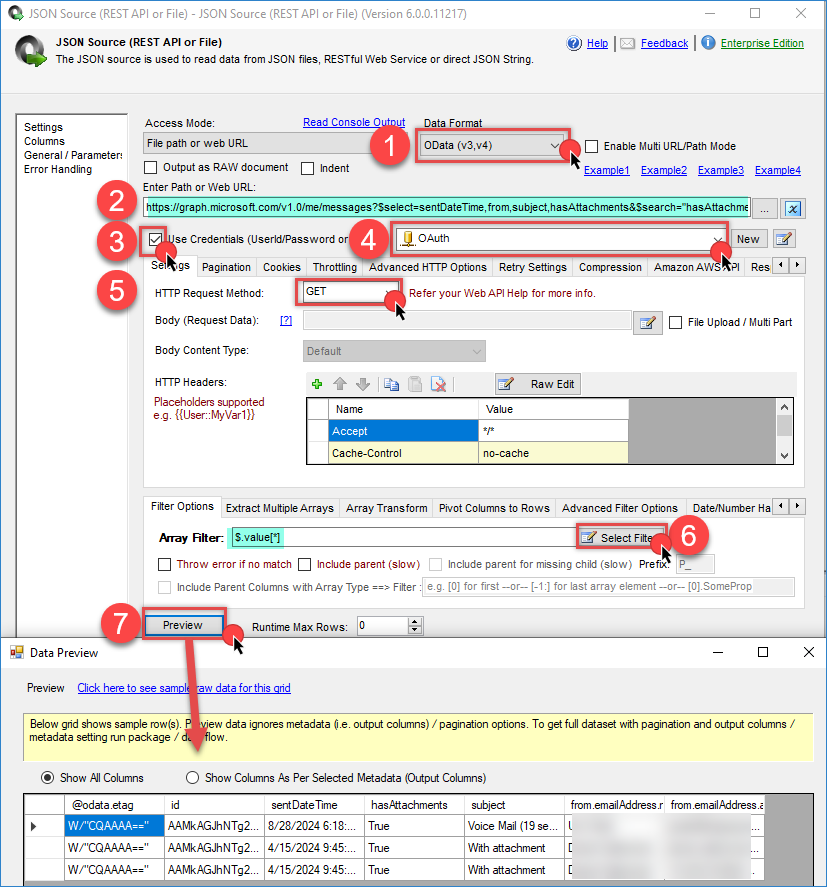
SSIS JSON Source – Get data from Microsoft Graph API (Office 365 API – Read Mail Example)
To customize the URL with additional parameters, check this help link. It’s a standard OData Protocol, so you can leverage many common OData features (e.g., use $top parameters to set pageSize. Default is 10 for List Mail, but you can include more records per response by changing it, such as …/messages?$top=50).
- Now, let’s use Template Transform to set the URL using the message ID to make the Get attachment API call.
1https://graph.microsoft.com/v1.0/me/messages/<%id%>/attachments

SSIS Template Transform sending attachment id
- Now we need to use the Web API Destination to make the Get Attachment API call by message ID. Select the Input column for URL as that TemplateOutput.
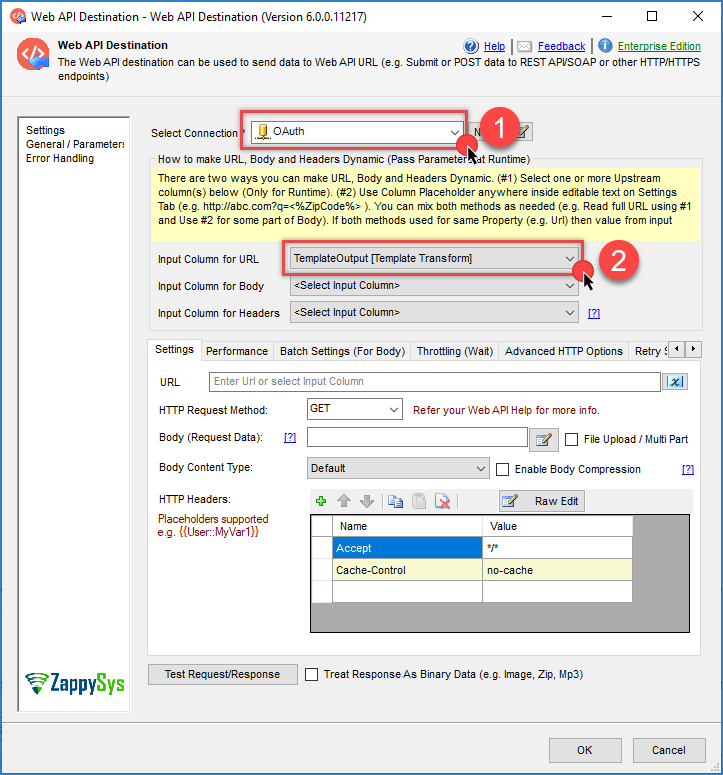
SSIS Web API Destination – Get data from Microsoft Graph API (Office 365 API – Get Attachment Example)
- Now, the next step is to parse the JSON Response String of the get attachment api call. For that, we need to use a JSON Parser. Select the input as Web PAI Destination ResponseText and use the below sample JSON string to configure the metadata(Columns).
123456{"@odata.context":"https://graph.microsoft.com/v1.0/$metadata#users('support%40zappysys.com')/messages('AQMkADAwATMwMAItMDkyMC0zZTg4AC0wMAItMDAKAEYAAAP_JUy')/attachments","value":[{"@odata.type":"#microsoft.graph.fileAttachment","@odata.mediaContentType":"text/plain","id":"AQMkADAwATMwMAItMDkyMC0zZTg4AC0wMAItMDAKAEYAAAP_JUy_27M","lastModifiedDateTime":"2020-02-21T07:36:16Z","name":"Test.txt","contentType":"text/plain","size":870,"isInline":false,"contentId":null,"contentLocation":null,"contentBytes":"VGVzdCBNZXNzYWdl"}]}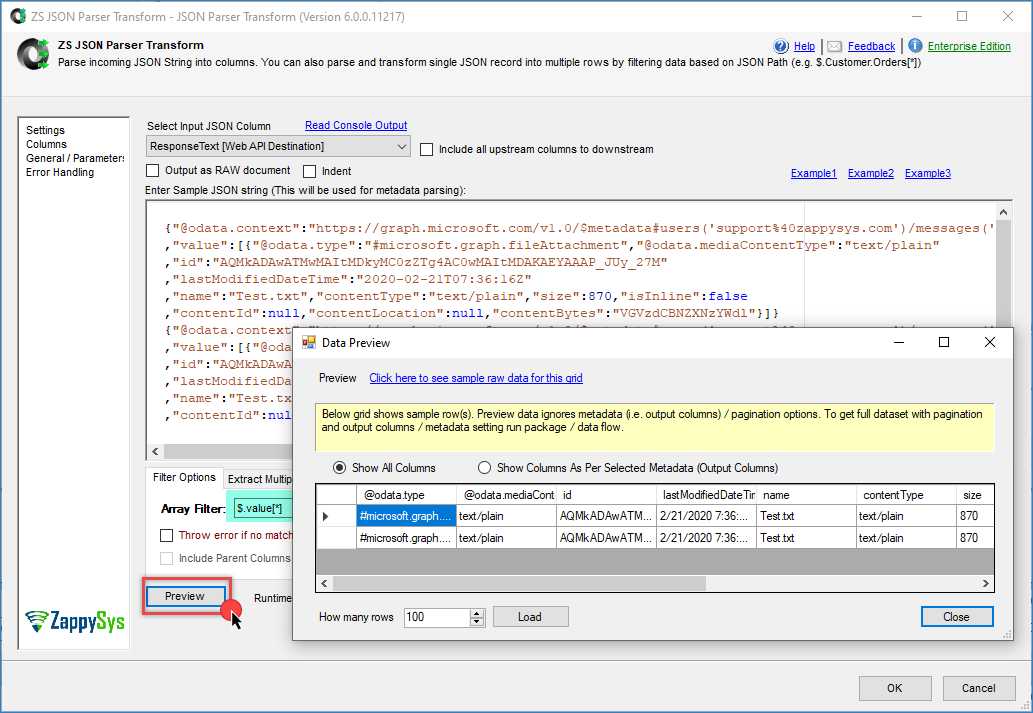
JSON Parser Transform – using JSON example
- Now, in the JSON Parser, go to the Go-to columns Tab and set the contentBytes DataType to DT_IMAGE, and increase the other columns’ DT_WSTR lengths by 1000 and 1500. We set contentBytes to the DT_IMAGE datatype, which is like varbinary(MAX).
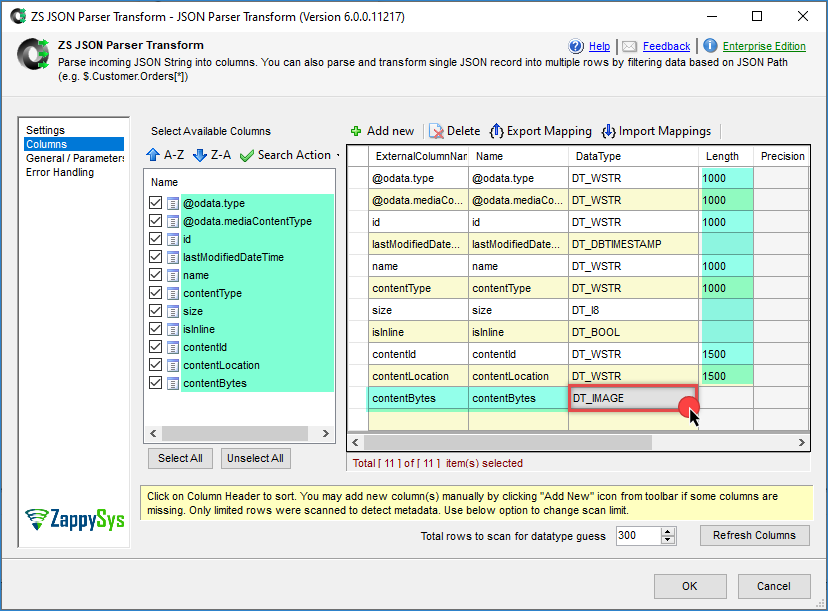
JSON Parser Transform Columns Tab fix the datatype
- Furthermore, in the next step, we need to use an SSIS Derived Column to set the FilePath where we want to save the attachments, and then concatenate the local file path with the attachment name column.
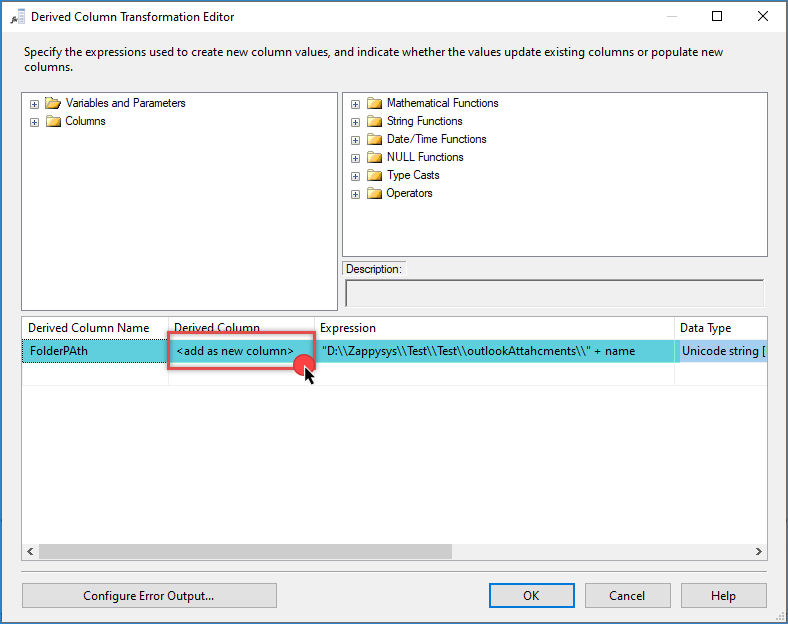
SSIS Derived Column: Add New Column
- Finally, we need to use the Export Column Transform (Native) to export attachment bytes to a local file. It needs to know 2 upstream info Bytes and the target file path.
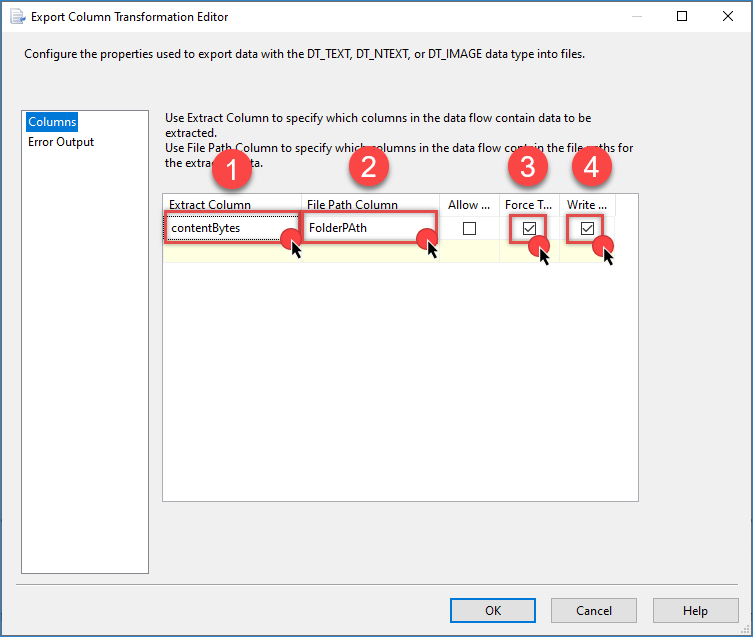
Export Column configuration
- Make sure to attach the export column to some destination (e.g., our ZS Trash Destination); the engine might remove it. At the same time, it optimizes the runtime. It may remove all transformations that don’t have a destination, such as deploying the package to SQL Server, or when you set optimize in Visual Studio.
- That’s it, execute the package, and it will download all the email attachments.
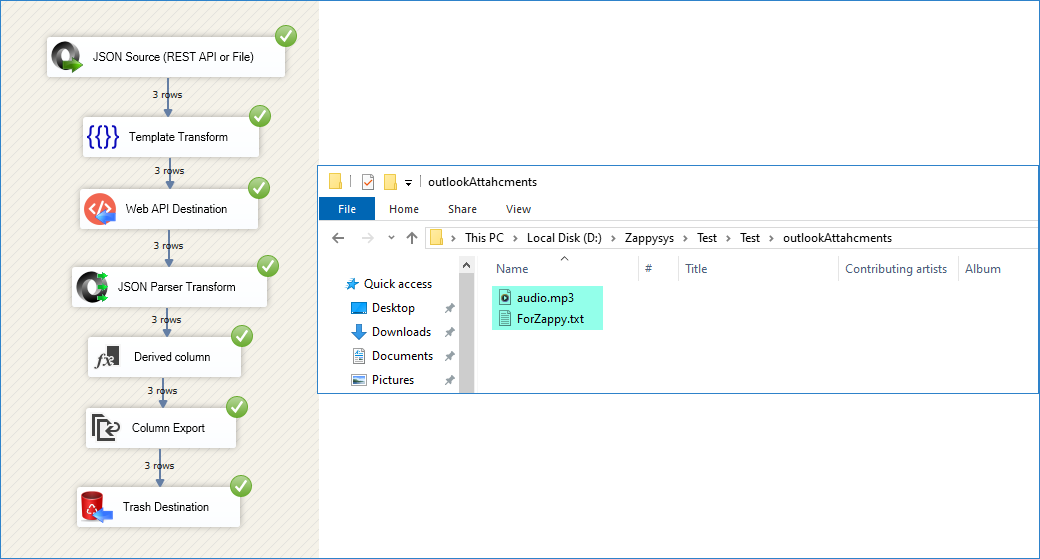
Downloaded Mail Attachments
Conclusion
After all, in this article, we learned how to make a Microsoft Graph API REST API call. We used the SSIS JSON / REST API Connector to extract data from Outlook Mail using OAuth. Made the Get attachment API call using the Web API Destination and parsed the JSON response using the JSON Parser. And using the Native SSIS Export Column, we saved the export attachment’s bytes to a local file. To explore many other scenarios not discussed in this article, download SSIS PowerPack from here (includes 70+ Components).
References
Finally, you can use the following links for more information:
-
- Help File: JSON Source(REST API or File)
- Help File: Web API Destination
- Help File: JSON Parser Transform
- Overview of the Microsoft Graph API