Introduction
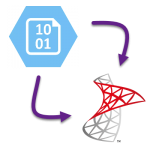
 There might be a case when you have many CSV, JSON or XML files in Amazon S3 bucket and you want them to be imported straight into a SQL Server table. Here come ZappySys ODBC PowerPack and ZappySys Data Gateway (part of ODBC PowerPack) which will enable you to accomplish that. ZappySys ODBC PowerPack includes powerful Amazon S3 CSV, Amazon S3 JSON and Amazon S3 XML drivers that let you connect to an S3 bucket and read the contents from the files in the bucket. Bringing in ZappySys Data Gateway allows doing that right from a SQL Server. Let’s begin and see how to import Amazon S3 files into SQL Server.
These drivers are related to this article:


Prerequisites
- Have an AWS account.
- Existing Amazon S3 bucket.
- SQL Server instance installed (can be a SQL Server Express LocalDB instance).
- SQL Server Management Studio (SSMS) installed.
- ZappySys ODBC PowerPack installed (must be installed on a Windows machine; can be a different machine than SQL Server is installed on).
Getting started
We will start from a simple example of how to load contacts from a JSON that are located in Amazon S3 bucket, then we will proceed by loading contacts from many XML files that are compressed in ZIP, and finally, we will traverse many folders and subfolders to gather CSVs and load contacts from them.
Step-by-Step – Import JSON file located at Amazon S3 into SQL Server
Open and configure ZappySys Data Gateway
- Assuming you have installed ZappySys ODBC PowerPack using default options (Which also enables Data Gateway Service)
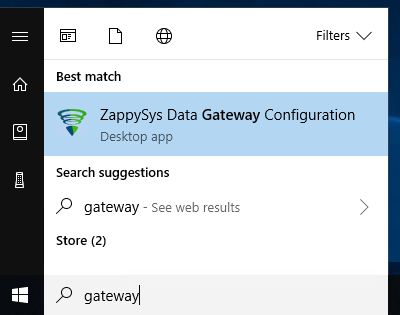
- Search "Gateway" in your start menu and click ZappySys Data Gateway
Open ZappySys Data Gateway
- First make sure Gateway Service is running (Verify Start icon is disabled)
- Also verify Port on General Tab
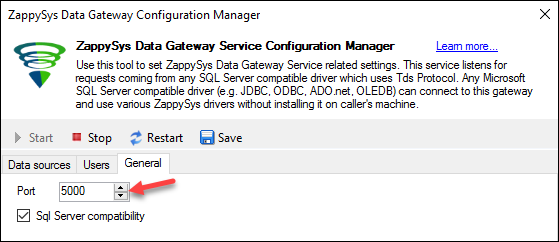
Port Number setting on ZappySys Data Gateway
- Now go to Users tab. Click Add icon to add a new user. Check Is admin to give access to all data sources you add in future. If you don't check admin then you have to manually configure user permission for each data source.
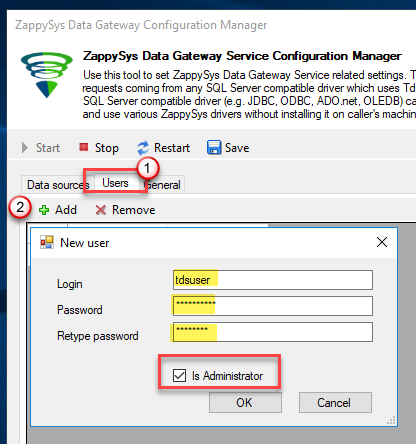
Add Data Gateway User
Create an Amazon S3 JSON data source in ZappySys Data Gateway
- The first thing you will have to do is to create a data source in ZappySys Data Gateway. Just click Add button, give the data source a name, e.g. “MyContactsJSON“, and then select Native – ZappySys Amazon S3 JSON Driver:

Adding a JSON data source in ZappySys Data Gateway to load it from Amazon S3 bucket into SQL Server
- Then click Edit and add the Data Gateway user you created in Users tab. We will use this user later when adding a Linked Server to the Data Gateway to authenticate:
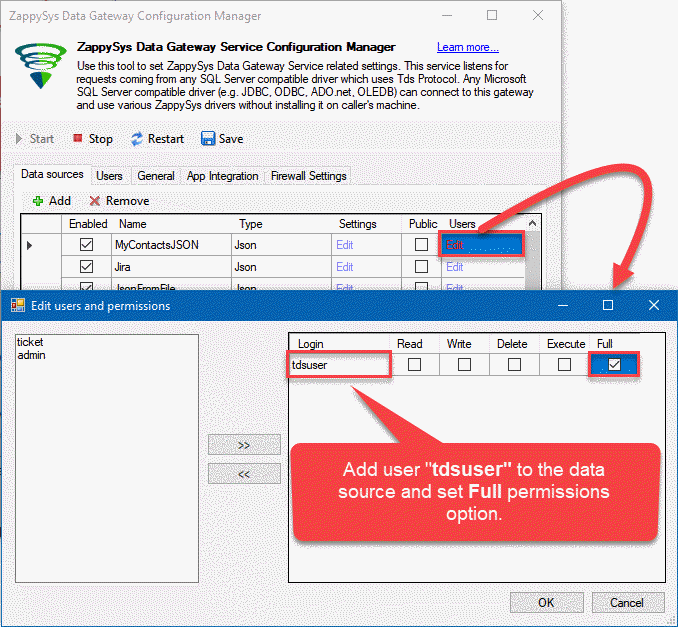
Adding a user to the newly created Amazon S3 JSON data source
- Once you do that, then click Edit to configure the data source:
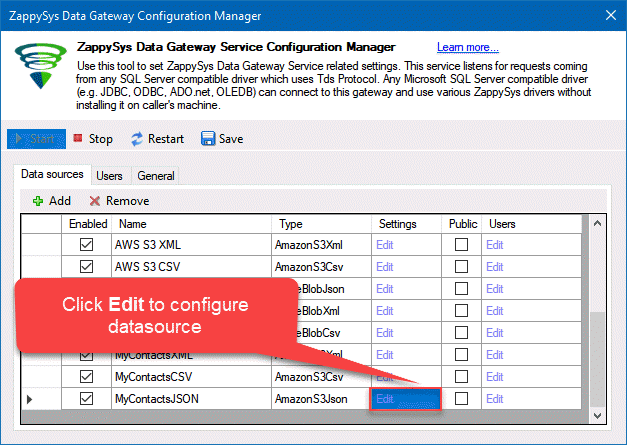
Preparing to configure the Amazon S3 JSON data source to load a JSON from Amazon S3 bucket to SQL Server
- When a window opens, click Click here to Configure the Connection and enter your Access Key and Secret Key:
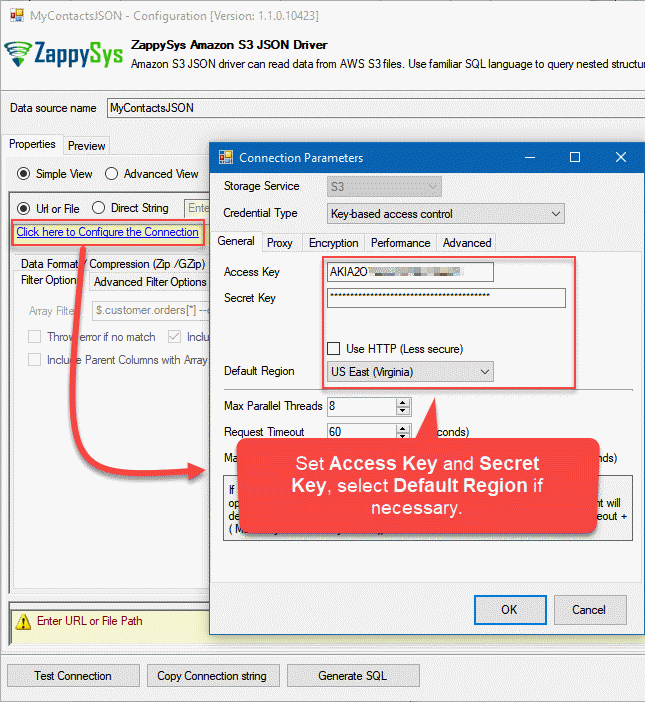
Configuring the authentication to Amazon S3 bucket in ZappySys Data Gateway
- After that, select a JSON file you want to load, and then click Select Filter button to choose data you want to be displayed in SQL Server:
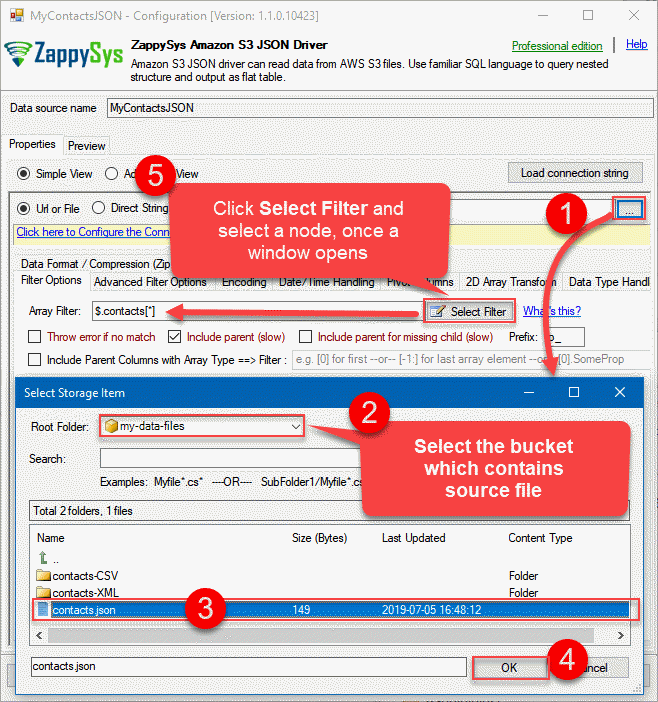
Configuring the JSON data source to load a JSON from Amazon S3 bucket into SQL Server
- Go to the Preview tab and click the Preview Data button to make sure everything is configured correctly and preview the results:
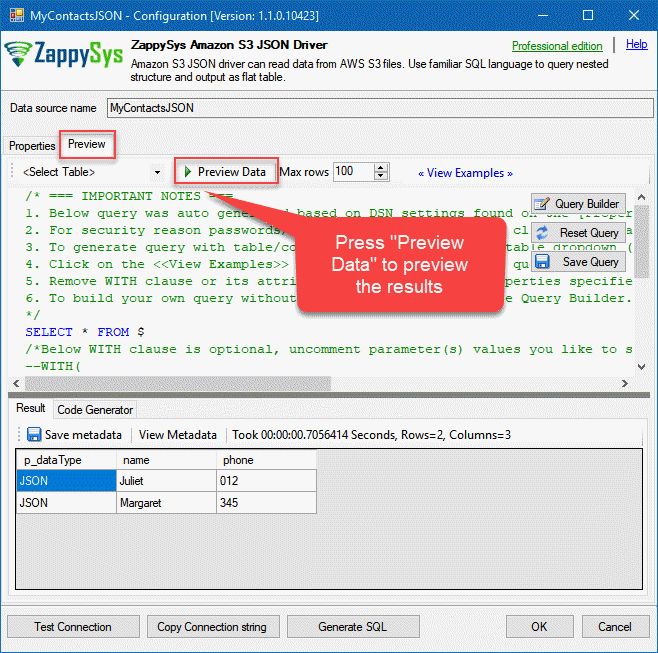
Previewing JSON data in the data source based on Amazon S3 JSON Driver
Now you are ready to create a Linked Server and connect to the data source you just created. If you used “MyContactsJSON” as the data source name, make sure to use the same name when creating a Linked Server.
Set up a SQL Server Linked Server
- Open SSMS and connect to a SQL Server.
- Go to Root > Server Objects > Linked Servers node. Right click and click New Linked Server...
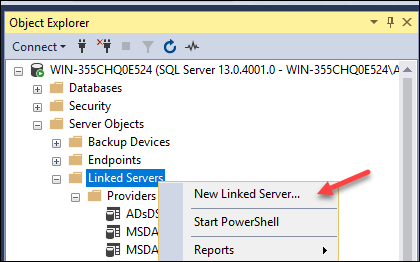
Adding Linked Server in SQL Server
- Now enter the linked server name, select Provider as SQL Native Client.
- Enter data source as GatewayServerName,PORT_NUMBER where server name is where ZappySys Gateway is running (can be the same as SQL Server machine or a remote machine). Default PORT_NUMBER is 5000 but confirm that on the Gateway > General tab in case it's different.
- Enter Catalog Name. This must match name from Data gateway Data sources grid > Name column
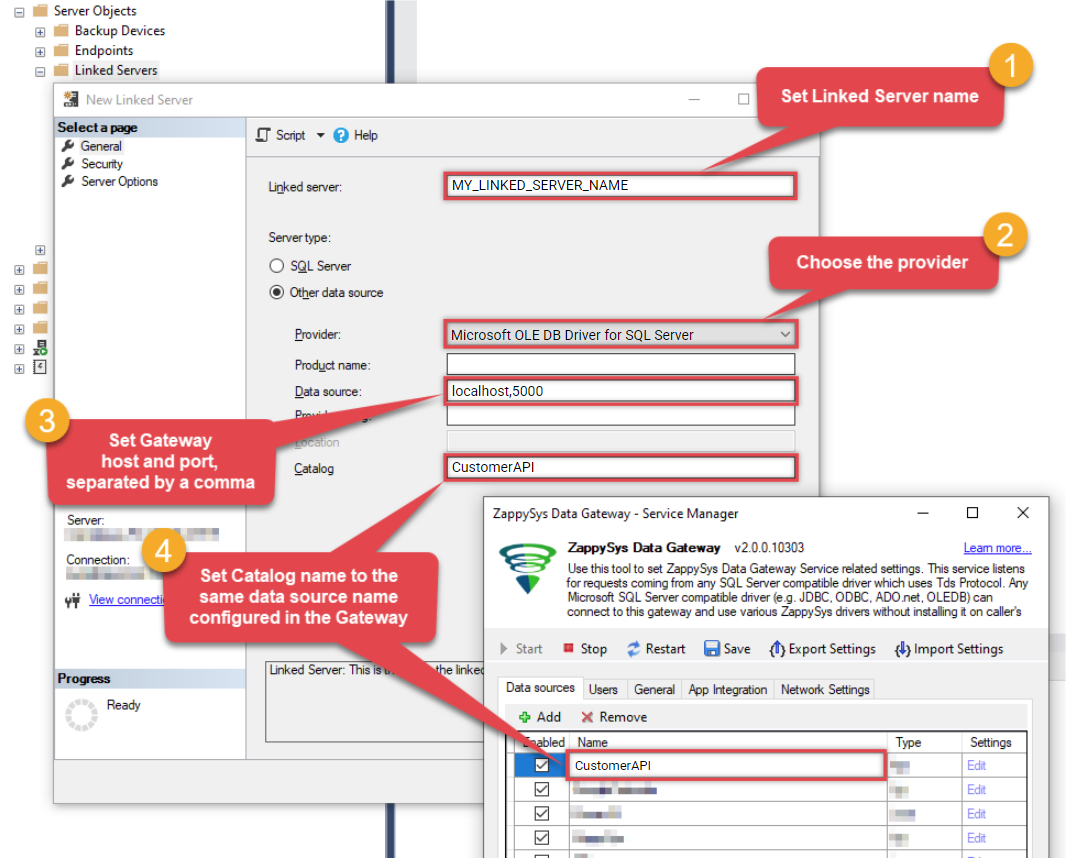
Configure Linked Server Provider, Catalog, Server, Port for ZappySys Data Gateway Connection
INFO:
- For SQL Server 2012, 2014, 2016, 2017, and 2019, use the SQL Server Native Client 11.0 as the Provider.
- For SQL Server 2022 or higher, use the Microsoft OLE DB Driver for SQL Server as the Provider.
- Click on Security Tab and select the last option "Be made using this security context". Enter your gateway user account here.
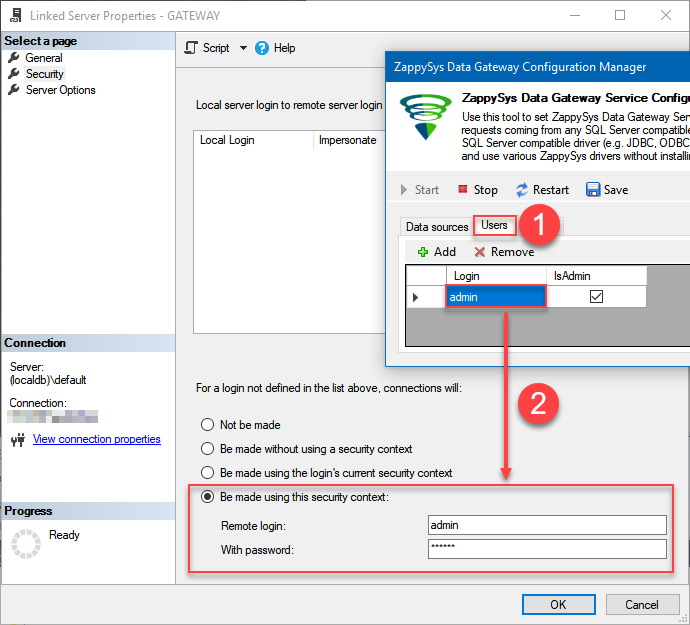
Configuring Linked Server credentials
Optional: Under the Server Options Tab, Enable RPC and RPC Out and Disable Promotion of Distributed Transactions(MSDTC).

RPC and MSDTC Settings
You need to enable RPC Out if you plan to use EXEC(...) AT [MY_LINKED_SERVER_NAME] rather than OPENQUERY.
If don't enabled it, you will encounter the 'Server "MY_LINKED_SERVER_NAME" is not configured for RPC' error.Query Example:
EXEC('Select * from Products') AT [MY_LINKED_SERVER_NAME]
If you plan to use 'INSERT INTO...EXEC(....) AT [MY_LINKED_SERVER_NAME]' in that case you need to Disable Promotion of Distributed Transactions(MSDTC).
If don't disabled it, you will encounter the 'The operation could not be performed because OLE DB provider "SQLNCLI11/MSOLEDBSQL" for linked server "MY_LINKED_SERVER_NAME" was unable to begin a distributed transaction.' error.Query Example:
Insert Into dbo.Products
EXEC('Select * from Products') AT [MY_LINKED_SERVER_NAME]
- Click OK to save the Linked Server.
Execute the SQL query
Once you created the Linked Server to ZappySys Data Gateway, you are ready to execute the SQL query and load data into SQL Server. Supposedly, you created the Linked Server with the name “GATEWAY”, then open SSMS and execute this query:
SELECT * INTO MyContacts FROM openquery([GATEWAY], 'SELECT * FROM $')

SELECT * FROM MyContacts
The results
You should see similar results after you execute the query:
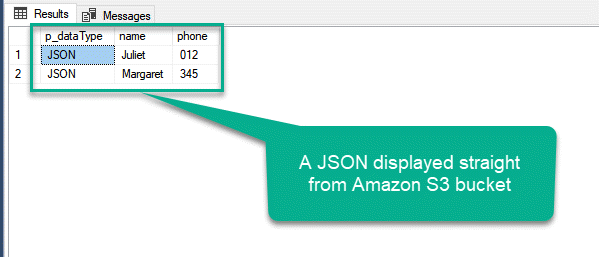
The results of getting JSON data straight from Amazon S3 bucket using ZappySys Amazon S3 JSON driver
Now we are ready to proceed to the next section and import many XML files at once.
Step-by-Step – Import many XML files located at Amazon S3 into SQL Server
Overview
Supposedly, you have many XMLs where each one is zipped and you want to load them all into a SQL Server table:
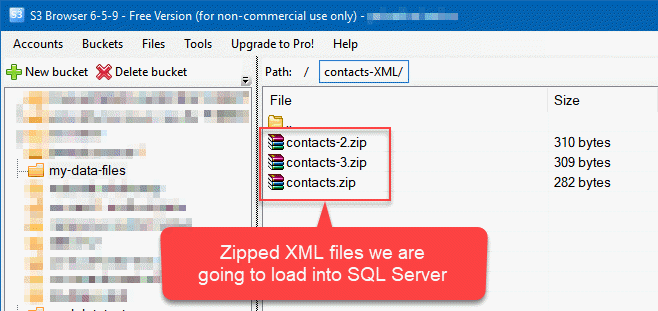
Zipped XML files located in Amazon S3 bucket to be loaded into SQL Server
The first thing you will have to do is to create a data source, based on ZappySys Amazon S3 XML Driver. Let’s proceed and just do that.
Create an Amazon S3 XML data source in ZappySys Data Gateway
Follow the same steps as in Create an Amazon S3 JSON data source in ZappySys Data Gateway section when adding a new data source, except for these two steps:
- When adding a data source select Native – ZappySys Amazon S3 XML Driver as Connector Type:
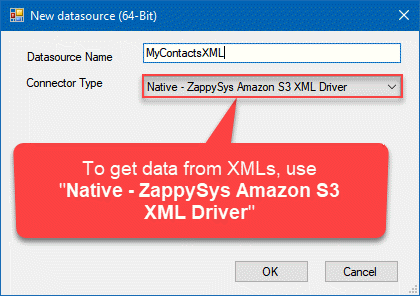
Choosing “ZappySys Amazon S3 XML Driver” to load XMLs to SQL Server
- Then click Edit and edit the data source similarly like in this window:
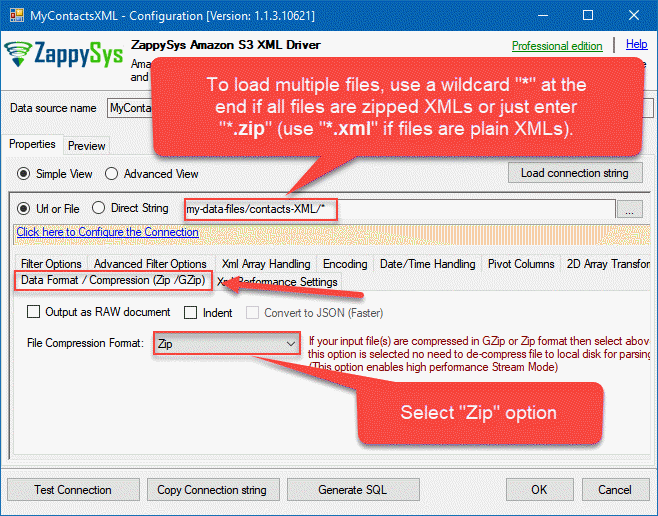
Configuring data source based on ZappySys Amazon S3 XML Driver to load XMLs into SQL Server
Now we are ready to set up a Linked Server to this newly created data source.
Set up a SQL Server Linked Server
Follow the very same steps from the section above where we added the Linked Server to a JSON data source, except that change Datasource property of the Linked Server to match the name of the Amazon S3 XML data source you created. Once you do that, you are ready to load XMLs into your SQL Server.
Execute the SQL query
Again, if you created the Linked Server with name “GATEWAY”, execute this SQL query in SSMS:
SELECT * INTO MyContacts FROM openquery([GATEWAY], 'SELECT * FROM $')

SELECT * FROM MyContacts
The results
You should see a similar view once you execute the query:
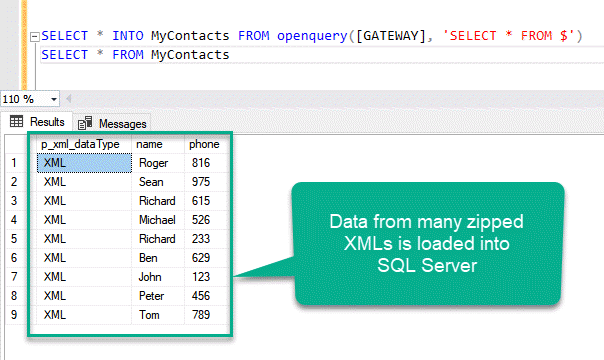
The data of many XMLs loaded from Amazon S3 bucket into SQL Server
Now we are ready to move to the next section and recursively scan CSVs and load them into SQL Server.
Step-by-Step – Import CSV file located at Amazon S3 into SQL Server
Overview
Let’s say you have many CSVs that are located in a folder tree, including subfolders and you want them all in your SQL Server:
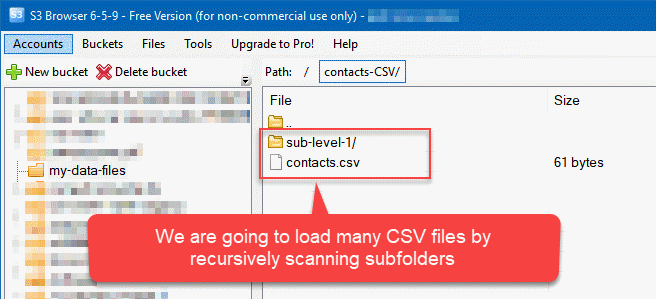
Many CSV files located in Amazon S3 bucket folders and subfolders to be loaded into SQL Server
We will follow the same steps to accomplish that as we did for loading JSON and XMLs.
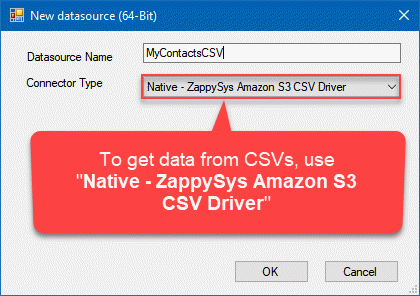
Create an Amazon S3 CSV data source in ZappySys Data Gateway
Follow the steps as in Create an Amazon S3 JSON data source in ZappySys Data Gateway section when adding a new data source, except for these two steps:
- When adding a CSV data source select Native – ZappySys Amazon S3 CSV Driver as Connector Type:
Choosing “ZappySys Amazon S3 CSV Driver” to load CSVs to SQL Server
- Then click Edit and edit the data source similarly:
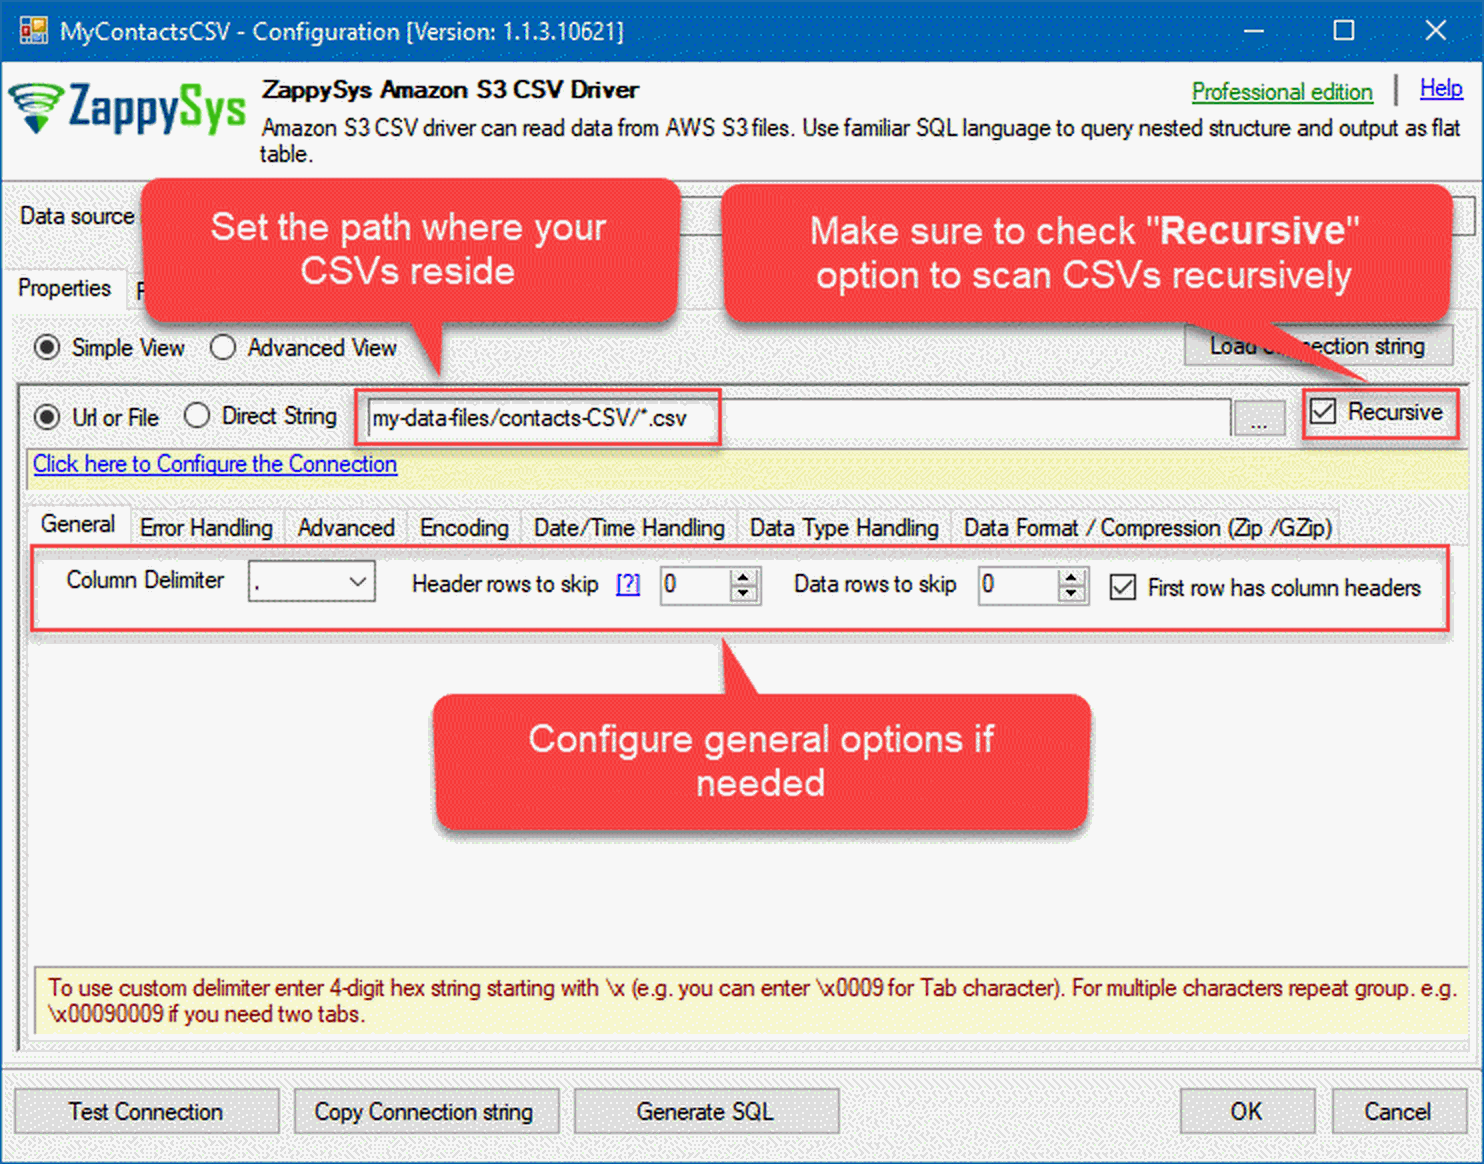
Configuring data source based on ZappySys Amazon S3 CSV Driver to load CSVs into SQL Server
Now we are ready to proceed and add a Linked Server to this data source.
Set up a SQL Server Linked Server
Again, follow the very same steps from the section above where we added the Linked Server to a JSON data source, except that change Datasource property of the Linked Server to match the name of the Amazon S3 CSV data source we created. Once you do that, you are ready to load CSVs into your SQL Server.
Execute the SQL query
Once again, if you created the Linked Server with name “GATEWAY”, execute this SQL query in SSMS:
SELECT * INTO MyContacts FROM openquery([GATEWAY], 'SELECT * FROM $')

SELECT * FROM MyContacts
The results
You should see a similar view, once you execute the query:
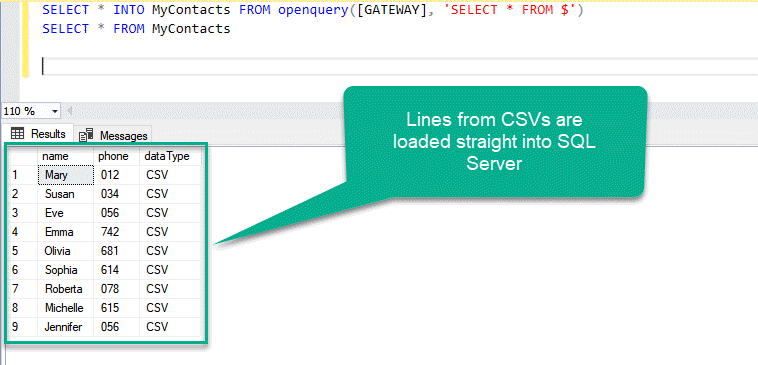
The results of loading many CSVs from Amazon S3 bucket into SQL Server
Conclusion
We had a goal to import Amazon S3 files into SQL Server from SQL Server itself. We learned how to load JSON, XML and CSV files into SQL Server, which some of them were zipped and were located at different folders and subfolders. It was possible to accomplish that using ODBC PowerPack, ZappySys Data Gateway and ODBC PowerPack drivers – Amazon S3 JSON Driver, Amazon S3 XML Driver, and Amazon S3 CSV Driver. At first, we created data sources in the Data Gateway, then we created Linked Servers in SQL Server and connected to ZappySys Data Gateway, which finally made it possible to load data from Amazon S3 bucket straight from SQL queries in SSMS.
Check Amazon S3 Integration with Other BI Tools (Power BI, Excel, SSRS, MS Access, etc.)
ZappySys ODBC Drivers built using ODBC standard which is widely adopted by industry for a long time. Which mean the majority of BI Tools / Database Engines / ETL Tools already there will support native / 3rd party ODBC Drivers. Below is the small list of most popular tools / programming languages our Drivers support. If your tool / programming language doesn't appear in the below list, which means we have not documented use case but as long as your tool supports ODBC Standard, our drivers should work fine.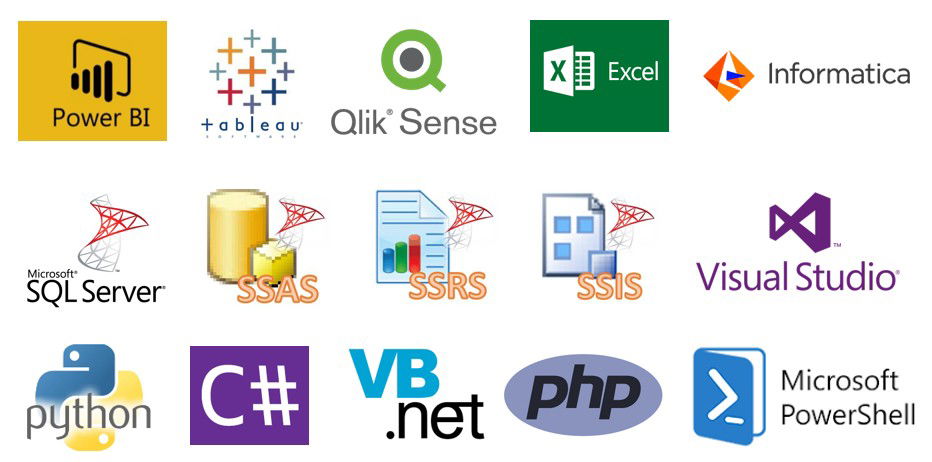
BI / Reporting Tools Integration
ETL Tools Integration Programming Languages Integration - Microsoft Power BI
- Tableau
- SSRS (SQL Reporting Services)
- QlikView /Qlik Sense
- MicroStrategy
- Google Sheet
- Microsoft Excel
- Microsoft Access
- Oracle OBIEE
- Many more (not in this list).....
- Informatica PowerCenter (Windows)
- Informatica Cloud
- SSIS (SQL Integration Services)
- SQL Server
- Talend Data Studio
- Pentaho Kettle
- Oracle OBIEE
- Many more (not in this list).....
- Visual Studio
- C#
- C++
- JAVA
- Python
- PHP
- PowerShell
- T-SQL (Using Linked Server)