Introduction
![]() In this article we will cover how to call REST API in PowerShell and export result to CSV file. If you want to export JSON based API result to file then you have to consider few things. Such as API Authentication, API Pagination, Parsing JSON, Error Handling and many more. Luckily we can use ODBC Driver like this one to call API services and get data from RESTful services using familiar SQL query language.
In this article we will cover how to call REST API in PowerShell and export result to CSV file. If you want to export JSON based API result to file then you have to consider few things. Such as API Authentication, API Pagination, Parsing JSON, Error Handling and many more. Luckily we can use ODBC Driver like this one to call API services and get data from RESTful services using familiar SQL query language.
ZappySys ODBC driver can take care most of details about your API calls and data parsing so you can focus on business problem.
Requirements
Before we start step by step tutorial let’s make sure we have necessary tools installed.
- You have PowerShell ISE – Editor for PowerShell (Search in your Start menu to confirm)
- Make sure you have installed ZappySys ODBC PowerPack
Getting Started
Once you have installed ODBC PowerPack we are ready to look at few examples on how to call REST API in PowerShell.
Example 1 – Call REST API and Export JSON data to CSV in PowerShell
Open PowerShell ISE (Editor) and Paste below code. Click
|
1 2 3 4 5 6 7 8 9 10 11 12 13 14 15 16 17 18 19 20 21 22 23 24 25 26 27 28 29 30 |
$conn = New-Object System.Data.Odbc.OdbcConnection $conn.ConnectionString = "DRIVER={ZappySys JSON Driver}" #--OR-- Use DSN name #$conn.connectionstring = "DSN=MyDSNName" $conn.Open() # ------------------------------------------------------------------------------- # In powershell $ is special char so we used `$ in below string to escape it. # Also We used multi string start with "@<new line> and ends with <new line>"@ # ------------------------------------------------------------------------------- $sql = @" SELECT * FROM value WITH (SRC='https://services.odata.org/V3/Northwind/Northwind.svc/Customers?`$format=json') "@ $cmd = $conn.CreateCommand() $cmd.CommandText = $sql $dataset = New-Object System.Data.DataSet #Load data in DataSet (New-Object System.Data.Odbc.OdbcDataAdapter($cmd)).Fill($dataSet) #Export datatable to file in CSV format $dataset.Tables[0] | ConvertTo-csv -NoTypeInformation -Delimiter "`t" | Out-File "c:\temp\dump.csv" -fo Write-Host "Total rows $($dataSet.Tables[0].Rows.Count)" $conn.Close() |
Here is what it will look like once you execute.
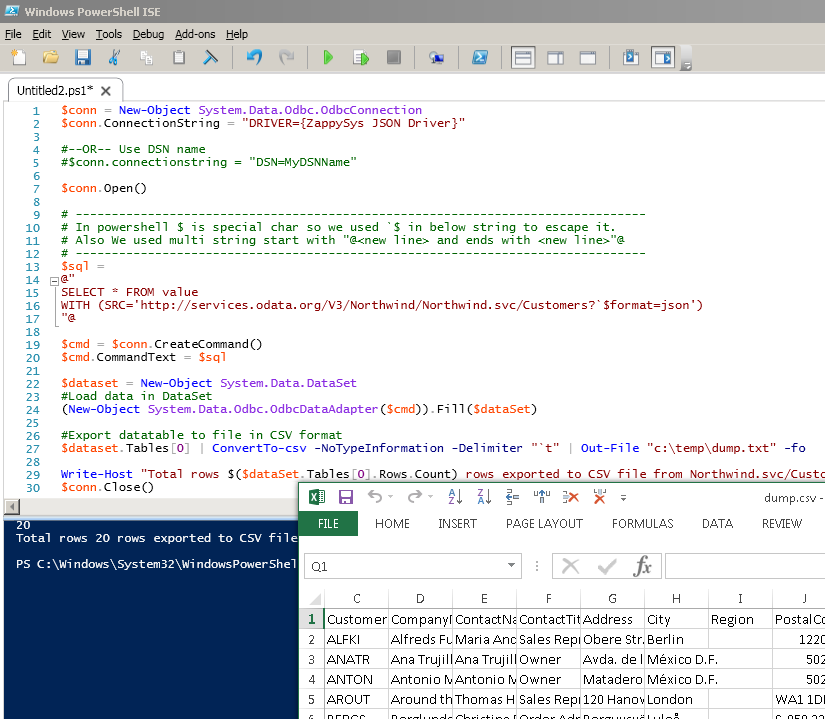
Example : Call REST API in PowerShell and Export JSON data to CSV File
Example 2 – Reading REST API data using ODBC DSN (User Interface Mode) in PowerShell
In previous section we saw simple script which was using DSN less connection string (i.e. DRIVER={xxxxxxx} ).
Now let’s look at another way to call API (i.e. Use DSN=xxxxx in your connection string). We will use ODBC Driver’s User Interface to configure various properties. We will also use query preview tool to test your API query. Finally we will use DSN name in Our PowerShell Script.
Advantage of using ODBC DSN is you don’t have to expose credentials in your PowerShell Script. Also when you have multiple scripts using same connection to query multiple API endpoints it becomes very easy to reuse just DSN name rather than many connection string settings.
So let’s get started
- To do this, we will first open the ODBC Data Source (32 bit):
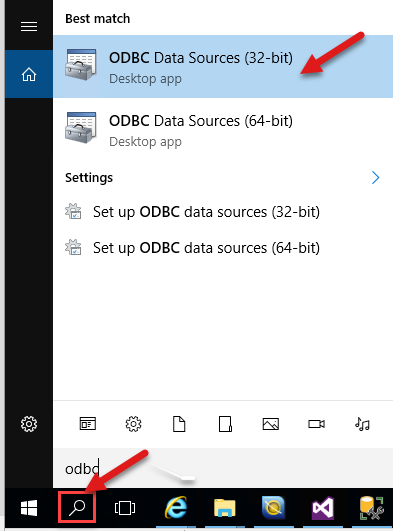
Open odbc data source
- Use the User DSN page and press Add

Add new data source
- Add the ZappySys JSON Driver

Select zappysys JSON Driver (needed for JSON / REST API Connection)
- Name your data source (e.g. in below screenshot its ZappySys JSON PowerBI). This will be used in our Script to refer in DSN=xxxxxxx for connectionstring.
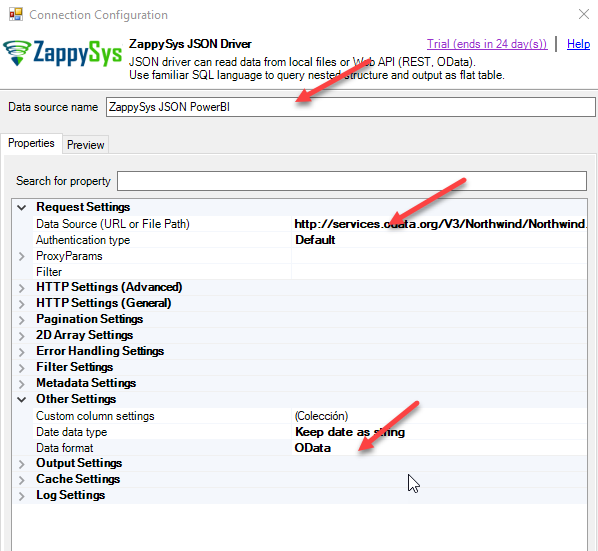
- It is time to connect with OData. In Data Source (URL or File Path), we will use the following URL.
After URL select Filter (Basically its a setting to flatten your data from selected hierarchy). In our case Filter = $.value[*]1https://services.odata.org/V3/Northwind/Northwind.svc/Customers?$format=jsonUI Mode (Simple View) – New Version
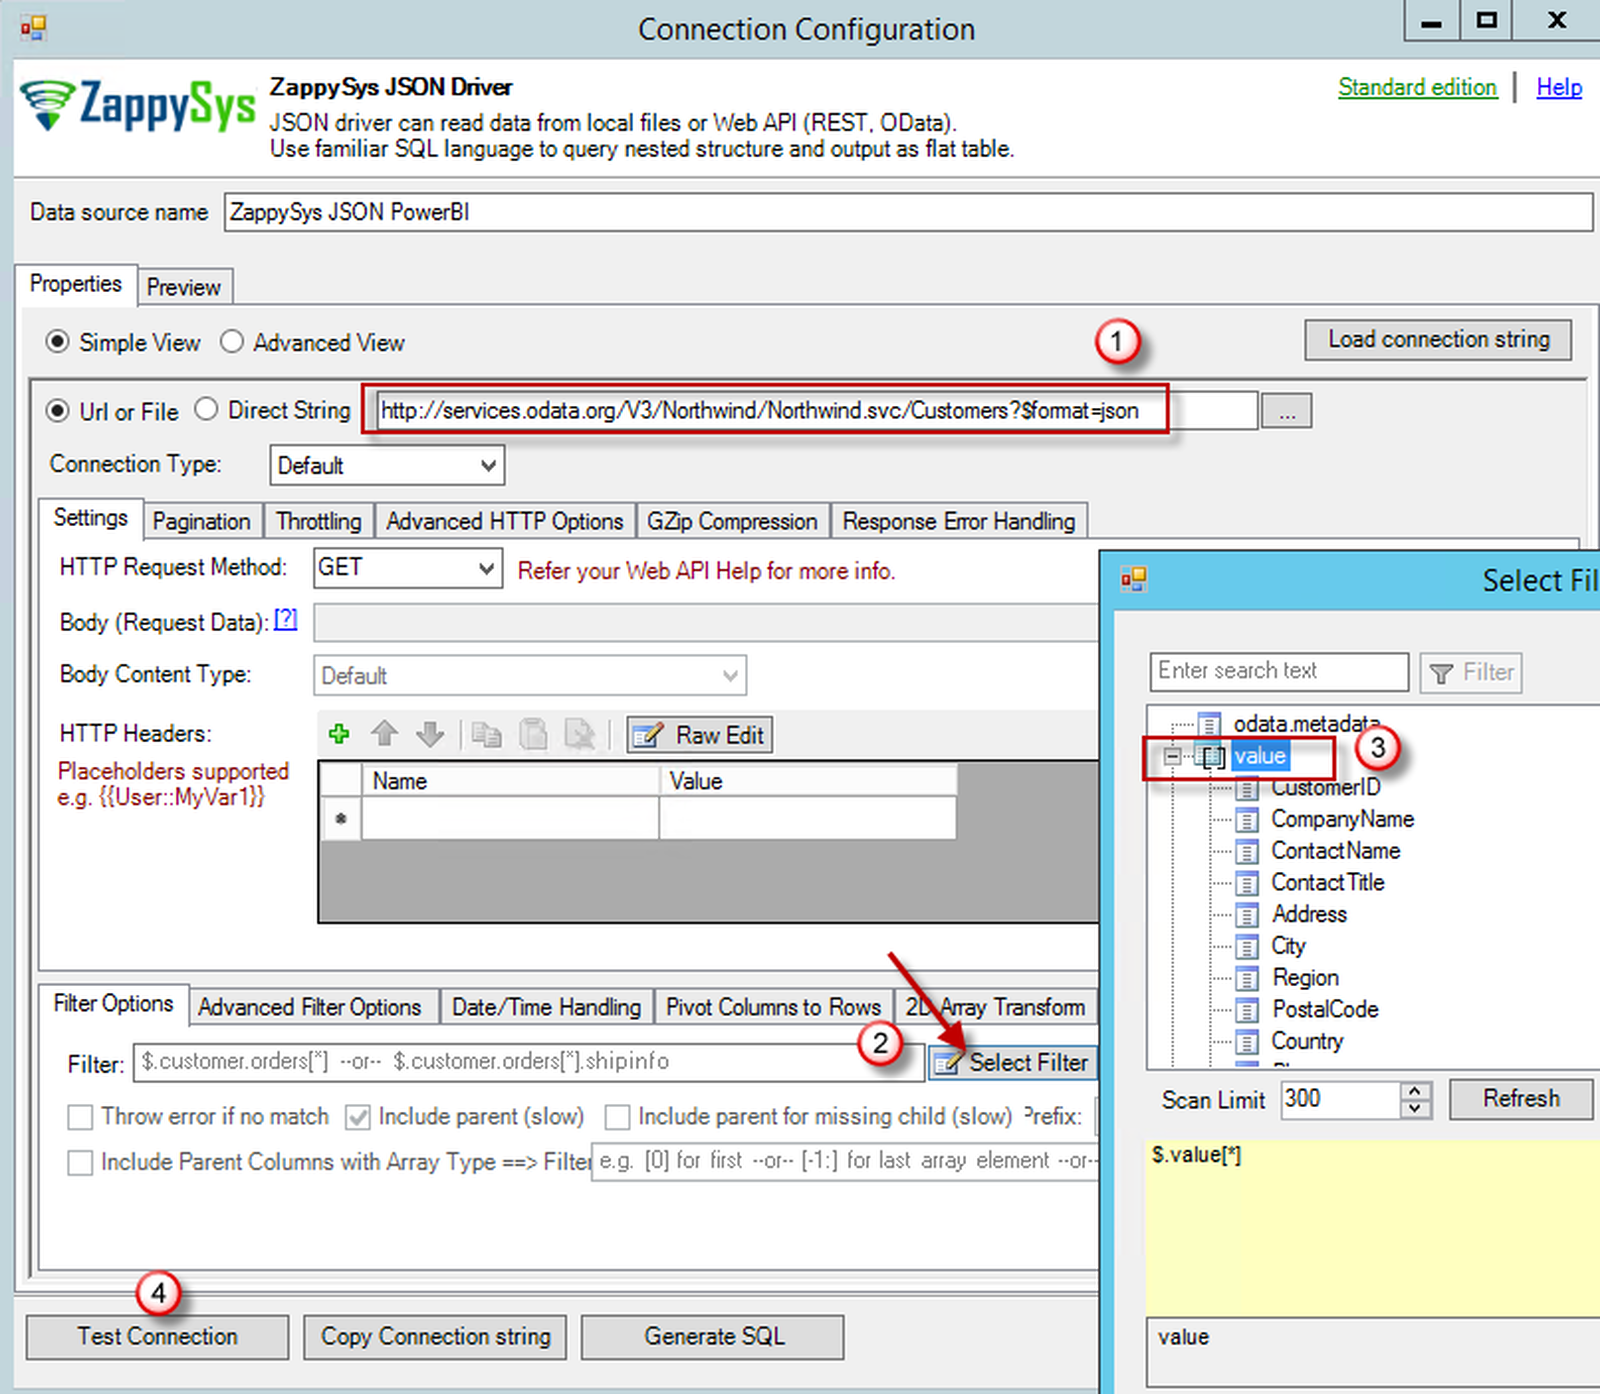
Simple View – Configure ZappySys JSON / REST API Driver Properties
Grid Mode (Advanced View) – Old Version
Advanced View – ZappySys JSON / REST API Driver Properties
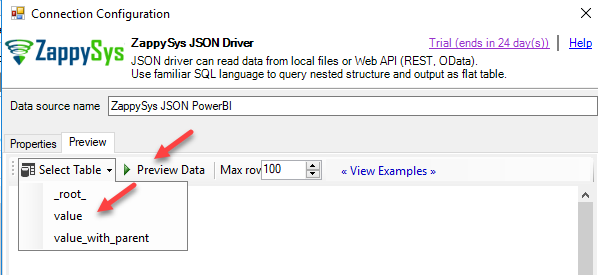
- We can now generate queries using a format similar to SQL. Click Select Table and select value. This option will generate a query to retrieve all the data automatically. Next, press Preview Data:
- When Preview is pressed, you can visualize the data.
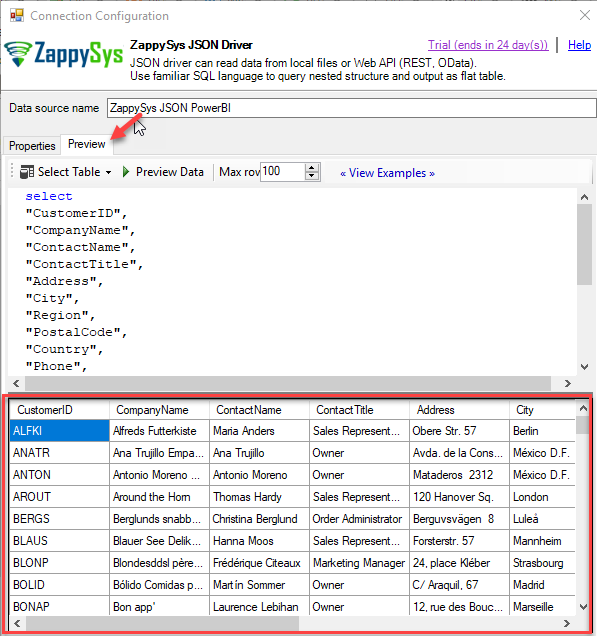
Display rest api information
- You should also review several other examples to learn many other features of Driver Query language.
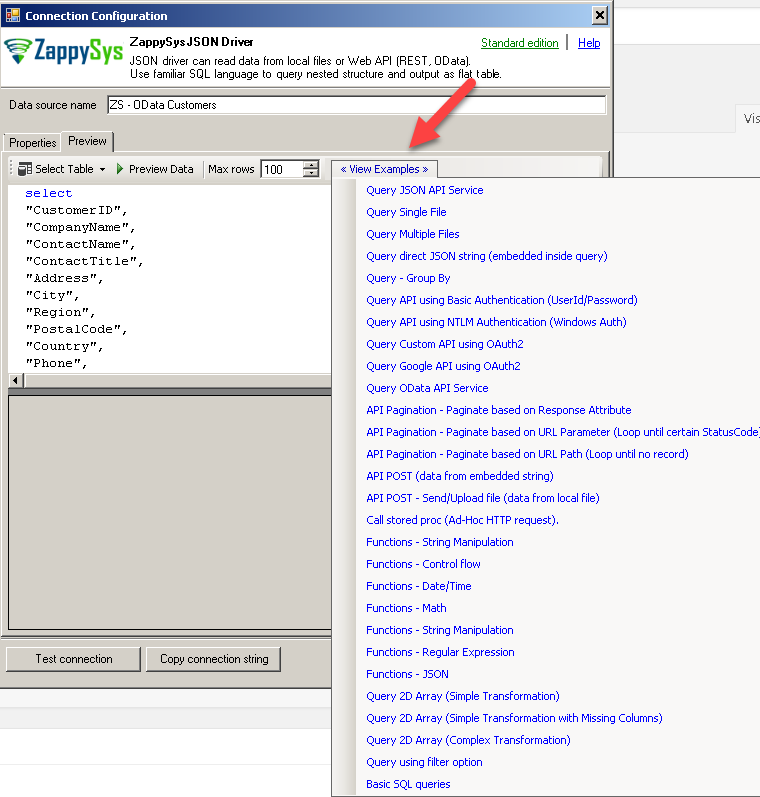
ZappySys JSON / REST Driver – Query Examples for PowerShell
- ZappySys is pretty cool because you can run any type of query like SQL. For example, you can run a query to RESP API using like and or:
123456789101112131415161718/*Object name can be wrapped in double quotes or rectangle bracketsuseful if name has space, dash or dot*/SELECTCustomerID,CompanyName,ContactName,ContactTitle,Address,City,Region,PostalCode,Country,Phone,FaxFROM [value]WHERE ContactTitle='Owner'
That’s it once you save your DSN you can change your previous script as below to use DSN
|
1 2 3 4 5 6 7 8 9 10 11 12 13 14 15 16 17 |
$conn = New-Object System.Data.Odbc.OdbcConnection $conn.connectionstring = "DSN=ZappySys JSON PowerBI" $conn.Open() $sql = "SELECT * FROM value" $cmd = $conn.CreateCommand() $cmd.CommandText = $sql $dataset = New-Object System.Data.DataSet #Load data in DataSet (New-Object System.Data.Odbc.OdbcDataAdapter($cmd)).Fill($dataSet) #Export datatable to file in CSV format $dataset.Tables[0] | ConvertTo-csv -NoTypeInformation -Delimiter "`t" | Out-File "c:\temp\dump.csv" -fo Write-Host "Total rows $($dataSet.Tables[0].Rows.Count)" $conn.Close() |
Example 3 – Reading data from JSON files (Single / Multiple Files) in PowerShell
If you like to read JSON data from local file then use File Path rather than URL as below. Notice that we are reading data from multiple files using Wildcard pattern (*.json). For reading from multiple file make sure all files have same structure.
|
1 2 3 4 5 6 7 8 9 10 11 12 13 14 15 16 17 |
$conn = New-Object System.Data.Odbc.OdbcConnection $conn.connectionstring = "DRIVER={ZappySys JSON Driver}" $conn.Open() $sql = "SELECT * FROM value WITH (SRC='C:\temp\File*.json')" $cmd = $conn.CreateCommand() $cmd.CommandText = $sql $dataset = New-Object System.Data.DataSet #Load data in DataSet (New-Object System.Data.Odbc.OdbcDataAdapter($cmd)).Fill($dataSet) #Export datatable to file in CSV format $dataset.Tables[0] | ConvertTo-csv -NoTypeInformation -Delimiter "`t" | Out-File "c:\temp\dump_multi_files.csv" -fo Write-Host "Total rows $($dataSet.Tables[0].Rows.Count)" $conn.Close() |
Example 4 – POST data to REST API URL (Supply Header / Body) in PowerShell
Now let’s look at some example to POST data to API. In below example we will also see how to pass HTTP headers and Body for POST request. POST requests usually made to Create or Update existing record. However sometimes you will call POST request to read data too (specially you have to supply many parameters in Body rather than URL to call your request).
|
1 2 3 4 5 6 7 8 9 10 11 12 13 14 15 16 17 18 19 20 21 22 23 24 25 26 |
$conn = New-Object System.Data.Odbc.OdbcConnection $conn.connectionstring = "DRIVER={ZappySys JSON Driver}" $conn.Open() $sql = @" SELECT * FROM `$ WITH ( SRC='http://httpbin.org/post' , METHOD='POST' , HEADER='Content-Type: application/json || x-hdr1: SomeValue' , BODY='{ id:1, notes:"My Line1\r\nMy Line2" }' ) "@ $cmd = $conn.CreateCommand() $cmd.CommandText = $sql $dataset = New-Object System.Data.DataSet #Load data in DataSet (New-Object System.Data.Odbc.OdbcDataAdapter($cmd)).Fill($dataSet) #Export datatable to file in CSV format $dataset.Tables[0] | ConvertTo-csv -NoTypeInformation -Delimiter "`t" | Out-File "c:\temp\dump_post_response.csv" -fo Write-Host "Total rows $($dataSet.Tables[0].Rows.Count)" $conn.Close() |
Example 5 – Upload File Content to Web API in PowerShell
Now let’s look at example where you have to Upload File Content to Web API using PowerShell Script.
|
1 2 3 4 5 6 7 8 9 10 11 12 13 14 15 16 17 18 19 20 21 22 23 24 25 26 27 |
$conn = New-Object System.Data.Odbc.OdbcConnection $conn.connectionstring = "DRIVER={ZappySys JSON Driver}" $conn.Open() $sql = @" SELECT * FROM `$ WITH ( SRC='http://httpbin.org/post' , METHOD='POST' , HEADER='Content-Type: application/json || x-hdr1: SomeValue' , BODY='@c:\temp\test.json', IsMultiPart='True' ) "@ $cmd = $conn.CreateCommand() $cmd.CommandText = $sql $dataset = New-Object System.Data.DataSet #Load data in DataSet (New-Object System.Data.Odbc.OdbcDataAdapter($cmd)).Fill($dataSet) #Export datatable to file in CSV format $dataset.Tables[0] | ConvertTo-csv -NoTypeInformation -Delimiter "`t" | Out-File "c:\temp\file-upload-response.csv" -fo Write-Host "Total rows $($dataSet.Tables[0].Rows.Count)" $conn.Close() |
REST API with Pagination in PowerShell
Paginate by Response Attribute
This example shows how to paginate API calls where you need to paginate until the last page detected. In this example, next page is indicated by some attribute called nextlink (found in response). If this attribute is missing or null then it stops fetching the next page.SELECT * FROM $ WITH( SRC=@'https://zappysys.com/downloads/files/test/pagination_nextlink_inarray_1.json' ,NextUrlAttributeOrExpr = '$.nextlink' --keep reading until this attribute is missing. If attribute name contains dot then use brackets like this $.['my.attr.name'] )
Paginate by URL Parameter (Loop until certain StatusCode)
This example shows how to paginate API calls where you need to pass page number via URL. The driver keeps incrementing page number and calls next URL until the last page detected (401 error). There are few ways to indicate the last page (e.g. By status code, By row count, By response size). If you don't specify end detection then it will use the default (i.e. No records found).SELECT * FROM $ WITH ( SRC=@'https://zappysys.com/downloads/files/test/page-xml.aspx?page=1&mode=DetectBasedOnResponseStatusCode' ,PagingMode='ByUrlParameter' ,PagingByUrlAttributeName='page' ,PagingByUrlEndStrategy='DetectBasedOnResponseStatusCode' ,PagingByUrlCheckResponseStatusCode=401 ,IncrementBy=1 )
Paginate by URL Path (Loop until no record)
This example shows how to paginate API calls where you need to pass page number via URL Path. The driver keeps incrementing page number and calls next URL until the last page is detected. There are few ways to indicate the last page (e.g. By status code, By row count, By response size). If you don't specify end detection then it will use the default (i.e. No records found).SELECT * FROM $ WITH ( SRC=@'https://zappysys.com/downloads/files/test/cust-<%page%>.xml' ,PagingMode='ByUrlPath' ,PagingByUrlAttributeName='<%page%>' ,PagingByUrlEndStrategy='DetectBasedOnRecordCount' ,IncrementBy=1 )
Paginate by Header Link (RFC 5988)
API like GitHub / Wordpress use Next link in Headers (RFC 5988)SELECT * FROM $ LIMIT 25 WITH( Src='https://wordpress.org/news/wp-json/wp/v2/categories?per_page=10' ,PagingMode='ByResponseHeaderRfc5988' ,WaitTimeMs='200' --//wait 200 ms after each request )
REST API Error Handling in PowerShell
METHOD 1 - Using Error Handling Options
When to use?
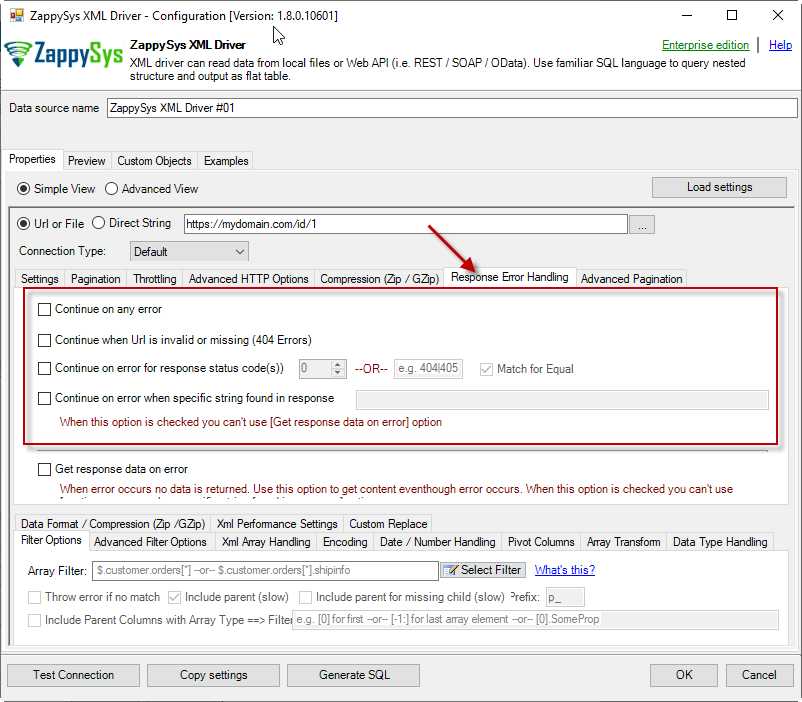
You may want to use them when your source is a resource located on the Internet; e.g. a file on a website, a file on an FTP server or just a plain API HTTP response. By default, when a remote server returns an error, data retrieval is stopped, an error is raised and no data is given back to you. This might not be always desirable.Scenario 1
Imagine a scenario, that there is a web server which each day at 12 AM releases a new JSON file with that day's date as filename, e.g. http://www.some-server.com/data/2018-06-20.json. And, of course, you want to download it and use it daily in your Power BI report. But you have a problem: Power BI report data sources are refreshed each hour and you may get HTTP 404 status code (no file was found) when a file is not released yet. Which consequentially means other data sources won't be updated as well and you will see old and cached data on the report. That's where you could use Continue on any error or Continue when Url is invalid or missing (404 Errors) to avoid an error being raised and let other data sources to be updated.Scenario 2
Another scenario is when you expect a web server to raise some kind of HTTP error when accessing a URL. You don't want ODBC Data Source to raise an error but instead, you want to get response data. That's where you can use Continue on any error or alike together with Get response data on error to continue on an error and get the data: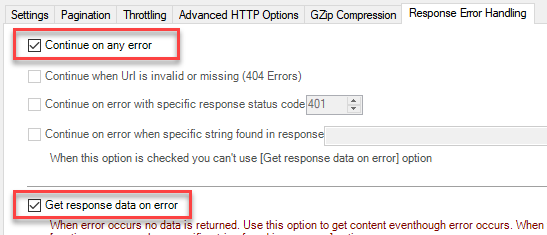
METHOD 2 - Using Connection [Retry Settings]
Another scenario you may run into is a buggy web server. You ask it to give you some file or data and it, like a snotty kid, just doesn't give it to you! You have to ask twice or thrice before it does its job. If that's the case, you have to retry HTTP requests using Connection: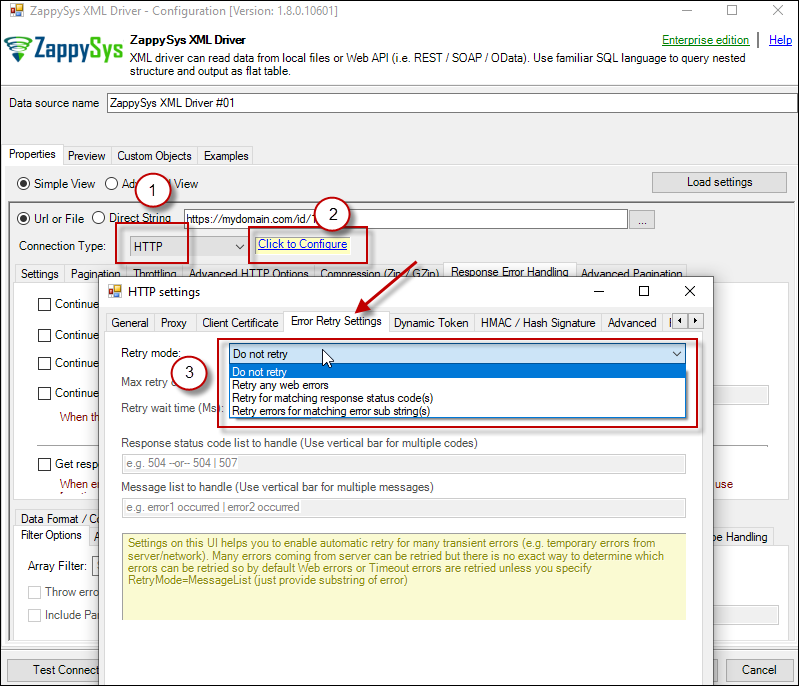
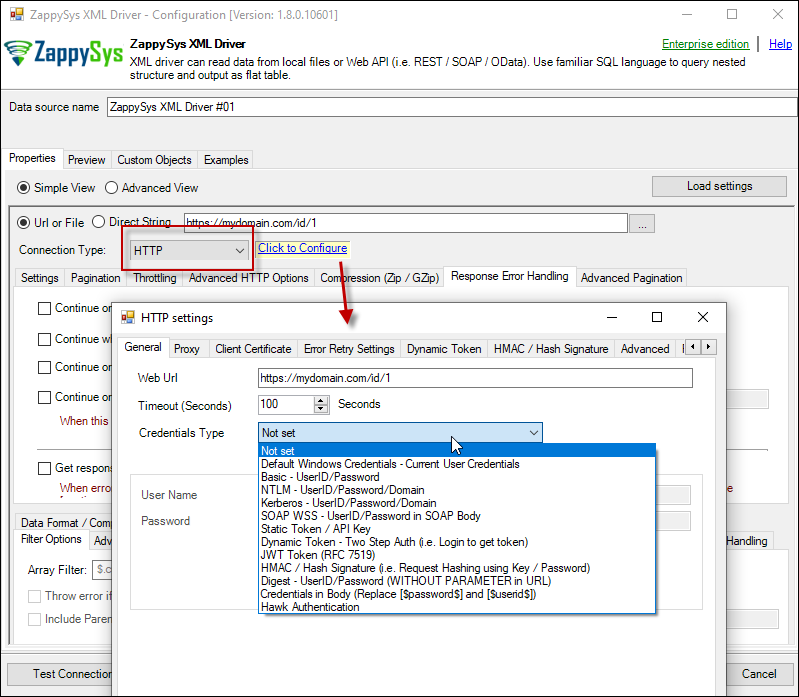
REST API Authentication in PowerShell (Basic Auth, OAuth, JWT, SOAP WSS)
- HTTP
- OAuth
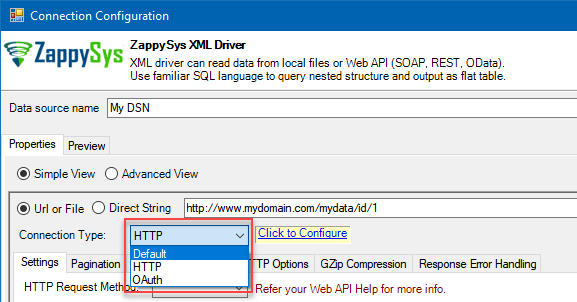
HTTP Connection
- SOAP WSS (when accessing a SOAP WebService)
- Static Token / API Key (when need to pass an API key in HTTP header)
- Dynamic Token (same as Static Token method except that each time you need to log in and retrieve a fresh API key)
- JWT Token (As per RFC 7519)
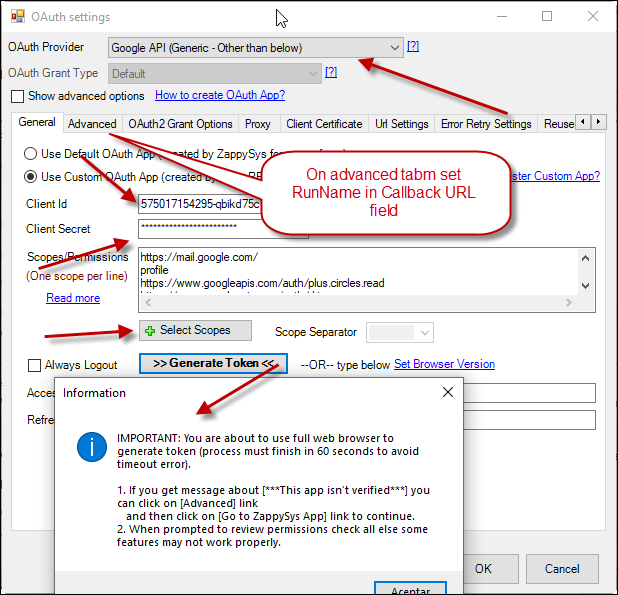
OAuth
If you are trying to access REST API resource, it is a huge chance, you will need to use OAuth Connection. Read this article to understand how OAuth authentication and authorization works and how to use it (article originally was written for SSIS PowerPack, but the concepts and UI stay the same):https://zappysys.com/blog/rest-api-authentication-with-oauth-2-0-using-ssis/
Other Consideration for REST API call in PowerShell
API Limit / Throttling
While calling public API or other external web services one important aspect you have to check, how many requests are allowed by your API. Especially when you use API pagination options to pull many records you have to slow down based on API limits. For example, your API may allow you only 5 requests per second. Use Throttling Tab on Driver UI to set delay after each request.2D Array Transformation
If you are using JSON or XML API Driver then possible you may have to transform your data using 2D array transformation feature. Check this link for more information.Conclusion
In this article we checked how to read REST API and JSON Files in PowerShell with minimum coding effort. Download ZappySys ODBC PowerPack to enhance your overall API integration scenarios in PowerShell and other programming languages such as Python, C# or tools like Power BI, Excel, SSRS, Informatica.