Introduction to REST API Call in Python
![]()
In this article, we will cover how to call REST API in Python without using REST Python client. We will use ZappySys ODBC Driver for JSON / REST API. This driver allows querying RESTful API Services without extensive coding effort. For demo purpose, we will see examples to call JSON based REST API in Python. However, the same concept can be used to connect to an XML file, JSON file, REST API, SOAP, Web API.
In this example, we will connect to the following JSON Service URL and query using Python Script.
|
1 |
https://services.odata.org/V3/Northwind/Northwind.svc/?$format=json |
Requirements
- First, make sure to install Python (we used the 3.6 version)
- Secondly, make sure that the ZappySys ODBC PowerPack is installed
Getting started
Install pip
If not installed before, you will need to install pip. Pip is a package management system created in Python. To install it, go here for more information:
Next, install Pip using the following instructions: https://pip.pypa.io/en/stable/installing/
Install pyodbc
After installing Pip, you will need to install pyodbc. Pyodbc will connect to an ODBC driver. To install pyodbc go to your python scripts on your machine:
C:\PythonXX\Scripts>Where XX is the current version
Also, in the script folder run the following command:
pip install pyodbc
This will install the pyodbc to connect to an ODBC driver.
Code example to get JSON information in Python
We will create a python script named zappyodbc.py in the script folder with the following code:
|
1 2 3 4 5 6 7 8 9 10 11 12 13 |
import pyodbc conn = pyodbc.connect( r'DRIVER={ZappySys JSON Driver};' ) cursor = conn.cursor() #execute query to fetch data from API service cursor.execute("SELECT * FROM value ORDER BY Country WITH (SRC='https://services.odata.org/V3/Northwind/Northwind.svc/Invoices?$format=json')") row = cursor.fetchone() while row: print (row) row = cursor.fetchone() |

CMD result
Also, the code will return the first row of the following URL with data in JSON format if you use row[0]:
Python results querying REST API
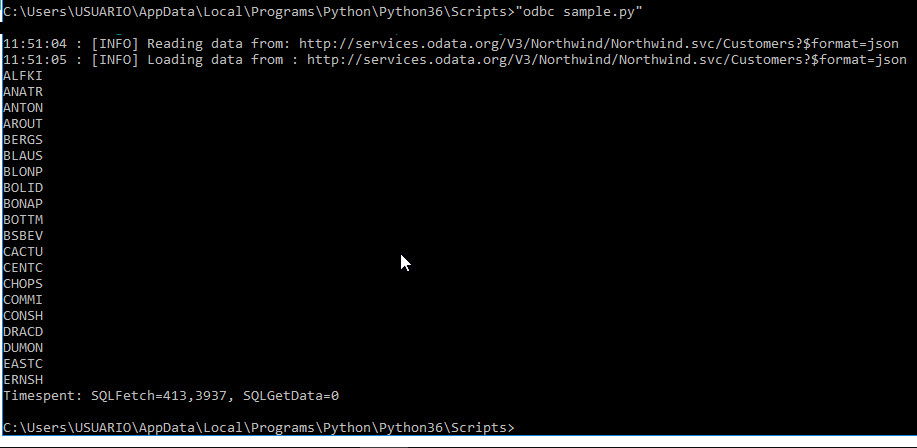
Get values from REST API and JSON with a where clause
The next example will show how to display 2 rows using filters. We will show the customer id and the company name of the customers from Germany:
|
1 2 3 4 5 6 7 8 9 10 11 12 13 |
import pyodbc conn = pyodbc.connect( r'DRIVER={ZappySys JSON Driver};' ) cursor = conn.cursor() #execute query to fetch data from API service cursor.execute("SELECT CustomerID,CompanyName FROM value WHERE COUNTRY='Germany' WITH (SRC='https://services.odata.org/V3/Northwind/Northwind.svc/Customers?$format=json')") row = cursor.fetchone() while row: print (row[0]) row = cursor.fetchone() |
How to get values in Python from a local file
First, we will add the following JSON file named customer1.json:
|
1 2 3 4 5 6 7 8 9 10 11 12 13 14 15 16 17 18 19 20 21 22 23 24 25 26 27 28 29 30 31 32 33 34 35 36 37 38 39 40 41 42 43 44 45 46 47 48 49 50 51 52 53 54 55 56 57 58 59 60 61 62 63 64 65 66 67 68 69 70 71 72 73 74 75 76 77 78 79 80 81 82 83 84 85 86 87 88 89 90 91 92 93 94 95 96 97 98 99 100 101 102 103 104 105 106 107 108 109 110 111 112 113 114 115 116 117 118 119 120 121 122 123 124 125 126 127 128 129 130 131 132 133 134 135 136 137 138 139 140 141 142 143 144 145 146 147 148 149 150 151 152 153 154 155 156 157 158 159 160 161 162 163 164 165 166 167 168 169 170 171 172 173 174 175 176 177 178 179 180 181 182 183 184 185 186 187 188 189 190 191 192 193 194 195 196 197 198 199 200 201 202 203 204 205 206 207 208 209 210 211 212 213 214 215 216 217 218 219 220 221 222 223 224 225 226 227 228 229 230 231 232 233 234 235 236 237 238 239 240 241 242 243 244 245 246 247 248 249 250 251 252 253 254 255 256 257 258 259 260 261 262 263 264 |
{ "value": [ { "CustomerID": "ALFKI", "CompanyName": "Alfreds Futterkiste", "ContactName": "Maria Anders", "ContactTitle": "Sales Representative", "Address": "Obere Str. 57", "City": "Berlin", "Region": null, "PostalCode": "12209", "Country": "Germany", "Phone": "030-0074321", "Fax": "030-0076545" }, { "CustomerID": "ANATR", "CompanyName": "Ana Trujillo Emparedados y helados", "ContactName": "Ana Trujillo", "ContactTitle": "Owner", "Address": "Avda. de la Constitución 2222", "City": "México D.F.", "Region": null, "PostalCode": "05021", "Country": "Mexico", "Phone": "(5) 555-4729", "Fax": "(5) 555-3745" }, { "CustomerID": "ANTON", "CompanyName": "Antonio Moreno Taquería", "ContactName": "Antonio Moreno", "ContactTitle": "Owner", "Address": "Mataderos 2312", "City": "México D.F.", "Region": null, "PostalCode": "05023", "Country": "Mexico", "Phone": "(5) 555-3932", "Fax": null }, { "CustomerID": "AROUT", "CompanyName": "Around the Horn", "ContactName": "Thomas Hardy", "ContactTitle": "Sales Representative", "Address": "120 Hanover Sq.", "City": "London", "Region": null, "PostalCode": "WA1 1DP", "Country": "UK", "Phone": "(171) 555-7788", "Fax": "(171) 555-6750" }, { "CustomerID": "BERGS", "CompanyName": "Berglunds snabbköp", "ContactName": "Christina Berglund", "ContactTitle": "Order Administrator", "Address": "Berguvsvägen 8", "City": "Luleå", "Region": null, "PostalCode": "S-958 22", "Country": "Sweden", "Phone": "0921-12 34 65", "Fax": "0921-12 34 67" }, { "CustomerID": "BLAUS", "CompanyName": "Blauer See Delikatessen", "ContactName": "Hanna Moos", "ContactTitle": "Sales Representative", "Address": "Forsterstr. 57", "City": "Mannheim", "Region": null, "PostalCode": "68306", "Country": "Germany", "Phone": "0621-08460", "Fax": "0621-08924" }, { "CustomerID": "BLONP", "CompanyName": "Blondesddsl père et fils", "ContactName": "Frédérique Citeaux", "ContactTitle": "Marketing Manager", "Address": "24, place Kléber", "City": "Strasbourg", "Region": null, "PostalCode": "67000", "Country": "France", "Phone": "88.60.15.31", "Fax": "88.60.15.32" }, { "CustomerID": "BOLID", "CompanyName": "Bólido Comidas preparadas", "ContactName": "Martín Sommer", "ContactTitle": "Owner", "Address": "C/ Araquil, 67", "City": "Madrid", "Region": null, "PostalCode": "28023", "Country": "Spain", "Phone": "(91) 555 22 82", "Fax": "(91) 555 91 99" }, { "CustomerID": "BONAP", "CompanyName": "Bon app'", "ContactName": "Laurence Lebihan", "ContactTitle": "Owner", "Address": "12, rue des Bouchers", "City": "Marseille", "Region": null, "PostalCode": "13008", "Country": "France", "Phone": "91.24.45.40", "Fax": "91.24.45.41" }, { "CustomerID": "BOTTM", "CompanyName": "Bottom-Dollar Markets", "ContactName": "Elizabeth Lincoln", "ContactTitle": "Accounting Manager", "Address": "23 Tsawassen Blvd.", "City": "Tsawassen", "Region": "BC", "PostalCode": "T2F 8M4", "Country": "Canada", "Phone": "(604) 555-4729", "Fax": "(604) 555-3745" }, { "CustomerID": "BSBEV", "CompanyName": "B's Beverages", "ContactName": "Victoria Ashworth", "ContactTitle": "Sales Representative", "Address": "Fauntleroy Circus", "City": "London", "Region": null, "PostalCode": "EC2 5NT", "Country": "UK", "Phone": "(171) 555-1212", "Fax": null }, { "CustomerID": "CACTU", "CompanyName": "Cactus Comidas para llevar", "ContactName": "Patricio Simpson", "ContactTitle": "Sales Agent", "Address": "Cerrito 333", "City": "Buenos Aires", "Region": null, "PostalCode": "1010", "Country": "Argentina", "Phone": "(1) 135-5555", "Fax": "(1) 135-4892" }, { "CustomerID": "CENTC", "CompanyName": "Centro comercial Moctezuma", "ContactName": "Francisco Chang", "ContactTitle": "Marketing Manager", "Address": "Sierras de Granada 9993", "City": "México D.F.", "Region": null, "PostalCode": "05022", "Country": "Mexico", "Phone": "(5) 555-3392", "Fax": "(5) 555-7293" }, { "CustomerID": "CHOPS", "CompanyName": "Chop-suey Chinese", "ContactName": "Yang Wang", "ContactTitle": "Owner", "Address": "Hauptstr. 29", "City": "Bern", "Region": null, "PostalCode": "3012", "Country": "Switzerland", "Phone": "0452-076545", "Fax": null }, { "CustomerID": "COMMI", "CompanyName": "Comércio Mineiro", "ContactName": "Pedro Afonso", "ContactTitle": "Sales Associate", "Address": "Av. dos Lusíadas, 23", "City": "Sao Paulo", "Region": "SP", "PostalCode": "05432-043", "Country": "Brazil", "Phone": "(11) 555-7647", "Fax": null }, { "CustomerID": "CONSH", "CompanyName": "Consolidated Holdings", "ContactName": "Elizabeth Brown", "ContactTitle": "Sales Representative", "Address": "Berkeley Gardens 12 Brewery", "City": "London", "Region": null, "PostalCode": "WX1 6LT", "Country": "UK", "Phone": "(171) 555-2282", "Fax": "(171) 555-9199" }, { "CustomerID": "DRACD", "CompanyName": "Drachenblut Delikatessen", "ContactName": "Sven Ottlieb", "ContactTitle": "Order Administrator", "Address": "Walserweg 21", "City": "Aachen", "Region": null, "PostalCode": "52066", "Country": "Germany", "Phone": "0241-039123", "Fax": "0241-059428" }, { "CustomerID": "DUMON", "CompanyName": "Du monde entier", "ContactName": "Janine Labrune", "ContactTitle": "Owner", "Address": "67, rue des Cinquante Otages", "City": "Nantes", "Region": null, "PostalCode": "44000", "Country": "France", "Phone": "40.67.88.88", "Fax": "40.67.89.89" }, { "CustomerID": "EASTC", "CompanyName": "Eastern Connection", "ContactName": "Ann Devon", "ContactTitle": "Sales Agent", "Address": "35 King George", "City": "London", "Region": null, "PostalCode": "WX3 6FW", "Country": "UK", "Phone": "(171) 555-0297", "Fax": "(171) 555-3373" }, { "CustomerID": "ERNSH", "CompanyName": "Ernst Handel", "ContactName": "Roland Mendel", "ContactTitle": "Sales Manager", "Address": "Kirchgasse 6", "City": "Graz", "Region": null, "PostalCode": "8010", "Country": "Austria", "Phone": "7675-3425", "Fax": "7675-3426" } ] } |
Next, use the following Python code shows how to get values from a file named customer1.json:
|
1 2 3 4 5 6 7 8 9 10 11 12 13 14 15 |
import pyodbc conn = pyodbc.connect( r'DRIVER={ZappySys JSON Driver};' ) cursor = conn.cursor() #execute query to fetch data from API service cursor.execute("SELECT CustomerID,ContactName FROM value WITH (SRC=@'C:\sql\customer2.json')") row = cursor.fetchone() while row: #print two rows print (row[0],row[1]) row = cursor.fetchone() |
How to read data from multiple JSON files in Python
Also, the following example with extract data from multiple JSON files with names that start with cust. For example customer1.json, customer2.json, etc:
|
1 2 3 4 5 6 7 8 9 10 11 12 13 14 15 |
import pyodbc conn = pyodbc.connect( r'DRIVER={ZappySys JSON Driver};' ) cursor = conn.cursor() #execute query to fetch data from API service cursor.execute("SELECT CustomerID,ContactName FROM value WITH (SRC=@'C:/sql/cust*.json')") row = cursor.fetchone() while row: #print two rows print (row[0],row[1]) row = cursor.fetchone() |
How to store your data from REST API or JSON to a CSV file in Python
Finally, the next example will show how to store your values from a JSON file or a REST API call to a local CSV file named customer.csv:
|
1 2 3 4 5 6 7 8 9 10 11 12 13 |
import csv import pyodbc conn = pyodbc.connect( r'DRIVER={ZappySys JSON Driver};' ) cursor = conn.cursor() rows = cursor.execute("SELECT CustomerID,CompanyName FROM value WHERE COUNTRY='Germany' WITH (SRC='https://services.odata.org/V3/Northwind/Northwind.svc/Customers?$format=json')") with open(r'C:/sql/customer.csv', 'w', newline='') as csvfile: writer = csv.writer(csvfile) writer.writerow([x[0] for x in cursor.description]) for row in rows: writer.writerow(row) |
How to connect using OAuth in Python to connect to Google Sheet
Oauth is a standard to connect to Web applications or services. In this example, we will get the rows from a google sheet:
We will use our ZappySys ODBC PowerPack Driver. In Windows ODBC Data Sources, add the ZappySys JSON Driver.
Add an URL like the following in Data Source:
|
1 |
https://sheets.googleapis.com/v4/spreadsheets/{spreadSheet_id}/values/'{table_name}'!A2:F |
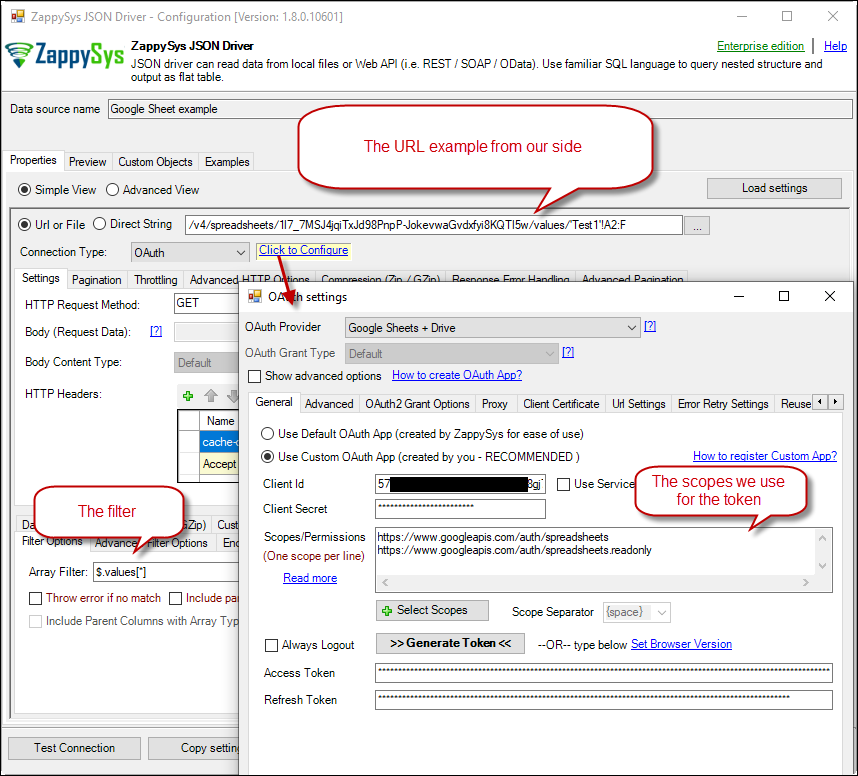
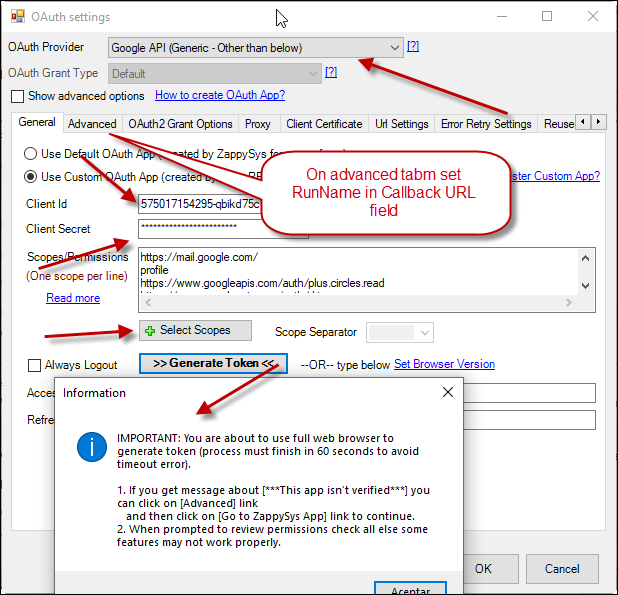
In addition, go to Authentication type and select OAuth and in OAuth settings, press the button. The Data source name in this example is ZappySys Google Sheet:
Also, in settings go to OAuth Provider and select Gogle Sheet + Drive. The Client Id and Client Secret are provided by an application created in the Google Console, Check this article for step-by-step instructions.
In scopes we will use https://www.googleapis.com/auth/spreadsheets and https://www.googleapis.com/auth/spreadsheets.readonly then press Generate Token:
Google Sheet OAuth connection
Finally, this is the code used to get the rows from a spreadsheet in Python:
|
1 2 3 4 5 6 7 8 9 10 11 12 |
import pyodbc conn = pyodbc.connect('DSN=Google Sheet example') cursor = conn.cursor() #execute query to fetch data from API service cursor.execute("SELECT * FROM $") row = cursor.fetchone() while row: print (row[1]) row = cursor.fetchone() |
Finally, the rows are displayed:

The result, rows from the spreadsheet
How to read Gmail information in Python
To start this new example, we will show how to get Gmail information in Python.
After that, we will add an ODBC DSN to connect to Gmail as we did with Google Sheet. Next, we will select OAuth to connect to Google. In Data Source, we will use a URL similar to this one:
|
1 |
https://www.googleapis.com/gmail/v1/users/{user-id}/messages/{message-id} |
Where user-id is your email account. For example zappysys@gmail.com or you can use “me”. The message id can be obtained when you click on your gmail message in a browser:
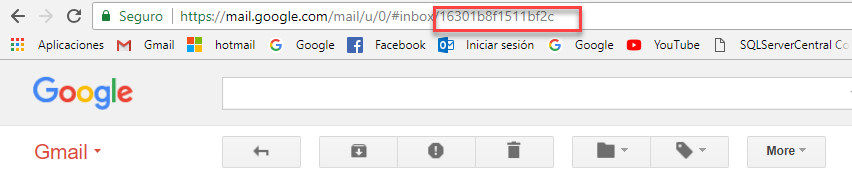
Gmail message id
Also, your configuration should be similar to this one. Press the OAuth Settings button, in your OAuth parameters in OAuth Provider, select Google, in scopes, write https://mail.google.com/ and finally press Generate Token:
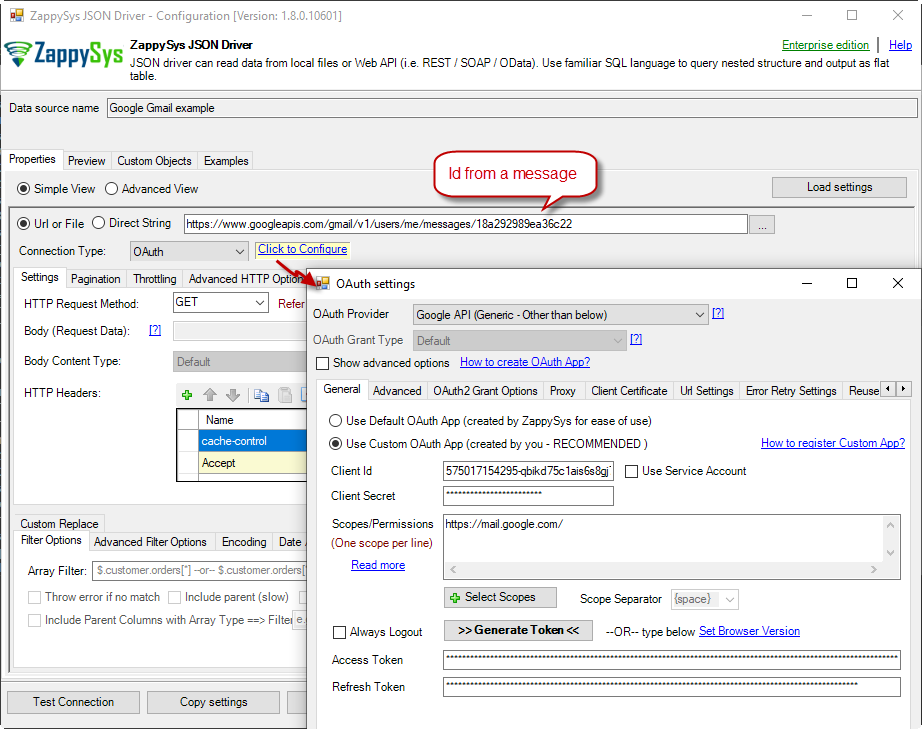
Gmail OAuth configuration
After that, your configuration is ready, use the following code to get data:
|
1 2 3 4 5 6 7 8 9 10 11 12 13 |
import pyodbc conn = pyodbc.connect('DSN=Google Gmail example') cursor = conn.cursor() #execute query to fetch data from API service cursor.execute("select name,value from [payload.headers]") row = cursor.fetchone() while row: print ("name:"+row[0]+" value:"+row[1]) row = cursor.fetchone() |
Finally, the query will show the sender of the email message, the receiver, IP information of the sender (if provided):
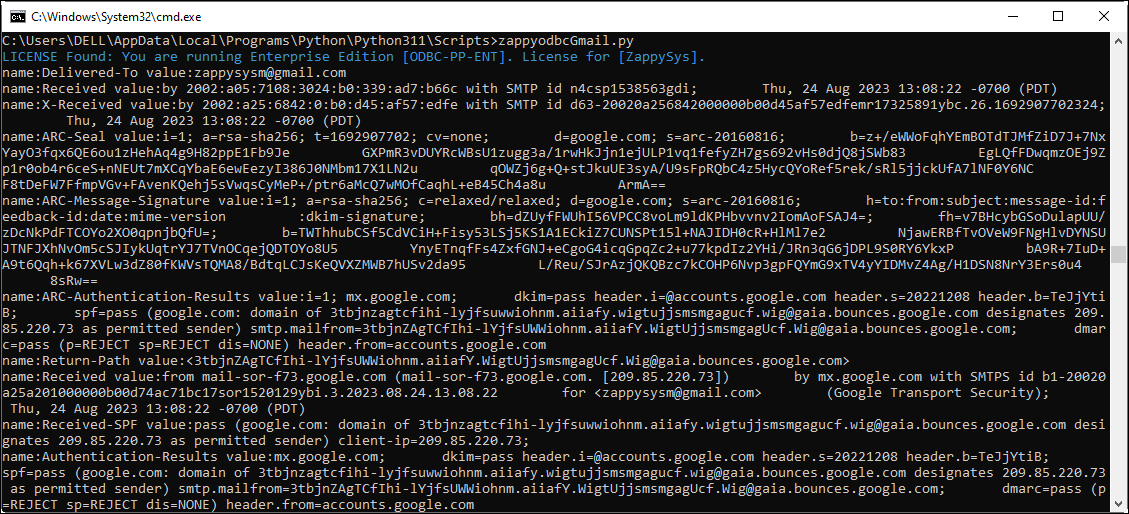
Result from the Message
Calling XML SOAP Web Service in Python
So far we have looked at examples to consume data using JSON driver. Now let’s look at an example, to call XML SOAP Web Service in Python.
What is SOAP Web Service?
If you are new to SOAP Web Service sometimes referred as XML Web Service then please read some concept about SOAP Web service standard from this link There are two important aspects in SOAP Web service.- Getting WSDL file or URL
- Knowing exact Web Service URL
What is WSDL
In very simple term WSDL (often pronounced as whiz-dull) is nothing but a document which describes Service metadata (e.g. Functions you can call, Request parameters, response structure etc). Some service simply give you WSDL as xml file you can download on local machine and then analyze or sometimes you may get direct URL (e.g. http://api.mycompany.com/hr-soap-service/?wsdl )Example SQL Query for SOAP API call using ZappySys XML Driver
Here is an example SQL query you can write to call SOAP API. If you not sure about many details then check next few sections on how to use XML Driver User Interface to build desired SQL query to POST data to XML SOAP Web Service without any coding.SELECT * FROM $
WITH(
Src='http://www.holidaywebservice.com/HolidayService_v2/HolidayService2.asmx'
,DataConnectionType='HTTP'
,CredentialType='Basic' --OR SoapWss
,SoapWssPasswordType='PasswordText'
,UserName='myuser'
,Password='pass$$w123'
,Filter='$.soap:Envelope.soap:Body.GetHolidaysAvailableResponse.GetHolidaysAvailableResult.HolidayCode[*]'
,ElementsToTreatAsArray='HolidayCode'
,RequestMethod='POST'
,Header='Content-Type: text/xml;charset=UTF-8 || SOAPAction: "http://www.holidaywebservice.com/HolidayService_v2/GetHolidaysAvailable"'
,RequestData='
<soapenv:Envelope xmlns:soapenv="http://schemas.xmlsoap.org/soap/envelope/" xmlns:hol="http://www.holidaywebservice.com/HolidayService_v2/">
<soapenv:Header/>
<soapenv:Body>
<hol:GetHolidaysAvailable>
<!--type: Country - enumeration: [Canada,GreatBritain,IrelandNorthern,IrelandRepublicOf,Scotland,UnitedStates]-->
<hol:countryCode>UnitedStates</hol:countryCode>
</hol:GetHolidaysAvailable>
</soapenv:Body>
</soapenv:Envelope>'
)
Now let's look at steps to create SQL query to call SOAP API. Later we will see how to generate code for your desired programming language (e.g. C# or SQL Server)
Video Tutorial - Introduction to SOAP Web Service and SoapUI tool
Before we dive into details about calling SOAP API using ZappySys XML Driver, lets first understand what is SOAP API and how to create SOAP requests using SoapUI tool. You will learn more about this process in the later section. The video contains some fragment about using SOAP API in SSIS but just ignore that part because we will be calling Soap API using ZappySys ODBC Driver rather than SSIS Components.Using SoapUI to test SOAP API call / Create Request Body XML
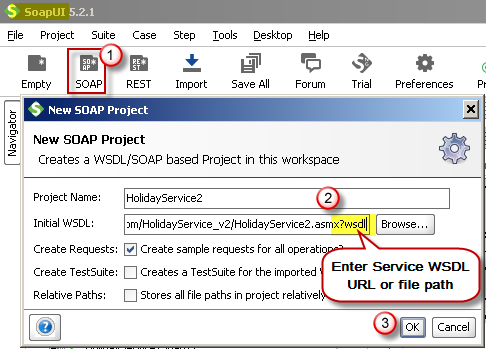
Assuming you have downloaded and installed SoapUI from here, now we are ready to use WSDL for your SOAP Web Service Calls. If you do not have WSDL file or URL handy then contact your API provider (sometimes you just have to add ?wsdl at the end of your Service URL to get WSDL so try that. Example: http://mycompany/myservice?wsdl ). If you don't know what is WSDL then in short, WSDL is Web service Description Language (i.e. XML file which describes your SOAP Service). WSDL helps to craft SOAP API request Body for ZappySys XML Driver. So Let's get started.- Open SoapUI and click SOAP button to create new SOAP Project
- Enter WSDL URL or File Path of WSDLFor example WSDL for our sample service can be accessed via this URL
http://www.dneonline.com/calculator.asmx?wsdl
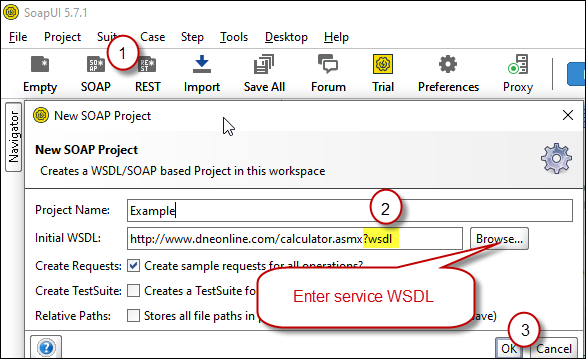 Create new SOAP API Project in SoapUI tool for SOAP API Testing
 - Once WSDL is loaded you will see possible operations you can call for your SOAP Web Service.
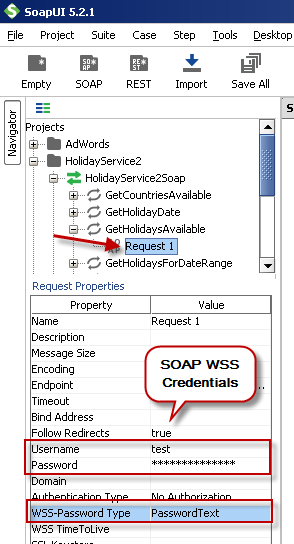
- If your web service requires credentials then you have to configure it. There are two common credential types for public services (SOAP WSS or BASIC )
-
To use SOAP WSS Credentials select request node and enter UserId, Password, and WSS-PasswordType (PasswordText or PasswordHash)
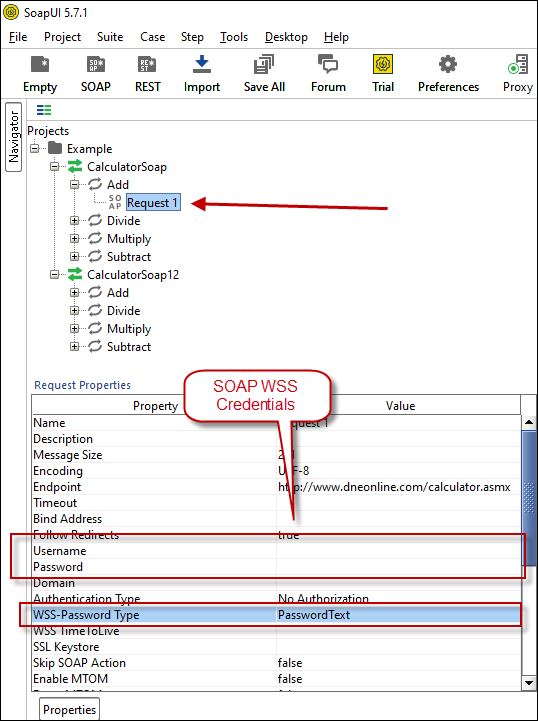 Configure SOAP WSS Credentials for SoapUI (SOAP API Testing Tool)
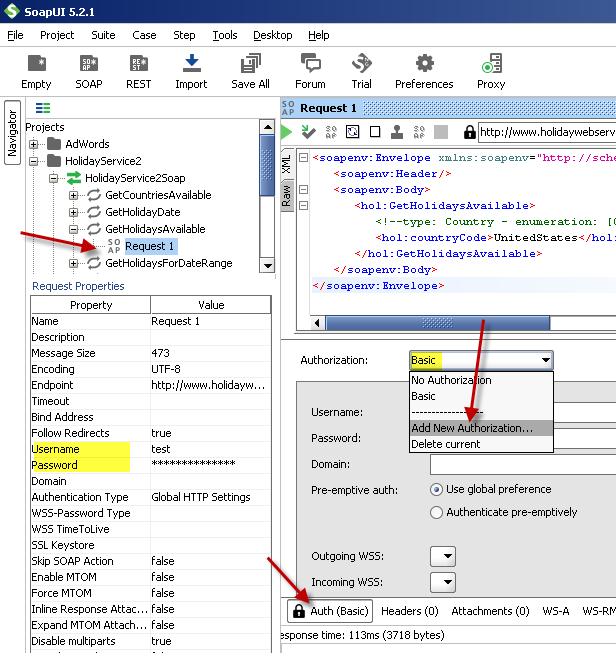
 - To use BASIC Auth Credentials select request node and double-click it. At the bottom click on Auth (Basic) and From Authorization dropdown click Add New and Select Basic.
Configure Basic Authorization for SoapUI (SOAP API Testing Tool)
-
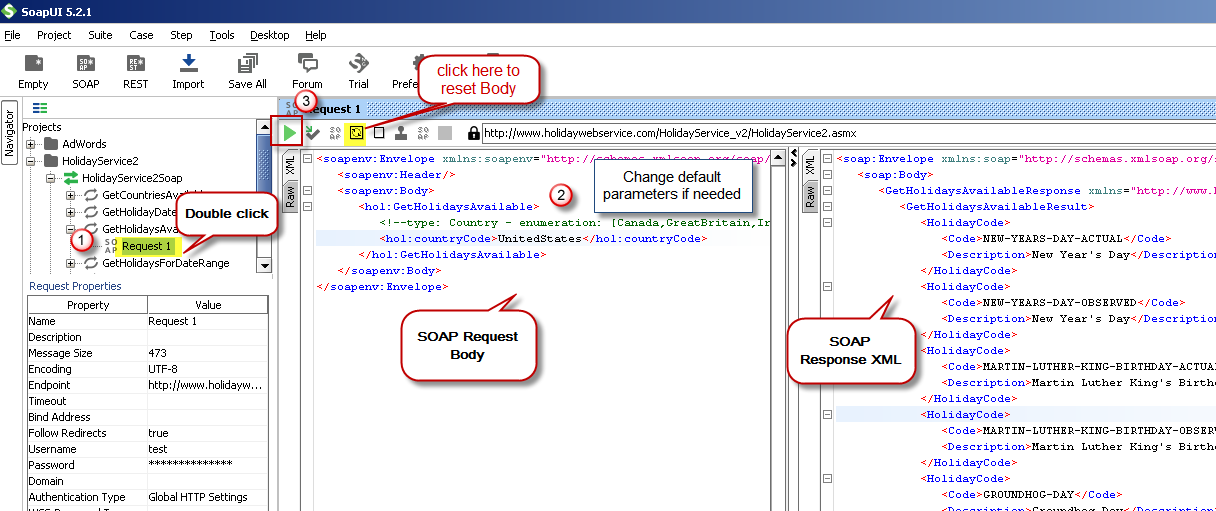
- Now you can test your request first Double-click on the request node to open request editor.
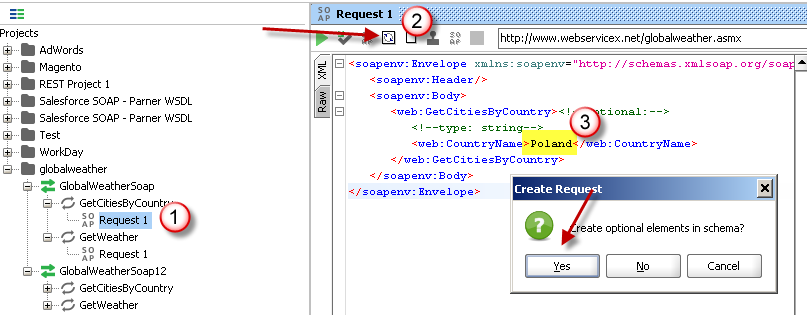
- Change necessary parameters, remove optional or unwanted parameters. If you want to regenerate request you can click on Recreate default request toolbar icon.
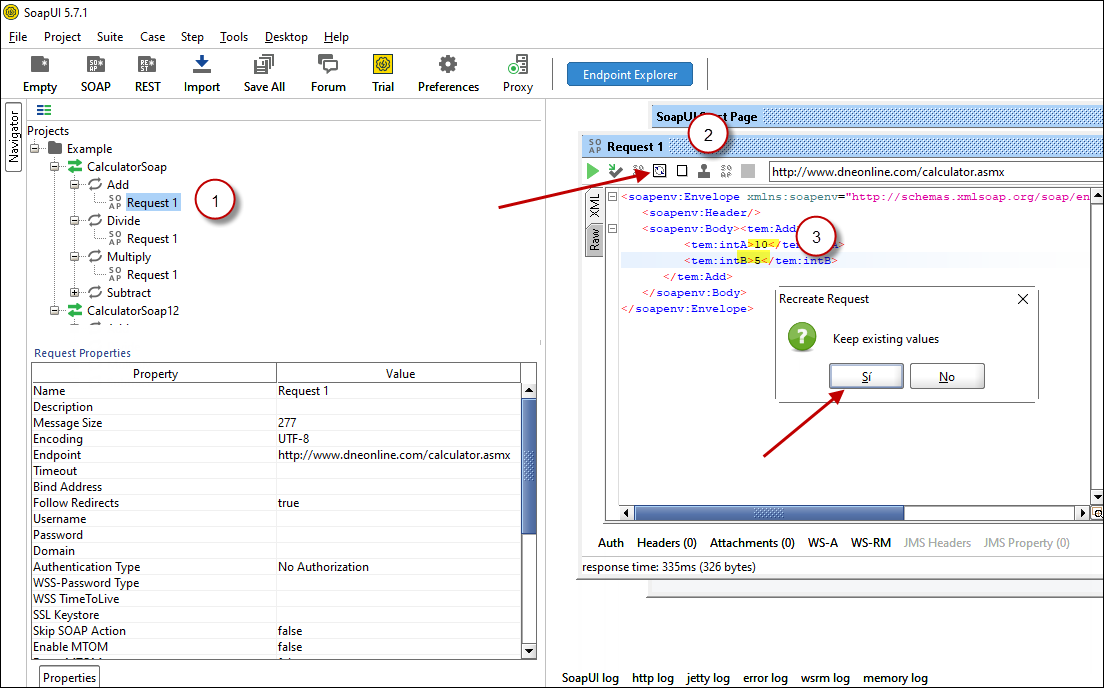 Create SOAP Request XML (With Optional Parameters)
 - Once your SOAP Request XML is ready, Click the Play button in the toolbar to execute SOAP API Request and Response will appear in Right side panel.
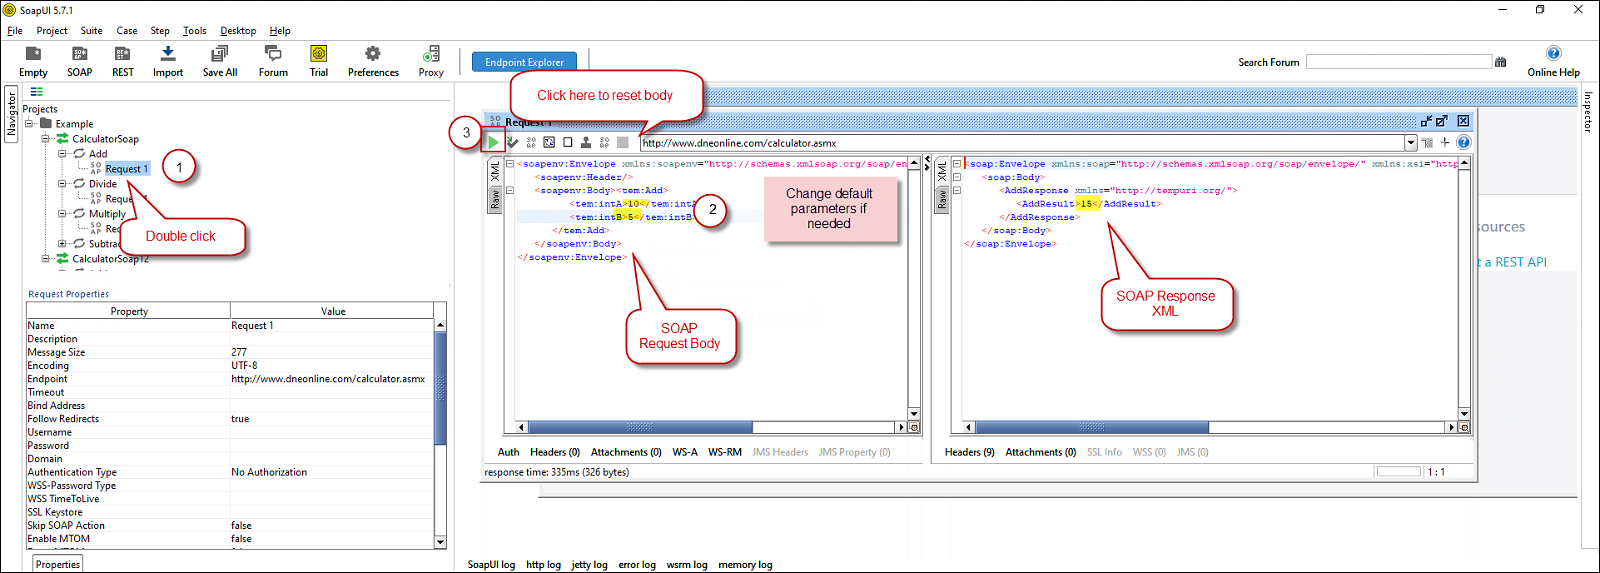 Test SOAP API using SoapUI Tool (Change Default XML Body / Parameters, Execute and See Response)
Create DSN using ZappySys XML Driver to call SOAP API
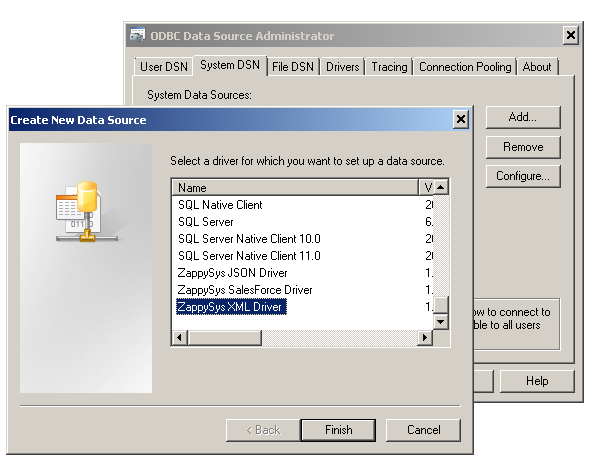
Once you have tested your SOAP API in SoapUI tool, we are ready to use ZappySys XML driver to call SOAP API in your preferred BI tool or Programming language.- First open ODBC Data Sources (search ODBC in your start menu or go under ZappySys > ODBC PowerPack > ODBC 64 bit)
- Goto System DSN Tab (or User DSN which is not used by Service account)
- Click Add and Select ZappySys XML Driver
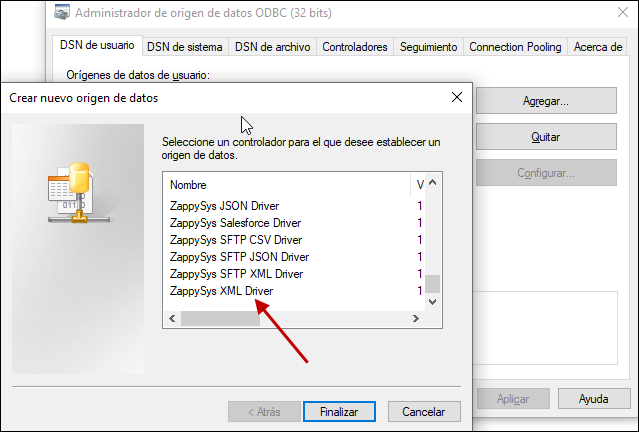 ZappySys ODBC Driver for XML / SOAP API
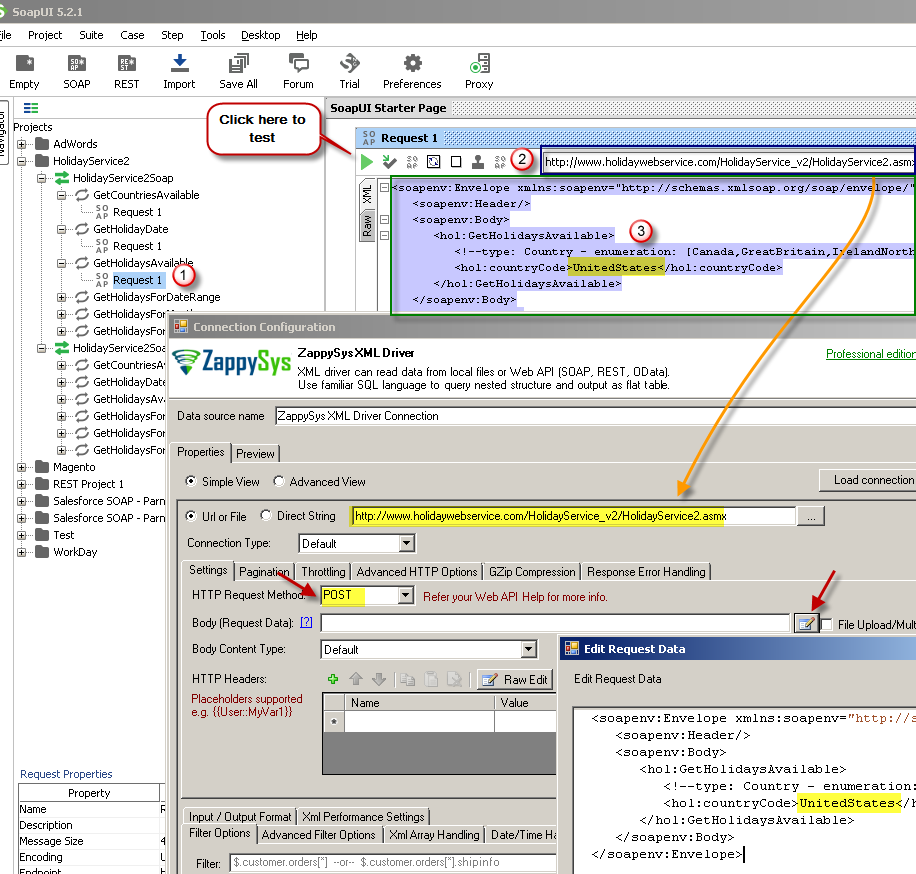
 - Configure API URL, Request Method and Request Body as below
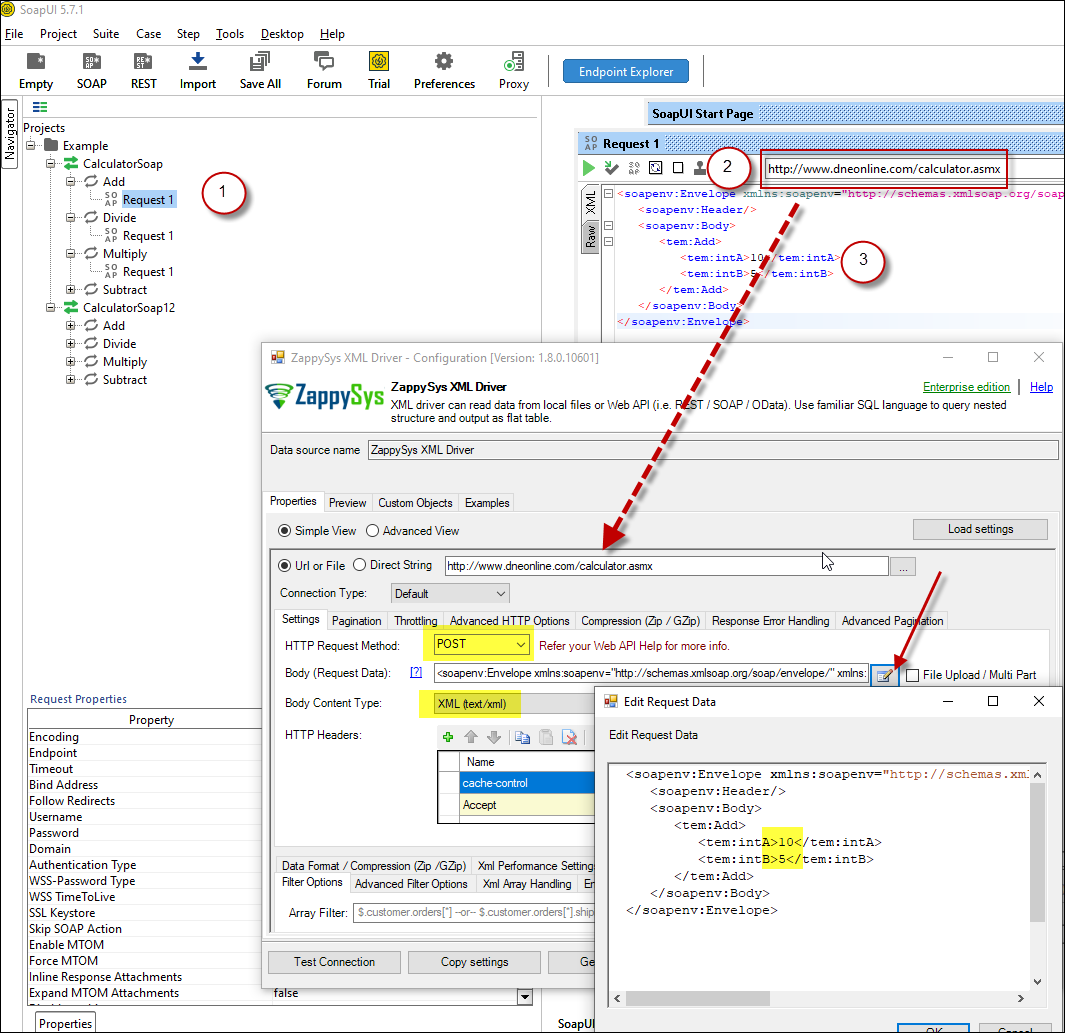 ZappySys XML Driver - Calling SOAP API - Configure URL, Method, Body
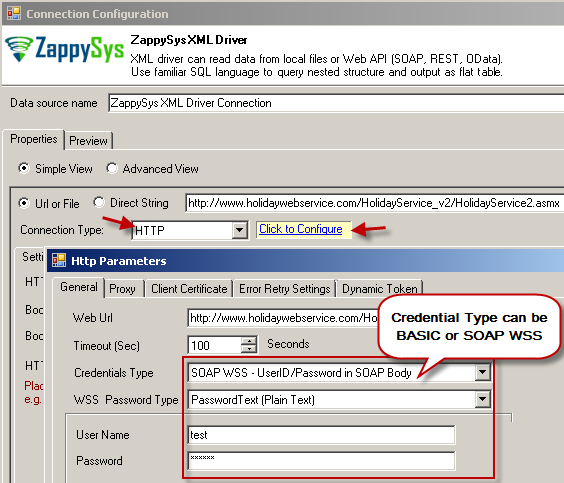
 - (This step is Optional) If your SOAP API requires credentials then Select Connection Type to HTTP and configure as below.
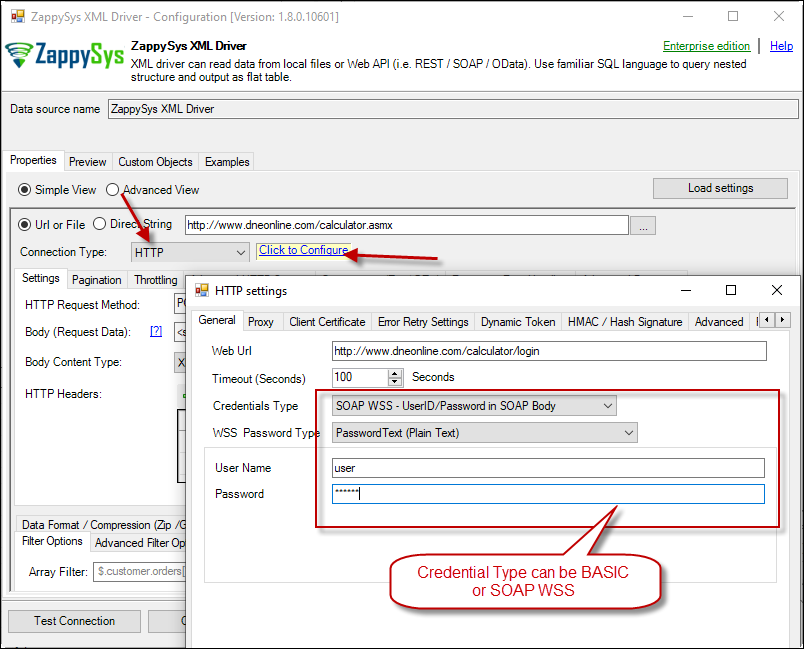 ZappySys XML Driver - Configure SOAP WSS Credentials or Basic Authorization (Userid, Password)
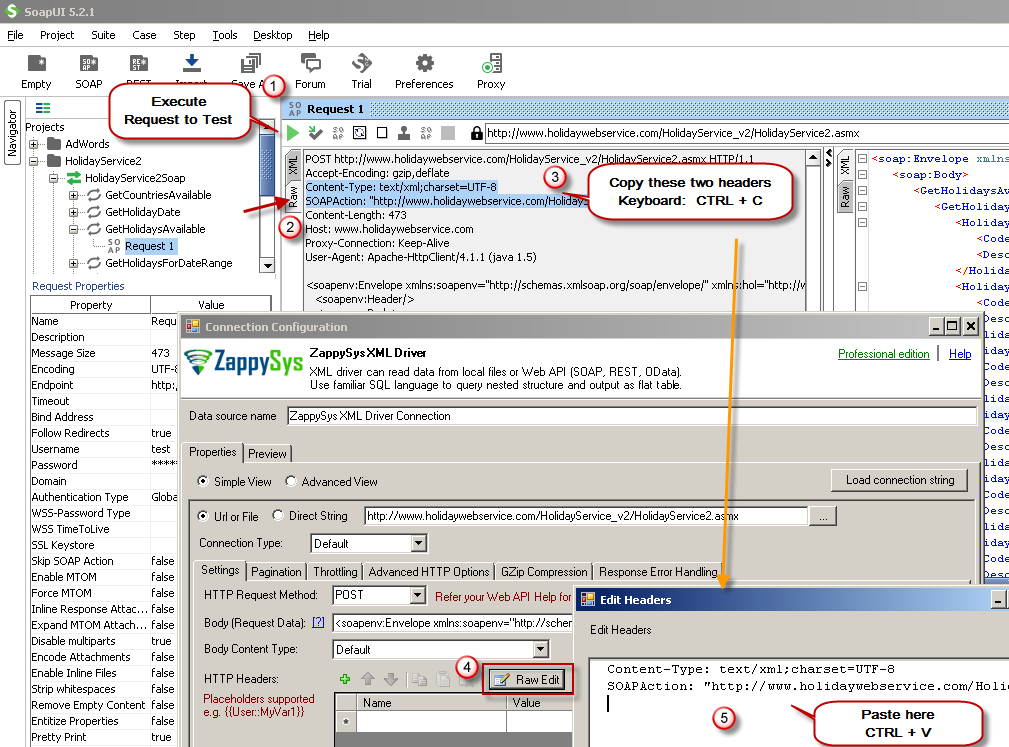
 - Configure-Request Headers as below (You can get it from Request > Raw tab from SoapUI after you test the request by clicking the Play button)
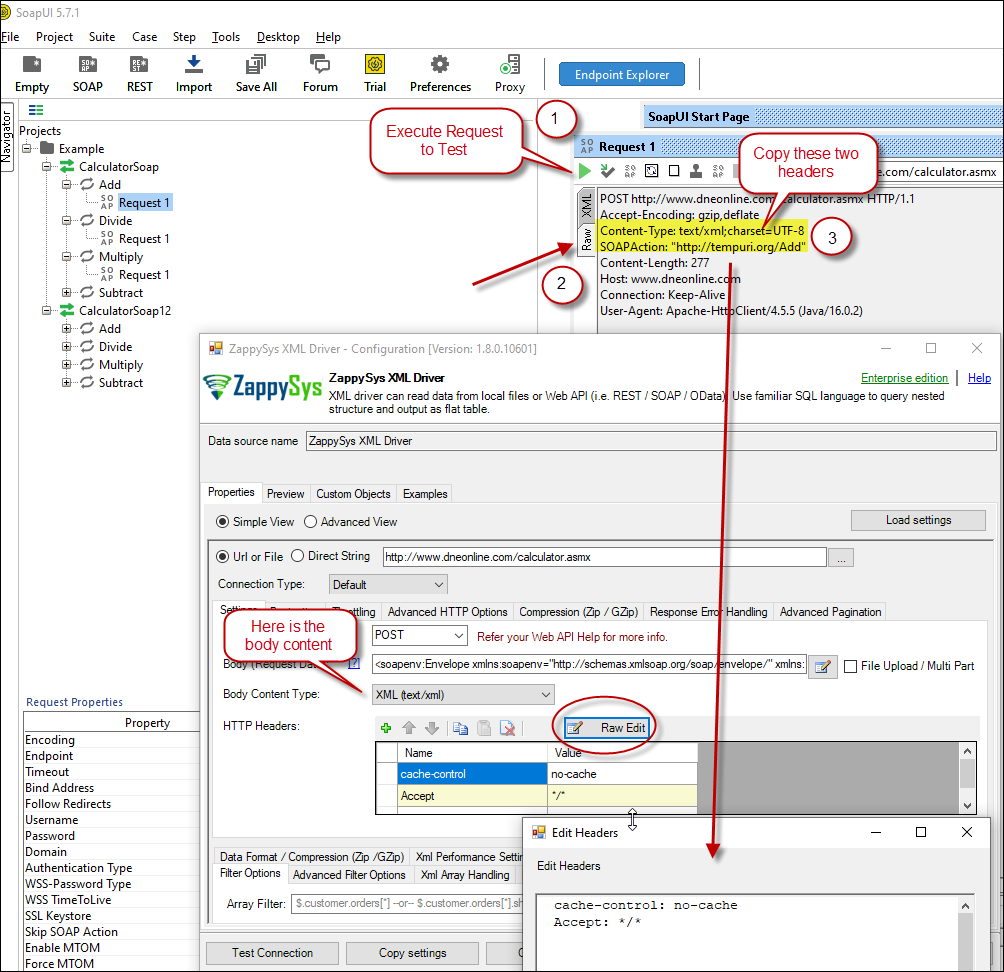 Configure SOAP API Request Headers - ZappySys XML Driver
 - Once credentials entered you can select Filter to extract data from the desired node. Make sure to select array node (see special icon) or select the node which contains all necessary columns if you don't have array node.
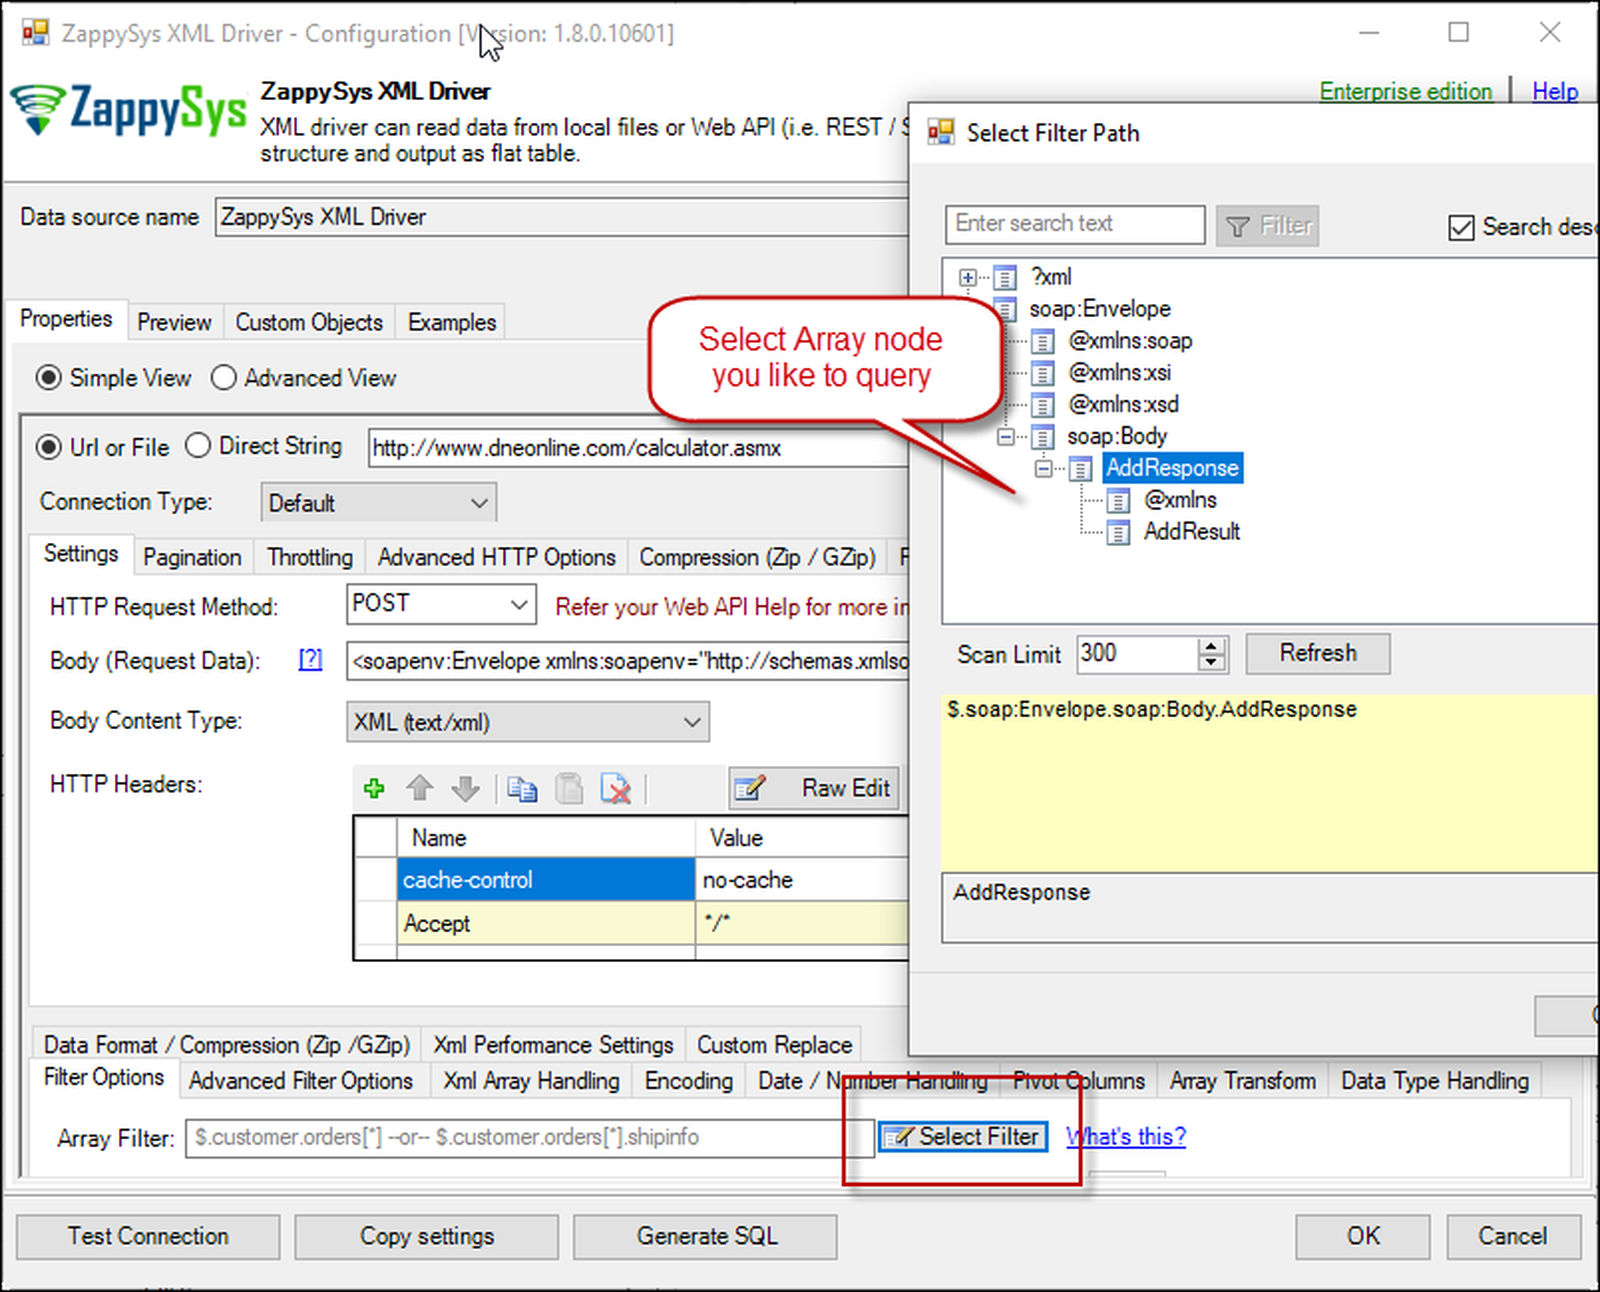 Select Filter - Extract data from nested XML / SOAP API Response (Denormalize Hierarchy)
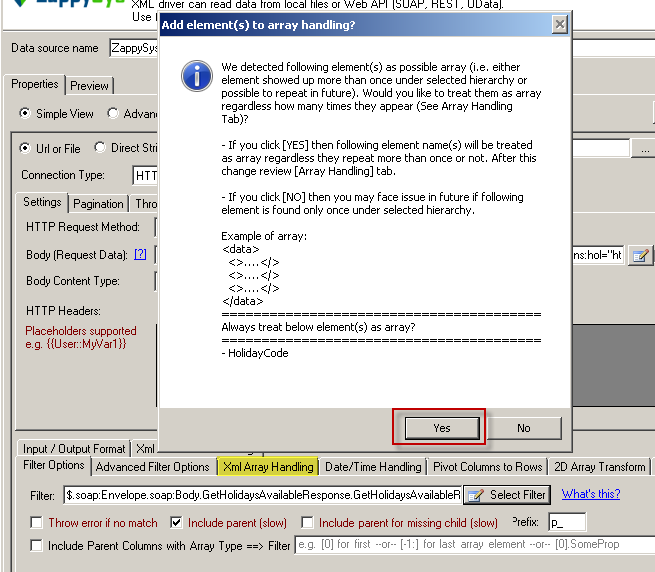
 - If prompted select yes to treat selected node as Array (This is helpful when you expect one or more record for selected node)
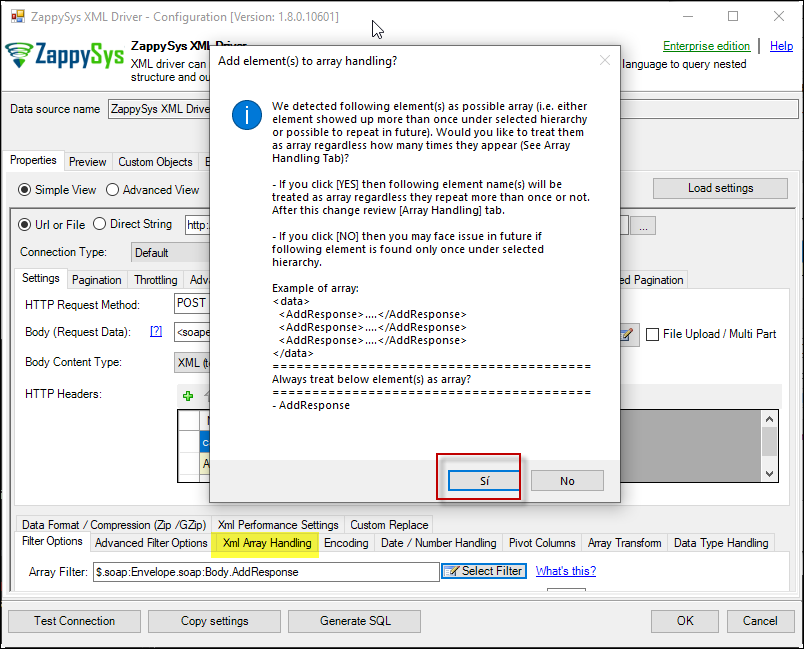 Treat selected node as XML Array Option for SOAP API Response XML

Preview SOAP API Response / Generate SQL Code for SOAP API Call
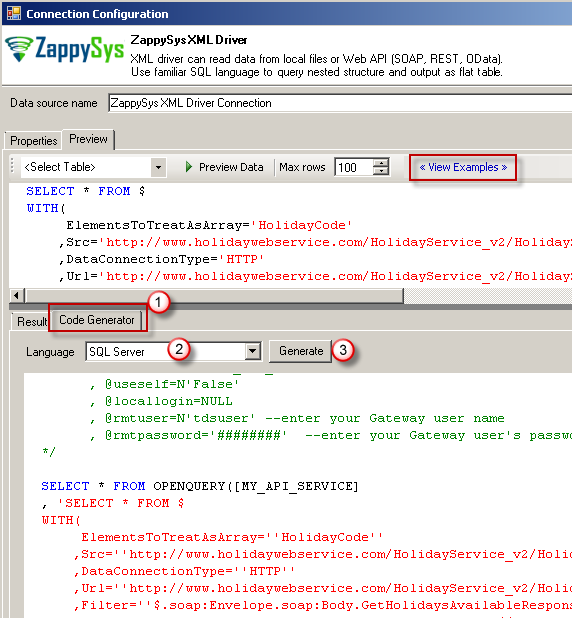
Once you configure settings for XML Driver now you can preview data or generate example code for desired language (e.g. C#, Python, Java, SQL Server). Go to Preview tab and you will see default query generated based on settings you entered in previous sections. Attributes listed in WITH clause are optional. If you omit attribute in WITH clause it will use it from Properties tab.Preview Data
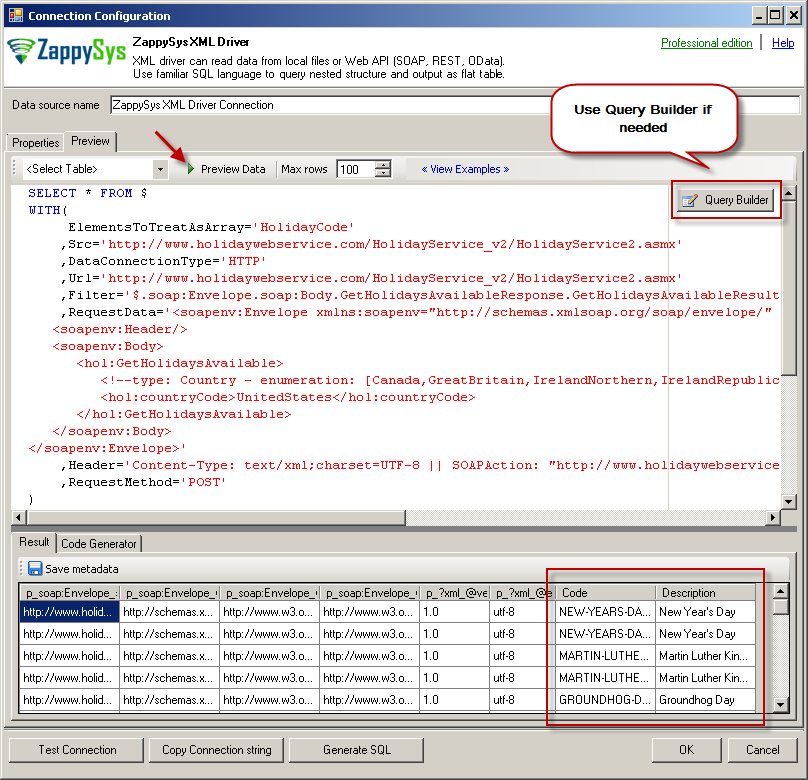 Preview SOAP API Response in ZappySys XML Driver
Generate Code Option
SOAP / REST API pagination in Python
Paginate by Response Attribute
This example shows how to paginate API calls where you need to paginate until the last page detected. In this example, next page is indicated by some attribute called nextlink (found in response). If this attribute is missing or null then it stops fetching the next page.SELECT * FROM $ WITH( SRC=@'https://zappysys.com/downloads/files/test/pagination_nextlink_inarray_1.json' ,NextUrlAttributeOrExpr = '$.nextlink' --keep reading until this attribute is missing. If attribute name contains dot then use brackets like this $.['my.attr.name'] )
Paginate by URL Parameter (Loop until certain StatusCode)
This example shows how to paginate API calls where you need to pass page number via URL. The driver keeps incrementing page number and calls next URL until the last page detected (401 error). There are few ways to indicate the last page (e.g. By status code, By row count, By response size). If you don't specify end detection then it will use the default (i.e. No records found).SELECT * FROM $ WITH ( SRC=@'https://zappysys.com/downloads/files/test/page-xml.aspx?page=1&mode=DetectBasedOnResponseStatusCode' ,PagingMode='ByUrlParameter' ,PagingByUrlAttributeName='page' ,PagingByUrlEndStrategy='DetectBasedOnResponseStatusCode' ,PagingByUrlCheckResponseStatusCode=401 ,IncrementBy=1 )
Paginate by URL Path (Loop until no record)
This example shows how to paginate API calls where you need to pass page number via URL Path. The driver keeps incrementing page number and calls next URL until the last page is detected. There are few ways to indicate the last page (e.g. By status code, By row count, By response size). If you don't specify end detection then it will use the default (i.e. No records found).SELECT * FROM $ WITH ( SRC=@'https://zappysys.com/downloads/files/test/cust-<%page%>.xml' ,PagingMode='ByUrlPath' ,PagingByUrlAttributeName='<%page%>' ,PagingByUrlEndStrategy='DetectBasedOnRecordCount' ,IncrementBy=1 )
Paginate by Header Link (RFC 5988)
API like GitHub / Wordpress use Next link in Headers (RFC 5988)SELECT * FROM $ LIMIT 25 WITH( Src='https://wordpress.org/news/wp-json/wp/v2/categories?per_page=10' ,PagingMode='ByResponseHeaderRfc5988' ,WaitTimeMs='200' --//wait 200 ms after each request )
SOAP / REST API Error Handling in Python
METHOD 1 - Using Error Handling Options
When to use?
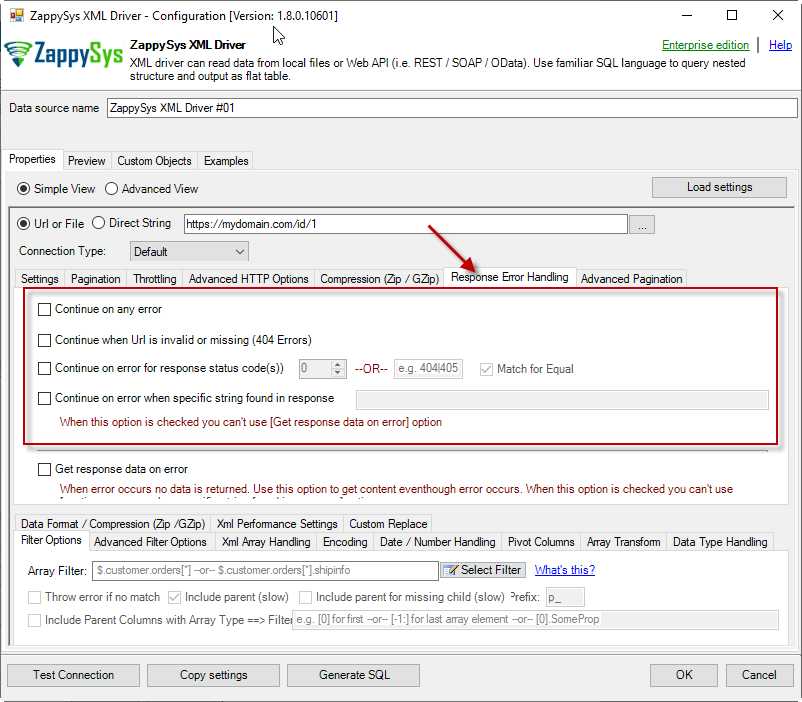
You may want to use them when your source is a resource located on the Internet; e.g. a file on a website, a file on an FTP server or just a plain API HTTP response. By default, when a remote server returns an error, data retrieval is stopped, an error is raised and no data is given back to you. This might not be always desirable.Scenario 1
Imagine a scenario, that there is a web server which each day at 12 AM releases a new JSON file with that day's date as filename, e.g. http://www.some-server.com/data/2018-06-20.json. And, of course, you want to download it and use it daily in your Power BI report. But you have a problem: Power BI report data sources are refreshed each hour and you may get HTTP 404 status code (no file was found) when a file is not released yet. Which consequentially means other data sources won't be updated as well and you will see old and cached data on the report. That's where you could use Continue on any error or Continue when Url is invalid or missing (404 Errors) to avoid an error being raised and let other data sources to be updated.Scenario 2
Another scenario is when you expect a web server to raise some kind of HTTP error when accessing a URL. You don't want ODBC Data Source to raise an error but instead, you want to get response data. That's where you can use Continue on any error or alike together with Get response data on error to continue on an error and get the data: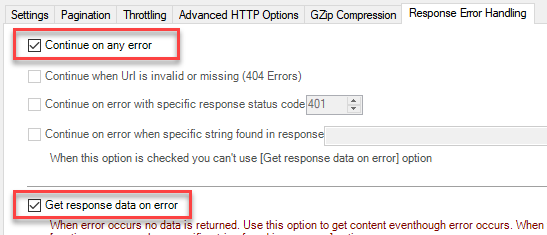
METHOD 2 - Using Connection [Retry Settings]
Another scenario you may run into is a buggy web server. You ask it to give you some file or data and it, like a snotty kid, just doesn't give it to you! You have to ask twice or thrice before it does its job. If that's the case, you have to retry HTTP requests using Connection: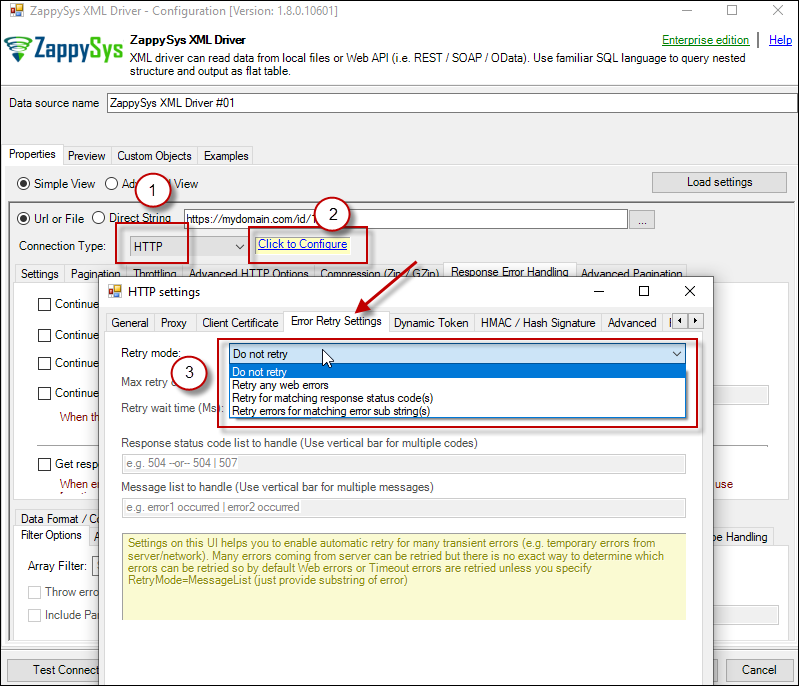
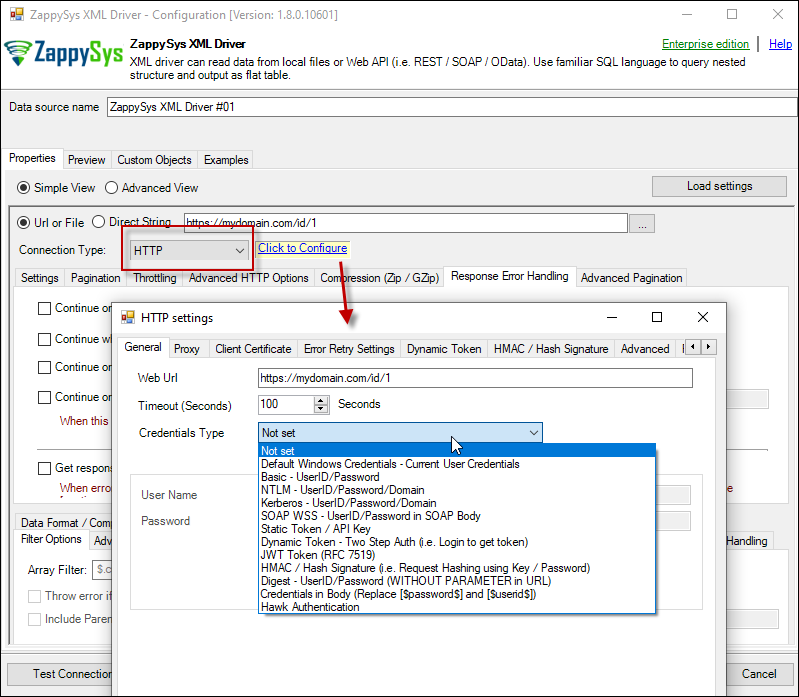
Security / Connection Types (Options for HTTP, OAuth, SOAP) in Python
- HTTP
- OAuth
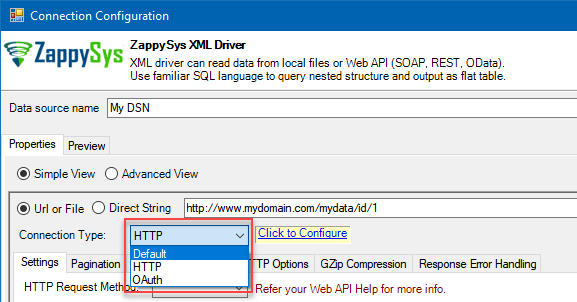
HTTP Connection
- SOAP WSS (when accessing a SOAP WebService)
- Static Token / API Key (when need to pass an API key in HTTP header)
- Dynamic Token (same as Static Token method except that each time you need to log in and retrieve a fresh API key)
- JWT Token (As per RFC 7519)
OAuth
If you are trying to access REST API resource, it is a huge chance, you will need to use OAuth Connection. Read this article to understand how OAuth authentication and authorization works and how to use it (article originally was written for SSIS PowerPack, but the concepts and UI stay the same):https://zappysys.com/blog/rest-api-authentication-with-oauth-2-0-using-ssis/
API Limit / Throttling
While calling public API or other external web services one important aspect you have to check, how many requests are allowed by your API. Especially when you use API pagination options to pull many records you have to slow down based on API limits. For example, your API may allow you only 5 requests per second. Use Throttling Tab on Driver UI to set delay after each request.2D Array Transformation
If you are using JSON or XML API Driver then possible you may have to transform your data using 2D array transformation feature. Check this link for more information.Conclusion
In conclusion, we can say that working to get a REST Python client. We learn how to get information from a JSON file or REST using the ZappySys ODBC PowerPack.
References
Finally, you can use the following links for more information:
Keywords:
REST Python client example, REST Python client JSON, REST Python client library, REST Python API