Introduction
![]() In this article, we will learn to create a Qlik REST connector to OneDrive, Google, and other services.
In this article, we will learn to create a Qlik REST connector to OneDrive, Google, and other services.
Qlik is a very powerful tool to analyze data from multiple sources and visualize, create relations and charts. It is a simple, but powerful tool used to visualize data.
In this tutorial, we will show how to get data from the REST API in Qlik. We will use the ZappySys ODBC PowerPack which is a very useful tool used to get data from REST API, WEB API, JSON files, XML files, SOAP and OData using simple SQL queries to the data.
This article will show how to extract data from Facebook, Twitter, and Google Sheets in Qlik using REST API.
Requirements for Qlik REST connector
- First of all, you will need Qlik Sense for Desktop.
- Secondly, ZappySys ODBC PowerPack installed.
Getting started – Reading data form API
We will first show how to connect to OData in JSON format.
Configure ODBC Data Source for API Connection
- First of all, we will access the following URL:
1https://services.odata.org/V3/Northwind/Northwind.svc/Orders?$format=json - Secondly, in the windows start menu, Search for “ODBC” open the ODBC Data Sources.
- Also, in the ODBC Administrator, press Add and select the ZappySys JSON
Driver: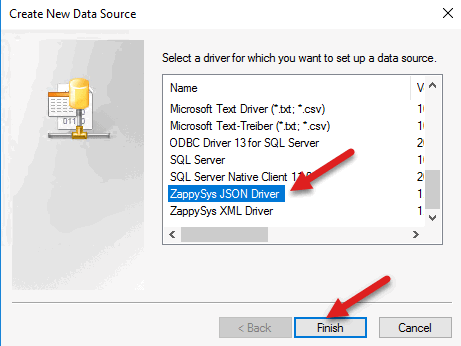
Add ODBC JSON
- Finally, specify the URL of step 1 and save the configuration:

URL ODBC
Reading REST API data in Qlik (via ODBC Connector)
- First of all, open the Qlik Sense Desktop:
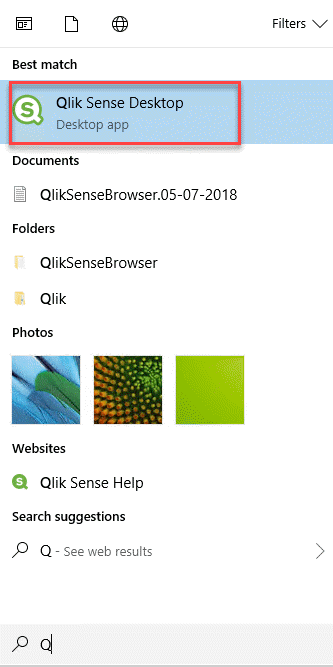
Open Qlik Sense
- Secondly, enter your login and password:

Login to Qlik Sense
- Also, create a new App:

Create new app Qlik Sense
- Additionally, enter your App name:
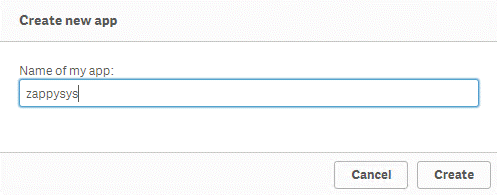
Add new Qlik create app
- In addition, select the option Add data from files and other sources:
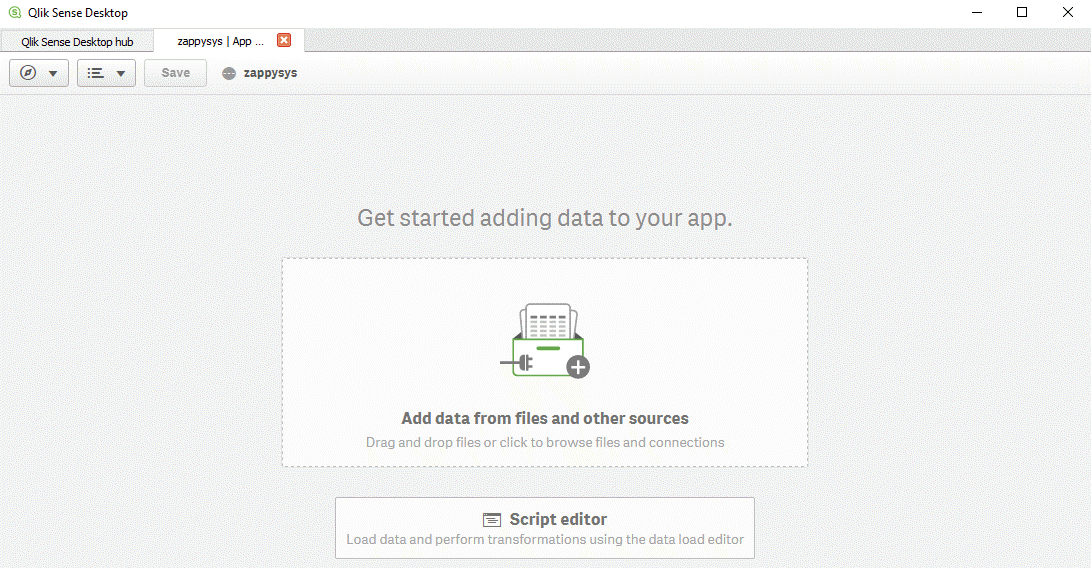
Add data from files and folders
- Select the ODBC data source:
Select ODBC connector
- Also, select the ZappySys DSN created in the Create Qlik REST connector to OData:
Qlik REST connector
- Finally, you will be able to see the data and create graphs and more. For more information about Qlik Sense refer to this link.
Qlik to Odata
Other REST API Examples in Qlik
Now lets look at a few more examples of other popular REST API services (JSON or XML API).
Google SpreadSheet / Drive API Example in Qlik
In this new example, we will connect to a Google Sheet. The Sheet is the
following:

Qlik to Google Sheet
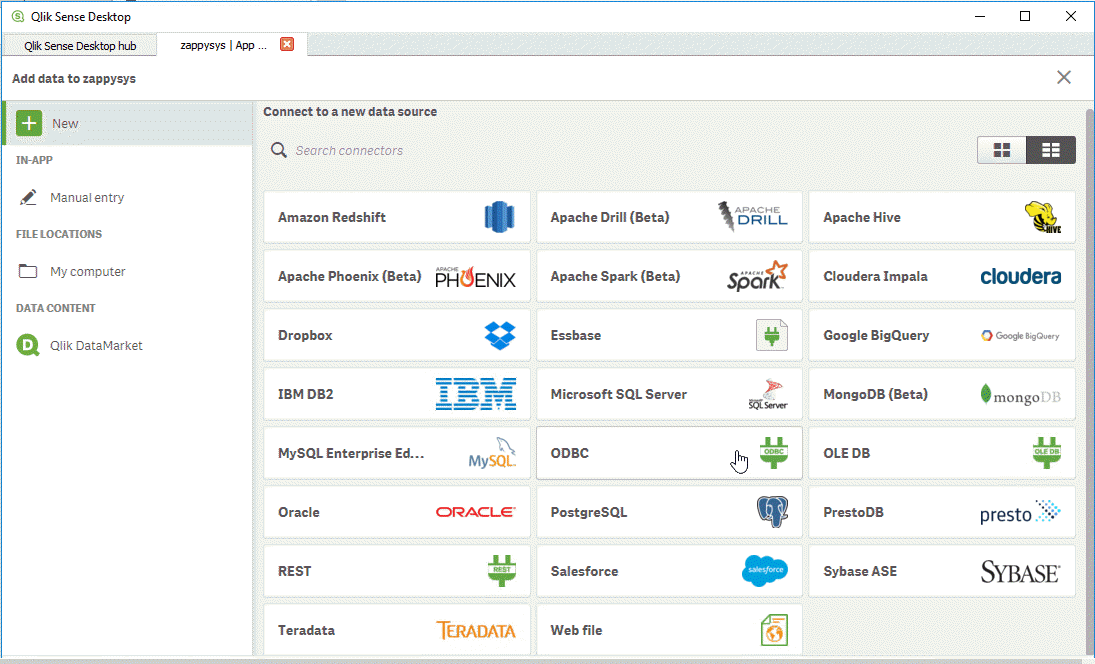
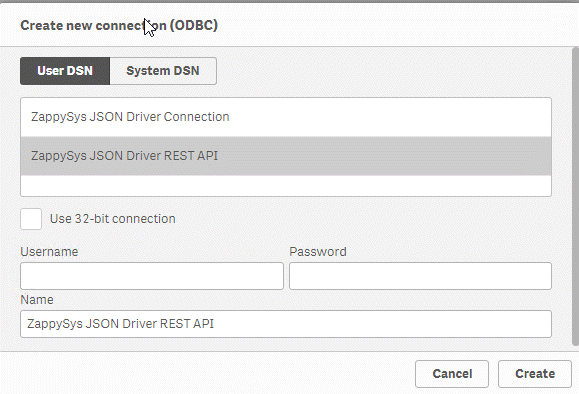
- First of all, create a new ZappySys JSON Driver Connection in the ODBC.
- Secondly, you will need to specify the following link:
where 1yfNChaljZvAL-HXF4lmM4o16Paa_BZuBWSflgBssZAQ is the ID of the Google Sheet and A1:B4 are the ranges of cells to retrieve:1https://sheets.googleapis.com/v4/spreadsheets/1yfNChaljZvAL-HXF4lmM4o16Paa_BZuBWSflgBssZAQ/values/A1:B4
Google file id
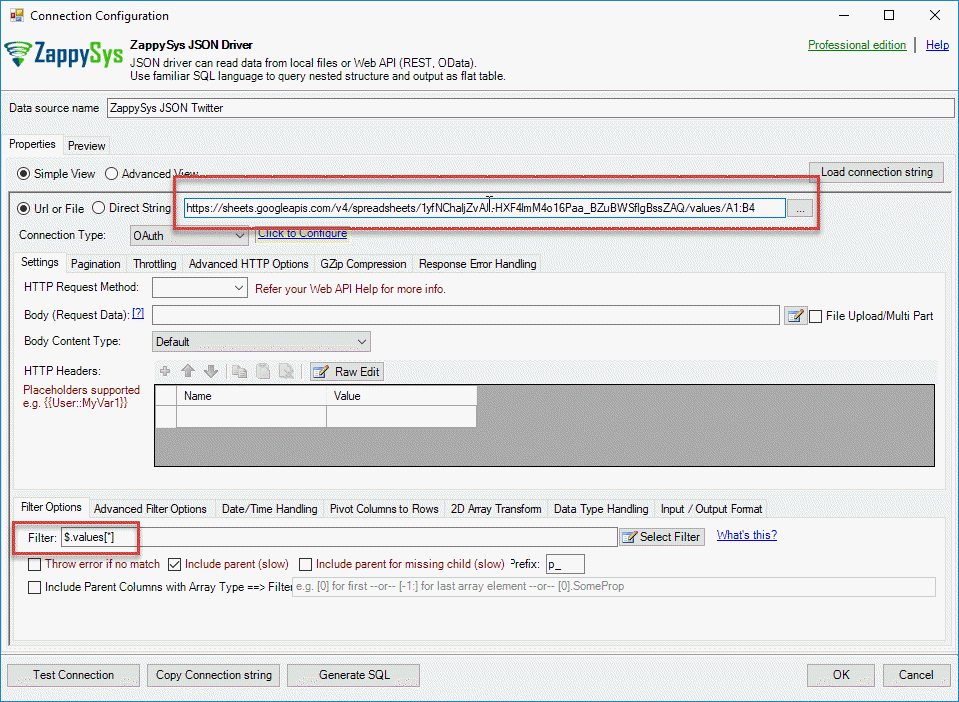
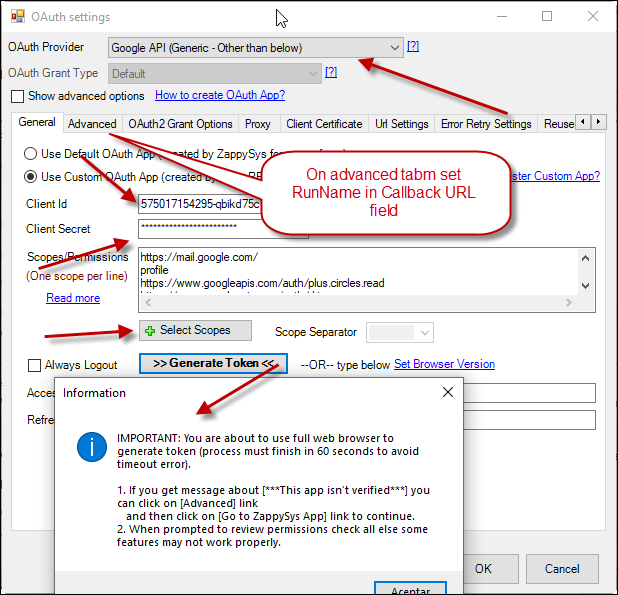
- Also, in filter enter $.values[*] and select the OAuth Connection Type and press the link to configure the OAuth connection:
Google drive url
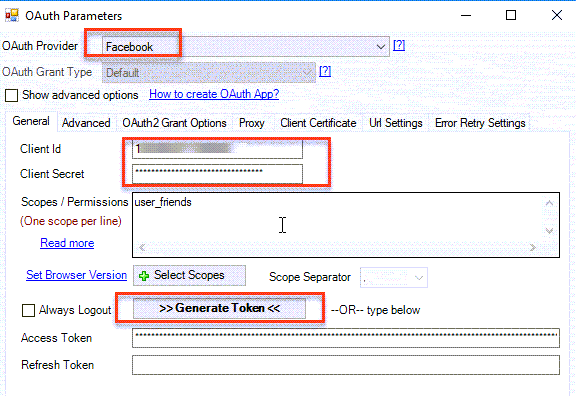
- In addition, select Google OAuth Provider and specify the following scope and Generate a Token:
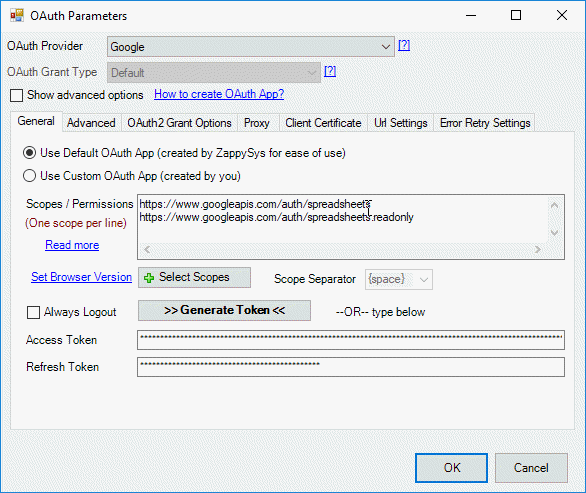
OAuth REST API Qlik Sense
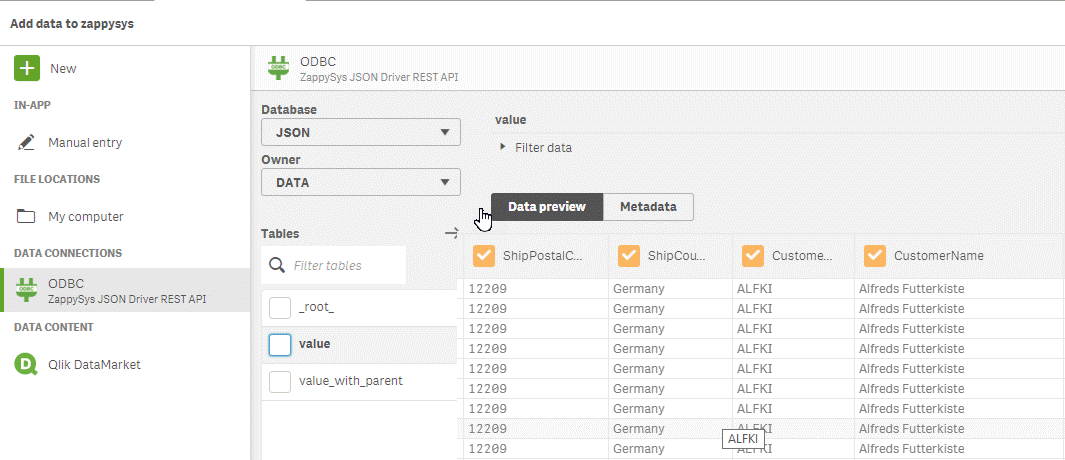
- Finally, create an Application in Qlik Sense Desktop and add the ODBC DSN created in the previous step and you will have the Google Sheet data:
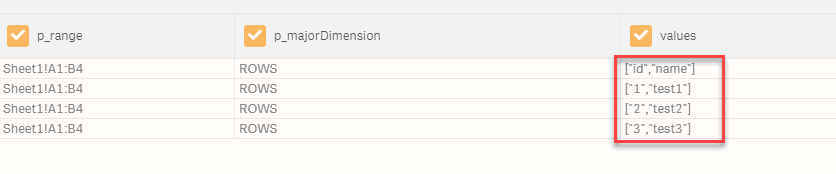
Display data REST
Twitter REST API Example in Qlik
In this new section, we will show how to connect to Twitter and get the
information in Qlik using REST.
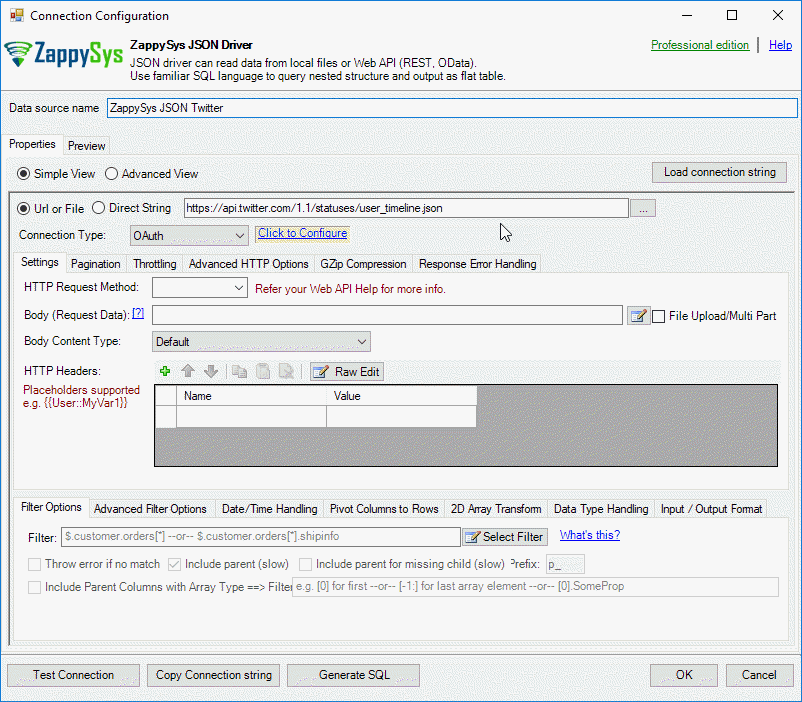
- First of all, we will use the ODBC Administrator to use the ZappySys ODBC PowerPack and select the ZappySys JSON Driver.
- Secondly, we will enter the following URL in the ZS JSON Drive:
1https://api.twitter.com/1.1/statuses/user_timeline.json? - Also in connection type, select OAuth:
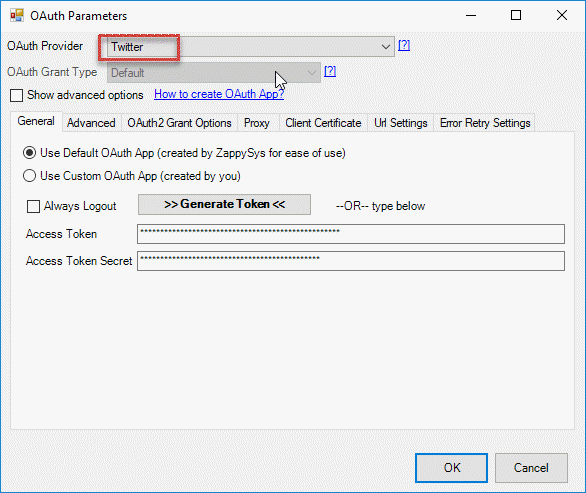
Select OAuth options
- In Addition, in the OAuth parameters, select the Twitter OAuth provider and generate a Token. The application will ask for your Twitter credentials:
Qlik connection information
- Finally, create a new app in Qlik Sense Desktop and add the ODBC DSN just created and you will have your Twitter data in Qlik Sense.

Qlik sense to Twitter
Facebook REST API Example in Qlik
Facebook is another popular social network with interesting information. The following example will show how to show the number of Facebook friends in Qlik using REST API.
- First of all, open the ODBC Administrator in Windows and add the ZappySys JSON Driver.
- Secondly, you will need a Facebook application. The following link shows you how to configure the application.
Connect Facebook Qlik
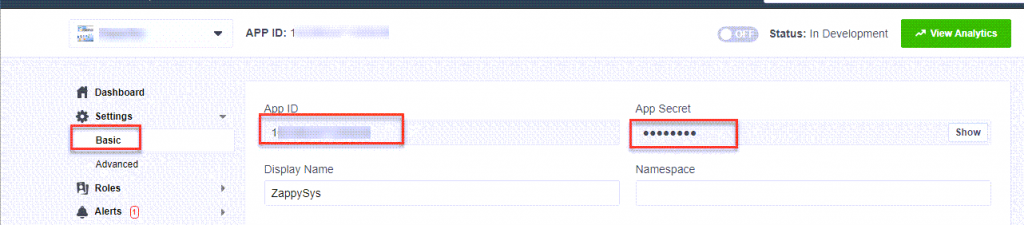
- In your ZappySys ODBC driver, add your client id and client secret that can be obtained from the Facebook Application:
Facebook Connection information for qlik
- Finally add your ODBC connection to Facebook in Qlik Sense as we did in previous examples.

ZappySys JSON /REST API Driver Query Examples
Reading from XML files or API can be done using the same way as previous sections except you have to use ZappySys XML Driver. Read help file here to see json query examples.
ZappySys XML / SOAP Driver Query Examples
Reading from XML files or API can be done using the same way as previous sections except you have to use ZappySys XML Driver. Read help file here to see xml query examples.
Calling XML SOAP Web Service in Qlik
So far we have looked at examples to consume data using JSON driver. Now lets look at an example, to call XML SOAP Web Service in Qlik.
What is SOAP Web Service?
If you are new to SOAP Web Service sometimes referred as XML Web Service then please read some concept about SOAP Web service standard from this link There are two important aspects in SOAP Web service.- Getting WSDL file or URL
- Knowing exact Web Service URL
What is WSDL
In very simple term WSDL (often pronounced as whiz-dull) is nothing but a document which describes Service metadata (e.g. Functions you can call, Request parameters, response structure etc). Some service simply give you WSDL as xml file you can download on local machine and then analyze or sometimes you may get direct URL (e.g. http://api.mycompany.com/hr-soap-service/?wsdl )Example SQL Query for SOAP API call using ZappySys XML Driver
Here is an example SQL query you can write to call SOAP API. If you not sure about many details then check next few sections on how to use XML Driver User Interface to build desired SQL query to POST data to XML SOAP Web Service without any coding.SELECT * FROM $
WITH(
Src='http://www.holidaywebservice.com/HolidayService_v2/HolidayService2.asmx'
,DataConnectionType='HTTP'
,CredentialType='Basic' --OR SoapWss
,SoapWssPasswordType='PasswordText'
,UserName='myuser'
,Password='pass$$w123'
,Filter='$.soap:Envelope.soap:Body.GetHolidaysAvailableResponse.GetHolidaysAvailableResult.HolidayCode[*]'
,ElementsToTreatAsArray='HolidayCode'
,RequestMethod='POST'
,Header='Content-Type: text/xml;charset=UTF-8 || SOAPAction: "http://www.holidaywebservice.com/HolidayService_v2/GetHolidaysAvailable"'
,RequestData='
<soapenv:Envelope xmlns:soapenv="http://schemas.xmlsoap.org/soap/envelope/" xmlns:hol="http://www.holidaywebservice.com/HolidayService_v2/">
<soapenv:Header/>
<soapenv:Body>
<hol:GetHolidaysAvailable>
<!--type: Country - enumeration: [Canada,GreatBritain,IrelandNorthern,IrelandRepublicOf,Scotland,UnitedStates]-->
<hol:countryCode>UnitedStates</hol:countryCode>
</hol:GetHolidaysAvailable>
</soapenv:Body>
</soapenv:Envelope>'
)
Now let's look at steps to create SQL query to call SOAP API. Later we will see how to generate code for your desired programming language (e.g. C# or SQL Server)
Video Tutorial - Introduction to SOAP Web Service and SoapUI tool
Before we dive into details about calling SOAP API using ZappySys XML Driver, lets first understand what is SOAP API and how to create SOAP requests using SoapUI tool. You will learn more about this process in the later section. The video contains some fragment about using SOAP API in SSIS but just ignore that part because we will be calling Soap API using ZappySys ODBC Driver rather than SSIS Components.Using SoapUI to test SOAP API call / Create Request Body XML
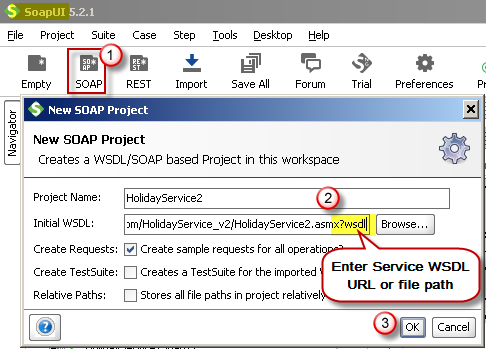
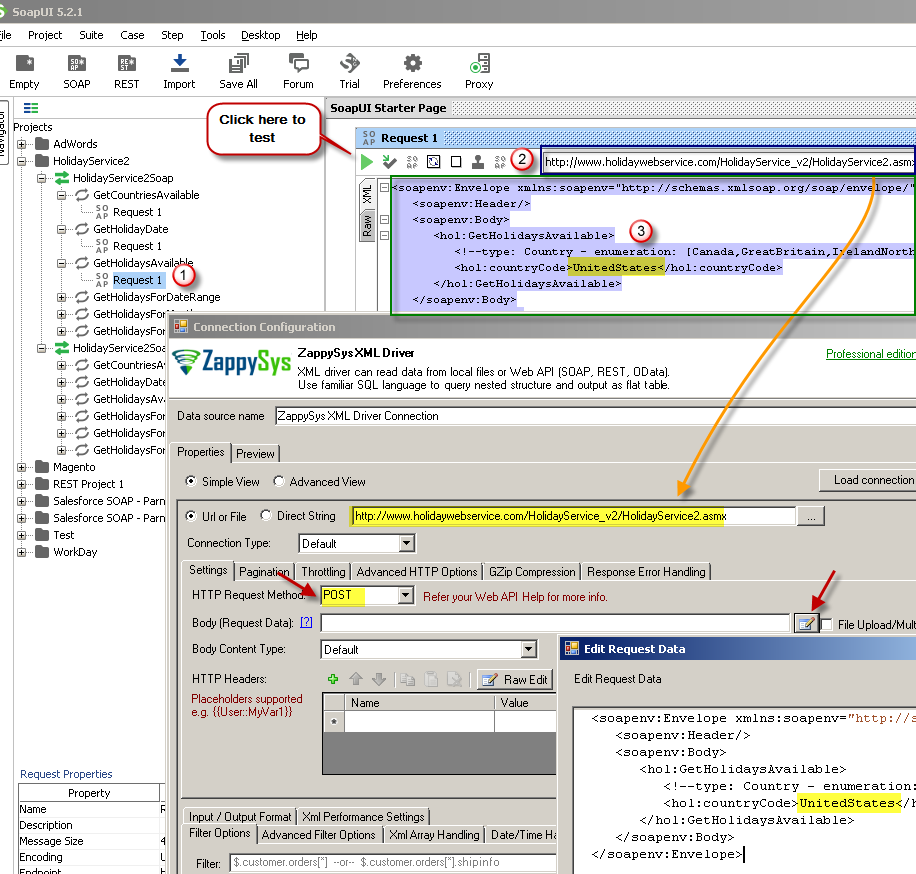
Assuming you have downloaded and installed SoapUI from here, now we are ready to use WSDL for your SOAP Web Service Calls. If you do not have WSDL file or URL handy then contact your API provider (sometimes you just have to add ?wsdl at the end of your Service URL to get WSDL so try that. Example: http://mycompany/myservice?wsdl ). If you don't know what is WSDL then in short, WSDL is Web service Description Language (i.e. XML file which describes your SOAP Service). WSDL helps to craft SOAP API request Body for ZappySys XML Driver. So Let's get started.- Open SoapUI and click SOAP button to create new SOAP Project
- Enter WSDL URL or File Path of WSDLFor example WSDL for our sample service can be accessed via this URL
http://www.dneonline.com/calculator.asmx?wsdl
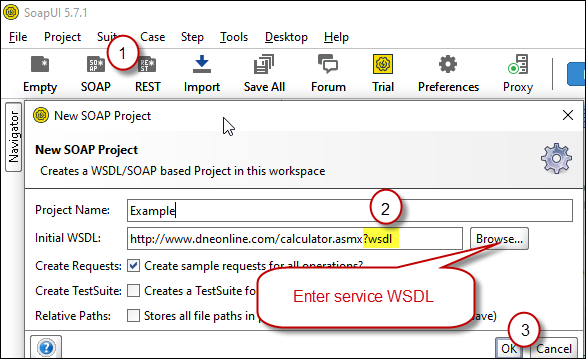 Create new SOAP API Project in SoapUI tool for SOAP API Testing
 - Once WSDL is loaded you will see possible operations you can call for your SOAP Web Service.
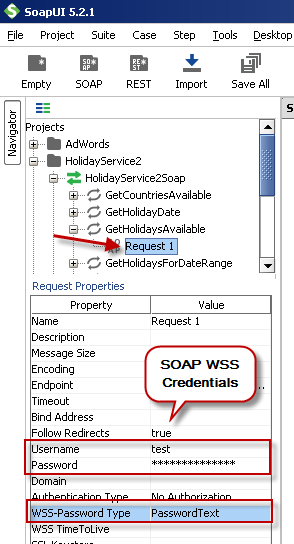
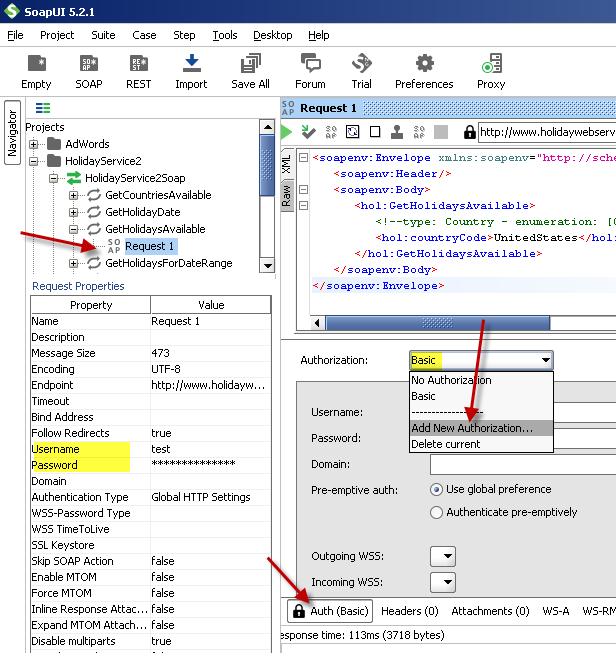
- If your web service requires credentials then you have to configure it. There are two common credential types for public services (SOAP WSS or BASIC )
-
To use SOAP WSS Credentials select request node and enter UserId, Password, and WSS-PasswordType (PasswordText or PasswordHash)
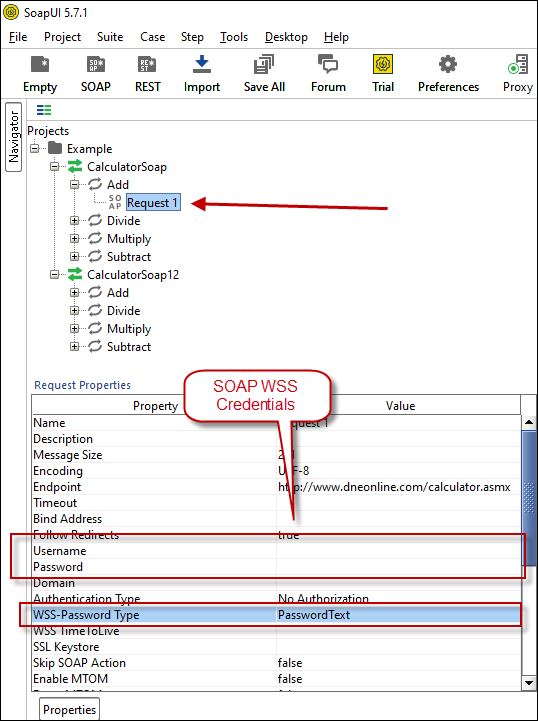 Configure SOAP WSS Credentials for SoapUI (SOAP API Testing Tool)
 - To use BASIC Auth Credentials select request node and double-click it. At the bottom click on Auth (Basic) and From Authorization dropdown click Add New and Select Basic.
Configure Basic Authorization for SoapUI (SOAP API Testing Tool)
-
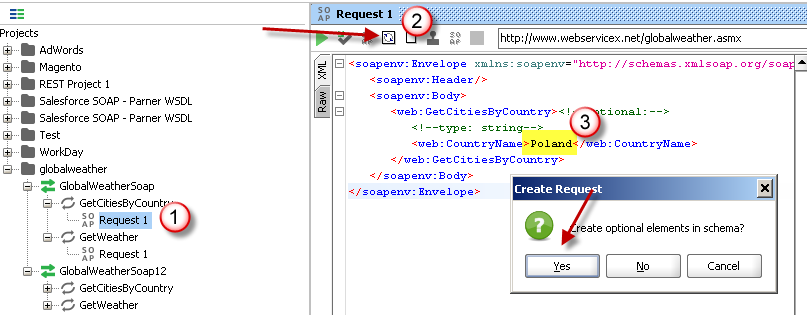
- Now you can test your request first Double-click on the request node to open request editor.
- Change necessary parameters, remove optional or unwanted parameters. If you want to regenerate request you can click on Recreate default request toolbar icon.
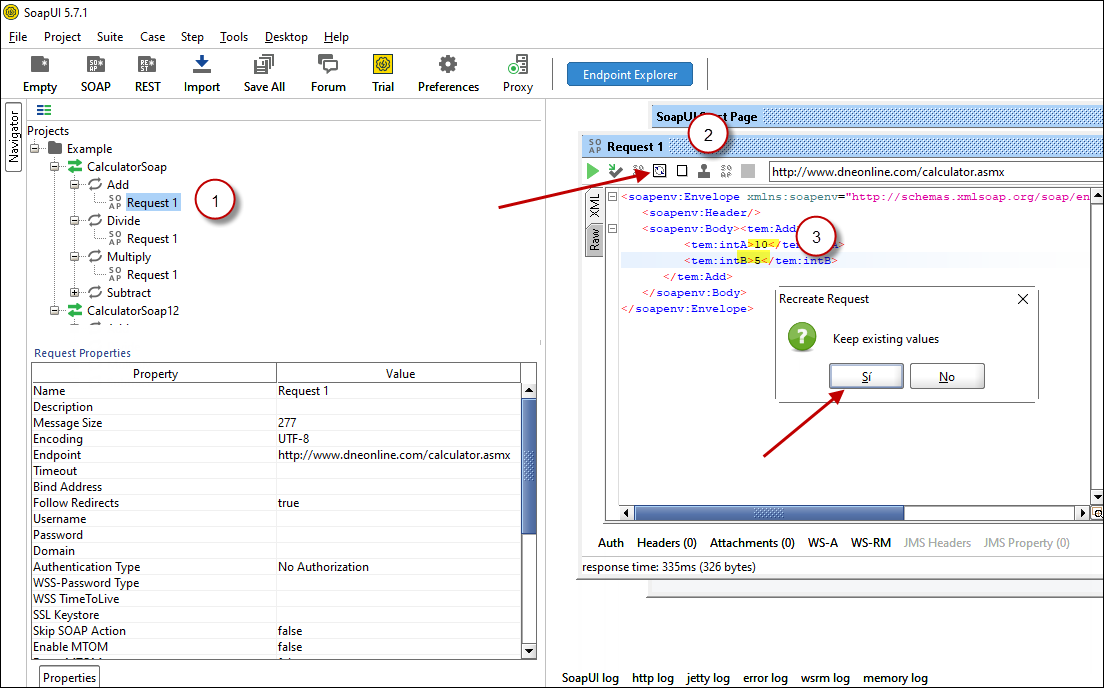 Create SOAP Request XML (With Optional Parameters)
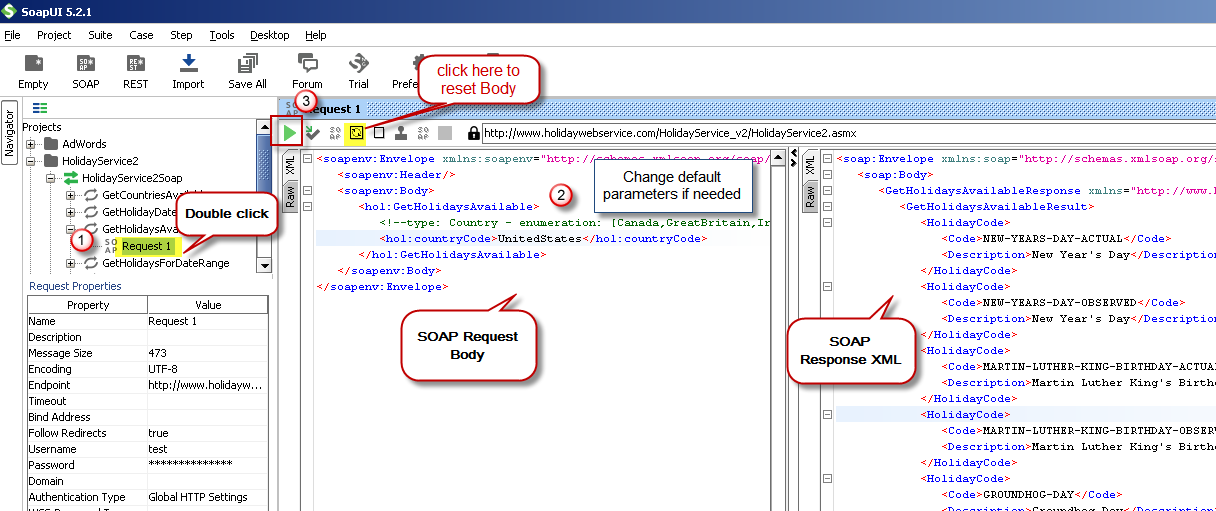
 - Once your SOAP Request XML is ready, Click the Play button in the toolbar to execute SOAP API Request and Response will appear in Right side panel.
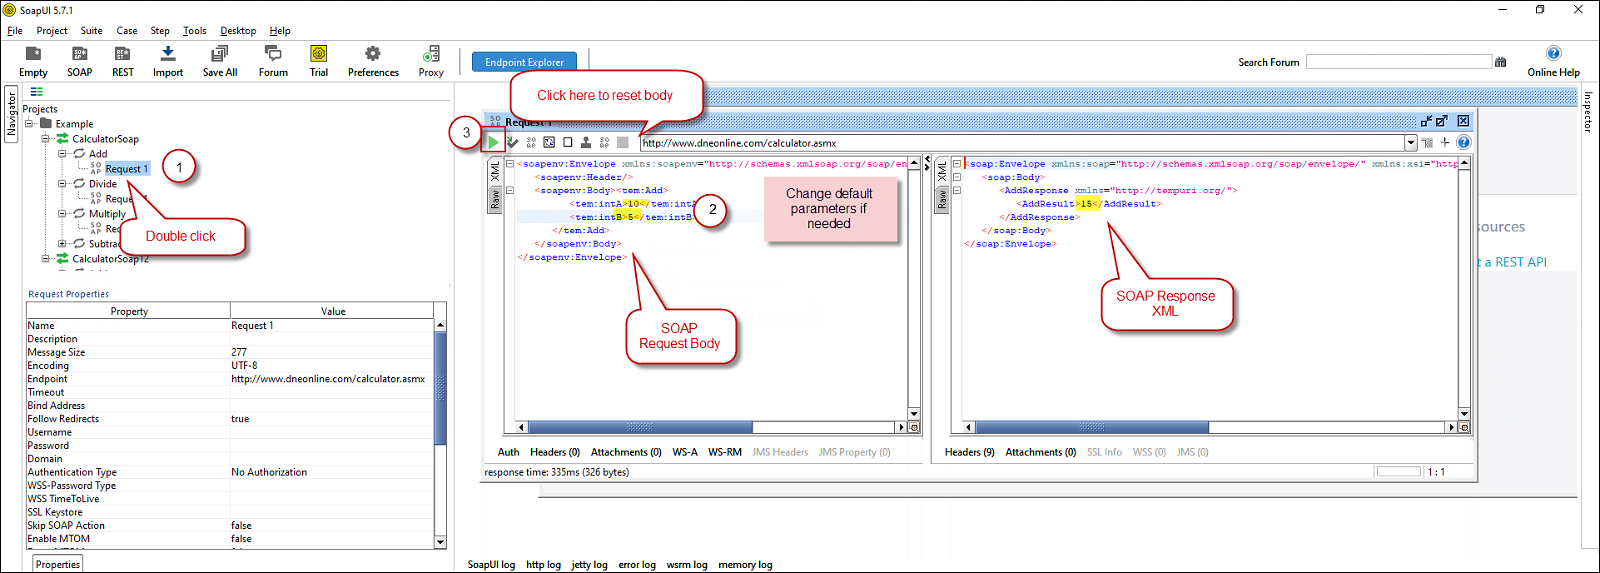 Test SOAP API using SoapUI Tool (Change Default XML Body / Parameters, Execute and See Response)
Create DSN using ZappySys XML Driver to call SOAP API
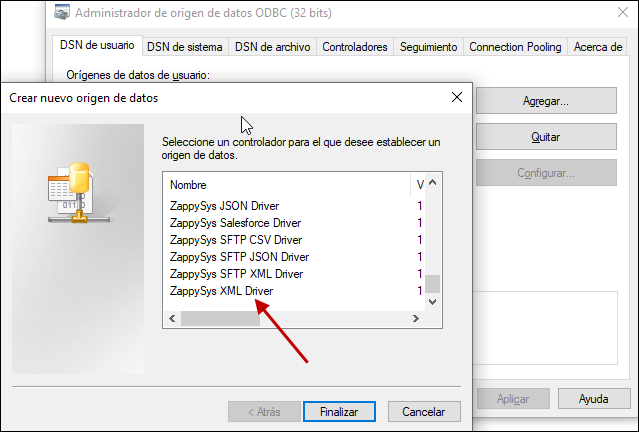
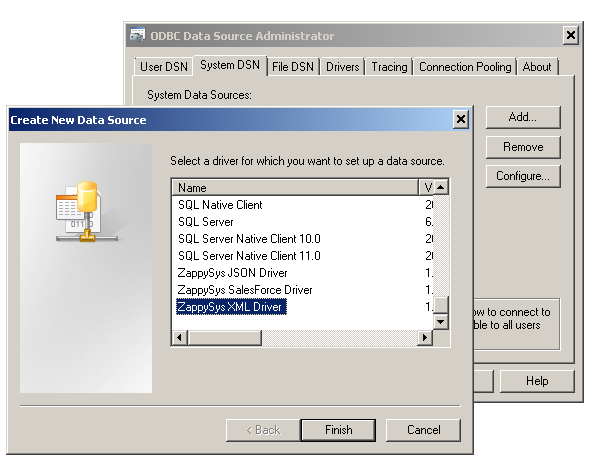
Once you have tested your SOAP API in SoapUI tool, we are ready to use ZappySys XML driver to call SOAP API in your preferred BI tool or Programming language.- First open ODBC Data Sources (search ODBC in your start menu or go under ZappySys > ODBC PowerPack > ODBC 64 bit)
- Goto System DSN Tab (or User DSN which is not used by Service account)
- Click Add and Select ZappySys XML Driver
 ZappySys ODBC Driver for XML / SOAP API
 - Configure API URL, Request Method and Request Body as below
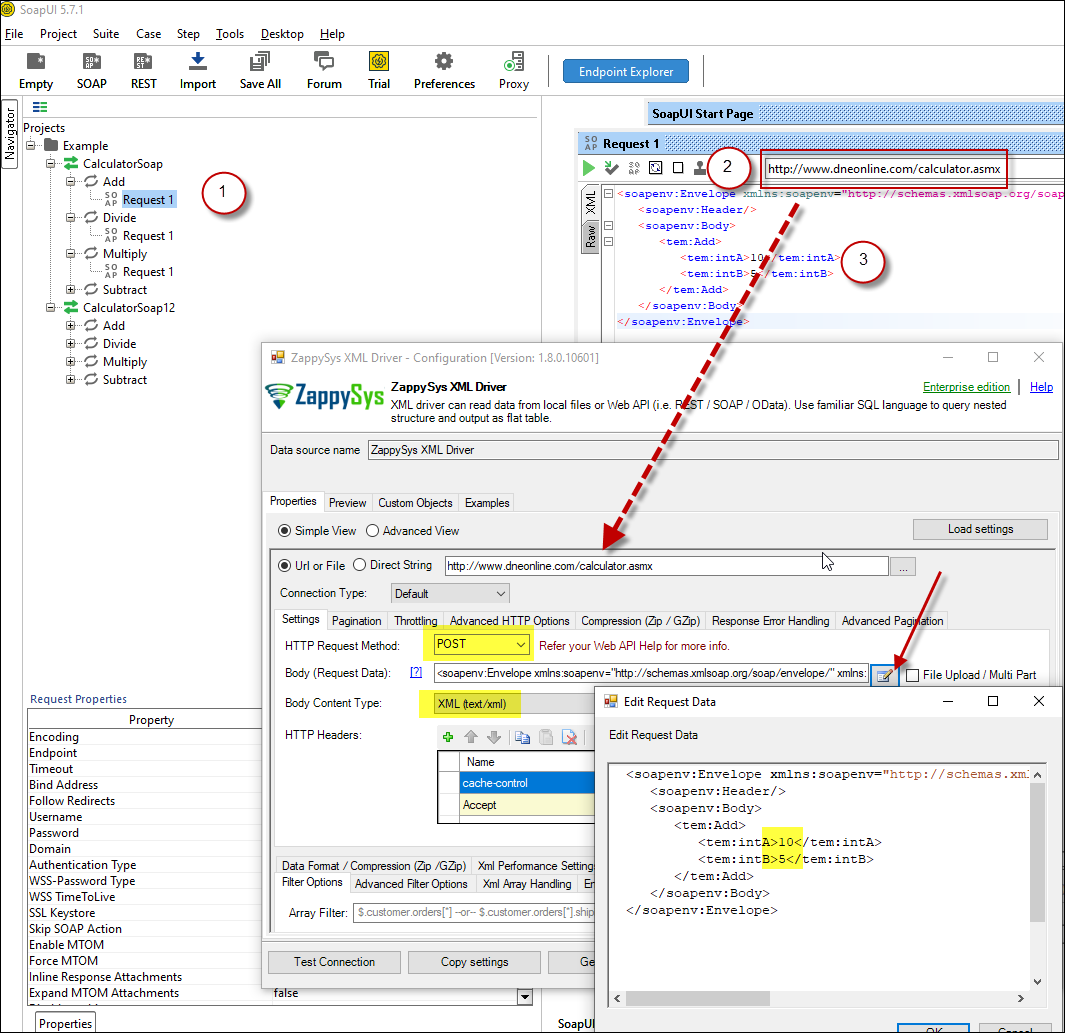 ZappySys XML Driver - Calling SOAP API - Configure URL, Method, Body
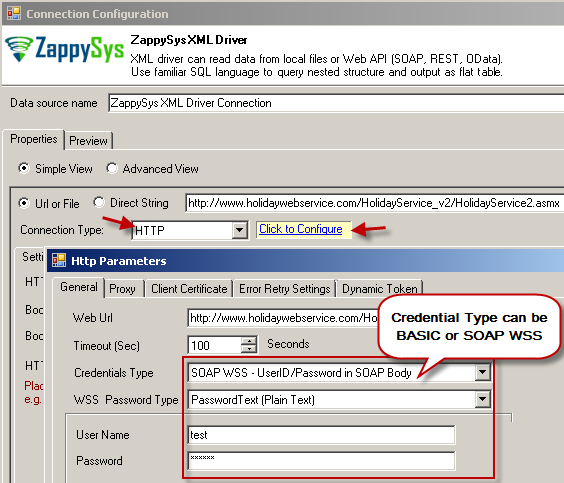
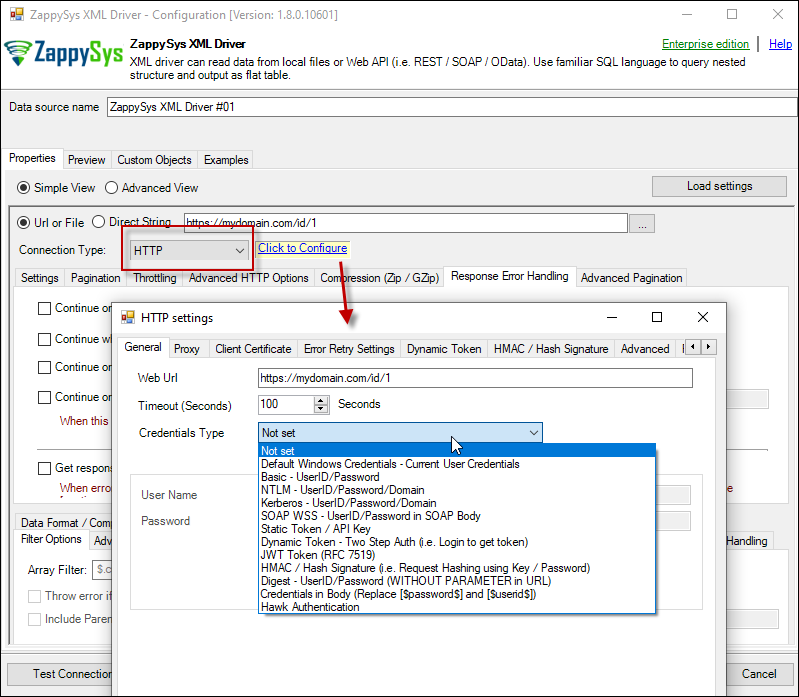
 - (This step is Optional) If your SOAP API requires credentials then Select Connection Type to HTTP and configure as below.
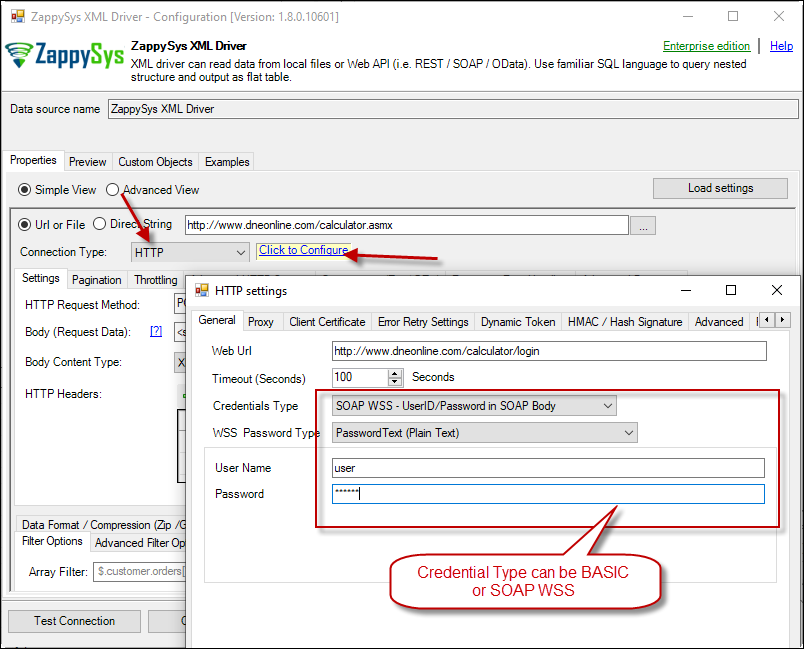 ZappySys XML Driver - Configure SOAP WSS Credentials or Basic Authorization (Userid, Password)
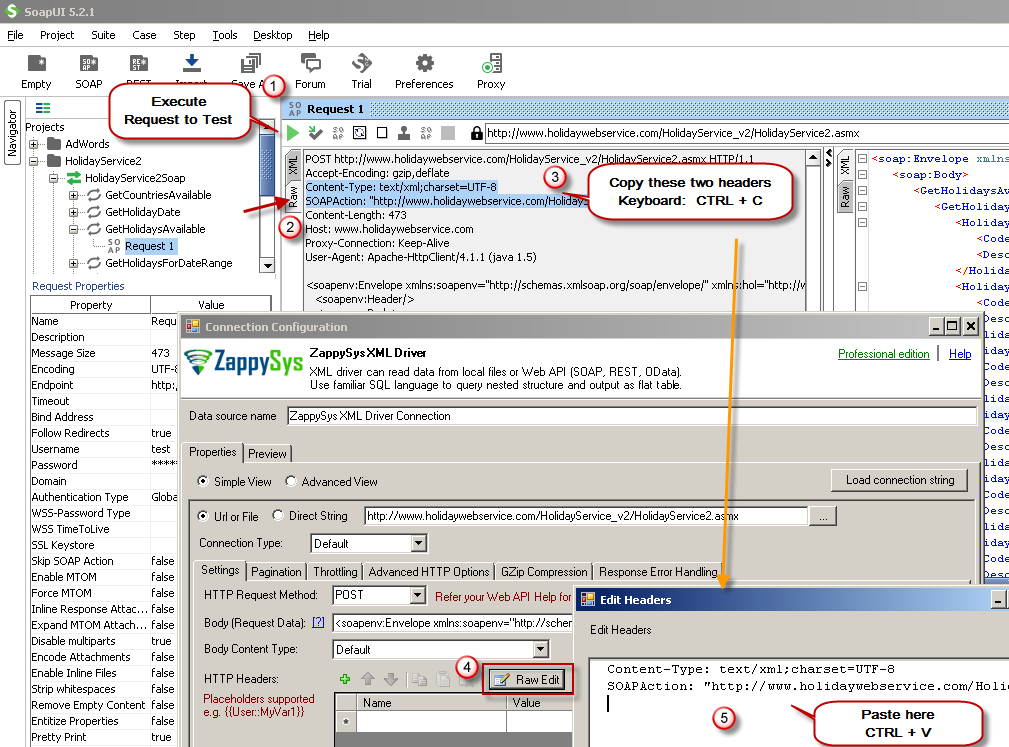
 - Configure-Request Headers as below (You can get it from Request > Raw tab from SoapUI after you test the request by clicking the Play button)
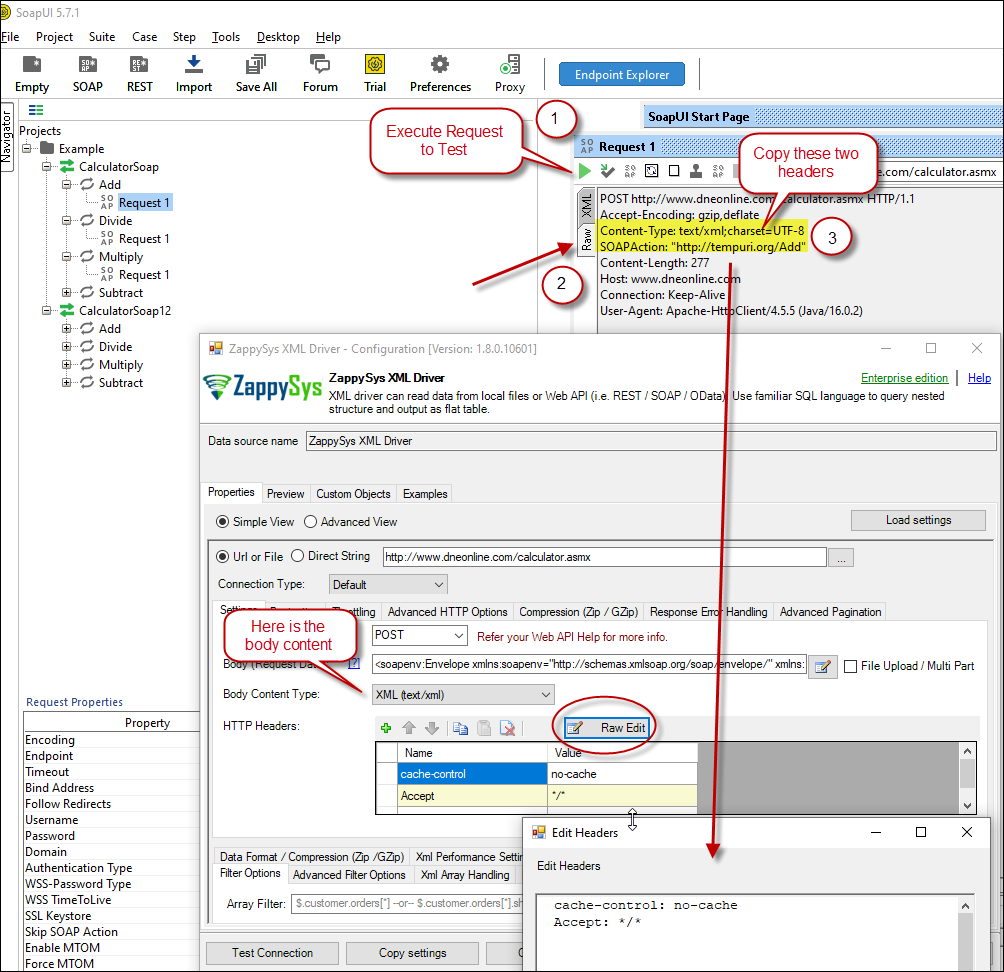 Configure SOAP API Request Headers - ZappySys XML Driver
 - Once credentials entered you can select Filter to extract data from the desired node. Make sure to select array node (see special icon) or select the node which contains all necessary columns if you don't have array node.
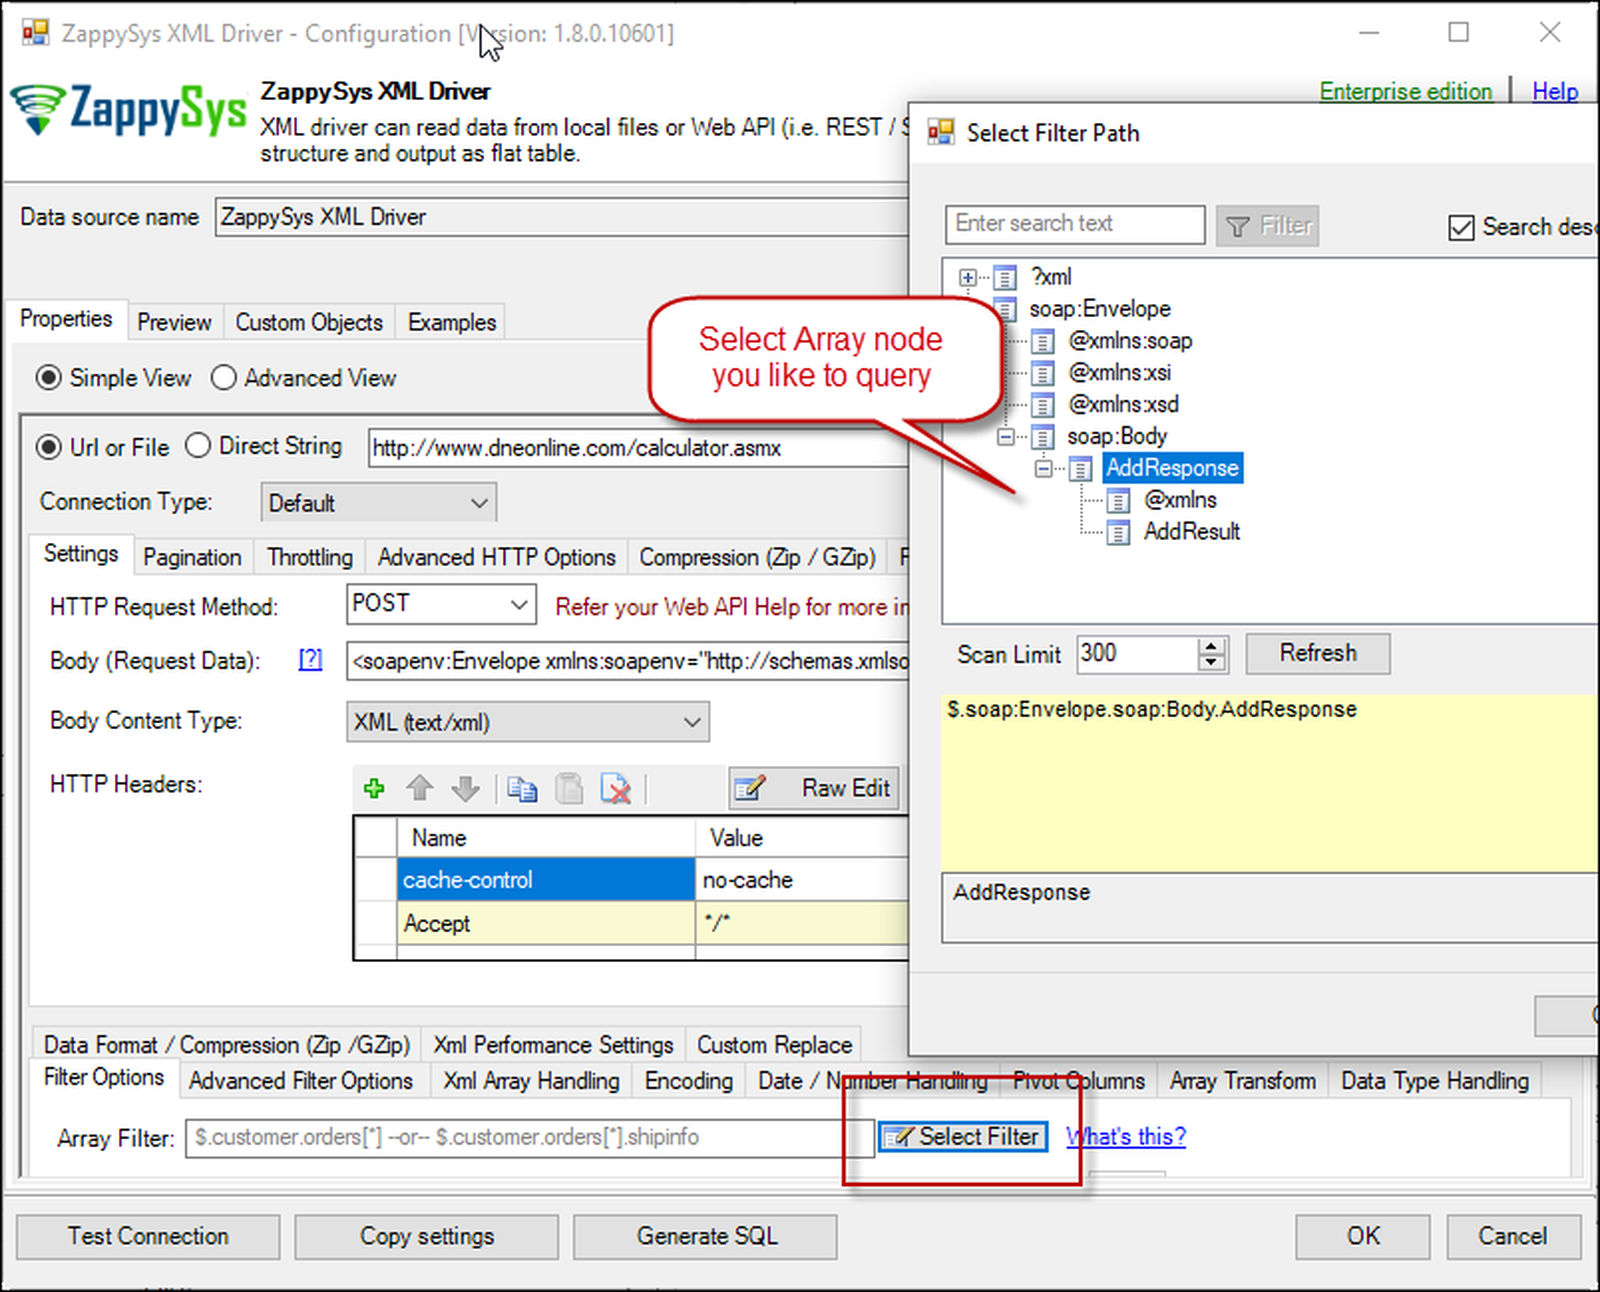 Select Filter - Extract data from nested XML / SOAP API Response (Denormalize Hierarchy)
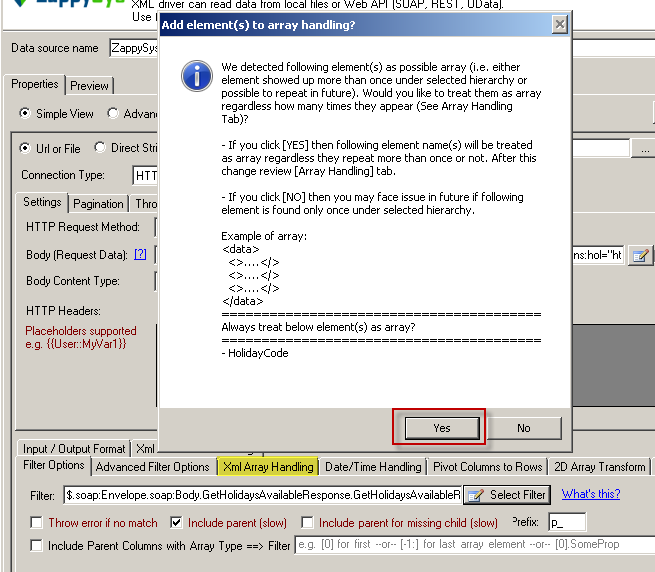
 - If prompted select yes to treat selected node as Array (This is helpful when you expect one or more record for selected node)
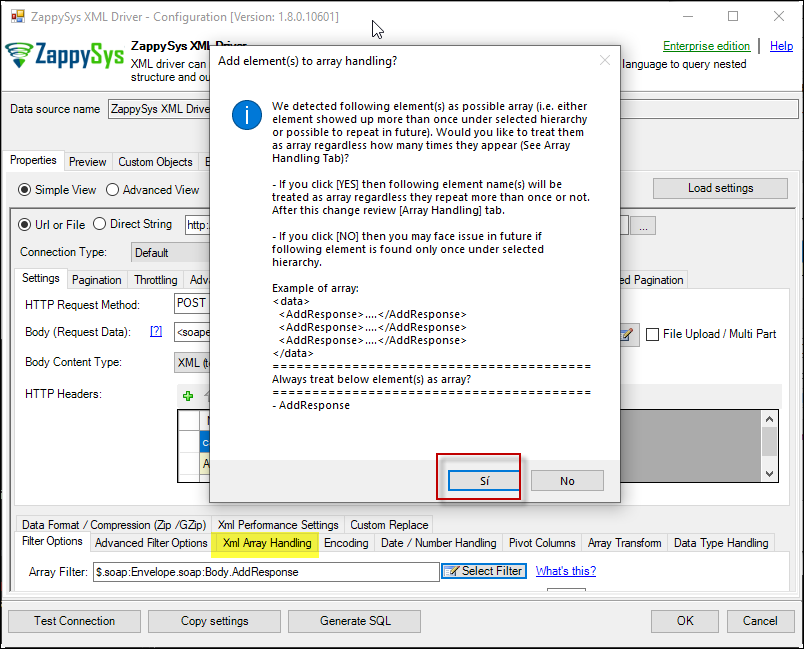 Treat selected node as XML Array Option for SOAP API Response XML

Preview SOAP API Response / Generate SQL Code for SOAP API Call
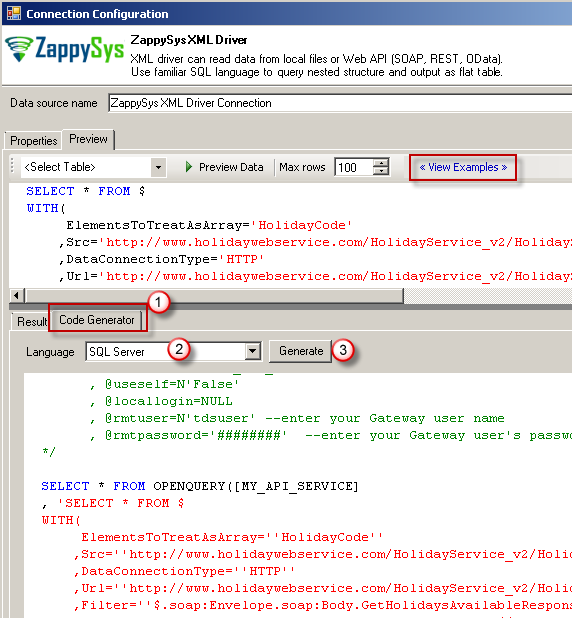
Once you configure settings for XML Driver now you can preview data or generate example code for desired language (e.g. C#, Python, Java, SQL Server). Go to Preview tab and you will see default query generated based on settings you entered in previous sections. Attributes listed in WITH clause are optional. If you omit attribute in WITH clause it will use it from Properties tab.Preview Data
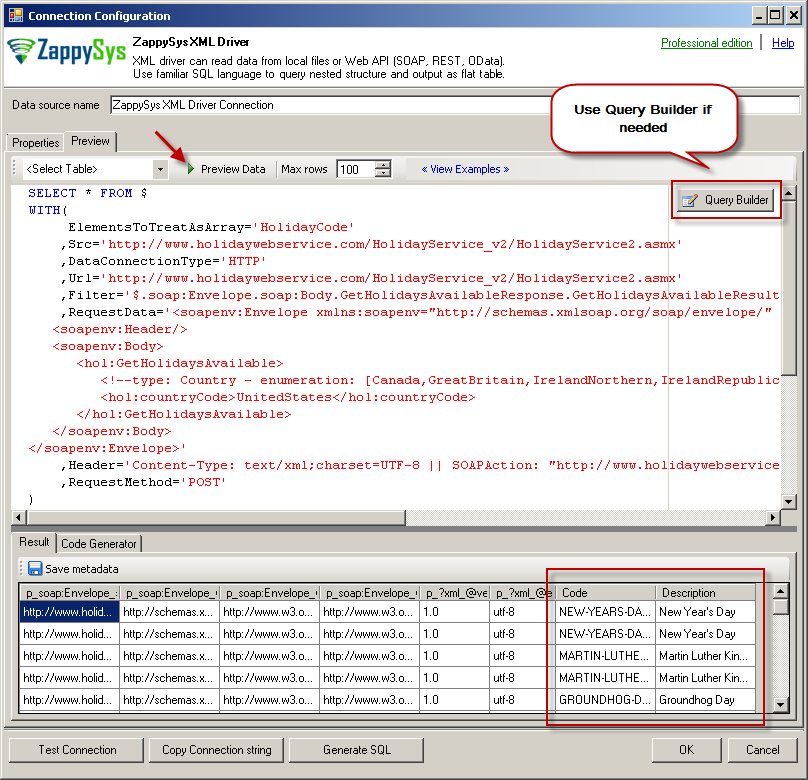 Preview SOAP API Response in ZappySys XML Driver
Generate Code Option
POST data to REST API URL from file in Qlik
Above example was POST data to API URL but what if your Request Body is large and you have saved that to file? Well here is the way to get your request body from a file (Use @ symbol before path).
|
1 2 3 4 5 6 7 8 |
SELECT * FROM $ WITH (METHOD='POST' ,HEADER='Content-Type:text/plain || x-hdr1:AAA' ,SRC='http://httpbin.org/post' ,BODY='@c:\files\dump.xml' ,IsMultiPart='True' ) |
REST API Pagination in Qlik Sense / QlikView
Paginate by Response Attribute
This example shows how to paginate API calls where you need to paginate until the last page detected. In this example, next page is indicated by some attribute called nextlink (found in response). If this attribute is missing or null then it stops fetching the next page.SELECT * FROM $ WITH( SRC=@'https://zappysys.com/downloads/files/test/pagination_nextlink_inarray_1.json' ,NextUrlAttributeOrExpr = '$.nextlink' --keep reading until this attribute is missing. If attribute name contains dot then use brackets like this $.['my.attr.name'] )
Paginate by URL Parameter (Loop until certain StatusCode)
This example shows how to paginate API calls where you need to pass page number via URL. The driver keeps incrementing page number and calls next URL until the last page detected (401 error). There are few ways to indicate the last page (e.g. By status code, By row count, By response size). If you don't specify end detection then it will use the default (i.e. No records found).SELECT * FROM $ WITH ( SRC=@'https://zappysys.com/downloads/files/test/page-xml.aspx?page=1&mode=DetectBasedOnResponseStatusCode' ,PagingMode='ByUrlParameter' ,PagingByUrlAttributeName='page' ,PagingByUrlEndStrategy='DetectBasedOnResponseStatusCode' ,PagingByUrlCheckResponseStatusCode=401 ,IncrementBy=1 )
Paginate by URL Path (Loop until no record)
This example shows how to paginate API calls where you need to pass page number via URL Path. The driver keeps incrementing page number and calls next URL until the last page is detected. There are few ways to indicate the last page (e.g. By status code, By row count, By response size). If you don't specify end detection then it will use the default (i.e. No records found).SELECT * FROM $ WITH ( SRC=@'https://zappysys.com/downloads/files/test/cust-<%page%>.xml' ,PagingMode='ByUrlPath' ,PagingByUrlAttributeName='<%page%>' ,PagingByUrlEndStrategy='DetectBasedOnRecordCount' ,IncrementBy=1 )
Paginate by Header Link (RFC 5988)
API like GitHub / Wordpress use Next link in Headers (RFC 5988)SELECT * FROM $ LIMIT 25 WITH( Src='https://wordpress.org/news/wp-json/wp/v2/categories?per_page=10' ,PagingMode='ByResponseHeaderRfc5988' ,WaitTimeMs='200' --//wait 200 ms after each request )
Error Handling in REST API / SOAP
METHOD 1 - Using Error Handling Options
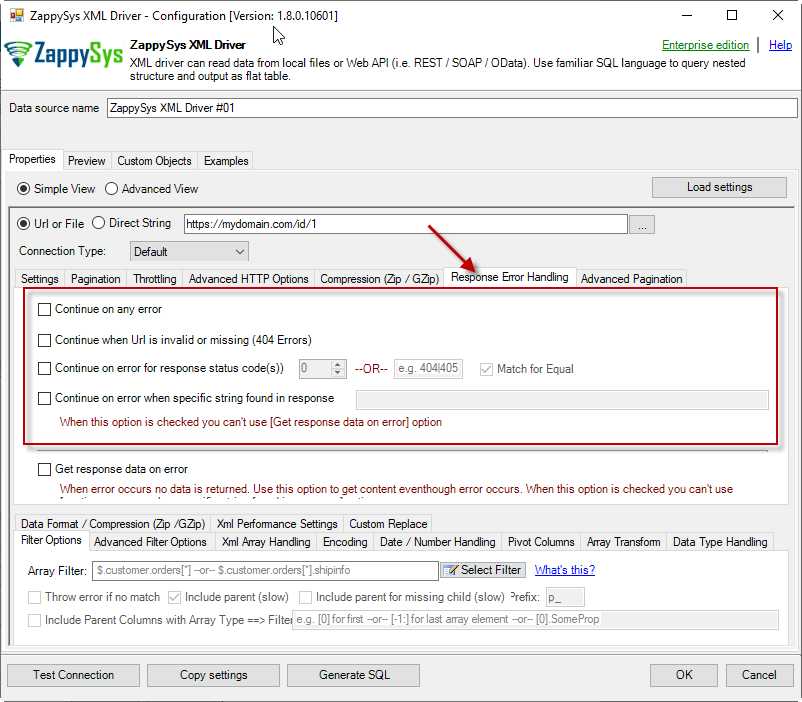
When to use?
You may want to use them when your source is a resource located on the Internet; e.g. a file on a website, a file on an FTP server or just a plain API HTTP response. By default, when a remote server returns an error, data retrieval is stopped, an error is raised and no data is given back to you. This might not be always desirable.Scenario 1
Imagine a scenario, that there is a web server which each day at 12 AM releases a new JSON file with that day's date as filename, e.g. http://www.some-server.com/data/2018-06-20.json. And, of course, you want to download it and use it daily in your Power BI report. But you have a problem: Power BI report data sources are refreshed each hour and you may get HTTP 404 status code (no file was found) when a file is not released yet. Which consequentially means other data sources won't be updated as well and you will see old and cached data on the report. That's where you could use Continue on any error or Continue when Url is invalid or missing (404 Errors) to avoid an error being raised and let other data sources to be updated.Scenario 2
Another scenario is when you expect a web server to raise some kind of HTTP error when accessing a URL. You don't want ODBC Data Source to raise an error but instead, you want to get response data. That's where you can use Continue on any error or alike together with Get response data on error to continue on an error and get the data: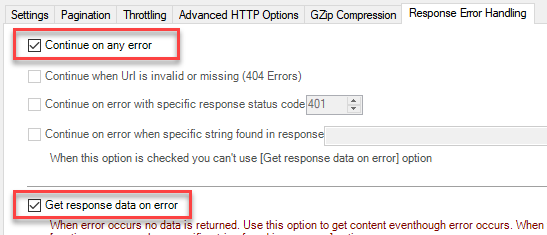
METHOD 2 - Using Connection [Retry Settings]
Another scenario you may run into is a buggy web server. You ask it to give you some file or data and it, like a snotty kid, just doesn't give it to you! You have to ask twice or thrice before it does its job. If that's the case, you have to retry HTTP requests using Connection:
REST API / SOAP Connection Types in Qlik (OAuth / HTTP)
- HTTP
- OAuth
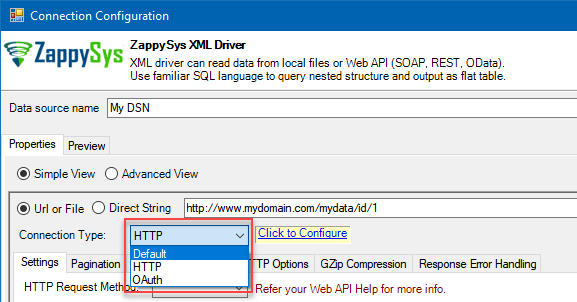
HTTP Connection
- SOAP WSS (when accessing a SOAP WebService)
- Static Token / API Key (when need to pass an API key in HTTP header)
- Dynamic Token (same as Static Token method except that each time you need to log in and retrieve a fresh API key)
- JWT Token (As per RFC 7519)
OAuth
If you are trying to access REST API resource, it is a huge chance, you will need to use OAuth Connection. Read this article to understand how OAuth authentication and authorization works and how to use it (article originally was written for SSIS PowerPack, but the concepts and UI stay the same):https://zappysys.com/blog/rest-api-authentication-with-oauth-2-0-using-ssis/
Performance consideration for Web API Calls
Use Server-side filtering if possible in URL or Body Parameters
Many API supports filtering your data by URL parameters or via Body. Whenever possible try to use such features. Here is an example of odata API, In the below query the first query is faster than the second query because in the first query we filter at the server.SELECT * FROM value WITH( Src='https://services.odata.org/V3/Northwind/Northwind.svc/Customers?$format=json&$filter=Country eq ''USA''' ,DataFormat='Odata' ) -- Slow query - Client-side filtering SELECT * FROM value WHERE Country ='USA' WITH( Src='https://services.odata.org/V3/Northwind/Northwind.svc/Customers?$format=json' ,DataFormat='Odata' )
Avoid Special features in SQL Query (e.g. WHERE, Group By, Order By)
ZappySys API engine triggers client-side processing if special features are used in Query. Following SQL Features will trigger Client-Side processing which is several times slower than server-side processing. So always try to use simple query (Select col1, col2 .... from mytable )- WHERE Clause
- GROUP BY Clause
- HAVING Clause
- ORDER BY
- FUNCTIONS (e.g. Math, String, DateTime, Regex... )
Consider using pre-generated Metadata / Cache File
Use META option in WITH Clause to use static metadata (Pre-Generated)There are two more options to speedup query processing time. Check this article for details.-
select * from value WITH( meta='c:\temp\meta.txt' ) --OR-- select * from value WITH( meta='my-meta-name' ) --OR-- select * from value WITH( meta='[ {"Name": "col1", "Type": "String", Length: 100}, {"Name": "col2", "Type": "Int32"} ...... ]' ) - Enable Data Caching Options (Found on Property Grid > Advanced Mode Only )
Consider using Metadata / Data Caching Option
ZappySys API drivers support Caching Metadata and Data rows to speed up query processing. If your data doesn't change often then you can enable this option to speed up processing significantly. Check this article for details how to enable Data cache / metadata cache feature for datasource level or query level. To define cache option at query level you can use like below.SELECT * FROM $ WITH ( SRC='https://myhost.com/some-api' ,CachingMode='All' --cache metadata and data rows both ,CacheStorage='File' --or Memory ,CacheFileLocation='c:\temp\myquery.cache' ,CacheEntryTtl=300 --cache for 300 seconds )
Use --FAST Option to enable Stream Mode
ZappySys JSON / XML drivers support --FAST suffix for Filter. By using this suffix after Filter driver enables Stream Mode, Read this article to understand how this works.SELECT * FROM $ LIMIT 10 --//add this just to test how fast you can get 10 rows WITH( Filter='$.LargeArray[*]--FAST' --//Adding --FAST option turn on STREAM mode (large files) ,SRC='https://zappysys.com/downloads/files/test/large_file_100k_largearray_prop.json.gz' --,SRC='c:\data\large_file.json.gz' ,IncludeParentColumns='False' --//This Must be OFF for STREAM mode (read very large files) ,FileCompressionType='GZip' --Zip or None (Zip format only available for Local files) )
Other considerations for Web API calls in Qlik
API Limit / Throttling
While calling public API or other external web services one important aspect you have to check, how many requests are allowed by your API. Especially when you use API pagination options to pull many records you have to slow down based on API limits. For example, your API may allow you only 5 requests per second. Use Throttling Tab on Driver UI to set delay after each request.2D Array Transformation
If you are using JSON or XML API Driver then possible you may have to transform your data using 2D array transformation feature. Check this link for more information.Conclusion
To conclude, we can say that Qlik Sense with the help of ZappySys ODBC PowerPack can be useful to access to different data using REST API. We learned how to connect Qlik Sense with ODBC to connect to OData, Google Drive Sheets, Facebook information and Twitter. If you enjoy it. Try our product.
References
Finally, for more information about Qlik Sense and REST API with ODBC, refer
to these links: