Introduction
In this article, we will learn how to import REST API in Power BI.
Power BI is a very popular Business Analytic tool used to get business information. It is very popular because it is easy to install, simple to learn and very intuitive. Also, REST API is very popular these days and we wanted to show you a way to integrate them in Power BI with the help of the ZappySys ODBC PowerPack. This software includes powerful drivers to query REST API URL, Local XML / JSON files and XML SOAP Web Service with simple SQL queries.
The following video will show how to import REST API in Power BI (JSON or XML Data):
[youtube https://www.youtube.com/watch?v=-3OPfhMY1aI&w=720&h=405]
Requirements
- First, you will need to have Power BI Desktop (FREE) installed
- In the second place, you will need to have internet access
- On third place, our ZappySys ODBC Power Pack
Step-by-Step: Import REST API into Power BI
We’ll walk through the steps to import a REST API into Power BI. The steps outlined below focus on working with JSON APIs, but the same principles can be applied when importing SOAP XML Web Services or local JSON/XML files.
For demonstration purposes, we will utilize a REST API to retrieve data in JSON format. The example URL we’ll use is:
|
1 |
https://services.odata.org/V3/Northwind/Northwind.svc/Customers?$format=json |
This URL leverages OData and presents information in JSON format. Our objective is to use the ZappySys ODBC Power Pack to establish a connection to this URL and retrieve the information seamlessly into Power BI.
Create ODBC DSN – JSON Driver
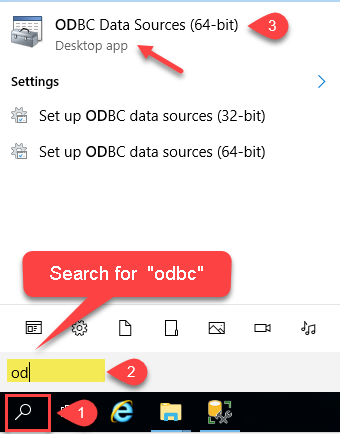
- Search for "odbc" in your start menu and click on ODBC (64 bits). * If you cant find this then you can also go to Start Menu > ZappySys > ODBC PowerPack > Click on ODBC Data Sources (64-Bit). If you don't see ODBC 64 bit then most likely you are running 32-bit OS (So just click first ODBC Data Source)
- Go to User DSN Tab and press Add. If your DSN needs to be accessed by all users or some service account (like SQL Task Scheduler) then click on System Tab rather than User Tab.
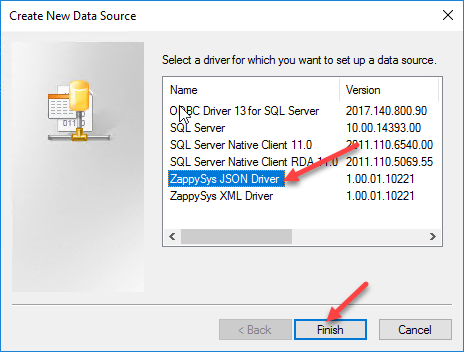
- Add the ZappySys JSON Driver. It is installed with the ZappySys ODBC PowerPack.
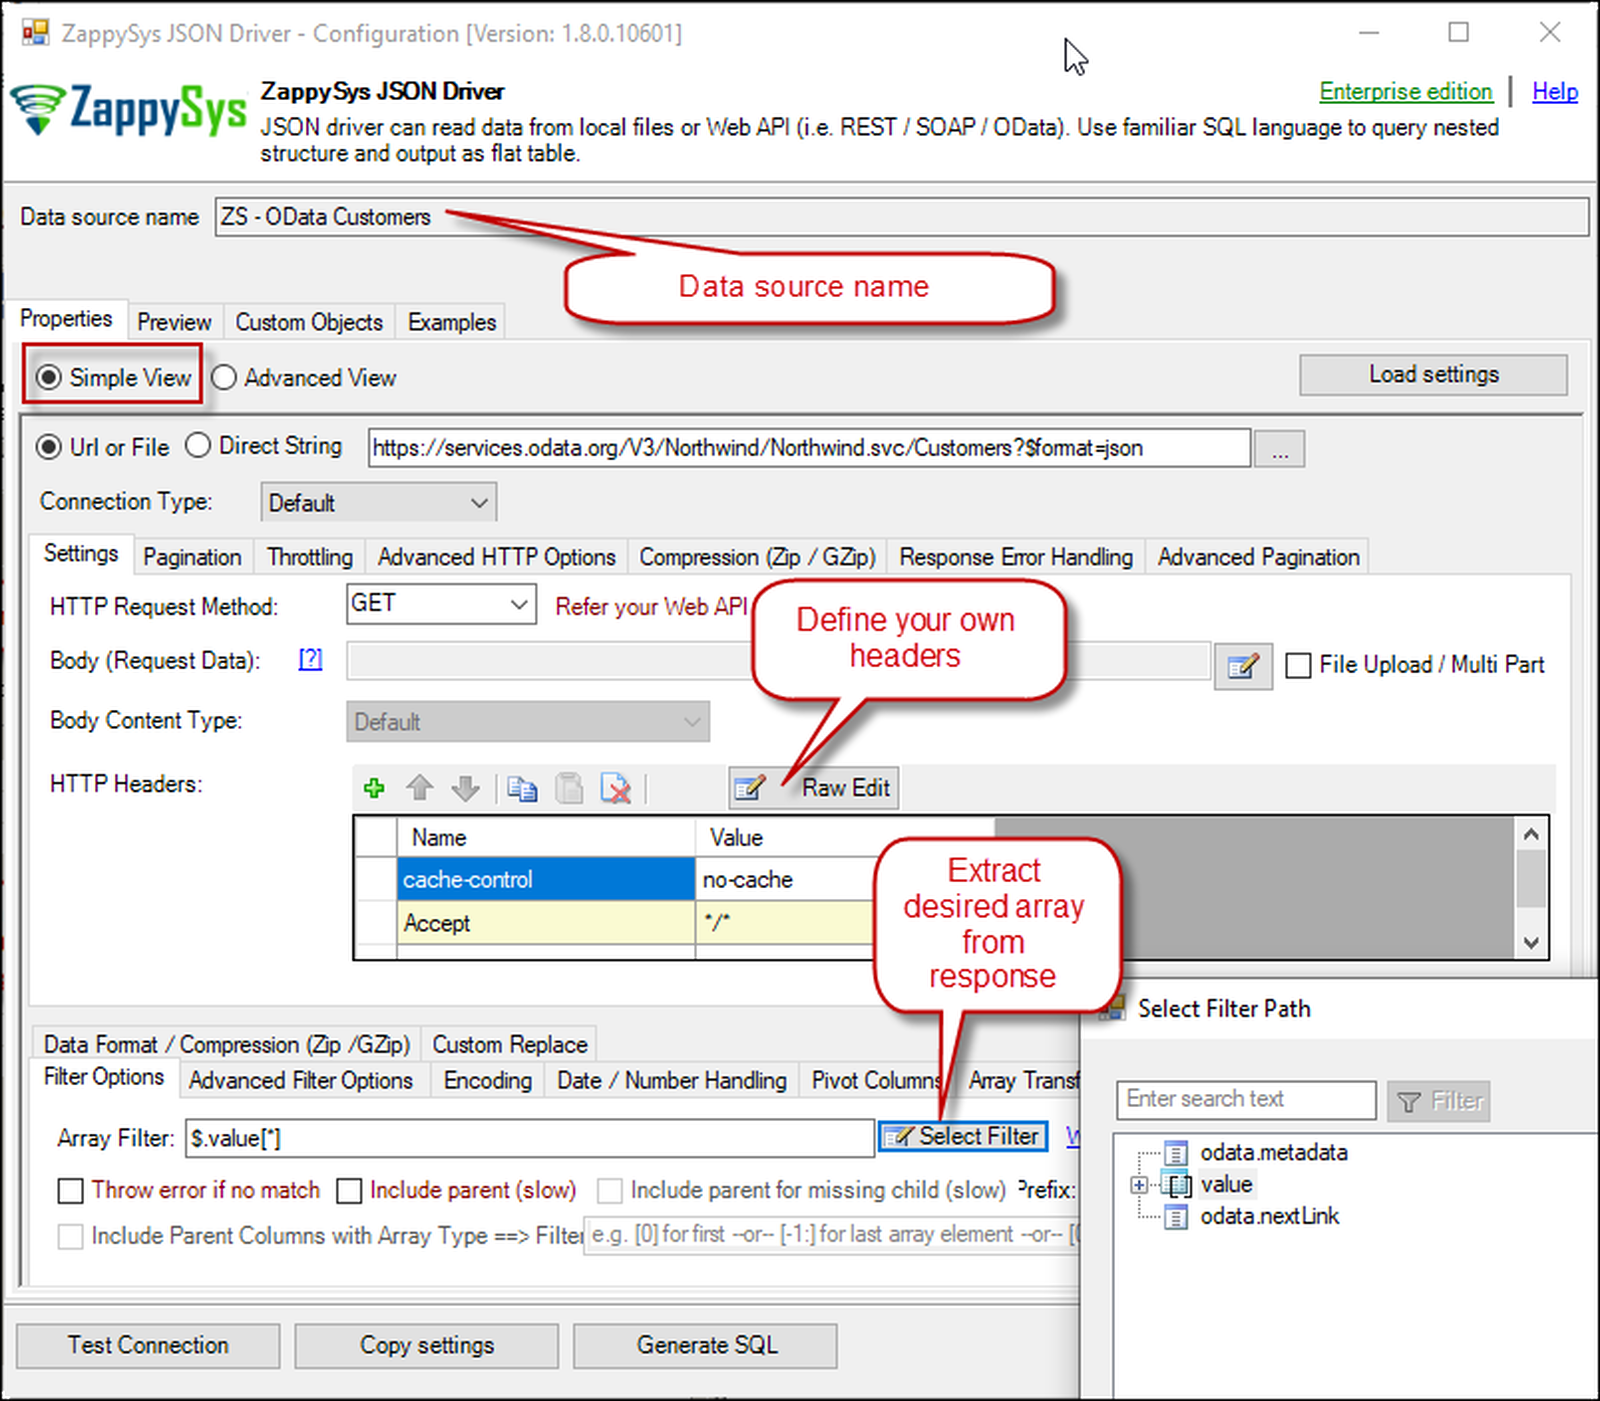
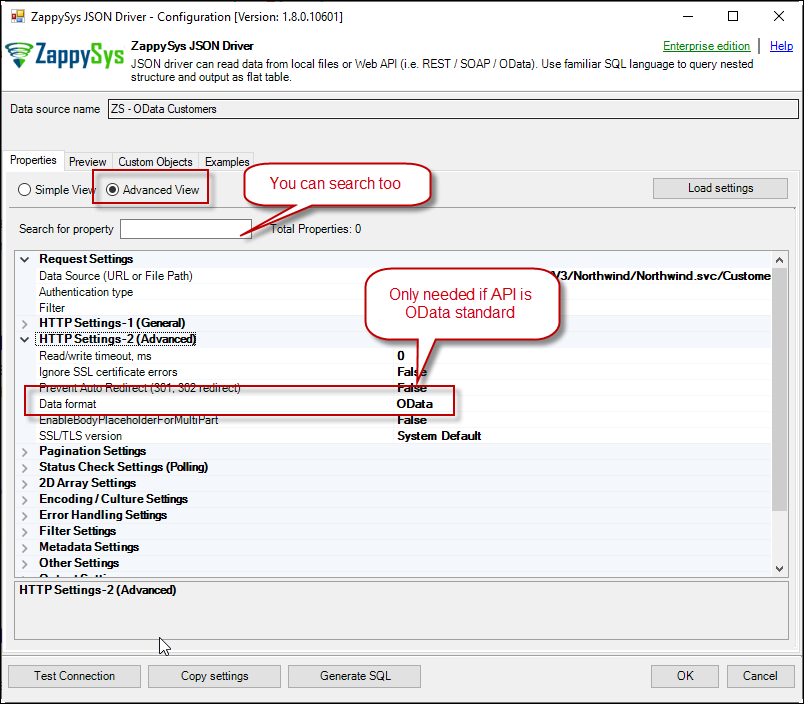
- Enter a name for the Data source and configure other necessary properties (e.g. URL / Credentials). You can configure properties in two different modes (Simple Mode (Default) or Advanced Mode). For Our JSON Driver Example enter URL and Set Data Format as OData (For Simple Mode Check Input / Output Format Tab, For Advanced Mode Check. HTTP Advanced Settings). If your API is not OData compliant or you are not sure then keep it DEFAULT.
https://services.odata.org/V3/Northwind/Northwind.svc/Customers?$format=json
- Here is the Advanced view with all properties in Grid mode.
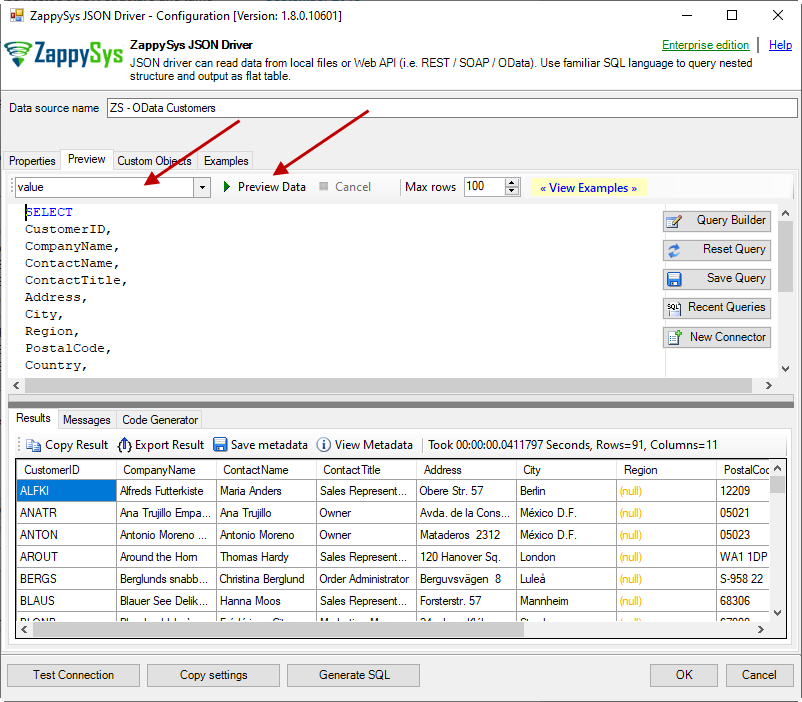
- Finally, you can go to preview tab. Click on the select table to generate your default SQL Query for API service and press Preview data to see the magic :).When you click Preview data it parses your SQL Query and sends HTTP Request to fetch Data from JSON service. Once the response is returned it parse nested JSON structure and turns into rows/columns.
-
Once you select Table name from drop down, UI generates default query for you with all possible column names for selected table like below.Sample Query
select
	"CustomerID",
	"CompanyName",
	"ContactName",
	"ContactTitle",
	"Address",
	"City",
	"Region",
	"PostalCode",
	"Country",
	"Phone",
	"Fax"
 from [value]
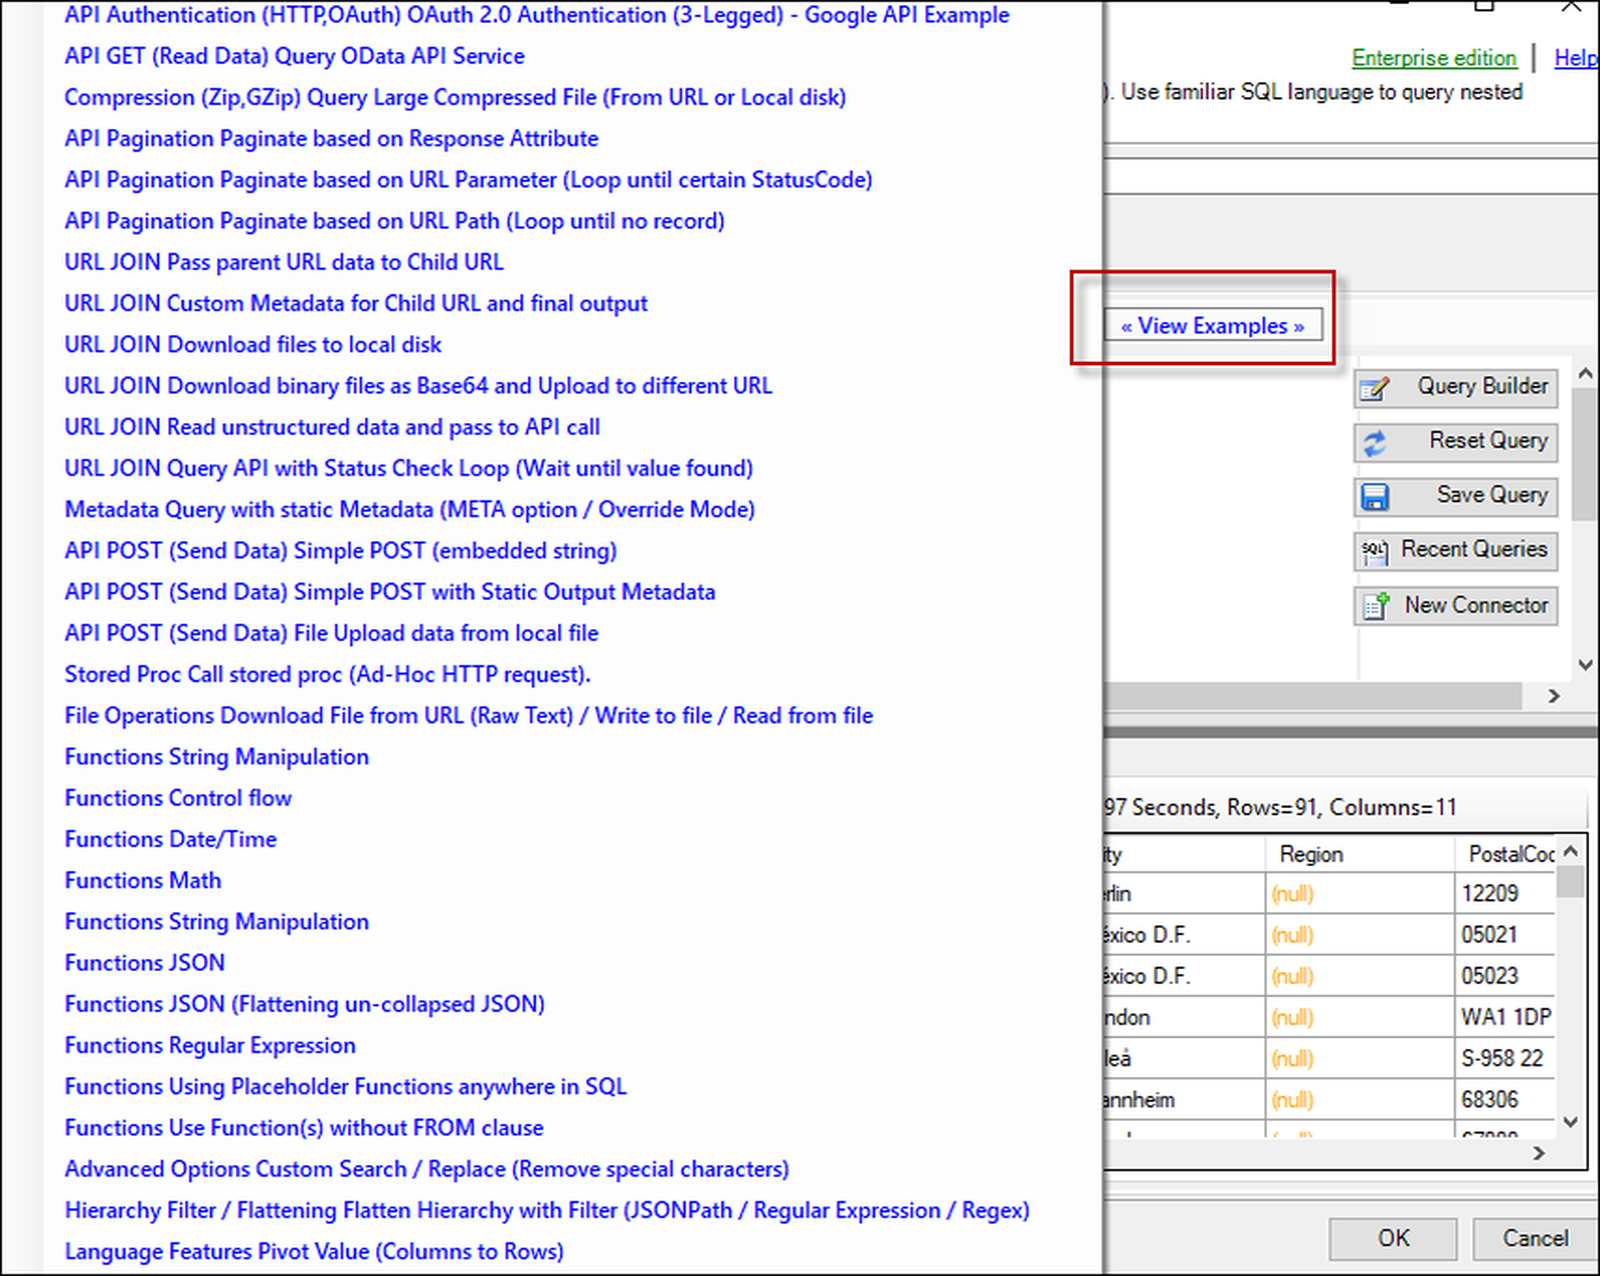
- To review more examples, make sure to click on View Examples button to see many more ways to call API services and extract/transform data
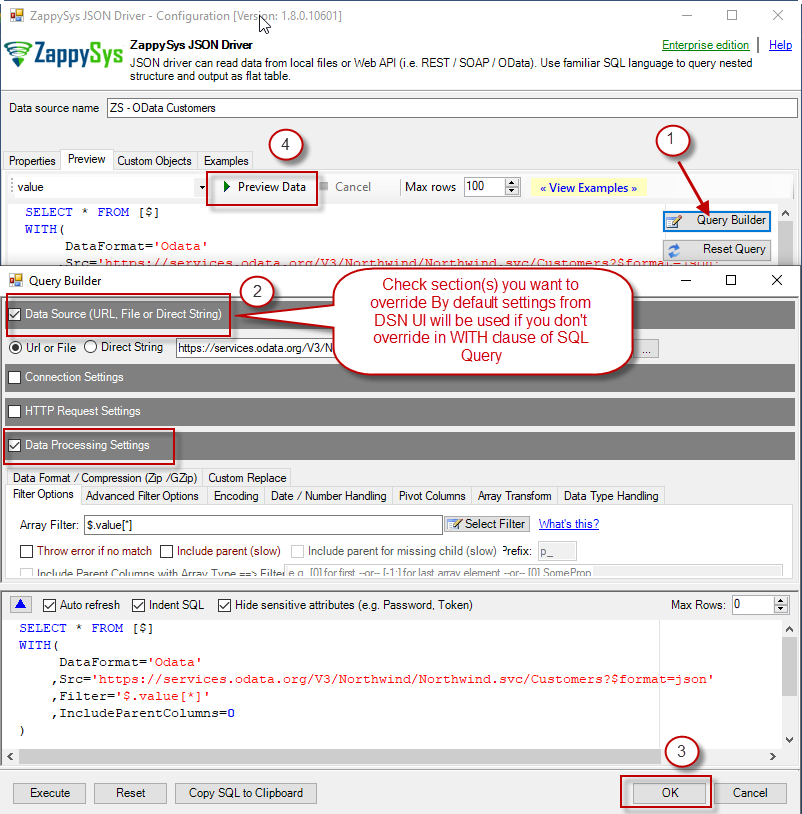
- Now last thing you can try is use Query Builder. Query Builder is an easy way to Build Queries by Overriding certain setting defined on DSN. ZappySys API SQL Query language support WITH Clause which can override settings defined on DSN UI. Usually you can Define Connection related settings on DSN and override Dynamic Settings in your SQL Query so you dont have to create many DSN for each API URL.
- Using Driver Name in the Connection String (You can use Copy Connection String option)
- Using DSN Name in the Connection String
DRIVER={DRIVER-NAME-GOES-HERE}[;Prop1=xxxxxx][;Prop2=xxxxxx] .... [;PropN=xxxxxx]
Examples:
DRIVER={ZappySys JSON Driver}
DRIVER={ZappySys JSON Driver};DataPath='c:\mydata.json'
DRIVER={ZappySys XML Driver};DataPath='http://myserver/api/xml/getOrders'
DRIVER={ZappySys XML Driver};DataPath='c:\mydata.xml'
Using DSN Name in the Connection String
Syntax:
DRIVER={DRIVER-NAME-GOES-HERE}[;Prop1=xxxxxx][;Prop2=xxxxxx] .... [;PropN=xxxxxx]
Examples:
DSN=MyJsonAPI_DSN
DSN=MyJsonAPI_DSN;DataPath='http://myserver/api/json/getOrders'
Connect to REST API data source in Power BI (Connect JSON / XML data)
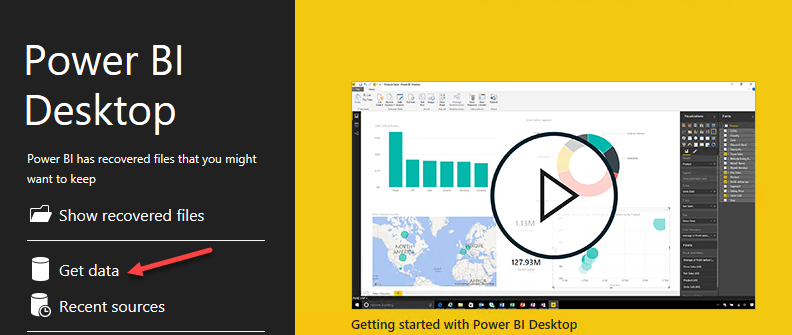
- Open Power BI Desktop and select the Get data option.
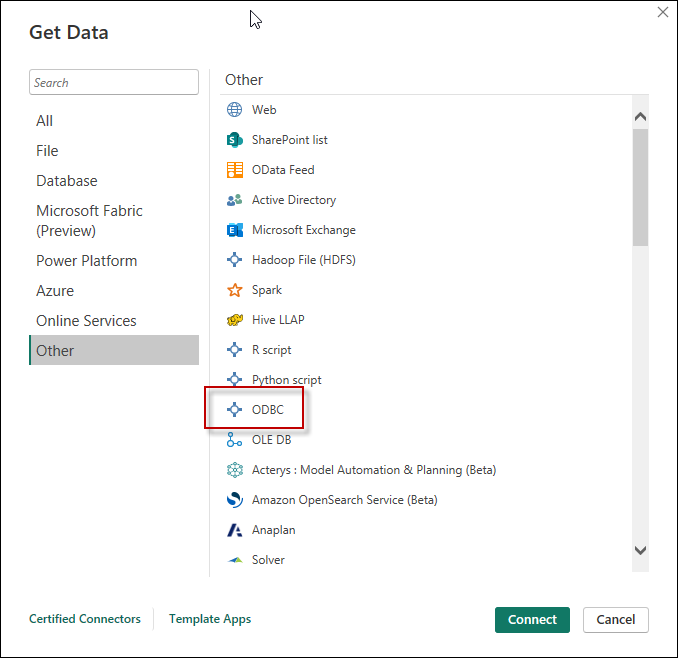
- Once Get data is clicked, Go to Other and select ODBC.
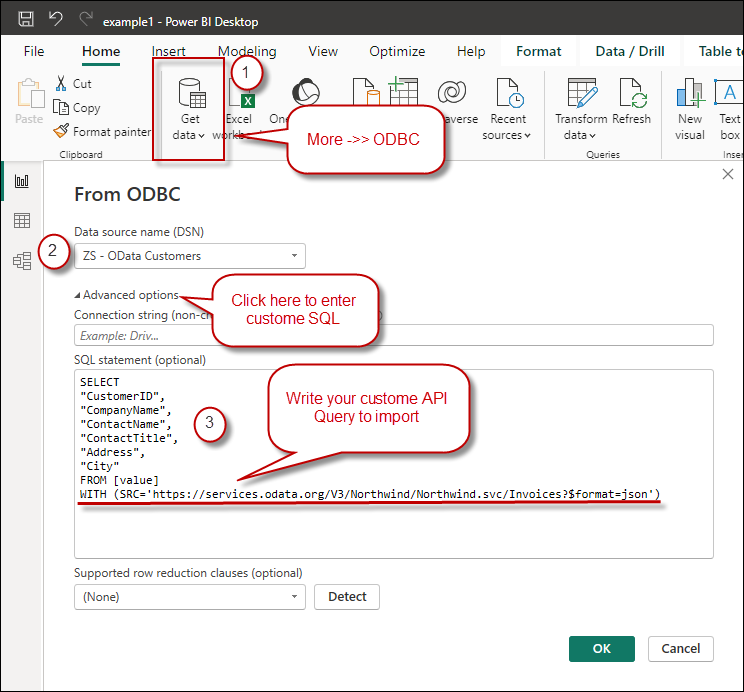
- After that select ODBC DSN name from the DSN dropdown
- Now it's time to import data. Basically, there are two modes to import data. Table Mode and Query Mode. Query mode is the most common but we will show you both ways.
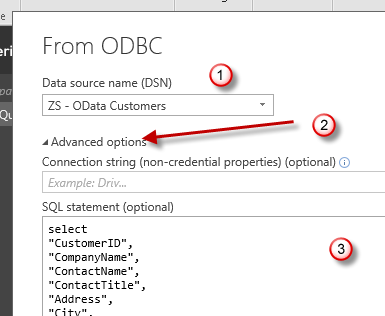
- Import using Power BI Query Mode: Select your DSN and click Advanced Option to enter custom SQL Query to Import your REST API data. You can use ODBC DSN Data sources Preview tool to generate SQL Query. For example you can enter query like below. If you are not sure use Query builder (Found on Driver Preview Window)
SELECT * FROM $
WITH(SRC='https://my-api-url')
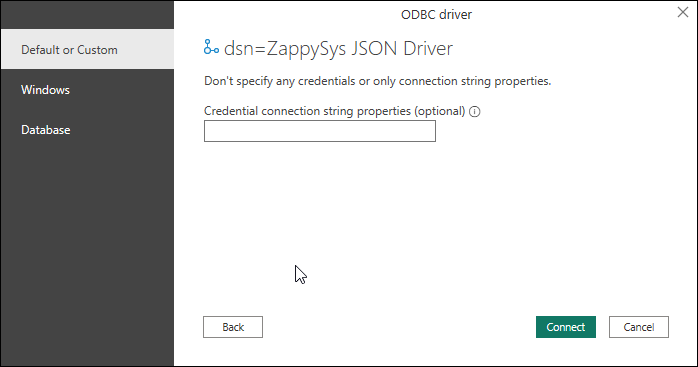
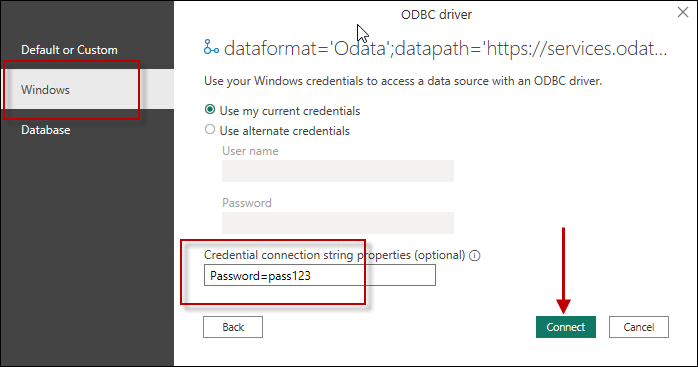
- Import using Power BI Table Mode: If you don't specify SQL query under advanced options then you may get a chance to select Table name to import and Credentials. If Power BI asks for credentials then select Windows and connect.
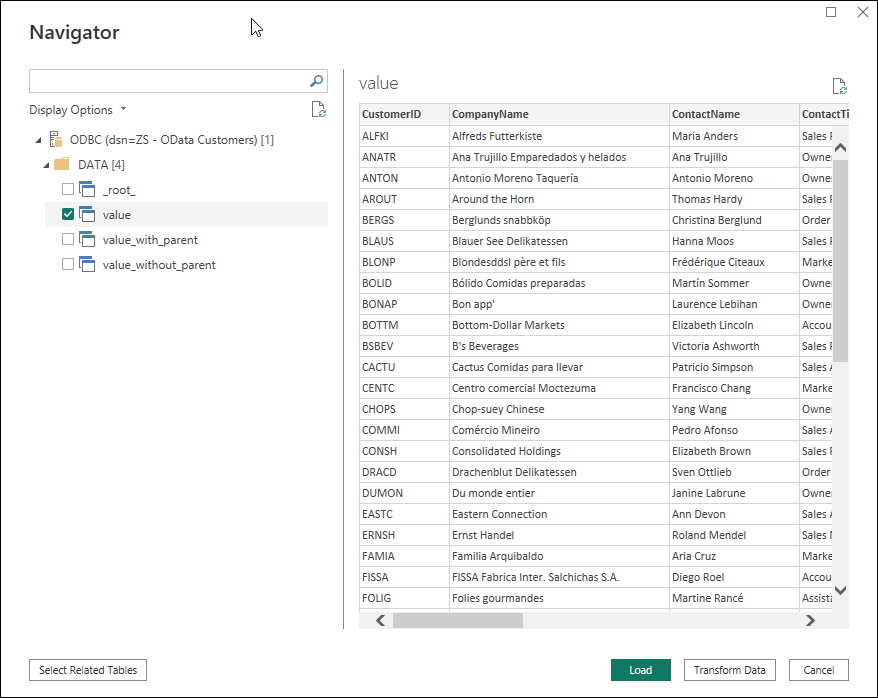
- Once you enter select table, you can choose Select data to import and click OK (Below screeenshot is for the Table mode import when no SQL specified. You can pick desired table to import)
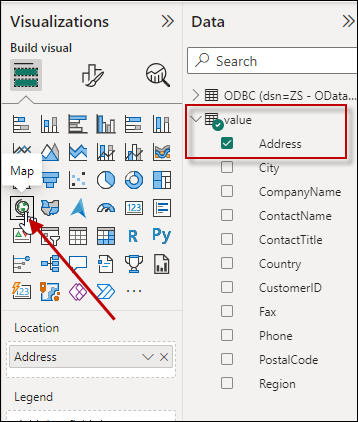
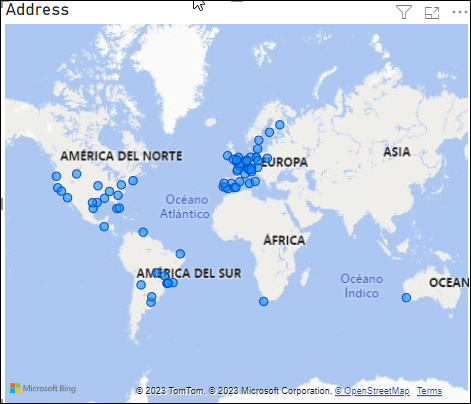
- You can also display data in map using Map visualization like below. Press the map and check Address this option will display the addresses in a map.
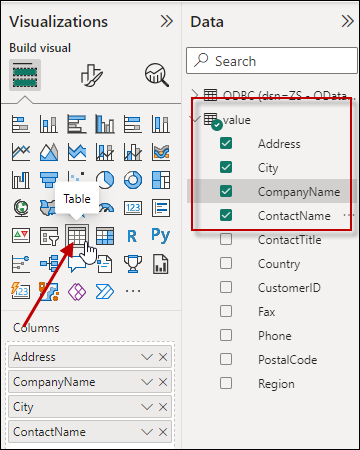
- Now, let's display data in Table Format. Select in values more columns and select the data grid to visualize the data.
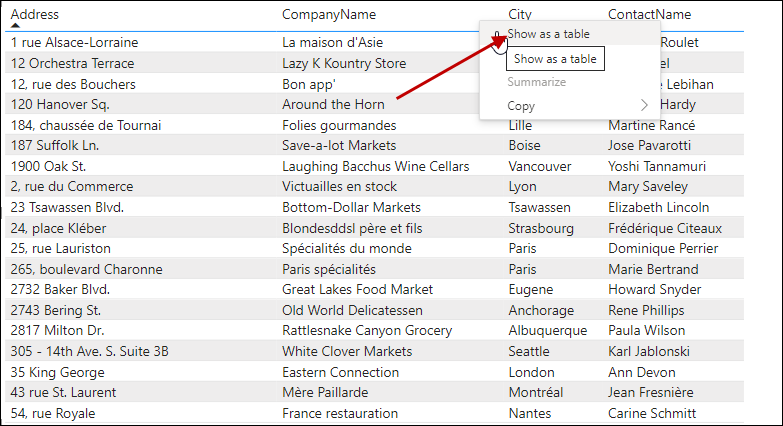
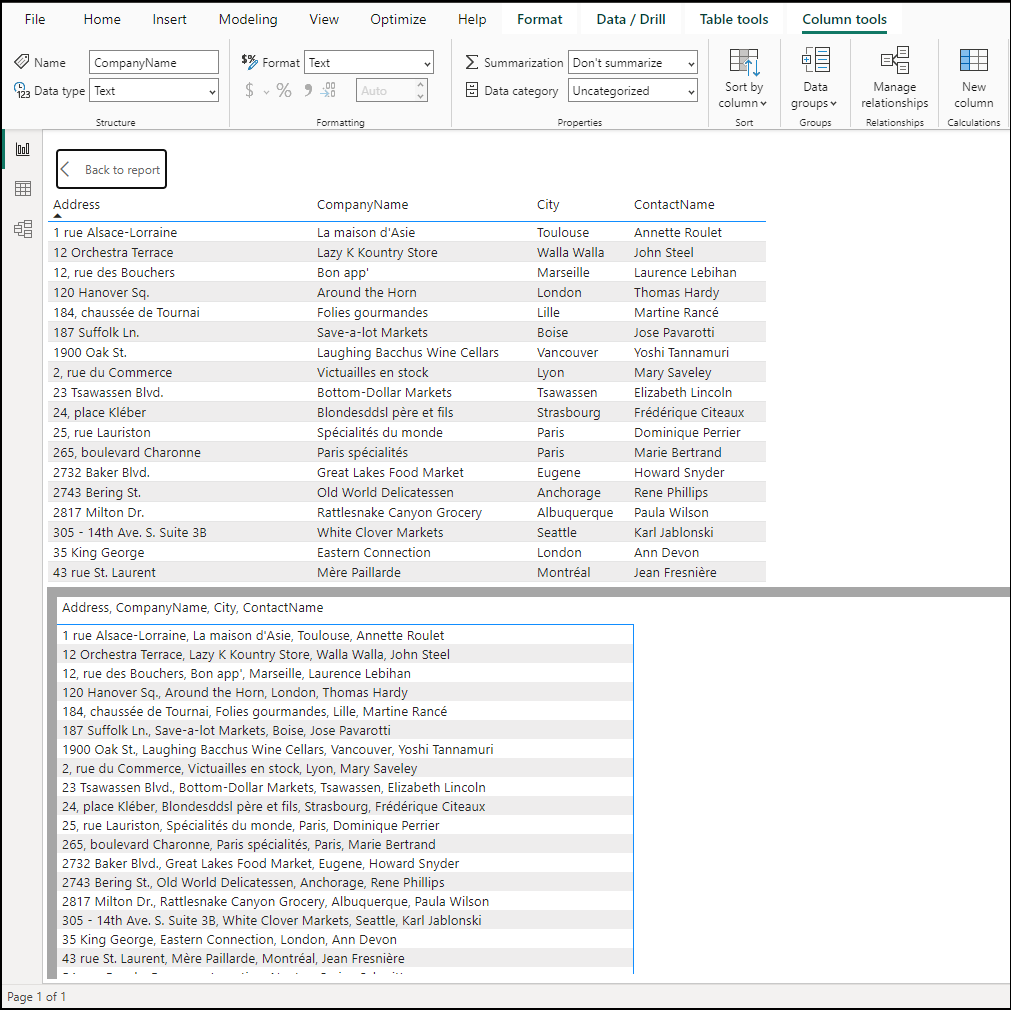
- Once data is displayed, Right click on the data and select Show Data.
- The data will be displayed
Publish Power BI dashboard
- In order to publish the report, press Publish
- Press Save
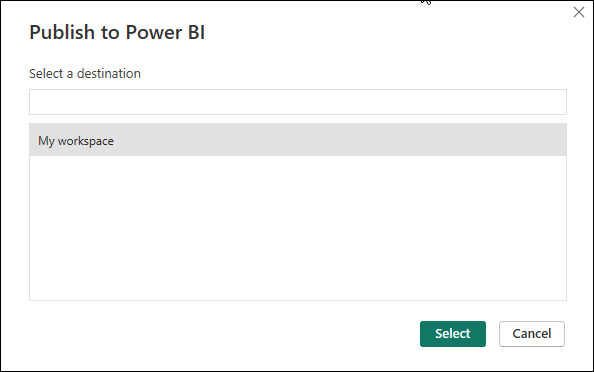
- Select a workspace for the report
- And that is all. You have now your report ready.
Import data using ODBC ConnectionString (DSN-less)
Let’s explore the process of importing data using the ODBC Driver without the need for configuring an ODBC DSN.
When importing data, you have the option to either use an ODBC DSN or a Direct ConnectionString. This section will guide you through the steps of utilizing the ODBC ConnectionString.
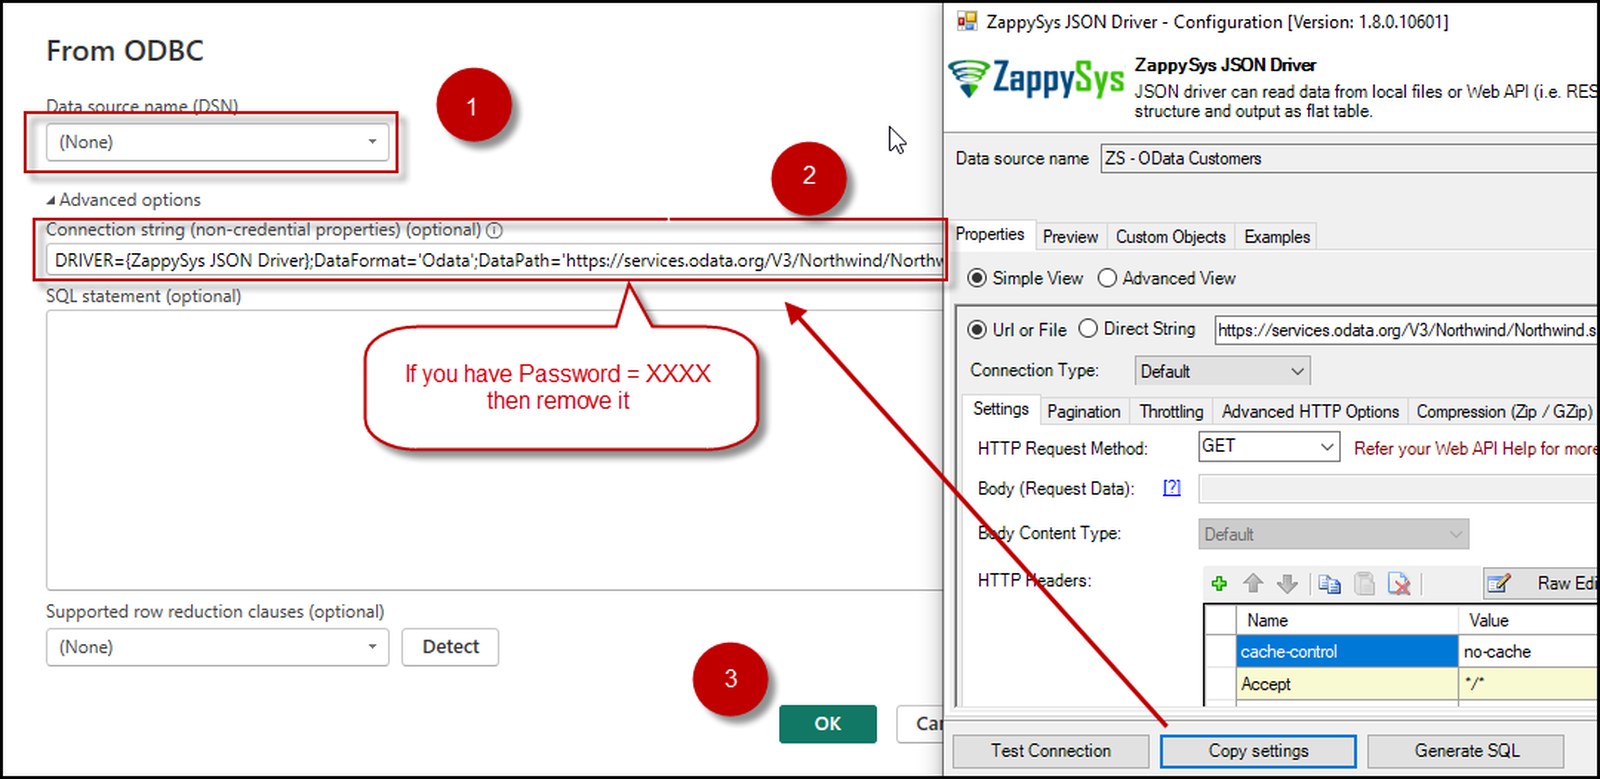
After opting for the ODBC option to retrieve data, you will encounter the “Select ODBC Data Source” screen. To proceed without a DSN, follow these steps:
- Change the DSN dropdown to “(none).”
- Enter the full ODBC ConnectionString, adhering to the syntax below. You can construct your own connection string using the ODBC Driver UI and utilize the “Copy ConnectionString” option.
Syntax: Driver={Your Driver Name}[;Property1=value][;Property2=value]...... - Here is a screenshot with ConnectionString Setting
- Click “Next” to select the authentication method. Choose “Windows” and input the password value if necessary. If your connection string already includes the Password attribute, there’s no need to worry.
POST data to REST API URL
Up until now, we’ve explored the process of fetching data from URLs and importing it into Power BI. However, in certain scenarios, APIs may necessitate the use of the PUT or POST method. These methods involve submitting parameters in the body and receiving a response.
For a more in-depth understanding of how to seamlessly POST data to a URL in Power BI, watch the informative video below.
Calling XML SOAP Web Service in Power BI
So far, we have looked at examples to consume data using JSON driver. Now let’s look at an example, to call XML SOAP Web Service in Power BI.
What is SOAP Web Service?
If you are new to SOAP Web Service sometimes referred as XML Web Service then please read some concept about SOAP Web service standard from this link There are two important aspects in SOAP Web service.- Getting WSDL file or URL
- Knowing exact Web Service URL
What is WSDL
In very simple term WSDL (often pronounced as whiz-dull) is nothing but a document which describes Service metadata (e.g. Functions you can call, Request parameters, response structure etc). Some service simply give you WSDL as xml file you can download on local machine and then analyze or sometimes you may get direct URL (e.g. http://api.mycompany.com/hr-soap-service/?wsdl )Example SQL Query for SOAP API call using ZappySys XML Driver
Here is an example SQL query you can write to call SOAP API. If you not sure about many details then check next few sections on how to use XML Driver User Interface to build desired SQL query to POST data to XML SOAP Web Service without any coding.SELECT * FROM $
WITH(
Src='http://www.holidaywebservice.com/HolidayService_v2/HolidayService2.asmx'
,DataConnectionType='HTTP'
,CredentialType='Basic' --OR SoapWss
,SoapWssPasswordType='PasswordText'
,UserName='myuser'
,Password='pass$$w123'
,Filter='$.soap:Envelope.soap:Body.GetHolidaysAvailableResponse.GetHolidaysAvailableResult.HolidayCode[*]'
,ElementsToTreatAsArray='HolidayCode'
,RequestMethod='POST'
,Header='Content-Type: text/xml;charset=UTF-8 || SOAPAction: "http://www.holidaywebservice.com/HolidayService_v2/GetHolidaysAvailable"'
,RequestData='
<soapenv:Envelope xmlns:soapenv="http://schemas.xmlsoap.org/soap/envelope/" xmlns:hol="http://www.holidaywebservice.com/HolidayService_v2/">
<soapenv:Header/>
<soapenv:Body>
<hol:GetHolidaysAvailable>
<!--type: Country - enumeration: [Canada,GreatBritain,IrelandNorthern,IrelandRepublicOf,Scotland,UnitedStates]-->
<hol:countryCode>UnitedStates</hol:countryCode>
</hol:GetHolidaysAvailable>
</soapenv:Body>
</soapenv:Envelope>'
)
Now let's look at steps to create SQL query to call SOAP API. Later we will see how to generate code for your desired programming language (e.g. C# or SQL Server)
Video Tutorial - Introduction to SOAP Web Service and SoapUI tool
Before we dive into details about calling SOAP API using ZappySys XML Driver, lets first understand what is SOAP API and how to create SOAP requests using SoapUI tool. You will learn more about this process in the later section. The video contains some fragment about using SOAP API in SSIS but just ignore that part because we will be calling Soap API using ZappySys ODBC Driver rather than SSIS Components.Using SoapUI to test SOAP API call / Create Request Body XML
Assuming you have downloaded and installed SoapUI from here, now we are ready to use WSDL for your SOAP Web Service Calls. If you do not have WSDL file or URL handy then contact your API provider (sometimes you just have to add ?wsdl at the end of your Service URL to get WSDL so try that. Example: http://mycompany/myservice?wsdl ). If you don't know what is WSDL then in short, WSDL is Web service Description Language (i.e. XML file which describes your SOAP Service). WSDL helps to craft SOAP API request Body for ZappySys XML Driver. So Let's get started.- Open SoapUI and click SOAP button to create new SOAP Project
- Enter WSDL URL or File Path of WSDLFor example WSDL for our sample service can be accessed via this URL
http://www.dneonline.com/calculator.asmx?wsdl
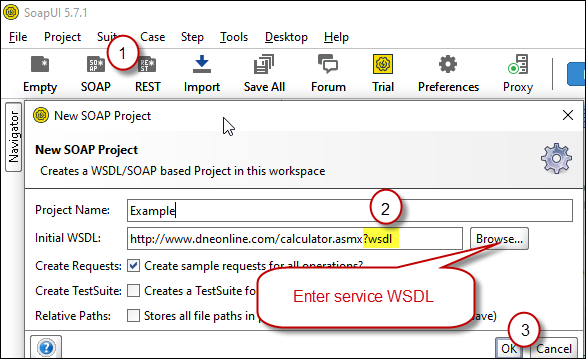 Create new SOAP API Project in SoapUI tool for SOAP API Testing
 - Once WSDL is loaded you will see possible operations you can call for your SOAP Web Service.
- If your web service requires credentials then you have to configure it. There are two common credential types for public services (SOAP WSS or BASIC )
-
To use SOAP WSS Credentials select request node and enter UserId, Password, and WSS-PasswordType (PasswordText or PasswordHash)
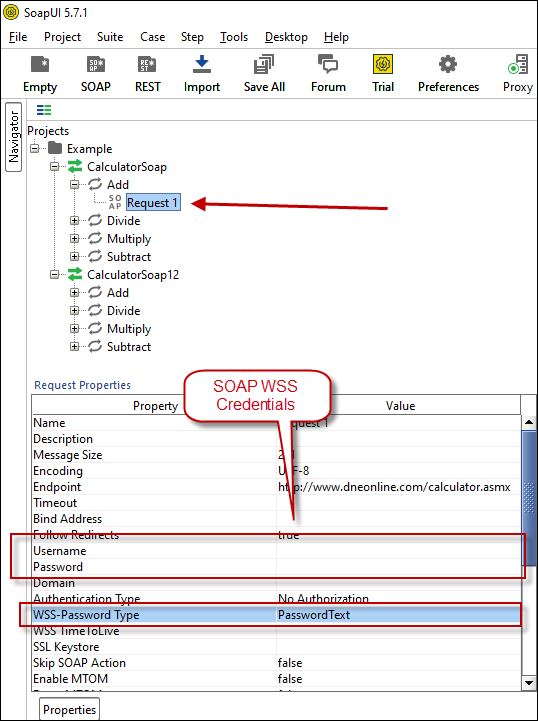 Configure SOAP WSS Credentials for SoapUI (SOAP API Testing Tool)
 - To use BASIC Auth Credentials select request node and double-click it. At the bottom click on Auth (Basic) and From Authorization dropdown click Add New and Select Basic.
 Configure Basic Authorization for SoapUI (SOAP API Testing Tool)
-
- Now you can test your request first Double-click on the request node to open request editor.
- Change necessary parameters, remove optional or unwanted parameters. If you want to regenerate request you can click on Recreate default request toolbar icon.
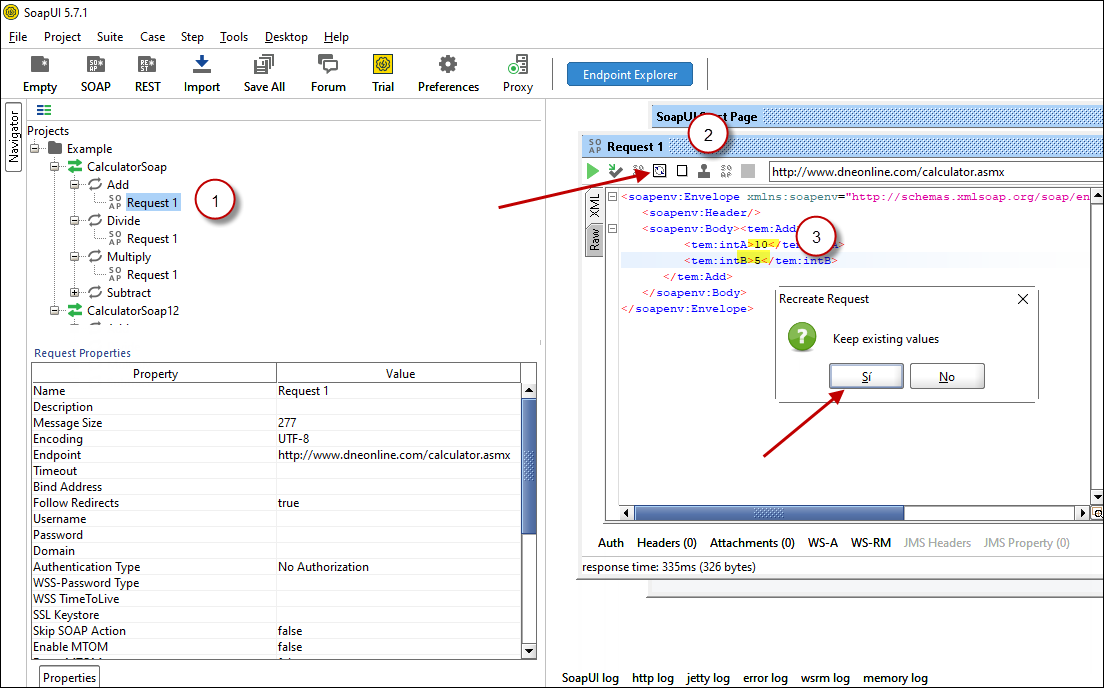 Create SOAP Request XML (With Optional Parameters)
 - Once your SOAP Request XML is ready, Click the Play button in the toolbar to execute SOAP API Request and Response will appear in Right side panel.
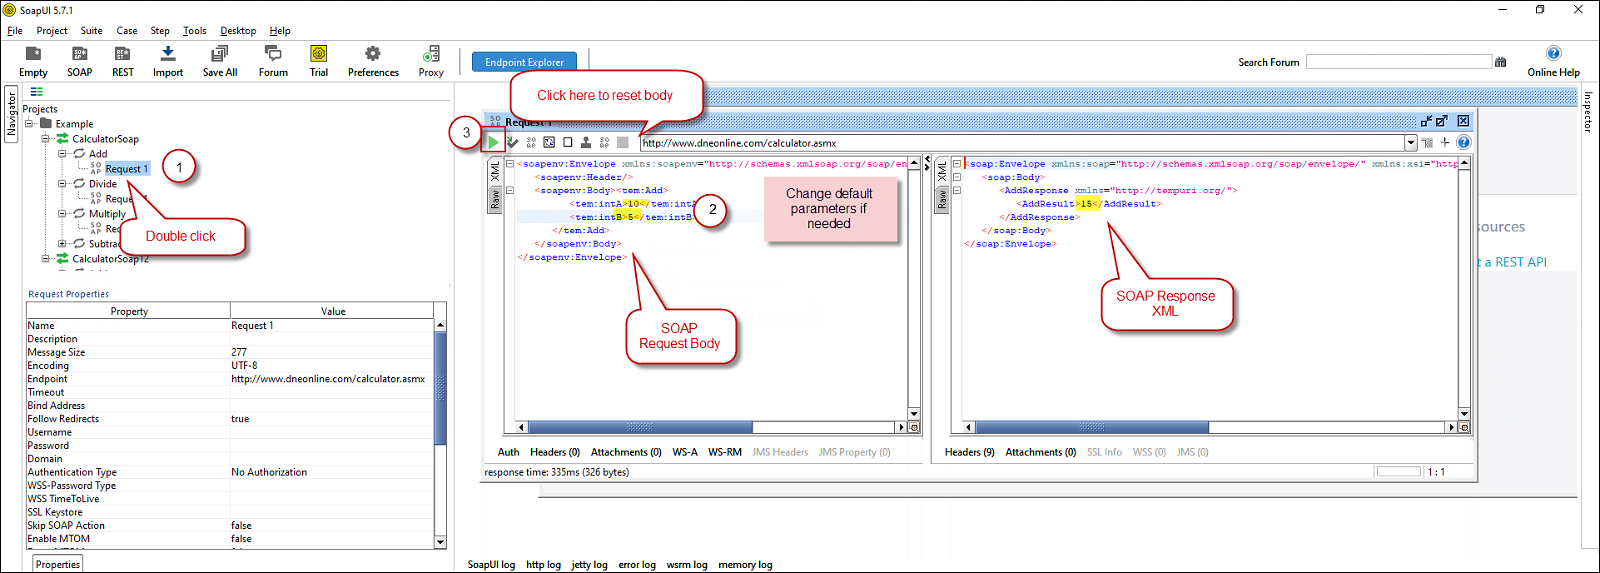 Test SOAP API using SoapUI Tool (Change Default XML Body / Parameters, Execute and See Response)
Create DSN using ZappySys XML Driver to call SOAP API
Once you have tested your SOAP API in SoapUI tool, we are ready to use ZappySys XML driver to call SOAP API in your preferred BI tool or Programming language.- First open ODBC Data Sources (search ODBC in your start menu or go under ZappySys > ODBC PowerPack > ODBC 64 bit)
- Goto System DSN Tab (or User DSN which is not used by Service account)
- Click Add and Select ZappySys XML Driver
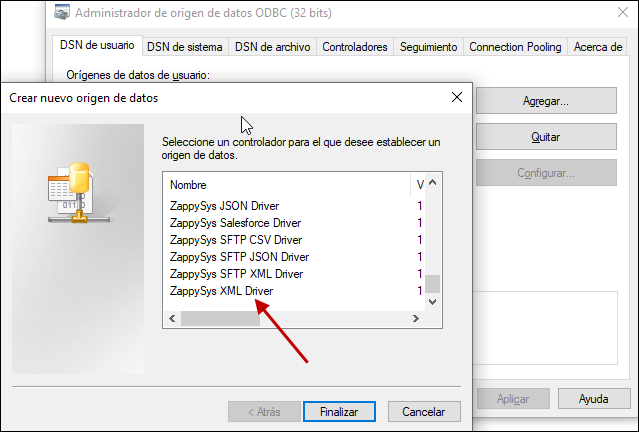 ZappySys ODBC Driver for XML / SOAP API
 - Configure API URL, Request Method and Request Body as below
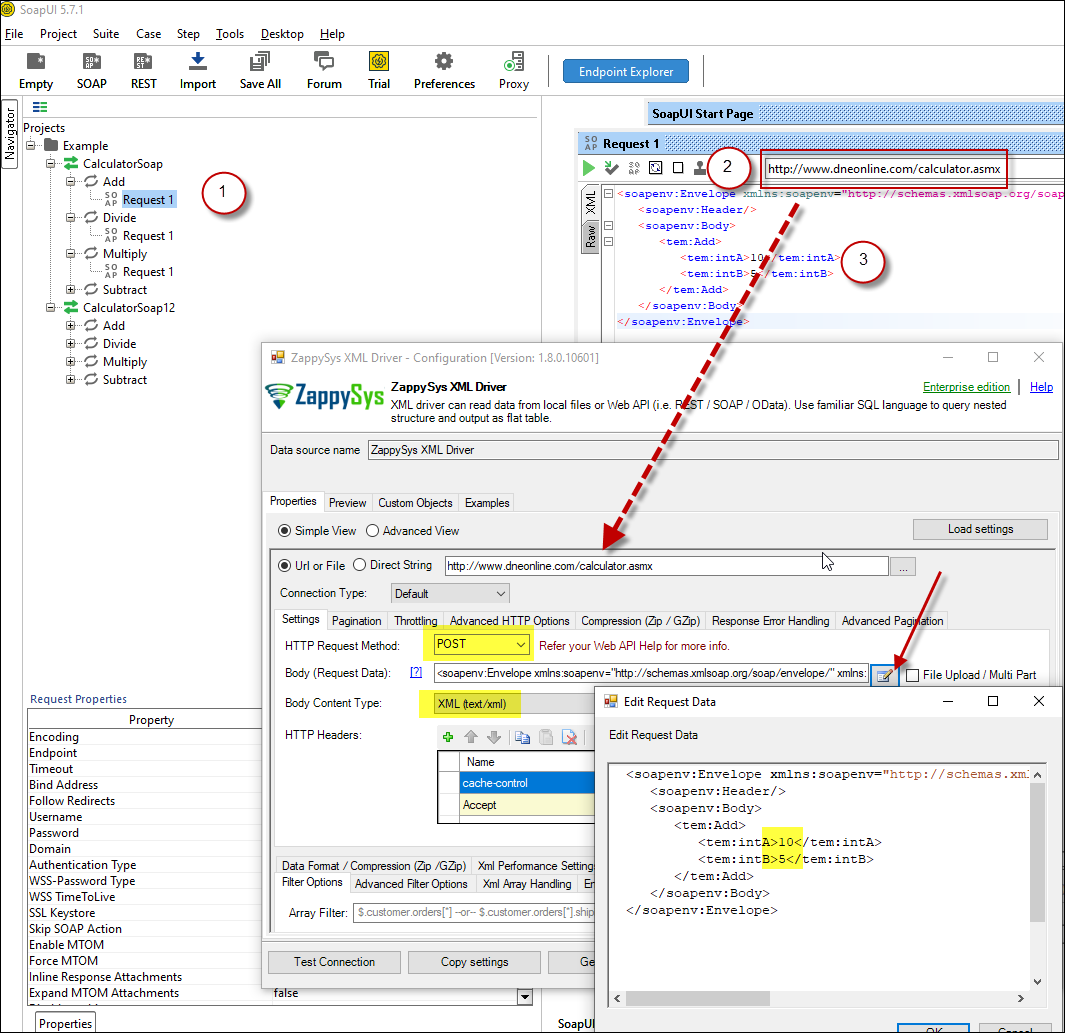 ZappySys XML Driver - Calling SOAP API - Configure URL, Method, Body
 - (This step is Optional) If your SOAP API requires credentials then Select Connection Type to HTTP and configure as below.
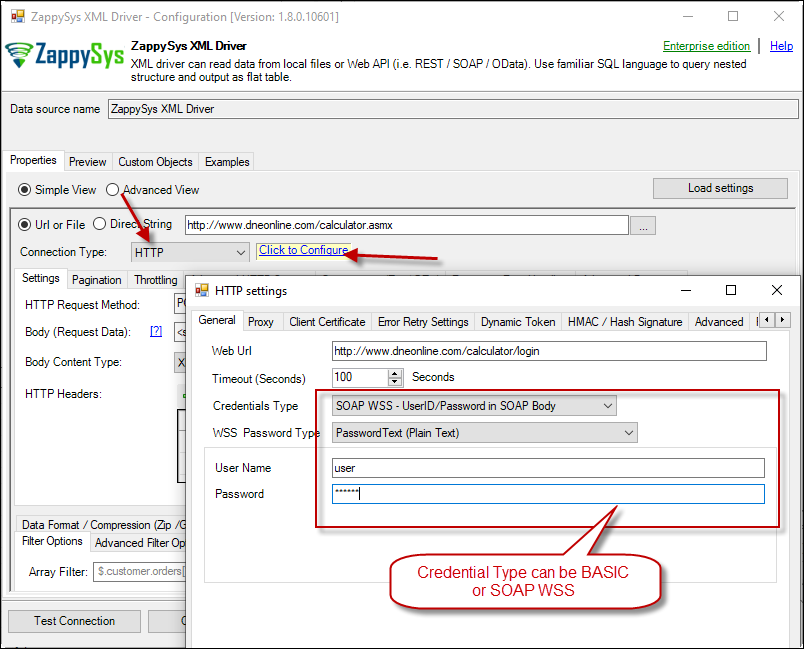 ZappySys XML Driver - Configure SOAP WSS Credentials or Basic Authorization (Userid, Password)
 - Configure-Request Headers as below (You can get it from Request > Raw tab from SoapUI after you test the request by clicking the Play button)
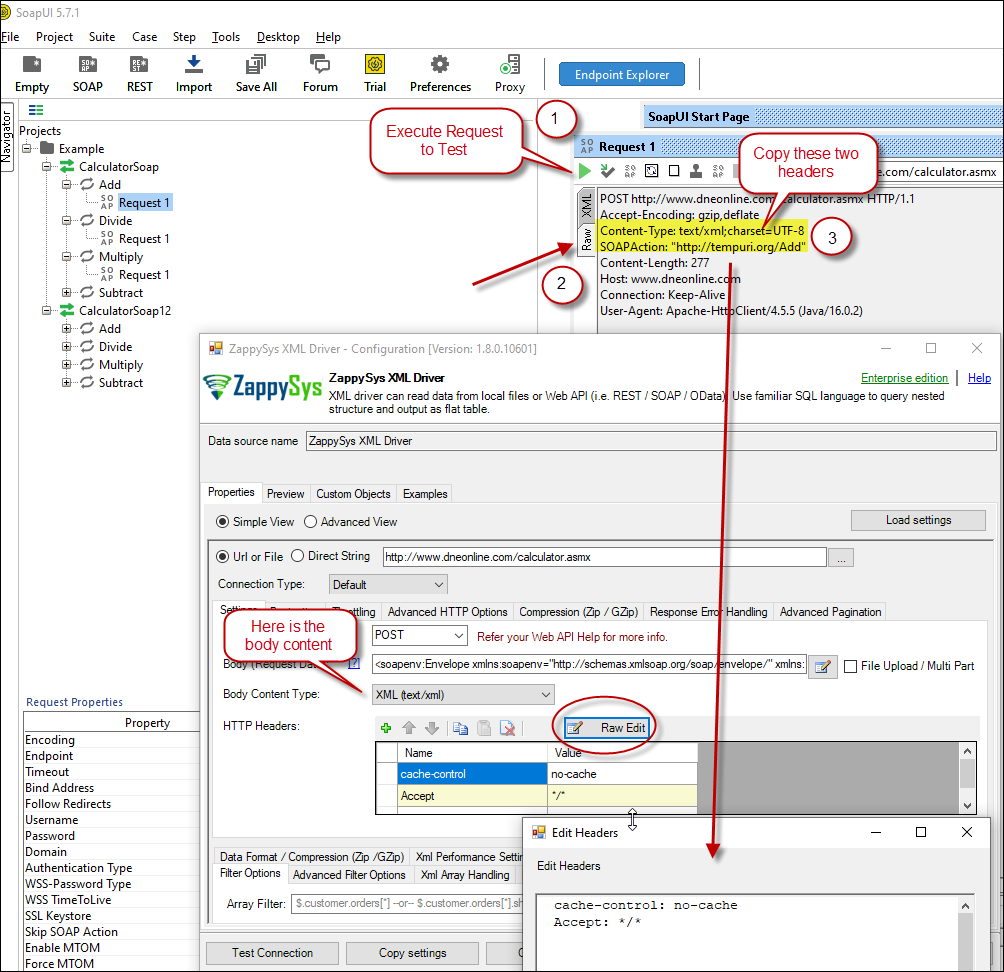 Configure SOAP API Request Headers - ZappySys XML Driver
 - Once credentials entered you can select Filter to extract data from the desired node. Make sure to select array node (see special icon) or select the node which contains all necessary columns if you don't have array node.
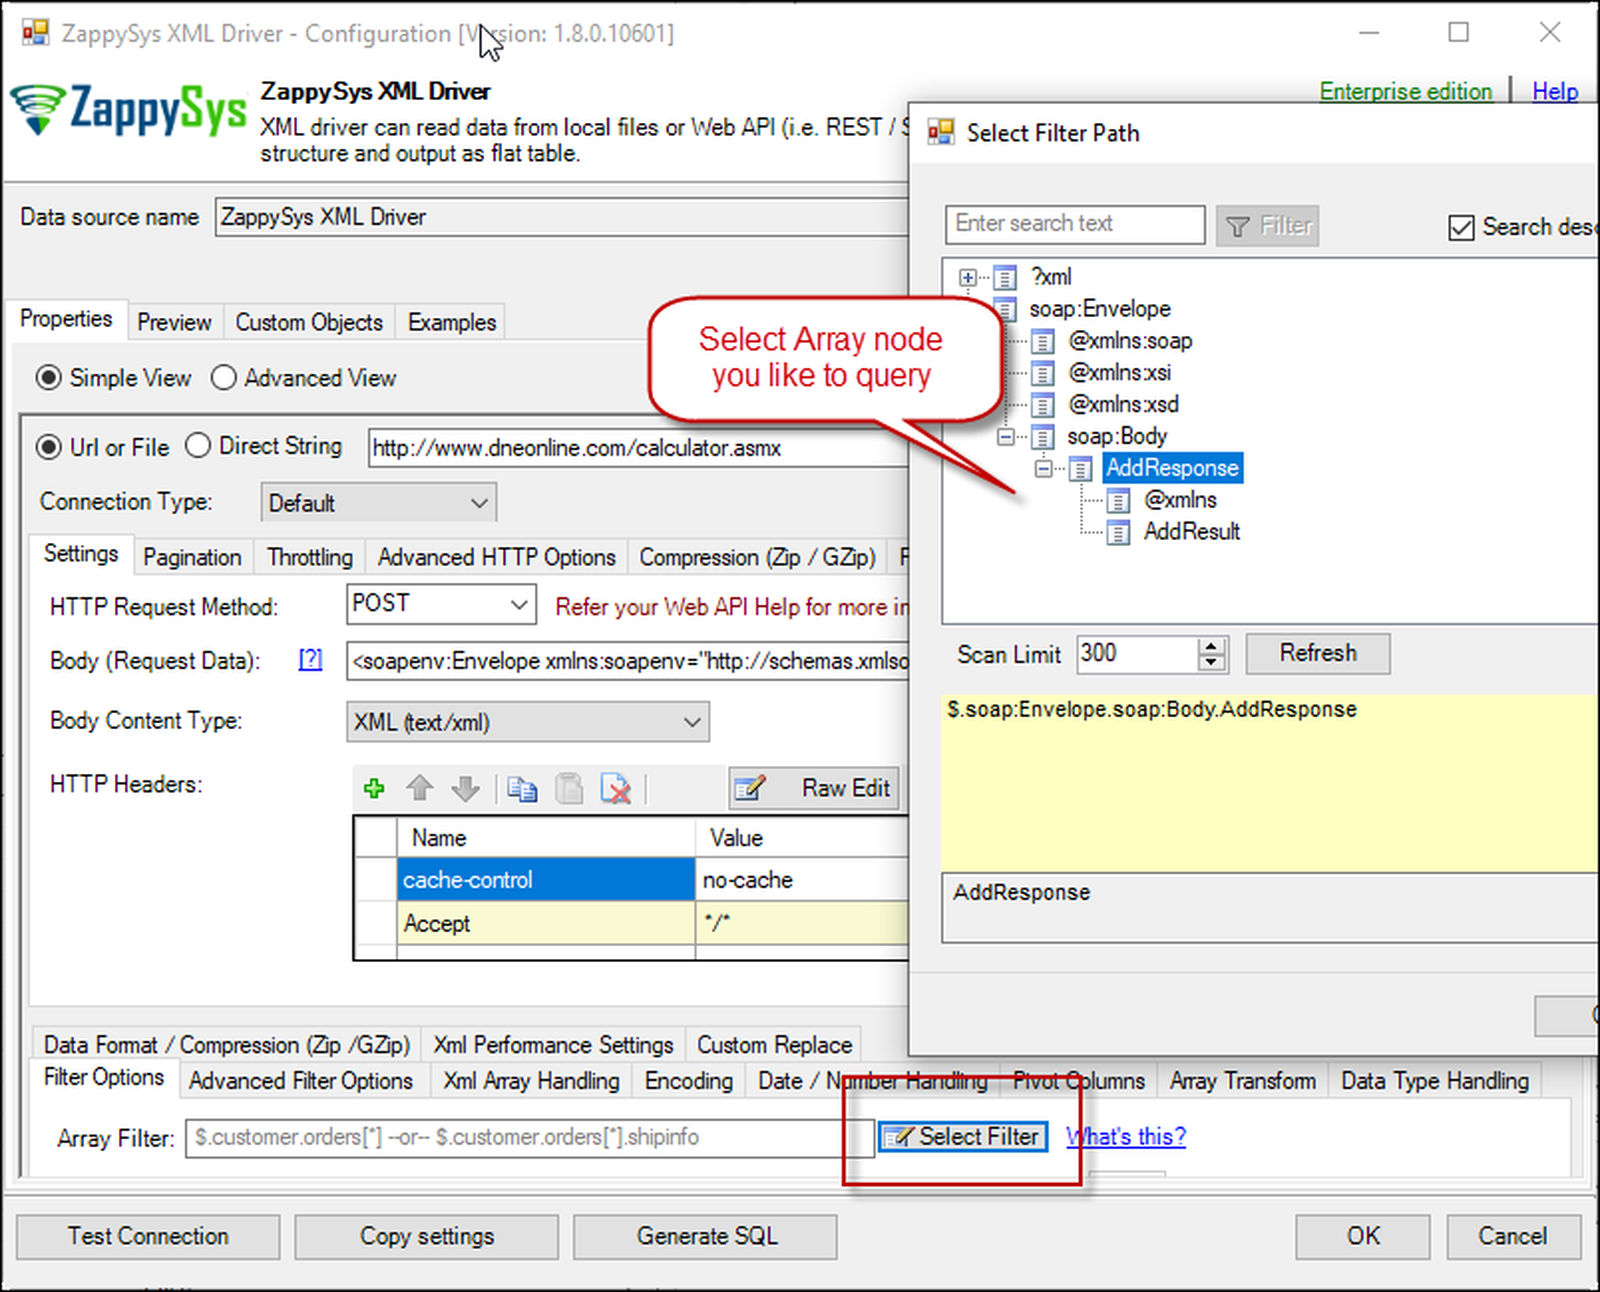 Select Filter - Extract data from nested XML / SOAP API Response (Denormalize Hierarchy)
 - If prompted select yes to treat selected node as Array (This is helpful when you expect one or more record for selected node)
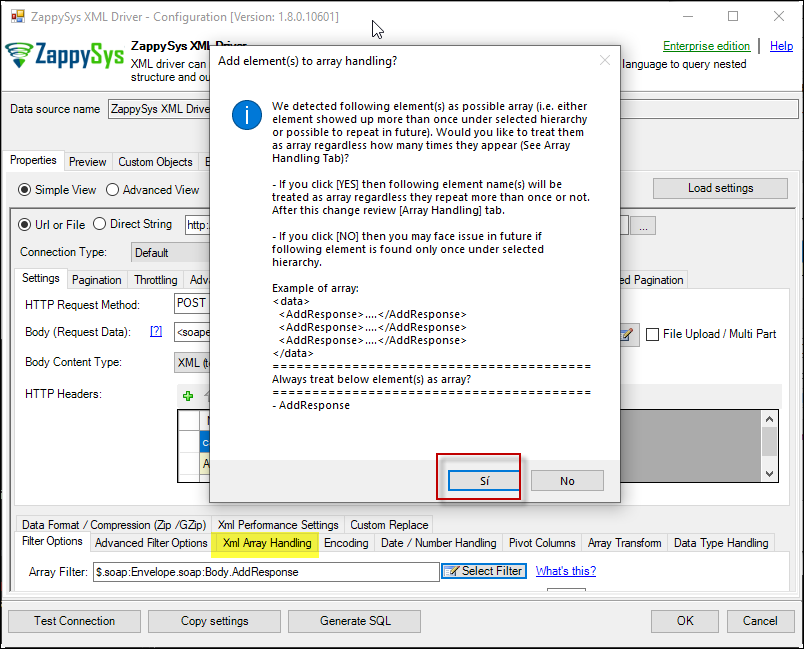 Treat selected node as XML Array Option for SOAP API Response XML
Preview SOAP API Response / Generate SQL Code for SOAP API Call
Once you configure settings for XML Driver now you can preview data or generate example code for desired language (e.g. C#, Python, Java, SQL Server). Go to Preview tab and you will see default query generated based on settings you entered in previous sections. Attributes listed in WITH clause are optional. If you omit attribute in WITH clause it will use it from Properties tab.Preview Data
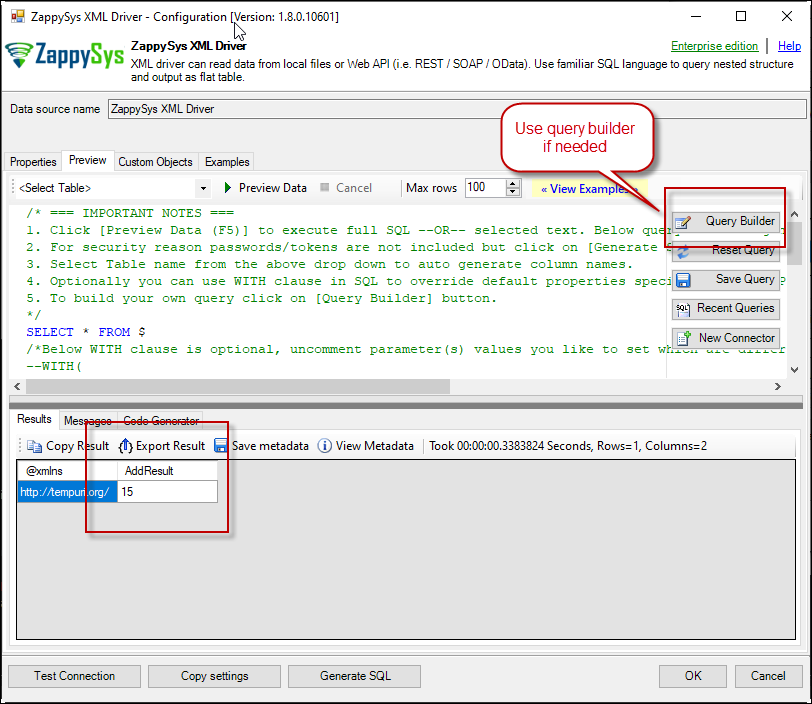 Preview SOAP API Response in ZappySys XML Driver
Generate Code Option
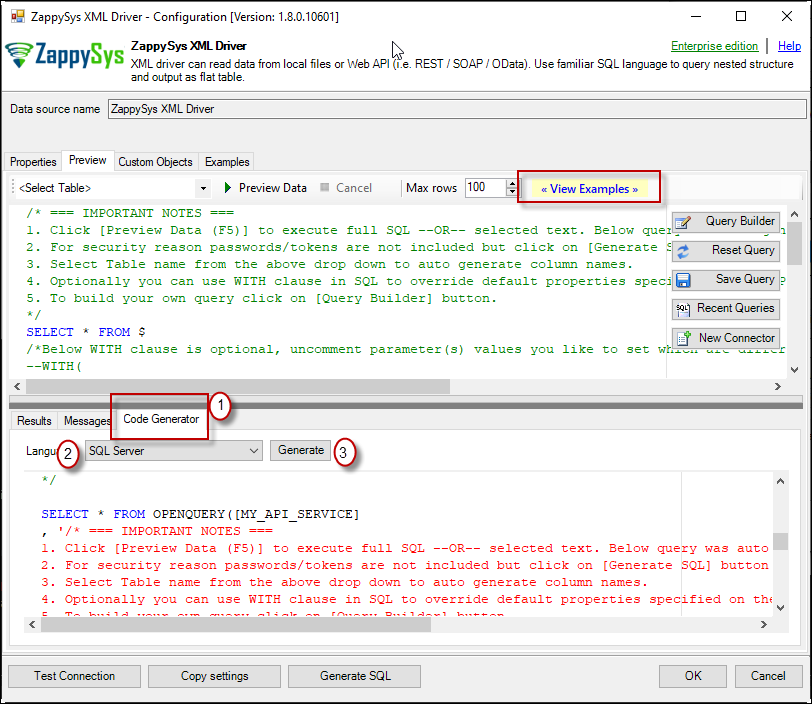
SOAP / REST API pagination in Power BI
Paginate by Response Attribute
This example shows how to paginate API calls where you need to paginate until the last page detected. In this example, next page is indicated by some attribute called nextlink (found in response). If this attribute is missing or null then it stops fetching the next page.SELECT * FROM $ WITH( SRC=@'https://zappysys.com/downloads/files/test/pagination_nextlink_inarray_1.json' ,NextUrlAttributeOrExpr = '$.nextlink' --keep reading until this attribute is missing. If attribute name contains dot then use brackets like this $.['my.attr.name'] )
Paginate by URL Parameter (Loop until certain StatusCode)
This example shows how to paginate API calls where you need to pass page number via URL. The driver keeps incrementing page number and calls next URL until the last page detected (401 error). There are few ways to indicate the last page (e.g. By status code, By row count, By response size). If you don't specify end detection then it will use the default (i.e. No records found).SELECT * FROM $ WITH ( SRC=@'https://zappysys.com/downloads/files/test/page-xml.aspx?page=1&mode=DetectBasedOnResponseStatusCode' ,PagingMode='ByUrlParameter' ,PagingByUrlAttributeName='page' ,PagingByUrlEndStrategy='DetectBasedOnResponseStatusCode' ,PagingByUrlCheckResponseStatusCode=401 ,IncrementBy=1 )
Paginate by URL Path (Loop until no record)
This example shows how to paginate API calls where you need to pass page number via URL Path. The driver keeps incrementing page number and calls next URL until the last page is detected. There are few ways to indicate the last page (e.g. By status code, By row count, By response size). If you don't specify end detection then it will use the default (i.e. No records found).SELECT * FROM $ WITH ( SRC=@'https://zappysys.com/downloads/files/test/cust-<%page%>.xml' ,PagingMode='ByUrlPath' ,PagingByUrlAttributeName='<%page%>' ,PagingByUrlEndStrategy='DetectBasedOnRecordCount' ,IncrementBy=1 )
Paginate by Header Link (RFC 5988)
API like GitHub / Wordpress use Next link in Headers (RFC 5988)SELECT * FROM $ LIMIT 25 WITH( Src='https://wordpress.org/news/wp-json/wp/v2/categories?per_page=10' ,PagingMode='ByResponseHeaderRfc5988' ,WaitTimeMs='200' --//wait 200 ms after each request )
SOAP / REST API Error Handling in Power BI
METHOD 1 - Using Error Handling Options
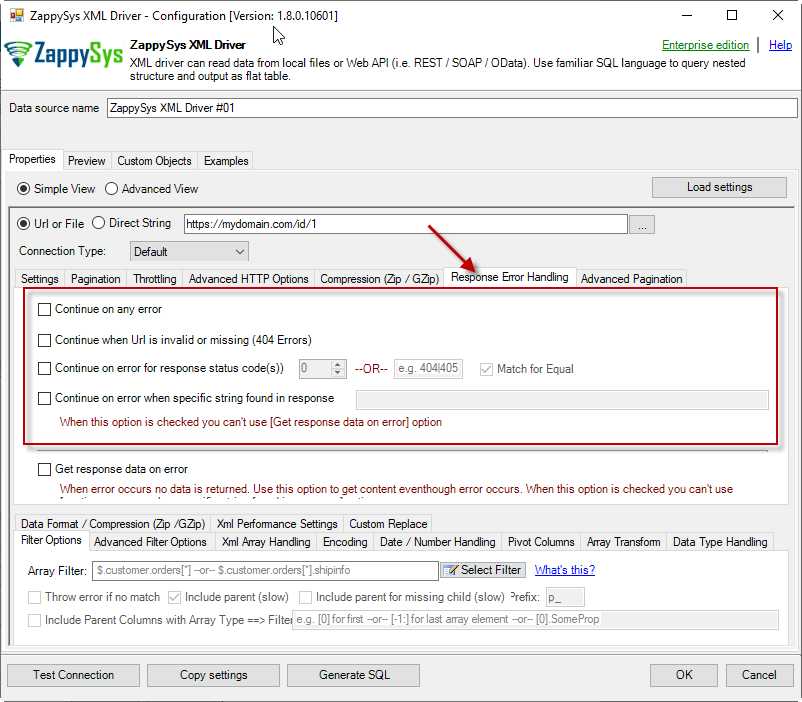
When to use?
You may want to use them when your source is a resource located on the Internet; e.g. a file on a website, a file on an FTP server or just a plain API HTTP response. By default, when a remote server returns an error, data retrieval is stopped, an error is raised and no data is given back to you. This might not be always desirable.Scenario 1
Imagine a scenario, that there is a web server which each day at 12 AM releases a new JSON file with that day's date as filename, e.g. http://www.some-server.com/data/2018-06-20.json. And, of course, you want to download it and use it daily in your Power BI report. But you have a problem: Power BI report data sources are refreshed each hour and you may get HTTP 404 status code (no file was found) when a file is not released yet. Which consequentially means other data sources won't be updated as well and you will see old and cached data on the report. That's where you could use Continue on any error or Continue when Url is invalid or missing (404 Errors) to avoid an error being raised and let other data sources to be updated.Scenario 2
Another scenario is when you expect a web server to raise some kind of HTTP error when accessing a URL. You don't want ODBC Data Source to raise an error but instead, you want to get response data. That's where you can use Continue on any error or alike together with Get response data on error to continue on an error and get the data: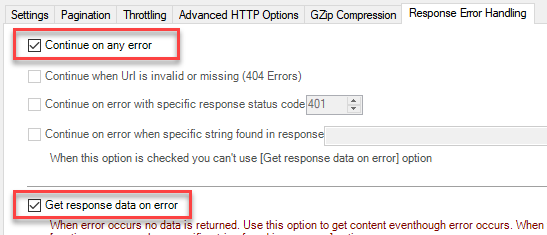
METHOD 2 - Using Connection [Retry Settings]
Another scenario you may run into is a buggy web server. You ask it to give you some file or data and it, like a snotty kid, just doesn't give it to you! You have to ask twice or thrice before it does its job. If that's the case, you have to retry HTTP requests using Connection: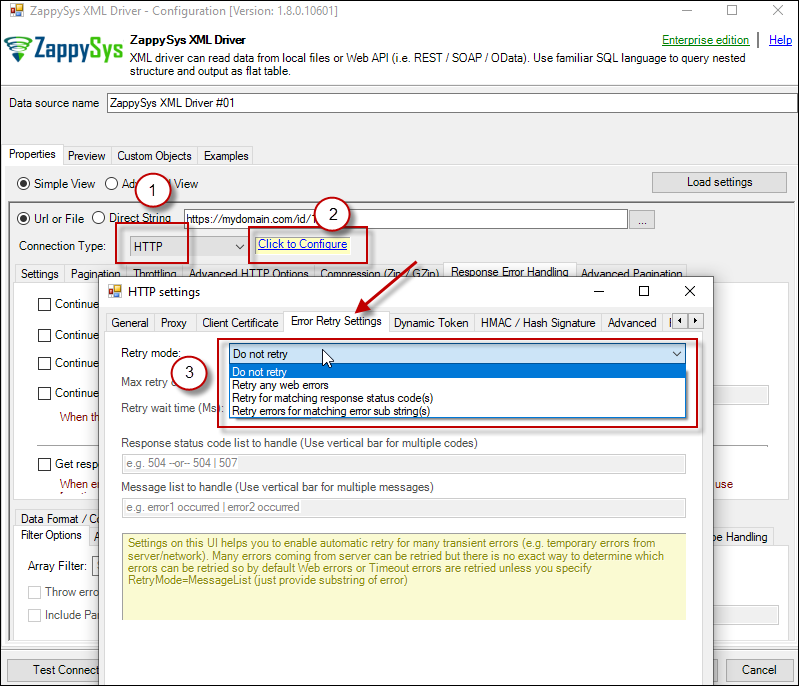
Security / Connection Types (Options for HTTP, OAuth, SOAP) in Power BI
- HTTP
- OAuth
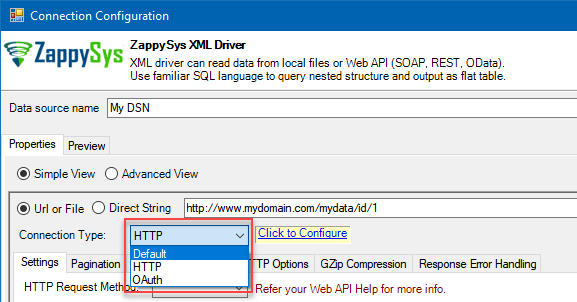
HTTP Connection
- SOAP WSS (when accessing a SOAP WebService)
- Static Token / API Key (when need to pass an API key in HTTP header)
- Dynamic Token (same as Static Token method except that each time you need to log in and retrieve a fresh API key)
- JWT Token (As per RFC 7519)
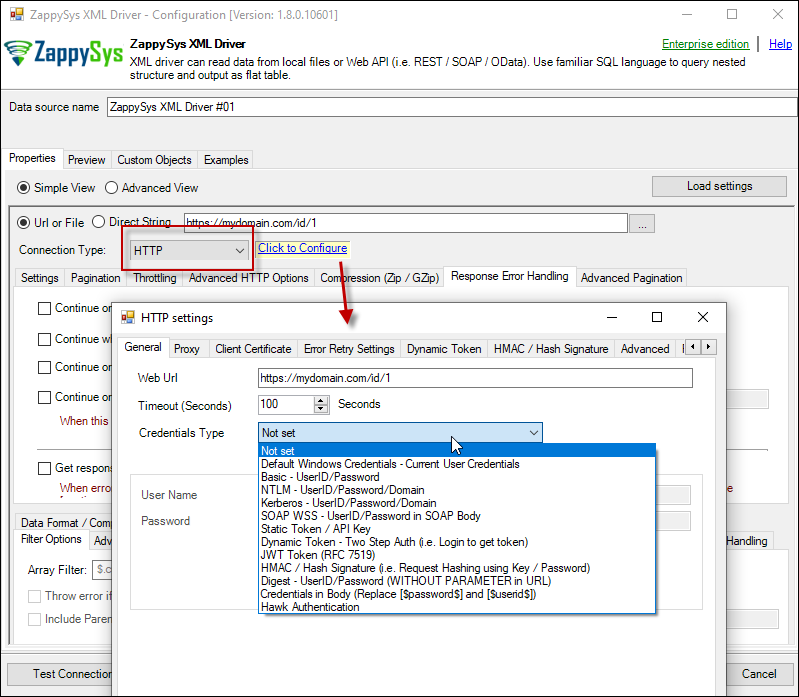
OAuth
If you are trying to access REST API resource, it is a huge chance, you will need to use OAuth Connection. Read this article to understand how OAuth authentication and authorization works and how to use it (article originally was written for SSIS PowerPack, but the concepts and UI stay the same): https://zappysys.com/blog/rest-api-authentication-with-oauth-2-0-using-ssis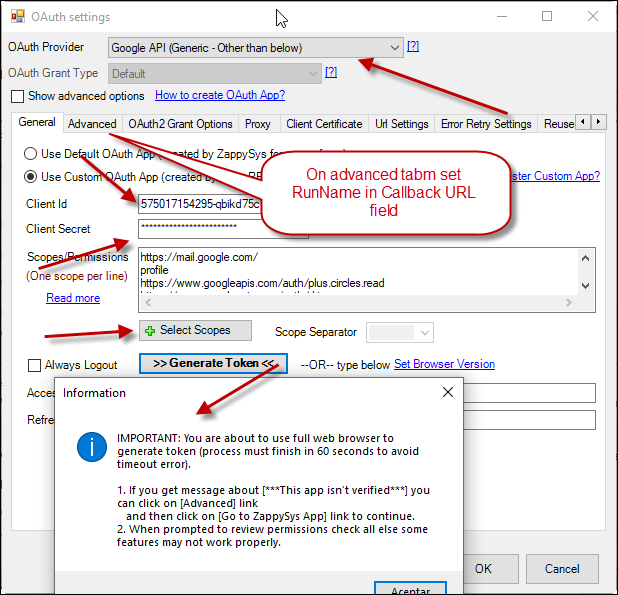
API Limit / Throttling
While calling public API or other external web services one important aspect you have to check, how many requests are allowed by your API. Especially when you use API pagination options to pull many records you have to slow down based on API limits. For example, your API may allow you only 5 requests per second. Use Throttling Tab on Driver UI to set delay after each request.2D Array Transformation
If you are using JSON or XML API Driver then possible you may have to transform your data using 2D array transformation feature. Check this link for more information.Import data into Power BI from SQL Query
If you prefer to import data from an SQL query instead of selecting a table name, you can leverage advanced options during the import steps. Here’s a step-by-step guide:
- After selecting the DSN, proceed to the import steps.
- Click on the “Advanced Options” to access the SQL Query editor.
By utilizing these advanced options, you gain the flexibility to tailor your import process by specifying custom SQL queries to retrieve the exact data you need.
Edit Query / Using Parameters in Power BI (Dynamic Query)
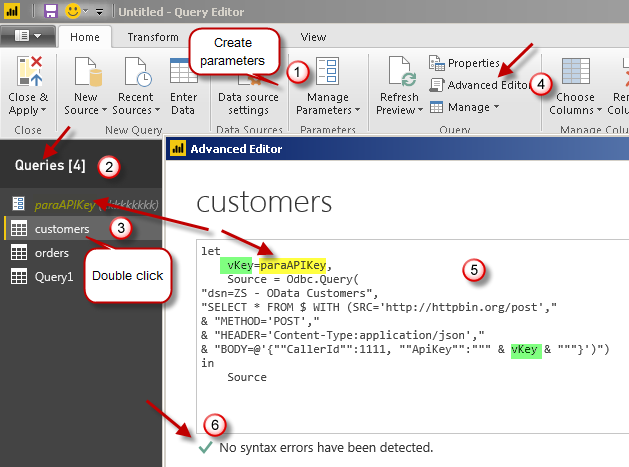
let
    vKey=paraAPIKey,
    Source = Odbc.Query(
"dsn=ZS - OData Customers",
"SELECT * FROM $ WITH (SRC='http://httpbin.org/post',"
& "METHOD='POST',"
& "HEADER='Content-Type:application/json',"
& "BODY=@'{""CallerId"":1111, ""ApiKey"":""" & vKey & """}')")
in
    Source
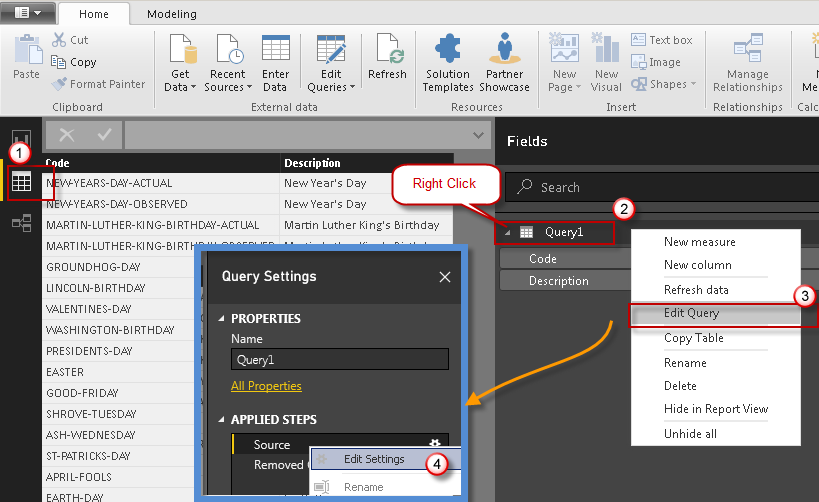
Edit Query Settings after Import
There will be a time you need to change initial Query after dataset import in Power BI. Not to worry, just follow these steps to edit your SQL.
Using DirectQuery Option rather than Import
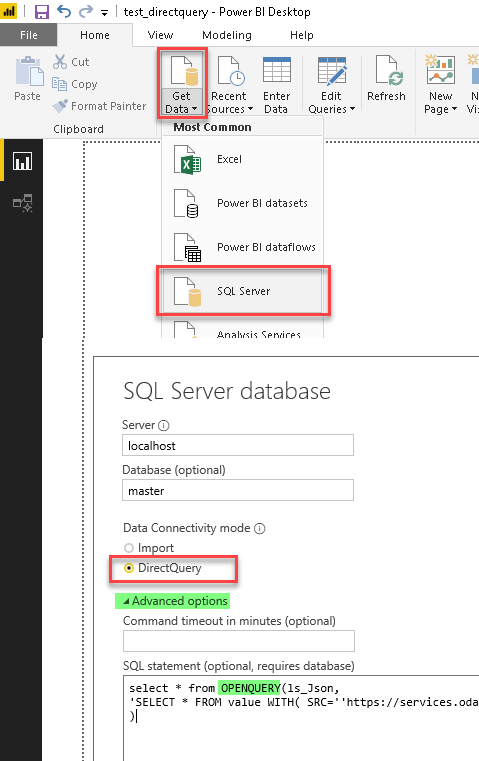
So far we have seen how to Import REST API data into Power BI but what if you have too much data and you dont want to import but link it. Power BI Offers very useful feature for this scenario. Its called DirectQuery Option. In this section we will explore how to use DirectQuery along with ZappySys Drivers. Out of the box ZappySys Drivers wont work in ODBC Connection Mode so you have to use SQL Server Connection rather than ODBC if you wish to use Live data using DirectQuery option. See below step by step instructions to enable DirectQuery mode in Power BI for REST API data. Basically we will use ZappySys Data Gateway its part of ODBC PowerPack. We will then use Linked Server in SQL Server to Link API Service and then we will issue OPENROWSET queries from Power BI to SQL Server and it will then call REST API via ZappySys Data Gateway.Step-By-Step
- First read this article carefully how to query REST API in SQL Server.
- Once linked server is configured we are ready to issue API query in Power BI.
- Click Get Data in Power BI, select SQL Server Database
- Enter your server name and any database name
- Select Mode as DirectQuery
- Click on Advanced and enter query like below (we are assuming you have created JSON Data Source in Data Gateway and defined linked server (Change name below).
select * from OPENQUERY(YOUR_LINKED_SERVER_NAME,
'SELECT * FROM value WITH( SRC=''https://services.odata.org/V3/Northwind/Northwind.svc/Orders?$format=json''  )'
)
- Click OK and Load data ... That's it. Now your REST API data is linked rather than imported.
Performance Tips for REST API / XML SOAP Calls
Use Server-side filtering if possible in URL or Body Parameters
Many API supports filtering your data by URL parameters or via Body. Whenever possible try to use such features. Here is an example of odata API, In the below query the first query is faster than the second query because in the first query we filter at the server.SELECT * FROM value WITH( Src='https://services.odata.org/V3/Northwind/Northwind.svc/Customers?$format=json&$filter=Country eq ''USA''' ,DataFormat='Odata' ) -- Slow query - Client-side filtering SELECT * FROM value WHERE Country ='USA' WITH( Src='https://services.odata.org/V3/Northwind/Northwind.svc/Customers?$format=json' ,DataFormat='Odata' )
Avoid Special features in SQL Query (e.g. WHERE, Group By, Order By)
ZappySys API engine triggers client-side processing if special features are used in Query. Following SQL Features will trigger Client-Side processing which is several times slower than server-side processing. So always try to use simple query (Select col1, col2 .... from mytable )- WHERE Clause
- GROUP BY Clause
- HAVING Clause
- ORDER BY
- FUNCTIONS (e.g. Math, String, DateTime, Regex... )
Consider using pre-generated Metadata / Cache File
Use META option in WITH Clause to use static metadata (Pre-Generated)There are two more options to speedup query processing time. Check this article for details.-
select * from value WITH( meta='c:\temp\meta.txt' ) --OR-- select * from value WITH( meta='my-meta-name' ) --OR-- select * from value WITH( meta='[ {"Name": "col1", "Type": "String", Length: 100}, {"Name": "col2", "Type": "Int32"} ...... ]' ) - Enable Data Caching Options (Found on Property Grid > Advanced Mode Only )
Consider using Metadata / Data Caching Option
ZappySys API drivers support Caching Metadata and Data rows to speed up query processing. If your data doesn't change often then you can enable this option to speed up processing significantly. Check this article for details how to enable Data cache / metadata cache feature for datasource level or query level. To define cache option at query level you can use like below.SELECT * FROM $ WITH ( SRC='https://myhost.com/some-api' ,CachingMode='All' --cache metadata and data rows both ,CacheStorage='File' --or Memory ,CacheFileLocation='c:\temp\myquery.cache' ,CacheEntryTtl=300 --cache for 300 seconds )
Use --FAST Option to enable Stream Mode
ZappySys JSON / XML drivers support --FAST suffix for Filter. By using this suffix after Filter driver enables Stream Mode, Read this article to understand how this works.SELECT * FROM $ LIMIT 10 --//add this just to test how fast you can get 10 rows WITH( Filter='$.LargeArray[*]--FAST' --//Adding --FAST option turn on STREAM mode (large files) ,SRC='https://zappysys.com/downloads/files/test/large_file_100k_largearray_prop.json.gz' --,SRC='c:\data\large_file.json.gz' ,IncludeParentColumns='False' --//This Must be OFF for STREAM mode (read very large files) ,FileCompressionType='GZip' --Zip or None (Zip format only available for Local files) )
Working with Gateways in Power BI (Schedule Import)
If the data needs to be updated, it is necessary to create a gateway on-premises. In this new section, we will install a Power BI Gateway and in the next section schedule it to update the REST API information.- In the last section, we Published the report. Power BI may ask you to SIGN IN.
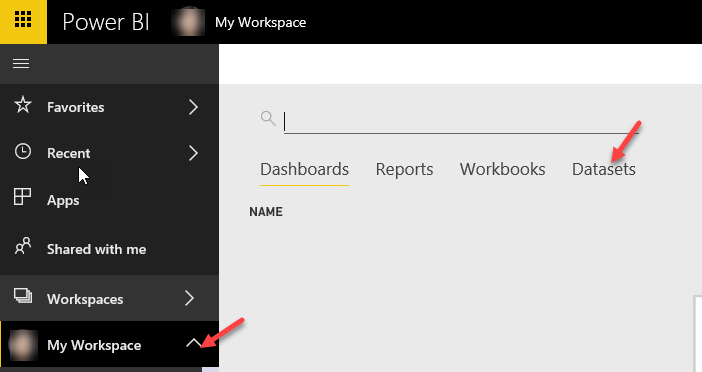
- Select the Workspace and select Datasets
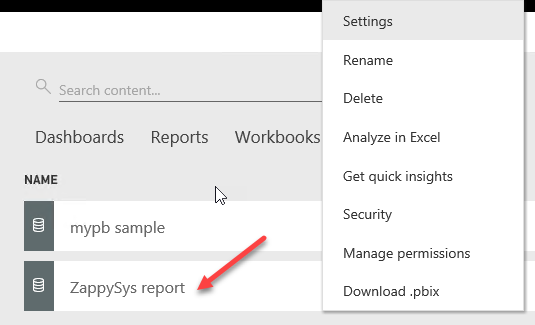
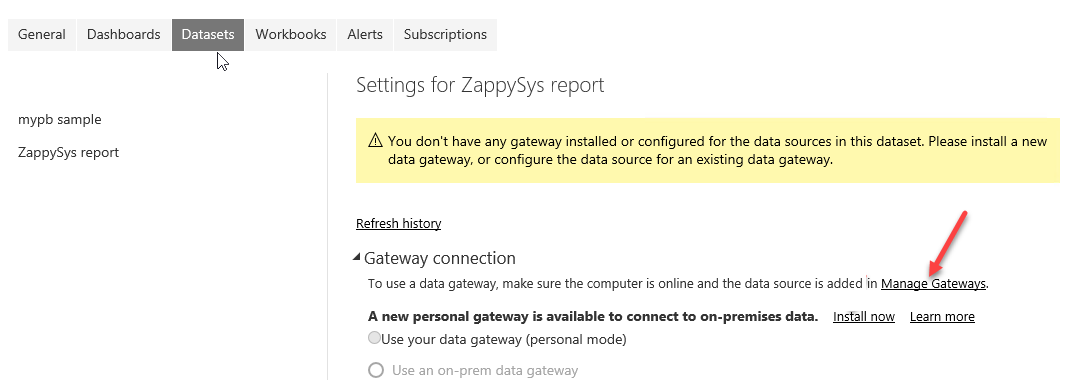
- Right-click the report and select Settings.
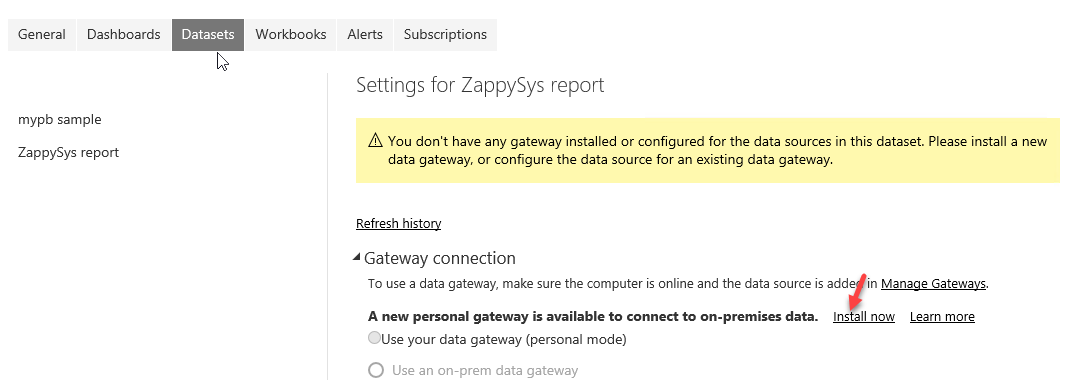
- The system will ask for a Gateway. Stay here.
- Use the following link to install a Data Gateway:
https://docs.microsoft.com/en-us/power-bi/service-gateway-onprem
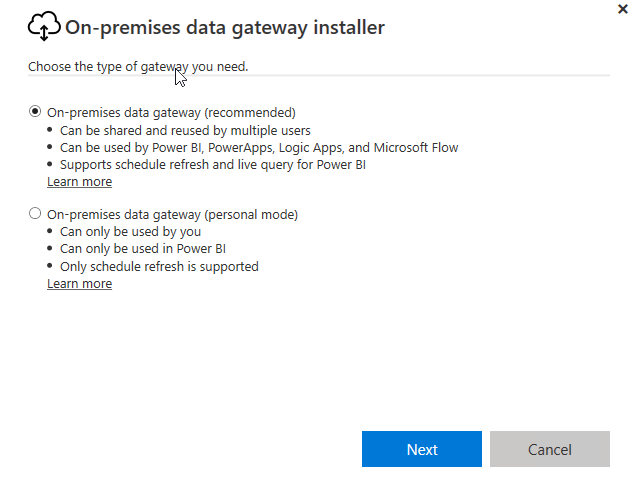
- Run the installer and press Next
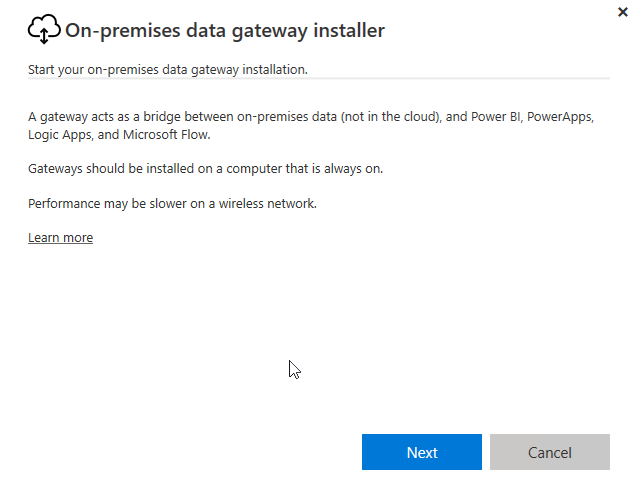
Gateway installer
- Select the option On-premises data gateway (recommended). This option allows access to multiple users and can be used by more applications than Power BI.
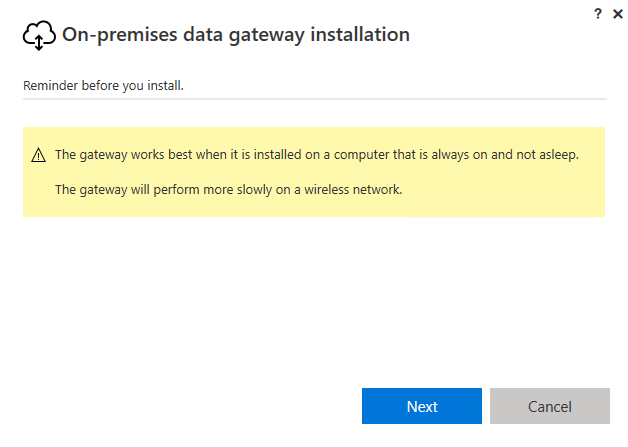
- The installer will show a warning message.
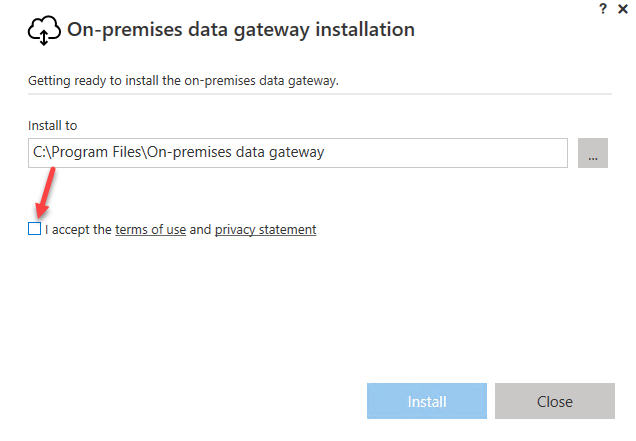
- Select the path to install and check the I accept the terms.
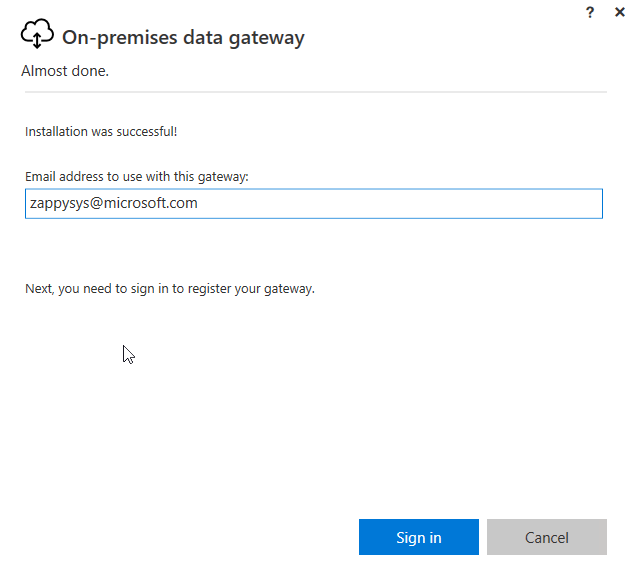
- Specify the email address to use the gateway.
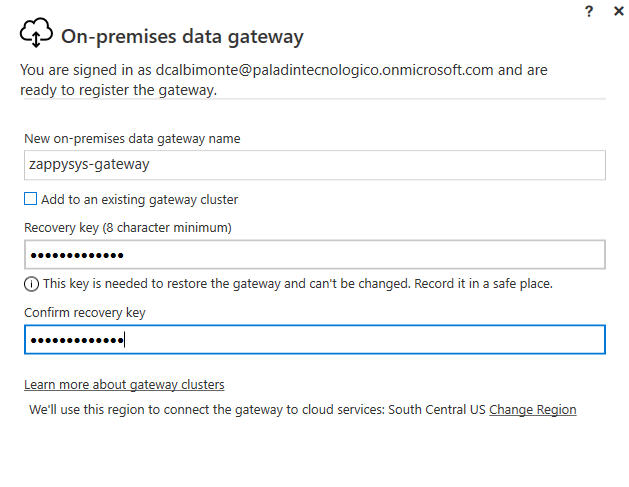
- After entering the email, write the gateway name and a recovery key. Make sure to confirm the recovery key.
Manage gateways and configure the schedule
Once that the gateway is installed we will configure it and add the connection strings.- The next step is to go to manage gateway
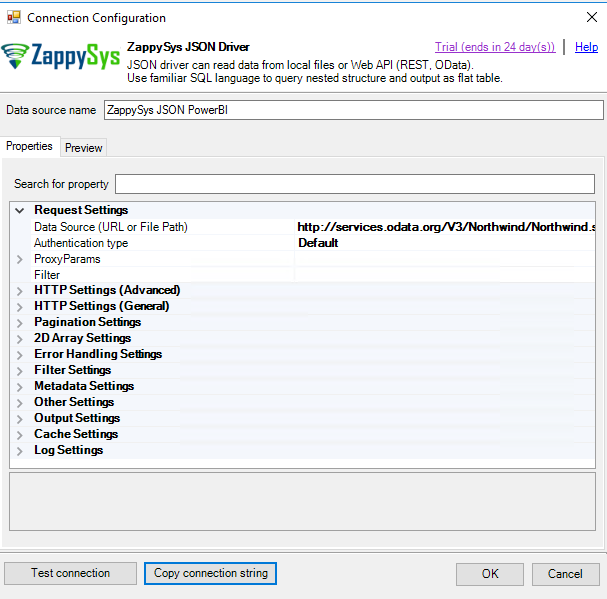
- In order to get the connection string, we will need the connection string of the ZappySys JSON Driver. In the first section of this post, we explained how to configure it. Press Copy Connection String
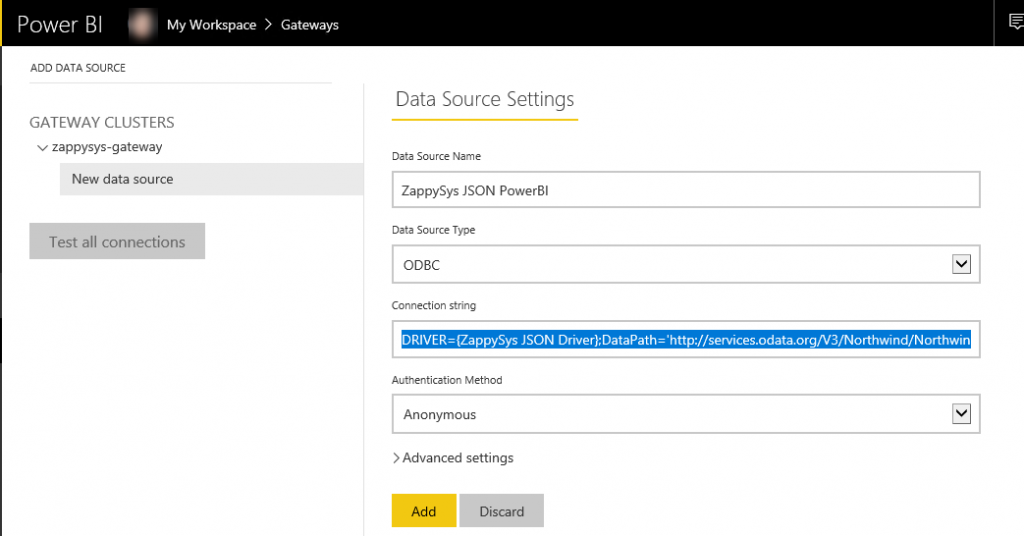
- Once that the data is copied, add a New data Source. In Data Source Name, enter the Data Source Name of the ZappySys JSON driver in step 13 and in Data Source Type, select ODBC. In connection string copy and paste from the clipboard of the step 13 and press Add.
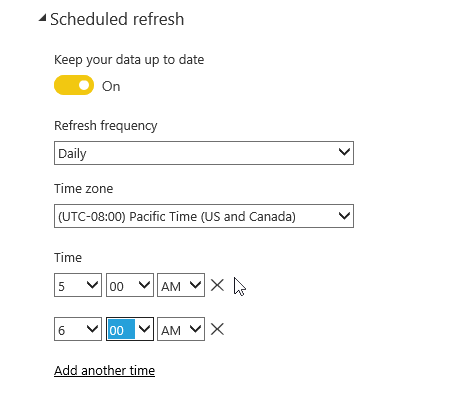
- Once added the gateway. You can see the schedule refresh to On and Add another time to add the time where you want to refresh the data.
Conclusion
In this article, we guide you through the process of configuring the ZappySys Power Pack, focusing on the ZappySys driver for JSON. This driver is instrumental in extracting data from REST APIs or JSON files. Follow these steps to seamlessly add the extracted data to Power BI and generate insightful reports.
Additionally, we’ll walk you through the configuration of the Power BI gateway, ensuring that the data is refreshed on a specified schedule for up-to-date and accurate reporting. To try this configuration yourself, download ODBC PowerPack and embark on a journey of efficient data extraction and reporting.
References
- What is Power BI?
- Keep your dashboards and reports up-to-date with your on-premises data sources
- Power BI – Read REST API / JSON File / XML File / SOAP (Pagination, OAuth, OData)

