Introduction
Please visit this page to see all Pre-Configured ready to use API connectors which you can use in SSIS API Source / SSIS API Destination OR API ODBC Driver (for non-SSIS Apps such as Excel, Power BI, Informatica).
 In our previous blog we saw how to call REST API in Power BI to import data from JSON based REST API services. Now let’s continue on that and learn how to import Amazon MWS data in Power BI using XML driver. To learn more about how to consume Amazon MWS data in ETL using SSIS check this article.
We will read data from Amazon MWS API using ZappySys XML Driver which is part of ODBC PowerPack.
Requirements
- Active Amazon Seller Account needed (Make sure you have Professional Plan or higher (around $39/month) to call Amazon MWS API)
- You are already registered as a Developer and you obtained AWS Access Key / Secret Key and Seller ID (i.e. Merchant ID) (see next section)
- Download and Install ODBC PowerPack
- You will also need Power BI Desktop (FREE) installed
About Amazon MWS / API
If you want to sell something on Amazon you can use their e-commerce platform with some monthly fee. You can setup your entire online store / inventory using admin interface.
Amazon Marketplace Web Service (Amazon MWS) is an integrated web service API that helps Amazon sellers to programmatically exchange data on listings, orders, payments, reports, and more. Using these API you can read or write data from your Seller account and integrate it inside your own Systems (e.g. Reporting / ETL / BI tools).
Obtain MWS API Access Key / Secret and Seller ID
Very first thing to call any MWS API is to obtain Access Key, Secret Key and Seller ID (i.e. Merchant ID). To obtain this you first have to register a developer.
Here is where to look for your Merchant ID and Key / Secret. Here is direct link to User Permissions page.
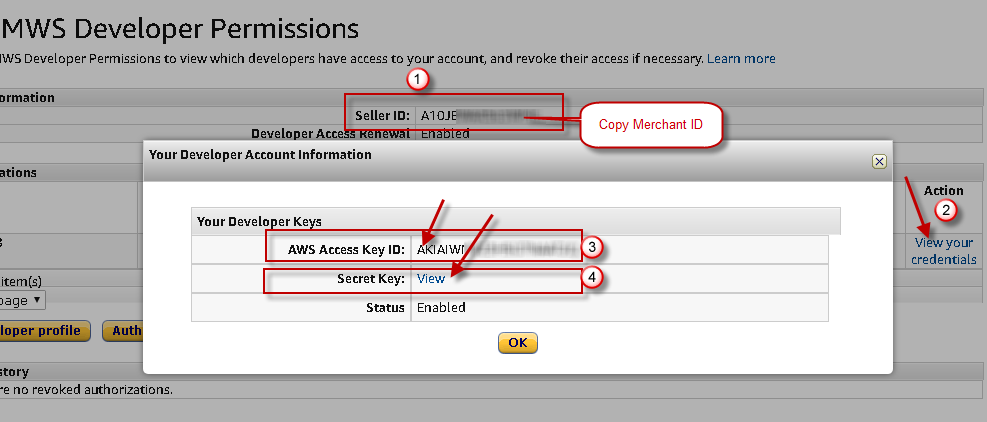
How to get Amazon MWS developer keys and know your Merchant ID (i.e. Seller ID)
Getting Started
Now let’s look at step by step instructions on how to call Amazon MWS API and then import into Power BI. In below steps we will use ZappySys ODBC PowerPack so make sure it’s installed first.
Using ScratchPad to Test Amazon MWS API
Each MWS API has set of required and optional parameters. You can refer each API page for details. For example ListMatchingProducts API which we will use as an example. To make MWS API testing / learning easy, Amazon provides online testing tool called MWS ScratchPad. We will use this tool to craft API requests and use that information in ODBC driver SQL queries and later import data in Power BI.
- Open MWS ScratchPad by vising https://mws.amazonservices.com/scratchpad/index.html
- Select Products API category and pick ListMatchingProducts API
- Enter your SellerID (i.e. Merchant ID), Developer AccessKey (i.e. AWSAccessKeyId) and Secret Key we obtained in the previous section. Enter MarketId (e.g. ATVPDKIKX0DER for USA Market) and other parameters as below and Click Submit to see response.

Using Amazon MWS ScratchPad (API Testing Tool – Created by Amazon)
- Click on the Response Details Tab to extract some important information we will use for ODBC configuration. Notice attributes in red rectangles. They are the ones which we will need in the POST request Body. ZappySys Drivers supply many common parameters automatically but any API endpoint specific parameter must be supplied in the Request Body. For example you dont have to supply SignatureVersion, Timestamp, Signature or SignatureMethod

Calling Amazon MWS API in Scratchpad Testing Tool (Response Details Tab) – ListMatchingProducts Example
This API requires Market ID parameter so enter it as per your Market where you selling. For example USA marketplaceid = ATVPDKIKX0DER. You can lookup correct MarketplaceId by checking this help (endpoints / marketplaces).
Create ODBC DSN Connection for MWS API / Test Query
Once you have necessary details to call your Amazon MWS API, we can create ODBC DSN which will be used as a reusable connection for MWS API data access in apps like Power BI.
So let’s get started.
- In your start menu search for ODBC and select Data Source (64 bit): If you need to access DSN by Service or scheduled Job then make sure you choose 64-bit DSN if caller App is 64 bit App.
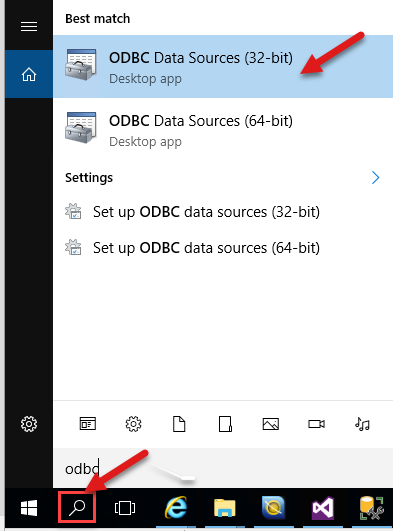
Open odbc data source
- Use the User DSN page and press Add. For DSN access by Service account or automated jobs which runs under different user, choose System DSN Tab, Make sure You create DSN for correct Bitness (i.e. for 64bit Apps create 64 Bit DSN)

Add new data source
- Select ZappySys XML Driver and click Finish. Amazon MWS API is XML format so we selected XML driver however you can choose JSON or CSV Driver instead of XML if you dealing with JSON format.

Add new ZappySys XML Driver (For XML / SOAP API)
- Once you see Driver Configuration UI window open, enter the following settings
- ODBC DSN name (e.g. ZS – Amazon MWS API Connection)
- Enter MWS API Service URL as below. Notice that we added /Products/2011-10-01 (This was extracted from previous section). You can check full list of Amazon MWS Endpoints here. Because we are connecting to USA region we will use below URL.
1https://mws.amazonservices.com/Products/2011-10-01 - Select OAuth from the Connection dropdown and Click Configure Settings
- On the Connection UI, Select OAuth Provider Amazon Market Web Service (MWS)
- Enter your API Access Key and Secret Key (obtained from here)
- Your connection will look like below.

ODBC Connection Credentials for Amazon MWS API (Access Key, Secret Key, URL Endpoint)
- Also configure Retry options to handle API limit reached error when you call API too often. For Amazon MWS we get Status code 503 when request is throttled so lets narrow down on which error we want to retry.
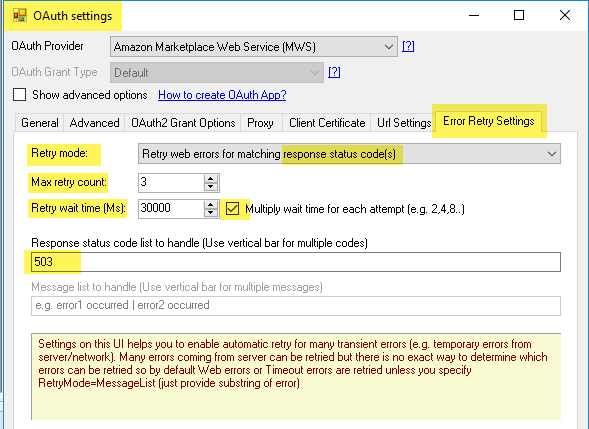
Retry Options
- Click OK to save OAuth Connection UI to go back to main UI
- Now let’s use some information we gathered from the previous section (Using Scraptchpad Test).
- Select POST for HTTP Request Method
- Enter Body as below (Change last parameter with your own SellerID and if needed change your MarketPlaceId too if its not USA)
1Action=ListMatchingProducts&MarketplaceId=ATVPDKIKX0DER&Query=harry%20potter%20dvd&SellerId=ZZZZZ-YOUR-SELLER-ID-ZZZZZ - Click on Select Filter to select correct node (in our case it will be Product node as below.
1$.ListMatchingProductsResponse.ListMatchingProductsResult.Products.Product[*] - Now Go to Throttling Tab and enter some delay (e.g. enter 20000 for 20sec delay after each request). This will slow down API calls so we don’t face errors about API Limit reached.
- You can also consider enabling Data Caching for MWS API as below to avoid API throttling / rate exceeded error. Change Cache Mode to Cache All (Use Cache for Metadata + Data Requests)
NOTE: MWS may allow only certain number of requests per minute so you might want to use each call wisely. You can find Throttling information on API help page itself (like this one see throttling section. Also this one).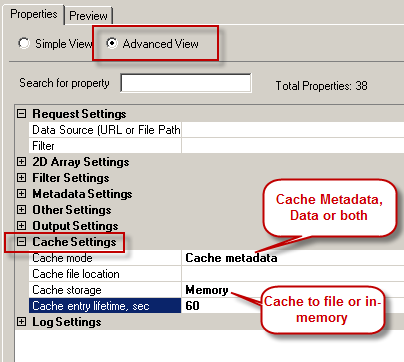
Enable Caching Options for Metadata / Data for ZappySys ODBC Drivers
- Now goto Preview Tab and click on Green Play button to test query
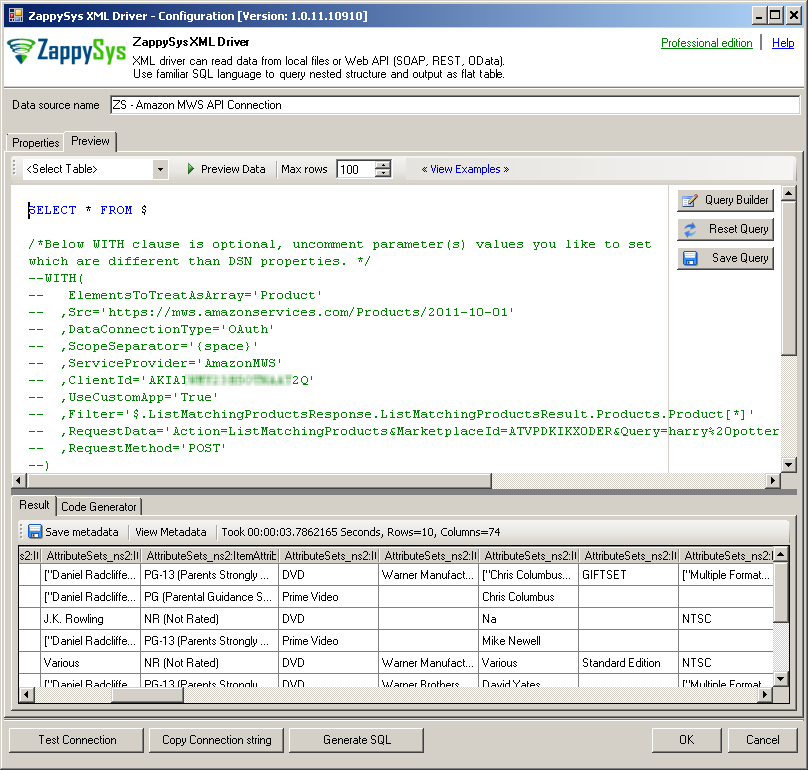
Query Amazon MWS API using ZappySys XML Driver – Preview UI
- That’s it. We have successfully tested first query to read data from Amazon MWS API
Caching Metadata and Using in SQL Query
We talked briefly about Data Caching but still there will be a time you will face such errors. So lets do another safeguard to reduce total API requests for MWS. Check this article to learn about Caching and META Clause in SQL.
Here are high level steps to Use predefined Schema File so Driver doesn’t call API request to guess metadata.
- Go to ODBC Preview window and write desired query you like to use. Click Preview Button to see sample data
- Now click Save Metadata of query which we can use later. Save to File in our case (name as mws-query-meta.txt ).
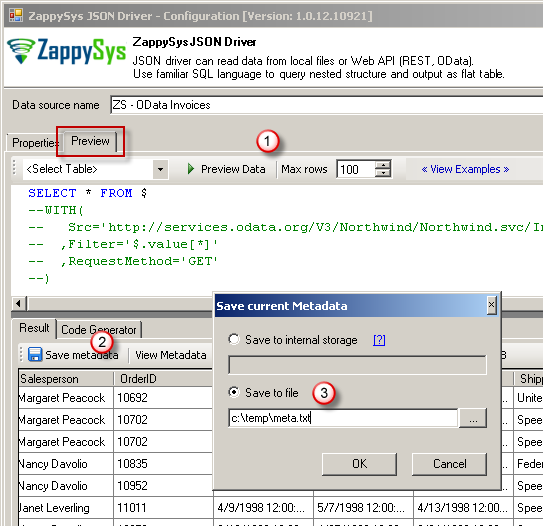
Create Metadata for ODBC Driver Query – ZappySys API Drivers
- Now change our query as below
12345SELECT............FROM xxxxxxxxxWITH (META='c:\somefolder\mws-query-meta.txt') - That’s it. Use query like above when we import Amazon MWS data in Power BI in the next section.
Import Amazon MWS data in Power BI (List Orders Example)
Now it’s time to load our data in Power BI and create reports.
- Open Power BI Desktop and select the option Get data
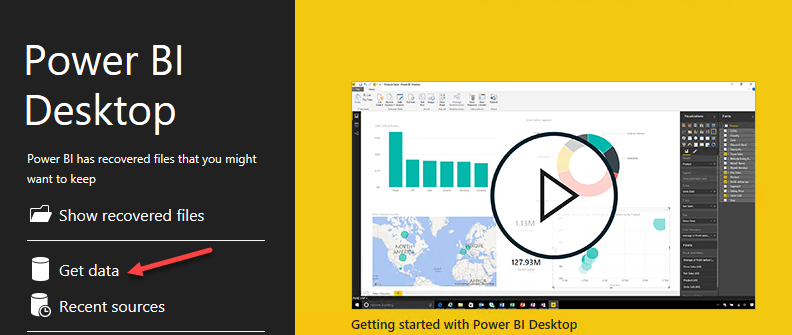
Get data in power bi
- Get Data will allow adding the ZappySys ODBC driver. Go to Other and select ODBC.
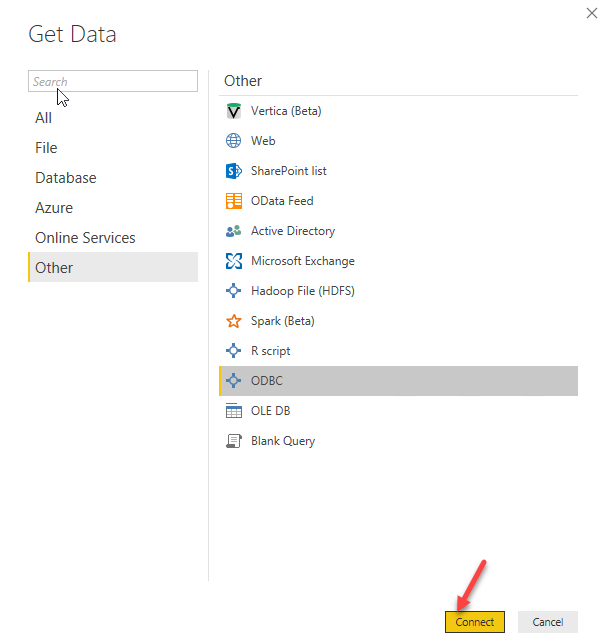
select odbc in power bi
- Now it’s time to import data. Basically, there are two modes to import data. Table Mode and Query Mode. Query mode is the most common way. Select your DSN and click Advanced Option to enter custom SQL Query to Import your MWS API data. You can use ODBC DSN Data sources Preview tool to generate SQL Query. For example you can enter query to import Orders for specified date range. We have added some pagination attributes which we will cover in the next section. Click OK to continue.
123456789101112131415161718192021222324SELECT * FROM $WITH(ElementsToTreatAsArray='Order',Src='https://mws.amazonservices.com/Orders/2013-09-01',Filter='$.ListOrders[$tag$]Response.ListOrders[$tag$]Result.Orders.Order[*]',RequestData='Action=ListOrders[$tag$]&SellerId=A1xxxxxxxxxxxxx&CreatedAfter=2018-09-01T04%3A00%3A00Z&MarketplaceId.Id.1=ATVPDKIKX0DER',RequestMethod='POST',NextUrlAttributeOrExpr='$.ListOrders[$tag$]Response.ListOrders[$tag$]Result.NextToken',NextUrlSuffix='&NextToken=<%nextlink_encoded%>',HasDifferentNextPageInfo='True',EnablePageTokenForBody='True',PagePlaceholders='body=|ByNextToken;filter=|ByNextToken',WaitTimeMs=300 -- API throttling for pagination--Uncomment Caching Line to Speedup API calls and Avoid API Limit. Power BI issues many API calls behind the scene--,CachingMode='All',CacheStorage='File',CacheEntryTtl=120,CacheFileLocation='c:\temp\mws-orders.cache'--,DataConnectionType='OAuth'--,ScopeSeparator='{space}'--,ServiceProvider='AmazonMWS'--,ClientId='AKIAIWxxxxxxxxxxxxx' --Skip this to use DSN credentials--,ClientSecret='AKIAIWxxxxxxxxxxxxx' --Skip this to use DSN credentials--,UseCustomApp='True')--Uncomment below if you are using Schema file for cached metadata--WITH (META='c:\somefolder\mws-query-meta.txt') - Use above query for example and paste in Query editor while you Import Amazon MWS data.
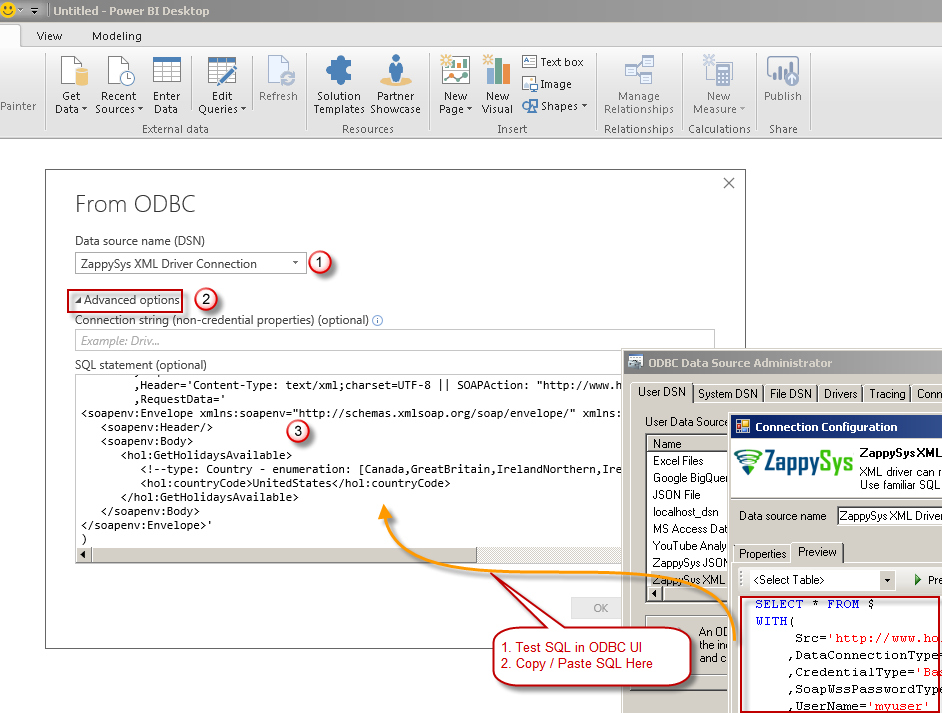
Enter custom SQL to load SOAP Web Service Data in Power BI (ZappySys XML Driver)
- On the next screen select Windows Authentication

Select Authentication for Amazon MWS connection in Power BI data load
- Once data is imported you can use dataset to build your dashboard
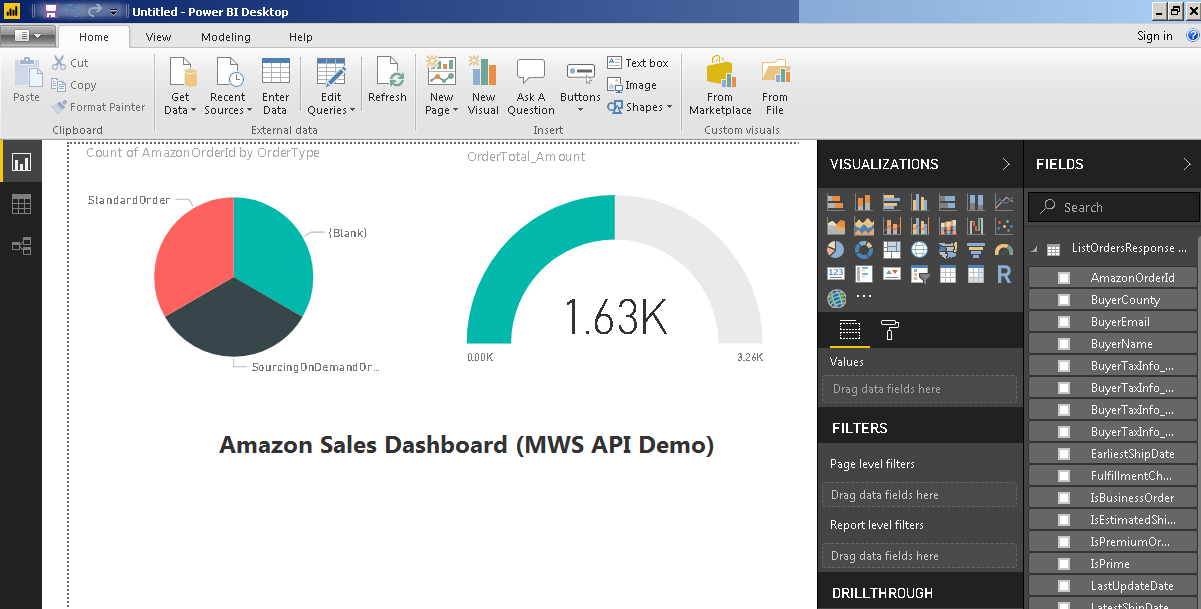
Load Amazon MWS data in Power BI – Create Amazon Sales Dashboard
Using Pagination in Amazon MWS API calls
Now let’s look at how to query certain API which allows paginated response. Pagination is fully explained here. Certain APIs like ListOrders , ListOrderItems, ListInboundShipments, ListInventorySupply, GetFullfillmentOrder and few more supports Pagination.
When you call Paginated response next request changes Action with ByNextToken suffix. For example to get orders call ListOrders and next request will be ListOrdersByNextToken
MWS API has multiple pagination patterns so based on which action you calling you have to use correct SQL parameters.
Using NextToken for Pagination (ListOrders Example)
Many MWS API returns NextToken attribute in the response which you can pass in the body of next request until no more NextToken found in the response.
Check below example query for ListOrders API. We have enabled pagination by supplying few extra parameters in our original SQL Query.
|
1 2 3 4 5 6 7 8 9 10 11 12 13 14 15 16 17 18 19 20 21 22 |
SELECT * FROM $ WITH( ElementsToTreatAsArray='Order' ,Src='https://mws.amazonservices.com/Orders/2013-09-01' ,Filter='$.ListOrders[$tag$]Response.ListOrders[$tag$]Result.Orders.Order[*]' ,RequestData='Action=ListOrders[$tag$]&SellerId=A10JBWAX563WMC&CreatedAfter=2018-09-01T04%3A00%3A00Z&MarketplaceId.Id.1=ATVPDKIKX0DER' ,RequestMethod='POST' ,NextUrlAttributeOrExpr='$.ListOrders[$tag$]Response.ListOrders[$tag$]Result.NextToken' ,NextUrlSuffix='&NextToken=<%nextlink_encoded%>' ,WaitTimeMs=300 -- slow down to avoid throttling ,HasDifferentNextPageInfo='True' ,EnablePageTokenForBody='True' ,PagePlaceholders='body=|ByNextToken;filter=|ByNextToken' --,DataConnectionType='OAuth' --,ScopeSeparator='{space}' --,ServiceProvider='AmazonMWS' --,ClientId='AKIxxxxxx' --,ClientSecret='AKIxxxxxx' --,UseCustomApp='True' ) --Uncomment below if you are using Schema file for cached metadata --WITH (META='c:\somefolder\mws-query-meta.txt') |
Using NextToken with operations that return HasNext / MoreResultsAvailable
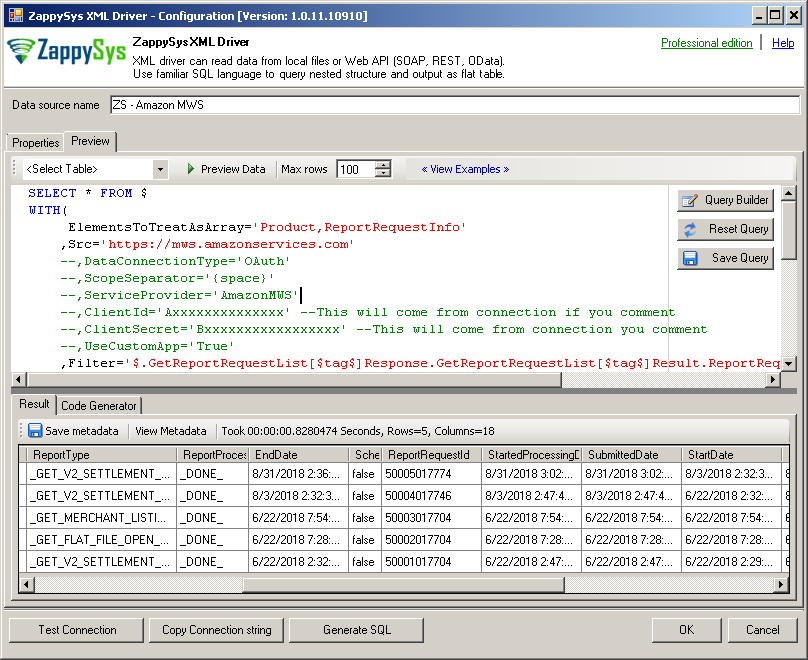
Some API has attribute which tells you to stop pagination (e.g. HasNext). Check below example query for GetReportRequestList. We have enabled pagination by supplying few extra parameters in SQL Query.
|
1 2 3 4 5 6 7 8 9 10 11 12 13 14 15 16 17 18 19 20 21 22 23 |
SELECT * FROM $ WITH( ElementsToTreatAsArray='Product,ReportRequestInfo' ,Src='https://mws.amazonservices.com' --,DataConnectionType='OAuth' --,ScopeSeparator='{space}' --,ServiceProvider='AmazonMWS' --,ClientId='Axxxxxxxxxxxxxx' --This will come from connection if you comment --,ClientSecret='Bxxxxxxxxxxxxxxxxx' --This will come from connection you comment --,UseCustomApp='True' ,Filter='$.GetReportRequestList[$tag$]Response.GetReportRequestList[$tag$]Result.ReportRequestInfo[*]' ,RequestData='Action=GetReportRequestList[$tag$]&Merchant=A10xxxxxxxxxxxxxxxx' ,RequestMethod='POST' ,NextUrlAttributeOrExpr='$.GetReportRequestList[$tag$]Response.GetReportRequestList[$tag$]Result.NextToken' ,NextUrlEndIndicator='false' ,StopIndicatorAttributeOrExpr='$.GetReportRequestList[$tag$]Response.GetReportRequestList[$tag$]Result.HasNext' ,NextUrlSuffix='&NextToken=<%nextlink_encoded%>' ,HasDifferentNextPageInfo='True' ,EnablePageTokenForBody='True' ,PagePlaceholders='body=|ByNextToken;filter=|ByNextToken' ) --Uncomment below if you are using Schema file for cached metadata --WITH (META='c:\somefolder\mws-query-meta.txt') |
Some API calls return slightly different response so rather than HasNext attribute you will see MoreResultsAvailable. In that case change StopIndicatorAttributeOrExpr property to use MoreResultsAvailable property.
Properties you need to change for pagination
Now let’s look at properties which need to be changed to support pagination.
| Property | Description | ||||
| Src | Change this to correct URL. Look at Scratchpad Response Details Tab and Findout first line after POST and before “?” . e.g. /Orders/2013-09-01 this will be used in your URL. Example: https://mws.amazonservices.com/Orders/2013-09-01 |
||||
| Body (i.e. RequestData) | Scratchpad shows HTTP POST section. You can copy that and remove System supplied parameters and then arrange all in one line to form your Body for request.
Example:
Above HTTP POST can be used as below for your Body in ZappySys Driver. Rest of the parameters are automatically supplied by system. See special placeholder named [$tag$] this gets replaced at runtime when you set EnablePageTokenForBody=True and HasDifferentNextPageInfo=True
|
||||
| Filter | Change this parameter according to XML structure in the response. For example: If you see below response (first xml) in Scratchpad then your Filter will be $.ListOrdersResponse.ListOrdersResult.Orders.Order[*] to enable pagination refer to Sample listed here (click Example response at the bottom of that page). In second response and onwards your Filter should be below (See Bold Part). $ListOrdersByNextTokenResponse.ListOrdersByNextTokenResult.Orders.Order[*]However in Driver we replace ByNextToken with [$tag$]. Like below. Using [$tag$] will automatically pick up the correct filter based on page number. You must set HasDifferentNextPageInfo=True to use [$tag$] feature.$.ListOrders[$tag$]Response.ListOrders[$tag$]Result.Orders.Order[*]Example of first page response
Example of next page response
|
||||
| NextUrlAttributeOrExpr | This property defines which attributes indicate Token for next page. You can use this token in Body of next request (see NextUrlSuffix and EnablePageTokenForBody). You must set EnablePageTokenForBody=true to use Extracted token in Body. | ||||
| StopIndicatorAttributeOrExpr | Some APIs like GetReportRequestList stop pagination based on HasNext attribute value. Use this property to extract HasNext from response by supplying correct Filter expression. You also need to set NextUrlEndIndicator property which defines static value which indicates the last page. | ||||
| NextUrlSuffix | This is used to create a string for NextToken attribute for next page request. If you want to just append extracted token to Body then you dont have to set this but in our case, we have to use &NextToken=EncodedValueOfExtractedToken so we have used &NextToken=<%nextlink_encoded%> expression. | ||||
| PagePlaceholders | This property contains [$tag$] values for first page and next pages. You can define tags for filter, body or header. Each pair must be pipe delimited. First value or pair is [$tag$] for first request and second value of the pair is [$tag$] for any next request afterwards. Our first request use blank value for [$tag$]. Example: PagePlaceholders=’body=|ByNextToken;filter=|ByNextToken’ |
||||
| HasDifferentNextPageInfo | Set to True – This enables use of [$tag$] inside body, filter, headers to use different values of first request and second onwards requests. | ||||
| EnablePageTokenForBody | Set to True – This enables use of [$tag$] inside body to use different RequestBody values of first request and second onwards requests. |
Here is the preview of MWS API query output with Pagination Attributes.
Amazon MWS API Pagination Example – Preview SQL Query Result
Import data from MWS Custom Reports (Inventory Report Example)
Now lets look at how to extract data from Custom Report API (You must need ODBC PowerPack v1.1.1 or higher). However reading data from Reports not single step process because report generation is Job style API. Which means you send report request and wait until its done. Once Report ready you have to read in CSV format or XML. Some Reports only available in CSV format. Check this post to understand how complex it can be to get data. We will make it simple for you to understand this in 3 steps. Basically calling reports requires minimum 3 API calls (see below)
- Create a new report request – Cal RequestReport API . It returns ReportRequestId (You can use it in the next step)
- Check Report Status see its done – Call GetReportRequestList API (Pass ReportRequestId got in the previous step to get data for only one Report request we care). Keep checking Report Status every few seconds until you get _DONE_ status in response.
- Read Report Data – Call GetReport. This API call returns CSV or XML data. So use correct Driver for this step. If CSV data is returned then we must use CSV Driver rather than XML Driver.
Now lets see how to get this 3 steps done in Power BI. In this example, We will get Inventory by calling _GET_MERCHANT_LISTINGS_DATA_ report type.
- Create a directory c:\temp
- Create new ZappySys XML Driver DSN (User DSN) using same steps we described before. Lets name this DSN as ZAPPY-MWS-API-XML
- Create new ZappySys CSV Driver DSN (User DSN) using same steps we described before (Except the Driver Type should be ZappySys CSV Driver). Lets name this DSN as ZAPPY-MWS-API-CSV
- Once you done with ODBC DSN Setup open or create new Power BI Project.
- Click on Create Source > from Blank Query

Power BI – Create New Data source from Query (M Script)
- When Query Editor Shows up click on Advanced Editor and paste below code (Its Power BI M Language). If you are unsure how to write Power BI check this tutorial.
Replace MarketPlaceId and Seller ID in the script (i.e. A1xxxxxx and A2xxxxxx ). See we are using ReportType=_GET_MERCHANT_LISTINGS_DATA_ but you can use any valid report ID from here. You can also pass other optional parameter available for each report Type (e.g. StartDate and EndDate)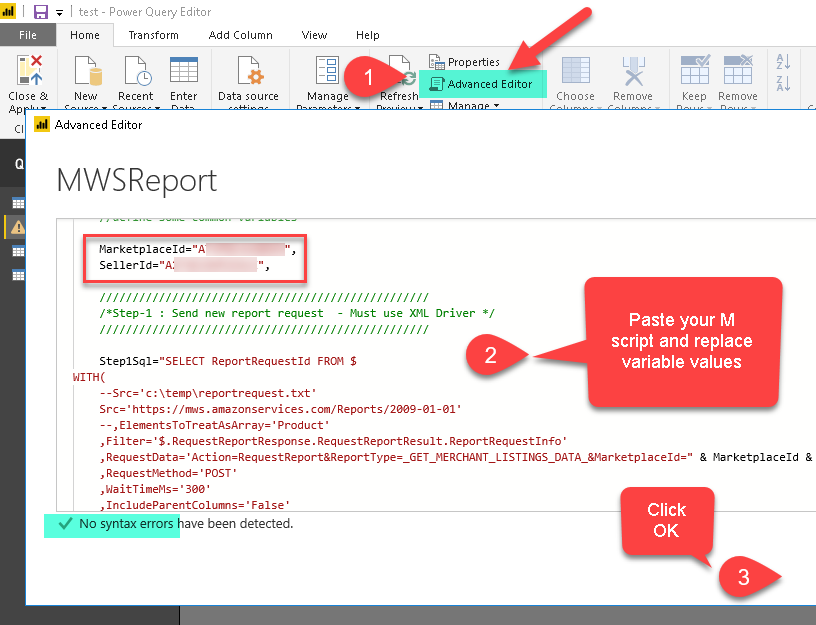
Edit Power BI Query Script – Use custom M Language Script to import data from ODBC or other Relational
Power BI M Script (New Driver) – Import MWS Custom Report in Power BI
123456789101112131415161718192021222324252627282930313233343536373839404142434445//////////////////////////////////////////////////////////////////////////// Change _GET_MERCHANT_LISTINGS_DATA_ to something else if you need different report type (all 3 steps) -- https://docs.developer.amazonservices.com/en_US/reports/Reports_ReportType.html// Replace MarketplaceId in all 3 steps (i.e for USA use ATVPDKIKX0DER) --https://docs.developer.amazonservices.com/en_US/dev_guide/DG_Endpoints.html// Replace SellerId in all 3 steps// Remove or Change CreatedAfter in first step (or use CreatedBefore parameter instread of CreatedAfter)//////////////////////////////////////////////////////////////////////////letsql="SELECT s3.* FROM $WITH(Src='https://mws.amazonservices.com/Reports/2009-01-01',RequestMethod='POST',RequestData='Action=RequestReport&ReportType=_GET_MERCHANT_LISTINGS_DATA_&MarketplaceId=ATVPDKIKX0DER&SellerId=Axxxxxxxxxx&CreatedAfter=2017-12-31T04%3A00%3A00Z',IncludeParentColumns='False',EnableRawOutputModeSingleRow='True',RawOutputFilterExpr='//*[local-name()=""ReportRequestId""]',RawOutputDataRowTemplate='{ReportRequestId:""[$1]""}',RawOutputExtractMode='Xml',WaitTimeMs=5000,Meta='[{""Name"": ""ReportRequestId"",""Type"": ""Int64""}]',Alias='s1',Join1_alias='s2',Join1_Src='https://mws.amazonservices.com/Reports/2009-01-01',Join1_RequestMethod='POST',Join1_RequestData='Action=GetReportRequestList&ReportRequestIdList.Id.1=[$s1.ReportRequestId$]&MarketplaceId=ATVPDKIKX0DER&SellerId=Axxxxxxxxxx',Join1_EnableRawOutputModeSingleRow='True',Join1_RawOutputFilterExpr='//*[local-name()=""ReportProcessingStatus""]||//*[local-name()=""GeneratedReportId""]',Join1_RawOutputDataRowTemplate='{ReportProcessingStatus:""[$1]"",GeneratedReportId:""[$2]""}',Join1_RawOutputExtractMode='Xml',Join1_EnableStatusCheck='True',,Join1_StatucCheckMaxWaitSeconds=300,,Join1_StatucCheckIterationWaitSeconds=25,,Join1_StatusSuccessValue='_DONE_',Join1_StatusFailedValue='_DONE_NO_DATA_|_CANCELLED_',Join2_Alias='s3',Join2_Src='https://mws.amazonservices.com/Reports/2009-01-01',Join2_RequestMethod='POST',Join2_RequestData='Action=GetReport&ReportId=[$s2.GeneratedReportId$]&MarketplaceId=ATVPDKIKX0DER&SellerId=Axxxxxxxxxx',Join2_ColumnDelimiter='{TAB}',Join2_ResponseCharset='Windows-1252',Join2_EnableStatusCheck='False',Join2_EnableRawOutputModeSingleRow='False')",Source = Odbc.Query("dsn=ZS-AMAZON-MWS-CSV", sql)inSourcePower BI M Script (Old Driver) – v1.1.2 or older
If you are using older version – v1.1.2 or older then use below script.
123456789101112131415161718192021222324252627282930313233343536373839404142434445464748495051525354555657585960616263646566676869707172737475767778798081828384858687888990/*All Copy Rights Reserved - ZappySys LLC. Feel free to share this snippet as long as you retain copyrights notice. https://zappysys.comDescription: This snippet will call Amazon MWS API to generate Inventory Report (Its multi step process - Job Style API call. First 2 calls gets XML data and Last call CSV data)*/let//NOTE: In Power BI M Language... each declare is separated by comma...//variable can be any type.. string, number, table, list , record, function reference. More info: https://docs.microsoft.com/en-us/powerquery-m/power-query-m-reference/*letvar1=expression, var2=expression, ... varN=expressioninvarN //return some variable*///define some common variablesMarketplaceId="A1xxxxxx",SellerId="A2xxxxxxxxxx",///////////////////////////////////////////////////*Step-1 : Send new report request - Must use XML Driver *///////////////////////////////////////////////////Step1Sql="SELECT ReportRequestId FROM $WITH(--Src='c:\temp\reportrequest.txt'Src='https://mws.amazonservices.com/Reports/2009-01-01'--,ElementsToTreatAsArray='Product',Filter='$.RequestReportResponse.RequestReportResult.ReportRequestInfo',RequestData='Action=RequestReport&ReportType=_GET_MERCHANT_LISTINGS_DATA_&MarketplaceId=" & MarketplaceId & "&SellerId=" & SellerId & "',RequestMethod='POST',WaitTimeMs='300',IncludeParentColumns='False',CachingMode='All',CacheStorage='File',CacheFileLocation='c:\temp\mws-step1.cache',CacheEntryTtl=300,Meta='[{""Name"": ""ReportRequestId"",""Type"": ""Int64""}]')",Source1 = Odbc.Query("dsn=ZAPPY-MWS-API-XML", Step1Sql),ReportRequestId= Source1{0}[ReportRequestId],//NOTE: Technically we need to implement status check loop Wait for few seconds before//Increase this if you get ERROR in 3rd stepBlankTextForDelay = Function.InvokeAfter(()=>"", #duration(0,0,0,15)), //define delay - You must use it somewhere inorder to invoke delay///////////////////////////////////////////////////*Step-2 : Get report id - once report is done - Must use XML Driver *///////////////////////////////////////////////////Step2Sql=BlankTextForDelay & "SELECT * FROM $WITH(--Src='c:\temp\report-status.xml'Src='https://mws.amazonservices.com/Reports/2009-01-01',ElementsToTreatAsArray='ReportRequestInfo',Filter='$.GetReportRequestListResponse.GetReportRequestListResult.ReportRequestInfo',RequestData='Action=GetReportRequestList&ReportRequestIdList.Id.1=" & ReportRequestId & "&MarketplaceId=" & MarketplaceId & "&SellerId=" & SellerId & "',RequestMethod='POST',WaitTimeMs='300',IncludeParentColumns='False',CachingMode='All',CacheStorage='File',CacheFileLocation='c:\temp\mws-step2.cache',CacheEntryTtl=15,Meta='[{""Name"": ""ReportProcessingStatus"",""Type"": ""String"", Length: 100},{""Name"": ""GeneratedReportId"",""Type"": ""Int64""}]')",Source2 = Odbc.Query("dsn=ZAPPY-MWS-API-XML", Step2Sql),ReportId= Source2{0}[GeneratedReportId],///////////////////////////////////////////////////*Step-3 : Get report data in CSV format - Must use CSV Driver *///////////////////////////////////////////////////Step3Sql="SELECT * FROM $WITH(--Src='c:\temp\inventory.csv.txt'Src='https://mws.amazonservices.com/Reports/2009-01-01',RequestData='Action=GetReport&ReportId=" & ReportId & "&MarketplaceId=" & MarketplaceId & "&SellerId=" & SellerId & "',RequestMethod='POST',WaitTimeMs='300',ColumnDelimiter='{TAB}',CachingMode='All',CacheStorage='File',CacheFileLocation='c:\temp\mws-step3.cache',ResponseCharset='Windows-1252')",Source3 = Odbc.Query("dsn=AMAZON-MWS-CSV", Step3Sql)inSource3 //return Source3 (i.e. Table type variable) - Once done click OK.
- You may be prompted few times to trust each Query we defined in M Script above. Also you may be prompted to select DSN Credentials (Just Select Windows Credentials)
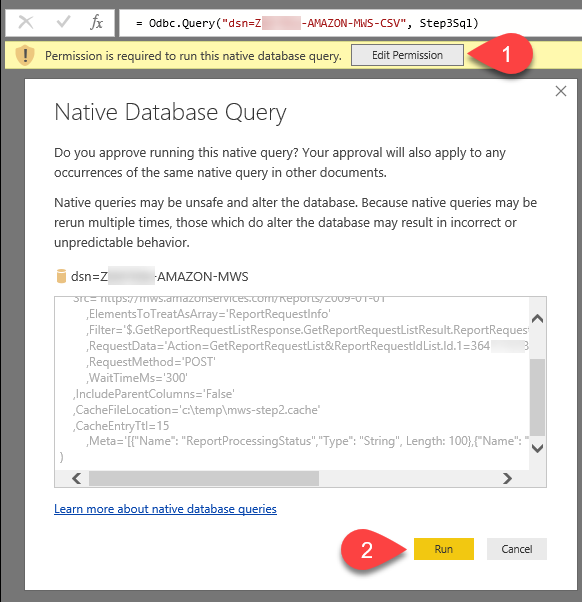
Power BI – Run Native Database Query Prompt
- If you get prompted to select DSN Credentials then select as below (Click Windows).
Select Authentication for Amazon MWS connection in Power BI data load
- After few seconds (Depending on Delay we define in Script – default 15 sec) you will see data loaded.
- Once data is loaded click Close & Apply and it will close the query editor and we will see main designer where you can see Dataset and Fields we just created.

Loading Amazon MWS Reports data in Power BI (List Inventory Example using M Script)
Conclusion
In this article, we saw how to build sales report by reading data from your Amazon Seller Account. We used simple SQL queries with ZappySys XML Driver to pull data from Amazon MWS API. ZappySys ODBC PowerPack makes it super easy to consume data from virtually any API (JSON / XML or CSV Web Services), no coding required. Download here to get started with ZappySys ODBC drivers.