Introduction
Please visit this page to see all Pre-Configured ready to use API connectors which you can use in SSIS API Source / SSIS API Destination OR API ODBC Driver (for non-SSIS Apps such as Excel, Power BI, Informatica).
 Google BigQuery is a fully managed Big Data platform to run queries against large scale data. In this article you will learn how to integrate Google BigQuery data into Microsoft SQL Server using SSIS. We will leverage highly flexible JSON based REST API Connector and OAuth Connection to import / export data from Google BigQuery API just in a few clicks.
If you are looking for a similar product inside Amazon AWS Cloud then check an article about Amazon Athena.
Prerequisites
Before we look into a Step-By-Step section to extract and load data from BigQuery to SQL Server let’s make sure you meet the following requirements:
- SSIS designer installed. Sometimes it is referred as BIDS or SSDT (download it from Microsoft site).
- Basic knowledge of SSIS package development using Microsoft SQL Server Integration Services.
- ZappySys SSIS PowerPack installed. Click on the link to download a FREE trial.
- You have basic familiarity with REST API concepts and Google BigQuery API. This post uses free Public Dataset to query BigQuery table so no billing is required to get your hands dirty 🙂 However, if you like to query your own dataset then make sure you have at least one BigQuery dataset and one table with some sample data created (this part does require billing enabled). Read a Google Quickstart article for more information on how to create a new BigQuery dataset and a table.
Understanding Google BigQuery Object Heirarchy
Google BigQuery has 3 main concepts below.
- Project
- Dataset
- Table
- Query requests (each query creates a unique JobID – valid for 24 hours from which you can read data)
- Table
- Dataset
So in order to create BigQuery table you always need Project and then Dataset under that project. You can group objects around Project / Datasets. When you query you can supply fully qualified name of your table in FROM clause (e.g. select count(*) from `bigquery-public-data.usa_names.usa_1910_2013` Here bigquery-public-data is project name, usa_names is dataset and usa_1910_2013 is table). So lets get started with Read operation first and then we will cover write operation. For Read operation we will use public dataset so we can quickly show you demo without too many steps but later we will cover how to automate create / delete of Dataset / Tables using API calls.
So let’s get started.
Read data from Google BigQuery using SSIS
Basically you can query Google BigQuery data in two ways: In this article we will not cover 2nd method.
- Method-1: Query data using jobs/query method in BigQuery API. Use it if you expect to get a result in a fairly short amount of time. This API method generates a temp table which gets deleted after 24 hours. You can read data within that time frame using newly created JobId reference.
NOTE: If you have records that sum up to more than 10MB of data or ~10,000 rows (assuming 1 row uses 1KB of data) then you need to proceed with two-step process as explained below. - Method-2: Export SQL query result using jobs/insert method in BigQuery API. Use this method if you expect a query to take a long time to finish.
Now let’s see how to query Google BigQuery data using SSIS 🙂
Create Google API Project and Register OAuth App
To use any Google API firstly you have to finish two tasks:
- Create Google API Project and obtain projectId (see next section).
- Enable BigQuery API
- Register your own Google OAuth App and obtain ClientId and Client Secret.
Check step-by-step instructions on how to create Google API Project and create OAuth App for Google. During instructions make sure you enable BigQuery API (screenshots may differ).
Get Google API Project ID
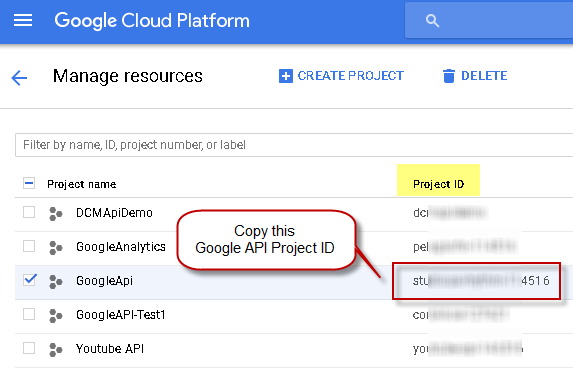
Once you have Google API Project created you can grab Project ID (see screenshot below). You will need Project ID in the next step when building API URL.
Configure OAuth Connection for Google BigQuery API
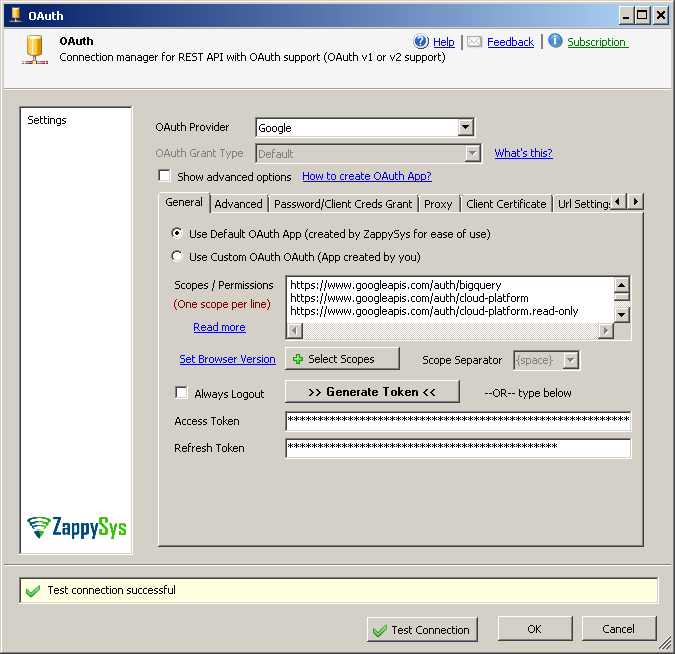
In order to call most of Google APIs you will need an OAuth App. If you want to use your own app then refer to how to register Google OAuth Application (Get ClientID and ClientSecret) article. For simplicity we will use Default OAuth App:
- Right click inside Connection Managers area and click “New Connection…”
- From the connection type list select “ZS-OAUTH” connection type.
- For OAuth Provider select “Google”.
- For OAuth App type options leave “Use Default OAuth App” selected. If you created custom OAuth App then you would need to select “Use Custom OAuth App” option.
- For Scopes enter or select the following URLs (URL is just a permission name). Each URL must be in a separate line. For demo purposes we use only the first 3 scopes but we included a few more in case you like to test API in depth with a different permission set:
1234567https://www.googleapis.com/auth/bigqueryhttps://www.googleapis.com/auth/cloud-platformhttps://www.googleapis.com/auth/cloud-platform.read-onlyhttps://www.googleapis.com/auth/bigquery.insertdatahttps://www.googleapis.com/auth/devstorage.full_controlhttps://www.googleapis.com/auth/devstorage.read_onlyhttps://www.googleapis.com/auth/devstorage.read_write - Click Generate Token. Login using correct account if needed and then you will be prompted to click “Approve” OAuth App.
- Once you click OK on the login screen you will see new tokens populated on the connection screen.
- Click Test to make sure connection / tokens are valid and then click OK to save the connection.NOTE: Below screenshot uses Default App but we recommend you to to use Custom OAuth App (Your own Clientid / secret – Obtained in previous section)
Start BigQuery Job and get JobId (Submit Query)
Once you have SSIS OAuth connection created for BigQuery API it’s time to read data from BigQuery. So, basically, there are two ways you can read BigQuery data: using query or insert method. For demo purposes we will use jobs/query method. If you want fire complex queries which can run for many minutes then refer to jobs/insert method.
If you are expecting more than 10MB of data (~10K records) then you have to split data extract in two steps:
- Step-1 : Call jobs/query method using REST API Task to submit SQL query. This steps returns jobComplete: true if supplied query execution is done within timeoutMs parameter you included. By default its 10 seconds so if your query is going to take longer than 10 seconds then its good idea to add bigger timeout that way you dont need step#2. Once API call is done you will Get JobId in the response. Save that JobId in a variable for later use. This job result is valid for 24-hours only.
- Step-2 (Optional) – You can add another optional REST API Task after previous step to Wait until Job is completed. For simplicity, this article will Omit setting up Status Check but its very simple….Use below settings
- Drag new REST API Task from toolbox. Connect it to Step-1 and double click to configure as below.
- Select URL From Connection mode,
- Select OAuth connection
- Enter URL as https://www.googleapis.com/bigquery/v2/projects/{{User::ProjectId}}/jobs/{{User::JobId}} , Method: GET
- On Response Settings Tab, Select Response Content Type JSON and for content filter enter $.status.state
- On Status Check Tab, check Enable Status Check Loop and enter DONE in SuccessValue field
- Doing this setup will make sure we do not query data until Job Status is DONE (System keeps checking every 5 seconds)
- Step-2 : Read Job result using JSON Source in a Data Flow Task.
Now lets see how to configure REST API Task to submit query and extract JobId (which will be used in next section).
- In the Control Flow designer drag and drop ZS REST API Task from the SSIS toolbox.
- Double click the task to configure it.
- Change Request URL Access Mode to [Url from connection].
- From the connection dropdown select OAuth connection created in the previous section.
- Enter URL as below (replace YOUR-PROJECT-ID with a valid Project ID obtained in the previous section):
1https://www.googleapis.com/bigquery/v2/projects/YOUR-PROJECT-ID/queries - Select Method as POST.
- Enter Body (Request Data) as below (change your query if needed; we used Public dataset for the demo): If you do not specify timeout then default is 10 seconds only. Also in this call we only care about JobID from response so we just added maxResults=10 because in 2nd step we will get all rows by doing pagination.
To use a Standard SQL query instead of Legacy SQL, add useLegacySql property and set it to false:12345{"timeoutMs": 100000,"maxResults": 10,"query": "SELECT title id,language,wp_namespace,reversion_id ,comment ,num_characters FROM [bigquery-public-data:samples.wikipedia] LIMIT 100000"}
For all possible parameters refer to jobs/query method documentation.123456{"timeoutMs": 100000,"maxResults": 10,"query": "SELECT title id,language,wp_namespace,reversion_id ,comment ,num_characters FROM [bigquery-public-data:samples.wikipedia] LIMIT 100000","useLegacySql": false}NOTE: You can also supply location Parameter in the Body JSON to indicate where job should run. For non EU / US datacenters we suggest you to supply this parameter. See details at https://cloud.google.com/bigquery/docs/locations#specifying_your_location.
Example Use Of Location
1{ "location":"us-east1", "maxResults": 10, "query": "SELECT title FROM [bigquery-public-data:samples.wikipedia] LIMIT 10" } - Select Body Content Type as application/json.
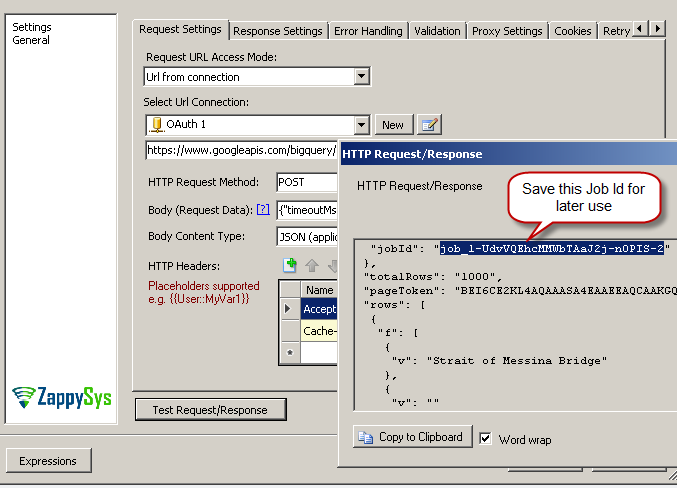
- Click Test Request/Response. If things go well you will see JSON content. Then just copy JobId from the response and save for later use:
- Now go to Response Settings tab.
- Select ContentType=Json.
- Enter below expression to extract JobId from the response. You will need this Id to read SQL query output (this JobId is valid for 24 hrs):
1$.jobReference.jobId - Choose save response content to save to a variable. Select <New Variable…> option. When prompted give a name to your variable (i.e. vJobId) and for the value field paste JobId copied from the above step:
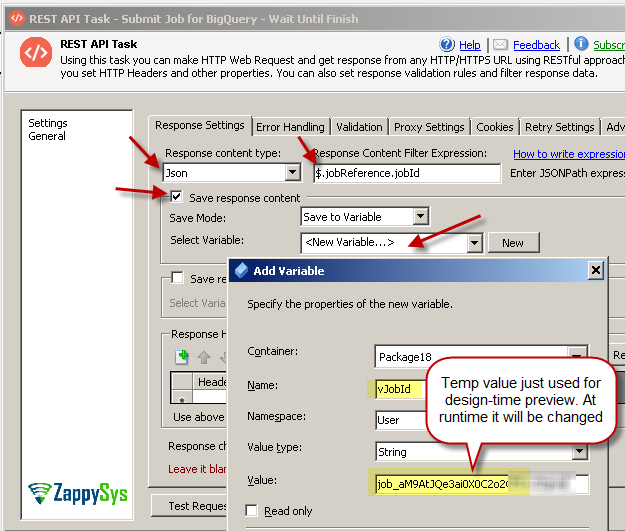
NOTE: This JobId expires after 24-hrs so while you are designing a package and not running it then design time value is used for testing/previewing. So make sure your JobId is valid. If needed click Test Request/Response to grab a new JobId and update the variable with a new value so you can preview data without running a full package. - Click OK to save the UI.
Read BigQuery SQL result (for specified JobID)
Now let’s look at how to read data from BigQuery
Configure Google BigQuery Web Request (URL, Method, ContentType, Body etc.)
- In the Control Flow designer drag and drop Data Flow Task from SSIS toolbox.
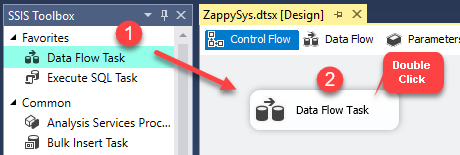
- Double click Data Flow Task and drag and drop ZS JSON Source (For API/File) from SSIS toolbox.

- Double click JSON Source to edit and configure as below
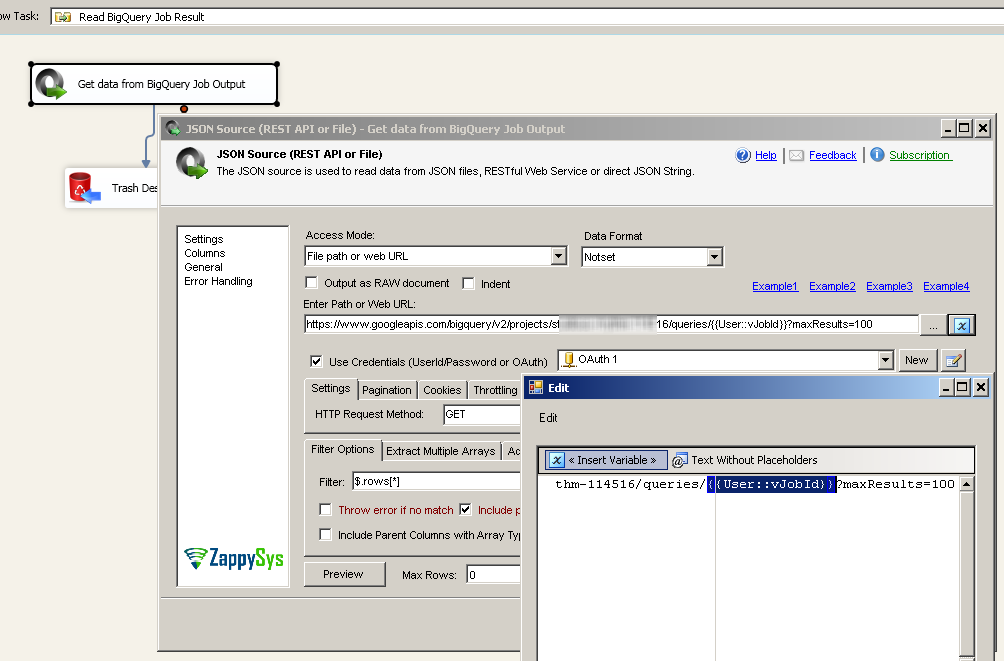
- Enter URL as below. Replace YOUR-API-PROJECT-ID with the API Project ID obtained in the previous section.
–OR– (Use below if your Job ran outside US / EU data center)1https://www.googleapis.com/bigquery/v2/projects/YOUR-API-PROJECT-ID/queries/{{User::vJobId}}?maxResults=10000
1https://www.googleapis.com/bigquery/v2/projects/YOUR-API-PROJECT-ID/queries/{{User::vJobId}}?location=YOUR_REGION_ID&maxResults=10000NOTE: location Parameter indicates the geographic location of the job. This is Required parameter except for US and EU. See details at https://cloud.google.com/bigquery/docs/locations#specifying_your_location. You can supply same location parameter for first step when you submit the queryFailure to supply location parameter for non US /EU users may result in 404 NotFound Error.
- Check Use Credentials option and select OAuth Connection Manager created in the previous section.
- For HTTP Request Method select GET.
Read data from Google BigQuery from Temp Job result
Configure Filter
We need to transform a single JSON response into multiple rows so we need to apply a correct filter.
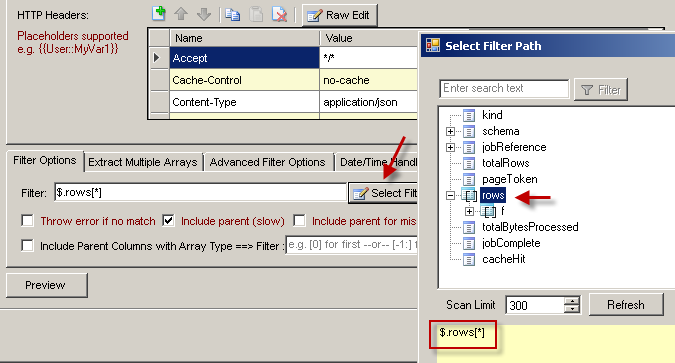
- On JSON Source go to Filter Options tab.
- In the Filter field enter $.rows[*] or click [Select Filter] button to browse hierarchy you want to extract.
Configure BigQuery API Pagination Settings
Most of modern APIs usually implement some sort of pagination technique so you get a part of data in each request rather than all in one go. Thus if you want more you can paginate through pages until the last page is reached. You can also read Understanding REST API Pagination in SSIS article to learn more about pagination in SSIS.
BigQuery API returns pageToken attribute in response JSON if more data is found for requested query result. You can then pass pageToken in the next URL in this format: http://my-api-url/?pageToken=xxxxxxxxxx
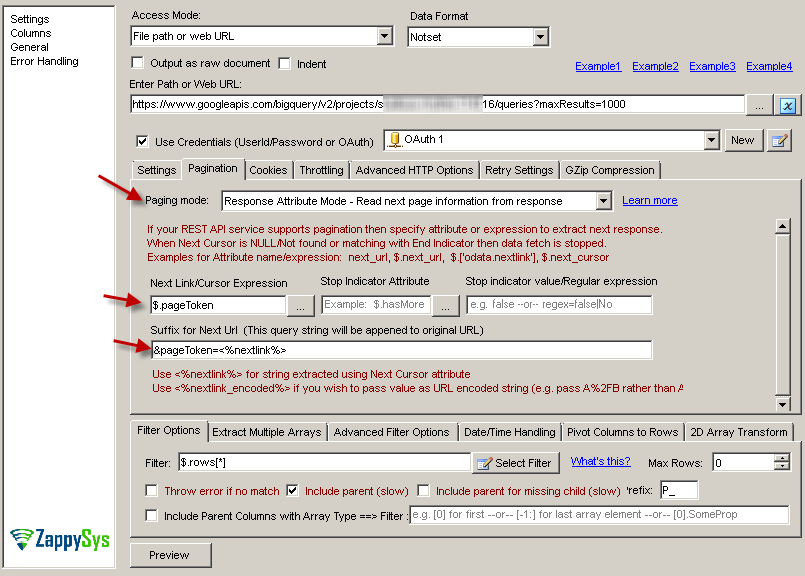
Now lets configure JSON Source to automate this pagination for us. On JSON Source go to Pagination Tab and enter the following two settings:
- Set Next Link as $.pageToken.
- Set Suffix for Next URL as &pageToken=<%nextlink%>.
See the screenshot below to get more clarity:
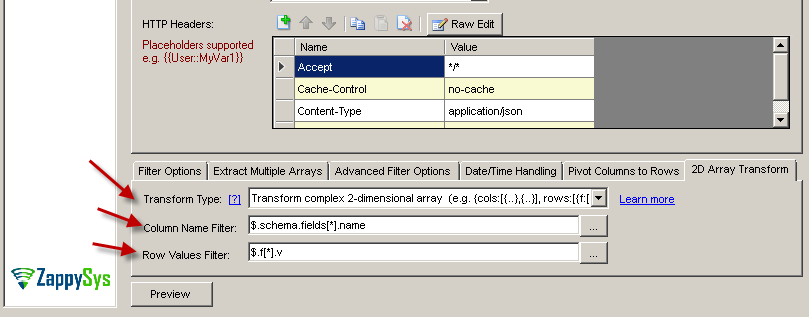
Configure Array Transformation
Now the last thing we have to configure is special 2-dimensional JSON array format used by BigQuery API:
- On the JSON Source UI go to 2D Array Transformation tab.
- Enter the following settings:
- For Transformation Type select Transform complex 2-dimensional array.
- For Column Name filter enter $.schema.fields[*].name.
- For Row Values Filter enter $.f[*].v.
Preview Data and Save UI
That’s it click Preview to see some data. If you entered sample JobID for your User::vJobID variable then you will see some data. In the next section we will see how to load Google BigQuery data into SQL Server. You can click Columns Tab to review Metadata.
Click OK to save UI and generate Metadata.
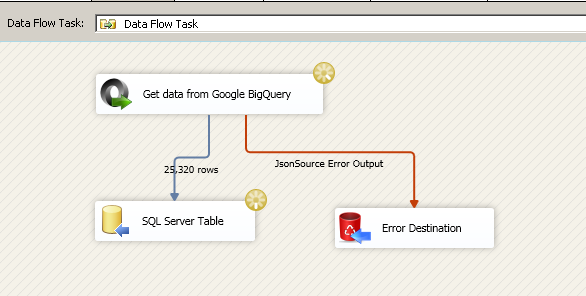
Configure Target – Load Google BigQuery data into SQL Server
Now you can connect your JSON Source to any target such as ZS Trash Destination or a real database destination such as OLEDB Destination.
If you wish to dump data from Google BigQuery to a SQL Server table then just perform the following steps:
- Drag and drop OLEDB Destination from SSIS Toolbox. Rename it to something like SQL Server Table.
- Double click on OLEDB Destination.
- Click New to create a new connection > Configure connection > Click OK.
- Click on New to create a new table > Rename default table name > Click OK.
- Click on Mappings tab and click OK to save UI with default mappings.
Execute Package – Loading BigQuery data into SQL Server
Create / Delete Google BigQuery Dataset using API call
As we mentioned before, you need dataset before you can create a table. Most common way to create dataset is via User Interface but what if you like to automate from your SSIS Package or other workflow? Here is how you can create or delete. Basically you can use REST API Task to send CREATE or DROP command for Dataset object
Create Google Dataset
To create dataset configure REST API Task using below settings (We will call this API)
- Drag REST API Task from toolbox
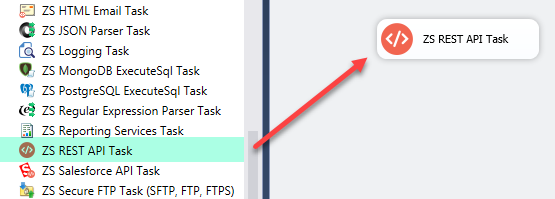
- Select URL from Connection mode and select connection as OAuth connection (Created in previous section)
- Enter below URL (assuming you stored your ProjectID in a variable called ProjectId
1https://bigquery.googleapis.com/bigquery/v2/projects/{{User::ProjectId}}/datasets - Request Method as POST
- Enter Request Body as below (change YOUR_DATASET_NAME – e.g. TestDataset )
1{"datasetReference": { "datasetId": "YOUR_DATASET_NAME", "projectId": "{{User::ProjectId}}"} } - Select Request Content Type as application/json from the dropdown
- (Optional) – If you want to implement Continue if Dataset already exists then you can go to Error Handling Tab (See next section for screenshot) and check Continue On Error Code option and set 409 status code
- That’s it. Click Test Request/Response see it works.
Delete Google BigQuery Dataset
For deleing dataset you have to choose same steps as above except two things
- Request Method as DELETE
- Request Body as blank
Create / Delete Google BigQuery Table using API call
Now let’s look at how to create /drop Table in Google BigQuery using API calls.
Create Google BigQuery Table
To send CREATE TABLE SQL statement (DDL) we have to use same approach as we send normal SQL Query using this API call. So notice we used Standard SQL for this call by supplying useLegacySql: false . DDL Statement must be all in one line
|
1 2 3 4 5 6 7 8 9 10 11 |
POST https://www.googleapis.com/bigquery/v2/projects/{{User::ProjectId}}/queries Content-Type: application/json >>>> BODY <<<<< { "query": "CREATE TABLE TestDataset.Table1 (RecordID INT64,CustomerID STRING,CustomerName STRING);", "useLegacySql": false, "timeoutMs": 100000 } |
To create dataset configure REST API Task using below settings
- Drag REST API Task from toolbox

- Select URL from Connection mode and select connection as OAuth connection (Created in previous section)
- Enter below URL (assuming you stored your ProjectID in a variable called ProjectId
1https://bigquery.googleapis.com/bigquery/v2/projects/{{User::ProjectId}}/queries - Request Method as POST
- Enter Request Body as below
12345{"query": "CREATE TABLE TestDataset.Table1 (RecordID INT64,CustomerID STRING,CustomerName STRING);","useLegacySql": false,"timeoutMs": 100000} - Select Request Content Type as application/json from the dropdown
- (Optional) – If you want to implement Continue if Table exists then you can go to enable Error Handling Tab and check Continue On Error Code option and set 409 status code
- That’s it. Click Test Request/Response see it works.
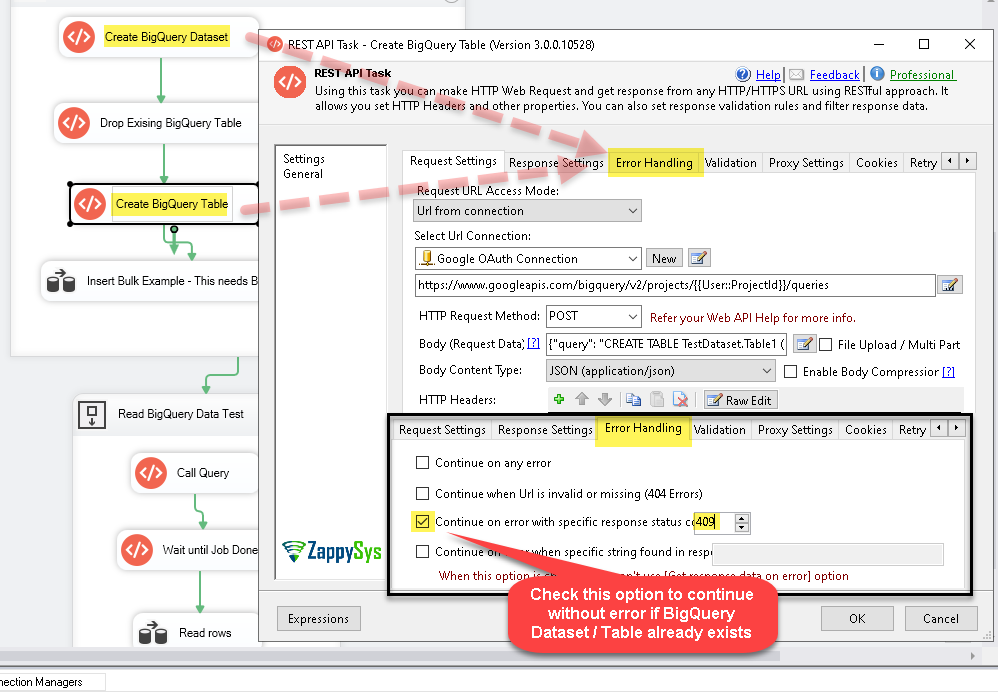
Create Google BigQuery Table – API Call (Continue On Error Setting – Skip CREATE if Table / Dataset Already Exists)
Delete Google BigQuery Table
For deleing table you have to choose same steps as above except two things
- Request Method as DELETE
- Request Body as blank
Write data to Google BigQuery using SSIS – 1 Million row insert test (FAST)
Now let’s look at how easy it is to import data into Google BigQuery using SSIS. We will use the same OAuth connection we created before. To learn more about inserting data into BigQuery check tabledata/insertAll method documentation.
Make sure billing is enabled
Make sure that billing is enabled for your Google Cloud project. Learn how to confirm billing is enabled for your project.
Streaming is not available via the free tier. If you attempt to use streaming without enabling billing, you receive the following error: BigQuery: Streaming insert is not allowed in the free tier.
As long as your API calls fall under Free Tier limit you wont be charged but you still need to enable billing if you wish to call Streaming insertAll API call (Write demo).
Configure OAuth Connection / Permissions
If you want to perform data insert operation in BigQuery using API calls then include the following scopes in your OAuth Connection Manager and generate a token (see our first section of this article – We already included scopes for Write operation but incase you didnt do then regenerate token with below scopes):
|
1 2 3 |
https://www.googleapis.com/auth/bigquery https://www.googleapis.com/auth/cloud-platform https://www.googleapis.com/auth/bigquery.insertdata |
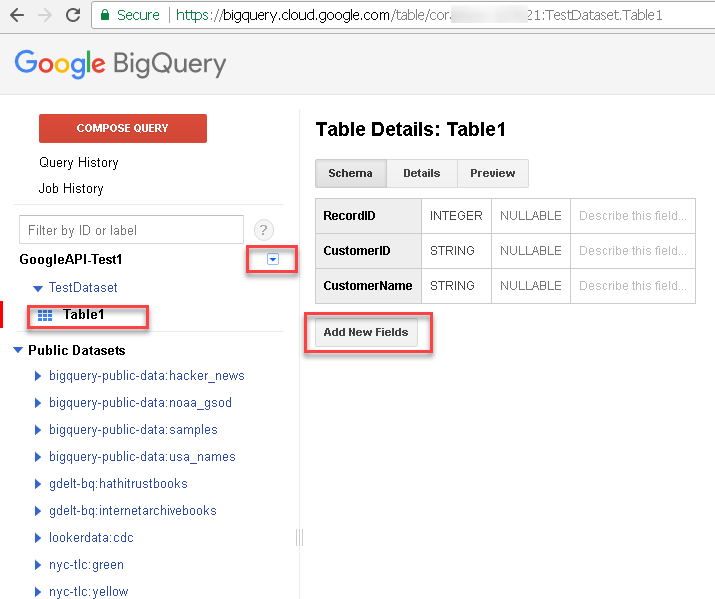
Create BigQuery Dataset (From UI)
For this demo first create a test dataset and one table under it like shown below (billing must be enabled on your Google API Project). To do that go to https://bigquery.cloud.google.com/welcome and configure them:
Insert data into BigQuery using API call
And here is a REST API example to insert data into a BigQuery Table:
Request URL:
|
1 |
https://www.googleapis.com/bigquery/v2/projects/MY_PROJECT_ID/datasets/MY_DATASET_ID/tables/MY_TABLE_ID/insertAll |
Request Headers:
|
1 2 |
Authorization: Bearer ya29.Gl0cBxxxxxxxxxxxxxxxxxxuEIhJIEnxE6GsQPHI Content-Type: application/json |
Request Body:
|
1 2 3 4 5 6 7 |
{ "kind": "bigquery#tableDataInsertAllRequest", "rows": [ {"json": {"RowId": 1,"CustomerName": "AAA"} }, {"json": {"RowId": 2,"CustomerName": "BBB"} } ] } |
Here is our data flow setup to achive very high throughput for Google BigQuery Data Load. We will show you how to insert one million rows in Google BigQuery in less than a minute based on below setup. We will use Multi Threading option and New Compression Option (Added in v3.1.4)
- Dummy Data Source – Generate sample records
- JSON Generator Transform – Generates JSON documents to send as POST request for above /insertAll API call.
- Web API destination – Call /insertAll API call to submit our data to BigQuery
- (Optional) JSON Parser Transform – Parse Error Message for any response
- (Optional) Trash Destination – Save any errors to text file for review
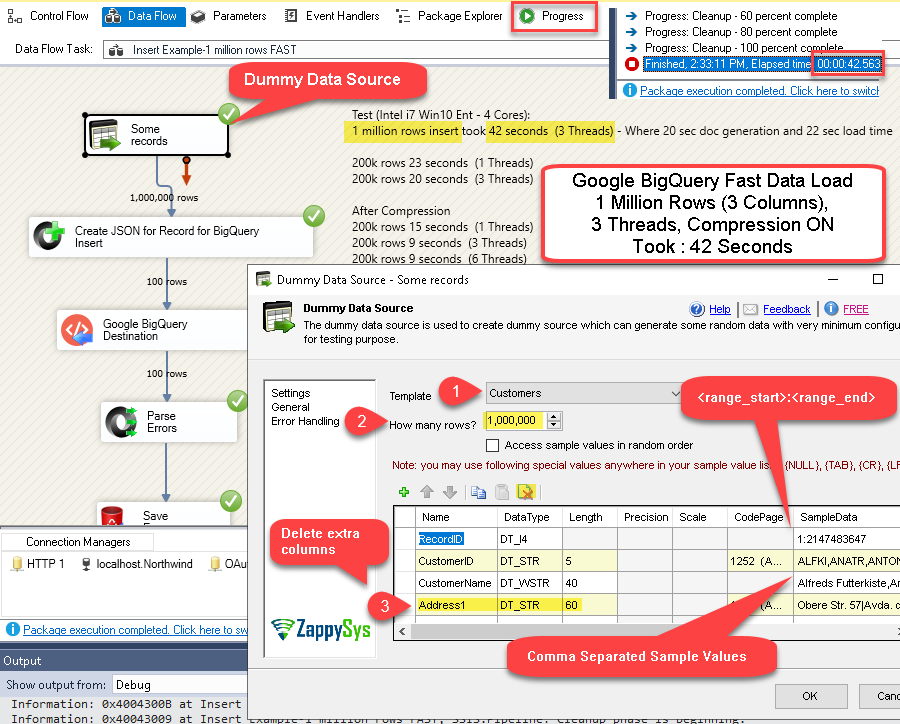
Google BigQuery Data Load Demo in SSIS – 1 Million Rows Insert with Multi Threads and Compression ON (Fast Upload)
Configure SSIS JSON Generator – Generate JSON for BigQuery Table Insert
Now let’s see how to build an HTTP request with JSON body and send it to BigQuery:
- Drag Data Flow Task and double click on it.

- Drag and configure your Source (for this demo we use Dummy Data Source with Customer Template). See previous section for configuration of Dummy Data Source.

- Drag and drop ZS JSON Generator Transform to produce JSON from a database or file records. If your source is already sending a valid JSON then you can skip this step (e.g. SQL query is
returning JSON). You can also read raw JSON from a very large file (new-line separated JSON) using JSON Source with Output as Raw Data option checked.
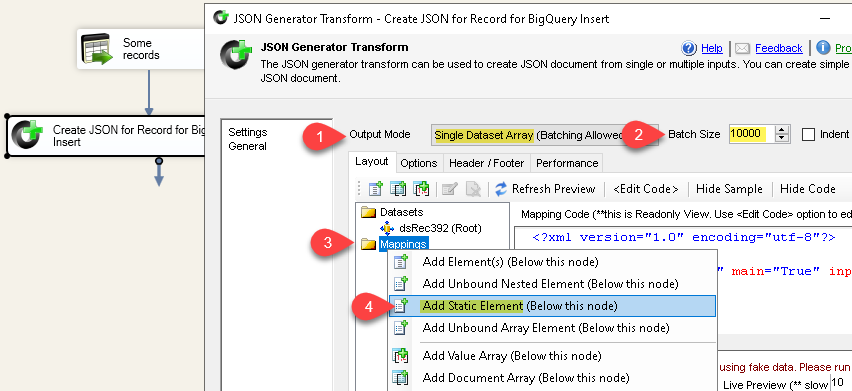
- Connect Source to JSON Generator. Double click JSON Generator Transform to start configuring it like below.
- Select Output Mode as Single Dataset Array and enter Batch Size 10000 (This is Max limit allowed by Google BigQuery API insertAll)
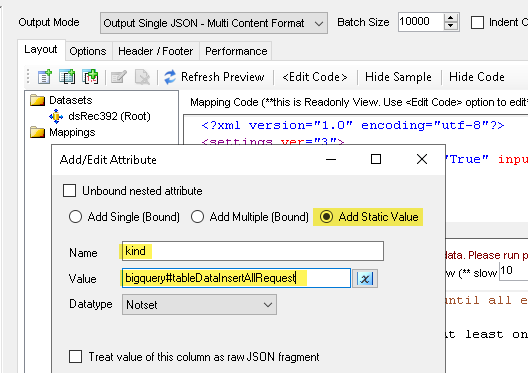
- First right click on Mappings node and select Add Static Element
- Enter Name as kind and value as bigquery#tableDataInsertAllRequest
- Now right click on Mappings node and select Add Document Array option
- Enter rows as array title and click OK
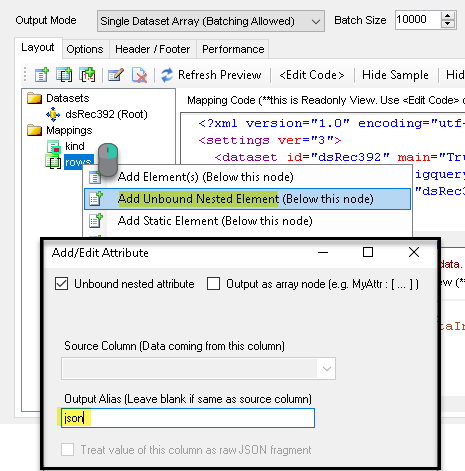
- Select newly added array node and right click > Add unbound nested element enter Output alias as json and click OK.
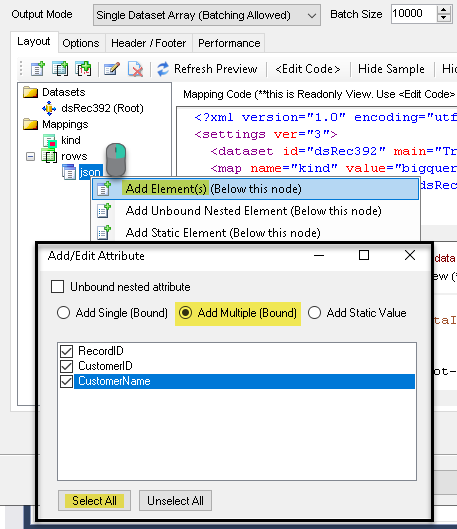
- Select json node and right click > Select Add Elements below this node and select multiple columns you like to send to BigQuery. Click OK to save.
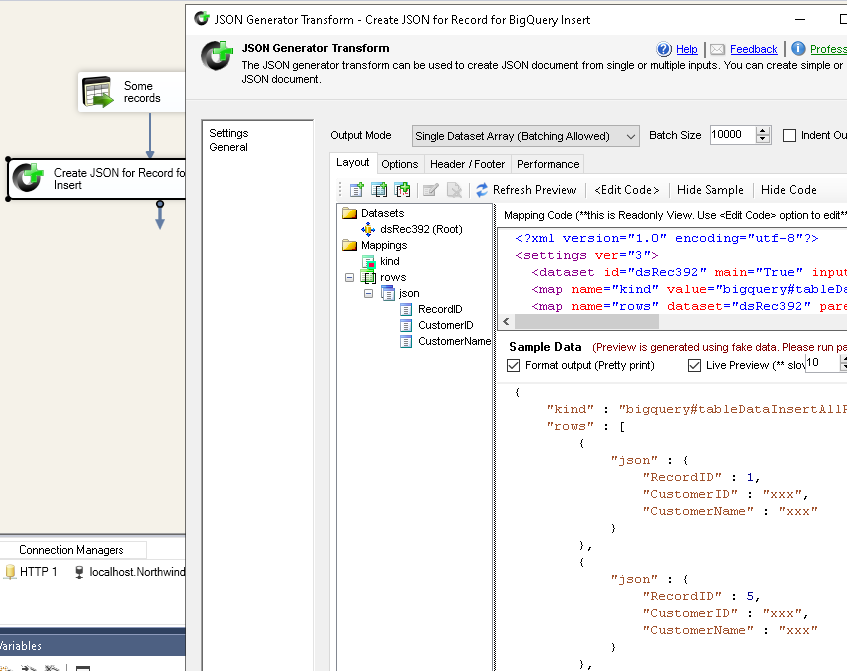
- Now let’s preview our JSON (Copy preview JSON to try in the next step – Web API destination)Here is the finished JSON Structure for next StepNOTE: Table name and column names are case-sensitive so make sure your JSON attribute matches exact same way.
- Click OK to save UI.
Configure SSIS Web API destination – Insert data into BigQuery Table
Once you have Input JSON prepared, now let’s configure destination for BigQuery.
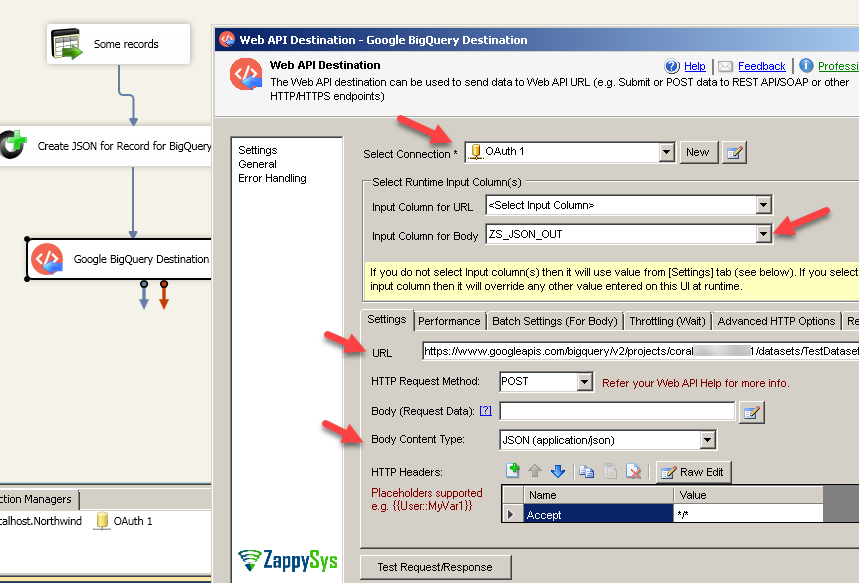
- Drag and drop ZS Web API Destination.
- Connect your JSON Generator Transform to Web API destination.
- Configure general properties:
- Make sure to enter URL in this format:
Make sure to replace 3 parts in above URL (MY_PROJECT_ID, MY_DATASET_ID, MY_TABLE_ID) with actual values from your Google Project and BigQuery dataset/table configuration.1https://www.googleapis.com/bigquery/v2/projects/MY_PROJECT_ID/datasets/MY_DATASET_ID/tables/MY_TABLE_ID/insertAll - Now you can enable Compression and Multiple Threads for higher throughput as below.
NOTE: Compression Property was added in v3.1.4 so you may not see it if you have older version. - If you want to try test insert request from UI without running full package then go back to first tab and edit Body (Use Sample JSON generated by previous JSON Transform – You can grab from JSON Preview Panel on Generator Transform).Click Test Request / Response and confirm Success as below. You can go back to your BigQuery Portal and check one row is inserted after our test click. If everything looking good then run full package to insert all records.Sample JSON for Body:
1234567{"kind": "bigquery#tableDataInsertAllRequest","rows": [{"json": {"RowId": 1,"CustomerName": "AAA"} },{"json": {"RowId": 2,"CustomerName": "BBB"} }]} - Hit OK to save UI.
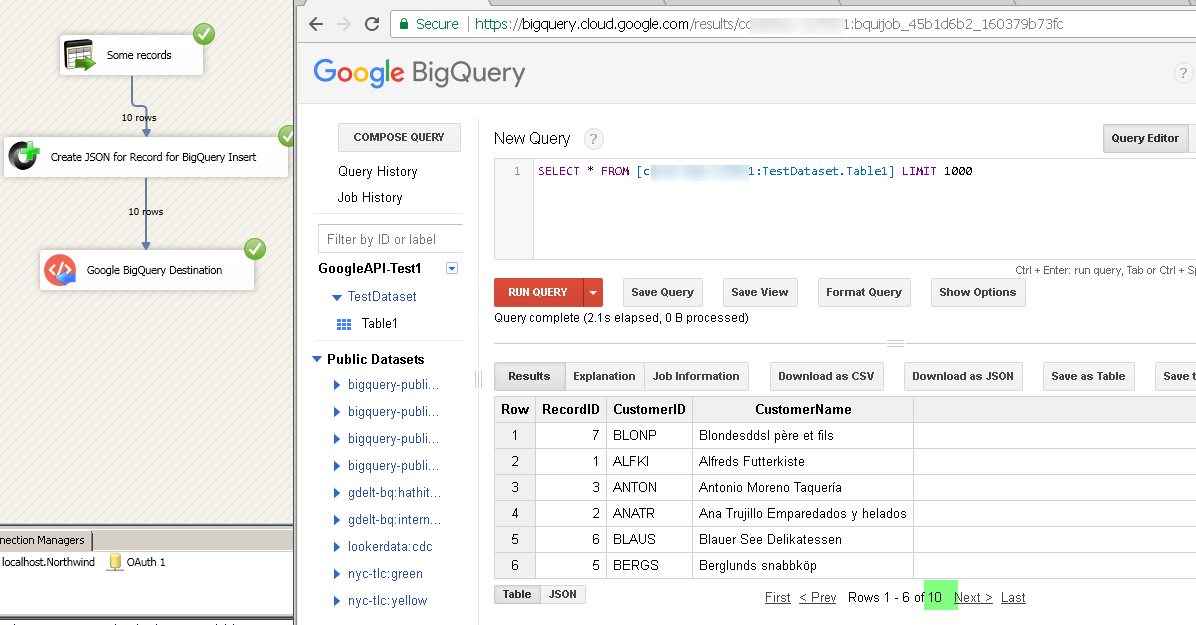
- Run the package and verify data in Google BigQuery Console:
Error Handling for BigQuery Data Load (Bulk Insert API Calls)
There will be a time when some records you insert may not go well in Google BigQuery. In such case you can read output from Web API destination and parse further with JSON Parser Transform. Check for certain values in the output. You must use JSON Parser after Web API destination (Connect Blue Arrow from Web API destination – Since its Soft Error it won’t redirect in Red Arrow ).
For example here is the sample JSON in POST Body for testing which produces error due to bad column name. When bad row found in batch all records will be rejected. Notice that error returns index of record in batch so you can identify which row went bad. It also returns column name in location attribute.
NOTE: Bad column name in 2nd record
Test Body (Bad):
|
1 2 3 4 5 6 7 8 |
{ "kind": "bigquery#tableDataInsertAllRequest", "rows": [ {"json": {"RecordID": 1,"CustomerID": "X1"} }, {"json": {"Bad_Column": 2,"CustomerID": "X2"} } {"json": {"RecordID": 3,"CustomerID": "X3"} }, ] } |
Response (For Bad Input):
|
1 2 3 4 5 6 7 8 9 10 11 12 13 14 15 16 17 18 19 20 21 22 23 24 25 26 27 28 29 30 31 32 33 34 35 36 37 38 |
{ "kind": "bigquery#tableDataInsertAllResponse", "insertErrors": [ { "index": 1, "errors": [ { "reason": "invalid", "location": "bad_column", "debugInfo": "", "message": "no such field." } ] }, { "index": 0, "errors": [ { "reason": "stopped", "location": "", "debugInfo": "", "message": "" } ] }, { "index": 2, "errors": [ { "reason": "stopped", "location": "", "debugInfo": "", "message": "" } ] } ] } |
To configure error detection perform following steps.
- Drag and drop ZS JSON Parser Transform after Web API destination
- Click on Web API destination. Connect Blue arrow to JSON Parser Transform
- Configure JSON Parser Transform like below
- Connect JSON Parser TRansform to some Destination to save error information (e.g. SQL Table or Trans destination)
Other Common Errors in BigQuery API calls
In this section we will talk about many common API errors in BigQuery.
Error: The project XXXXXXX has not enabled BigQuery
Sometimes you might get below error. To fix this error make sure you go to your Project and Enable BigQuery API
|
1 2 3 4 5 6 7 8 9 10 11 12 13 14 15 16 |
Status Code: BadRequest Response Body: { "error": { "code": 400, "message": "The project bigquerytest-281915 has not enabled BigQuery.", "errors": [ { "message": "The project bigquerytest-281915 has not enabled BigQuery.", "domain": "global", "reason": "invalid" } ], "status": "INVALID_ARGUMENT" } } |
Error: 404 – Not Found: Table / Job xxxxxx
- Make sure you are setting GET request and not POST.
- Also make sure your jobId is valid because it expires after 24 hours.
- Make sure project-id supplied in URL is valid ID (DO NOT Specify Alias, use internal ID for project)
-
Make sure you supplied location parameter if your outside EU / US region. Reading data using this API call might fail if you failed to supply location in URL
|
1 2 3 4 5 6 7 8 9 10 11 12 13 |
{ "error": { "errors": [ { "domain": "global", "reason": "notFound", "message": "Not Found: Table xxxxxx" } ], "code": 404, "message": "Not Found: Table xxxxxxx } } |
Error: 403 – Access Denied: BigQuery BigQuery: Streaming insert is not allowed in the free tier
If you trying call certain APIs on sandbox mode or free tier then you might get below error. To overcome this error enable billing on google bigquery. As long as your API calls fall under Free Tier limit you wont be charged but you still need to enable billing if you wish to call Streaming insertAll API call.
|
1 2 3 4 5 6 7 8 9 10 11 12 13 14 15 16 17 18 |
Response Url: https://www.googleapis.com/bigquery/v2/projects/bigquerytest-281915/datasets/TestDataset/tables/Table1/insertAll Status Code: Forbidden Response Body: { "error": { "code": 403, "message": "Access Denied: BigQuery BigQuery: Streaming insert is not allowed in the free tier", "errors": [ { "message": "Access Denied: BigQuery BigQuery: Streaming insert is not allowed in the free tier", "domain": "global", "reason": "accessDenied" } ], "status": "PERMISSION_DENIED" } } |
Debugging Web API Requests
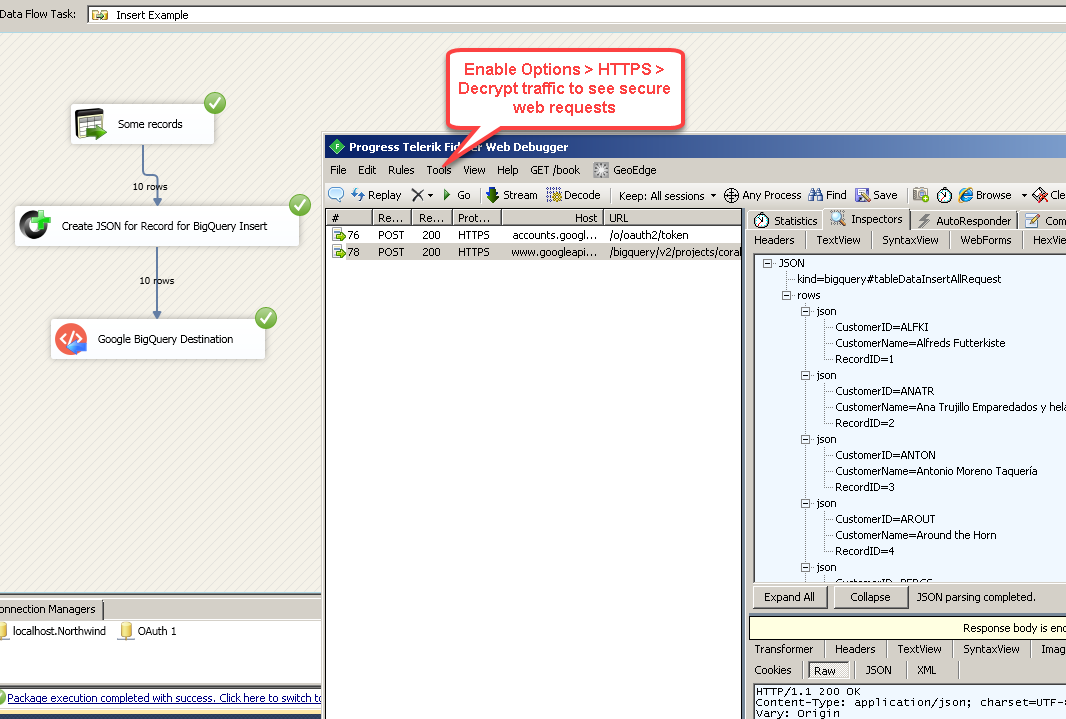
If you need to debug actual requests made to Google server then you can use a tool like Fiddler. It’s a very handy tool to troubleshoot JSON format issues. It will allow to see how a request is made to a server.
Common Errors
The most common error you may face when you run an SSIS package is truncation error. During the design time only 300 rows are scanned from a source (a file or a REST API call response) to detect datatypes but at runtime, it is likely you will retrieve far more records. So it is possible that you will get longer strings than initially expected. For detailed instructions on how to fix common metadata related errors read an article "How to handle SSIS errors (truncation, metadata issues)".
Another frequent error you may get is an authentication error, which happens when you deploy/copy a package to another machine and run it there. Check the paragraph below to see why it happens and how to solve this problem.
Deployment to Production
In SSIS package sensitive data such as tokens and passwords are by default encrypted by SSIS with your Windows account which you use to create a package. So SSIS will fail to decrypt tokens/passwords when you run it from another machine using another Windows account. To circumvent this when you are creating an SSIS package which uses authentication components (e.g. an OAuth Connection Manager or an HTTP Connection Manager with credentials, etc.), consider using parameters/variables to pass tokens/passwords. In this way, you won’t face authentication related errors when a package is deployed to a production server.
Check our article on how to configure packages with sensitive data on your production or development server.
Download Sample Package
Conclusion. What’s next?
In this article we have learned how to load data from Google BigQuery into SQL Server using SSIS (drag and drop approach without coding). We used SSIS JSON / REST API Connector to extract data from Google BigQuery REST API using OAuth. JSON Source Connector makes it super simple to parse complex/large JSON files or any Web API response into rows and columns so you can load data into a database, e.g. SQL Server database. Download SSIS PowerPack to try many other automation scenarios that were not discussed in this article.
Keywords:
Google BigQuery Integration with SQL Server | How to extract data from google bigquery in SSIS? | How to read data from Google BigQuery API? | Loading BigQuery Data into SQL Server. | BigQuery to SQL Server | SSIS Google Big Query Integration | SSIS Google BigQuery Import JSON File | SSIS Google BigQuery Export data

