Introduction
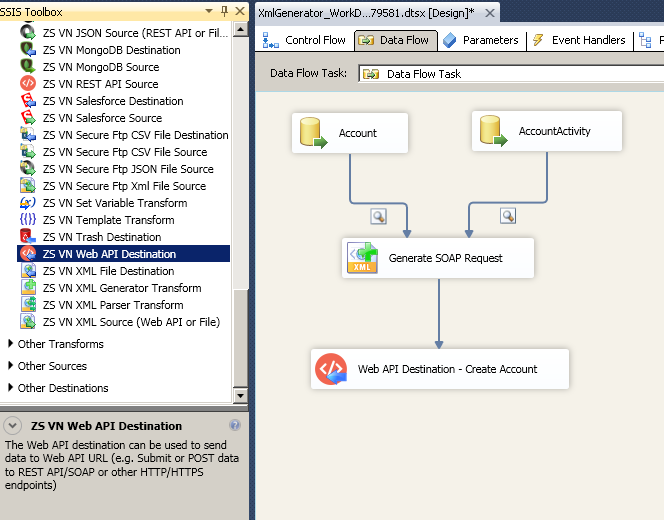
 In our previous article, we saw step-by-step approach to read data from workday using SSIS. In this article, we will focus on how to load SQL Server data to Workday (e.g. POST, Create, Update). We will use SSIS Web API Destination and the combination of other Transforms such as SSIS Template Transform and SSIS XML Generator Transform .
The main thing in this article how to create SOAP Request correctly inside your request. This article explains how to use Free tools like SoapUI to create Workday Request. Once you do that you can call virtually any Workday API using the same technique. If you need more help contact our Support and we will be happy to help you step by step.
Prerequisites
Before we perform the steps listed in this article, you will need to make sure the following prerequisites are met:- SSIS designer installed. Sometimes it is referred to as BIDS or SSDT (download it from the Microsoft site).
- Basic knowledge of SSIS package development using Microsoft SQL Server Integration Services.
- Make sure ZappySys SSIS PowerPack is installed (download it, if you haven't already).
- (Optional step). Read this article, if you are planning to deploy packages to a server and schedule their execution later.
Step-By-Step : Import SQL Server data to Workday using SSIS
Lets build our SSIS Package to load data from SQL Server or any Source (e.g. Oracle, DB2) to Workday using SOAP API calls. Using below approach you can Create new records or Update existing records in Workday. You can also delete records with same concept.
Basic steps outlined below.
- Fetch records from SQL Source and build XML Request for each Row (e.g. Create Account)
- Build XML Request (SOAP Body) using Template Transform or SSIS XML Generator Transform. If you have Array nodes (e.g. One to Many) then you have to use SSIS XML Generator Transform else use Template Transform for ease of use.
- Pass input record (e.g. SOAP Body) to Web API destination to call Workday API call (CREATE, UPDATE, DELETE requests)
- Parse XML Response (i.e. output) using SSIS XML Parser Transform or save raw XML to SQL Server database.
- Redirect Bad rows or failed requests to log file for review
Now let’s look at each step in detail
Obtain Workday API URL
Once you have WSDL file, next step is craft correct URL for API service you like to call. The service name can be obtained from here (Check service column)
Syntax: https://<workday host name>.workday.com/ccx/service/<tenant name>/<service-name>
Example: https://MY-INSTANCE.workday.com/ccx/service/MY-TenantID/Human_Resources
Craft SOAP Body (XML API Request) using SoapUI
Now its time to craft some SOAP Request. Check steps outlined here (Use SoapUI tool) . Once you have Request Body XML you can change parameters as per your need.
Here is sample SOAP XML Body for Get Employee call from Human_Resopurces service.
Create SOAP Request Body from WSDL (Using SoapUI tool)
Creating SSIS Connection for Workday SOAP API call using WSS Security
To create a new connection for workday perform the following steps.
- Two ways you can create HTTP connection for the workday service
First approach: Right click in the connection managers panel and click “New Connection…” and Select ZS-HTTPconnection from the connection type list and click OK.
— OR —
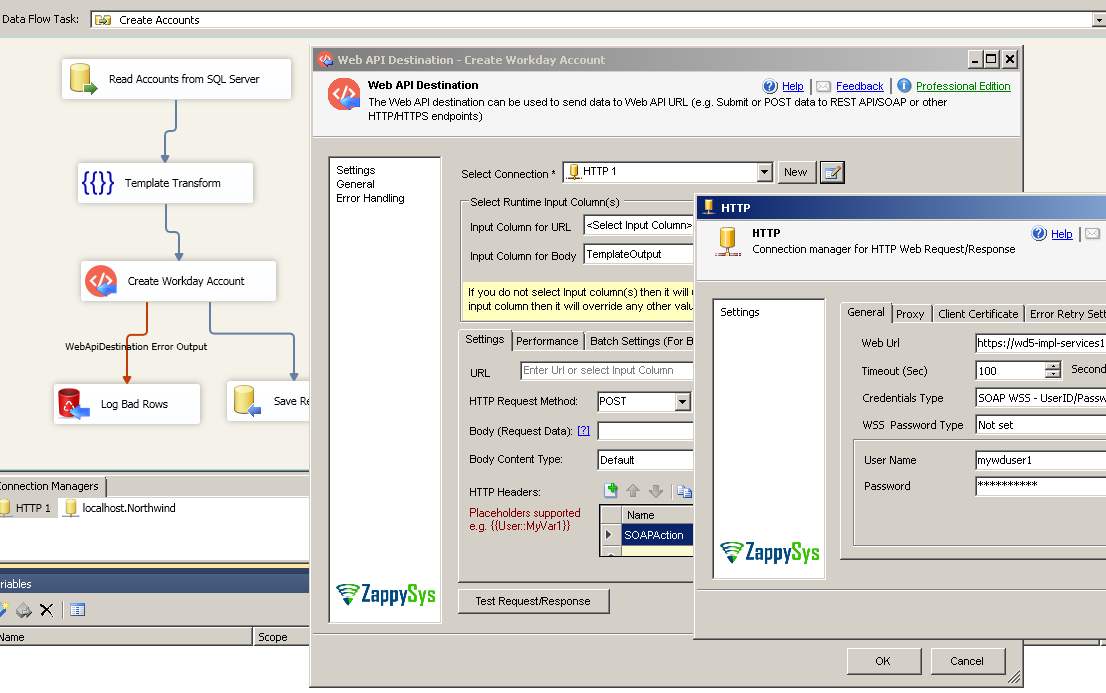
Second approach: If you are already on SSIS XML Source or SSIS REST API TASK or SSIS Web API Destination UI then click [New] next to the Connection Dropdown. - Once HTTP Connection UI is visible configure following way.
- Enter API URL for Workday (Make sure you don’t enter WSDL URL found here ). Your API URL will be something like below.
Syntax: https://<workday host name>.workday.com/ccx/service/<tenant name>/<service-name>
Example: https://wd1-impl-services1.workday.com/ccx/service/MyTenantID/Human_Resources - Select credential type as SOAP WSS (This setting is only found in v2.6.4 or Higher)
- Enter your workday userid and password
- For WSS password type setting you leave it default (Not set) or change to PasswordHash for more secure communication.
- Click OK to save.
- Enter API URL for Workday (Make sure you don’t enter WSDL URL found here ). Your API URL will be something like below.
Loading SQL Server data to Workday using SSIS
Let’s look at the real-world scenario. You have Accounts table stored in SQL Server and you like to create same accounts in Workday by calling appropriate API calls.
- Drag Data flow task from SSIS Toolbox. Double click to edit.
- Drag OLEDB Source configure to read SQL Table (e.g. Accounts)
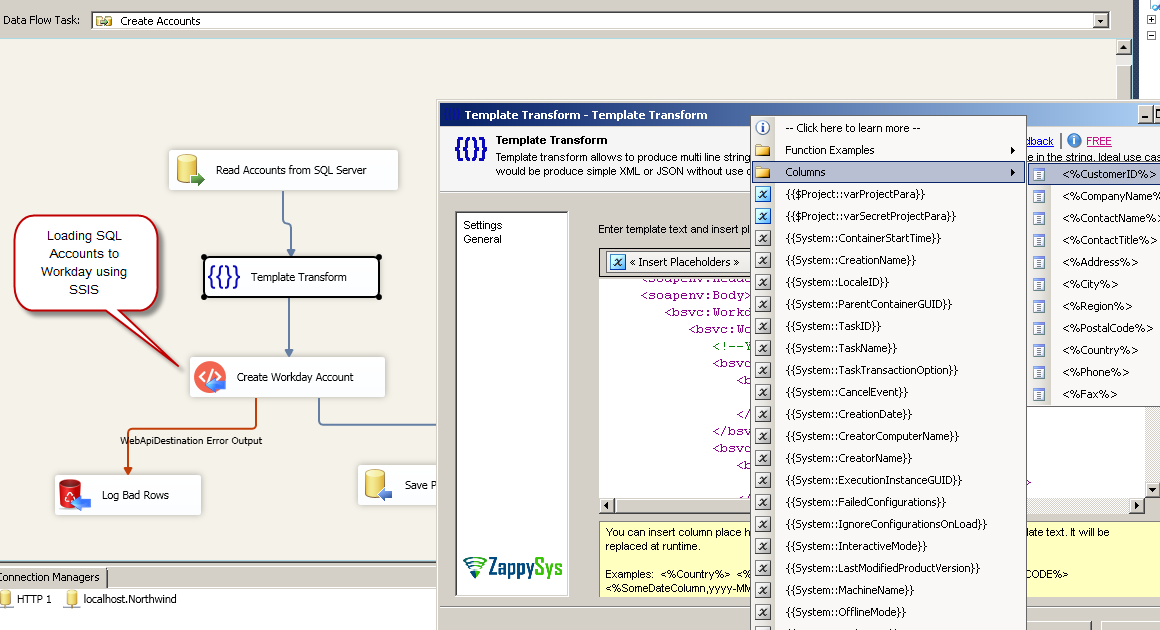
- Drag ZS Template Transform from the toolbox. Connect OLEDB Source to Template Transform. If you need flexible XML Generation then use XML Generator Transform but it may require some learning curve so for simplicity we are skipping that from this article.
- Enter your SOAP request in the template text (like below) you like to call (This is obtained from the previous section – using tool like SoapUI)
For Example: To create a new account you can use enter like below. Replace xxxxxxxxxx with Columns placeholder.
To insert Column name as Placeholder click <<Insert Placeholder>> and then Select [Columns] node. Template Transform outputs column name TemplateOutput. You can use this as Body to feed next step (i.e. Call Workday API using Web API Destination )When you insert placeholder to make sure you use XML Encoded Columns if you expecting a Long text or special characters part of your data.
Syntax for encoded value is <%CustomerName,FUN_XMLENC%> . You don’t need FUN_XMLENC for numeric fields. For normal placeholder without encoding use just name with column placeholder indicators e.g. <%Amount%>123456789101112131415161718192021222324<soapenv:Envelope xmlns:soapenv="http://schemas.xmlsoap.org/soap/envelope/" xmlns:bsvc="urn:com.workday/bsvc"><soapenv:Header/><soapenv:Body><bsvc:Workday_Account_for_Worker_Add><bsvc:Worker_Reference><!--You have a CHOICE of the next 2 items at this level--><bsvc:Employee_Reference><bsvc:Integration_ID_Reference><bsvc:ID>xxxxxxxxxx</bsvc:ID></bsvc:Integration_ID_Reference></bsvc:Employee_Reference><bsvc:Contingent_Worker_Reference><bsvc:Integration_ID_Reference><bsvc:ID>xxxxxxxxxxxx</bsvc:ID></bsvc:Integration_ID_Reference></bsvc:Contingent_Worker_Reference></bsvc:Worker_Reference><bsvc:Workday_Account_for_Worker_Data><!--type: string--><bsvc:User_Name>xxxxxxxxxxxxxx</bsvc:User_Name></bsvc:Workday_Account_for_Worker_Data></bsvc:Workday_Account_for_Worker_Add></soapenv:Body></soapenv:Envelope> - Drag ZS Web API Destination from SSIS Toolbox. Connect Template Transform to Web API Destination.
- Configure Web API Destination as below (See we used same HTTP connection created in the previous section)
- Select HTTP Connection
- Select Input Column for Body (select TemplateOutput)
- Select Body Content Type as XML (text/xml;charset=UTF-8)
- Click Raw Edit above Headers grid. Enter following text (We just need one header)
1SOAPAction: "" - Now you can connect Web API Destination Output (Blue Arrow to Either XML Parser or some other Destination). Web API destination gives you a response in Raw XML Format. This article explains how to use JSON or XML Parser to parse API response coming from Web API destination.
Video Tutorial (See Part#4) – Create XML and POST data to SOAP Web Service or REST API
Now lets look at examples of creating XML from multiple data sources and POST XML request to SOAP Web Service URL or any other XML Based REST API URL. This video has 5 parts to cover full length tutorial but if you want to fast forward to see XML Generator Transform and Web API Destination then see part#4.
Sending complex SOAP Request (Nested Parent-Child Array)
If you have to call more complex SOAP request which requires Parent-child structure (Nested Array) then you cant use Template Transform. In that case, check this article for real-world example.

Create nested XML for SOAP Request – Multiple inputs (POST data to API using SSIS Web API Destination)
Extract single XML node from SOAP Response
There will be a time when you need to extract just one value out of your response and save into SSIS variable / use it later on. If that’s the case then refer to this article.
Conclusion
In this article we have learned how to load data from SQL Server to Workday using SSIS ( drag and drop approach without coding). Combination of few ZappySys Components (e.g. Web API Destination, XML Generator ) makes it super simple to call any Web API to load data from one system to API endpoint. Download SSIS PowerPack to try many other automation scenarios not discussed in this article.


