Introduction
![]() In this post you will learn how to Read / write Smartsheet data using SSIS (Drag and drop approach without any coding). We will use SSIS JSON/ REST API Source to extract data from Smartsheet API and use SSIS Web API Destination to write data to Smartsheet. This approach is similar to our previous blog where we described how to read and write Google sheet using SSIS
In this post you will learn how to Read / write Smartsheet data using SSIS (Drag and drop approach without any coding). We will use SSIS JSON/ REST API Source to extract data from Smartsheet API and use SSIS Web API Destination to write data to Smartsheet. This approach is similar to our previous blog where we described how to read and write Google sheet using SSIS
Now let’s look at step by step approach to call Smartsheet REST API.
Prerequisites
Before we perform the steps listed in this article, you will need to make sure the following prerequisites are met:
- SSIS designer installed. Sometimes it is referred to as BIDS or SSDT (download it from the Microsoft site).
- Basic knowledge of SSIS package development using Microsoft SQL Server Integration Services.
- Make sure ZappySys SSIS PowerPack is installed (download it, if you haven’t already).
- (Optional step). Read this article, if you are planning to deploy packages to a server and schedule their execution later.
Create Token to access Smartsheet REST API
First step to access smartsheet API in SSIS is create API Token. We will use this API token later on to read data from Smartsheet Sheet.
- Login to your Smartsheet account
- Click on Account > Apps & Integrations > Click API Access > Click Generate Token

Create Smartsheet API Token for REST API Access (Step 1)

Generate new Smartsheet token (Step 2)
- Once Token is generated copy that for later use (Make sure you treat this token as password and do not share with unauthorized user.
Getting started with Smartsheet API
In this article we will use few out of many API provided by Smartsheet. To get started with Smartsheet API concepts click here. To read full details about each Smartsheet API click here.
Step-By-Step – Import/Export Smartsheet data in SSIS
Now lets see how to read and write smartsheet data using SSIS.
Read data from Smartsheet using SSIS JSON / REST API Source (Load Smartsheet to SQL Server)
To read data from smartsheet you need to perform following steps.
Find Sheet ID for Smartsheet API access
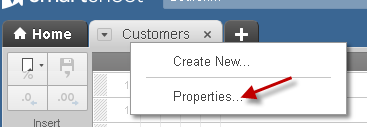
- First you need to know how to find Sheet ID. Perform below steps to find Sheet ID.
- Goto your portal and open sheet you like to read. Right click on the Sheet Tab > Click Properties and Copy Sheet ID
Find Sheet ID for Smartsheet API call
Once you know Sheet ID. Now lets create SSIS package to extract data from Smartsheet and load into SQL Server.
- Create new SSIS Package or Open existing one.
- From control flow SSIS toolbox drag Data Flow task
- Double click Data flow
- From SSIS Toolbox drag and drop ZS JSON Source (for REST API / File)
- Double click JSON Source and configure following properties
- Enter Shartsheet API Access URL as below (Change last part with your own sheet id)
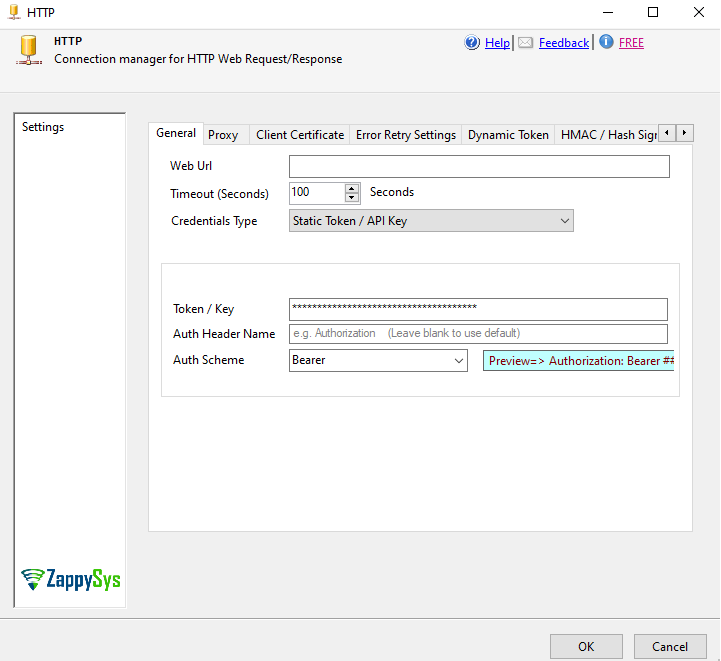
1https://api.smartsheet.com/2.0/sheets/YOUR-SHEET-ID-GOES-HERE - Check use credentials and then create a new HTTP connection. Select Static Token / API Key and enter enter your token we got in previous section
- Click on Select Filter and pick Rows node or just type below text in the Filter textbox
1$.rows[*]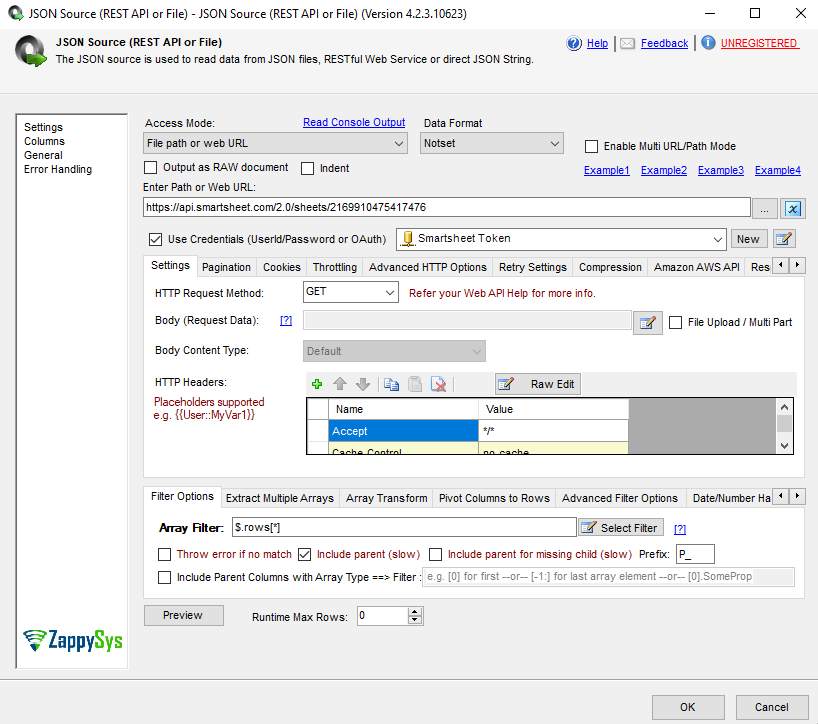
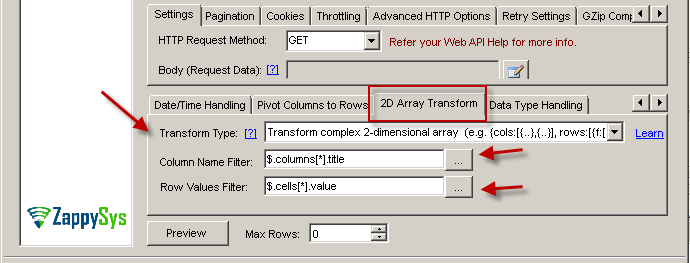
- Now goto 2D Array Transformation Tab and set following settings
- Set Transformation Type to Complex 2-dimensional array
- Column Name Filter to $.columns[*].title
- Row Value Filter to $.cells[*].value
SSIS Smartsheet API Configuration – Complex Array transformation (Read nested array)
- Once everything is configured Click Preview. Click OK to save.
- Drag OLEDB Destination from SSIS Toolbox.
- Connect JSON SOurce to OLEDB Destination
- Double click OLEDB Destination and configure connection (e.g. Select SQL Server connection) and select Target Table or click New to Create new Table based on Source columns.
- Click on Mappings to map source columns to target
- Click OK to save
- Execute Package
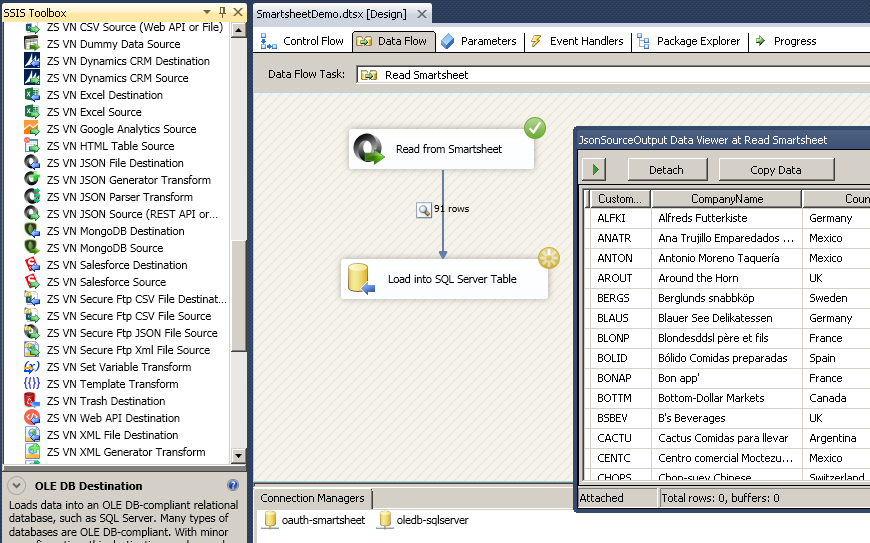
SSIS Example : Loading Smartsheet data into SQL Server (REST API Call)
- Enter Shartsheet API Access URL as below (Change last part with your own sheet id)
Read Smartsheet data with Pagination option
Smartsheet API support options to read large amount of data in small chunks by using pagination options. ZappySys offers many ways to paginate for various API.
Disable Smartsheet Pagination
Many API endpoints in Smartsheet by default send you paginated response. Pagination requires some extra configuration so try to disable it if possible by using includeAll=true option in your URL as below. If you cannot includeAll for some reason then perform steps listed in next section.
|
1 |
https://api.smartsheet.com/2.0/sheets?includeAll=true |
Smartsheet Pagination in SSIS
To paginate Smartsheet response in SSIS JSON Source perform the following steps. Below steps assume that you trying to get all sheets by calling https://api.smartsheet.com/2.0/sheets URL in JSON Source (Just like we explained in previous section). Before dataflow we have to add one step to enable pagination. Lets check.
- Go to Control Flow designer right click > Select Variables
- Create new string datatype variable called name it TotalPages. Set default value to 0
- Now drag ZS REST API Task from SSIS Toolbox
- Enter Following URL (we don’t need many rows to so reduced default page size to just 10)
1https://api.smartsheet.com/2.0/sheets?pageSize=10 - Now click on Raw Edit (Above Headers grid)
- Enter following header (Replace Token with your own token we obtained in the previous section)
1Authorization: Bearer YOUR-TOKEN-GOES-HERE - Go to Response Settings Tab
- Select Content Type Json and enter filter as $.totalPages
- Check Save response to Variable. Select Variable we created in Previous step (Only string datatype variables are visible)
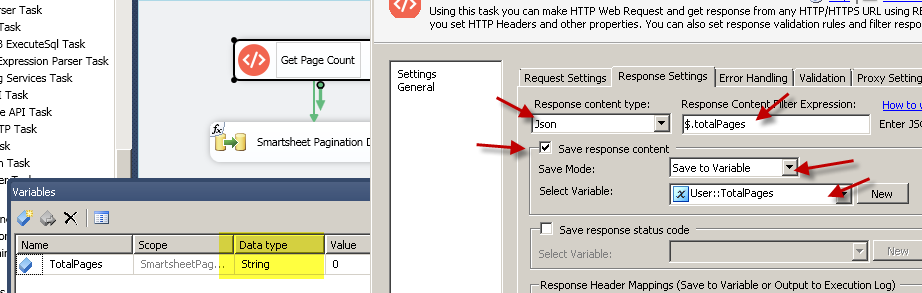
Save Total Page Count to SSIS variable
- Click Test Request/Response to confirm it works
- Click OK to save
- Now let’s use this variable to configure MaxPageNumber setting in JSON Source. Using following way you can make any Data flow component property dynamic.
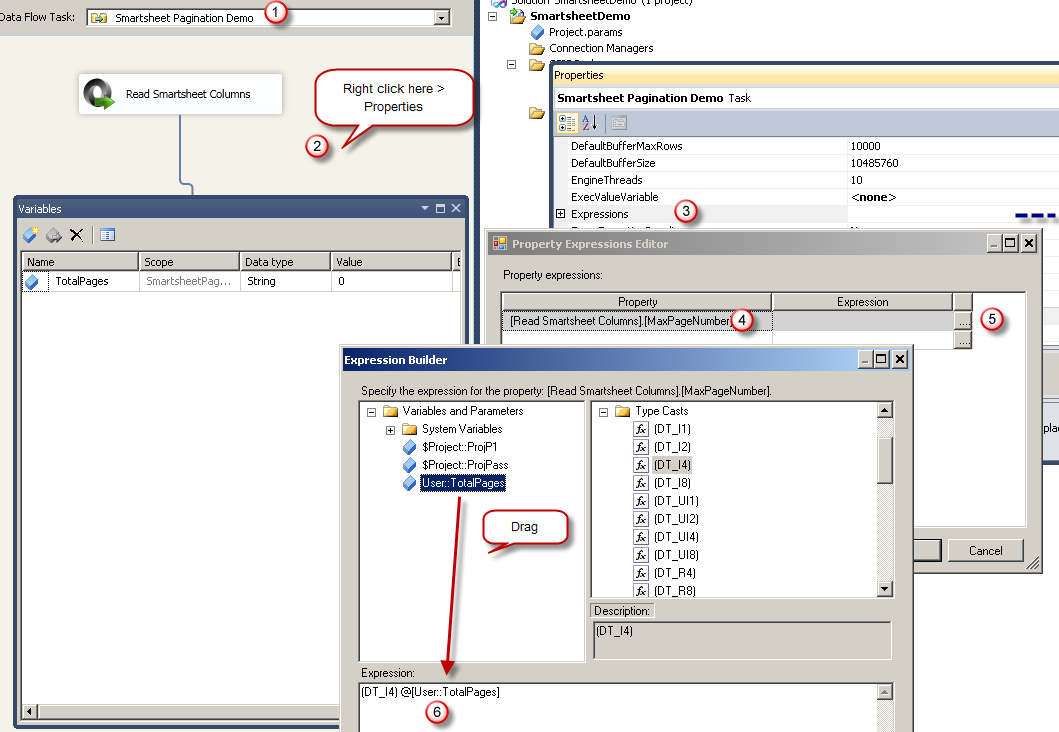
Define expression on SSIS Data flow Component Property (Dynamic Value)
- Now connect your REST API Task to Data flow
- On the JSON Source go to Pagination Tab and enter following settings.

Smartsheet API Pagination settings – SSIS JSON / REST Source
- That’s it. Now if you run it you will see all records will be pulled.
Write data to Smartsheet using SSIS Web API Destination (SQL Server to Smartsheet Import)
Now lets see how to write some data to Smartsheet Sheet. We will read records from SQL Server and write to SmartSheet using ZS Web API Destination
For inserting multiple rows we can call this Smartsheet API Endpoint
Basically High level steps are.
- Find out Smartsheet Column ID to use along with API call
- Read Records from SQL Server using OLEDB Source
- Construct desired JSON for Add New Row API Call
- Send JSON to Smartsheet Add Row API (Configure Bulk Options )
Find out Smartsheet Column ID
Very first step you have to perform is get Column ID which correspond to certain title. You can use following URL endpoint to get list of all columns (Change your Sheet ID). Make sure you append includeAll=true else it may only fetch 100 columns. You can save Column result to some database table to File to copy ID. Preview Grid also allows to copy cell.
|
1 |
https://api.smartsheet.com/2.0/sheets/YOUR-SHEET-ID/columns?includeAll=true |

Get Smartsheet Column ID using API call in SSIS JSON Source
Configure SQL Server Source (OLEDB Source)
Once you have column ID you can drag OLEDB Source from SSIS Toolbox and configure to read from SQL Server. Below is sample source query to extract data from SQL Server.
|
1 |
Select OrderID,CustomerID,EmployeeID,OrderDate from Orders |
Configure SSIS Template Transform
Once SQL Source is configure we are ready for next step. SSIS PowerPack v2.6.4 and later introduced new SSIS transform called Template Transform. This transform allows you to produce desired JSON /XML from single input record by using Column name as placeholder anywhere in your text. This is much simpler method than constructing JSON using JSON Generator Transform
Here is the sample JSON we want to produce to insert into Sheet which contains 4 columns OrderID, CustomerID, EmployeeID and OrderDate.
|
1 2 3 4 5 6 7 8 9 10 11 12 13 14 15 16 17 18 19 20 21 |
{ "toTop": true, "cells": [ { "columnId": 8146714579232644, "value": 10548 }, { "columnId": 828365184755588, "value": "TOMSP" }, { "columnId": 5331964812126084, "value": 3 }, { "columnId": 3080164998440836, "value": "1997-05-26T00:00:00" } ] } |
Now lets configure SSIS Template Transform to create desired JSON Request for API call.
- Drag ZS Template Transform from the SSIS toolbox
- Connect OLEDB Source to ZS Template Transform
- Double click Template Transform. Paste above sample request in the Template Text
- Now highlight sample value you wish to replace from upstream by some input column.
- Click on Insert Placeholders > Columns > Your Column
- Perform above steps for each value you wish to replace. You can also add use placeholder functions such as JSONENC after column name (useful if you expecting new line or special characters such as tab or double quotes in your input text ). Date formatting (e.g. yyyy-MM-dd ) also allowed. See below example after placeholders added.
123456789101112131415161718192021{"toTop": true,"cells": [{"columnId": 8146714579232644,"value": <%OrderID%>},{"columnId": 828365184755588,"value": "<%CustomerID,JSONENC%>"},{"columnId": 5331964812126084,"value": <%EmployeeID%>},{"columnId": 3080164998440836,"value": "<%OrderDate,yyyy-MM-ddTHH:mm:ss%>"}]} - Here is final configuration of Template Transform
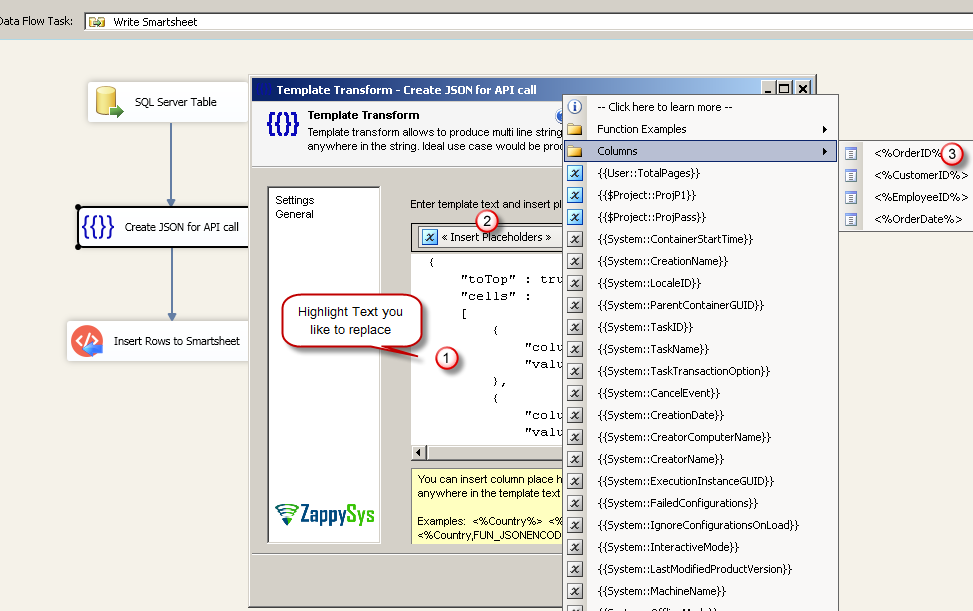
Create JSON for API Request (POST) using SSIS Template Transform
Configure SSIS Web API Destination (POST New Rows to Smartsheet)
Now lets configure last step. This will POST API request to insert multiple rows to Smartsheet. Previous template transform crafts request for one new row but later in this section we will enable Batch mode so we can JOIN multiple JSON and created Bulk requests in one go so we avoid many API call. Always use Bulk mode if API endpoint supports it.
- Drag and drop ZS Web API destination from SSIS Toolbox
- Connect previous Template Transform to your Web API Destination.
- Select new HTTP connection. When Prompted enter following URL on HTTP Connection UI (Replace your Sheet ID)
1https://api.smartsheet.com/2.0/sheets/YOUR-SHEET-ID/rows - In the input column for Body select TemplateOutput
- For Body you can enter Sample Body if you wish to Test at design time else leave it blank
- Select Body Content Type as application/json
- In the Headers enter Authorization Header like we did in previous section (Read from Smartsheet)
1Authorization: Bearer YOUR-TOKEN-GOES-HERE
Configure SSIS Web API Destination – Add / Insert Rows to Smartsheet (Bulk API call)
- Go to Batch Setting mode. Change following settings
- Check on Enable submitting multiple records
- For Body Header enter [
- For Body Footer enter ]
- For Body Row separator enter , (i.e comma)
- You can change Body Batch Size to desired value (100 is recommended)

Configure SSIS Web API Destination for Bulk API call (Smartsheet REST API – Insert multiple rows)
- That’s it run your package to test the entire flow.
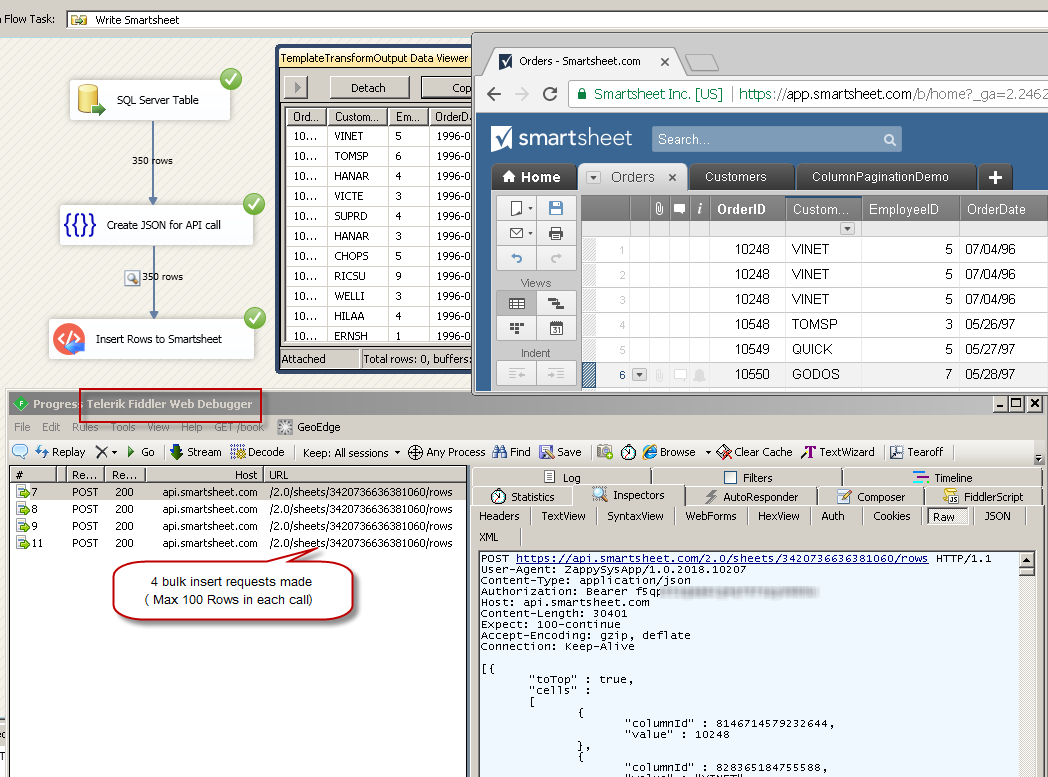
Loading data from SQL Server to Smartsheet using SSIS (Web API POST Example – Bulk Mode)
The most common error you may face when you run an SSIS package is truncation error. During the design time only 300 rows are scanned from a source (a file or a REST API call response) to detect datatypes but at runtime, it is likely you will retrieve far more records. So it is possible that you will get longer strings than initially expected. For detailed instructions on how to fix common metadata related errors read an article “How to handle SSIS errors (truncation, metadata issues)“.
Another frequent error you may get is an authentication error, which happens when you deploy/copy a package to another machine and run it there. Check the paragraph below to see why it happens and how to solve this problem.
Things have gone bad: Error handling & debugging
Incidentally, bad things can happen. A remote server may go offline or your server may go out of memory. In any case, you may want to know when that happens and take actions accordingly. For that purpose, you have to redirect bad rows to some other destination. For this example, we will take and use Web API Destination, but basically, you can use any SSIS component:
Handling errors
- Add a Derived Column above Web API Destination with expression “(DT_WSTR,4000)ZS_JSON_OUT” and name it “JsonAsString”. This will let you see what JSON you are actually passing.
- Then add a database or file destination or use another Trash Destination for debugging purposes and redirect the bad rows (red arrow) from Web API Destination into it. Don’t forget to set Redirect row option for both, Error and Truncation columns:
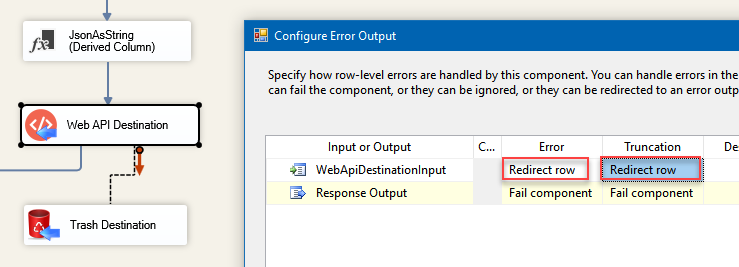
Redirected failed requests from Web API Destination to a desired destination when loading from SQL Server to REST API Service is failing. Derived Column JsonAsString added to be able to read JSON which was passed to Elasticsearch
- Finally, add a Data Viewer for the red path, if you want to debug the flow. You will be able to see URL, JSON and the error message for each record. You may want to copy-paste ErrorMessage to Notepad if you want it to be more readable:
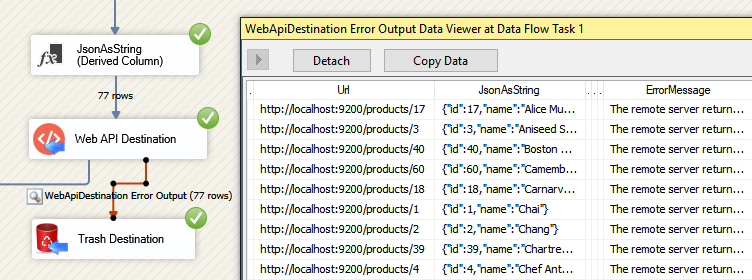
Use Data Viewer to view HTTP requests that failed to be fulfilled.
Debugging HTTP requests
A common thing you have to do when working with HTTP requests is to debug those requests; e.g. to check what headers, body or URL was passed. To test how things look behind the scenes we strongly suggest to use Fiddler – a popular web debugging tool.
Inside it, you can double-click the URL entry (Right side) to see Request and Response Panels. The top panel is Request (URL, Headers, Body) and Bottom Panel is Response. For https:// (secure URL) make sure you enable HTTPS option in Fiddler (Tools > Options > HTTPS > Check Decrypt https request):

Debugging Web API call using Fiddler in SSIS
Conclusion
Smartsheet API provides great way to automate data read/write. However to call Smartsheet API you have to use SDK / coding approach (e.g. C#, Java, Python, Ruby). Luckily ZappySys SSIS PowerPack provides great way to integrate any Smartsheet API call via simple drag and drop approach without coding. Try SSIS PowerPack for free and call virtually any REST API in few clicks.
Keywords: Import smartsheet into sql server | export smartsheet to sql server | ssis smartsheet read | ssis smartsheet write | reading smartsheet data using API call | write to smartsheet