Introduction
 In our previous blog post we saw how to import SOAP API data in Power BI. Now let’s continue to explore more use cases. In this article we will check how to Connect WorkDay in Power BI. We will show you step by step approach on how to call Workday SOAP API in Power BI and create Power BI reports / dashboards using imported datasets.
We will use ZappySys XML / SOAP Driver for this demonstration.
Requirements
- First, you will need to have Power BI Desktop installed
- Make sure you have ZappySys ODBC Power Pack installed
- Download and have install SoapUI
Get Started
Once above requirements are fulfilled, let’s learn how to use Workday SOAP API and import workday data in Power BI.
Here are high level steps to import Workday data in Power BI using ZappySys XML / SOAP Driver.
- Craft Workday SOAP request XML using tool like SoapUI for desired operation (e.g Get_Employee )
- Configure ODBC DSN for Workday SOAP API Connection using ZappySys XML / SOAP Driver. (Select HTTP Connection with SOAP WSS mode using workday Userid / password).
- Test SQL Query for desired SOAP API call
- Finally, Import Data in Power BI using ODBC Connection, Supply Custom SQL Query during Import Process (Crafted in previous step).
Now let’s look at each step in detail in the following sections
Craft Workday SOAP request XML using SoapUI
Now let’s look at how to use tool like SoapUI to craft SOAP API requests. It would be helpful if you can refer this article to learn more about using SoapUI tool (Check SoapUI section in that article).
Obtain Workday SOAP WSDL URL (API Metadata URL)
First step to consume workday api using SSIS is download SOAP WSDL file. WSDL is an XML file which describes available API operations in Workday. It also describes the structure of XML request / response. Here is the list of available WSDL for various Workday API Services. You can right click on WSDL icon and save to local disk or use Direct WSDL URL in next section for importing in SoapUI tool.
You can find more information about Other Workday API here.
Obtain Workday API URL
Once you have WSDL file, next step is craft correct URL for API service you like to call. Service name can be obtained from here (Check service column). Notice my-instance and my-tenantid placeholders (Its specific to your company).
Syntax:
https://<workday host name>.workday.com/ccx/service/<tenant name>/<service-name>
Example:
https://MY-INSTANCE.workday.com/ccx/service/MY-TenantID/Human_Resources
Load WSDL in SoapUI
Now it’s time to load WSDL and craft some SOAP Request and test. For detailed steps check this (watch Video to learn SoapUI tool) .
- Open SoapUI tool
- Click new File > New Soap Project
- Enter WSDL Path and Name of the project
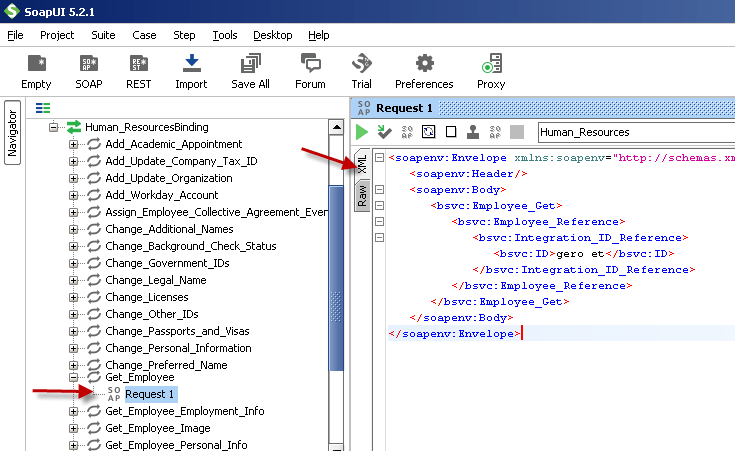
- You will see many different operations in the imported project. For example below screenshot shows Human_Resources service and Get Employee API call. You can fill out necessary parameters in your request / remove optional parameters from XML as needed.

Create SOAP Request Body from WSDL (Using SoapUI tool)
Configure Soap Request Body, URL and Credentials in SoapUI
Now it’s time to configure SOAP Request service URL and Credentials. To generate correct Credentials Header in SOAP Request use tool like SoapUI. Check this article to learn more how to generate WSS Security header.
- Go to the API method you like to call and double click on the default Request node. Check this article to learn more.
- Change default request parameters (Add /Remove as per your need). You can click on Re-generate icon in the toolbar to reset the request and create optional parameters.
- Enter the Service URL
Example: https://myinstance0001.workday.com/ccx/service/AB11111111/Human_Resources - In the properties window select WSS-Password Type as PasswordDigest, Enter workday username and password
- Once you done click Play button to execute the request. If things go well then you should see response on your right panel as below.
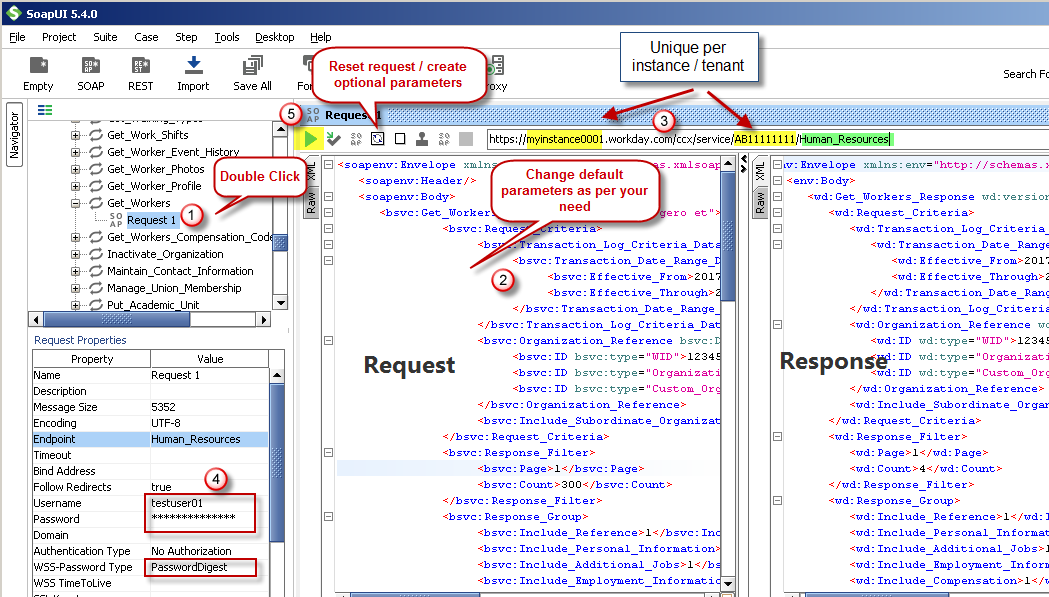
SoapUI – Call Workday SOAP API (Configure WSS Security, Service URL, Body, Test Request / Response)
Creating ODBC DSN for Workday Connection
Once you test correct parameters in your XML Request we can create ODBC DSN for Workday.
- Open start menu and search for “ODBC 64”. Launch ODBC Data sources for 64 bit

Open ODBC Data Sources from Startup menu
- Click Add and select ZappySys XML Driver
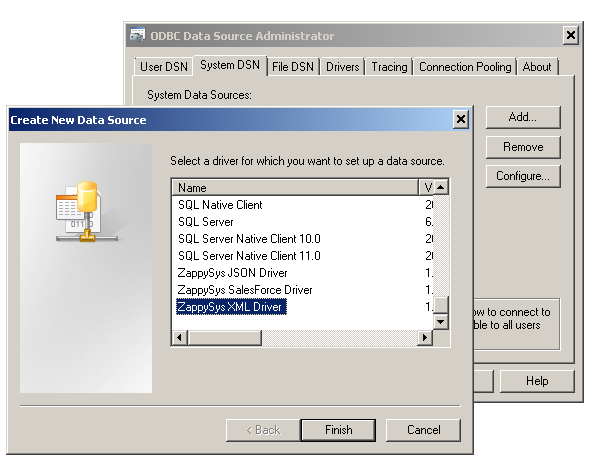
ZappySys ODBC Driver for XML / SOAP API
- Once driver UI is visible change default DSN name (e.g. change something to WorkdayDSN)
- Enter API EndPoint URL (Get it from SoapUI) and Select connection type as HTTP.
Example URL: https://YOUR-INSTANCE.workday.com/ccx/service/YOUR-TENANT/Human_Resources - Configure HTTP connection as below.
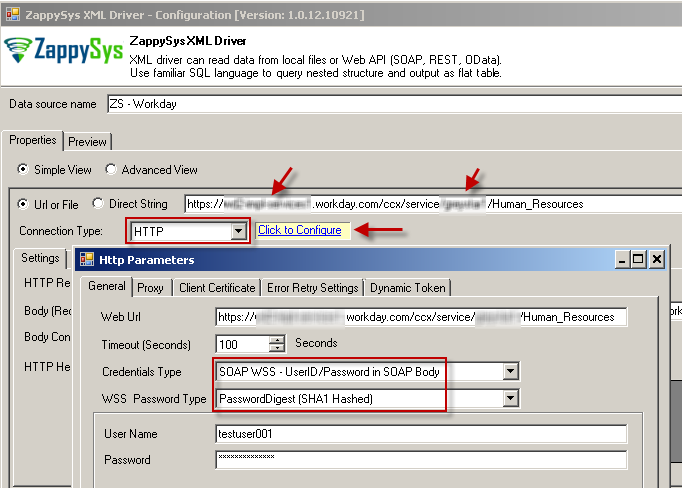
Configure Workday Connection in ODBC DSN – XML / SOAP Driver
- Click OK to save connection.
- Now Configure other settings as below.
- Select Method as POST
- Select Content Type as text/xml
- Enter one required Header for SOAP API as below
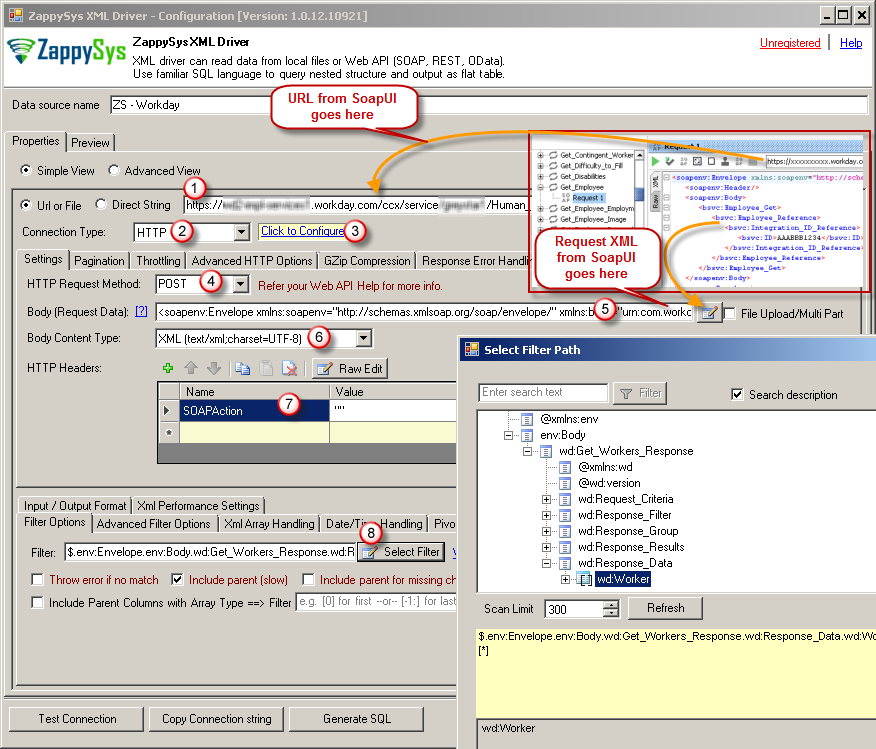
1SOAPAction : "" - Enter Body (Get it from SoapUI ). Here is example body for Get_Employee request.
NOTE: Change ID to your own record id.123456789101112<soapenv:Envelope xmlns:soapenv="http://schemas.xmlsoap.org/soap/envelope/" xmlns:bsvc="urn:com.workday/bsvc"><soapenv:Header/><soapenv:Body><bsvc:Employee_Get><bsvc:Employee_Reference><bsvc:Integration_ID_Reference><bsvc:ID>XXXX-1234-CHANGE-THIS-XXXXXXX</bsvc:ID></bsvc:Integration_ID_Reference></bsvc:Employee_Reference></bsvc:Employee_Get></soapenv:Body></soapenv:Envelope> - ( Optional ) If your API returns more than one record (e.g. if you call API like Get_Workers) then select Filter as per below screenshot (Click Yes if asked to treat selection as array). For example in below screenshot we called Get_Workers request which returns multiple records under wd:Worker node. Look for Array Icon in the Filter selection. Skip this step if no array extraction needed.
- After Configuration your screen may look like below.
Configure Workday SOAP Request – URL, Body, Filter
- Now go to Preview Tab and you will see default SQL query generated for you. Here is example query (Replace Body part as per your need)
12345678910111213141516171819202122232425SELECT * FROM $/*Below WITH clause is optional, uncomment parameter(s) values you like to setwhich are different than DSN properties.*/WITH(Src='https://xxxxxxxxxx.workday.com/ccx/service/yyyyyyyyy/Human_Resources'--,ElementsToTreatAsArray='wd:Worker'--,DataConnectionType='HTTP'--,SoapWssPasswordType='PasswordDigest'--,UserName='testuser001'--,CredentialType='SoapWss'--,Filter='$.env:Envelope.env:Body.wd:Get_Workers_Response.wd:Response_Data.wd:Worker[*]'--,RequestContentTypeCode='TextXmlUtf8'--,RequestMethod='POST'--,Header='SOAPAction: ""',RequestData='<soapenv:Envelope xmlns:soapenv="http://schemas.xmlsoap.org/soap/envelope/" xmlns:bsvc="urn:com.workday/bsvc"><soapenv:Header/><soapenv:Body>.......... .......... .................... FROM SOAPUI ................... .......... ..........</soapenv:Body></soapenv:Envelope>') - Click Preview button to see data. Copy your SQL Query for later step.
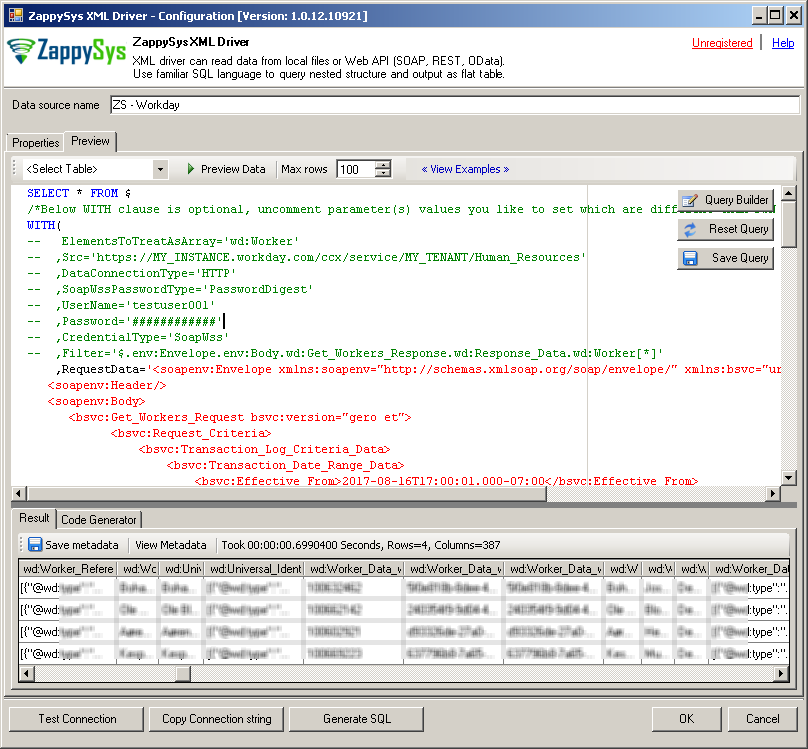
Preview Workday Data (Test SQL query for ODBC XML / SOAP Driver)
- Click OK to save DSN
Import Workday data in Power BI
Now let’s move to the final step. We will use SQL query and DSN created in previous step for data load in Power BI.
- Open Power BI Desktop
- Click on Get Data > More Data… > Other > ODBC
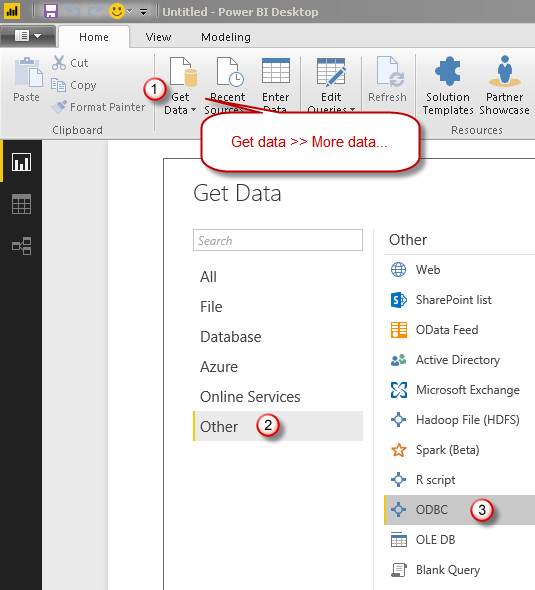
Import SOAP API in Power BI (Using ZappySys XML ODBC Driver)
- Select your ODBC DSN Source from the dropdown (Assuming you have created a ODBC Data Source using ZappySys XML Driver – See the previous Section)
- Expand Advanced Options to enter custom Query.
- Enter your SOAP API call SQL query here. For example purpose, you can use below query to get all JOB categories.
12345678910111213141516171819SELECT * FROM $WITH(Src='https://xxxxxxxxxx.workday.com/ccx/service/yyyyyyyyyy/Human_Resources'--,DataConnectionType='HTTP'--,SoapWssPasswordType='PasswordText'--,UserName='testuser001'--,Password='###########'--,CredentialType='SoapWss',RequestMethod='POST',RequestContentTypeCode='TextXmlUtf8',Filter='$.soapenv:Envelope.soapenv:Body.bsvc:Get_Job_Categories_Response.bsvc:Response_Data.bsvc:Job_Category[*]',ElementsToTreatAsArray='bsvc:Job_Category',RequestData='<soapenv:Envelope xmlns:soapenv="http://schemas.xmlsoap.org/soap/envelope/" xmlns:bsvc="urn:com.workday/bsvc"><soapenv:Body><bsvc:Get_Job_Categories_Request/></soapenv:Body></soapenv:Envelope>')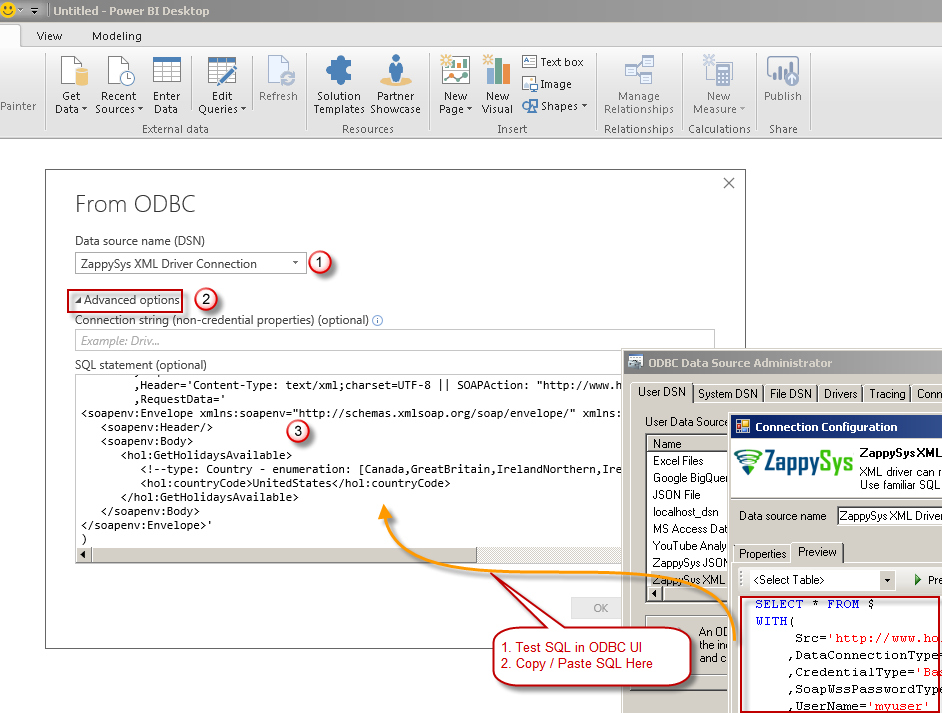
Import Workday SOAP Web Service Data in Power BI (ZappySys XML Driver)
- Once you see data preview click OK to import.
- After data import is done you can edit your dataset (e.g. remove unwanted columns)
- You can also edit Source query after data is imported (See below)
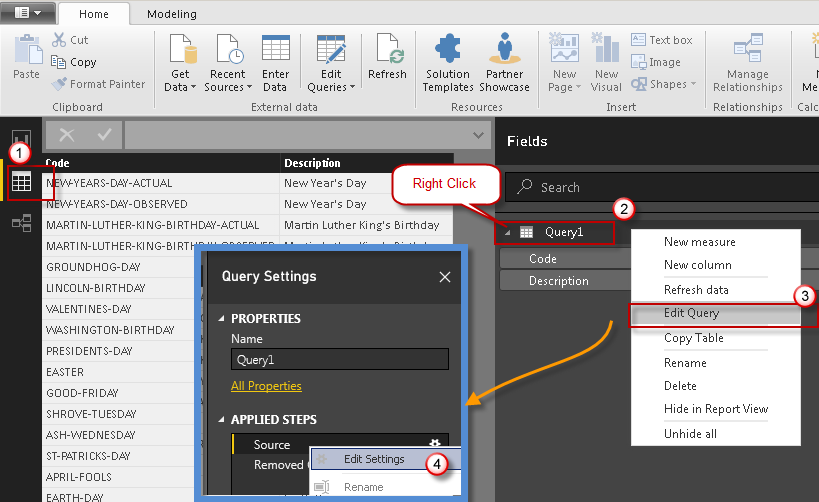
Edit Power BI Data Source SQL after REST / SOAP Web Service Import
- That’s it. You can now create your dashboards using data we just imported. See below example.
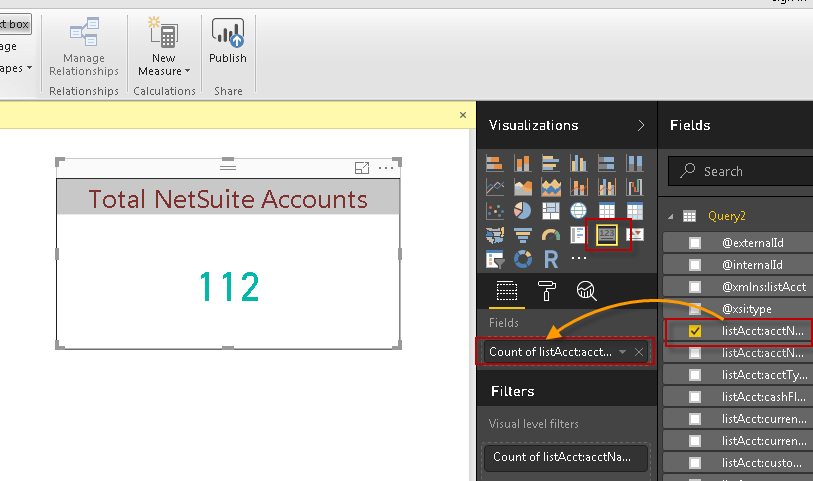
Import Workday data in Power BI dashboard
Workday API Pagination – Retrieve more than 100 rows
By default Workday API will return only 100 records unless you specify Page / Count in Response_Filter . Regardless it will only send you 999 maximum rows. To fetch more records after first page you have to setup pagination in XML Driver. Below screenshot
- Select Paging Mode= POST Data Mode
- Enter Page Number Indicator (e.g. <%page%> )
- Click browse button for Max Pages Expression (select node which indicates how many pages in response. e.g. Total_Pages)

Workday SOAP API Pagination Settings in ZappySys XML / SOAP Driver
- Once this is done go to Settings Tab. Edit your Body and make sure you supply Response_Filter. Pass Response_Filter parameter as below. See how we used <%page%> placeholder. You can use tool like fiddler to see multiple response at runtime. Run package and check fiddler. In the below example we are fetching maximum 300 rows per response. It will keep reading until all pages are done. For example if you have 1000 rows to read then it will take 4 response behind the scene.
12345678910<soapenv:Envelope xmlns:soapenv="http://schemas.xmlsoap.org/soap/envelope/" xmlns:bsvc="urn:com.workday/bsvc"><soapenv:Body><bsvc:Get_Job_Categories_Request bsvc:version=""><bsvc:Response_Filter><bsvc:Page><%page%></bsvc:Page><bsvc:Count>300</bsvc:Count></bsvc:Response_Filter></bsvc:Get_Job_Categories_Request></soapenv:Body></soapenv:Envelope>
Workday API Pagination – Supply Response_Filter (Page Size and Current Page Number)
That’s it. Now if you run your query it will fetch all pages and you can now read more than 1000 rows. Make sure you configure Count at reasonable size (Rows per Page) in above screenshot we use 5 just to demo small sample. We suggest you to to set around 300.
How to pass parameters to SQL query in Power BI
In the real world, many values of your REST / SOAP API call may be coming from Parameters. If that’s the case for you can try to edit script manually as below. In below example its calling SQL Query with POST method and passing some parameters. Notice below where paraAPIKey is Power BI Parameter (string type). You can use parameters anywhere in your script just like the normal variable.
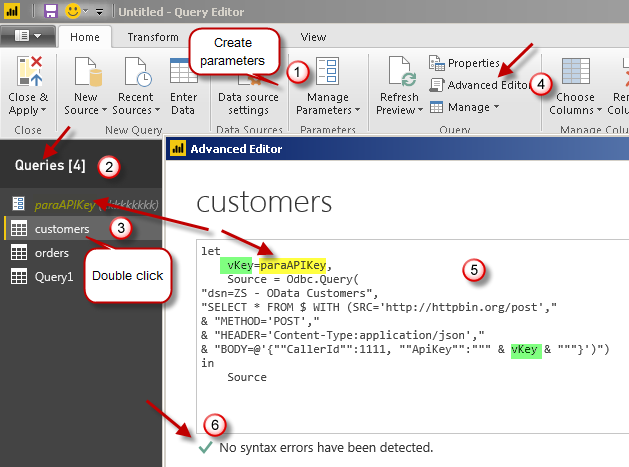
let
    vKey=paraAPIKey,
    Source = Odbc.Query(
"dsn=ZS - OData Customers",
"SELECT * FROM $ WITH (SRC='http://httpbin.org/post',"
& "METHOD='POST',"
& "HEADER='Content-Type:application/json',"
& "BODY=@'{""CallerId"":1111, ""ApiKey"":""" & vKey & """}')")
in
    Source

How to debug Web Requests using Fiddler
There will be a time you like to see RAW HTTP Requests generated by driver for NetSuite SOAP API. If you like to do that check this article.
Conclusion
Consuming data from Workday API or any XML / SOAP based API in your Reporting / ETL apps can be tricky. But we have seen how to solve this challenging task using ZappySys XML Driver in few clicks. Download ODBC PowerPack and explore many other API integration scenarios not discussed in this article.