Introduction
 Google DoubleClick is one of the most popular platforms for Advertisers. Many times you have need for custom integration or Automation for many operations. In this article we will learn how to Call Google DFP API (i.e. DoubleClick for Publishers) without coding using SSIS (Microsoft SQL Server Integration Services). In our previous article we discussed how to Integrate Google AdWords API using SSIS (Click here).
If you are new to SSIS then no worry there are plenty of tutorials for ssis
To achieve Custom integration for DoubleClick (DFP) API we will use SSIS XML Source. XML Source is part of SSIS PowerPack which has 45+ connectors and Tasks.
Prerequisite
Before you can finish tasks explained in this article you have to finish below steps. This article assumes you have basic knowledge of SSIS (SQL Server Integration Services)
- Make sure you SSIS designer installed. Sometimes its referred as BIDS or SSDT (Get from here)
- Download SSIS PowerPack
- Download SoapUI (Its free third party tool to test SOAP API). SoapUI can help you to generate XML Request BODY easily from WSDL file provided by API Vendor. You can also test your service by supplying parameters.
- Optional – Another very useful Free tool is Fiddler. You can use it to see raw request/response (Check this article)
Download DFP API Example SSIS Package
Click here to DFP API download Sample for SSIS SSIS Package (SSIS 2012, 2014, 2016)
Screenshot of Sample Package:
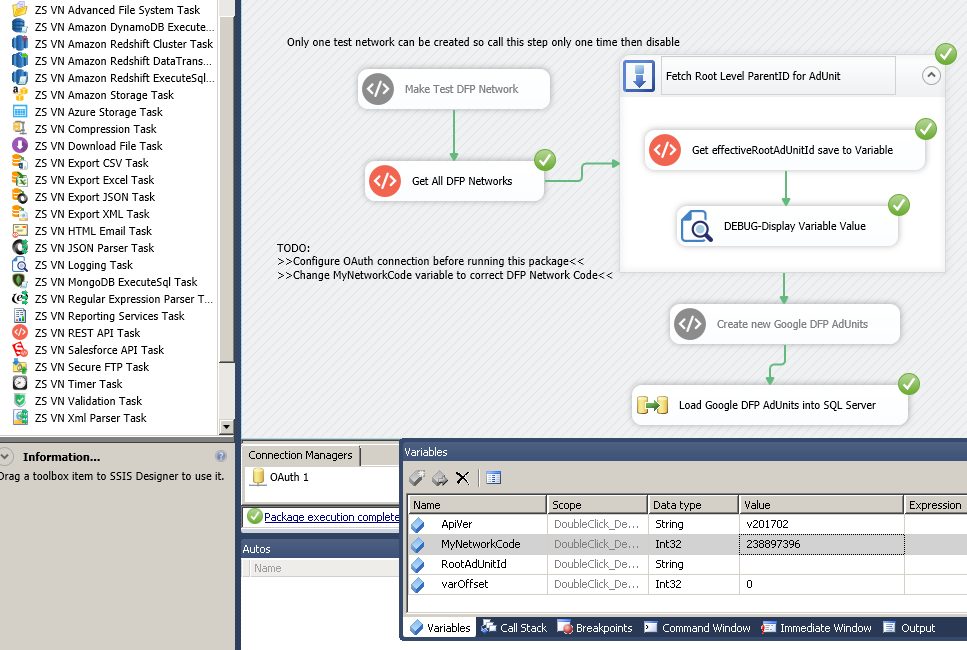
Example SSIS Package – Google DFP API Integration (Read / Write data in Google Double Click for Publisher) – No Coding required
Making your first DFP API Call using SSIS
Once you install PowerPack you are ready to execute your very first Google DFP API Call.
NOTE: If you don’t have any DFP network for test then see next section (Explains how to create test network for testing).
Lets look at how to call Google DFP API step-by-step.
- Create new SSIS Project and open package designer
- Drag ZS REST API Task from SSIS control flow toolbox and drop it on designer.
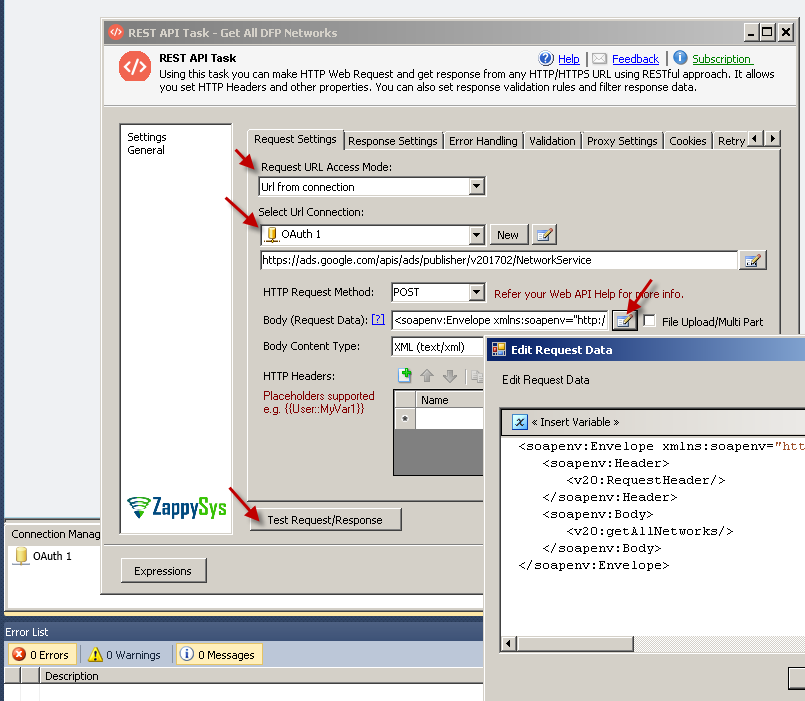
REST API Task is useful when you want to call SOAP/REST API but not necessarily parse response into rows and columns. We will look at JSON Source later in this article which can actually parse response into rows and columns (Useful to load Google DFP data into SQL Server or other RDBMS / flatfile ) - Double click REST API Task to configure. Select Access mode to [Url from Connection]
- Enter following URL in the URL Textbox
1https://ads.google.com/apis/ads/publisher/v201702/NetworkService - From the connection dialogbox select ZS-OAUTH to create new OAuth Connection for DFP API
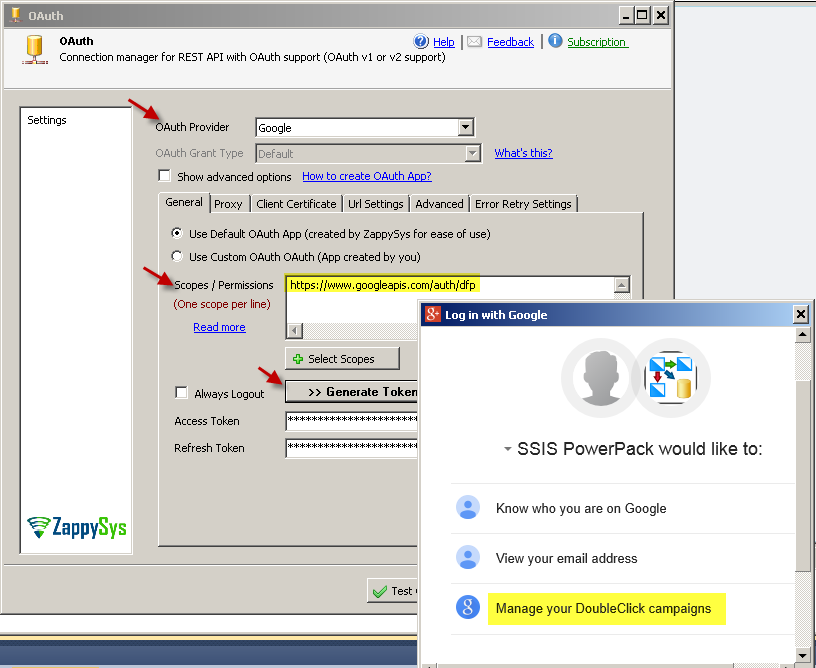
- On OAuth Connection dialogbox select Google from Provider dropdown. In this demo we will use Default OAuth App but you can register your own google OAuth app if you wish to use Custom OAuth option from UI.
- Enter following Scopes in the Scopes textbox (or select manually by clicking Select Scopes button). Scope is nothing but permission for API (In our case View/Manage DFP data and Read/Write Report Files to Cloud Storage).
1234567https://www.googleapis.com/auth/dfphttps://www.googleapis.com/auth/devstorage.read_onlyhttps://www.googleapis.com/auth/devstorage.write_onlyhttps://www.googleapis.com/auth/cloud-platform.read-onlyhttps://www.googleapis.com/auth/devstorage.full_controlhttps://www.googleapis.com/auth/cloud-platformhttps://www.googleapis.com/auth/devstorage.read_write - If you are not going call ReportService API to generate Reports in CSV format then you will need only one scope
1https://www.googleapis.com/auth/dfp - Click Generate Token button. You will see browser popup for login and then Accept option to confirm permissions like below. Once you don’t it will populate tokens and prompt to save tokens to backup file. Secure token backup to safe place.
- Once done Click Test Connection and if its green then Click OK to save connection
- Once you are back to REST API Task UI then select Method to POST
- Select Request Body Content Type to XML (i.e. text/xml)
- Click edit button next to Request Body and enter following XML.
12345678<soapenv:Envelope xmlns:soapenv="http://schemas.xmlsoap.org/soap/envelope/" xmlns:v20="https://www.google.com/apis/ads/publisher/v201702"><soapenv:Header><v20:RequestHeader/></soapenv:Header><soapenv:Body><v20:getAllNetworks/></soapenv:Body></soapenv:Envelope>If you are wondering how did we get above XML fragment then read next section about using 3rd party tool called SoapUI. Also we have detail article for calling SOAP request. Check this article on how to use SoapUI (free 3rd party tool) to create SOAP request Bodyfrom WSDL. DFP has many API endpoints for different actions (e.g. NetworkService , InventoryService , …). For each service you have different Api URL and different WSDL. In the next section you can learn how to create correct SOAP Body (for POST) using SoapUI tool.
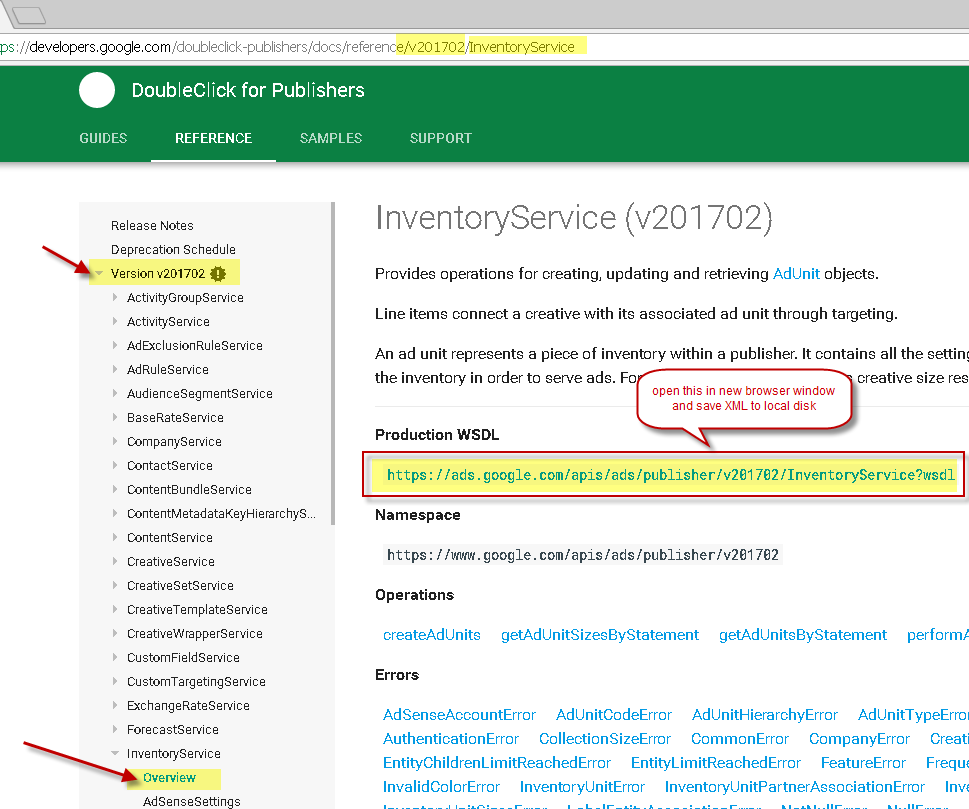
For example if you using DFP NetworkService API for version v201702 then your help page URL would be like this
https://developers.google.com/doubleclick-publishers/docs/reference/v201702/NetworkService
And on the same page you will see WSDL link below
https://adwords.google.com/api/adwords/mcm/v201609/ManagedCustomerService?wsdl
(Just download that WSDL XML and save to local disk then use with SoapUI to generate XML body to submit for any DFP API call.) - Once you done with above steps, your Task Configuration will look like below.
- Now click Test Request button. You will see Response popup with below content if its successful (Scroll at the bottom on response form and you will see XML data) .. see below
123456789101112131415161718192021222324252627282930313233343536373839404142434445464748495051525354555657585960------------------------------------Request------------------------------------POST https 1.1 ==> /apis/ads/publisher/v201702/NetworkServiceHost: ads.google.com>>>> HEADERS <<<<<Authorization: Bearer ya29.Glz-xxxxxxxxxxxxxxxxxxxxxxxxxxxxxxxxxxxxxxxxxxxContent-Type: text/xml;charset=UTF-8User-Agent: ZappySysAppHost: ads.google.comContent-Length: 291Expect: 100-continueAccept-Encoding: gzip, deflateConnection: Keep-Alive------------------------------------Response------------------------------------POST 1.1 200 OK==> OK>>>> HEADERS <<<<<Content-Encoding:X-Content-Type-Options: nosniffX-Frame-Options: SAMEORIGINX-XSS-Protection: 1; mode=blockAlt-Svc: quic=":443"; ma=2592000; v="35,34"Transfer-Encoding: chunkedCache-Control: private, max-age=0Content-Type: text/xml; charset=UTF-8Date: Sun, 26 Feb 2017 01:18:32 GMTExpires: Sun, 26 Feb 2017 01:18:32 GMTServer: GSE>>>> Cookies <<<<<>>>> CONTENT <<<<<<soap:Envelope xmlns:soap="http://schemas.xmlsoap.org/soap/envelope/"><soap:Header><ResponseHeader xmlns="https://www.google.com/apis/ads/publisher/v201702"><requestId>27ab3d2e4e1fcb8f444b317d0b0f871d</requestId><responseTime>50</responseTime></ResponseHeader></soap:Header><soap:Body><getAllNetworksResponse xmlns="https://www.google.com/apis/ads/publisher/v201702"><rval><id>551196</id><displayName>XFP sandbox property</displayName><networkCode>238897396</networkCode><propertyCode>ca-pub-2799179143725683</propertyCode><timeZone>America/New_York</timeZone><currencyCode>USD</currencyCode><effectiveRootAdUnitId>237897516</effectiveRootAdUnitId><isTest>true</isTest></rval></getAllNetworksResponse></soap:Body></soap:Envelope>
How to generate SOAP Request Body using SoapUI tool
This section describes how to create DoubleClick SOAP API Request Body (XML fragment) for any DFP SOAP API call described anywhere in this article.
- Download SoapUI (Its free third party tool to test SOAP API). SoapUI can help you to generate XML Request BODY easily from WSDL file provided by API Vendor. You can also test your service by supplying parameters.
- Now download WDSL xml for appropriate API calls you want to make. Assume that you want to call getAllNetworksResponse API found under NetworkService. For that first navigate to help file page and open help page. Make sure you select correct version from help navigation. Copy WSDL link and open in new browser window. Save XML to local disk (e.g. c:\api\dfp_networkservice_wsdl.xml (See below screenshot how to find DFP API WSDL link)
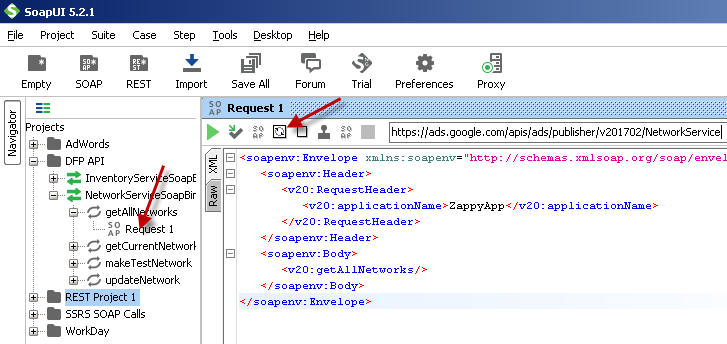
- Once SoapUI is downloaded and installed click File menu > Create New SOAP Project option
- Name your project (e.g. DFP API) and specify WSDL URL or File Path if it was saved locally (e.g. c:\api\dfp_networkservice_wsdl.xml) and click OK
- Now navigate to API Action for which you would like to get Body. Click Request node (If missing create new) and edit request. You may see XML like below (If some optional parameters not visible in XML then click Re-create request with optional parameters button from toolbar)
- Edit necessary parameters from above XML code and copy to Body of SSIS REST API Task.
Creating test network – DFP Sandbox
Very first step we recommend before testing DFP API call is create test network. You can call DFP API against LIVE network but not recommended if you are calling create/update API.
To create test network you can follow exact same steps described in the previous section except the Body step (Step#12). Use following Request body to call makeTestNetwork command.
API makeTestNetwork – Request
URL: https://ads.google.com/apis/ads/publisher/v201702/NetworkService
Body (see below):
|
1 2 3 4 5 6 7 8 |
<soapenv:Envelope xmlns:soapenv="http://schemas.xmlsoap.org/soap/envelope/" xmlns:v20="https://www.google.com/apis/ads/publisher/v201702"> <soapenv:Header> <v20:RequestHeader/> </soapenv:Header> <soapenv:Body> <v20:makeTestNetwork/> </soapenv:Body> </soapenv:Envelope> |
Once you click Test you may receive following response. Note your network code (e.g. 1122334455 from below). This network code is used in pretty much all DFP API to view or manage ad network related items or properties.
API makeTestNetwork – Response
|
1 2 3 4 5 6 7 8 9 10 11 12 13 14 15 16 17 18 19 20 21 22 |
<soap:Envelope xmlns:soap="http://schemas.xmlsoap.org/soap/envelope/"> <soap:Header> <ResponseHeader xmlns="https://www.google.com/apis/ads/publisher/v201702"> <requestId>ba61d79efee325bf4b5aa45c46836021</requestId> <responseTime>1021</responseTime> </ResponseHeader> </soap:Header> <soap:Body> <makeTestNetworkResponse xmlns="https://www.google.com/apis/ads/publisher/v201702"> <rval> <id>551196</id> <displayName>XFP sandbox property</displayName> <networkCode>1122334455</networkCode> <propertyCode>ca-pub-2799179143725683</propertyCode> <timeZone>America/Los_Angeles</timeZone> <currencyCode>USD</currencyCode> <effectiveRootAdUnitId>237897516</effectiveRootAdUnitId> <isTest>true</isTest> </rval> </makeTestNetworkResponse> </soap:Body> </soap:Envelope> |
You can also get network code using two different ways.
- Visit your DFP console homepage by visiting https://www.google.com/dfp/ and you will see network name and code in the top potion. Also its listed in the URL (e.g. https://www.google.com/dfp/1234567)
- Another way to get available networks for your login is to visit DFP API Play ground here https://dfp-playground.appspot.com/ and you will see network list in the dropdown ( name and network code)
How to Create new Ad Units
Now lets look at an example which will create few Ad Units by calling createAdUnits API. If you are creating Ad Unit at the root level then you will need to specify correct Parent ID (i.e effectiveRootAdUnitId). To obtain that Parent ID you may have to call getCurrentNetwork API. In the response you will see effectiveRootAdUnitId.
There is another way to know effectiveRootAdUnitId or Id of any Ad Units which can be Parent for new AdUnit. Goto google.com/dfp > Click Inventory Tab > Click Ad Units Side menu > Click Download ad units hyper link. You can also download AdUnits as CSV file from DFP Portal and look for Ad Units which are created at the root. Parent ID column for Root level Ad Units is basically called effectiveRootAdUnitId.
Now lets look at how to get EffectiveRootID by calling getCurrentNetwork.
API getCurrentNetwork – Request
URL: https://ads.google.com/apis/ads/publisher/v201702/NetworkService
Body (see below):
|
1 2 3 4 5 6 7 8 9 10 11 12 |
<?xml version="1.0" encoding="utf-8"?> <soap:Envelope xmlns:soap="http://schemas.xmlsoap.org/soap/envelope/" xmlns:xsi="http://www.w3.org/2001/XMLSchema-instance" xmlns:xsd="http://www.w3.org/2001/XMLSchema"> <soap:Header> <RequestHeader xmlns="https://www.google.com/apis/ads/publisher/v201608"> <networkCode xmlns="https://www.google.com/apis/ads/publisher/v201608">1122334455</networkCode> <applicationName xmlns="https://www.google.com/apis/ads/publisher/v201608">ZappySysApp</applicationName> </RequestHeader> </soap:Header> <soap:Body> <getCurrentNetwork xmlns="https://www.google.com/apis/ads/publisher/v201608" /> </soap:Body> </soap:Envelope> |
API getCurrentNetwork – Response
|
1 2 3 4 5 6 7 8 9 10 11 12 13 14 15 16 17 18 19 20 21 22 |
<soap:Envelope xmlns:soap="http://schemas.xmlsoap.org/soap/envelope/"> <soap:Header> <ResponseHeader xmlns="https://www.google.com/apis/ads/publisher/v201608"> <requestId>81d1b00e8fbfb862129eb2dd485cf7bb</requestId> <responseTime>4507</responseTime> </ResponseHeader> </soap:Header> <soap:Body> <getCurrentNetworkResponse xmlns="https://www.google.com/apis/ads/publisher/v201608"> <rval> <id>551196</id> <displayName>XFP sandbox property</displayName> <networkCode>1122334455</networkCode> <propertyCode>ca-pub-2799179143725683</propertyCode> <timeZone>America/New_York</timeZone> <currencyCode>USD</currencyCode> <effectiveRootAdUnitId>237897516</effectiveRootAdUnitId> <isTest>true</isTest> </rval> </getCurrentNetworkResponse> </soap:Body> </soap:Envelope> |
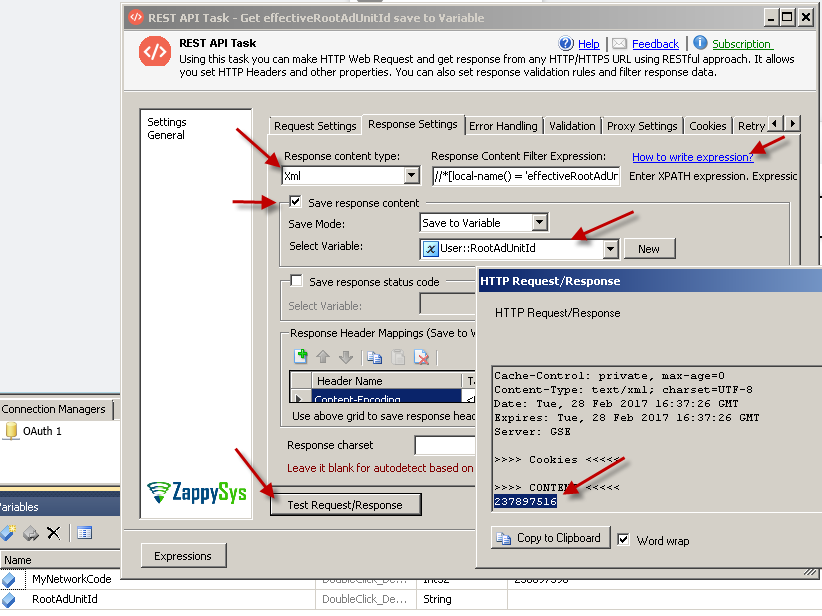
If you want to save single Element Value from Response into SSIS Variable then perform following steps (example of how to get just effectiveRootAdUnitId from above response)
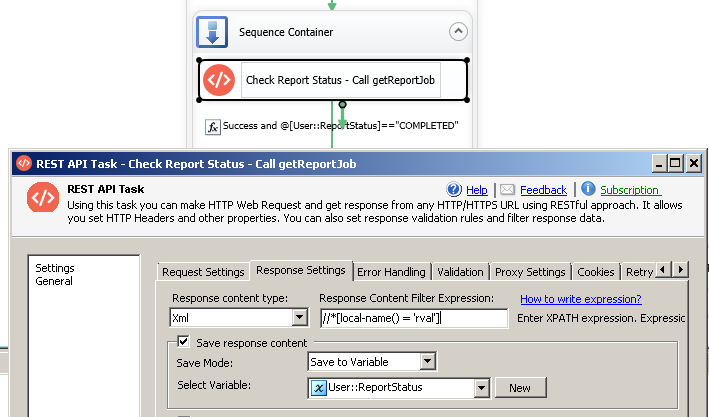
- On REST API Task > Go to Response Tab > Select Response Content Type = XML
- Enter following expression in the XPath filter
1//*[local-name() = 'effectiveRootAdUnitId'] - Check Save response content option
- Select Variable from Dropdown – Click New Variable > Name it RootAdUnitId.
- Click Test Request Button to test…. In the content textbox you will now see only Numeric value extracted by Filter
Once you know Parent ID for your AdUnit now lets look at how to create Ad Units by calling createAdUnits
API createAdUnits – Request
URL: https://ads.google.com/apis/ads/publisher/v201702/InventoryService
Body (see below):
|
1 2 3 4 5 6 7 8 9 10 11 12 13 14 15 16 17 18 19 20 21 22 23 24 25 26 27 28 29 30 31 32 33 34 35 36 37 38 39 |
<?xml version="1.0" encoding="utf-8"?> <soap:Envelope xmlns:soap="http://schemas.xmlsoap.org/soap/envelope/" xmlns:xsi="http://www.w3.org/2001/XMLSchema-instance" xmlns:xsd="http://www.w3.org/2001/XMLSchema"> <soap:Header> <RequestHeader xmlns="https://www.google.com/apis/ads/publisher/v201608"> <networkCode xmlns="https://www.google.com/apis/ads/publisher/v201608">1122334455</networkCode> <applicationName xmlns="https://www.google.com/apis/ads/publisher/v201608">ZappySysApp</applicationName> </RequestHeader> </soap:Header> <soap:Body> <createAdUnits xmlns="https://www.google.com/apis/ads/publisher/v201608"> <adUnits> <parentId>237897516</parentId> <name>Ad_Unit_0</name> <description>Ad unit description #0.</description> <targetWindow>BLANK</targetWindow> <adUnitSizes> <size> <width>300</width> <height>250</height> </size> <environmentType>BROWSER</environmentType> </adUnitSizes> </adUnits> <adUnits> <parentId>237897516</parentId> <name>Ad_Unit_1</name> <description>Ad unit description #1.</description> <targetWindow>BLANK</targetWindow> <adUnitSizes> <size> <width>300</width> <height>250</height> </size> <environmentType>BROWSER</environmentType> </adUnitSizes> </adUnits> </createAdUnits> </soap:Body> </soap:Envelope> |
API createAdUnits – Response
|
1 2 3 4 5 6 7 8 9 10 11 12 13 14 15 16 17 18 19 20 21 22 23 24 25 26 27 28 29 30 31 32 33 34 35 36 37 38 39 40 41 42 43 44 45 46 47 48 49 50 51 52 53 54 55 56 57 58 59 60 61 62 63 64 65 66 67 68 69 70 71 72 73 74 75 76 77 78 79 80 81 82 83 84 85 86 87 88 89 90 91 92 93 94 95 96 97 98 99 100 101 102 103 104 105 106 107 108 109 110 111 112 113 114 115 116 117 118 119 120 121 122 123 124 125 126 127 128 129 130 131 132 133 134 135 136 137 138 139 140 141 142 143 144 145 146 147 148 149 150 151 152 153 154 155 156 157 158 159 160 161 162 163 164 165 166 167 168 169 170 171 172 173 |
<soap:Envelope xmlns:soap="http://schemas.xmlsoap.org/soap/envelope/"> <soap:Header> <ResponseHeader xmlns="https://www.google.com/apis/ads/publisher/v201608"> <requestId>b244d7ba9b65e96fc42b849a7bfb16e4</requestId> <responseTime>331</responseTime> </ResponseHeader> </soap:Header> <soap:Body> <createAdUnitsResponse xmlns="https://www.google.com/apis/ads/publisher/v201608"> <rval> <id>252312396</id> <parentId>237897516</parentId> <hasChildren>false</hasChildren> <parentPath> <id>237897516</id> <name>ca-pub-2799179143725683</name> <adUnitCode>ca-pub-2799179143725683</adUnitCode> </parentPath> <name>Ad_Unit_0</name> <description>Ad unit description#0.</description> <targetWindow>BLANK</targetWindow> <status>ACTIVE</status> <adUnitCode>253312396</adUnitCode> <adUnitSizes> <size> <width>300</width> <height>250</height> <isAspectRatio>false</isAspectRatio> </size> <environmentType>BROWSER</environmentType> <fullDisplayString>300x250</fullDisplayString> </adUnitSizes> <mobilePlatform>SITE</mobilePlatform> <explicitlyTargeted>false</explicitlyTargeted> <inheritedAdSenseSettings> <value> <adSenseEnabled>true</adSenseEnabled> <borderColor>FFFFFF</borderColor> <titleColor>0000FF</titleColor> <backgroundColor>FFFFFF</backgroundColor> <textColor>000000</textColor> <urlColor>008000</urlColor> <adType>TEXT_AND_IMAGE</adType> <borderStyle>DEFAULT</borderStyle> <fontFamily>DEFAULT</fontFamily> <fontSize>DEFAULT</fontSize> </value> </inheritedAdSenseSettings> <lastModifiedDateTime> <date> <year>2017</year> <month>2</month> <day>27</day> </date> <hour>7</hour> <minute>23</minute> <second>32</second> <timeZoneID>PST8PDT</timeZoneID> </lastModifiedDateTime> <smartSizeMode>NONE</smartSizeMode> <isSharedByDistributor>false</isSharedByDistributor> <isSetTopBoxEnabled>false</isSetTopBoxEnabled> </rval> <rval> <id>252312516</id> <parentId>237897516</parentId> <hasChildren>false</hasChildren> <parentPath> <id>237897516</id> <name>ca-pub-2799179143725683</name> <adUnitCode>ca-pub-2799179143725683</adUnitCode> </parentPath> <name>Ad_Unit_1</name> <description>Ad unit description#2.</description> <targetWindow>BLANK</targetWindow> <status>ACTIVE</status> <adUnitCode>253312516</adUnitCode> <adUnitSizes> <size> <width>300</width> <height>250</height> <isAspectRatio>false</isAspectRatio> </size> <environmentType>BROWSER</environmentType> <fullDisplayString>300x250</fullDisplayString> </adUnitSizes> <mobilePlatform>SITE</mobilePlatform> <explicitlyTargeted>false</explicitlyTargeted> <inheritedAdSenseSettings> <value> <adSenseEnabled>true</adSenseEnabled> <borderColor>FFFFFF</borderColor> <titleColor>0000FF</titleColor> <backgroundColor>FFFFFF</backgroundColor> <textColor>000000</textColor> <urlColor>008000</urlColor> <adType>TEXT_AND_IMAGE</adType> <borderStyle>DEFAULT</borderStyle> <fontFamily>DEFAULT</fontFamily> <fontSize>DEFAULT</fontSize> </value> </inheritedAdSenseSettings> <lastModifiedDateTime> <date> <year>2017</year> <month>2</month> <day>27</day> </date> <hour>7</hour> <minute>23</minute> <second>32</second> <timeZoneID>PST8PDT</timeZoneID> </lastModifiedDateTime> <smartSizeMode>NONE</smartSizeMode> <isSharedByDistributor>false</isSharedByDistributor> <isSetTopBoxEnabled>false</isSetTopBoxEnabled> </rval> <id>252312876</id> <parentId>237897516</parentId> <hasChildren>false</hasChildren> <parentPath> <id>237897516</id> <name>ca-pub-2799179143725683</name> <adUnitCode>ca-pub-2799179143725683</adUnitCode> </parentPath> <name>Ad_Unit_4</name> <description>Ad unit description.</description> <targetWindow>BLANK</targetWindow> <status>ACTIVE</status> <adUnitCode>253312876</adUnitCode> <adUnitSizes> <size> <width>300</width> <height>250</height> <isAspectRatio>false</isAspectRatio> </size> <environmentType>BROWSER</environmentType> <fullDisplayString>300x250</fullDisplayString> </adUnitSizes> <mobilePlatform>SITE</mobilePlatform> <explicitlyTargeted>false</explicitlyTargeted> <inheritedAdSenseSettings> <value> <adSenseEnabled>true</adSenseEnabled> <borderColor>FFFFFF</borderColor> <titleColor>0000FF</titleColor> <backgroundColor>FFFFFF</backgroundColor> <textColor>000000</textColor> <urlColor>008000</urlColor> <adType>TEXT_AND_IMAGE</adType> <borderStyle>DEFAULT</borderStyle> <fontFamily>DEFAULT</fontFamily> <fontSize>DEFAULT</fontSize> </value> </inheritedAdSenseSettings> <lastModifiedDateTime> <date> <year>2017</year> <month>2</month> <day>27</day> </date> <hour>7</hour> <minute>23</minute> <second>32</second> <timeZoneID>PST8PDT</timeZoneID> </lastModifiedDateTime> <smartSizeMode>NONE</smartSizeMode> <isSharedByDistributor>false</isSharedByDistributor> <isSetTopBoxEnabled>false</isSetTopBoxEnabled> </rval> </createAdUnitsResponse> </soap:Body> </soap:Envelope> |
Loading Google DoubleClick data into SQL Server Table
So far we saw how to make simple DFP API calls without doing any parsing. Now lets look at how to use SSIS XML Source which not only make API calls but it will parse XML Response into rows and columns which can be loaded into target database such as SQL Server, Oracle, MySQL or even Flat File. XML Source also supports pagination so if you have many records it will automatically loop through all response untill all records are fetched.
Step-By-Step – Using XML Source to read Google DFP data (Parse into rows and columns)
- Assuming you have tested your first DFP API Call (Explianed in the beginning of this article). You must have OAuth connection tested for API call.
- Drag new Data flow task from SSIS Toolbox
- Inside Data flow designer drag and drop ZS XML Source from toolbox
- Double click XML Source to configure.
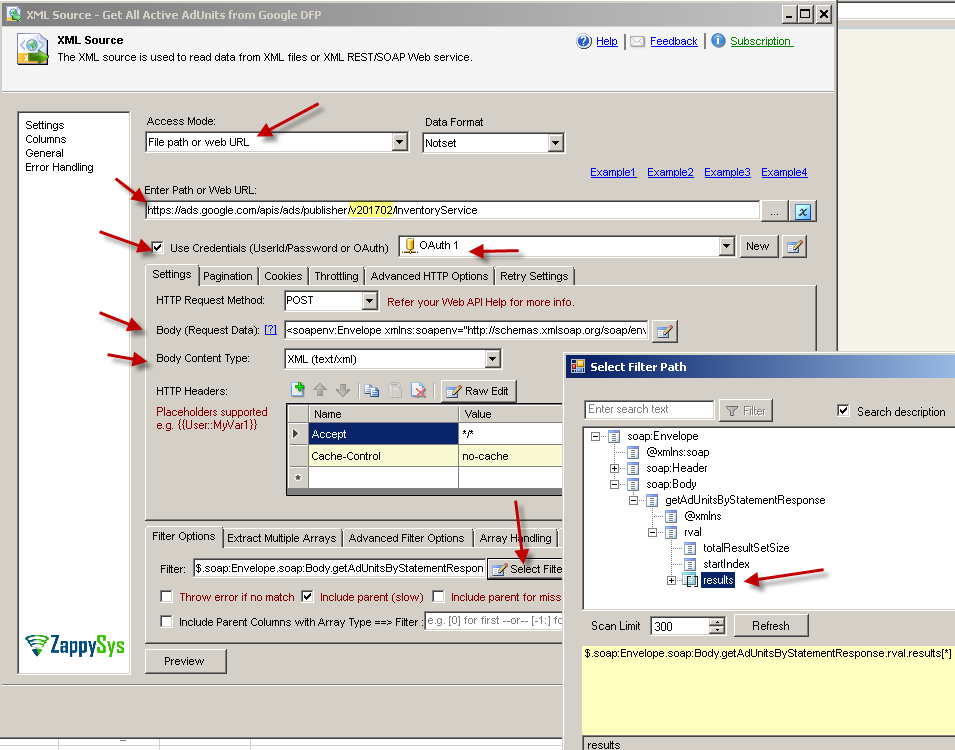
- Set URL as below
https://ads.google.com/apis/ads/publisher/v201702/InventoryService - Check Use credentials option and from Drop down select OAuth connection manager (created in previous section)
- Select Method = POST,
- Select Request Content Type = XML (text/xml)
- Enter Body as below (Click edit button).
Notice that in above we calling getAdUnitsByStatement API to fetch all Ad Units which are Active. Here is more information about Query Syntax for any API call getXXXXXXByStaement123456789101112131415<soapenv:Envelope xmlns:soapenv="http://schemas.xmlsoap.org/soap/envelope/" xmlns:v20="https://www.google.com/apis/ads/publisher/v201702"><soapenv:Header><v20:RequestHeader><v20:networkCode>238897396</v20:networkCode><v20:applicationName>ZappySysApp</v20:applicationName></v20:RequestHeader></soapenv:Header><soapenv:Body><v20:getAdUnitsByStatement><v20:filterStatement><v20:query>WHERE Status='ACTIVE'</v20:query></v20:filterStatement></v20:getAdUnitsByStatement></soapenv:Body></soapenv:Envelope> - Now click on Select Filter button and select results node and click OK. If prompted add array to list.
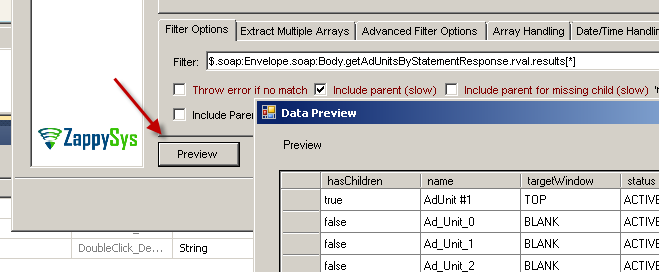
- Click Preview to see data. Click Columns tab to review data types (Auto detected). If you wish to change length or datatype then edit there and check Lock option (Last column)
- Click OK to save UI
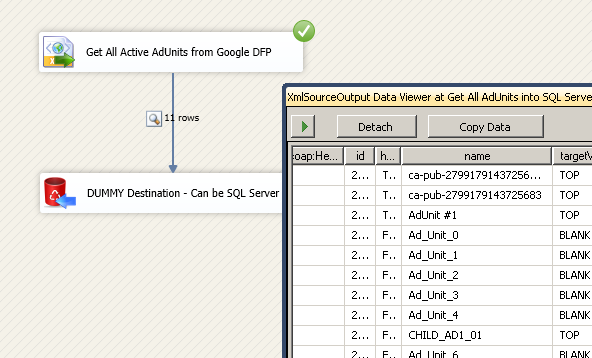
- Connect XML Source to same target (e.g. OLEDB Destination – SQL Server Connection)
- Run data flow
Configure Pagination for Google DFP API / PQL Query result
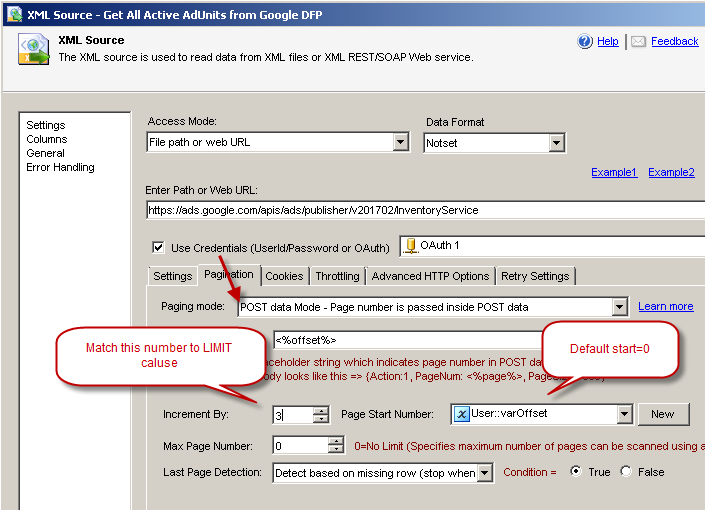
If you have large dataset to read from DoubleClick API ( when calling API such as getxxxxxxByStatement) then we recommend to supply LIMIT and OFFSET clause in your PQL query.
For example if you have 2000 ad units and you want to limit response size by maximum 300 rows then your query can be like below
|
1 2 3 4 5 6 7 8 9 10 |
--For first request (returns results 1-300) WHERE Status='ACTIVE' LIMIT 300 OFFSET 0 --For second request (returns results 301-600) WHERE Status='ACTIVE' LIMIT 300 OFFSET 300 --For third request (returns results 601-900) WHERE Status='ACTIVE' LIMIT 300 OFFSET 600 ........ |
This looping logic can be complex to implement if you do manually. But no worry if you are using SSIS XML Source. It comes with many pagination options (Click here to read more about pagination)
See below screenshot how to configure Pagination options for Google DoubleClick API. Basically two places you have to change. Inside body you have to set placeholder and change few settings on Pagination Tab.
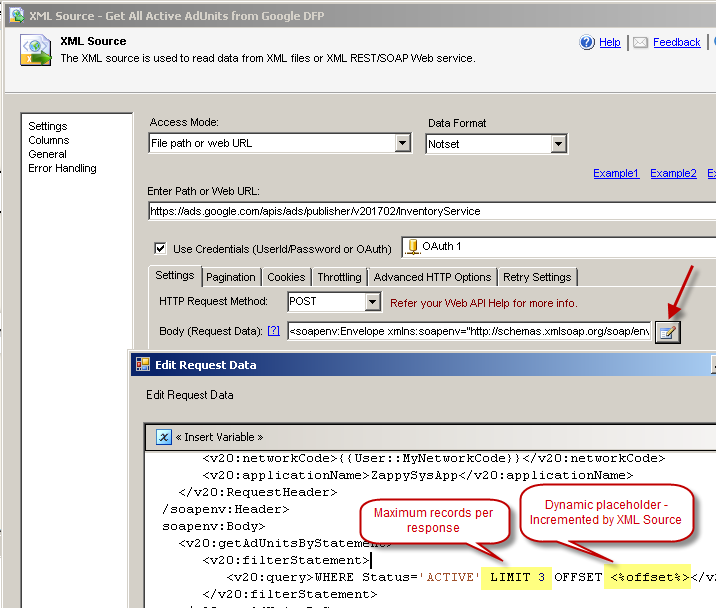
SSIS XML Source – Configure Pagination for Google DoubleClick API data fetch – PQL LIMIT and OFFSET clause for Google DFP API
Create CSV Report File and Download in GZip format (*.gz)
Sometime you have to download large amount of data (Possibly millions of rows) in that case Bulk approach would be better. DFP ReportService API allows to call following APIs which can be used to produce CSV report file in *.gz format and then you can download it using REST API Task.
Below are high level steps you have to perform to produce report file and download it.
- Create the ReportJob by invoking runReportJob command .
- Poll the ReportJob object using ReportService.getReportJob (This is required because file is not available right away) .
- Continue to poll the ReportJob object until the reportJobStatus field is equal to COMPLETED or FAILED.
- If successful, fetch the URL for downloading the report by invoking getReportDownloadURL.
Here is the sample SSIS Package to Perform this Action.
Click here to DFP API download Sample for SSIS SSIS Package (SSIS 2012, 2014, 2016)
See below screenshot how to generate Google DFP Report File and download / extract (Unzip) using Drag and Drop SSIS workflow.
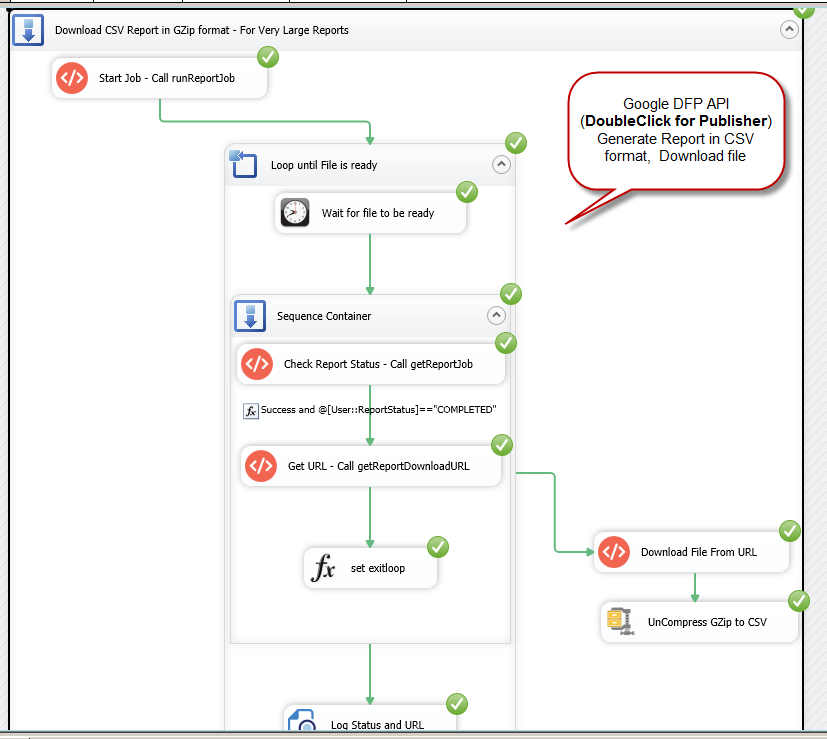
Create Google DFP Report File (CSV / Gzip) and Download Using SSIS (Example of ReportService functions runReportJob, getReportJob and .getReportDownloadURL)
Call runReportJob (Start DFP Report JOB)
Very first step to produce DFP Report file is call ReportService >> runReportJob API. See below Command.
Extract Single XML Node Value from SOAP API Response using XPATH
Once you get response you can extract id of your JOB using XPAth Expression (See REST API Task response settings tab. Change Format to XML and type following XPATH expression. This will look for <id>111111</id> node anywhere in SOAP response XML and extract value (i.e. 111111 ) .. For screenshot see next section
|
1 |
//*[local-name() = 'id'] |
Request
|
1 2 3 4 5 6 7 8 9 10 11 12 13 14 15 16 17 18 19 20 21 22 23 24 25 26 27 28 29 30 31 32 33 34 35 36 |
POST https://ads.google.com/apis/ads/publisher/v201702/ReportService HTTP/1.1 Authorization: Bearer ya29.xxxxxxxxxxxxxxxxxxxxxAKqG89gM-TpReRXO User-Agent: ZappySysApp/1.0.2017.10531 Content-Type: text/xml Accept: */* Cache-Control: no-cache Host: ads.google.com Content-Length: 1018 Expect: 100-continue Accept-Encoding: gzip, deflate <soapenv:Envelope xmlns:soapenv="http://schemas.xmlsoap.org/soap/envelope/" xmlns:v20="https://www.google.com/apis/ads/publisher/v201702"> <soapenv:Header> <v20:RequestHeader> <v20:networkCode>238897396</v20:networkCode> <v20:applicationName>ZappySysApp</v20:applicationName> </v20:RequestHeader> </soapenv:Header> <soapenv:Body> <v20:runReportJob> <v20:reportJob> <v20:reportQuery> <v20:dimensions>DATE</v20:dimensions> <v20:dimensions>LINE_ITEM_ID</v20:dimensions> <v20:dimensions>LINE_ITEM_NAME</v20:dimensions> <v20:dimensions>AD_UNIT_NAME</v20:dimensions> <v20:columns>AD_SERVER_IMPRESSIONS</v20:columns> <v20:columns>AD_SERVER_CLICKS</v20:columns> <v20:dimensionAttributes>LINE_ITEM_COST_TYPE</v20:dimensionAttributes> <v20:dimensionAttributes>LINE_ITEM_GOAL_QUANTITY</v20:dimensionAttributes> <v20:dateRangeType>LAST_MONTH</v20:dateRangeType> </v20:reportQuery> </v20:reportJob> </v20:runReportJob> </soapenv:Body> </soapenv:Envelope> |
Response
|
1 2 3 4 5 6 7 8 9 10 11 12 13 14 15 16 17 18 19 20 21 22 23 24 25 26 27 28 29 30 31 32 33 34 35 36 37 38 39 40 41 |
HTTP/1.1 200 OK Content-Type: text/xml; charset=UTF-8 Date: Fri, 02 Jun 2017 21:23:41 GMT Expires: Fri, 02 Jun 2017 21:23:41 GMT Cache-Control: private, max-age=0 X-Content-Type-Options: nosniff X-Frame-Options: SAMEORIGIN X-XSS-Protection: 1; mode=block Server: GSE Alt-Svc: quic=":443"; ma=2592000; v="38,37,36,35" Content-Length: 999 <soap:Envelope xmlns:soap="http://schemas.xmlsoap.org/soap/envelope/"> <soap:Header> <ResponseHeader xmlns="https://www.google.com/apis/ads/publisher/v201702"> <requestId>f03e7e474fde2a5f9c5d7c9d7eb83923</requestId> <responseTime>846</responseTime> </ResponseHeader> </soap:Header> <soap:Body> <runReportJobResponse xmlns="https://www.google.com/apis/ads/publisher/v201702"> <rval> <id>10000297829</id> <reportQuery> <dimensions>DATE</dimensions> <dimensions>LINE_ITEM_ID</dimensions> <dimensions>LINE_ITEM_NAME</dimensions> <dimensions>AD_UNIT_NAME</dimensions> <adUnitView>TOP_LEVEL</adUnitView> <columns>AD_SERVER_IMPRESSIONS</columns> <columns>AD_SERVER_CLICKS</columns> <dimensionAttributes>LINE_ITEM_COST_TYPE</dimensionAttributes> <dimensionAttributes>LINE_ITEM_GOAL_QUANTITY</dimensionAttributes> <dateRangeType>LAST_MONTH</dateRangeType> <useSalesLocalTimeZone>false</useSalesLocalTimeZone> <includeZeroSalesRows>false</includeZeroSalesRows> </reportQuery> </rval> </runReportJobResponse> </soap:Body> </soap:Envelope> |
Call getReportJob (Poll JOB Status)
Second step is to make sure is Report Status check. For large report it make take several seconds or minutes before you can get Download URL (See Next Step). If you try to call Next step before Report is ready then you may get error. So better to add Polling logic.
Extract Single XML Node Value from SOAP API Response using XPATH
Once you get response you can extract status of your JOB using XPAth Expression (See REST API Task response settings tab. Change Format to XML and type following XPATH expression. This will look for <rval>IN_PROGRESS</rval> node anywhere in SOAP response XML and extract value (i.e. IN_PROGRESS )
|
1 |
//*[local-name() = 'rval'] |
Request
|
1 2 3 4 5 6 7 8 9 10 11 12 13 14 15 16 17 18 19 20 21 22 23 24 |
POST https://ads.google.com/apis/ads/publisher/v201702/ReportService HTTP/1.1 Authorization: Bearer ya29.xxxxxxxxxxxxxxxxxxXmWqmq User-Agent: ZappySysApp/1.0.2017.10531 Content-Type: text/xml Accept: */* Cache-Control: no-cache Host: ads.google.com Content-Length: 524 Expect: 100-continue Accept-Encoding: gzip, deflate <soapenv:Envelope xmlns:soapenv="http://schemas.xmlsoap.org/soap/envelope/" xmlns:v20="https://www.google.com/apis/ads/publisher/v201702"> <soapenv:Header> <v20:RequestHeader> <v20:networkCode>238897396</v20:networkCode> <v20:applicationName>ZappySysApp</v20:applicationName> </v20:RequestHeader> </soapenv:Header> <soapenv:Body> <v20:getReportJobStatus> <v20:reportJobId>10000297829</v20:reportJobId> </v20:getReportJobStatus> </soapenv:Body> </soapenv:Envelope> |
Response
|
1 2 3 4 5 6 7 8 9 10 11 12 13 14 15 16 17 18 19 20 21 22 23 24 25 |
HTTP/1.1 200 OK Content-Type: text/xml; charset=UTF-8 Date: Fri, 02 Jun 2017 21:23:47 GMT Expires: Fri, 02 Jun 2017 21:23:47 GMT Cache-Control: private, max-age=0 X-Content-Type-Options: nosniff X-Frame-Options: SAMEORIGIN X-XSS-Protection: 1; mode=block Server: GSE Alt-Svc: quic=":443"; ma=2592000; v="38,37,36,35" Content-Length: 451 <soap:Envelope xmlns:soap="http://schemas.xmlsoap.org/soap/envelope/"> <soap:Header> <ResponseHeader xmlns="https://www.google.com/apis/ads/publisher/v201702"> <requestId>d52cb3a3d68af24aec2f9b0284379700</requestId> <responseTime>803</responseTime> </ResponseHeader> </soap:Header> <soap:Body> <getReportJobStatusResponse xmlns="https://www.google.com/apis/ads/publisher/v201702"> <rval>COMPLETED</rval> </getReportJobStatusResponse> </soap:Body> </soap:Envelope> |
Call getReportDownloadURL (Get Download URL)
Once you get status = COMPLETED in above API Call (i.e. getReportJobStatus) then you ready to call getReportDownloadURL to fetch URL which you can download.
Here is the API sample Request and Response
Request
|
1 2 3 4 5 6 7 8 9 10 11 12 13 14 15 16 17 18 19 20 21 22 23 24 25 |
POST https://ads.google.com/apis/ads/publisher/v201702/ReportService HTTP/1.1 Authorization: Bearer ya29.xxxxxxxxxxxxxxxxxxBp84ltTNyVRb9hlUEWx User-Agent: ZappySysApp/1.0.2017.10531 Content-Type: text/xml Accept: */* Cache-Control: no-cache Host: ads.google.com Content-Length: 581 Expect: 100-continue Accept-Encoding: gzip, deflate <soapenv:Envelope xmlns:soapenv="http://schemas.xmlsoap.org/soap/envelope/" xmlns:v20="https://www.google.com/apis/ads/publisher/v201702"> <soapenv:Header> <v20:RequestHeader> <v20:networkCode>238897396</v20:networkCode> <v20:applicationName>ZappySysApp</v20:applicationName> </v20:RequestHeader> </soapenv:Header> <soapenv:Body> <v20:getReportDownloadURL> <v20:reportJobId>10000297829</v20:reportJobId> <v20:exportFormat>CSV_DUMP</v20:exportFormat> </v20:getReportDownloadURL> </soapenv:Body> </soapenv:Envelope> |
Response
|
1 2 3 4 5 6 7 8 9 10 11 12 13 14 15 16 17 18 19 20 21 22 23 24 25 |
HTTP/1.1 200 OK Content-Type: text/xml; charset=UTF-8 Date: Fri, 02 Jun 2017 21:23:49 GMT Expires: Fri, 02 Jun 2017 21:23:49 GMT Cache-Control: private, max-age=0 X-Content-Type-Options: nosniff X-Frame-Options: SAMEORIGIN X-XSS-Protection: 1; mode=block Server: GSE Alt-Svc: quic=":443"; ma=2592000; v="38,37,36,35" Content-Length: 1039 <soap:Envelope xmlns:soap="http://schemas.xmlsoap.org/soap/envelope/"> <soap:Header> <ResponseHeader xmlns="https://www.google.com/apis/ads/publisher/v201702"> <requestId>8e5ac0bbeb8e88c180ea442fc5378d99</requestId> <responseTime>1957</responseTime> </ResponseHeader> </soap:Header> <soap:Body> <getReportDownloadURLResponse xmlns="https://www.google.com/apis/ads/publisher/v201702"> <rval>https://storage.googleapis.com/dfp-report-export/caxxxxxxxx-xxxxxxxxxxxxxxb?GoogleAccessId=3769xxxxxxxxxxx-qxxxxxxxxxxxxxxxxsqdb5dvi8g@developer.gserviceaccount.com&Expires=1496438929&Signature=vnhCiAIqd%2BFgWCtAHo9roFOI3W%2BveUTYuSvyBQ9gtMI2HDTXOCVDh7wzUV%2BPBJZZghaL6k8wKYq33GA4NpjZVNYuaAgPLWgGwAUPdtioHRi%2Bt3Eymp%2FAPRGIoos0ekP3O7l%2FPNPxenC6UTP087HV3j06V%2Fuui9ixpKZWGCK8r56oUPj6S8q1hG95Ns3d3sEcuz3%2BkShu6GYG5mqir5vjtZPuzwsr%2F96G5Kk123mke%2B%2FIVRJGoqnCMghNWtIG1yR1IdZx%2FIpit%2FnaJ9HP6IvAr3oMIXkQ3cHv%2FtOhXGy9dTG34q%2FKDbtkSJAayHgjlSLPGKucygcXBhUrbywBu8Y77A%3D%3D</rval> </getReportDownloadURLResponse> </soap:Body> </soap:Envelope> |
Extract Single XML Node Value from SOAP API Response using XPATH
Once you get response you can extract status of your JOB using XPAth Expression (See REST API Task response settings tab. Change Format to XML and type following XPATH expression. This will look for <rval>https://storage.googleapis.com/dfp-report-export/caxx……….</rval> node anywhere in SOAP response XML and extract value (i.e. URL)
Download File Using REST API Task
Once you get URL its time to download it. You can use REST API Task to download the file. On Response Setting Tab specify full file path (e.g. c:\report_csv.gz) and make sure Binary option is checked (Found next to the Save Path)
Making things dynamic
If you want to supply certain parameters at runtime (e.g. from SSIS Variable) rather than hard code then you can use Variable Placeholders any where in Request Body, URL or Headers. Click Insert Variable option found in Edit screen
Here is an example of dynamic URL (API Version stored in SSIS Variable)
|
1 |
https://ads.google.com/apis/ads/publisher/{{User::ApiVer}}/NetworkService |
Deployment to Production
When you ready to deploy your SSIS Package to production make sure to change Test NetworkCode supplied inside Request Body to your Production Ad Network. Also Set RefreshToken Property of OAuth Connection Manager (Get it from Backup file saved when you created OAuth connection first time). Once you set RefreshToken of connection manager you won’t have to Login again to get a new token.
Conclusion
Traditionally if you wanted to integrate Google DFP API (DoubleClick API) calls inside your ETL workflow then it required some sort of coding effort (e.g. Use C# SDK, JAVA SDK or Python SDK). Coding effort is not only time consuming and expensive but also hard to maintain for any non-coder (e.g. ETL Developer or DBA).
Thanks to SSIS PowerPack which changed the way developers do API integration. Now you can reduce time to implement and total cost of you API integration project significantly by using drag and drop approach. This approach is not only easy to maintain but also fast and high quality. You can use ZappySys REST/SOAP SSIS Connectors and SSIS Tasks for any API integration project such as Google DFP API. Try SSIS PowerPack for free to explore possibilities. If you have any issue with your integration Contact Support

