Introduction
In this blog post you will see how easy it is to load large amount of data from SQL Server to Azure Blob Storage using SSIS. We will export / compress data to multiple files.
For demo purpose we will use SQL Server as relational source but you can use same steps for any database engine such as Oracle, MySQL, DB2. In this post we will use Export CSV Task and Azure Blob Storage Task to achieve desired integration with Azure Blob with drag and drop approach. You can also export JSON or XML data to Azure Blob using same techniques (Use Export JSON Task or Export XML Task ).
Our goal is to achieve following things
- Extract large amount of data from SQL Server Table or Query and export to CSV files
- Generate CSV files in compressed format (*.gz) to speedup upload and save data transfer cost to Azure
- Split CSV files by row count
- Upload data to Azure Blob using highly parallel manner for maximum speed
There are three different ways you can achieve data export to Azure Blob using SSIS.
- Method-1 (Fastest): Use two step process (First export SQL Server data to local files using Export Task and then upload files to Azure using Azure Blob Storage Task )
- Method-2 (Slower): Use Export Task with Azure Blob Connection as Target rather than save to Local files.
- Method-3 (Slower): Use Data flow components like Azure Blob Destination for CSV (for JSON / XML use Method1 or Method2)
Each method has its own advantage / disadvantage. If you prefer to upload / compress / split large amount of data then we recommend Method#1 (Two steps). If you have not very huge dataset then you can use Method#2 or Method#3. For Last method you can only use CSV export option (we don’t have JSON/ XML Destination for Azure Blob yet – we may add in future)
Screenshot of SSIS Package
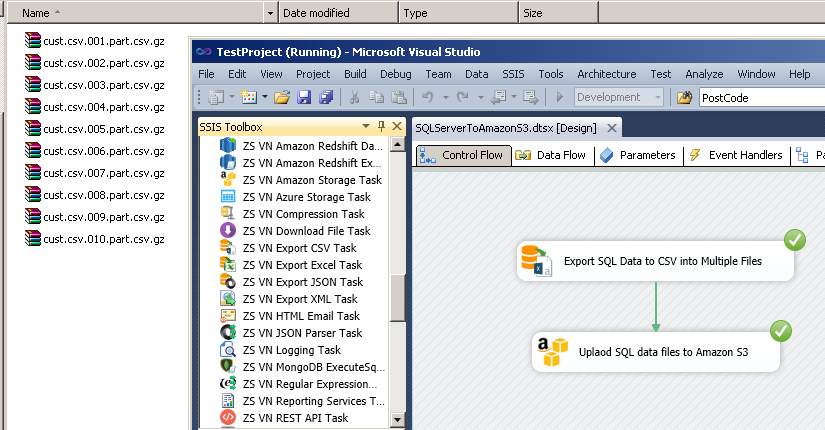
Extract SQL Server Data to CSV files in SSIS (Bulk export) Split / GZip Compress / upload files to Azure Blob Storage
Method-1 : Upload SQL data to Azure Blob in Two steps
In this section we will see first method (recommended) to upload SQL data to Azure Blob. This is the fastest approach if you have lots of data to upload. In this approach we first create CSV files from SQL Server data on local disk using SSIS Export CSV Task. After that in second step we upload all files to Azure Blob using SSIS Azure Storage Task.
Step-1: Configure Source Connection in Export CSV Task
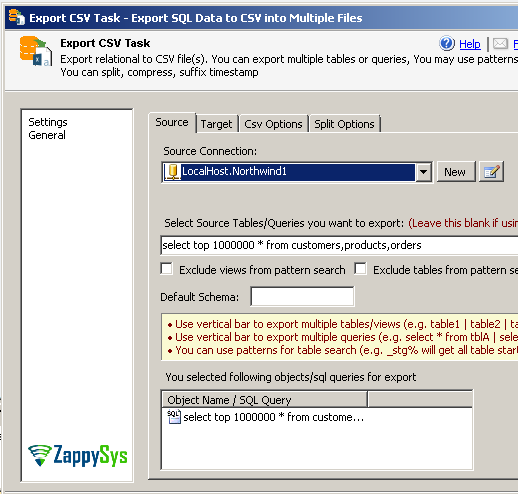
To extract data from SQL Server you can use Export CSV Task. It has many options which makes it possible to split large amount of data into multiple files. You can specify single table or multiple tables as your data source.
For multiple table use vertical bar. e.g. dbo.Customers|dbo.Products|dbo.Orders. When you export this it will create 3 files ( dbo.Customers.csv , dbo.Products.csv, dbo.Orders.csv )
Steps:
- Drag ZS Export CSV Task from Toolbox
- Double click task to configure
- From connection drop down select New connection option (OLEDB or ADO.net)
- Once connection is configured for Source database specify SQL Query to extract data as below
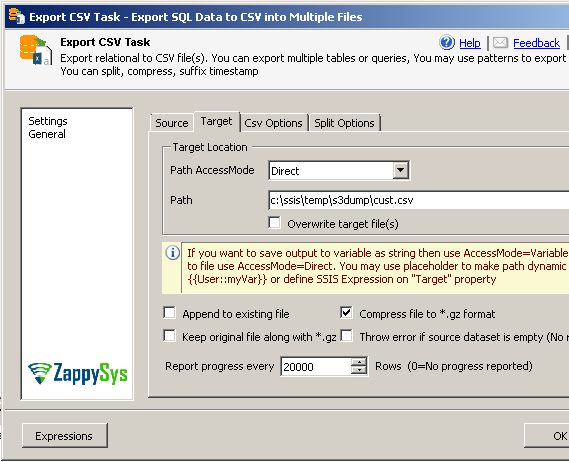
- Now go to target tab. Here you can specify full path for file. e.g. c:\ssis\temp\azure\cust.csv
Step-2: Compress CSV Files in SSIS ( GZIP format – *.gz )
Above steps will export file as CSV format without splitting or compression. But to compress file once exported you can go to Target tab of Export CSV Task and check [Compress file to *.gz format] option.
Step-3: Split CSV files by row count or data size in SSIS
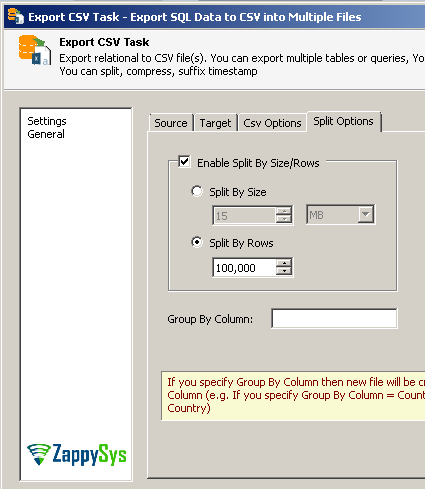
Now lets look at how to split exported CSV files into multiple files so we can upload many files in parallel. Goto Split Options and check [Enable Split by Size/Rows]
Step-4: Upload CSV files to Azure Blob – Using multi threaded option
Now final thing is use Azure Storage Task to upload files to Azure.
Steps:
- Drag ZS Azure Storage Task from SSIS toolbox
- Double click Azure Storage Task to configure it
- Specify Action = UploadFilesToAzure
- Specify Source file path (or pattern) e.g. c:\SSIS\temp\azure\*.*
- Now in the Target connection dropdown click [New]
- When Connection UI opens Enter your Account, Secret Key (Leave all other parameters default if you not sure)
- Click Test and close connection UI
- On the Target path on Azure Storage Task enter your bucket and folder path where you want to upload local files. For example your container name is bw-east-1 and folder is sqldata then enter as below
bw-east-1/sqldata/ - Click ok and Run package to test full package
Method-2 : Upload SQL data to Azure Blob without local stage (One step)
Now let’s change previous approach little bit to send SQL server data directly to Azure Blob without any Landing area on local disk. Export CSV Task , Export JSON Task and Export XML Task all of them supports Azure Blob / Azure Blob and Secure FTP (SFTP) connection as target (Only available in Pro Edition). We will use this feature in following section.
This approach helps to avoid any local disk need and it may be useful for security reason for some users. However drawback of this approach is, it wont use parallel threads to upload large amount of data like previous method.
Following change will be needed on Export task to upload SQL data directly to Azure / FTP or Azure storage.
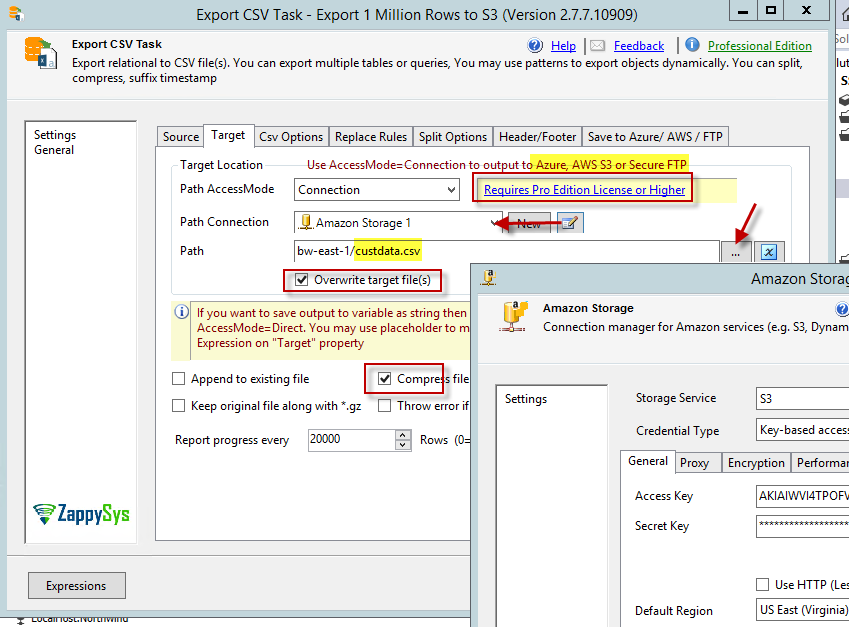
Export SQL data to multiple files to Azure Blob, Amazon S3, Secure FTP (SFTP) in Stream Mode using SSIS. Configure Compress GZip, Overwrite, Split Options
Method-3 : Using Azure Blob destination – Generate Azure Blob file from any source
Now let’s look at third approach to save data from any SSIS Source to Azure Blob file. Advantage of this approach is you are not limited to few source options provided by Export CSV Task. If you have complex data transformation needed in Data Flow before sending data to Azure then use this approach. We will use Azure Blob Destination for CSV as below
- Drag SSIS Data flow task from toolbox
- Create necessary source connection (e.g. OLEDB connection)
- Create Azure Blob Connection (Right click in Connection Managers panel in bottom and click New connection and select ZS-Azure-STORAGE type )
- Once connection managers are created Go to data flow designer and Drag OLEDB Source
- Configure OLEDB Source to read desired data from source system (e.g. SQL Server / Oracle)
- Once source is configured drag ZS Azure Blob CSV File Destination from SSIS toolbox
- Double click Azure Destination and configure as below
- On Connection Managers tab select Azure Connection (We created in earlier section).
- Properties tab configure like below screenshot
- On Input Columns tab select desired column you like to write in the target file. Your name from upstream will be taken as is for target file. So make sure to name upstream columns correctly.
- Click OK to save UI
- Execute package and check your Azure Bucket to see files got created.
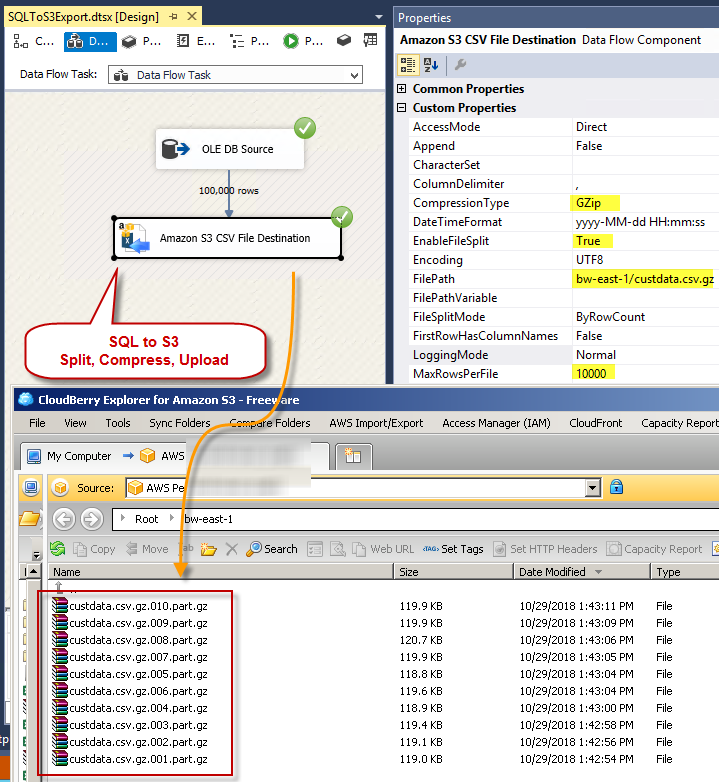
Loading SQL Server data into Azure Container Files (Split, Compress Gzip Options) – SSIS Azure Blob CSV File Destination
Conclusion
In this post you have seen how easy it is to upload / archive your SQL Server data (or any other RDBMS data) to Azure Blob Storage in few clicks. Try SSIS PowerPack for free and find out yourself how easy it is to integrate SQL Server and Azure Blob using SSIS.

