Introduction
In our previous article we understood little bit about OAuth 2.0 Protocol. We talked how to use Default App for ease of use. However In this post you will learn how to register Google OAuth Application so you can access various Google Services programmatically (e.g Youtube, Google Analytics, AdWords, DoubleClick etc.). Here is the link to find all services: Google API Services (Using OAuth 2.0)
Recently google started supporting OAuth 2.0 Protocol. There are many articles written explaining OAuth 2.0 protocol so we are not going to cover that in this article.
Following SSIS Connectors support OAuth Connectivity. When you use below connectors no coding required to pull data from OAuth enabled services.
SSIS Tasks / Components which Supports OAuth Connection / Google API
| API Source | |
| Google Analytics Source | |
| JSON Source Connector (File, REST API) | |
| REST API Webservice Task | |
| XML Source (File, REST, SOAP) | |
| Web API Destination |
ODBC Drivers which Supports OAuth Connection / Google API (Call in Power BI, Excel, Informatica, MS Access)
Create Google Project
Registering OAuth App in Google first requires you to create API Project. API Project is a container which can host many OAuth Apps or other API Keys.
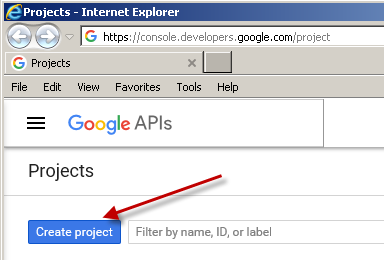
- To create API Project Visit https://console.developers.google.com/project
If you already have existing API Project then once you click above link you can pick desired API Project from dropdown (Found in the top bar). If you using existing API Project then you may skip next few steps and directly move to step which explains [how to create OAuth ClientId]. - To create new project Click on “Create Project” button. Once you click Create it will take few seconds to create project for you.
Create New Google API Project (Google API – Register new OAuth App)
- Now give some friendly name and change default Project ID (optional) for your project and click Create (See below).
NOTE: Before you click create you can change default Project ID suggested by Google by clicking Edit. This Project ID is used everywhere when calling many APIs like this one so copy this ID somewhere (You can also see this on project screen so dont worry if you miss it).Project ID is unique across google system so you may not get your preferred ID but if you can get one then its easy to remember for sure.
Create new Google Api Project for OAuth App (Set project name / edit default project ID)
Enable Google API for Integration
Once your Project is created, next step is enable APIs you like to call. By default most Google APIs are disabled so make sure you enable each APi category manually using below steps.
- Once project is created it will redirect you to the API Home page where you will see many common Google API you can use.If you do not see that you can always click below option to enable API manually.Visit : https://console.cloud.google.com/apis/library
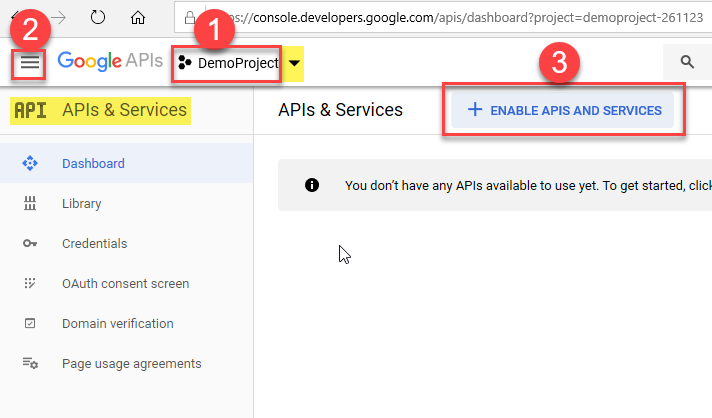
Enable Google APIs / Services
- By default API you like to call might not be enabled. Search for API you wish to enable, click on the API name and click Enable.Some common Google API Examples:
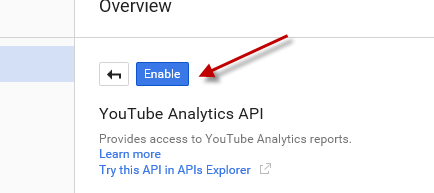
- To enable Google YouTube API
> search for “YouTube“. It has few APIs so pick the one you need under this,
> For example To manage/view channel use Data API, for Reporting use Analytics API) - To enable Google Drive API
search for “Drive” and click Enable - To enable Google Sheets API
search for “Sheet” (Some Sheets API operations need Drive API too see enable that as well) - To enable Google BigQuery API
> search for “BigQuery“ - To enable Google Analytics (GA3)
> search “Analytics“ and enable Google Analytics API - To enable Google Analytics (GA4)
> search for Google Analytics Data API and click Enable, Search for Google Analytics Admin API and click enable (needed this to query available properties)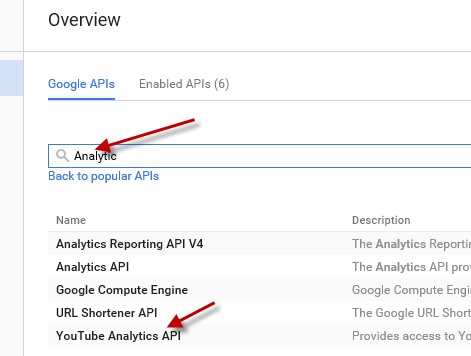
Search Google API for OAuth Application Access
Enable Google API for OAuth Application Access
- To enable Google YouTube API
Create OAuth Credentials (Client ID / Secret)
Once we create project and enable APIs our next step is to obtain OAuth ClientID / Secret. Before you can obtain that you have to configure few properties of your OAuth Consent Screen. Most fields are optional on this screen but fill out them if you plan to publish this API App for other users (i.e. Public App).
- Now click on the credentials tab and click “OAuth consent screen”. Fill out necessary information which will be visible to the user (such as App Name). Once you are done, continue on with credentials creation:
 Google OAuth API – Create OAuth App – Set Application Name on Consent Screen
 - Click on [Create credentials] button and select OAuth Client Id option.
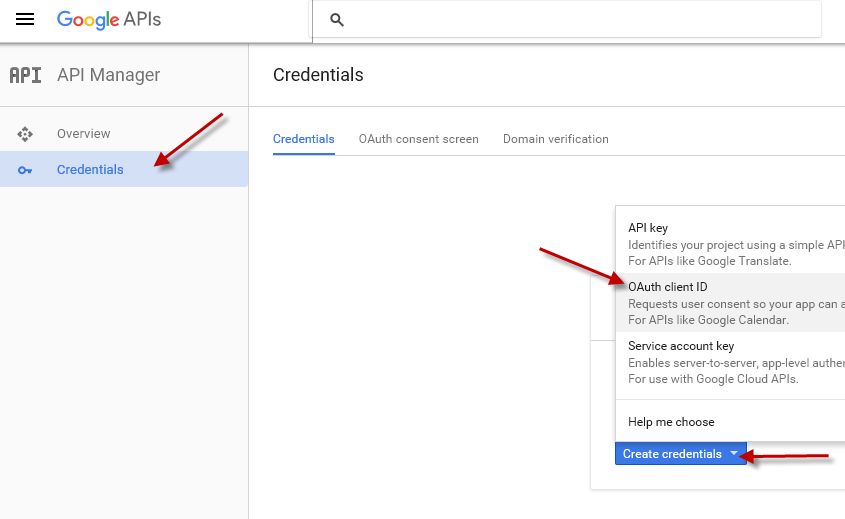
Create OAuth Client ID Credentials for Google API access
- Next you will be asked to select Application Type. Pick “Desktop app” if your Application is Desktop style application. If your app is web site or running browser then pick Web Application. Click on Create and you will see your ClientID and ClientSecret which you can use during OAuth Authentication. Keep these both information secret. This is used to call OAuth Approval Screen by your Desktop App or Web App… and then user can obtain Token which can be used to call desired Google API.NOTE: Make sure you do not choose Web App and only select Desktop App. Desktop App doesnt have Redirect URL making it simple to setup and use with ZappySys software.

Create Google OAuth 2.0 Credentials – Desktop App
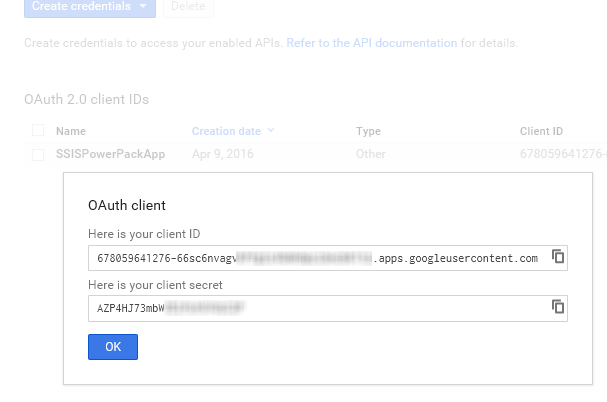
Generate ClientID and Client Secret for Google OAuth Application
Publish App
The last step in App creation is to go to the OAuth Consent Screen tab. Under Publishing Status, click PUBLISH APP to ensure your refresh token doesn’t expire often. If you plan to use the App for Private use, you do not have to worry about the Verification Status after Publishing (Which is the case for most users who access their own data).
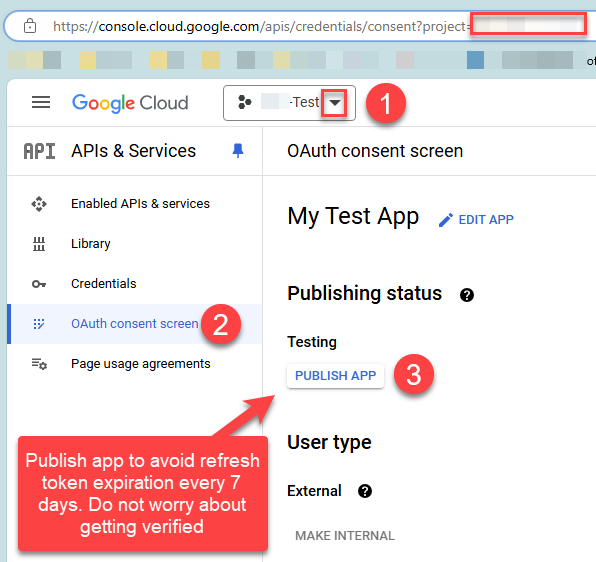
Publish Google App (This avoids Refresh Token Expiration every 7 days)
Using Client ID and Client Secret in ZappySys OAuth Connection
You can use generated ClientID and ClientSecret to initiate OAuth Authorization process. We are not going to cover how that works, but below is a simple screenshot of how these two pieces of information are used to call the Consent screen with some desired permission requested by calling Application:
ZappySys OAuth Connection can be used by many components suggested in the beginning of this article. So refer them for more information.
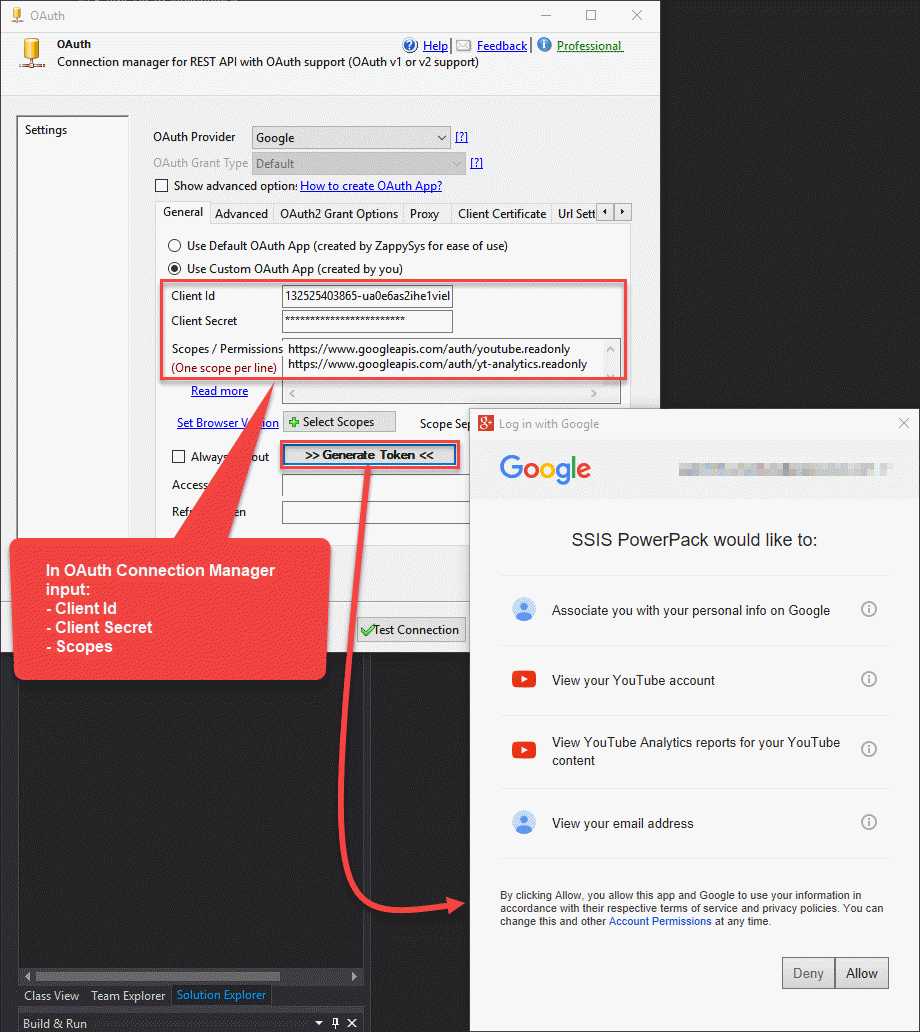
Google OAuth Application: Generating Access and Refresh tokens using SSIS and OAuth Connection Manager.
Using System Default Browser to get the token
If embedded browser has some issue to extract your token then you can close the window by pressing [X] in the title bar. Once you do that you will be prompted to use System Default browser to finish the token extraction. If you click Yes then Full browser will be launched.
NOTE: Below feature is added in version published after Dec 31, 2019 (v3.0.0.11231 or later) so make sure you have latest version.
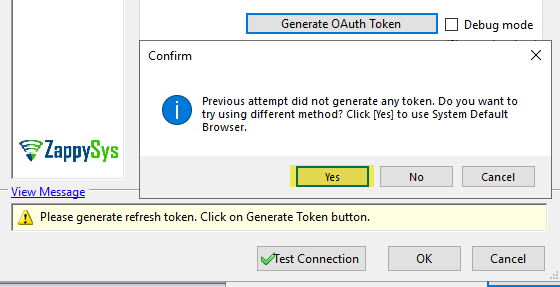
Using System Default Browser to extract OAuth Token
Untrusted App Warning
Sometimes Google might show you below warning. In order to continue the flow you might have to Click on Advanced and then click Go to YourAppName (unsafe) like below

How to ignore Google Unsafe App Warning (OAuth Flow)
OR, in some cases, you may see modern UI like below. In either case, choose continue.

Google App not Verified Warning (New UI)
Select the account

Using System Browser
Copy code and finish the flow

Manually Copy Code and Get OAuth Refresh / Access Token
Why I didn’t get refresh token back?
For some reason if you just see Access token and not refresh token then try following
- Logout current session in browser and close all browser windows and try again
- If you use Custom Provider rather than Google on OAuth connection then change Auth URL to include prompt and access_type like below
1https://accounts.google.com/o/oauth2/auth?access_type=offline&prompt=consent
What to do if Google Refresh Token expires every 7 days
Technically, once you have a refresh token, you should not worry about renewing as long as the API call is made atleast once every few months (max 6 months idle time). However, in some cases, your refresh token can expire sooner, and you have to click Generate Token manually
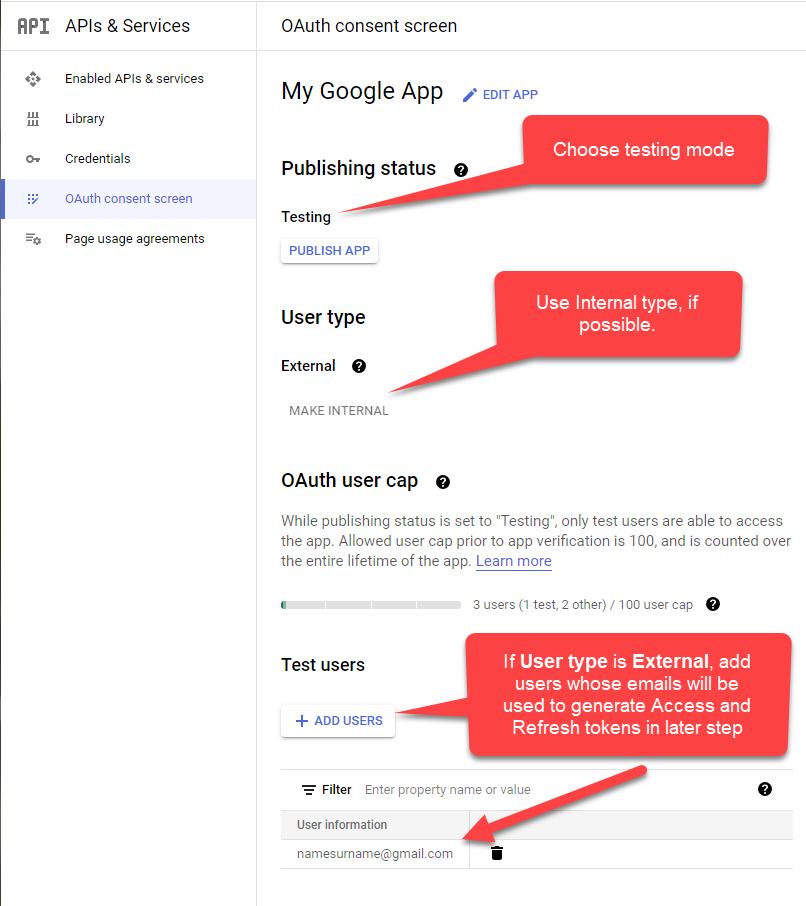
One main reason that is not well documented is if the Google Oauth Private App you created to access your own data is still in “testing” mode and not “published,” then as per Google, you may get this error. Perform these steps to publish your app, which is in testing mode, so you do not have to renew the refresh token every 7 days.
- Go to your Project in Google API console
Generally here - No API call has been made using the generated refresh_token for six months or longer
SOLUTION: Make at least some API in six months to keep refresh_token active - Your OAuth App is in “testing” status and not published yet
SOLUTION: Just click the Publish button on your App OAuth Consent screen. Do not worry about getting verified if you plan to use it for internal use; after this step, your refresh_token may not expire every 7 days See this thread.DO NOT WORRY ABOUT GETTING VERIFIED – Just publish it to avoid refresh token expiration every 7 days.Publish Google App (This avoids Refresh Token Expiration every 7 days)
What is Google OAuth AccessToken
AccessToken is short lived token which you can pass along with each API Service call. once this token is expired you can get new AccessToken as long as you have obtained and saved RefreshToken (Returned to caller after very first time user go through Approval process on Consent screen). If you are using ZappySys OAuth connection manager
What is Google OAuth RefreshToken
May OAuth services support short lived token which expires after few minutes or hours. Google API by default expires token after 3600 seconds … So how to get new token ? Do you always go through that annoying Consent screen… what if your application is Automated Service? Well OAuth has solution for that too… its called RefreshToken.
First time to setup OAuth connection user have to go through Approval screen (i.e. Consent screen) once they click Approve button they may receive two types of token (AccessToken and RefreshToken). RefreshToken is used only when you need to get new AccessToken without going through Consent screen. So technically if OAuth supports RefreshToken (This is optional) then you can Save this piece of information in database somewhere and when you get token_expired error or you detect expiration time you can get new AccessToken without involving user consent (because you already did once).
Conclusion
Hope this article helped you to understand how to register Google OAuth Application. Download SSIS PowerPack to try various OAuth data integration scenarios using drag and drop high performance connectors. With SSIS PowerPack OAuth support you can virtually pull data from any API service (XML REST API or JSON REST API). Such as Facbook, Twitter, SurveyMonkey, LinkedIn and many more.