Introduction
In our previous blog post we saw how to import xml into SQL server using SSIS. In this post we will see how to generate xml in SSIS. If you wish to export JSON rather than XML then check this article
To produce complex nested XML you can use following two task/components.
Video Tutorial – Create XML in SSIS
Below video tutorial will show you how to produce complex XML from single or multiple input datasets using SSIS.
Techniques illustrated in below video is almost identical for SSIS Export XML File Task and SSIS XML Generator Transform… but for demonstration we will use XML Generator Transform. If you wish to use Export XML File task then dataset will be Table or Query rather than Data flow Input.
Here is another video
SSIS XML Generator Transform
Use SSIS XML generator Transform when you want to produce XML inside data flow and feed to downstream system or save to XML file (You can use Flat File destination). If you have need for more flexible approach or save XML into SSIS Variable so you can POST XML data to Web API or SOAP webservice call then use Export XML File Task.
SSIS XML Generator Transform – Generate XML and save to file
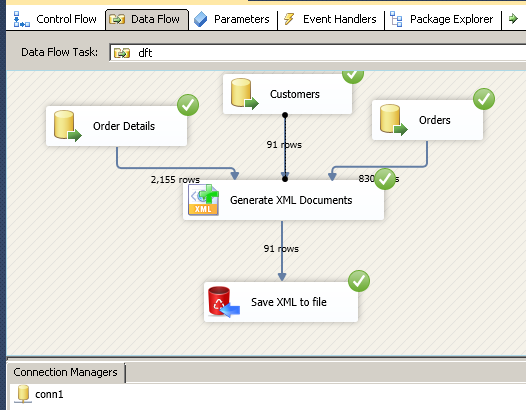
SSIS XML generator transform – Create XML Output inside Data flow
SSIS Export XML File Task
When you have need to generate XML from multiple SQL query / tables and save into XML File or SSIS Variable then you can consider Export XML File Task. Few options available in Export File Task which are not found in XML Generator Transform such as Compression, Splitting options, Simple export without Layout.
SSIS Export XML File Task – Select Source Tables, Queries, Connection

SSIS Export XML File Task – Split file options (Split by Size, Row count and Group by column

SSIS Export XML File Task – Split file options (Split by Size, Row count and Group by column
Create Input Datasets
First step to product XML is define input datasets. If you have no parent child relation (e.g. Customer and Orders) then most likely you will need one dataset. If you are using XML Generator Transform then any attached inputs to your transform becomes datasets. First dataset is automatically set to Root dataset.
For Export XML File task you have to define datasets manually. You need to pick connection manager and then select Table or Query. To make query dynamic you can use Variable Placeholder
|
1 |
select * from MyTable Where Month='{{User::varMonthName}}' |
SSIS Export XML File Task – Layout Editor (Define nested elements and Parent-Child relation)
")
SSIS Export XML File Task – Add/Edit input Dataset

Create XML Elements /Attributes
XML Element has start and end tags (end tag is optional if no children elements found). To add column as Element you can click on Add Element option.
Example of Elements
|
1 2 3 4 5 |
<rootelement> <rowelement><prop1element>AAA</prop1element></rowelement> <rowelement><prop1element /></rowelement> <rowelement><prop1element>CCC</prop1element></rowelement> </rootelement> |
SSIS Export XML File Task – Layout Editor Right Click Menu

SSIS Export XML File Task – Add/Edit Attribute

Create nested XML elements (indentation)
When you need nested element (e.g. <LocationInfo><ZipCode>xxxxxx</ZipCode></LocationInfo> ) then Add element and check Unbound option on the UI (e.g. add LocationInfo as Unbound).
Setting Advanced Option
In this section you will learn how to set many advanced options for XML generation.
SSIS Export XML File Task – Select XML Format Options

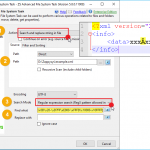
Handling NULL in XML output
By default NULL attributes or elements not included in output because its hard to identify Blank string vs NULL string. If you wish to explicitly flag NULL items in output then you may uncheck Do not include NULL option. By doing so you will notice two changes. In your root node xmlns:xsi attribute is added to add standard namespace and when element is NULL you will see xsi:nil=”true” in the self closing element tag. This indicates that column data is NULL. If you see self closing tab without xsi:nil=”true” then its Blank value rather than NULL.
Define XML Namespace (Prefix)
By default no XML namespace is defined in the XML output. But if you wish to include any attribute or element with prefix then it requires namespace declaration. For more information on how to create XML with namespace check this article.
Consider the following example. It has some prefix called ns1 for element and ns2 for attribute. To achieve such format make sure you define two namespaces on XML Options tab (e.g. ns1=http://someurl1,ns2=http://someurl2 ). Once you do this ns1 and ns2 can be used as prefix for any element or attribute.
Example of Namespace/Prefix use
|
1 2 3 |
<data xmlns:ns1="http://someurl1" xmlns:ns2="http://someurl2" > <ns1:row ns2:id="111"><prop1>AAA</prop1></ns1:row> </data> |
Using XML Namespace Prefix for Element or Attributes
In order to use namespace you have to set Prefix property for any Element or Attribute when you Add them. For example to add element <row> with prefix ns1 (e.g. <ns1:row> ) you have to set prefix to ns1 on the Add/Edit Element UI. Before you can use Prefix make sure namespace is defined as per previous section.
Removing XML declaration
Some times you have requirement to omit XML declaration (e.g. first line <?xml version=”1.0″ encoding=”utf-8″?> ). For that check “Do not output XML declaration” option on XML options tab.
Remove Invalid XML Characters
If you ever encounter invalid XML characters and want to remove them then check this article
Change / Remove Root Element from output
By default XML document has root element called “Root” (See XML Options tab to change this). You can change this to custom name or remove it if you wish to hide start and end tag of root element from output.
Change / Removing XML Row Element from output
By default row of dataset will start with default Row element (e.g. <DatasetRow>… </DatasetRow>). if you wish to hide those start and end tag then make sure you remove default Row element name in Dataset Declaration (Edit dataset and remove Row Element name)
Define Parent Child Join in XML datasets (One to Many)
If you have parent child relationship in XML (e.g. each Customer Tag has multiple Orders) then you need to define at least two datasets (One for parent (i.e. Customer) and one for Child (i.e Orders)).

Define Parent to Child Relationship for XML Output (One to Many JOIN)
Making things Dynamic (Query Parameter / Layout Information)
To make things dynamic you can insert variable placeholders anywhere in the editor (Look for {{Insert variable}} menu item in the editor). If you want to make entire Layout dynamic then use option to Load Layout from File or Variable. If this option is not available then consider SSIS expression to make it dynamic
Example:
|
1 |
select * from MyTable Where Month='{{User::varMonthName}}' |
Controlling XML Date Time formatting (How to use ISO date)
By default date/time values are exported as yyyy-MM-dd HH:mm:ss format but if you wish to change so its exported to ISO format or other format then goto XML Options tab and set Date format to yyyy-MM-ddTHH:mm:ss for ISO. If Datetime is UTC then change format to yyyy-MM-ddTHH:mm:ssZ (append “Z” at the end)
Conclusion
Creating nested XML may not be easy task but innovative drag and drop approach of SSIS PowerPack certainly makes it easy to produce complex XML with every possible option on hand. Try SSIS PowerPack for free (45+ tasks and components) and explore what else you can do with it.