Introduction
 In this article, we will show SSIS Azure Blob Storage task examples. Uploading files using Azure Blob Storage Task or downloading files are common requirements in SSIS. In order to work with Azure Blob Storage, Microsoft SSIS includes the Azure Blob Storage Task that allows to upload files to Azure Blob Storage, download files, creating local and remote directories an more. In this article, we will show how to use the SSIS Azure Blob Storage task included in ZappySys SSIS PowerPack.
Azure Blob Storage Task can be used to perform various operations with Azure Storage objects (blobs and containers) (e.g. Download, Upload, Copy, Move, Rename, Delete, etc). You can also get single property of any Azure blob or get a list of blobs as ADO.net Table and which can be easily looped through using ForEachLoop Task. Most of the operations in this task support recursive search using wild card pattern (e.g. Myfile*.txt).
Prerequisite
- First, you will need to have SSIS installed
- Secondly, make sure to have SSDT
- Download and install Microsoft Azure Storage Emulator
- Download and install Microsoft Azure Storage Explorer
- Finally, do not forget to install ZappySys SSIS PowerPack
NOTE: If you want to use Live account (Azure Blob Storage) then you can skip Step #3
What is Azure Blob Storage
Azure Blob storage is Microsoft’s object storage solution for the cloud. you can store large amounts of unstructured data, such as text or binary data. Blob storage discloses three resources:
- Storage account (You can access data objects in Azure Storage through a storage account.
For more information, click here.) - the containers in the account(constructs a set of blobs, it is similar to a folder in a file system.
All blobs lie within a container, Note: Container name must be lowercase) - the blobs in a container. (Azure Storage offers three types of blobs: block blobs, append blobs, and page blobs)
See the below-attached diagram. It shows the relationship between these resources.
 You can also use Azure Storage Explorer on your Local machine. Azure Storage Explorer is a standalone app that enables you to easily work with Azure Storage data on Windows, macOS, and Linux. You can use Blob storage to expose data publicly to the world or to store application data privately. Connect to an Azure storage account or service

Getting Started
In order to start, we will show several examples. ZappySys includes an SSIS Azure Blob Storage Task that will allow you to access files / folders from Azure Blob to the Local machine, Upload files(s) to Azure Blob Storage. It will also support Delete, Rename, List, Get Property, Copy, Move, Create, Set Permission … and many more operations. Here we are showing you is, How to upload, download, move and delete files / folders from Azure Blob Storage.
You can connect to your Azure Storage Account by entering your storage account credentials. Here I am showing an example of the use of local Azure Storage Emulator.
Setup Azure Storage client tools
- Once you have downloaded and installed storage emulator You can launch Microsoft Azure Storage Emulator from its Physical location or from the desktop or start menu shortcut.

Microsoft Azure Storage Emulator Physical Location
- If You can see the below-attached Command Prompt screen after Emulator started. Then you can proceed to start Microsoft Azure Storage Explorer as the Azure Storage Emulator is started successfully.
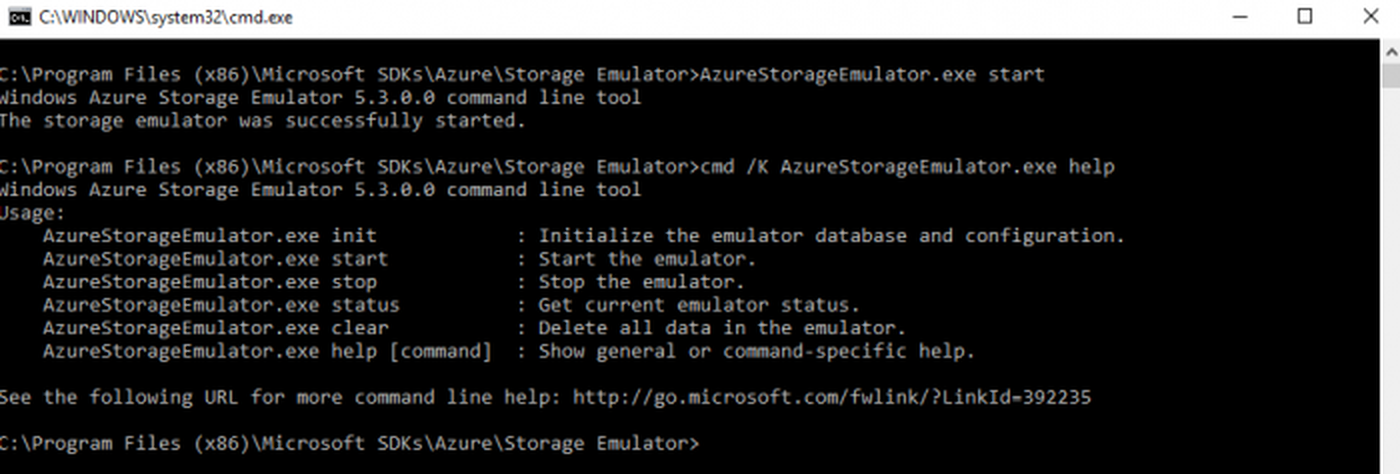
Command Prompt Screen after Microsoft Azure Storage Emulator Started
- Now, You have to download and install Microsoft Azure Storage Explorer and then You can launch Microsoft Azure Storage Explorer from its Physical location or from the desktop or start menu shortcut.

Microsoft Azure Storage Explorer Physical Location

Create an Azure Blob Storage Container
For Creating a Blob Container, First of all, you need to go to Microsoft Storage Explorer Window. Then you can go through like this way (Storage Accounts –> (Development) –> Blob Containers).

Microsoft Azure Storage Explorer: Create a Blob Container
you can also create a Virtual Directory under it. A Virtual Directory does not actually exist in Azure until you paste, drag or upload blobs into it.

Creating the new Virtual Directory under Blob Container
SSIS Azure Blob Storage Task Examples
Let´s start with an example. In this SSIS Azure Blob Storage Task File task example, we will upload, download, move and delete files / folders from Azure Blob Storage.
-
- First of All, Drag and Drop Azure Blob Storage Task from SSIS Toolbox and double click it to edit
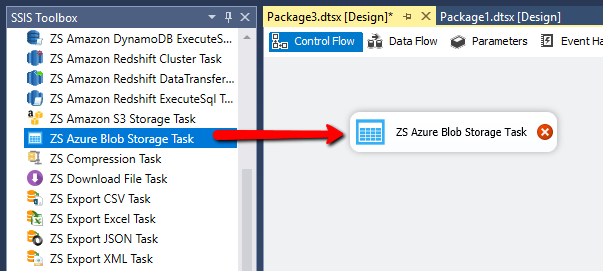
Drag and Drop Azure Blob Storage Task
- The following options are available in Azure Blob Storage Task:
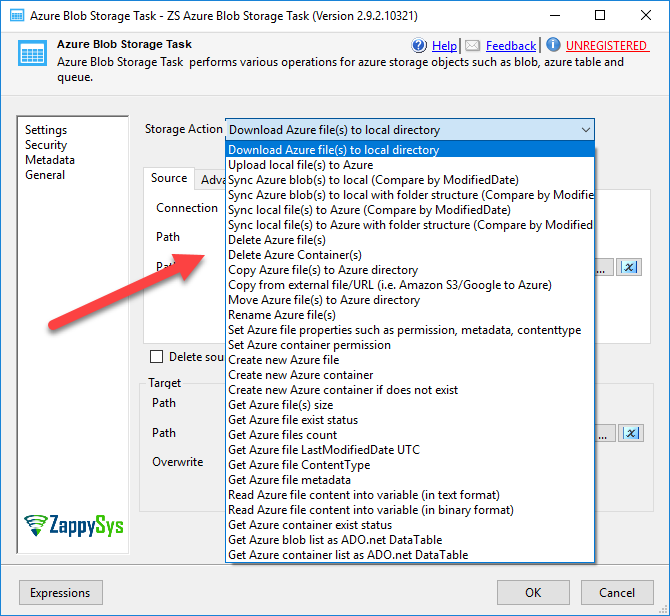
Options to upload, download files in SSIS
- You can also overwrite files and folder, skip all, overwrite if source is older, overwrite if the file size is different, rename files and more:
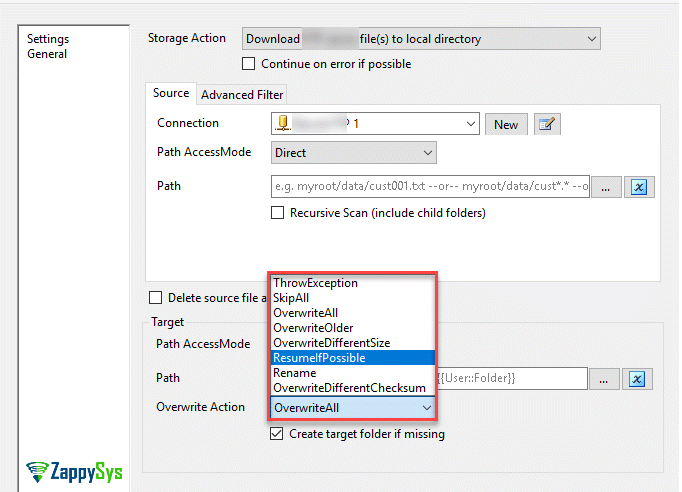
Overwrite files in SSIS
- Let’s select the Download Azure file(s) to local directory. Now select/add The Source path, Check Recursive Scan to get all the sub files and sub folders and it’s files and add Target Path, This option will download files. In Path AccessMode we can use Direct to write the path directly or to use an SSIS variable.
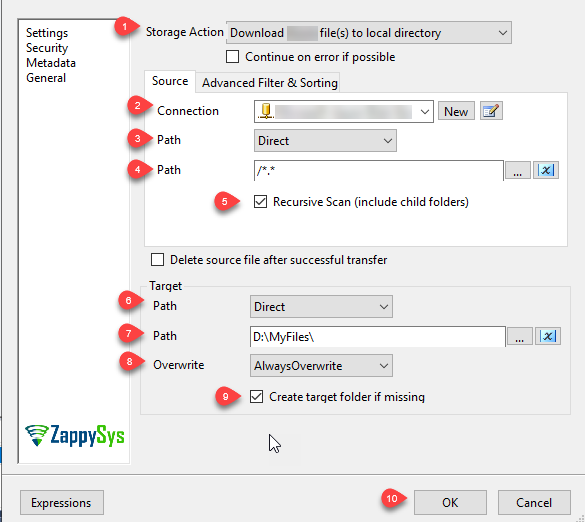
SSIS Azure Blob Storage Task – Download files from Azure Blob Storage
- That’s it now execute the package and it will download all the files and sub folders from the Azure Blob Storage Task to Local File Machine.
- First of All, Drag and Drop Azure Blob Storage Task from SSIS Toolbox and double click it to edit
- Now Let’s configure the task to upload the local directory files and folder to Azure Blob Storage like below and execute the package. And also in this example i created the variable and stored target folder path in it and used that variable Target Path Variable.
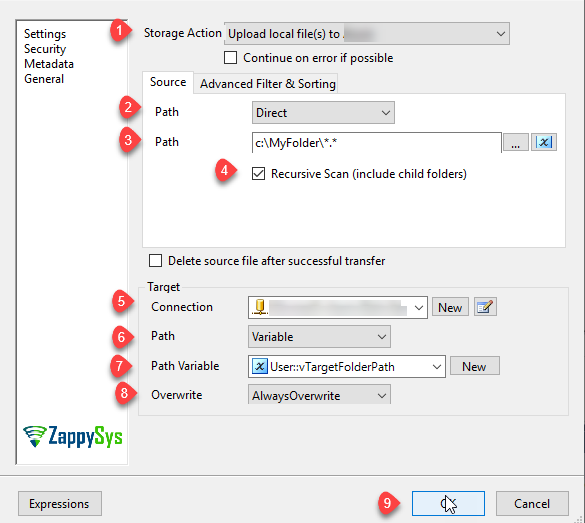
SSIS Azure Blob Storage Task – Upload files from Azure Blob Storage
- Let’s configure the task to delete Azure Blob Storage files like below and execute the package.

SSIS Azure Blob Storage Task – Delete files from Azure Blob Storage
- Let’s configure the task to move Azure Blob Storage files to another directory like below and execute the package.
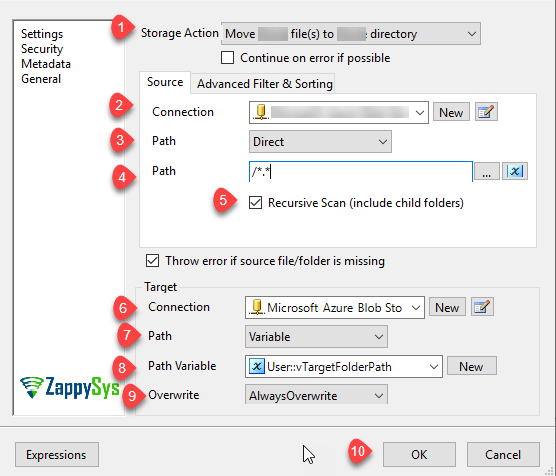
SSIS Azure Blob Storage Task – Move files from Azure Blob Storage
- That’s it like upper examples you can configure Azure Blob Storage Task to use it’s other options also.
- Let’s see other SSIS Azure Blob Storage Task examples in below sections
Working with advanced filters
In order to understand filters, we will create an example for you. This time we will create SSIS Azure Blob Storage task example to show how to exclude some files from the downloading process.
- In addition, it is also possible to add advanced filters to the SSIS Azure Blob Storage task to exclude or include files and folders. The following example shows how to use the Advanced filters. In the Azure Blob Storage Task, go to the Advanced Filter page and in Exclude RegX we will write \.exe$ to exclude the file with exe extension to be downloaded. You can use RegX (regular expressions) in the advanced filter:
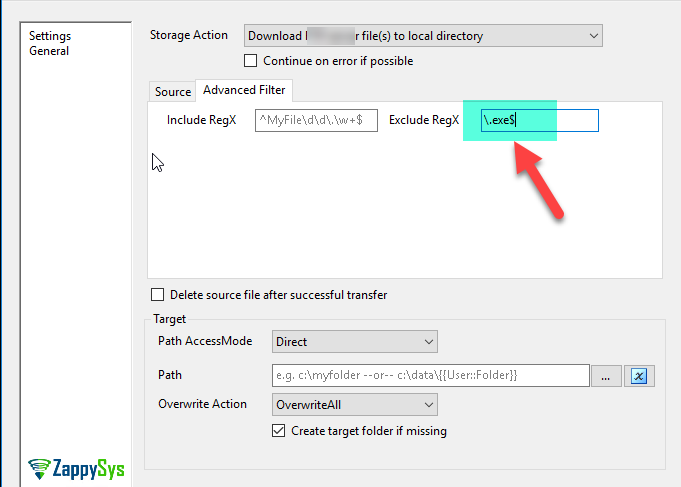
Advanced filters
Working with wildcards in SSIS Azure Blob Storage task (Multiple files only)
In order to understand wildcards, the new example will show how to work with Wildcards will help you to work with multiple files or folder with common characteristics.
- The following example shows how to copy all the files will all the extensions in the source folder. We use the *.*, which means that any file name with any extension will be downloaded:

Working with Wildcards
- If we want to download all the files with extension txt, use the following Path:
1/source/*.txt; - Another example would be to download all the files with the following names: file1.txt, file2.txt and file3.txt. We could use the following Path:
1/source/file?.txt
Working with SSIS expressions and variables in Azure Blob Storage Task
In order to understand expressions, the following example will show how to work with SSIS expressions combined with variables in the SSIS Azure Blob Storage task. In this example we will delete files in Azure Blob Storage using variables and expressions.
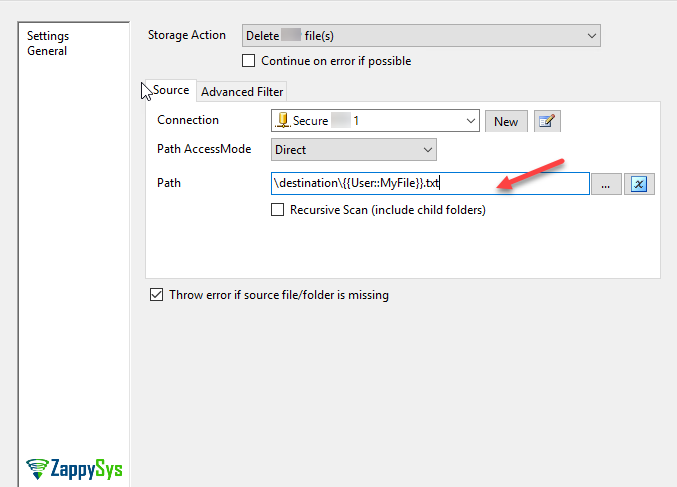
- First, we will first create a variable in SSIS. In this example the file name is MyFile and the Value file1.

Create an SSIS variable
- As a second step, we will write in path the value \destination\{{User.MyFile}}.txt. This will concatenate the folder destination with the variable MyFile. The task will delete the file1.txt from the Azure Blob Storage folder.
Using SSIS expressions
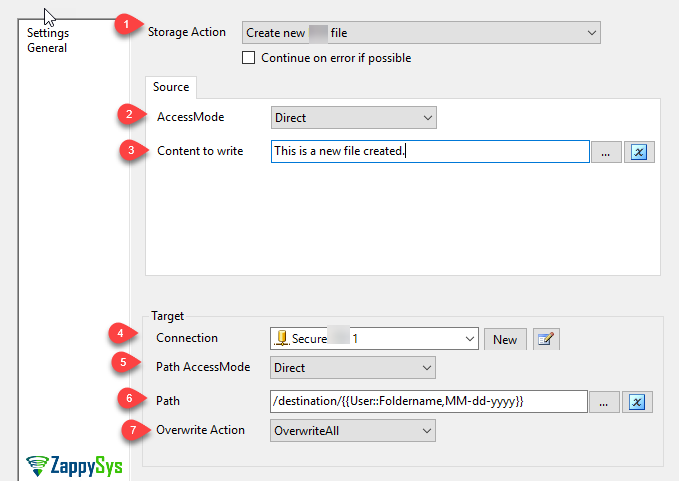
- The next example will show how to create a Azure Blob Storage file using expressions and variables in SSIS:
Create file
- Content to write is the content of the file. In Target, go to path and write the following: For more information on placeholders check this post and also check this post.
1/destination/{{User::FileName,MM-dd-yyyy}} - We are using a variable in SSIS named FileName of type DateTime. We are concatenating the Azure Blob Storage folder destination with the variable. As you can see, the expressions with ZappySys are very simple.
Example to verify if file exists in SSIS Azure Blob Storage task
Finally, we will verify if a file in Azure Blob Storage exists or not using the SSIS Azure Blob Storage task.
- In order to start, we will use the SSIS variables, create a variable of Boolean type named FileExists. In Storage Action, select Get Azure file exist status. In path, select the path of the file to verify if it exists or not.

SSIS Azure Blob Storage Task – Check File Exist in Azure Blob Storage
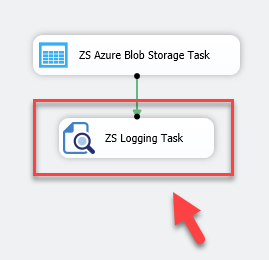
- Secondly, we will use the ZS Logging Task to check the value of the variable File Exists. This task will show the value of the variable in the log. Drag and drop the task and join it with the ZS Azure Blob Storage Task:
The SSIS Log task
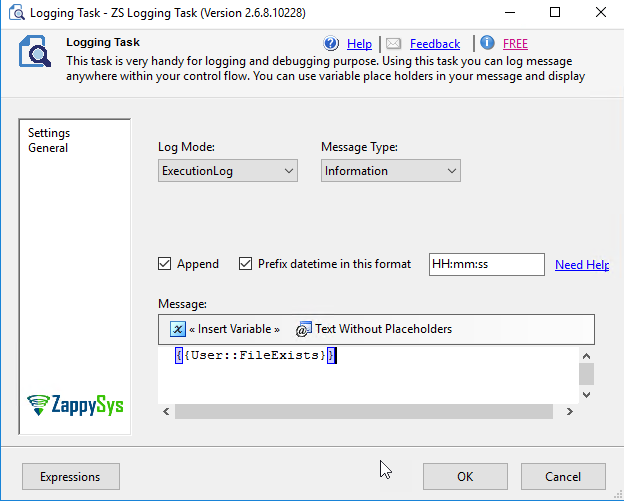
- In order to get the value, we will insert it in the Logging Task. To do that, insert the Variable and select the FileExists variable:
Add the variable in the task logging
- Finally, run the package and verify the Output (you can use View and Output to see the output) and check the value of the Logging Task. If the file exists, the value will be true. If it does not exist, the value will be false.
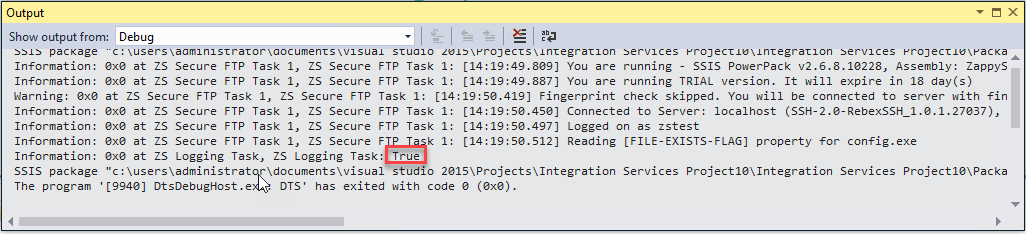
Verify the variable in Output
How to loop through Azure Blob Storage files in SSIS
You can also loop through files to perform custom action file by by. Azure Blob Storage Task support Action to get File List as ADO.net Recordset
To get File list from Azure Blob Storage Server perform the following steps.
- From Storage Action select Get Azure files as ADO.net DataTable

Get files as ADO.net DataTable
- Create new Azure Blob Storage Connection by clicking New next to connection dropdown.
- Select Source Path (e.g \myroot\folder\*.txt )
- Select or create new SSIS Variable (e.g. varFiles ) which will hold file list result (Must be Object datatype variable).
- Click OK to close.
- Create 3 more SSIS variables to hold File Path (String), Name (String) and Size (Int32). We will use in the next step.
- Now drag SSIS ForEach Loop Container Task from SSIS Toolbox
- Edit Loop Task and Select Foreach ADO Enumerator from the Enumerator dropdown
- Select variable (e.g. varFiles)

Loop through files in SSIS using ForEach Loop Task (use ADO.net Recordset variable)
- Click on Variable Mappings Tab and configure like below.

Variable Mappings for ForEach Loop Task – Loop through files in a folder using SSIS
- Drag ZS Logging Task and place inside Loop and Display variables
- That’s it
For more information to loop through files on local machine using SSIS check this article.
Conclusion
To conclude, we can say that working with Azure Blob Storage is now very simple. In this article, we looked at SSIS Azure Blob Storage Task examples on how to upload, download, delete files and folders. We used variables, wildcards and expressions. If you liked the tasks you can start using them by downloading SSIS PowerPack from our web site here. We saw different SSIS Azure Blob Storage Task examples to understand how to use the task in different scenarios.
Thanks for your time.