Introduction
 In the world of REST APIs you have to know how to authenticate, before using any API method. In this article we will cover a topic how to authenticate to an API with OAuth 2.0 technology using SSIS or ODBC Drivers. We are going to use OAuth Connection Manager SSIS component to achieve that, which is a part of ZappySys SSIS PowerPack. Concepts listed in this articles also applicable for ODBC PowerPack product. If you like to access API data in BI Tools (e.g. Power BI, Excel, MS Access) or SQL Server directly then use ODBC PowerPack
Prerequisites
Before we perform the steps listed in this article, you will need to make sure the following prerequisites are met:
- For SSIS: SSIS designer installed. Sometimes it is referred to as BIDS or SSDT (download it from the Microsoft site).
- Basic knowledge of SSIS package development using Microsoft SQL Server Integration Services.
- Make sure ZappySys SSIS PowerPack is installed (download it, if you haven’t already).
- (Optional step). Read this article, if you are planning to deploy packages to a server and schedule their execution later.
- For ODBC:Download and Install ZappySys ODBC PowerPack (This includes XML / JSON / REST API and few other drivers for SQL Server and ODBC connectivity in tools like Excel, Power BI, SSRS)
Concepts about OAuth 2.0
In this post we will not cover in depth about OAuth 2.0 protocol. If you want to learn how OAuth 2.0 Protocol works then check article like this (or few more you can search). Don’t get overwhelmed by details 🙂 because you don’t have to worry when you use SSIS OAuth Connection Manager. Most of complexity of OAuth Protocol such as Token Extract, Token Renew is taken care by connection manager behind the scene for you.
Important things you will have to do to Call API in SSIS using OAuth are listed below.
- Register OAuth App to obtain ClientID / Client Secret
- Confirm OAuth 2.0 Grant Type (By default it will be Authorization Code Grant (i.e. 3-legged grant – Which shows Login Page when you click Generate Token Button). If you see mention about Grant Type=Client Credentials or Password Grant on your API help file then on you must configure SSIS OAuth Connection Manager with OAuth Version=2.0 and Change OAuth Grant Type drop down on the UI to correct setting. Refresh Token is only supported in Authorization Code Grant.
- Obtain necessary Token URL (i.e. Token endpoint(s) – Usually documented in your API helpfile. Example : https://somesite/oauth/token )
- Optional – Identify Scopes (i.e. Permission you want to grant to the token. Many times its not needed)
- Optional – Identify redirect URL (Usually entered on App registration Page.. Same URL must be entered on the SSIS OAuth Connection Manager > Advanced Tab)
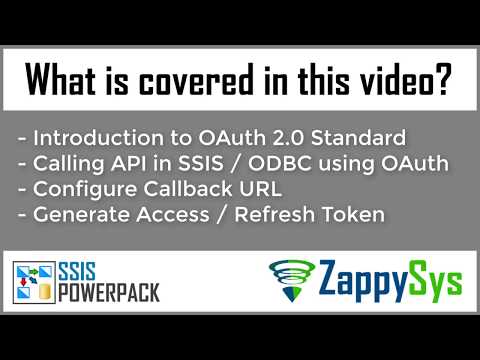
Video Tutorial
Grant Types in OAuth 2.0
There are multiple Grant Types in OAuth. API may enforce one or other based on Security Level they want to enforce. You can look at your API documentation to find out which Grant Type they are using. In above example of Hubspot API we used Authorization Code Grant (Its Default grant type in SSIS OAuth Connection Manager)
Authorization Code Grant Type
This is most common grant type for any popular API you may access (e.g. Google API, Facebook, LinkedIn ). In this grant type it requires 3-legged authorization for first time before you can obtain Access / Refresh Token. Basically you will see Login Prompt for first time which you have to Accept before you can get token(s). After that you may not have to Log in again if you are using ZappySys SSIS OAuth Connection manager. Refreshing Token is automatica after first login call.
Client Credentials Grant Type
ZappySys offers various data integration components, including REST API Task, JSON Source, XML Source, and CSV Source, which allow you to connect to external APIs and retrieve data. For secure API authentication, you can create an OAuth connection using the Client Credentials Grant Type. Check this article to learn more about this option.
What is Client Credentials Grant Type?
The Client Credentials Grant Type is used by applications to access an API without user involvement. It is commonly used for machine-to-machine authentication, where the application itself authenticates with the API using a Client ID and Client Secret.
Steps to Create an OAuth Connection in ZappySys
- Using ZappySys SSIS PowerPack or ODBC PowerPack
-
Using ZappySys SSIS PowerPack
- Launch Visual Studio and Open existing SSIS Project or Create new SSIS Project to use ZappySys SSIS PowerPack in your environment.
- Choose either:
- SSIS REST API Task or Web API Destination (for direct operations)
- SSIS JSON Source, XML Source, or CSV Source (for data extraction)
-
Using ZappySys ODBC PowerPack
- Launch ZappySys Data Gateway or ODBC DSN (64/32 bit) in your environment.
- Choose either:
- ODBC JSON Driver, XML Driver, or CSV Driver (for data extraction)
-
Using ZappySys SSIS PowerPack
-
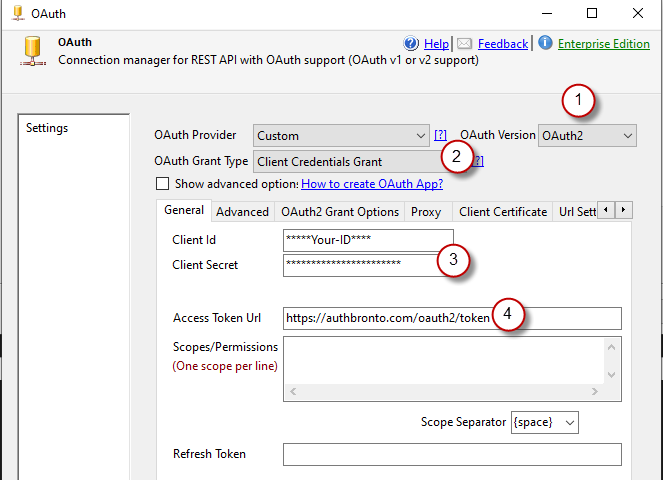
Create a New OAuth Connection
- Go to the Connection Manager.
- Select Add New Connection ➝ Choose OAuth Connection.
- Select Custom OAuth Provider.
- Select OAuth2 version.
- Select Client Credentials Grant Type.
-
Configure OAuth Settings. Enter the following details:
- Token Endpoint URL: The API endpoint to obtain the access token (e.g.,
https://api.example.com/oauth/token) - Client ID: Your app’s Client ID
- Client Secret: Your app’s Client Secret
- Scope: (Optional) Specify any required permissions or scopes
- Content-Type:
application/x-www-form-urlencoded(Default common for token requests)
- Token Endpoint URL: The API endpoint to obtain the access token (e.g.,
-
Test the Connection
- Click Test Connection to ensure that ZappySys can retrieve the token successfully.
-
Use the OAuth Connection in API Calls. Once the OAuth connection is established:
- In SSIS use it in REST API Task, JSON Source, XML Source, CSV Source, or Web API Destination.
- In ODBC use it in JSON Driver, XML Driver, or CSV Driver.
- The OAuth token will automatically be included in the Authorization header when making API requests.
Calling API in SSIS using OAuth 2.0 – Client Credentials Grant Type
Password Grant Type
In this grant you may use your User ID and Password to obtain Token for API call. This is not very popular Grant Type because you have to use your real credentials to make API call.
Understand AccessToken and RefreshTokens in OAuth 2.0
Along with GrantType there is one more concept in OAuth you have to understand. Its about two types of Tokens you get in OAuth 2.0
- Access Token
- Refresh Token
Here is brief description about each type of token.
Refresh Token
If you are using Authorization Code Grant Type (see previous section) then most API will send you RefreshToken and AccessToken after you finish 3-legged authorization first time (i.e. Login Dialog box). Refresh Token usually never expires. Some API may expire refresh tokens but after a long time (e.g. 90 days). If you have case of expiring RefreshToken then you may have to use this Pattern
Access Token
Access Token is needed to call API and its usually short lived (expires in 1-2 hours).
If you are using Authorization Code Grant Type then you have to use RefreshToken to get new AccessToken.
Step-by-Step – API Authentication with SSIS OAuth Connection
Now let’s look at an example of how to call API using SSIS OAuth Connection Manager and REST API Task. We will use HubSpot API as an example but concepts remain same for any other API such as Google API, Facebook, Twitter, LinkedIn
- Login into the service provider (whose API you want to use) membership area.
NOTE: Sometimes you have to create Developer account first and login using it. - Find API settings and create an application (API App). It will be your little bridge between user’s data and SSIS. Usually you will have to configure just a few fields:
- Name
- Scopes, your API App will be operating under
- Visibility
E.g. for HubSpot, it looks like this: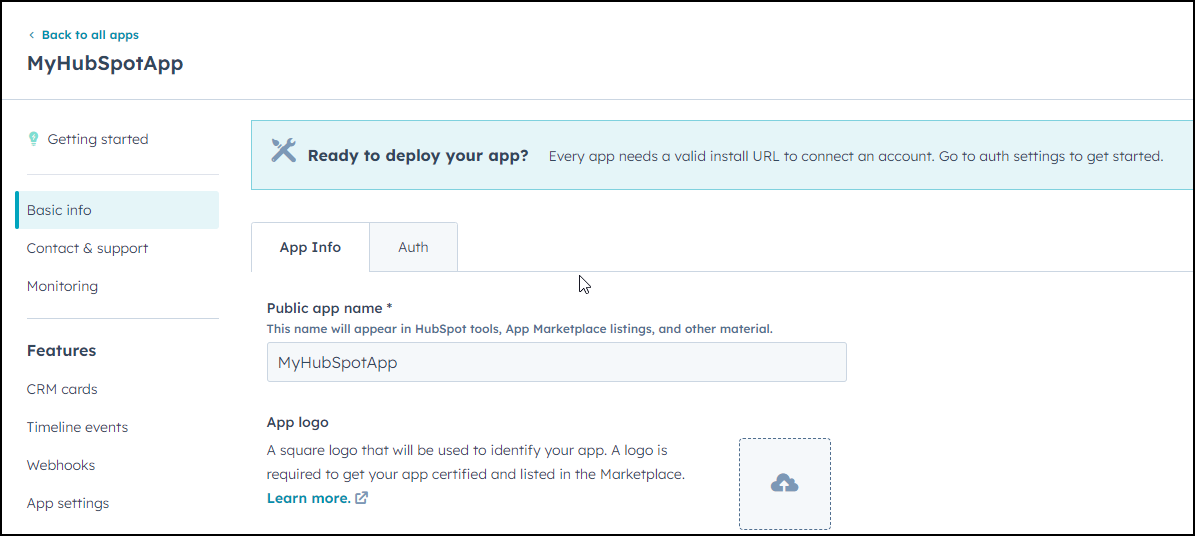
REST API App which will be used from within SSIS
NOTE: Your API App will never go out of the defined scope.
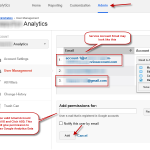
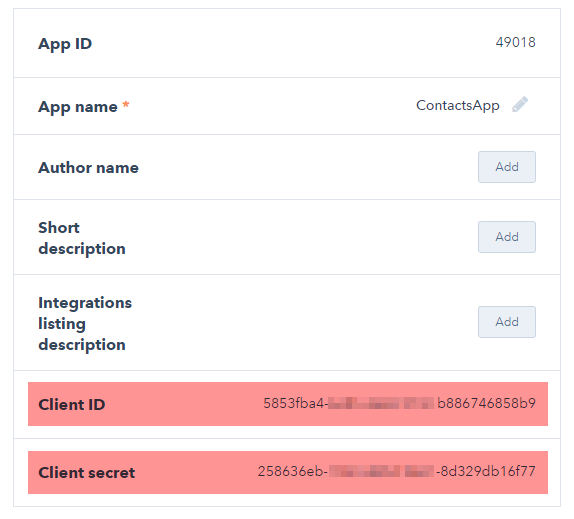
- Once you created an application, you should see fields Client ID and Client Secret nearby:
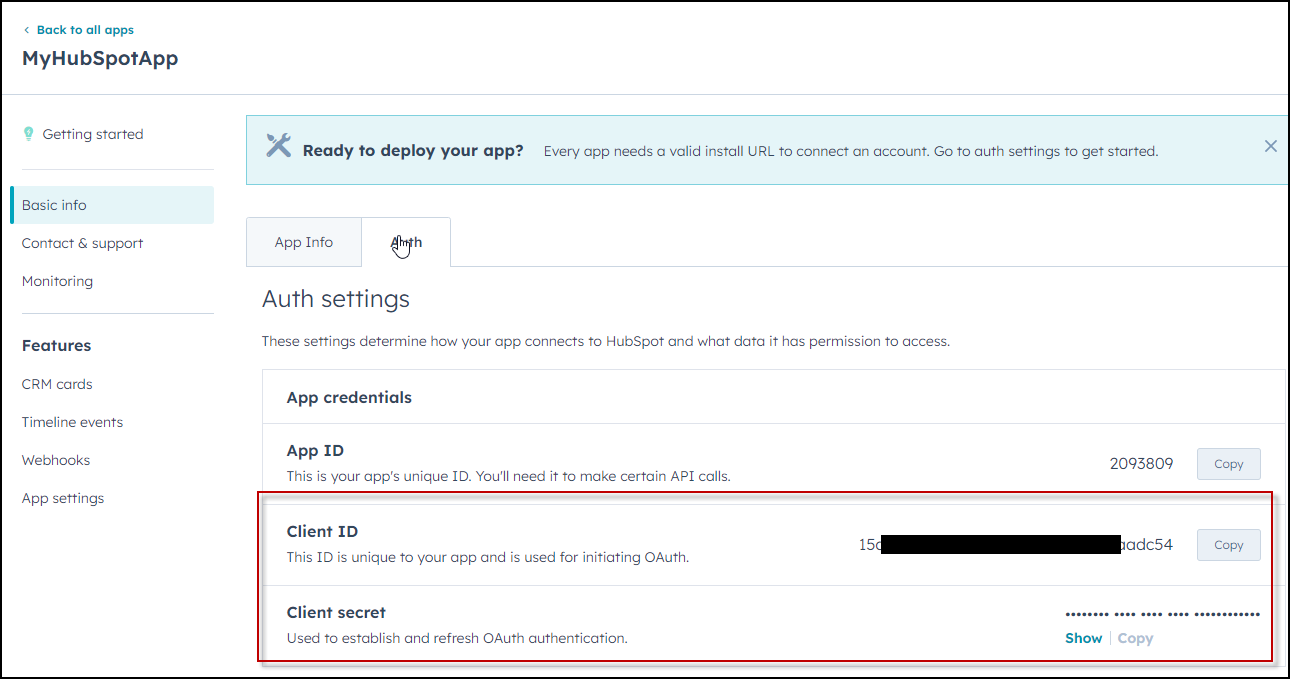
Write down Client Id and Client Secret for the next step in OAuth authentication process
NOTE: If you don’t see them right away, try accessing application settings and search them there. - Write down Client ID and Client Secret. We will need them later for authentication.
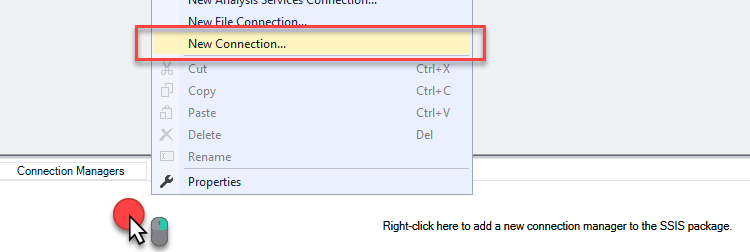
- Open SSIS Designer and create a new package.
- Right mouse click in the Connection Managers area and press New connection… and then ZS-OAUTH. This will create a new OAuth Connection.
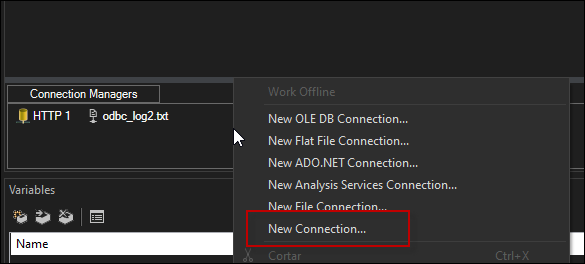
Create SSIS OAuth Connection for RESTful API authentication
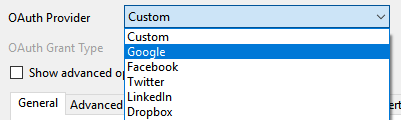
- Select OAuth Provider which will be used by an API when authenticating. Usually, OAuth Provider’s name is present in API’s name you want to use. E.g. Select
Google as OAuth Provider for Google Sheets API:
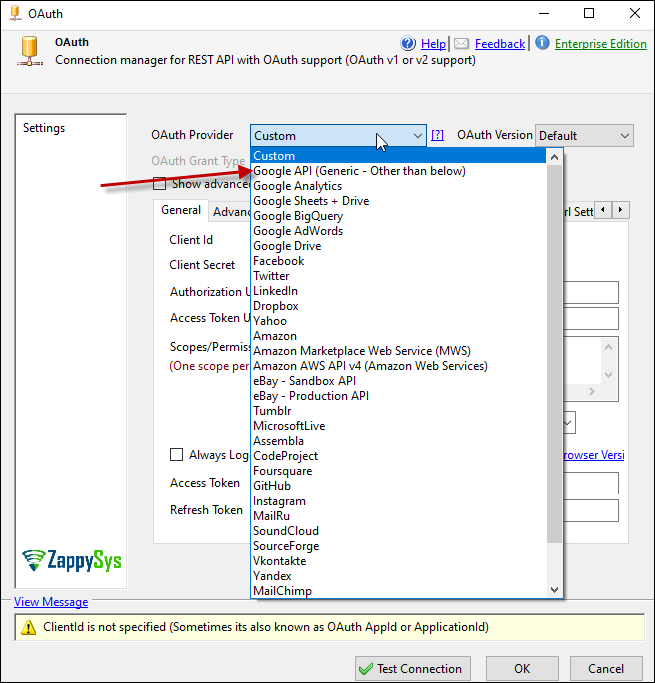
Select predefined OAuth Provider
NOTE: If you can’t see the provider you want, you will have to use Custom option. - This step is optional (use it if you didn’t find predefined OAuth Provider). For custom OAuth Provider you will need to configure:
- Authorization Url and Access Token Url, which you will find in a guideline of an API.
For HubSpot API these look like this: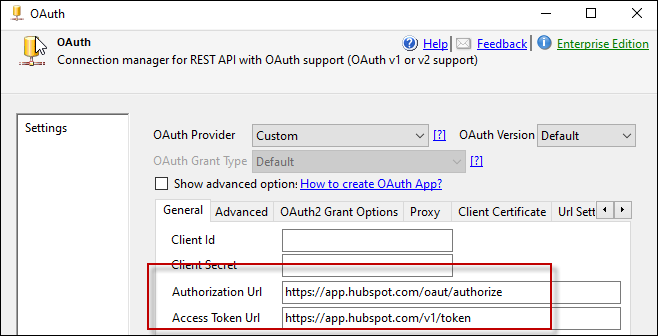
Configure SSIS OAuth Connection Authorization and Access Token URLs
- Callback/Return Url, which you should have the same as Redirect Url field in you API App settings.
For HubSpot API it is alright to enter your secure website address (with https). In this example, we will use https://zappysys.com/oauth.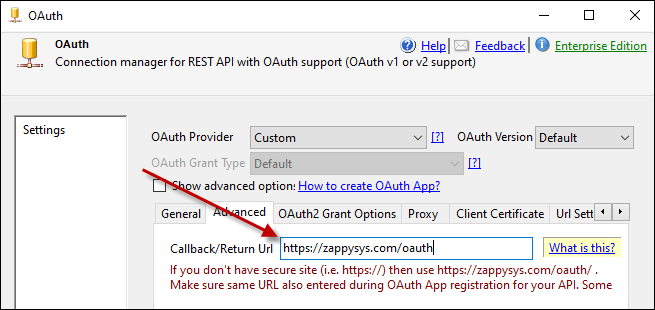
Set Callback/Return Url in OAuth Connection
NOTE: Don’t be surprised you cannot find Redirect Url field in your API App configuration. Some OAuth Providers don’t use this option.
- Authorization Url and Access Token Url, which you will find in a guideline of an API.
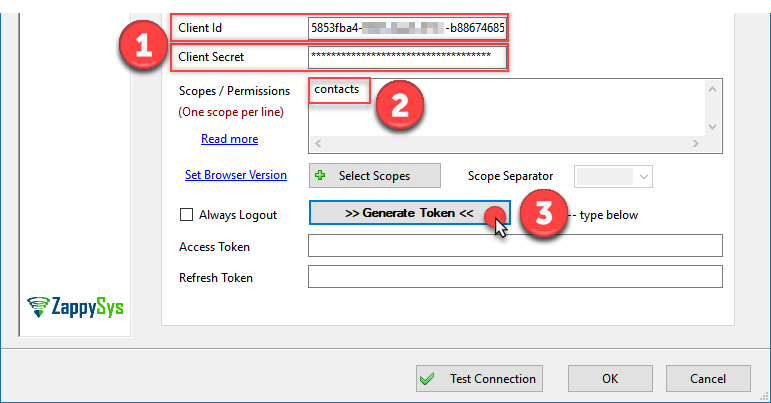
- Now it’s time to supply Client Id and Client Secret you wrote down in Step #4, enter Scopes / Permissions your user will need (we will use
contacts) and Generate a Token:
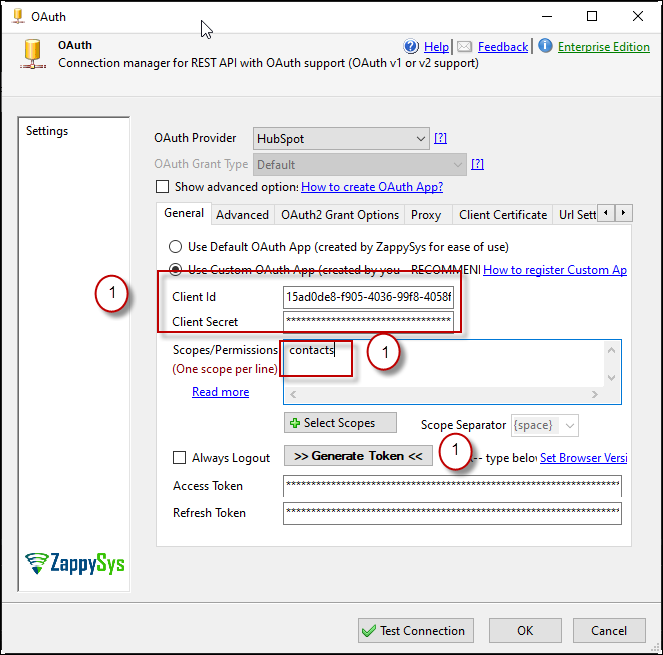
Input Client Id, Client Secret and Scopes to generate a token
NOTE:- To add a scope for the predefined OAuth Provider, use Select Scopes button.
- In scopes, if you set read only permissions you won’t be able call API methods that require write permissions.
- Also be aware that you cannot use different scopes other than you defined in Step #2.
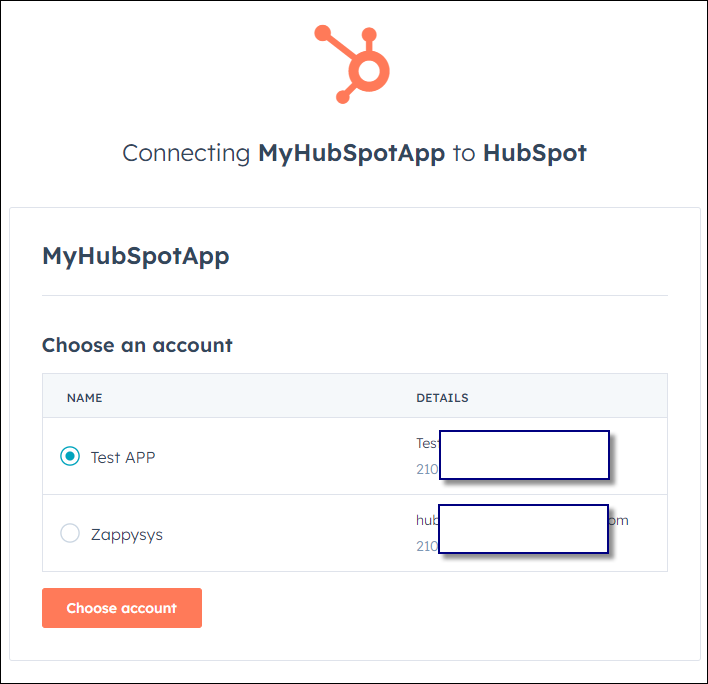
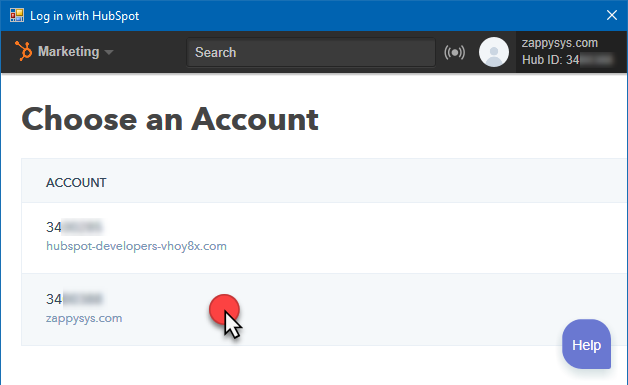
- Login with user account whose data you wish to access or just select a user if no login is needed:
Select the user, whose data you want to access
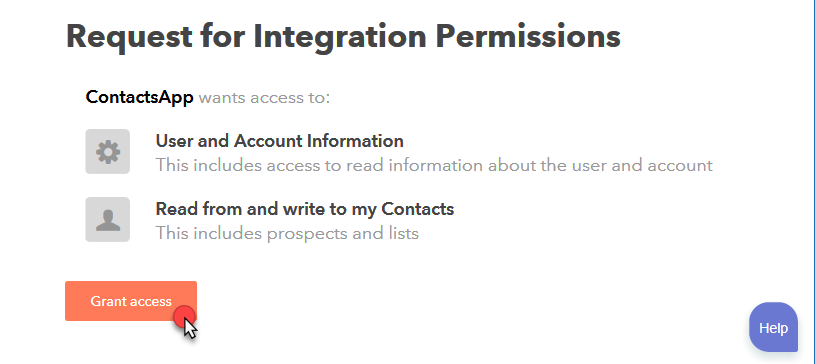
- Grant user access to your API App:
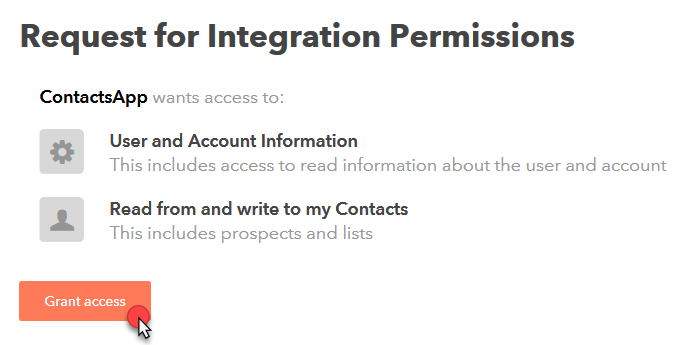
OAuth Connection SSIS component configuration – Grant access to HubSpot API App
- You will get a prompt to save Access and Refresh tokens to a backup file. Press “Yes” to save them.
NOTE: You will need to pass Refresh Token as the parameter, when you run the package in another machine. Check Deployment paragraph for more info. - That’s it! From now on your SSIS task/component via your API App will be able to use user’s data which you just granted access to.


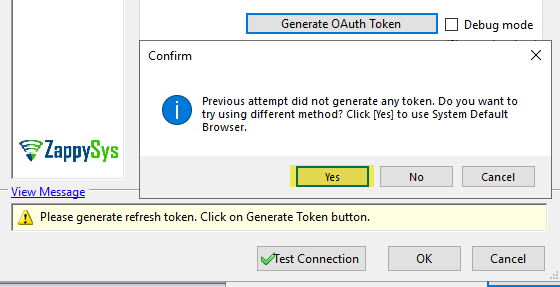
Using System Default Browser to get the token
If embedded browser has some issue to extract your token then you can close the window by pressing [X] in the title bar. Once you do that you will be prompted to use System Default browser to finish the token extraction. If you click Yes then Full browser will be launched.
NOTE: Below feature is added in version published after Dec 31, 2019 (v3.0.0.11231 or later) so make sure you have latest version.
Using System Default Browser to extract OAuth Token
Untrusted App Warning
Sometimes Google might show you below warning. In order to continue the flow you might have to Click on Advanced and then click Go to YourAppName (unsafe) like below

How to ignore Google Unsafe App Warning (OAuth Flow)
Select the account

Using System Browser
Copy code and finish the flow

Manually Copy Code and Get OAuth Refresh / Access Token
What is Google OAuth AccessToken
Using OAuth 2.0 in ODBC Drivers / Data gateway
So in previous section we talked how to setup OAuth in SSIS. If you like to use similar setup for Drivers in ODBC PowerPack then use below steps.
Following 3 drivers support OAuth Connection.
| Driver | Description | |
|---|---|---|
 |
JSON Files / REST API Driver Read More | Must have ODBC Driver for JSON Files / REST API / OData Integration Projects. It can be used to read data from local JSON Files or any JSON based API Services (such as Google Analytics, BigQuery, Office 365 and many more). It supports high performance JSON Streaming engine with many options such as Pagination, Error handling, Security, Filtering. |
 |
XML Files / SOAP API Driver Read More | Must have ODBC Driver for XML Files / SOAP API / OData Integration Projects. It can be used to read data from local XML Files or any XML / SOAP based API Services (such as Google AdWords, DoubleClick, Salesforce and many more). It supports high performance JSON Streaming engine with many options such as Pagination, Error handling, Security, Filtering. |
 |
CSV Files / REST API Driver Read More | Using this ODBC Driver you can read from CSV Formatted files or REST API which sends response in CSV format. It supports GZip or Zip format. If CSV data coming from URL you can use many advanced API settings such as Pagination, Error handling, Security. |
ODBC Driver OAuth Setup
If you are using ZappySys ODBC Drivers for API integration then use below steps to configure OAuth Connection to call API.
- Search for ODBC in start menu and select ODBC Data Source (64 bit)
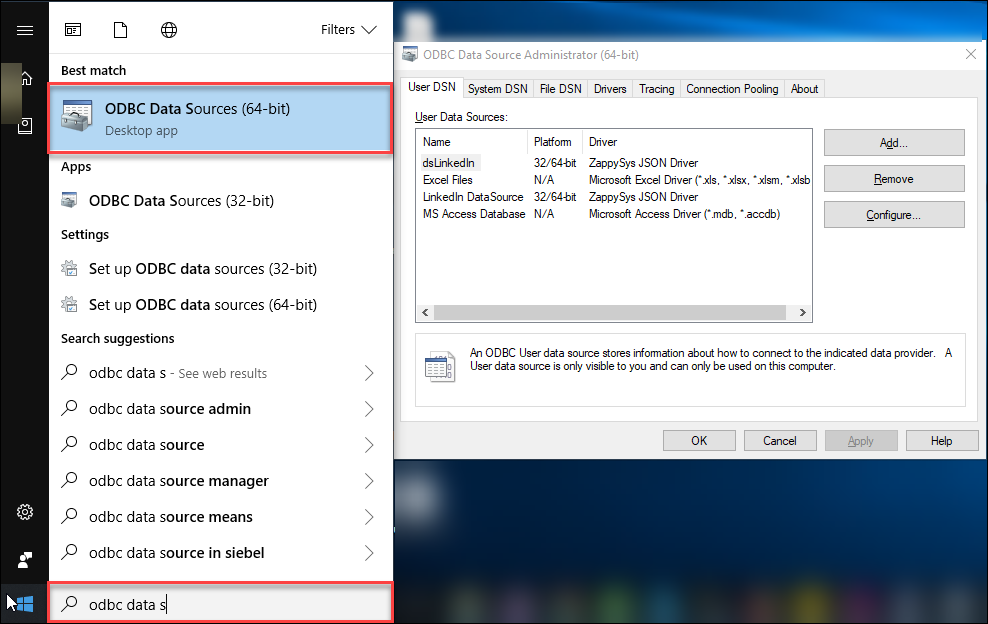
- Click ADD to Create a New ODBC DSN (Use System Tab if you creating DSN accessed by service account or other users on that machine)
- Select desired ZappySys API driver (e.g. JSON Driver, XML Driver or CSV Driver)
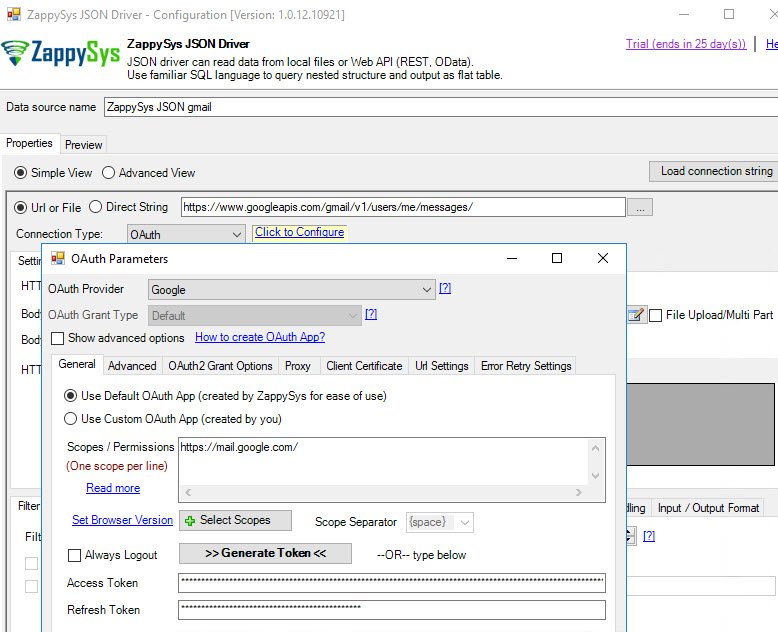
- When UI is visible like below you can select Connection Type dropdown to OAuth and click Configure.
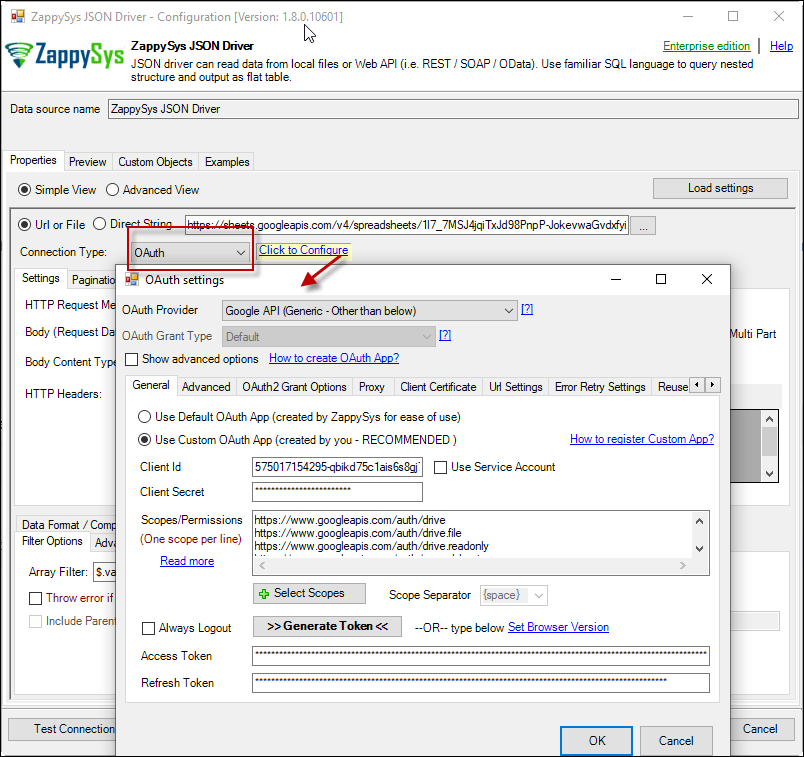
Configure OAuth Connection for ZappySys ODBC Drivers

Data Gateway OAuth Setup
If you are using Data Gateway for integration scenario like Import API data in SQL Server then use almost same steps as previous section (ODBC DSN Setup) but in this case we have to click on New Data Source on Gateway Config UI as below.
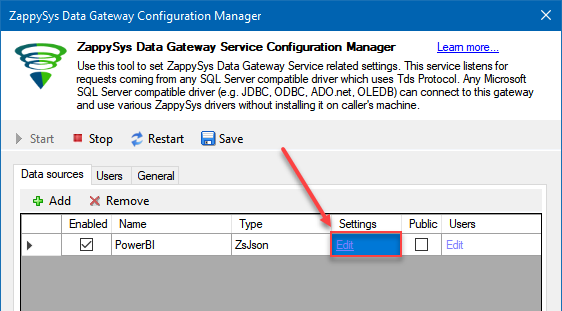
Configure Gateway Data Source
Parameterization and deployment to production
In SSIS package sensitive data such as tokens and passwords are by default encrypted by SSIS with your Windows account which you use to create a package. So SSIS will fail to decrypt tokens/passwords when you run it from another machine using another Windows account. To circumvent this when you are creating an SSIS package which uses authentication components (e.g. an OAuth Connection Manager or an HTTP Connection Manager with credentials, etc.), consider using parameters/variables to pass tokens/passwords. In this way, you won’t face authentication related errors when a package is deployed to a production server.
Check our article on how to configure packages with sensitive data on your production or development server.
Conclusion
In this tutorial we learned how to access user’s data from within SSIS using an API by authenticating with OAuth 2.0. As you have probably noticed already, OAuth 2.0 was used not only for authentication, but for authorization too (remember the Scope you had to set?). In subsequent article you will really get your hands dirty (not really, it is actually simple) and learn how to call an API method using SSIS REST API Task.
Keywords
Connect to a RESTful API with OAuth using SSIS | How to authenticate to an API with OAuth using SSIS | Authenticate a user using OAuth with SSIS | Grant user access to API using OAuth from within SSIS | Authorize a user to access REST API with OAuth using SSIS