Introduction
 In this post we will learn how to call Salesforce Marketing Cloud API using SSIS and load into SQL Server. We will show you use case of SSIS REST API Task and SSIS JSON Source
Basically there are two steps to call Salesforce Marketing Cloud API
- Obtain ClientID and ClientSecret ( Check these steps )
- Get Access Token by calling requestToken API call
- Once you have token you can call any other API endpoints to read / edit / update Marketing Cloud data. You must supply Token inside Authorization Header along with each call.
Requirements
Before we look into Step-By-Step section to call Salesforce Marketing API (Exacttarget) make sure you met the following requirements.
- SSIS designer installed. Sometimes it is referred as BIDS or SSDT (download it from Microsoft site).
- Basic knowledge of SSIS package development using Microsoft SQL Server Integration Services.
- ZappySys SSIS PowerPack installed. Click on the link to download a FREE trial.
- You have access to Salesforce Marketing Cloud and you have correct permission to create access key (or just ask Salesforce Admin to generate it for you Check these steps )
Getting Started
Now let’s look at step by step approach on how to read salesforce marketing data in SSIS.
Step-1 : Get Access Token for Salesforce Marketing Cloud API call
First step is to get token for Marketing Cloud API calls. We have to call this API to obtain token. This token typically lasts for one hour or so (3600 seconds).
Before we call below steps make sure you have obtained ClientID and ClientSecret ( Check these steps ).
- Download and install SSIS PowerPack
- Open SSIS Package
- Drag ZS REST API Task from the SSIS Toolbox on Control Flow designer.
- Rename task to call it Get Token
- Double click to edit as below.
Production URL:
Sandbox URL:1https://auth.exacttargetapis.com/v1/requestToken
1https://auth-test.exacttargetapis.com/v1/requestToken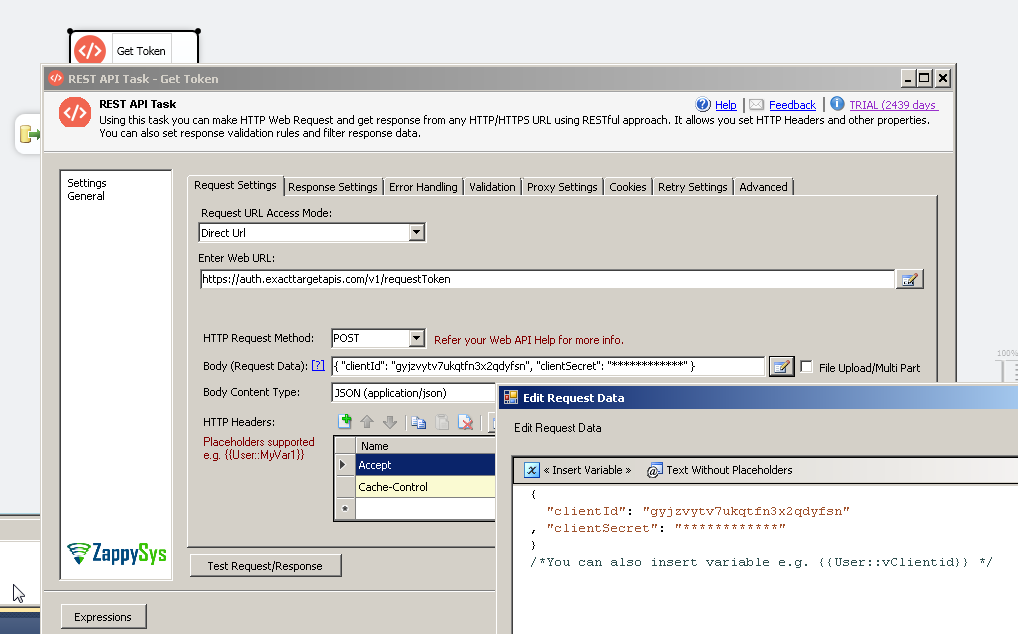
Get API Token for Salesforce Marketing Cloud API calls
- Go to response setting tab and change Response Type to JSON and set expression as $.accessToken , Check Save response and Select Variable <New Variable> (e.g. vToken)
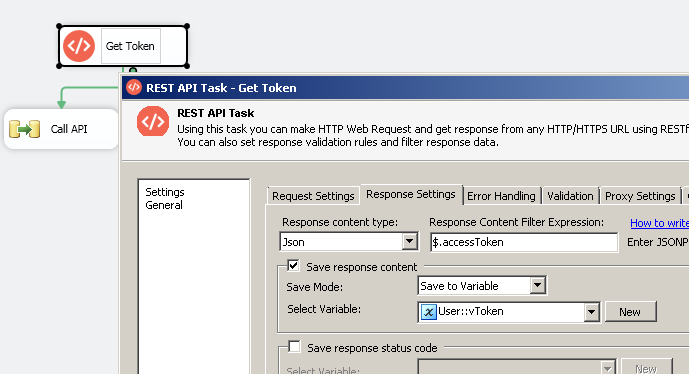
Configure Response Tab – Extract API Token for Salesforce Marketing Cloud API calls
- Now Click Test Request/Response to confirm you get token. Copy Token from Bottom panel and click OK to save UI
- Now right click in designer and click “Variables” and paste Token we got in previous step in the Value (This token is good for one hour only so update if it expires). This manual update is only needed while you designing page… and testing data Preview / get metadata (see Next Section). When you run full package it will get fresh token each time and ignore Hardcoded token from Variable.
Step-2 : Read data from Salesforce Marketing Cloud API (SSIS JSON Source)
Now once we have token extract step done. We can move to next step which is to read actual data from Exacttarget API (i.e. Salesforce Marketing Cloud API)
We will us SSIS JSON Source to read data (JSON format) and save to SQL Server.
- Drag data flow task from SSIS Toolbox and drop to control flow surface.
- Rename Data flow to Get Data or Call Data
- Connect first step (Get Token) to data flow
- Double click task and from data flow toolbox drag ZS JSON Source on the surface
- Double click JSON Source and configure as below.
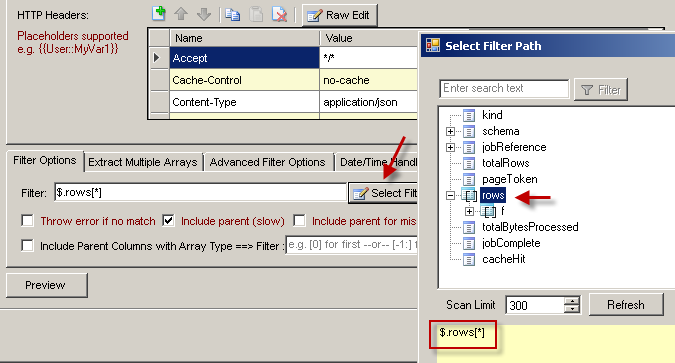
- Click ON Select Filter Button and Select Correct filter… (Make sure select only Array Node icon to extract correct data)
- Click Preview to confirm
- Click OK to save
- Connect JSON source to some target (e.g. OLEDB Destination for SQL Server)
- Run your package
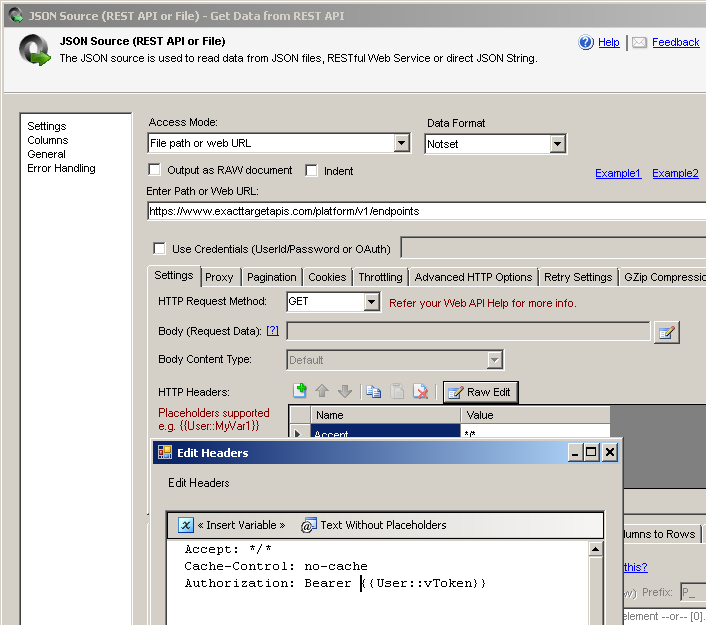
Read Salesforce Marketing Cloud data in SSIS and load into SQL Server (Using SSIS JSON Source)
Using HTTP Connection (New version – Single Step)
If you are using a new version (with HTTP – Dynamic Token Support), then you can try the following option.
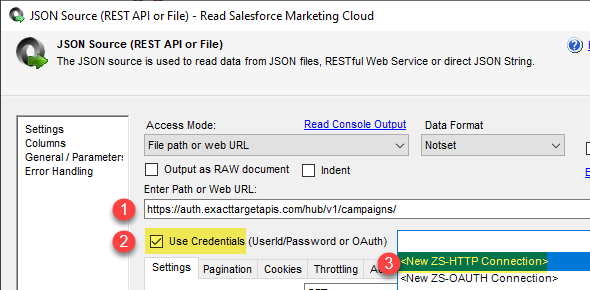
- On JSON Source Check Use Credentials and choose HTTP connection.
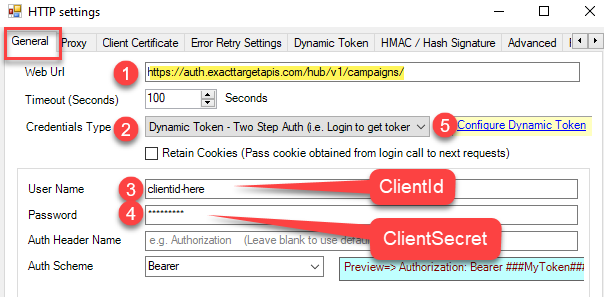
- On the HTTP Connection, choose the following settings
- For URL enter https://auth.exacttargetapis.com/hub/v1/campaigns/
- Choose Dynamic Token Auth
- Enter Client ID (same as the previous section)
- Enter Client Secret (same as the previous section)
- Click the Configure Dynamic Token link
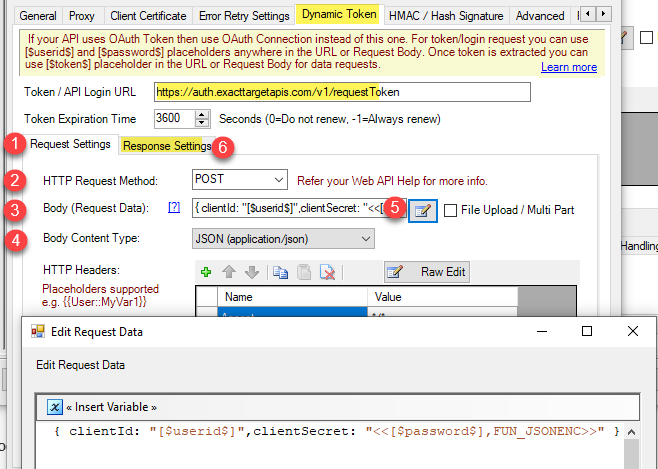
- Now on the Dynamic Token Tab configure like below (Request Settings Tab)
- Make sure you are on Request Settings Tab
- Enter token endpoint URL
1https://auth.exacttargetapis.com/v1/requestToken - Set Request Method (POST)
- Select Content Type (application/json)
- Enter Body like below
1{ clientId: "[$userid$]",clientSecret: "<<[$password$],FUN_JSONENC>>" } - Click on Response Settings Tab
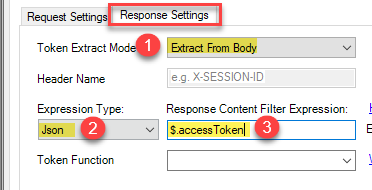
- On the Response Settings Tab configure like below
- Select Extract From Body
- Expression Type as Json
- Enter expression <span class="lang:default decode:true crayon-inline ">$.accessToken
- Click OK and you can preview your API data on JSON Source
Example: https://auth.exacttargetapis.com/hub/v1/campaigns/ - If you use HTTP COnnection with Dynamic Token you do not need two step approach we did in the previous section
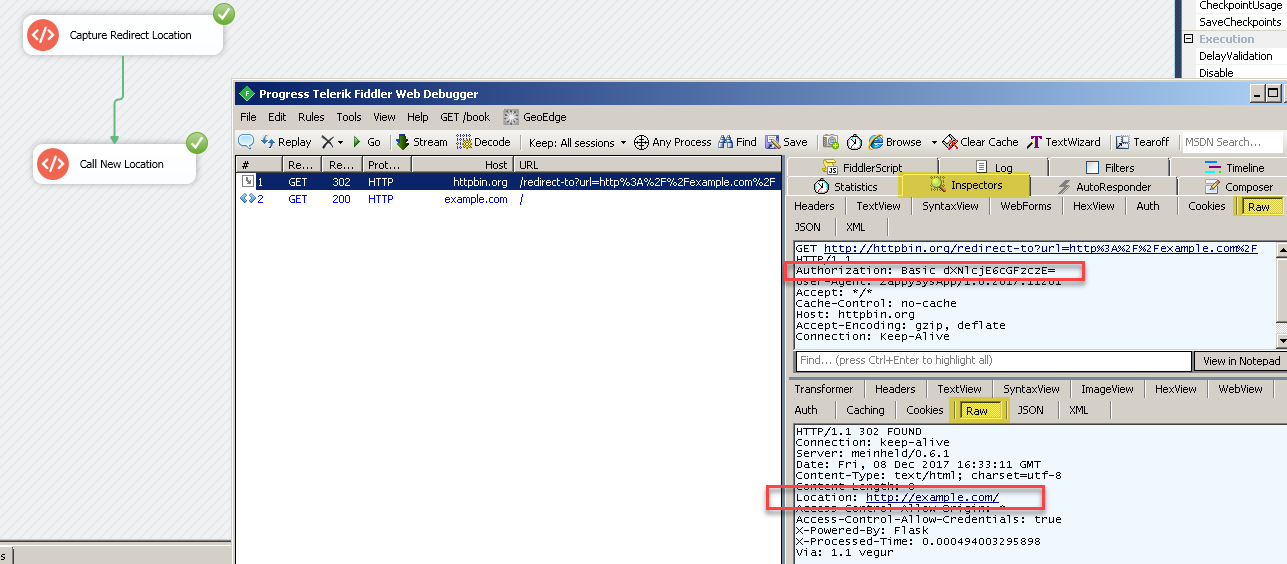
Debug Web API call using Fiddler
To test how things looking behind the scene we strongly suggest to use tool like fiddler. You can double click the URL entry (Right side) to see Request and Response Panels. Top panel is Request (URL, Headers, Body) and Bottom Panel is Response.Loading data from REST API to SQL Server
Once you setup HTTP / OAUTH connection we can use JSON Source or XML Source to extract data from API and load into SQL Server. If you are API is XML based API then use XML Source in below examples else use JSON Source. For example purpose we will load data into SQL Server but you can load into any Target (e.g. Flat file, Oracle, Excel) using Microsoft or ZappySys Destination connectors To load REST API data into SQL Server perform the following steps (Screenshots are generic and used for demonstration for purpose, your values can be different than below)- Go to SSIS Data Flow tab
- Drag ZS JSON Source from the SSIS Toolbox (Use ZS XML Source if your API is XML based API)
- Double click to edit Source
- Set API URL you like to call, Check Use Credentials if you need to use HTTP or OAuth connection
- Set Method / Body if its other than GET. For method other than GET make sure you select correct Content-Type from Dropdown (e.g. application/json). This indicate input data format in Body.
- Set HTTP Headers if needed (in Most cases you won't need to set this)
- Select Filter (many times this is not needed). If your API response has array node then select it here. For example if your response looks like this { rows: [ {...}, {...}, {...} ] } then filter would be $.rows[*]. Select Array node you like to extract in the Filter selection UI.
- Configure Pagination if needed on the pagination tab. Check your API documentation see it supports pagination.
- Click OK to Save component settings and generate desired metadata / columns for the output.
- Now drag OLEDB destination from the SSIS toolbox and drop on the Data Flow surface (technically you can use any valid Destination but for demo we will use OLEDB Destination)
- Connect Source to Destination Component
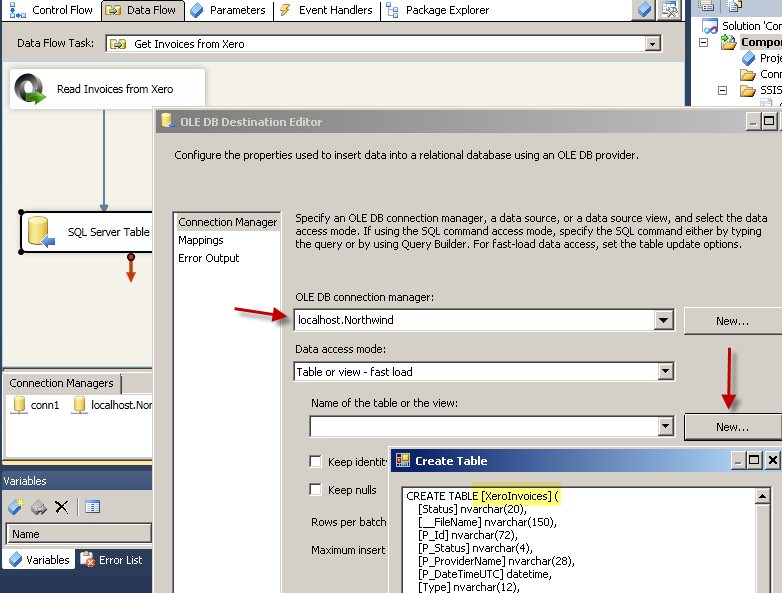
- On OLEDB destination select / create new SQL Connection and then Click "New Table"
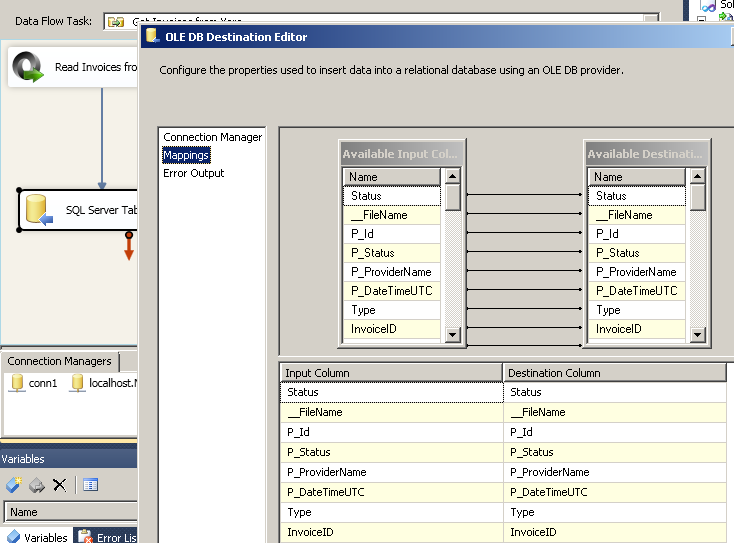
- Click on Mappings tab to map columns by names and click OK to save
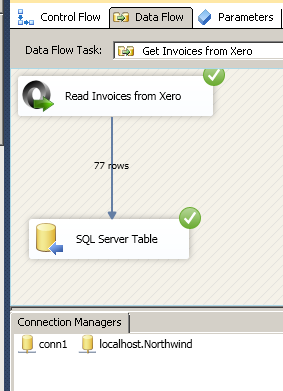
- Execute the Package

