Introduction
![]()
In this blog, we will learn How to read data from Azure DevOps in SSIS and load into SQL Server Table. Azure DevOps was formally known as TFS Online / VSTS.
In this article we will learn, how to read Issues (Work Items) using Azure DevOps API (i.e. VSTS API). In last few years Microsoft has changed marketing names few times for TFS Service. For example everything started with Visual Source Safe (VSS) > TFS > TFS Online > Visual Studio Online > VSTS (Visual Studio Team Services)) and finally now its called Azure DevOps. In this article we might use terms like VSTS or TFS Online or Azure DevOps but not to get confused its all about Calling Azure Dev Ops API.
In this article we will try to cover few topics such as.
- Register an OAuth App to call REST API for Azure DevOps API (i.e. VSTS / TFS Online)
- Read all Issues (Work Items) data from VSTS with SSIS and finally
- Create new Issue/Bug in Visual Studio Team Service Project WorkItems.
- Authenticate and Call Azure DevOps using PAT (Personal Access Tokens) rather than OAuth 2.0
We will go through the steps to read Issues data from Visual Studio Team Service and Load into SQL Server using SSIS REST API Task and SSIS JSON Source.
In nutshell, this post will focus on how to call VSTS API using SSIS.
So let’s get started.
Prerequisite
- First, you will need to have SSIS installed
- Secondly, make sure to have SSDT
- Finally, do not forget to install ZappySys SSIS PowerPack
Call Azure DevOps API Using PAT (Personal Access Token)
There are two ways to call Azure DevOps API. You can use OAuth 2.0 or use PAT (i.e. Personal Access Token) In the next section we will see how to use OAuth 2.0 if you like more secure way to authenticate (OAuth 2.0 requires more steps).
Microsoft offers Static API Token (referred as PAT – Personal Access Token) which you can use like a password (it remains valid for 1 year before you have regenerate).
So let’s get started.
Create PAT (Personal Access Token)
- Visit to
https://dev.azure.com/YOUR_COMPANY_NAME/_usersSettings/tokens . Create Personal Access Token (i.e. PAT ) by clicking User Settings icon > Personal Access Token (see below) (detailed steps listed here )
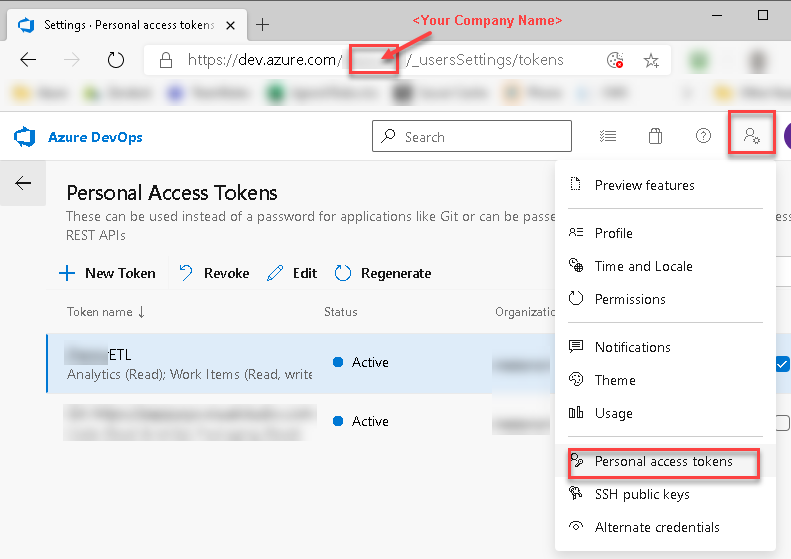
Call Azure DevOps API (formally known as VSTS / TFS Online) – Create Personal Access Token (i.e. PAT)
- On Token Configuration Screen change Expiration to maximum (i.e. one year from today)
- Now select permission – We will call Analytics API below (but you can also check Work Items section if you need to call some other API for read / write purpose)

Change Permission / Expiration Date for Azure DevOps PAT (Personal Access Token) – Read / Write Work Items, Call Analytics API Example
Call Azure DevOps OData API in SSIS – Read WorkItems Example (Analytics API Service)
Now lets configure JSON Source to read WorkItems by calling Azure DevOps Analytics API (in Previous few sections we call different set of APIs). Check this link for more information on AzureDevOps Analytics API (its OData format).
For demo purpose we are calling WorkItems entity but you can read from many other entities like (Read Areas, Iterations, Projects, Teams, Tags etc). Check this link to see which Entity (i.e. Table) you can query for specific OData API version.
So let’s get started
- Go to SSIS designer and drag Data Flow Task on the Designer Surface

- Then double click Data Flow and from toolbox drag ZS JSON Source

- Double click JSON Source to configure like below
- First change Data Format to OData (Analytics API we will call in this section is OData format)
- Enter URL to Query data like below. Change YOUR_COMPANY_NAME with your own name. Below API URL will call Analytics will
1https://analytics.dev.azure.com/YOUR_COMPANY_NAME/Odbc/_odata/v3.0/WorkItems?$select=WorkItemId,Title,WorkItemType,State,CreatedDate&$orderby=CreatedDate desc&$top=11 - Check Use Credentials and Select new ZS-HTTP connection (instead of OAUTH)
- On HTTP Connection UI Configure below
- Enter Some URL – This will be ignored anyways (e.g. https://dev.azure.com )
- Change Credentials Type to Basic (User ID / Password)
- Enter some random word in User ID -i.e. fakeusername (this is ignored anyways but needs some non-empty value for older version of SSIS PowerPack else validation fails)
- Enter PAT (i.e. Personal Access Token) obtained in the previous section
- Click OK to Save Connection UI and go back to JSON Source
- On JSON Source, Enter or Select Array Filter as $.value[*]
- Click Preview data see its working using HTTP connection method

Configure JSON Source – Call Azure DevOps Api using PAT (Personal Access Token)
Calling Azure DevOps API in SSIS using OAuth 2.0
Now in this section we will see how to use more secure but little harder approach to authenticate. We will use OAuth 2.0 this time rather than static token (PAT) which we used in previous section.
In order to start, we will show several examples. ZappySys includes an SSIS JSON Source that will help you to call VSTS API, read various data from VSTS with SSIS, create a new issue on VSTS with SSIS and do many more actions using REST API. To learn more about VSTS API check this help file.
Create VSTS App (for OAuth 2.0 API Call)
To access VSTS data using REST API call you need to create a VSTS app. Follow the mentioned steps below to register VSTS OAuth App:
- you can directly login to the Visual Studio Team Service – TFS Online site with your credentials, and redirect to the Visual Studio Team Service App Registration for creating an app.
- you can open MyApps Page.
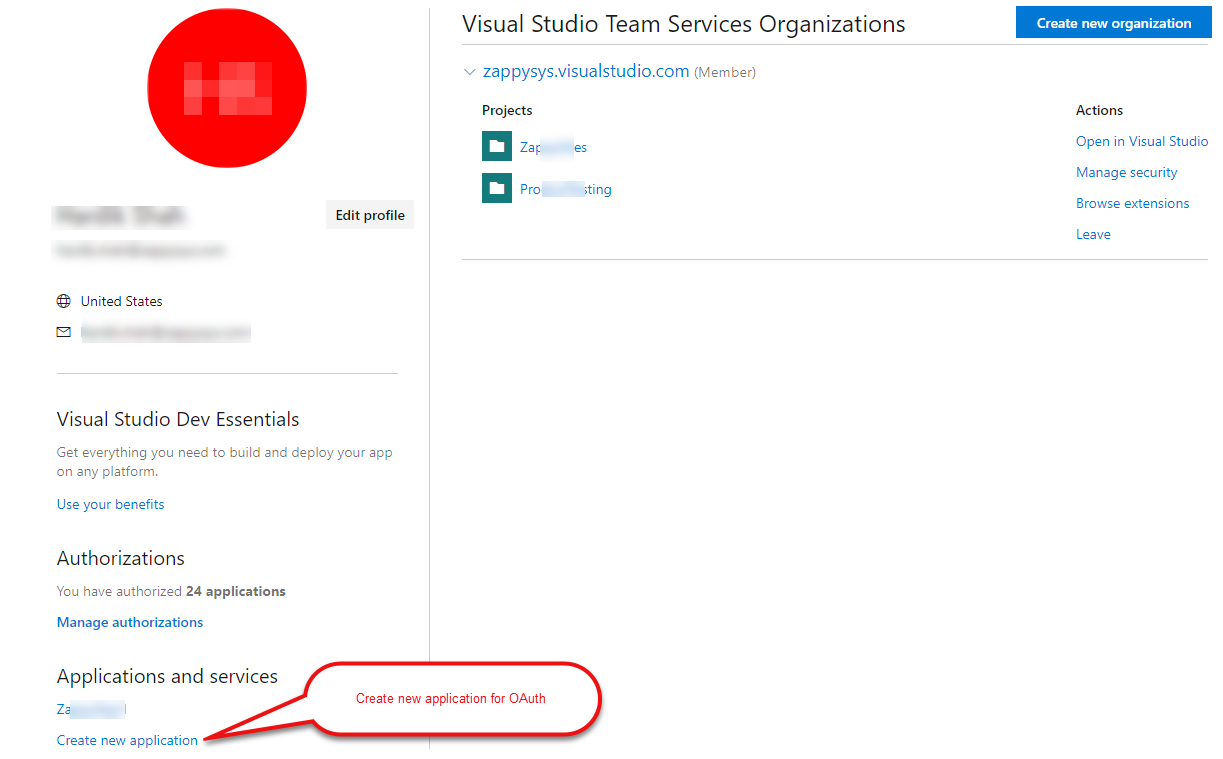
Visual Studio Team Service: My Apps
Visual Studio Team Service: My Apps[/caption]
- Click on Create new application link, and you will be redirected to the Visual Studio Team Service App Registration Page.
- Make sure you enter Authorization call base URL. We suggest to below call back URL if you are unsure. We will use exact same URL on OAuth connection UI (Advanced Tab)
1https://zappysys.com/oauth
-
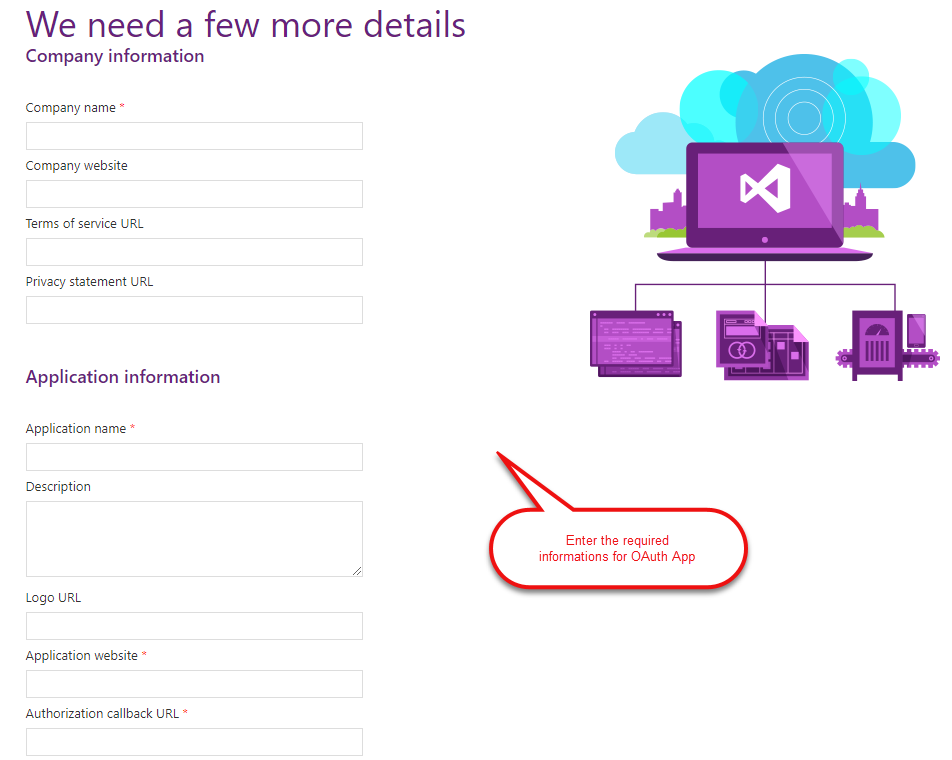
Visual Studio Team Service: New OAuth App Registration
- Select the Authorization scopes as per your requirements, and click on Create Application button.
For example to read Work Items or Create new Issues programmatically you can check following scope (i.e. OAuth permission).Check – Work items (full) (i.e. vso.work_full scope)Note: The scopes selected on your registered application (below screenshot) must match the scopes entered in the ZappySys OAuth connection scopes field (see below). If they do not match exactly, an InvalidScope error can be produced.
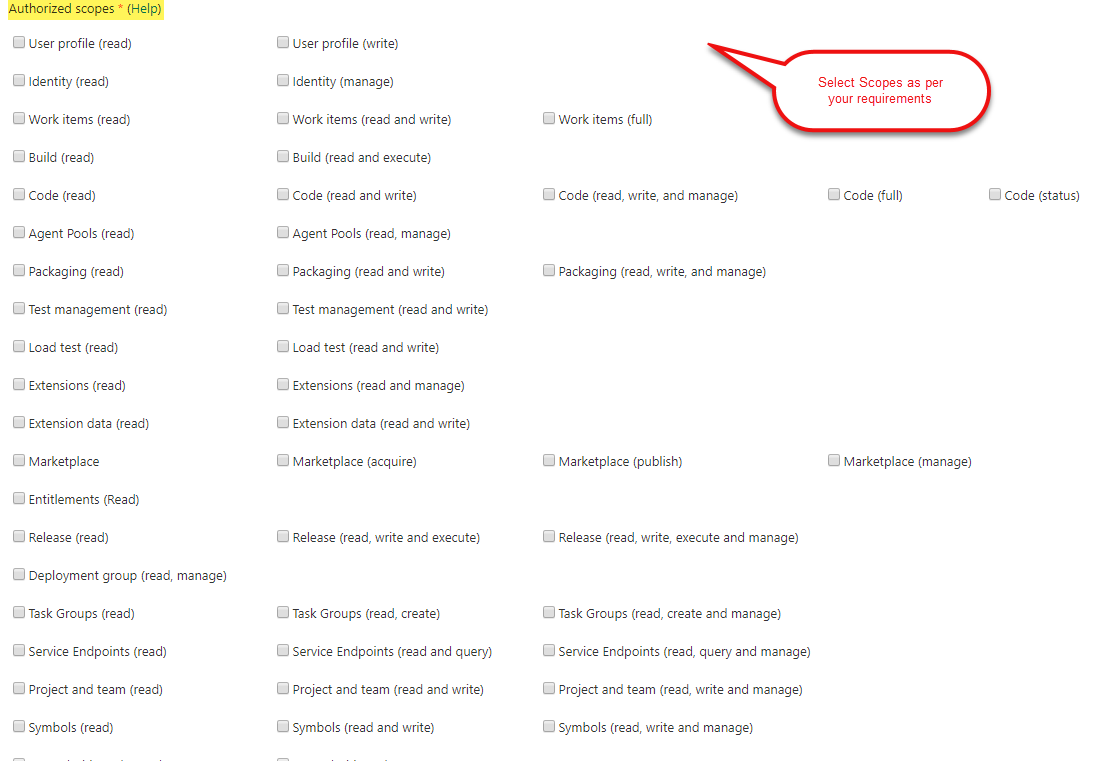
Visual Studio Team Service: Select Authorization Scopes
- Once you are done with the Creation of an App certainly, you can edit the Application If you want to change Redirect URL or something.
- furthermore, Go to MyApps Page and you have your App’s Lists there with App’s App ID as Client ID and App Secret as Client Secret.

Visual Studio Team Service: Your Apps with App’s Credentials
finally, we are ready with an App. Let´s start with an example. In this example, we will show how to retrieve all Issues data from Visual Studio Team Service – TFS Online and create a new Issue in Visual Studio Team Service – TFS Online Work Items List under your Project with SSIS.
Load VSTS data to SQL Server using SSIS JSON Source
Now once you registered OAuth app in the Visual Studio Team Service – TFS Online website we can move to SSIS Part.
Configure OAuth Connection Manager
- Right click on Connection Managers Panel to Create New OAuth Connection, and Context Menu will appear, Select New Connection from the Context Menu.
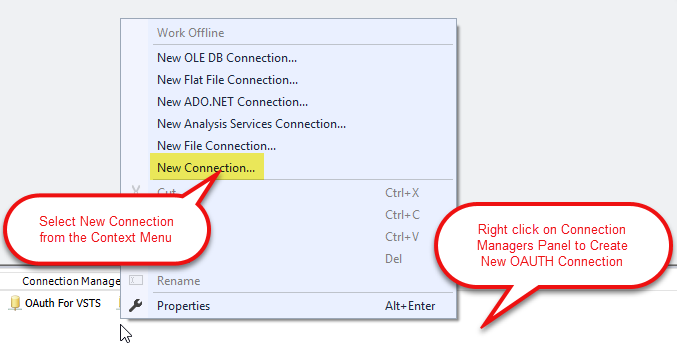
Connection Manager Panel: Select Connection
- Select ZS-OAUTH Connection Manager from the Connection Managers list.
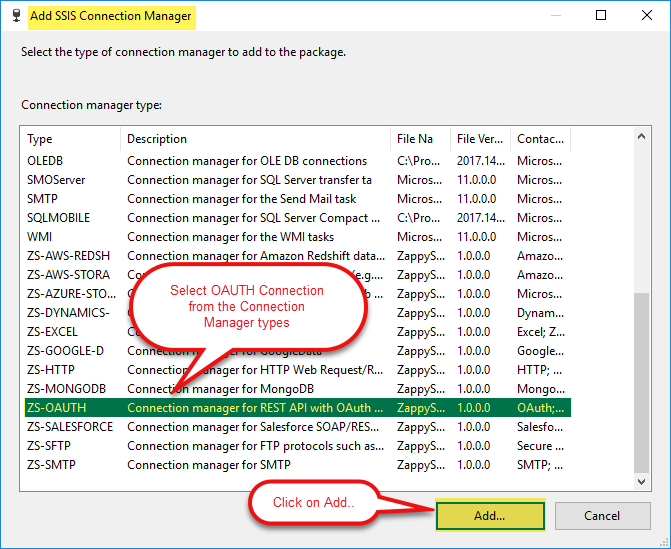
SSIS Connection Mangers List: Select O-AUTH Connection Manager
- Configure the new OAuth Connection for VSTS(Visual Studio Team Service – TFS Online) as below.
- First lets enter Call back URL (Same URL you entered when you created App earlier)
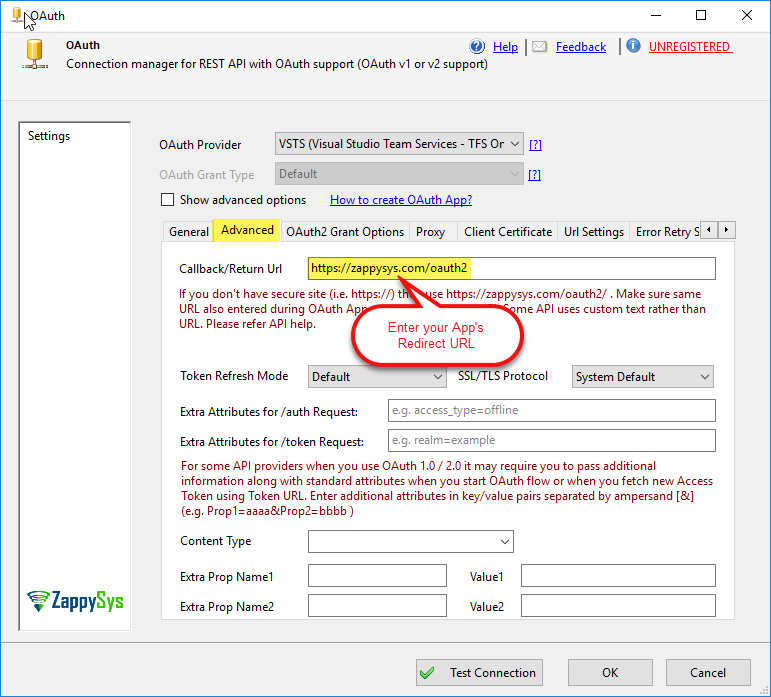 SSIS OAuth Connection Manager: Advanced Tab Configurations
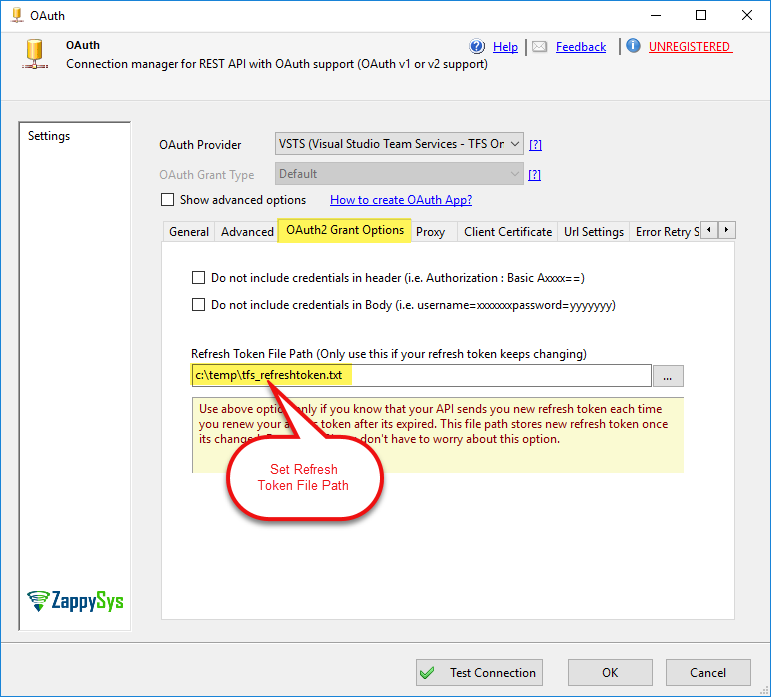
 - For VSTS API you need to set the Refresh Token File Path as below because VSTS API Token’s Refresh Token keeps changing.
- Then configure the App on the General tab like below (i.e. OAuth Provider, Client ID, Client Secret, Scopes, etc.)
Scope must be valid one from this list (only those scope allowed which are checked during app creation). For example during app creation you check Work items (full) then you can enter vso.work_full in scope.Note: The scopes selected on your registered application must match the scopes entered in the scopes field (below screenshot). If they do not match exactly, an InvalidScope error can be produced.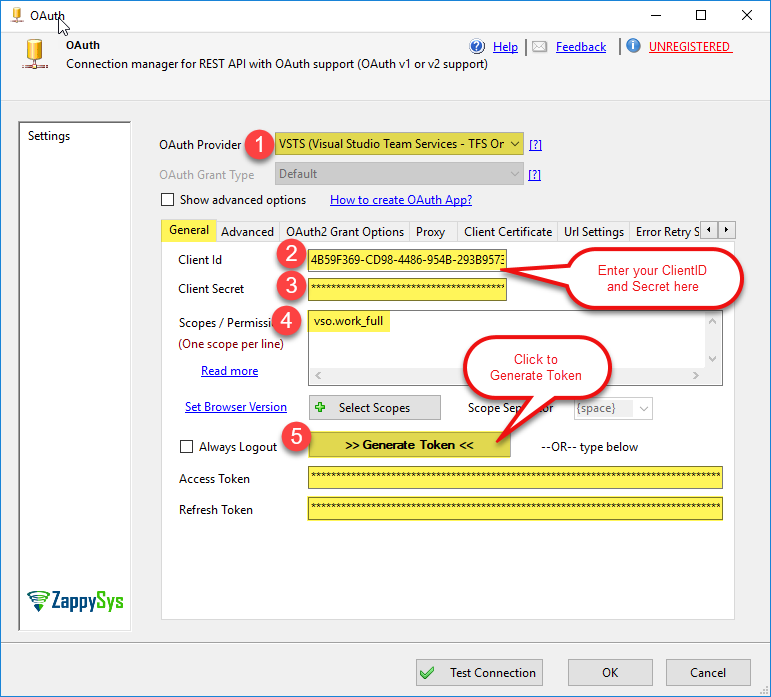
- finally, you are done with the OAuth Configurations. Click on Generate Token button to Generate token and then click on Test Connection button and click on OK to save the connection manager configurations settings.
How to get ProjectID?
If you don’t know the ProjectID, then you can also enter ProjectName in place of ProjectID in Request URL. you can also call GET Request for getting Lists of Projects. the Request URL for getting the list of Projects is:
|
1 |
https://{accountName}.visualstudio.com/_apis/projects?api-version=4.1 |
For this, we will use SSIS REST API Task
- First of All, Goto Control Flow Section, Drag and Drop SSIS REST API Task from the SSIS Toolbox.
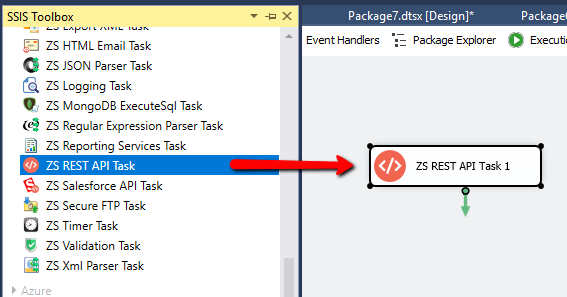
Drag and Drop REST API Task
- furthermore, Double click on that Component to Edit the Configurations and Configure the task like the below-attached screesnshot.
Some basic configurations need to be done in SSIS REST API Task.
# Request Tab:* Select Request URL Access Mode to Url from Connection.
* Select Url Connection to your configured ZS-OAuth Connection Manager.
* Enter Request URL: https://zappysys.visualstudio.com/_apis/projects?api-version=4.1
* Select HTTP Request Method: GET
SSIS REST API Tsk: Request Tab Configurations
Create New Variable from Variable Menu

SSIS User Variables: Create a new Variable and set Value
# Response Tab:
* Select Response Content Type: Json
* Set Response Content Filter Expression: $.value[1].id
* check the checkbox of Save Response Content
* Set Save Mode to Save to Variable
* Select your Variable: {{User::ProjectID}}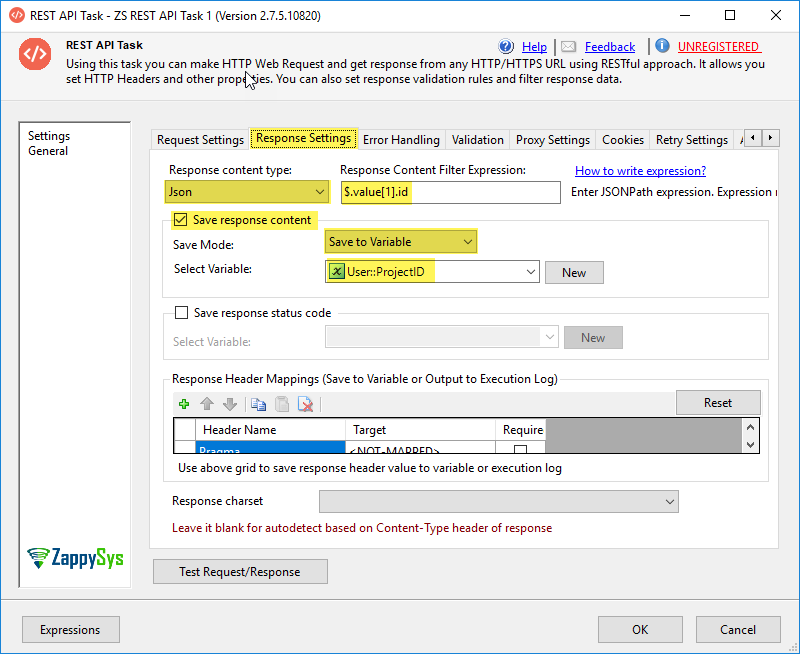
SSIS REST API Task: Response Tab Configurations
- finally, you are done with the configurations and do Test Request/Response and your ProjectID will be saved in {{User:: ProjectID}}

Configure JSON Source Component
- First of all, Create a new SSIS Project or Open Existing Project in Visual Studio (File > New > Project > Business Intelligence > Integration Services)
- Once SSIS Package is open, Goto Data Flow Section, Drag and Drop ZS JSON Source Component from the SSIS Toolbox.
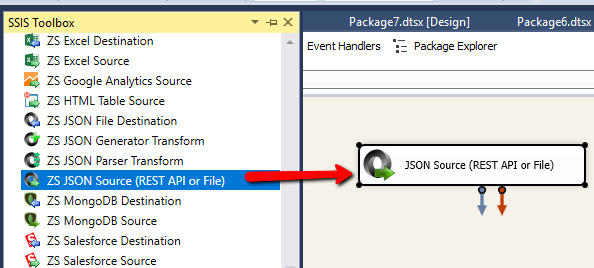
Drag and Drop JSON Source Component
- furthermore, Double click on that Component to Edit the Configurations. Select File path or web URL from the Access Mode drop-down.
Enter Web URL like this:
here, We have used 2 Parameters.1https://{accountName}.almsearch.visualstudio.com/{project}/_apis/search/workitemsearchresults?api-version=4.1-preview.1* {accountName} is the name of the Visual Studio Team Services – TFS Online account.
* {project} is Project ID or project name (For more See this Visual Studio Team Service API Documentation for getting filtered Issues data Request API)
We have used Search Work Items for Fetching Paginated Work Items(Issues, Bugs)You can use Variable too in your Request URL, to make URL Dynamic, See the below-attached Screenshot.
To make URL dynamic first create an SSIS variable like below screenshot and then change URL to use Variable Placeholder like this1https://zappysys.almsearch.visualstudio.com/{{User::ProjectID}}/_apis/search/workitemsearchresults?api-version=4.1-preview.1
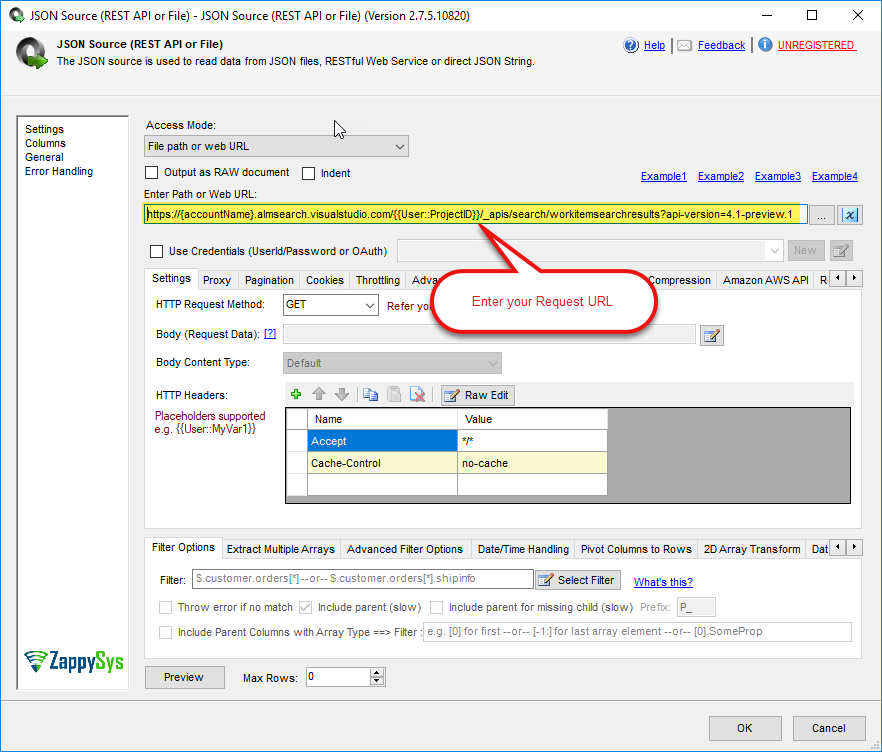
SSIS JSON Source Component: Enter the Request URL
JSON Source Configuration for Pagination
- now, we are going to set Pagination related configurations of Visual Studio Team Service – TFS Online for Getting all WorkItems with Search POST REST Request API. Here in our example,
Request Method: POST
Body Content-Type: JSON (application/json)
Request Body:
here, SearchText: The SearchText for filtering WorkItems based on the keywords match.12345678910{"searchText": "a","$skip": <%page%>,"$top": 100,"filters": {"System.TeamProject": ["ProductTesting"]}}
$skip: Number of results to be skipped
$top: Number of results to be returned.
filters: Filters to be applied. Set it to null if there are no filters to be applied.you can take any number of the page size. for example, you can set 100 in both $skip and $top properties (I have set 10 for the Demo Purpose only)
System.TeamProject: ProjectName in which you want to do filtering of WorkItems.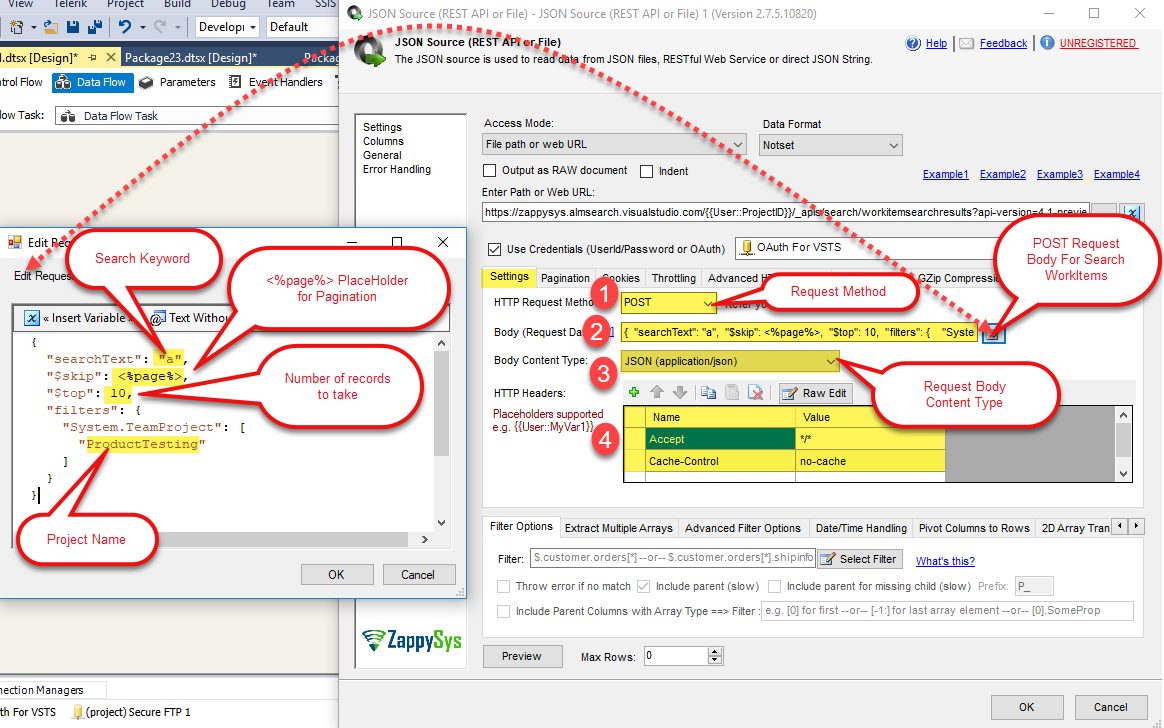
SSIS JSON Source Component: Configurations of Settings Tab
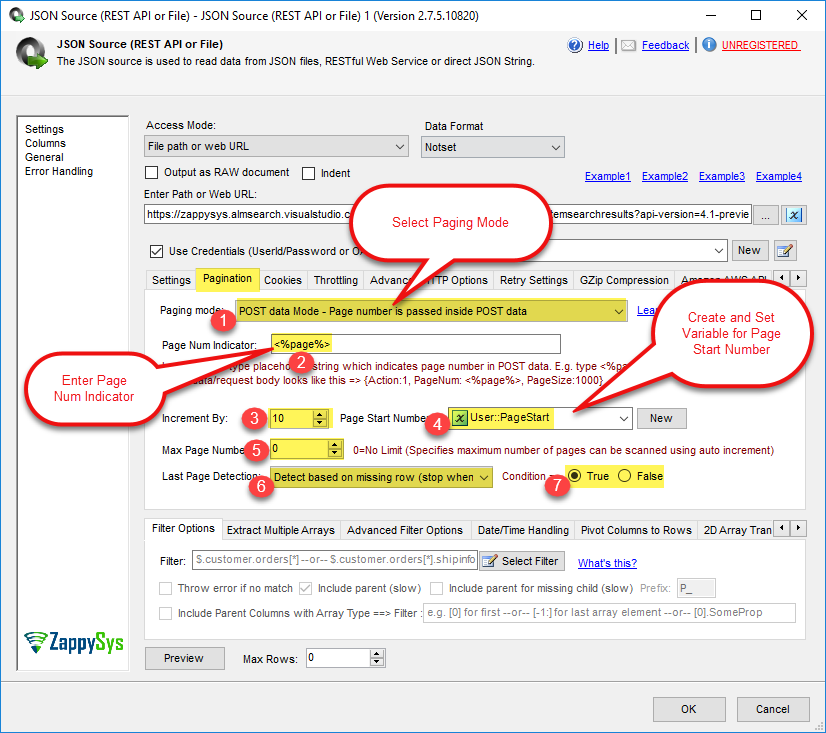
- You can Configure the Pagination Tab something like this:
SSIS JSON Source Component: Pagination Tab Settings
- furthermore, Select the Filter to set the Filter.
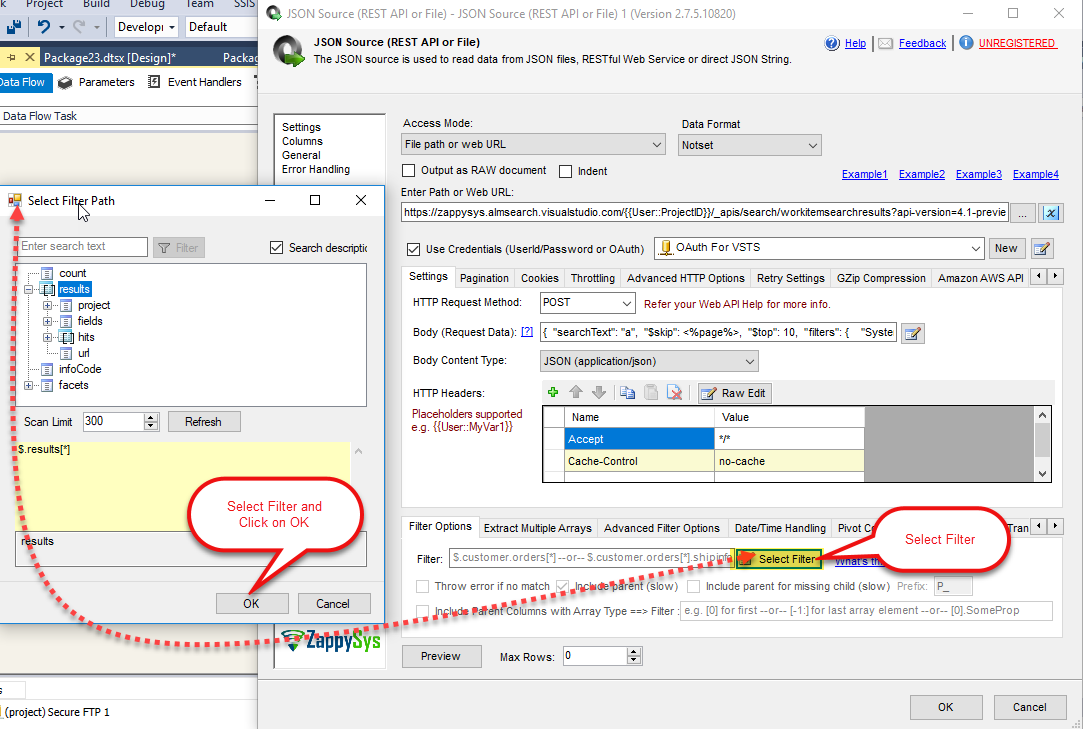
SSIS JSON Source Component Configurations: Select Filter
- It seems like you are all OK with the configurations, Click on the Preview button to see the response data.
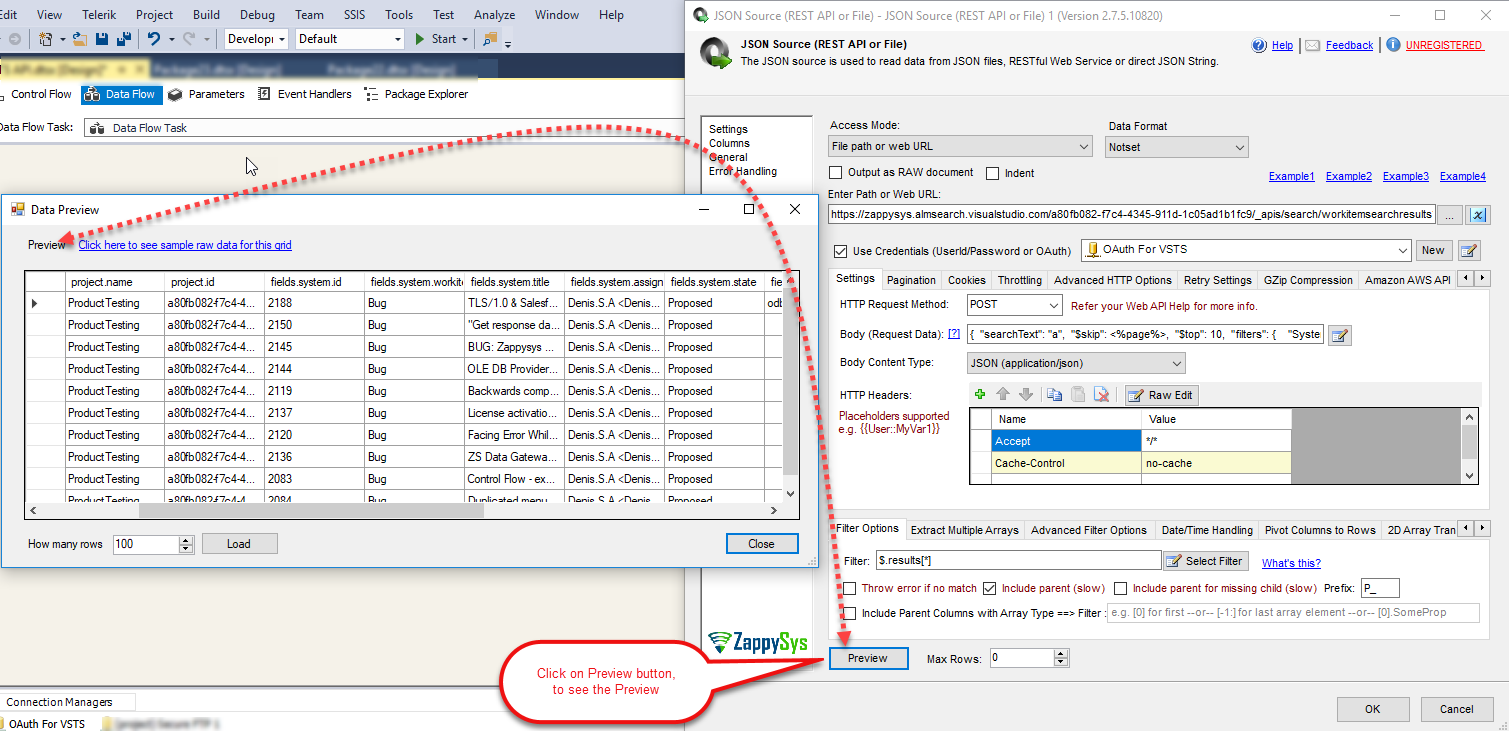
SSIS JSON Source Component: See the Preview
- finally, Click on OK button to save JSON Source settings.
Configure OLE DB Destination Component for dumping Contacts data into SQL
- first of all, Drag any destination (i.e. OLEDB Destination) from your SSIS toolbox. For demo purpose, we will load Contacts data into SQL Server Table.

Drag and Drop OLE DB Destination Component
- Configure OLEDB Destination (Select Connection and Target Table). You can Create a new Table for the destination by clicking a NEW button next to Table drop-down.
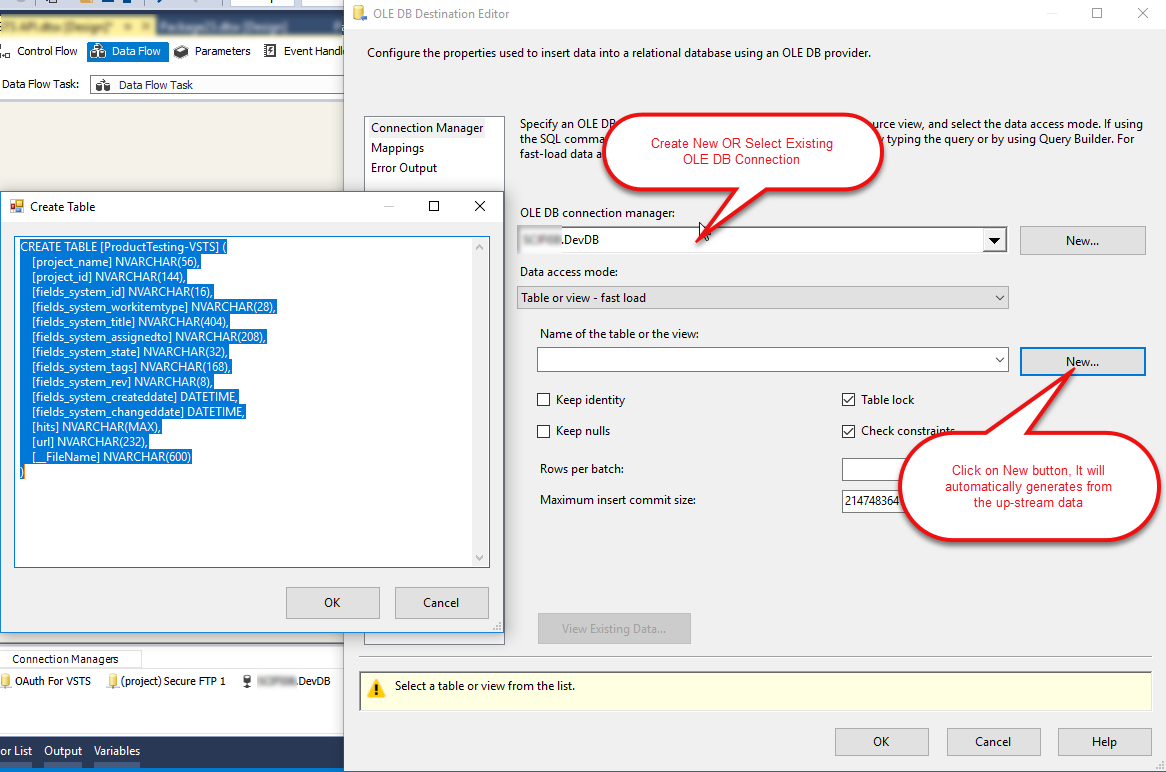
OLE DB Destination Component – Configure for dumping WorkItems of Project from VSTS data in SQL Table
- almost you are done with the configurations, just need to configure mappings, So for that Click on the Columns Tab to configure Mappings. also, Click on OK button to Save the configurations of OLE DB Destination Component.
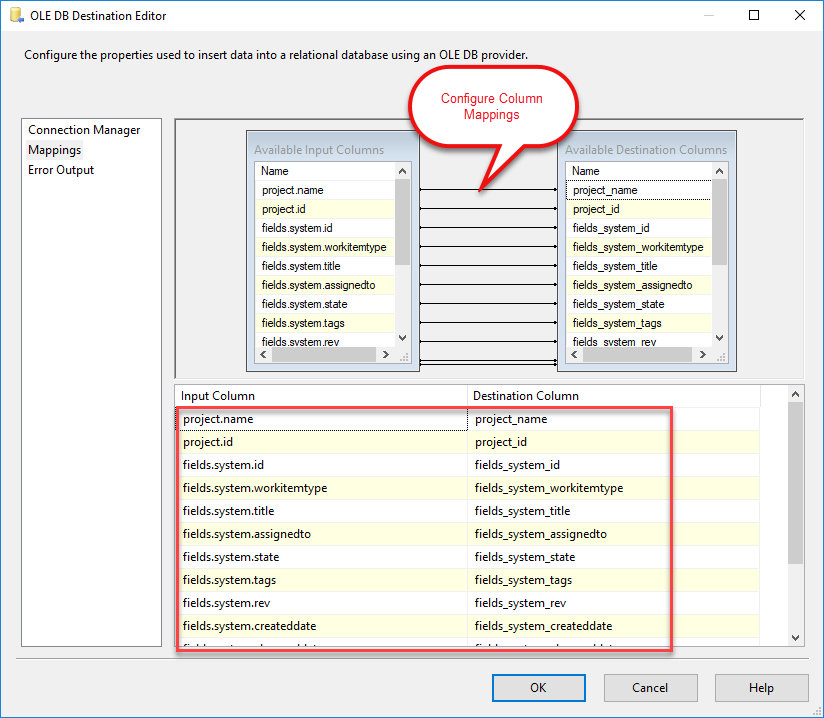
OLE DB Destination – Column Configurations
- furthermore, You can see the requests in Fiddler to see the Paginated requests flows.
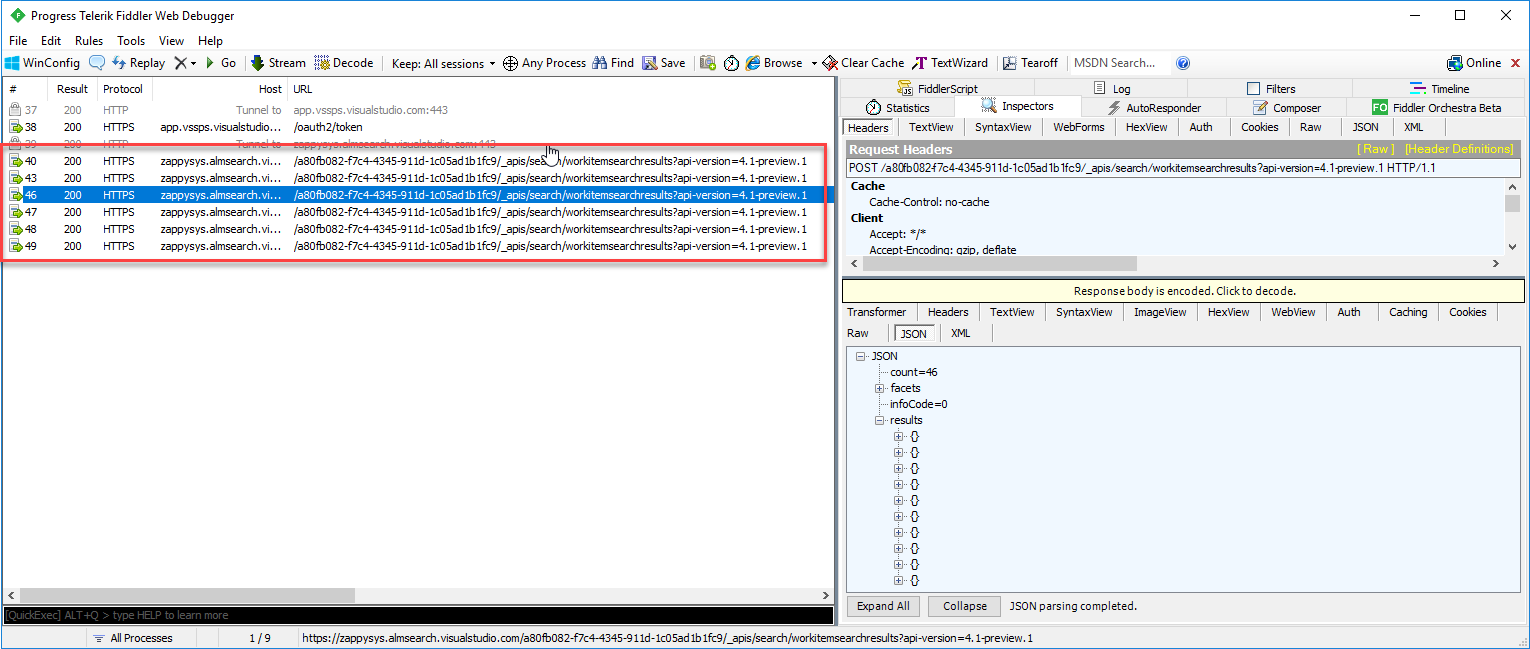
Fiddler – See All The Requests
- finally, Execute your package to Load Contacts data from Visual Studio Team Service – TFS Online to SQL Server.
Create a new WorkItem on Visual Studio Team Service – TFS Online (Use SSIS REST API Task)
Now let’s look at one more example to call Visual Studio Team Service(VSTS) – TFS Online REST API. This time we will create a new WorkItem using REST API call in SSIS. For this, we will use SSIS REST API Task
- First of All, Goto Control Flow Section, Drag and Drop SSIS REST API Task from the SSIS Toolbox.
Drag and Drop REST API Task
- furthermore, Double click on that Component to Edit the Configurations and Configure the task like the below-attached screesnshot.
12345678910111213141516171819202122232425::::: Request Settings :::::* Select Request URL Access Mode to select Url from Connection.* Select Url Connection: Select your created OAUTH Connection Manager.* Enter Reqeust URLRequest URL: POST https://{accountName}.visualstudio.com/{project}/_apis/wit/workitems/${type}?api-version=4.1here,{accountName} - The name of the Visual Studio Team Services account.{project} - Project ID or project name{type} - WorkItems Type (Task, Bug, Issue, Requirement etc)* Select HTTP Request Method as PATCH method* Enter Request Body.Request Body:[{"op": "add","path": "/fields/System.Title","value": "Sample task"}]* Select Body Content Type: Text/Plain*Enter Request Header:Content-Type: application/json-patch+json(For more Information See this Visual Studio Team Service - TFS Online API Documentation for Creating a new WorkItemhttps://docs.microsoft.com/en-us/rest/api/vsts/wit/work%20items/create?view=vsts-rest-4.1)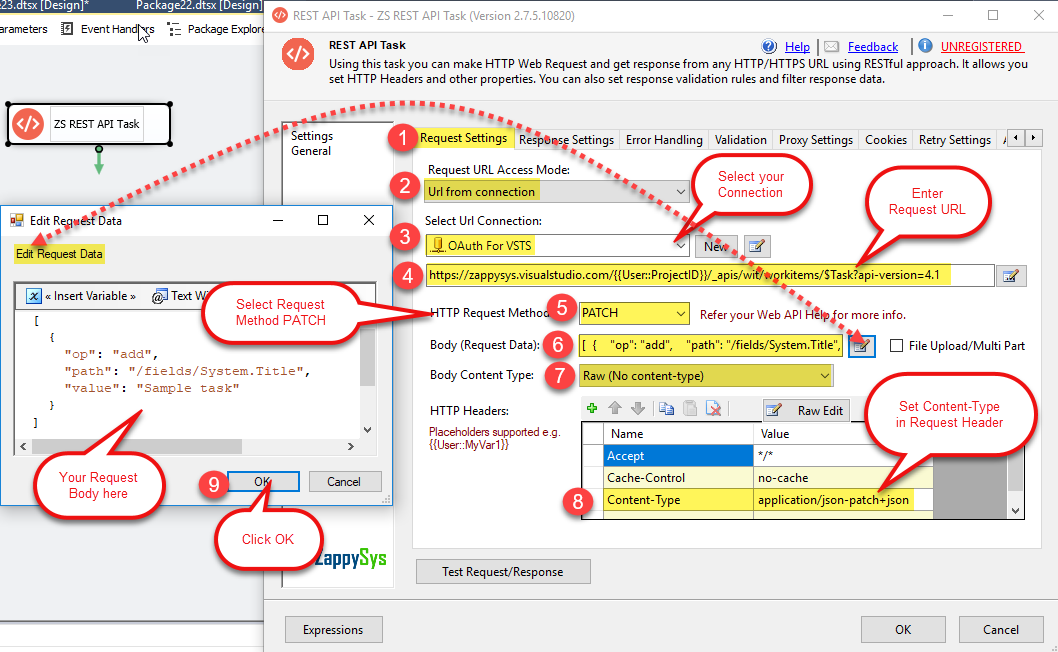
REST API Task: Configurations
- So all good with the Configurations let’s do Test Request/Response by clicking on Test Request/Response button. See the below-attached request/response screen.
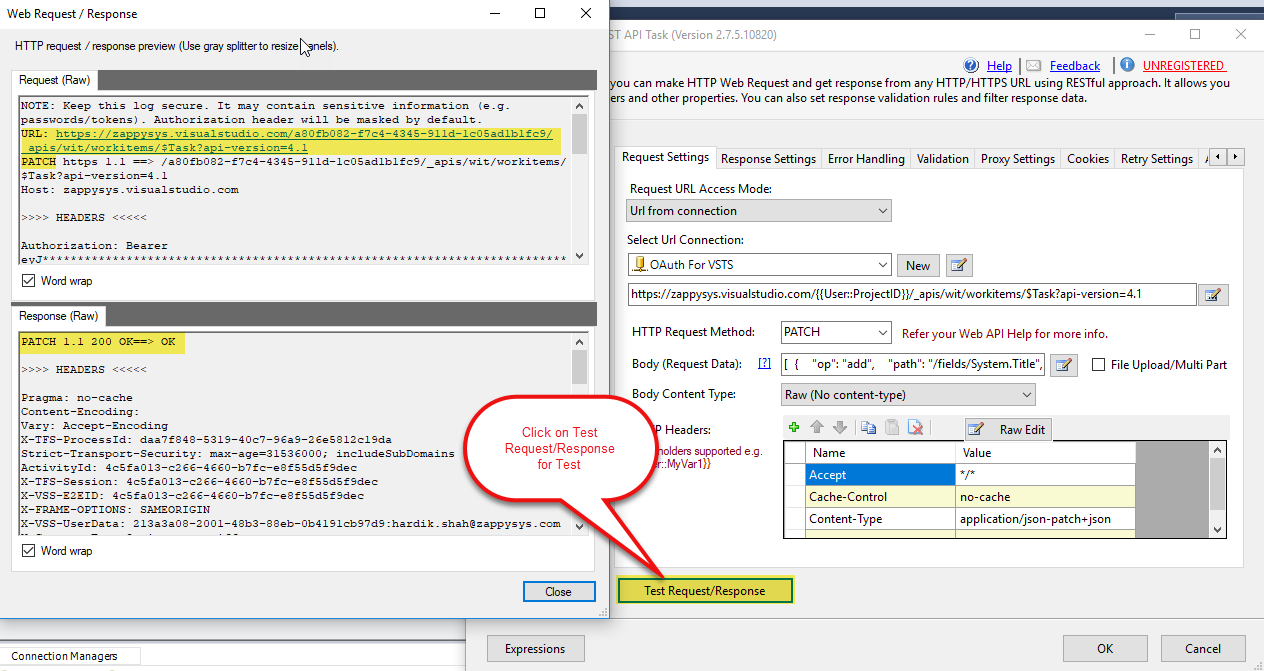
Create New WorkItem in VSTS Account: Do Test Request/Response
- finally, you have created a WorkItem in VSTS successfully using VSTS REST API and REST API Task, See in VSTS Site.

VSTS Site: See the Newly Created WorkItem
- And that’s it. similarly, you can Update/Delete particular WorkItem in WorkItems List in VSTS.
Conclusion
In this blog, we learned how to read Visual Studio Team Services – TFS(Team Foundation Server) Online data in SSIS, How to register an OAuth App for Visual Studio Team Service REST API, How to get all WorkItems data from Visual Studio Team Service – TFS(Team Foundation Server) Online and create a new WorkItem on VSTS with SSIS using ZS JSON Source Component and SSIS REST API Task in a very simple way. You can achieve many more functionalities with the use of both of these tools. Check our blogs/articles on REST API Task https://zappysys.com/blog/tag/ssis-rest-api-task/ and JSON Source Component https://zappysys.com/blog/tag/ssis-json-source/ to find out what these tools are capable of more.
References
Finally, you can use the following links for more information about the use of VSTS API with our tools:
- Visual Studio Team Service Documentation for API
- Landing Page for REST API Task, you can also find Tutorial Video here.
- Landing Page for JSON Source Component, you can also find Tutorial Video here.
- Help File: Documentation of SSIS REST API Task and JSON Source Component.