
Prerequisites
Before we begin, make sure the following prerequisites are met:
- SQL Server Data Tools (SSDT) designer installed for Visual Studio.
- SQL Server Integration Services Projects 2022+ Visual Studio extension installed.
- SSIS PowerPack is installed.
Create tickets in SSIS
-
Open Visual Studio and click Create a new project.
-
Select Integration Services Project. Enter a name and location for your project, then click OK.
-
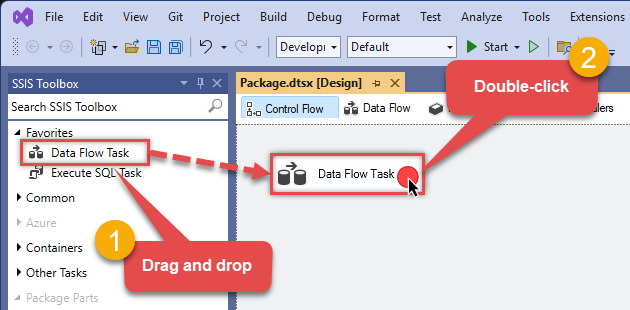
From the SSIS Toolbox, drag and drop a Data Flow Task onto the Control Flow surface, and double-click it:
-
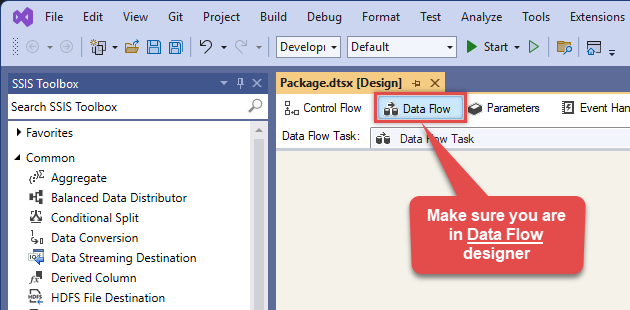
Make sure you are in the Data Flow Task designer:
-
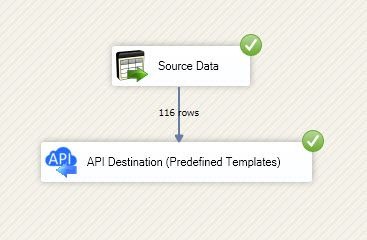
Read the data from the source, using any desired source component. You can even make an API call using the ZappySys JSON/XML/API Source and read data from there. In this example, we will use an OLE DB Source component to read real-time data from a SQL Server database.
-
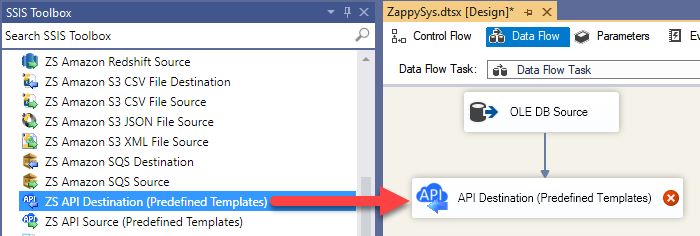
From the SSIS Toolbox drag and drop API Destination (Predefined Templates) on the Data Flow Designer surface and connect source component with it, and double click to edit it.
-
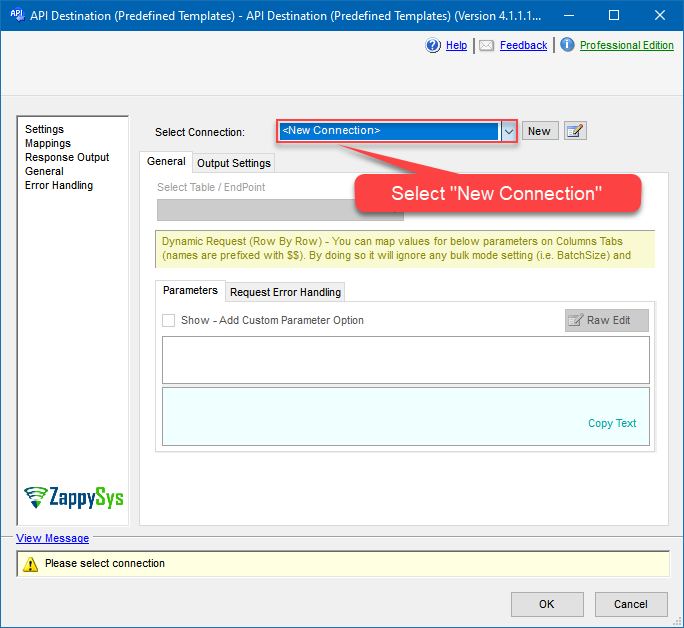
Select New Connection to create a new connection:
API Destination - ZendeskRead and write Zendesk data effortlessly. Manage tickets, users, and organizations — almost no coding required.
-
To configure the Zendesk connector, choose one of the following methods:
- Choose from Popular Connector List: Select a pre-installed service directly from the dropdown menu.
- Search Online: Use this to find and download a new connector file to your computer.
- Use Saved/Downloaded File: Once the file is downloaded, browse your local drive to load it into the configuration.
After that, just click Continue >>:
Zendesk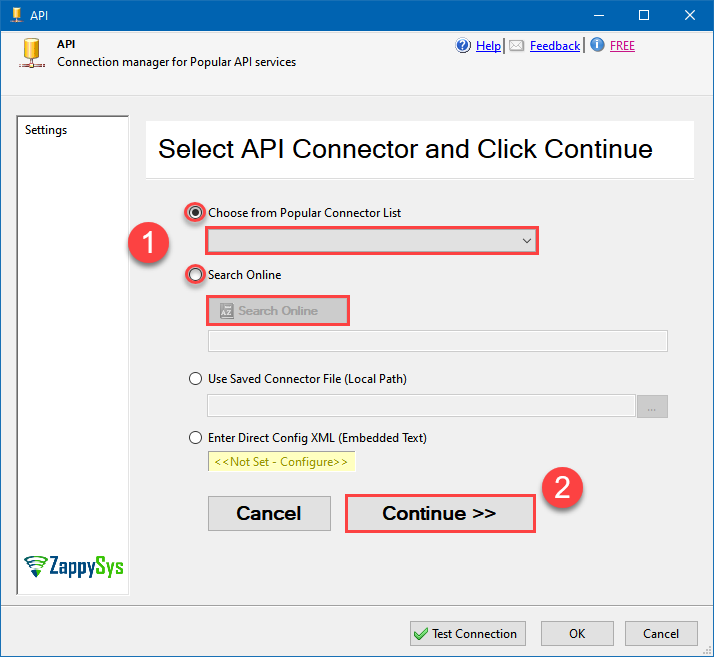
-
Proceed with selecting the desired Authentication Type. Then select API Base URL (in most cases default one is the right one). Finally, fill in all the required parameters and set optional parameters if needed. You may press a link Steps to Configure which will help set certain parameters. More info is available in Authentication section.
OAuth - Client Credentials (Server-to-Server)
Zendesk authentication
Recommended for unattended server-to-server automation. No interactive user login or refresh token is required. The OAuth client must be configured as a Confidential client in Zendesk. [API reference]
Use OAuth - Client Credentials (Server-to-Server) for unattended applications such as ETL packages, scheduled jobs, services, data pipelines, and other server-side integrations.
Recommended for unattended automation: This authentication method does not require an interactive user login and does not use a refresh token. When the access token expires, ZappySys automatically requests a new access token using the same Client ID and Client Secret.- Sign in to Zendesk as an administrator.
- Go to Admin Center > Apps and integrations > APIs > Zendesk API.
- Open the OAuth Clients section and create an OAuth client.
- Configure the OAuth client as a Confidential client.
- Enter a unique Client ID.
- Copy the generated Client Secret and store it securely.
- Configure the permissions/scopes required by your integration.
- In the ZappySys connection, enter your Zendesk Sub Domain, Client ID, Client Secret, and desired Permissions.
- Click Test Connection.
Security: Client Credentials should only be used in trusted server-side environments where the Client Secret can be stored securely. Do not expose the Client Secret in browser-side or client-side applications.The access token is associated with the Zendesk user linked to the OAuth client and inherits that user's permissions. For automated integrations, consider using a dedicated Zendesk service account with only the permissions required by the integration.No Redirect URL, browser login, authorization code, or refresh token is required for this authentication method.
API Connection Manager configuration
Just perform these simple steps to finish authentication configuration:
-
Set Authentication Type to
OAuth - Client Credentials (Server-to-Server) [OAuth] - Optional step. Modify API Base URL if needed (in most cases default will work).
- Fill in all the required parameters and set optional parameters if needed.
- Finally, hit OK button:
ZendeskOAuth - Client Credentials (Server-to-Server) [OAuth]https://[$Domain$].zendesk.com/api/v2Required Parameters Sub Domain (e.g. mycompany) Fill-in the parameter... OAuth Client ID Fill-in the parameter... OAuth Client Secret Fill-in the parameter... Permissions Fill-in the parameter... Optional Parameters RetryMode RetryWhenStatusCodeMatch RetryStatusCodeList 429 RetryCountMax 5 RetryMultiplyWaitTime True 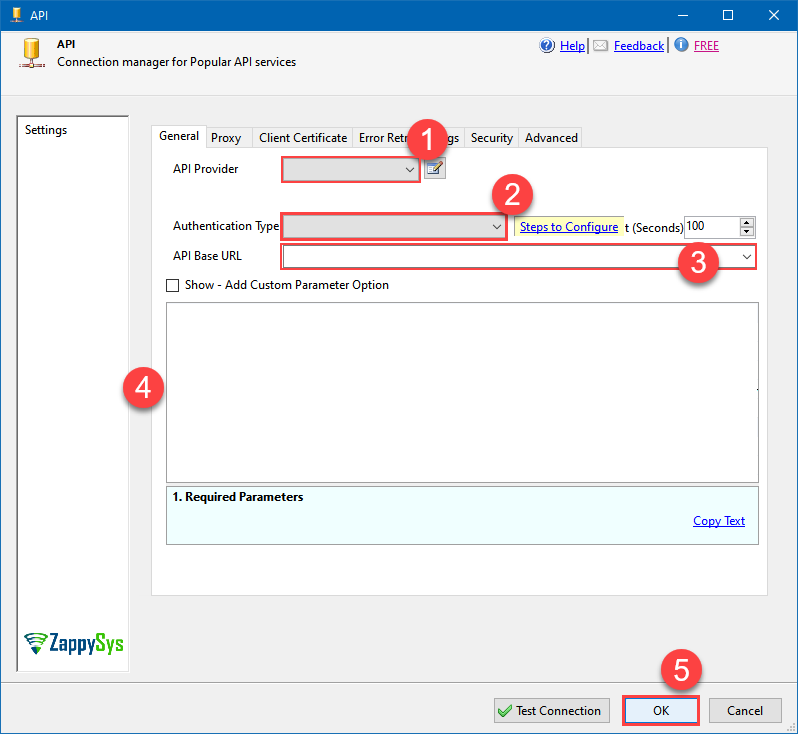 Find full details in the Zendesk Connector authentication reference.
OAuth - User Login (Interactive)
Zendesk authentication
Authenticate through an interactive Zendesk login. Create an OAuth client in Zendesk Admin Center under Apps and integrations > APIs > Zendesk API > OAuth Clients. [API reference]
Use OAuth - User Login (Interactive) when the integration should access Zendesk on behalf of a specific user.
During initial setup, a browser window opens and the user signs in to Zendesk and authorizes the application. No Zendesk password is stored in the connection.
- Sign in to Zendesk as an administrator.
- Go to Admin Center > Apps and integrations > APIs > Zendesk API.
- Open the OAuth Clients section and create an OAuth client.
- Enter a unique Client ID.
- Copy the generated Client Secret and store it securely.
-
Configure the following Redirect URL for the OAuth client:
https://zappysys.com/oauth - In the ZappySys connection, enter your Zendesk Sub Domain, Client ID, Client Secret, and desired Permissions.
- Start the authorization process and sign in to Zendesk when the browser opens.
- Approve access when prompted.
- Click Test Connection.
Token renewal: Zendesk access tokens expire. ZappySys uses the OAuth refresh token to obtain new access tokens without requiring the user to sign in again. The latest refresh token must be stored securely because Zendesk rotates refresh tokens during renewal.If the refresh token expires, is revoked, or cannot be restored from the saved connection, the interactive Zendesk login process must be performed again.For unattended server-side integrations where you do not want to maintain a refresh token, consider OAuth - Client Credentials (Server-to-Server).
API Connection Manager configuration
Just perform these simple steps to finish authentication configuration:
-
Set Authentication Type to
OAuth - User Login (Interactive) [OAuth] - Optional step. Modify API Base URL if needed (in most cases default will work).
- Fill in all the required parameters and set optional parameters if needed.
- Press Generate Token button to generate the tokens.
- Finally, hit OK button:
ZendeskOAuth - User Login (Interactive) [OAuth]https://[$Domain$].zendesk.com/api/v2Required Parameters Sub Domain (e.g. mycompany) Fill-in the parameter... ClientId Fill-in the parameter... ClientSecret Fill-in the parameter... Permissions Fill-in the parameter... RedirectUrl Fill-in the parameter... Optional Parameters RetryMode RetryWhenStatusCodeMatch RetryStatusCodeList 429 RetryCountMax 5 RetryMultiplyWaitTime True 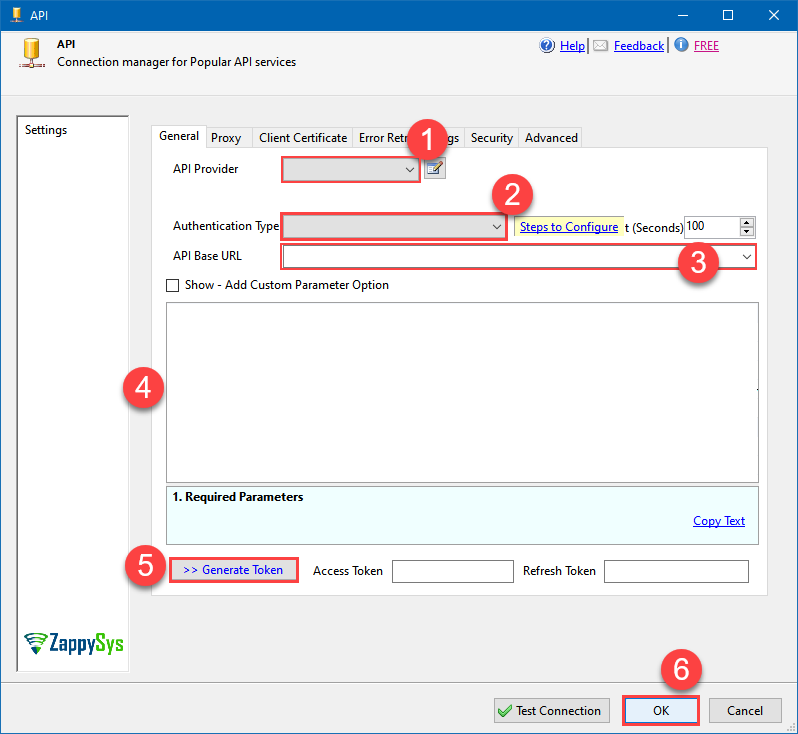 Find full details in the Zendesk Connector authentication reference.
Token Authentication (Legacy)
Zendesk authentication
Authenticate using Static Token instead of userid / password ([Token Access] option must be enabled under Admin Console > Channel > API > Settings and then Click [ADD API Token] to generate new token. These settings typically found here https://YOUR-SUB-DOMAIN.zendesk.com/agent/admin/api/settings [API reference]
Use API Token authentication to authenticate with your Zendesk user email and a Zendesk API token instead of your password.
Deprecated by Zendesk: Zendesk is removing API token authentication. Existing API tokens are scheduled to stop working on April 30, 2027. For new integrations, use OAuth instead.- Sign in to Zendesk as an administrator.
- Go to Admin Center > Apps and integrations > APIs > Zendesk API.
- Make sure Token access is enabled.
- Create or select an existing API token.
- Copy the generated token and store it securely.
- Enter your Zendesk Sub Domain.
- Enter your Zendesk User ID / Email.
- Paste the API token into the Token field.
- Click Test Connection.
Migration: For unattended ETL, scheduled jobs, and server-side integrations, use OAuth - Client Credentials (Server-to-Server).API Connection Manager configuration
Just perform these simple steps to finish authentication configuration:
-
Set Authentication Type to
Token Authentication (Legacy) [Http] - Optional step. Modify API Base URL if needed (in most cases default will work).
- Fill in all the required parameters and set optional parameters if needed.
- Finally, hit OK button:
ZendeskToken Authentication (Legacy) [Http]https://[$Domain$].zendesk.com/api/v2Required Parameters Sub Domain (e.g. mycompany) Fill-in the parameter... UserId Fill-in the parameter... Token Fill-in the parameter... Optional Parameters RetryMode RetryWhenStatusCodeMatch RetryStatusCodeList 429 RetryCountMax 5 RetryMultiplyWaitTime True 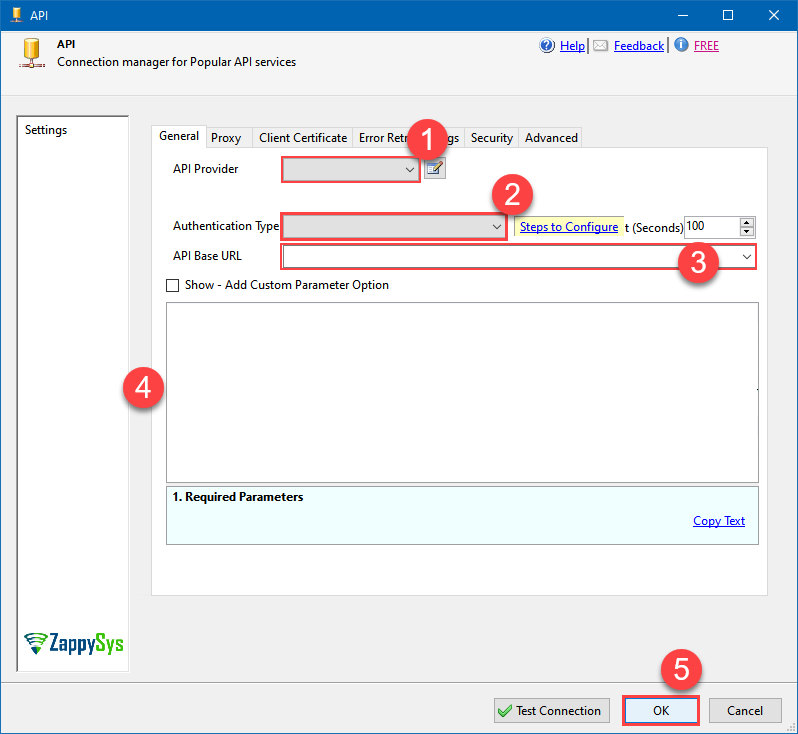 Find full details in the Zendesk Connector authentication reference.
Basic Authentication (User ID + Password)
Zendesk authentication
Authenticate using your Zendesk user ID and password. Two-factor authentication (2FA) must be disabled, and Password Access must be enabled under Admin Console > Channels > API > Settings. [API reference]
Use Basic Authentication to authenticate with your Zendesk user email and password.
Important: This method cannot be used when two-factor authentication (2FA) is enabled for the Zendesk user. Password access to the API must also be enabled in Zendesk.- Sign in to Zendesk as an administrator.
- Go to Admin Center > Apps and integrations > APIs > Zendesk API.
- Make sure Password access is enabled.
-
Enter your Zendesk Sub Domain.
For example, if your Zendesk URL is:
https://mycompany.zendesk.com, entermycompany. - Enter your Zendesk User ID / Email and Password.
- Click Test Connection.
Recommendation: For new integrations, OAuth is preferred over storing a user's password. For unattended server-side integrations, consider OAuth - Client Credentials (Server-to-Server).API Connection Manager configuration
Just perform these simple steps to finish authentication configuration:
-
Set Authentication Type to
Basic Authentication (User ID + Password) [Http] - Optional step. Modify API Base URL if needed (in most cases default will work).
- Fill in all the required parameters and set optional parameters if needed.
- Finally, hit OK button:
ZendeskBasic Authentication (User ID + Password) [Http]https://[$Domain$].zendesk.com/api/v2Required Parameters Sub Domain (e.g. mycompany) Fill-in the parameter... UserName (2FA Must be OFF) Fill-in the parameter... Password Fill-in the parameter... Optional Parameters RetryMode RetryWhenStatusCodeMatch RetryStatusCodeList 429 RetryCountMax 5 RetryMultiplyWaitTime True
Find full details in the Zendesk Connector authentication reference. -
Select Tickets (Bulk) table from the dropdown, then select Insert as operation, and hit Preview Data:
 API Destination - ZendeskRead and write Zendesk data effortlessly. Manage tickets, users, and organizations — almost no coding required.ZendeskTickets (Bulk)Insert
There are no parameters to configure. 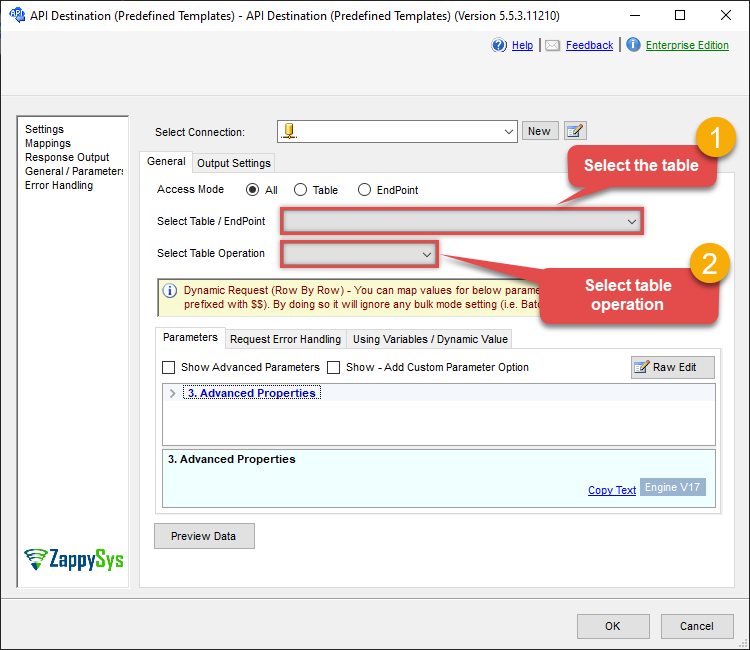
-
Finally, map the desired columns:
API Destination - ZendeskRead and write Zendesk data effortlessly. Manage tickets, users, and organizations — almost no coding required.
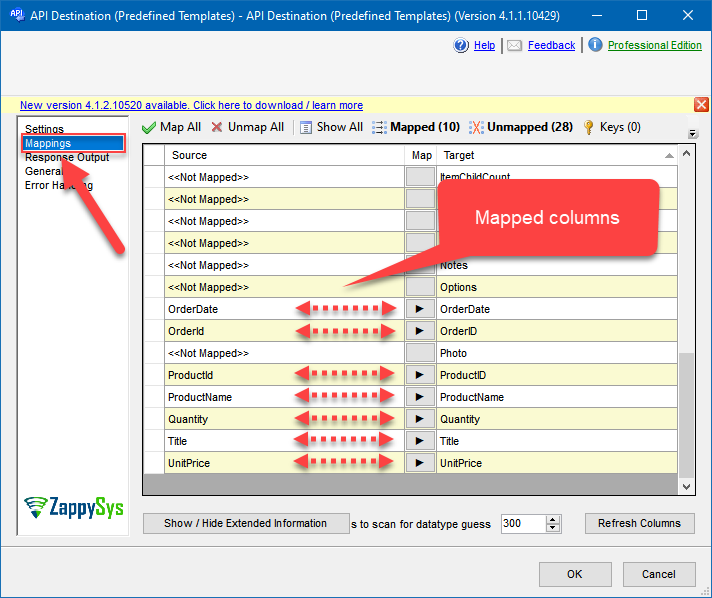
-
That's it; we successfully configured the POST API Call. In a few clicks we configured the Zendesk API call using ZappySys Zendesk Connector
Deploy SSIS package to Azure Data Factory (ADF)
Once your SSIS package is complete,
deploy it to the
Azure-SSIS runtime
within Azure Data Factory.
The setup process requires you
to upload the
SSIS PowerPack
installer to Azure Blob Storage
and then customize the runtime configuration using the main.cmd file.
For a complete walkthrough of these steps,
see our detailed guide on the
Azure Data Factory (SSIS) and Zendesk integration.
Zendesk Connector actions
Need another use case? Pick the next Zendesk action in Azure Data Factory (SSIS) below.
- Create Organization
- Create Ticket (Single)
- Create User
- Delete Attachment
- Delete Organization
- Delete Ticket
- Delete Tickets (Bulk)
- Delete Upload Session
- Delete User
- Read Attachment
- Read Brands
- Read Current User Info
- Read Groups
- Read Macros
- Read Organization Count
- Read Organization Fields
- Read Organization(s) by ID
- Read Organizations (All)
- Read Organizations (Incremental) changed after a specified date
- Read Requests
- Read Requests Search
- Read Sessions
- Read Tags
- Read Ticket ActivityStream
- Read Ticket ActivityStream Details
- Read Ticket Attachments
- Read Ticket Comments
- Read Ticket Events (Incremental) changed after a specified date
- Read Ticket Fields
- Read Ticket Forms
- Read Ticket Metric Events (Incremental) changed after a specified date
- Read Ticket Metrics
- Read Ticket(s) by ID
- Read Tickets (All)
- Read Tickets (Incremental) changed after a specified date
- Read Tickets (Recent)
- Read Tickets Count (All)
- Read Tickets Count (for Organization)
- Read Tickets for Organization
- Read Tickets for User (Assigned)
- Read Tickets for User (CCed)
- Read Tickets for User (Requested)
- Read User Fields
- Read User Sessions
- Read User(s) by ID
- Read Users (All)
- Read Users (Incremental) changed after a specified date
- Read Views
- Search Records - NO Sorting (Allows more than 1000 rows)
- Search Records - WITH Sorting and Extra Columns (Max 1000 rows)
- Update Organization
- Update Ticket (Single)
- Update Tickets (Bulk)
- Update User
- Upload Attachment (Single file)
- Upsert Organization - Create or Update
- Upsert User - Create or Update
- Upsert Users (Bulk) - Create or Update
- Make Generic REST API Request
- Make Generic REST API Request (Bulk Write)
Conclusion
You now know how to create tickets (bulk) in Azure Data Factory (SSIS) without writing complex code. Zendesk SSIS Connector handled pagination and authentication automatically.
Ready to get started? Download the trial or ping us via chat if you need help: