Authentication Application Credentials
Description
Application-only access is broader and more powerful than delegated access (User Credentials), so you should only use app-only access where needed. Use it when: 1. The application needs to run in an automated way, without user input (for example, a daily script that checks emails from certain contacts and sends automated responses). 2. The application needs to access resources belonging to multiple different users (for example, a backup or data loss prevention app might need to retrieve messages from many different chat channels, each with different participants). 3. You find yourself tempted to store credentials locally and allow the app to sign in 'as' the user or admin. [API reference]
Instructions
Follow these simple steps to create Microsoft Entra ID application with application access permissions:
- Create an OAuth app
- Configure App Permissions
-
Grant granular permissions to the OAuth application (optional)
This step allows to grant OAuth application granular permissions, i.e. access configured specificSites,Lists, andList Items.Step-1: Create OAuth app
- Navigate to the Azure Portal and log in using your credentials.
- Access Microsoft Entra ID.
-
Register a new application by going to
App registrations
and clicking on New registration button:
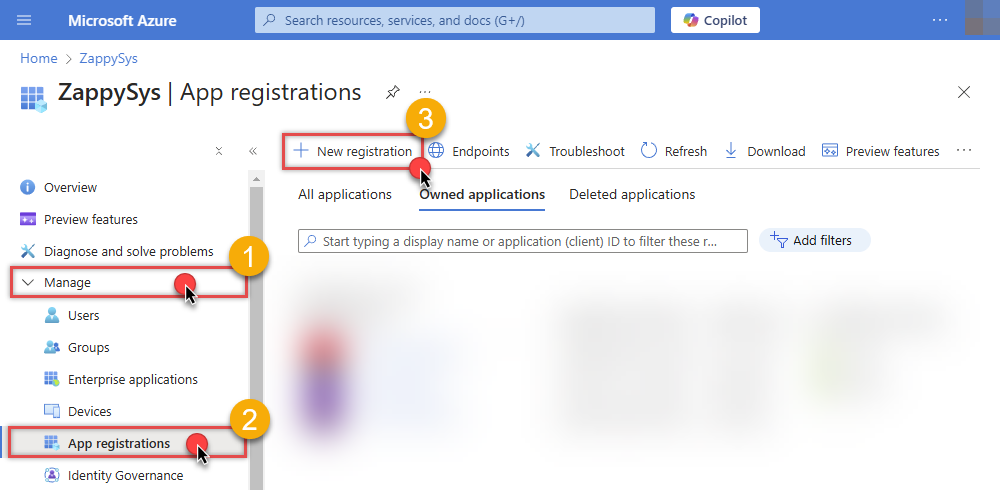 INFO: Find more information on how to register an application in Graph API reference.
 -
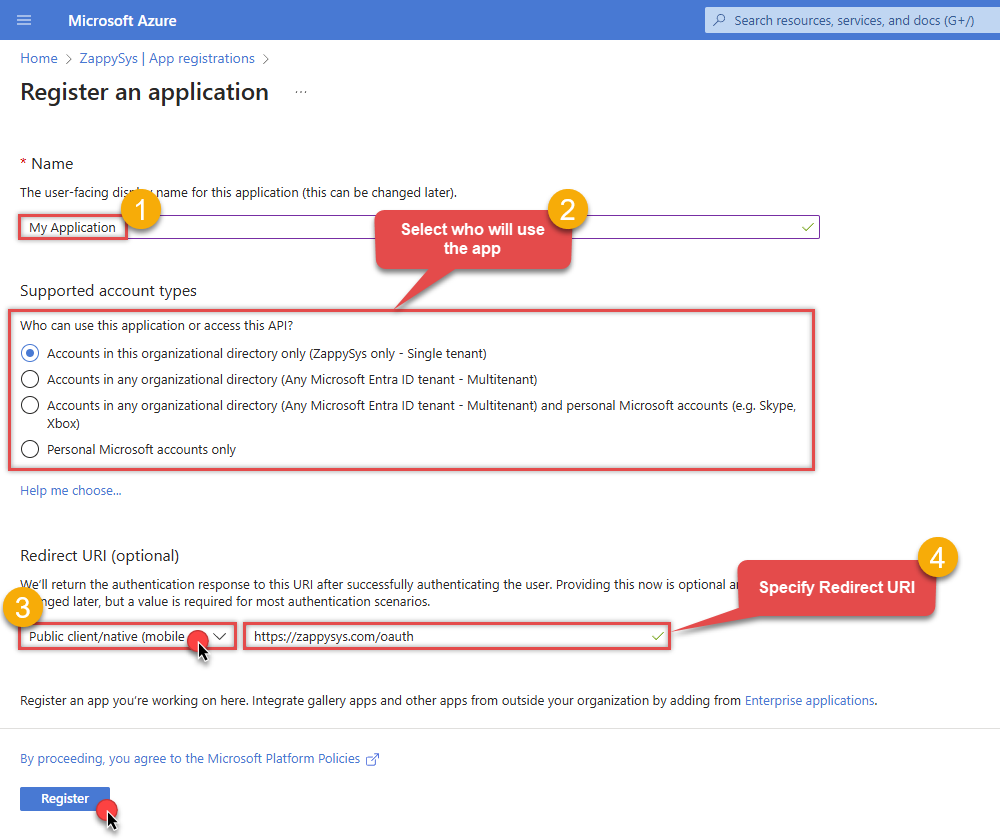
When configuration window opens, configure these fields:
-
Supported account type
- e.g. select
Accounts in this organizational directory onlyif you need access to data in your organization only.
- e.g. select
-
Supported account type
-
Redirect URI:
- Set the type to
Public client/native (mobile & desktop). - Leave the URL field empty.
- Set the type to
-
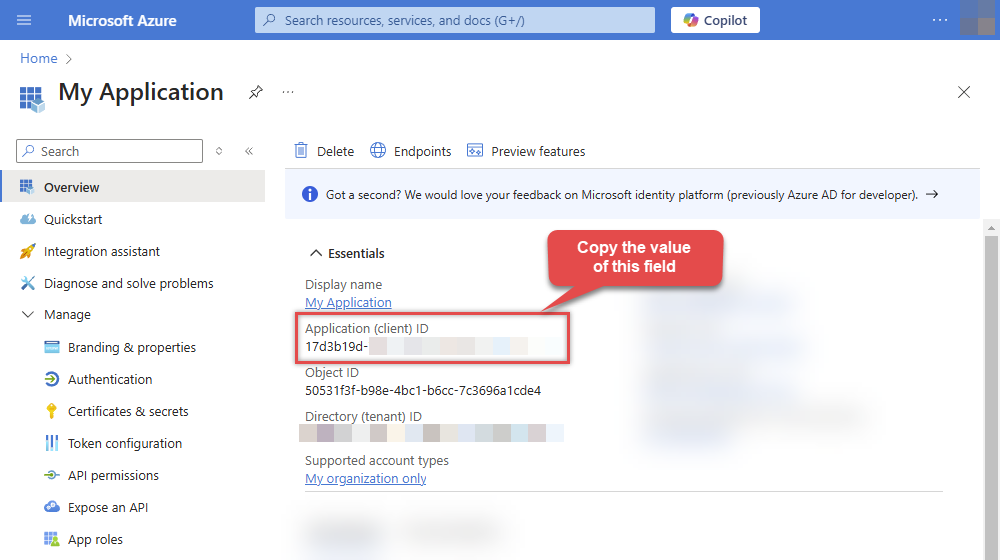
After registering the app, copy the Application (client) ID for later:
-
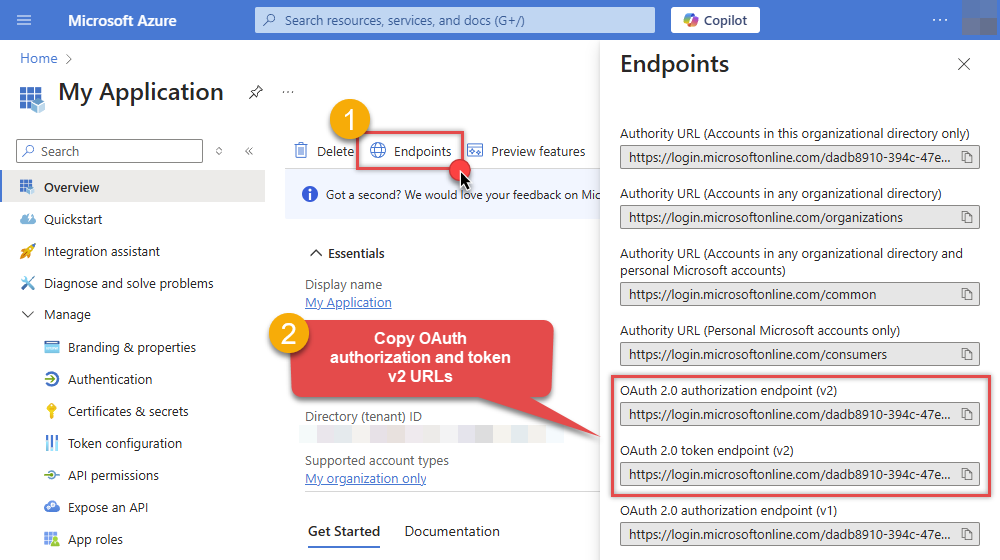
Then copy OAuth authorization endpoint (v2) & OAuth token endpoint (v2) URLs:
-
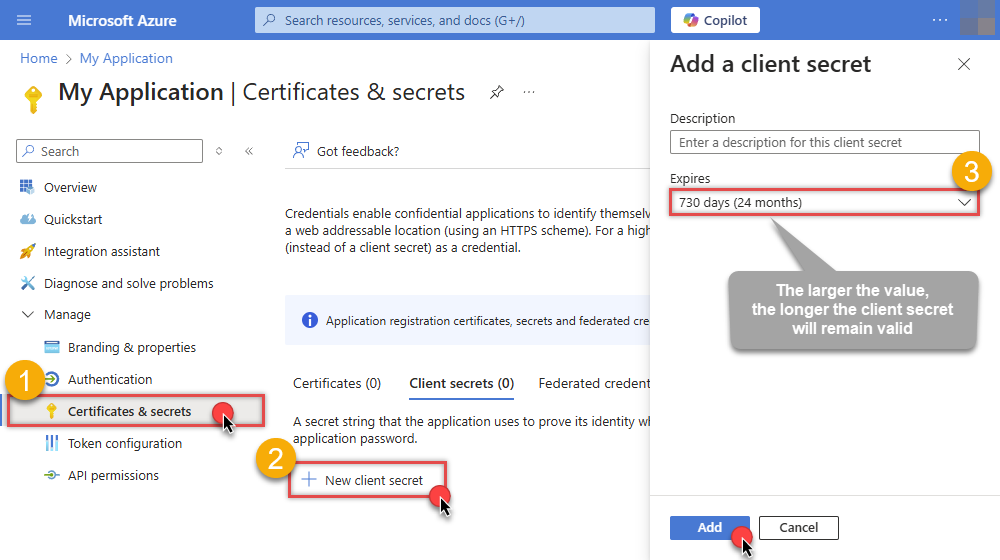
Continue and create Client secret:
-
Then copy the Client secret for later steps:

Step-2: Configure App Permissions
-
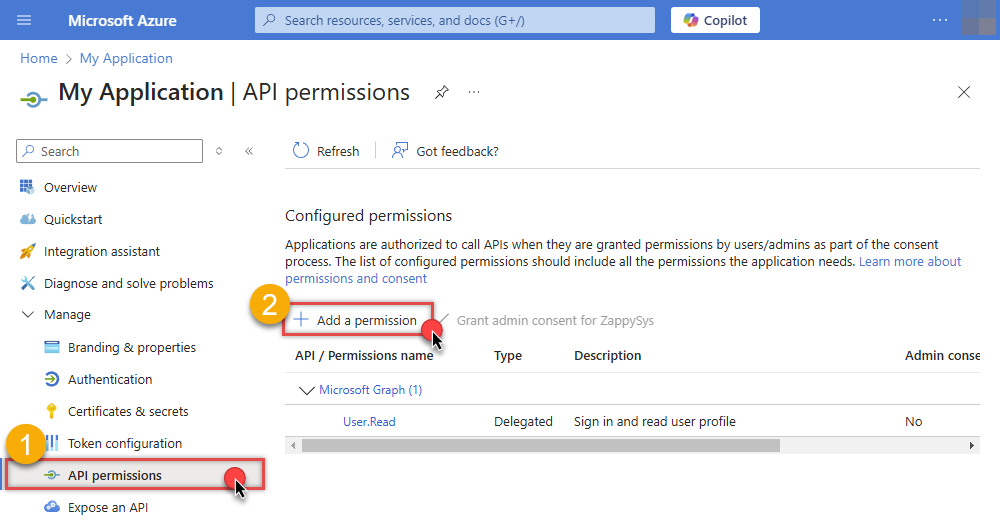
Continue by adding permissions for the app by going to the API permissions section, and clicking on Add a permission:
-
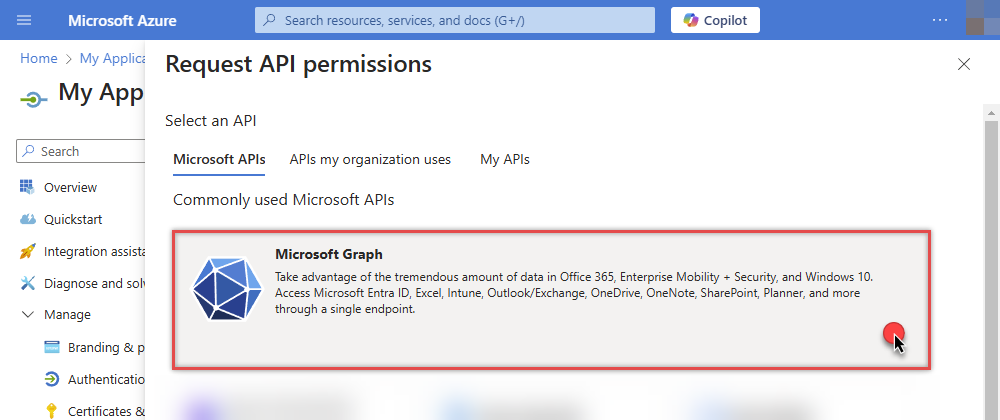
Select Microsoft Graph:
-
Then choose Application permissions option:

-
Continue by adding these Sites permissions (search for
site):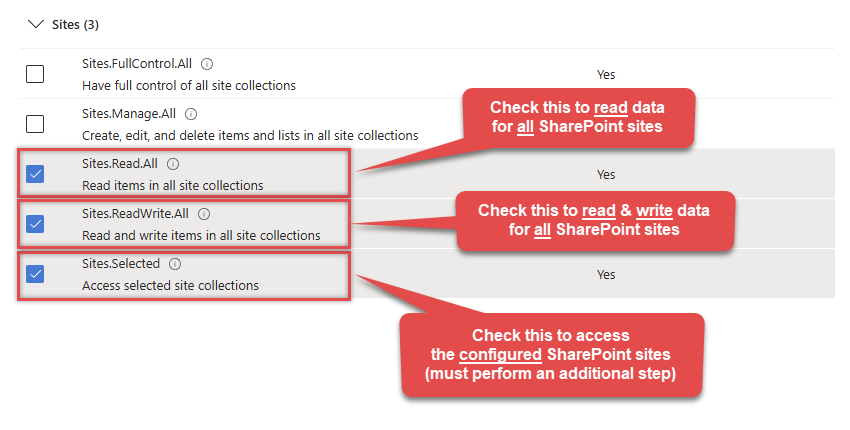 INFO: If you want to access specific lists or list items (table-level vs row-level security) rather than the full site, then add
Lists.SelectedOperations.SelectedorListItems.SelectedOperations.Selectedpermissions , just like in the previous step (search forlist).WARNING: If you add any of these permissions -Sites.Selected,Lists.SelectedOperations.Selected, orListItems.SelectedOperations.Selected- you must grant the app the SharePoint permissions for the specific resource (e.g. aSite, aList, or aListItem). Follow instructions in Grant SharePoint permissions to the OAuth app (optional) section on how to accomplish that. -
Finish by clicking Add permissions button:

-
Now it's time to Grant admin consent for your application:
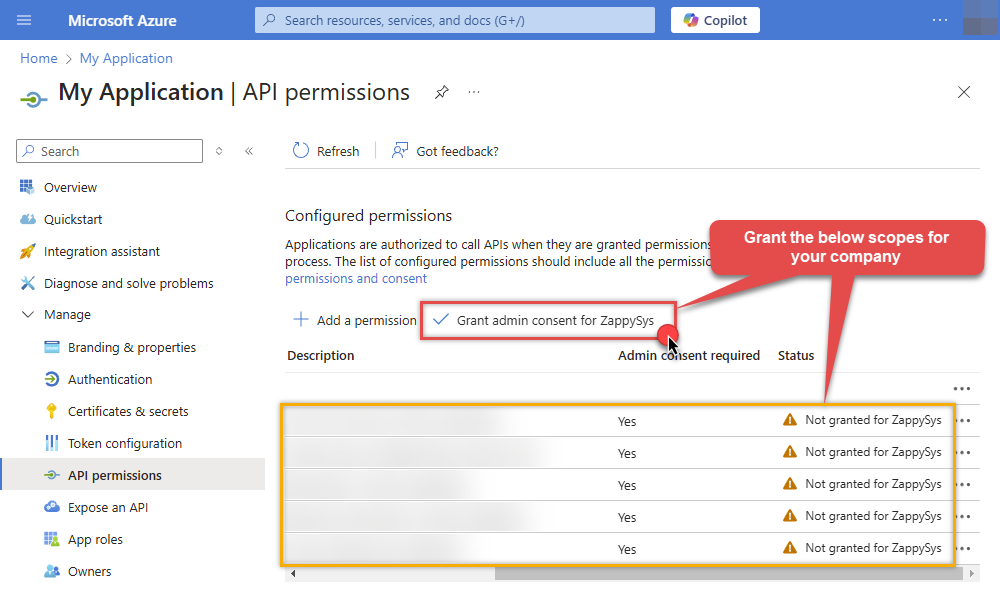
-
Confirm all the permissions are granted:

-
Now go to SSIS package or ODBC data source and use the copied values in Application Credentials authentication configuration:
- In the Token URL field paste the OAuth token endpoint (v2) URL value you copied in the previous step.
- In the Client ID field paste the Application (client) ID value you copied in the previous step.
- In the Client Secret field paste the Client secret value you copied in the previous step.
- Optional step. Choose Default Site Id from the drop down menu.
- Click Test Connection to confirm the connection is working.
- Done!
Step-3 (optional): Grant SharePoint permissions to the OAuth app
If you used
Sites.Selected,Lists.SelectedOperations.SelectedorListItems.SelectedOperations.Selectedpermission in the previous section, you must grant the app the SharePoint permissions for the specific resource (e.g. aSite, aList, or aListItem). You can do it using PowerShell or SharePoint admin center (obsolete method).Granting SharePoint permissions using PowerShell
Unfortunately, there is no user interface available to control these permissions yet. For now, granting permissions has to be accomplished via Microsoft Graph API [Microsoft reference]:
You must be the owner of the resource to grant permissions (i.e. belong to SharePoint owners group or be the owner of theSiteorList).- Open PowerShell (run as admin).
-
Call the following PowerShell code to grant
readandwritepermission for the app we created earlier (assuming Application (client) ID is89ea5c94-aaaa-bbbb-cccc-3fa95f62b66e):##### CONFIGURATION ############################################################################################ # More info at: # - https://learn.microsoft.com/en-us/graph/permissions-selected-overview?tabs=powershell # - https://learn.microsoft.com/en-us/powershell/module/microsoft.graph.sites/?view=graph-powershell-1.0 # Find SharePoint Site Id by following these steps: # - Login into SharePoint Online # - Open this URL https://{your-company}.sharepoint.com/_api/site in the browser # NOTE: For a subsite use https://{your-company}.sharepoint.com/sites/{your-subsite}/_api/site # - Find 'Id' element in the response (e.g. <d:Id m:type="Edm.Guid">efcdd21a-aaaa-bbbb-cccc-5d8104d8b5e3</d:Id>) # - Copy the Site Id, i.e.: efcdd21a-aaaa-bbbb-cccc-5d8104d8b5e3 # Set $siteId variable to the retrieved Site Id: $siteId="efcdd21a-aaaa-bbbb-cccc-5d8104d8b5e3" # Find your Application Id (i.e. Client Id) in the Azure Portal, in App Registrations page: # https://portal.azure.com/#view/Microsoft_AAD_RegisteredApps/ApplicationsListBlade $applicationId="89ea5c94-aaaa-bbbb-cccc-3fa95f62b66e" # Set one of app permissions: read, write, fullcontrol, owner ('write' includes 'read' permission) $appPermission="write" ##### SCRIPT ################################################################################################### # Step-1: Install 'Microsoft.Graph.Sites' module if it's not installed if (-not (Get-Module Microsoft.Graph.Sites -ListAvailable)) { Install-Module Microsoft.Graph.Sites } # Step-2: Load module Import-Module Microsoft.Graph.Sites # Step-3: Login (use Azure admin or SharePoint owner account) DisConnect-MgGraph Connect-MgGraph # Step-4: Set parameters for API call (set permissions, Site ID and Application ID) $params = @{ roles = @($appPermission) grantedTo = @{ application = @{id = $applicationId} } } # Step-5: Grant permissions New-MgSitePermission -SiteId $siteId -BodyParameter $params # Done! Write-Host "Granted SharePoint permissions to application '$applicationId' for site '$siteId'." - That's it! Now you can use the API Connector!
Granting SharePoint permissions using SharePoint admin center (obsolete method)
If you used
Site.Selectedpermission you can link it SharePoint site in SharePoint admin center [SharePoint reference]. Follow these simple steps to accomplish that:-
Log in to SharePoint admin center using this URL:
(replace
YOURCOMPANYwith your company name):https://YOURCOMPANY-admin.sharepoint.com/_layouts/15/appinv.aspx
INFO: To view all the registered apps in SharePoint, visit this page:https://YOURCOMPANY-admin.sharepoint.com/_layouts/15/appprincipals.aspx?Scope=Web. - In the App Id field enter Application (client) ID you copied in the previous step.
-
In the Permission Request XML field enter XML snippet which describes which SharePoint permissions you want to grant to the OAuth app, e.g.:
<AppPermissionRequests AllowAppOnlyPolicy="true">
  <AppPermissionRequest Scope="http://sharepoint/content/tenant" Right="FullControl" />
</AppPermissionRequests>
INFO: This example gives appFullControl, but you can also grant itReadorWritepermissions. - Click Create to grant the permission to your OAuth app.
- That's it! Now you can use the API Connector!
Parameters
Parameter Required Default value Options Name: TokenUrl Label: Token URL
YES Name Value For Single Tenant https://login.microsoftonline.com/{ENTER-TENANT-ID-HERE}/oauth2/v2.0/token For Multi Tenant https://login.microsoftonline.com/common/oauth2/v2.0/token Name: ClientId Label: Client ID
YES Name: ClientSecret Label: Client Secret
YES Name: SiteId Label: Default Site Id
Specify a siteYES rootName: Scope Label: Scope
Permissions you want to use.https://graph.microsoft.com/.defaultName: DriveId Label: Default Drive Id
Specify a default Drive Id you like to use for operations.Name: RetryMode Label: RetryMode
RetryWhenStatusCodeMatchName Value None None RetryAny RetryAny RetryWhenStatusCodeMatch RetryWhenStatusCodeMatch Name: RetryStatusCodeList Label: RetryStatusCodeList
429 is API limit reached, 423 is File locked429|503|423Name: RetryCountMax Label: RetryCountMax
5Name: RetryMultiplyWaitTime Label: RetryMultiplyWaitTime
TrueName: SearchOptionForNonIndexedFields Label: Search Option For Non-Indexed Fields (Default=Blank - Search Only Indexed)
If you wish to do certain operations e.g. search / order by on non-indexed fields then you have to set this option to HonorNonIndexedQueriesWarningMayFailRandomly. By default filter / orderby on non-indexed fields not allowed.Name Value Search Only Indexed Search Both Indexed and Non-Indexed HonorNonIndexedQueriesWarningMayFailRandomly Name: ExtraHeaders Label: Extra Headers (e.g. Header1:AAA||Header2:BBB)
Name Value MyHeader1:AAA MyHeader1:AAA MyHeader1:AAA||MyHeader2:BBB MyHeader1:AAA||MyHeader2:BBB Name: IsAppCred Label: IsAppCred
For internal use only1
