Introduction
 In our previous blog we saw how to load data into Azure Blob Storage. Now in this blog, we will see How to read Azure Blob Storage Files in SSIS (CSV, JSON, XML Format files). To illustrate, we will use ZappySys SSIS PowerPack, which includes several tasks to import/export data from multiples sources to multiple destinations like flat files, Azure, AWS, databases, Office files and more. They are Coding free, drag and drop high-performance suite of Custom SSIS Components and SSIS Tasks. If you like perform other operations on Azure Blob Storage Files (e.g. Download, Upload, Create, Delete) then check these articles.
In nutshell, this post will focus on how to Read Azure Blob Storage files in SSIS using following tasks / sources.
Components Mentioned in this article
| Azure Blob CSV File Source | |
| Azure Blob CSV File Destination | |
| Azure Blob XML File Source | |
| Azure Blob JSON File Source |
Prerequisite
- First, you will need to have SSIS installed
- Secondly, make sure to have SSDT
- Download and install Microsoft Azure Storage Emulator
- Download and install Microsoft Azure Storage Explorer
- Finally, do not forget to install ZappySys SSIS PowerPack
NOTE: If you want to use Live account (Azure Blob Storage) then you can skip Step #3
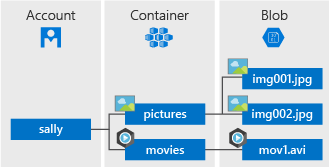
What is Azure Blob Storage
Azure Blob storage is Microsoft’s object storage solution for the cloud. you can store large amounts of unstructured data, such as text or binary data. Blob storage discloses three resources:
- Storage account (You can access data objects in Azure Storage through a storage account.
For more information, click here.) - the containers in the account(constructs a set of blobs, it is similar to a folder in a file system.
All blobs lie within a container, Note: Container name must be lowercase) - the blobs in a container. (Azure Storage offers three types of blobs: block blobs, append blobs, and page blobs)
See the below-attached diagram. It shows the relationship between these resources.
 You can also use Azure Storage Explorer on your Local machine. Azure Storage Explorer is a standalone app that enables you to easily work with Azure Storage data on Windows, macOS, and Linux. You can use Blob storage to expose data publicly to the world or to store application data privately. Connect to an Azure storage account or service
Getting Started
In order to start, we will show several examples. ZappySys includes an SSIS Azure Blob Source for CSV/JSON/XML File that will help you in reading CSV, JSON and XML Files from Azure Blob to the Local machine, Upload files(s) to Azure Blob Storage. It will also support Delete, Rename, List, Get Property, Copy, Move, Create, Set Permission … and many more operations. Here we are showing you is, How to download files from Azure Blob Storage.
You can connect to your Azure Storage Account by entering your storage account credentials. Here I am showing an example of the use of local Azure Storage Emulator.
Setup Azure Storage client tools
- Once you have downloaded and installed storage emulator You can launch Microsoft Azure Storage Emulator from its Physical location or from the desktop or start menu shortcut.

Microsoft Azure Storage Emulator Physical Location
- If You can see the below-attached Command Prompt screen after Emulator started. Then you can proceed to start Microsoft Azure Storage Explorer as the Azure Storage Emulator is started successfully.
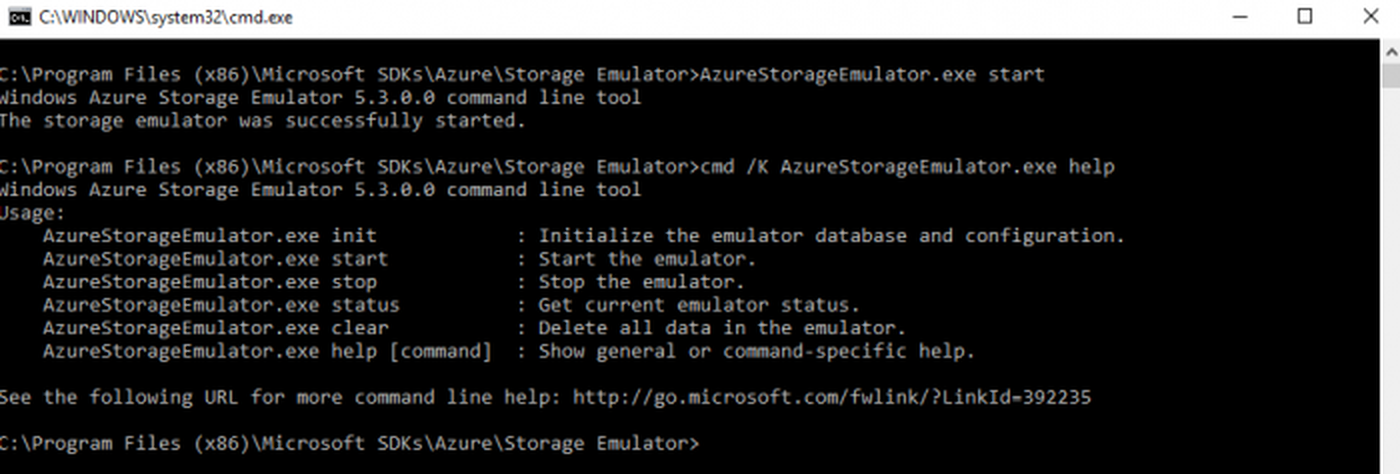
Command Prompt Screen after Microsoft Azure Storage Emulator Started
- Now, You have to download and install Microsoft Azure Storage Explorer and then You can launch Microsoft Azure Storage Explorer from its Physical location or from the desktop or start menu shortcut.

Microsoft Azure Storage Explorer Physical Location

Create an Azure Blob Storage Container
For Creating a Blob Container, First of all, you need to go to Microsoft Storage Explorer Window. Then you can go through like this way (Storage Accounts –> (Development) –> Blob Containers).

Microsoft Azure Storage Explorer: Create a Blob Container
you can also create a Virtual Directory under it. A Virtual Directory does not actually exist in Azure until you paste, drag or upload blobs into it.

Creating the new Virtual Directory under Blob Container
Read Azure Blob Storage Files in SSIS (CSV, JSON, XML)
Let´s start with an example. In this SSIS Azure Blob Source for CSV/JSON/XML File task example, we will read CSV/JSON/XML files from Azure Blob Storage to SQL Server database.
- First of All, Drag and drop Data Flow Task from SSIS Toolbox and double click it to edit.

Drag and Drop SSIS Data Flow Task from SSIS Toolbox
- Drag and Drop relevant Azure Blob Source for CSV/JSON/XML File Task from the SSIS Toolbox.
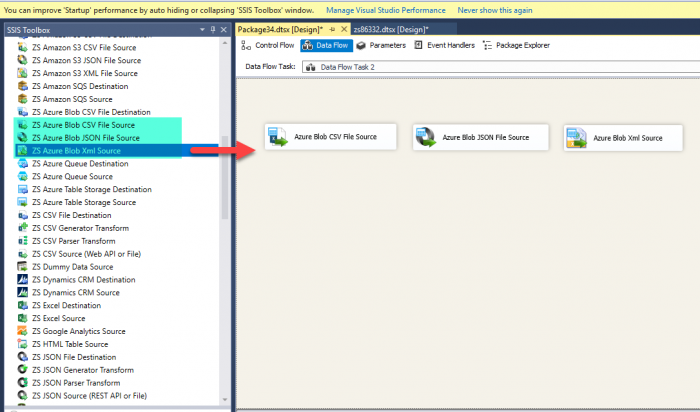
Add Azure Blob Source Tasks
- Create a connection for Azure Blob Storage Account.
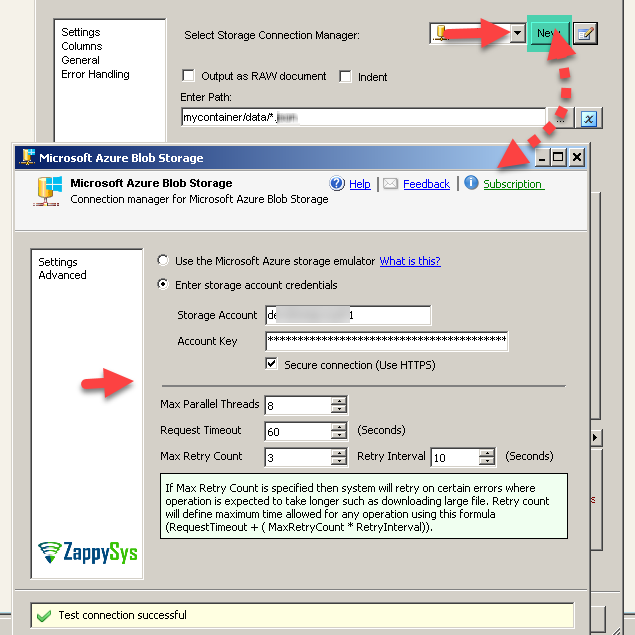
Create Azure Storage Connection
- We can also connect the Microsoft Azure Storage emulator also like this.

Connection Form of Azure Blob Storage Account
- Select the relevant single file to read from Azure Blob Storage in their relevant source of CSV/JSON/XML File Task.
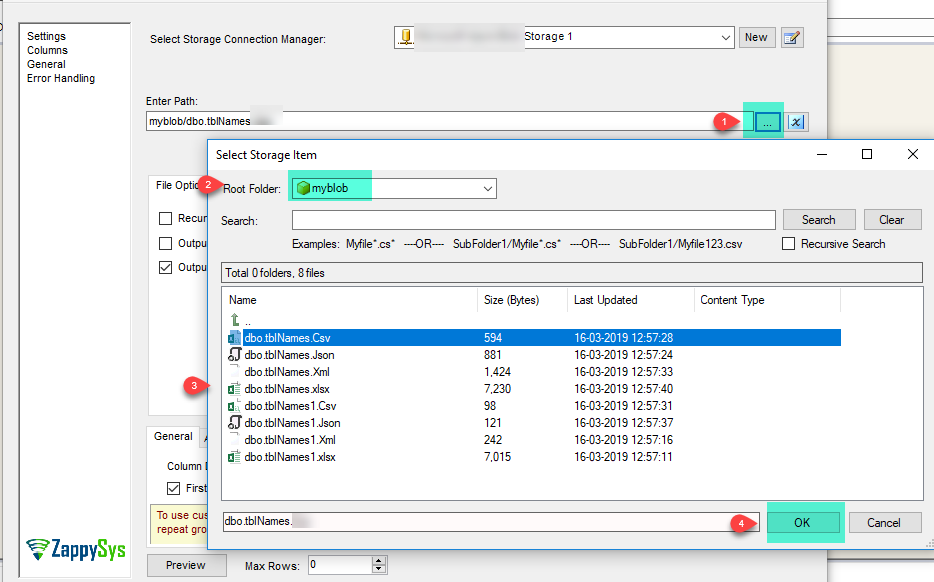
Select File From Azure Blob Storage
- We can also read the multiple files stored in Azure Blob Storage using wildcard pattern supported e.g. dbo.tblNames*.csv / dbo.tblNames*.json / dbo.tblNames*.xml in relevant source task
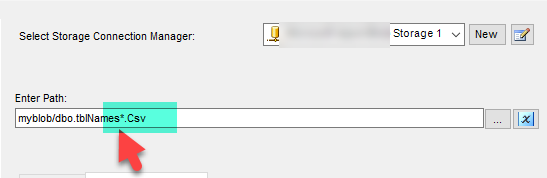
Use wildcard pattern .* to read multiple files data
- We can also read the zip and gzip compressed files also without extracting it in the specific Azure Blob Source for CSV/JSON/XML File Task.

Reading zip and gzip compressed files (stream mode)
- That’s it, we are ready to load this file(s) data into the SQL Server.

Load Azure Blob Storage Files data into SQL Server
ZappySys SSIS PowerPack makes it easy to load data from various sources such as REST, SOAP, JSON, XML, CSV or from other source into SQL Server, or PostgreSQL, or Amazon Redshift, or other targets. The Upsert Destination component allows you to automatically insert new records and update existing ones based on key columns. Below are the detailed steps to configure it.
Step 1: Add Upsert Destination to Data Flow
- Drag and drop the Upsert Destination component from the SSIS Toolbox.
- Connect your source component (e.g., JSON / REST / Other Source) to the Upsert Destination.
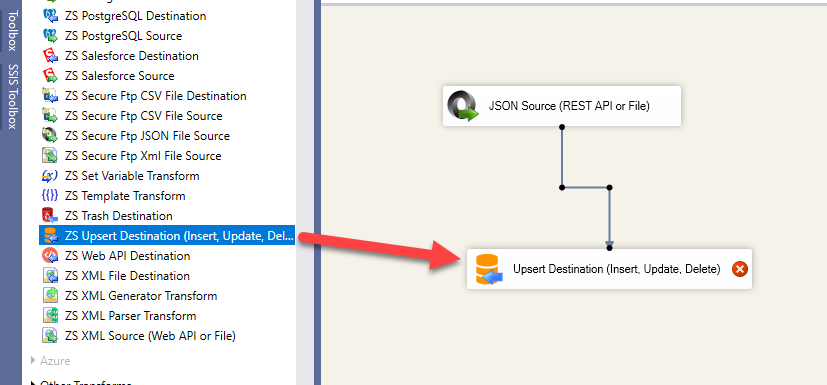
SSIS - Data Flow - Drang and Drop Upsert Destination Component
Step 2: Configure Target Connection
- Double-click the Upsert Destination component to open the configuration window.
- Under Connection, select an existing target connection or click NEW to create a new connection.
- Example: SQL Server, or PostgreSQL, or Amazon Redshift.
Step 3: Select or Create Target Table
- In the Target Table dropdown, select the table where you want to load data.
- Optionally, click NEW to create a new table based on the source columns.
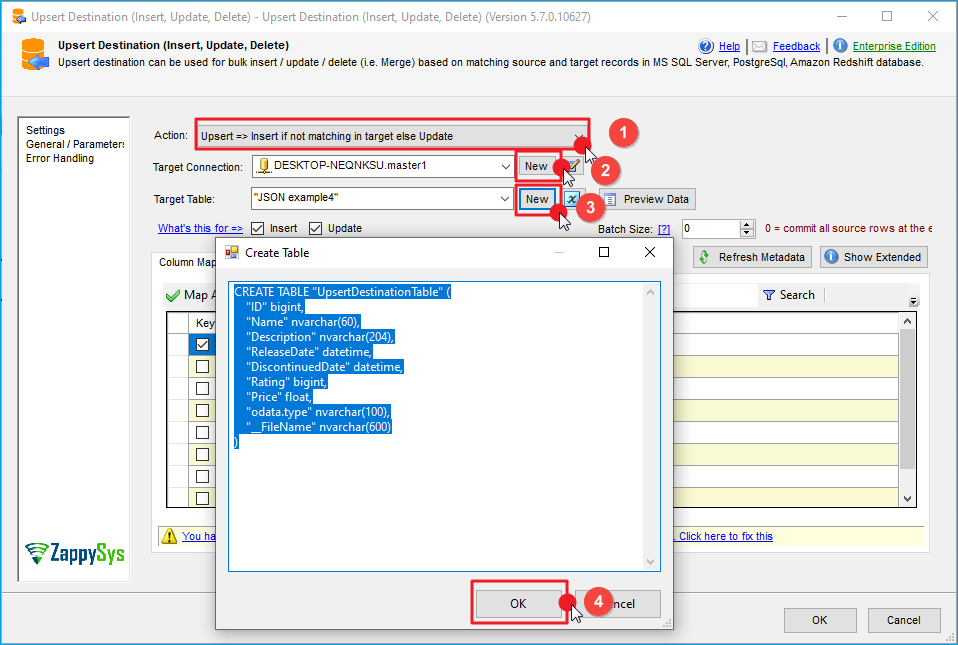
Configure SSIS Upsert Destination Connection - Loading data (REST / SOAP / JSON / XML /CSV) into SQL Server or other target using SSIS
Step 4: Map Columns
- Go to the Mappings tab.
- Click Auto Map to map source columns to target columns by name.
- Ensure you check the Primary key column(s) that will determine whether a record is inserted or updated.
- You can manually adjust the mappings if necessary.

SSIS Upsert Destination - Columns Mappings
Step 5: Save Settings
- Click OK to save the Upsert Destination configuration.
Step 6: Optional: Add Logging or Analysis
- You may add extra destination components to log the number of inserted vs. updated records for monitoring or auditing purposes.
Step 7: Execute the Package
- Run your SSIS package and verify that the data is correctly inserted and updated in the target table.
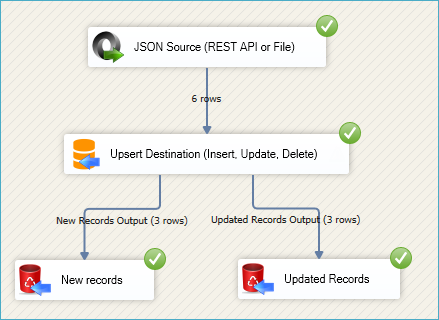
SSIS Upsert Destination Execution
Read / Write data to Azure Data Lake Storage Gen 2 / Gen 1 (CSV / XML / JSON)
Check the below articles if you like to know more about how to write to Azure Blob Storage.
Article#1
https://community.zappysys.com/t/how-to-read-write-from-azure-data-lake-storage-gen2-in-ssis/125
Article#2
SSIS Data Load – SQL Server to Azure Blob (Split Files, GZip)
Conclusion
Above all, in this blog, we learned how to Read Azure Blob Storage Files in SSIS. We used Azure Blob Source for CSV File, Azure Blob Source for JSON File and Azure Blob Source for XML File to read the file(s) from Microsoft Azure Blob Storage and load data into SQL server. You can download SSIS PowerPack here to try many other scenarios not discussed in this blog along with 70+ other components.
References
Finally, you can use the following links for more information: