Introduction
 In our previous blog we saw How to write data into CSV file in SSIS (GZip / Split). Now in this blog, we will see How to Pivot CSV Data in SSIS using CSV Source. It also supports Pivot mode so you can convert single CSV string value into Rows. In this article we also see how make some CSV columns as parent and not consider it in pivot and load it as it is using JSON Generator and JSON Parser Transform Pivot Option.
In nutshell, this post will focus on how to Pivot CSV Data into multiple columns and rows.
Prerequisites
Before we perform the steps listed in this article, you will need to make sure the following prerequisites are met:- SSIS designer installed. Sometimes it is referred to as BIDS or SSDT (download it from the Microsoft site).
- Basic knowledge of SSIS package development using Microsoft SQL Server Integration Services.
- Make sure ZappySys SSIS PowerPack is installed (download it, if you haven't already).
- (Optional step). Read this article, if you are planning to deploy packages to a server and schedule their execution later.
How to Pivot CSV Data in SSIS using CSV File Source
Let´s start with an example. In this SSIS CSV Parser Transform example, we will Parse database column string into multiple columns and rows.
- First of All, Drag and drop Data Flow Task from SSIS Toolbox and double click it to edit.

Drag and Drop : SSIS Data Flow Task from SSIS Toolbox
- Furthermore, drag and drop the CSV Source and Double click on it to configure it.

Drag and Drop : CSV Source from SSIS Toolbox
- Enter the CSV file path and select desire column delimiter most common in CSV is comma and check the First Row as headers and click on preview.
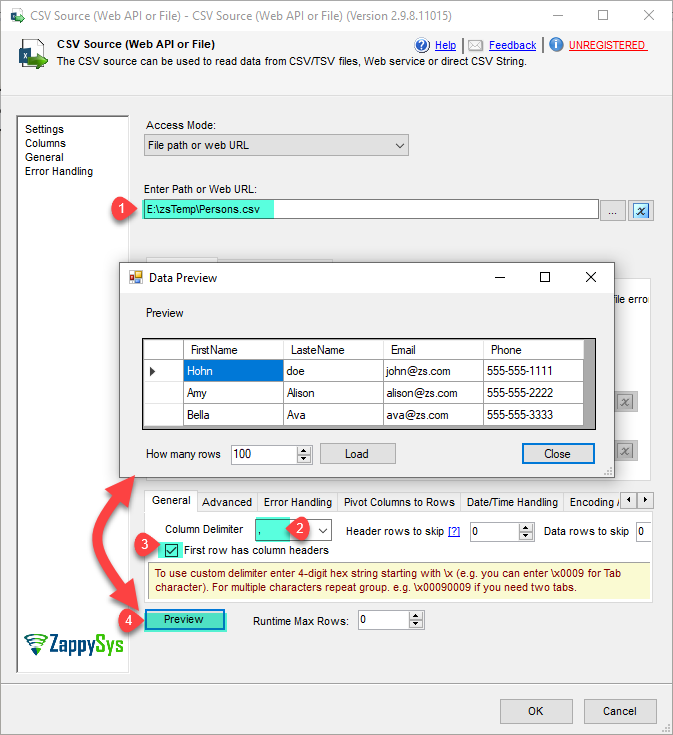
CSV Source Preview
- Now, go to Pivot Columns to Rows Tab and checked Enable Pivoting and click on Preview Data to view the data.
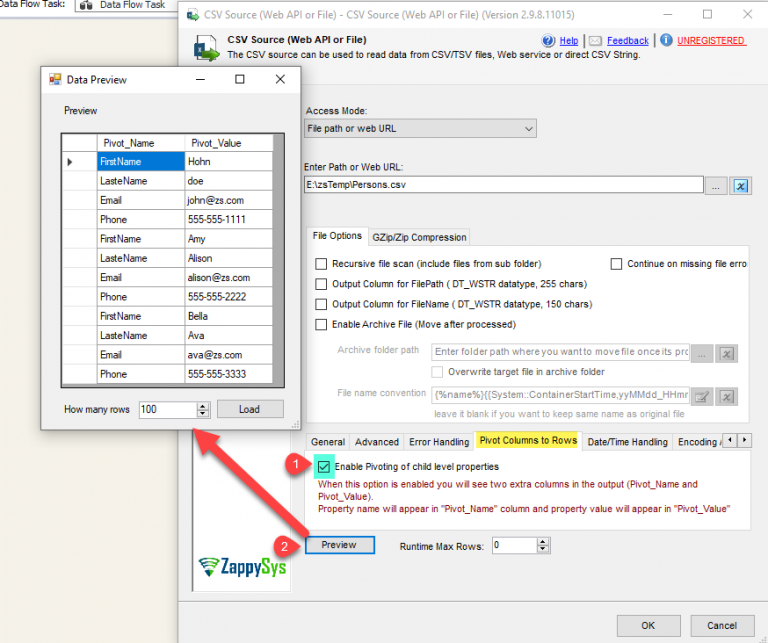
CSV Source Pivoted Data Preview
- That’s it we see how to read data from CSV File and also Pivot the CSV Data using CSV Source.
- Now In the next section we will see how to how make some CSV columns as parent and not consider it in pivot and load it as it is.
How make some CSV columns as parent.
Sometimes you just need to make child columns in to rows and want to leave parent level columns as it is.
- First of All, Drag and drop Data Flow Task from SSIS Toolbox and double click it to edit.
Drag and Drop : SSIS Data Flow Task from SSIS Toolbox
- Secondly, drag and drop the CSV Source and Double click on it to configure it.
Drag and Drop : CSV Source from SSIS Toolbox
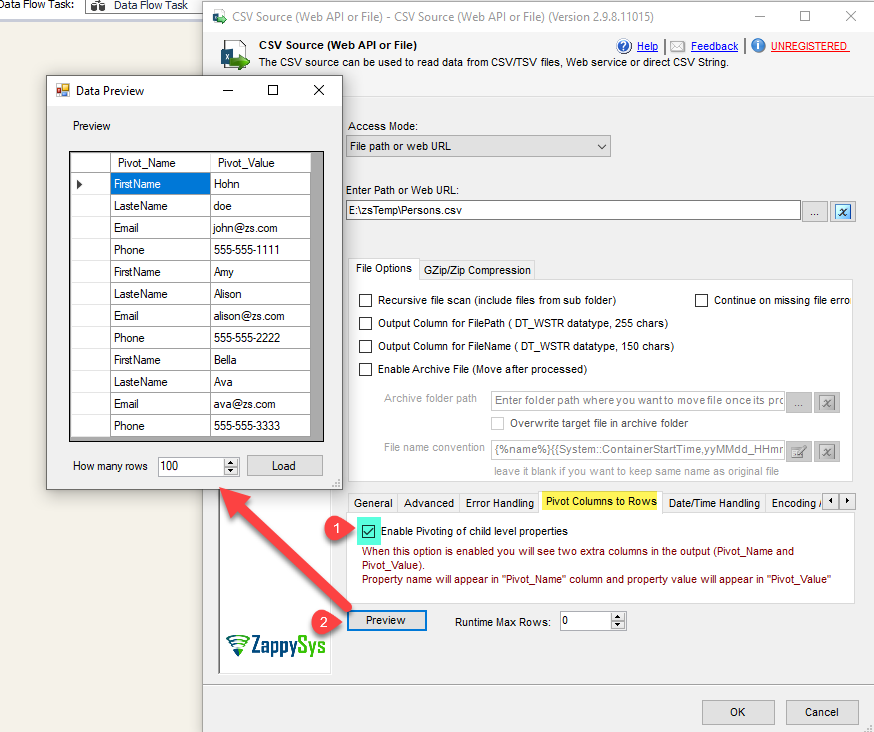
- Furthermore, enter the file path and click on preview.
CSV Source Preview
- For example if we want to pivot Email and Phone only in pivoting and wants to exclude parent level columns FirstName and LastName as it is.
- For that drag and drop JSON Generator Transform and Select Output Mode as Output One JSON Per Parent Input Row and Add Unbound Nested Element and named it as Persons and click on OK.
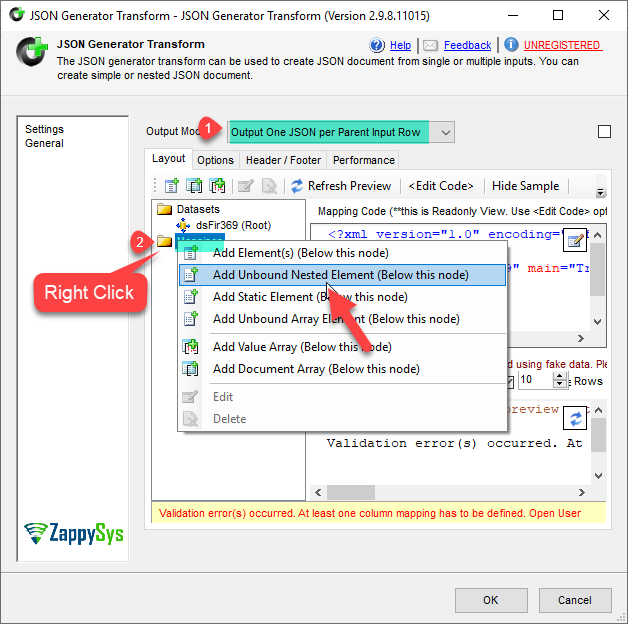
JSON Generator Add Unbound Nested Element
- Now add that two parent level fields FirstName and LastName in the Persons.
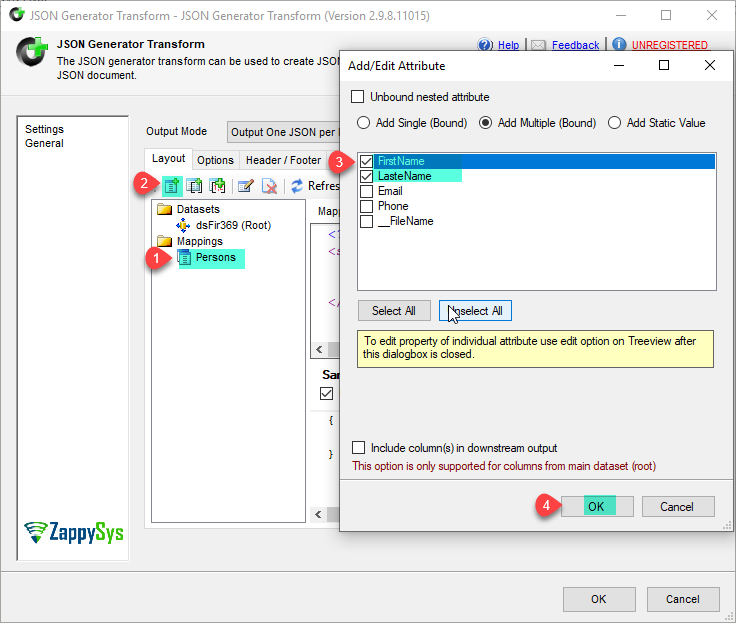
JSON Generator Add Multiple Elements
- Now select Person Element and right click and Add Unbound Nested Element and named it as Contacts and click on OK.
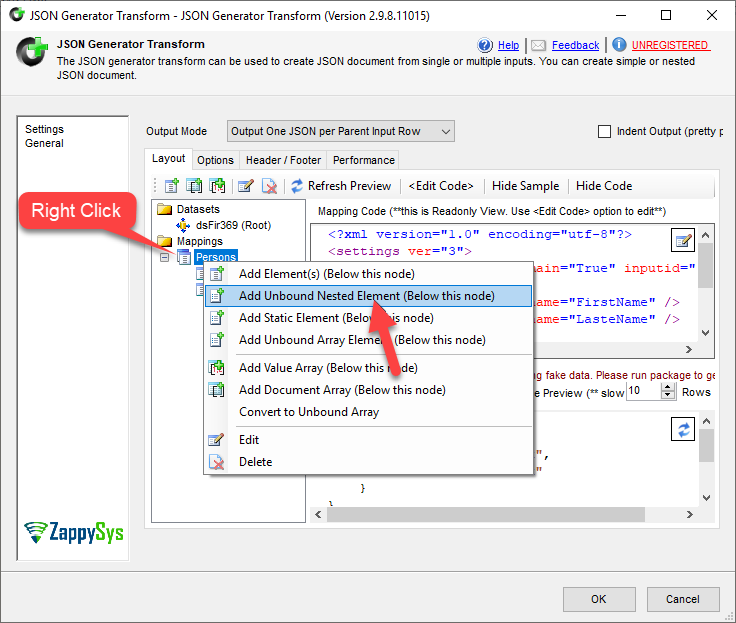
JSON Generator Add Unbound Nested Element
- Now add that two child level fields Email and Phone in the Contacts.
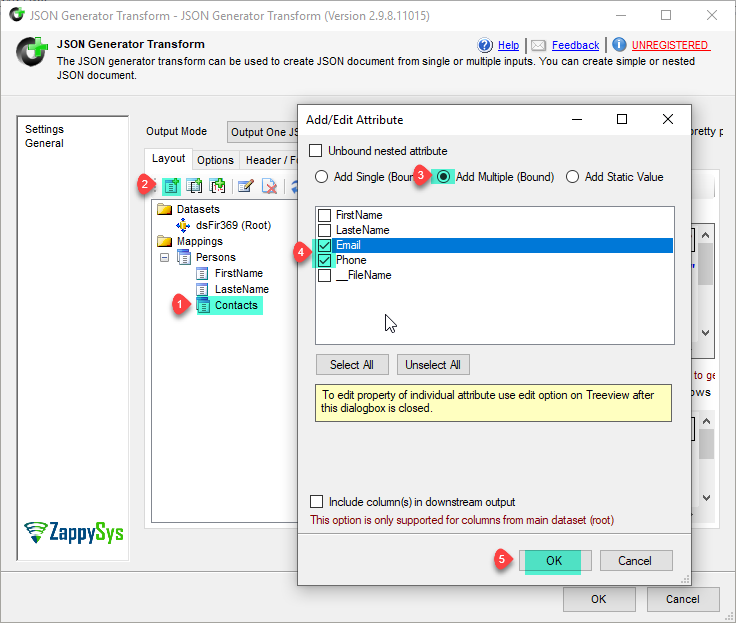
JSON Generator Add Multiple Elements
- Therefore JSON Generator Transform looks like below screen. Now Copy that Sample Preview JSON String to use it in the JSON Parser Transom as sample string.
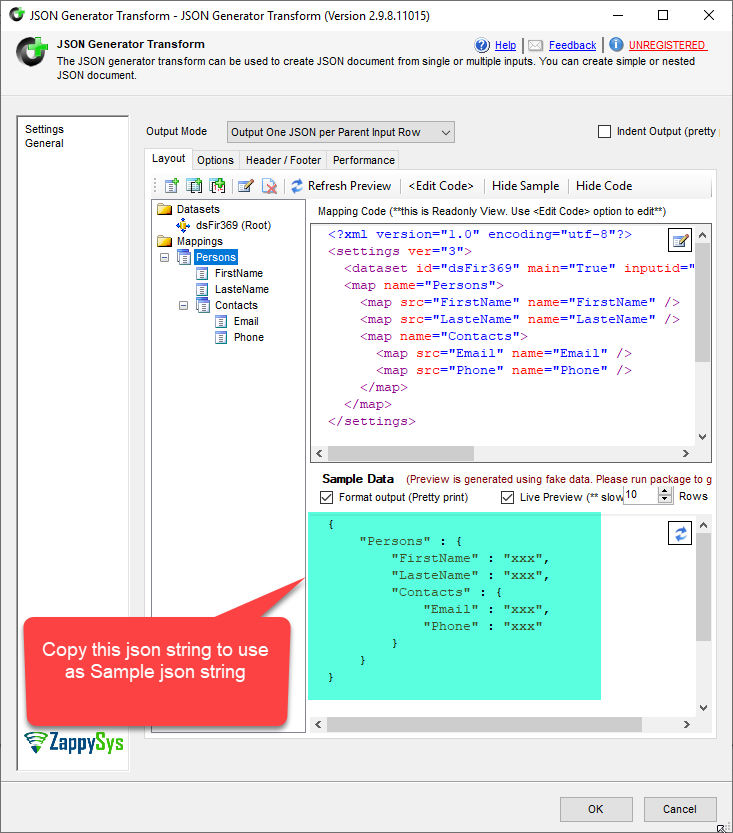
JSON Generator Transform – Sample Data
- Similarly, drag and drop JSON Parser Transform and select the Input JSON Column and Paste that copied Sample JSON String and select the Contacts filter to read the Child data and click on Include Parent.
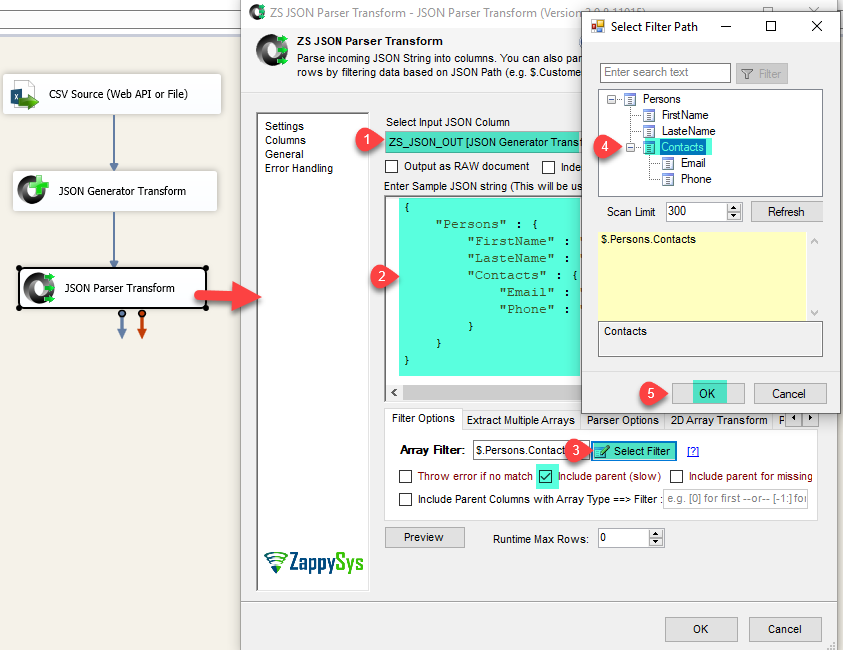
JSON Parser Transform – Select Filter
- Now go to Pivot Columns to Rows Tab and checked the Enable Pivoting and click on the Preview.
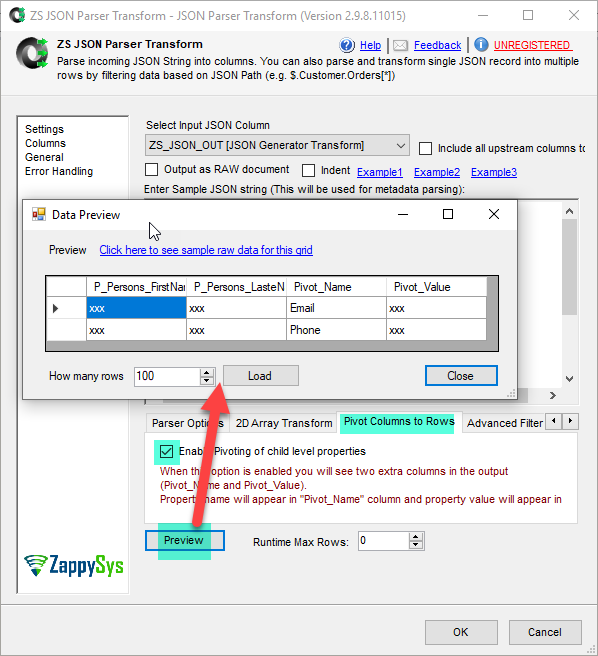
JSON Parser Transform – Enable Pivoting
- Finally, we are ready to load this data.
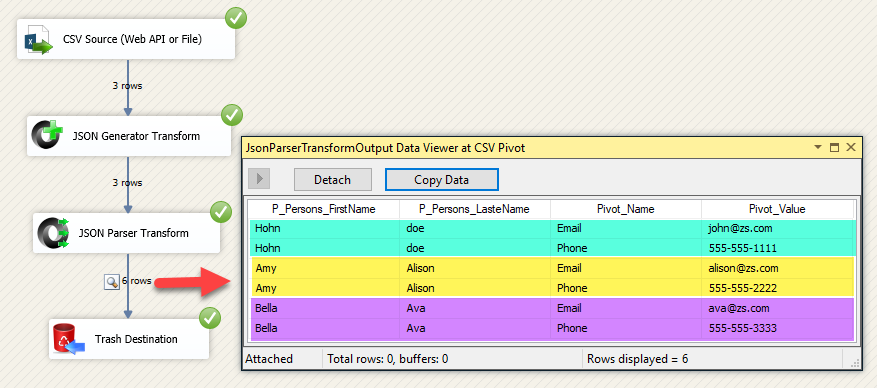
CSV Pivoted Data
- Let’s load this data in the SQL Server.
Load Pivoted CSV File data into SQL Server
ZappySys SSIS PowerPack makes it easy to load data from various sources such as REST, SOAP, JSON, XML, CSV or from other source into SQL Server, or PostgreSQL, or Amazon Redshift, or other targets. The Upsert Destination component allows you to automatically insert new records and update existing ones based on key columns. Below are the detailed steps to configure it.
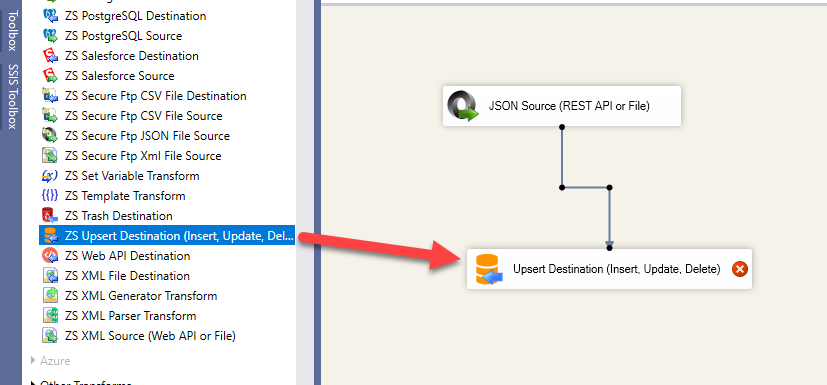
Step 1: Add Upsert Destination to Data Flow
- Drag and drop the Upsert Destination component from the SSIS Toolbox.
- Connect your source component (e.g., JSON / REST / Other Source) to the Upsert Destination.
SSIS - Data Flow - Drang and Drop Upsert Destination Component
Step 2: Configure Target Connection
- Double-click the Upsert Destination component to open the configuration window.
- Under Connection, select an existing target connection or click NEW to create a new connection.
- Example: SQL Server, or PostgreSQL, or Amazon Redshift.
Step 3: Select or Create Target Table
- In the Target Table dropdown, select the table where you want to load data.
- Optionally, click NEW to create a new table based on the source columns.
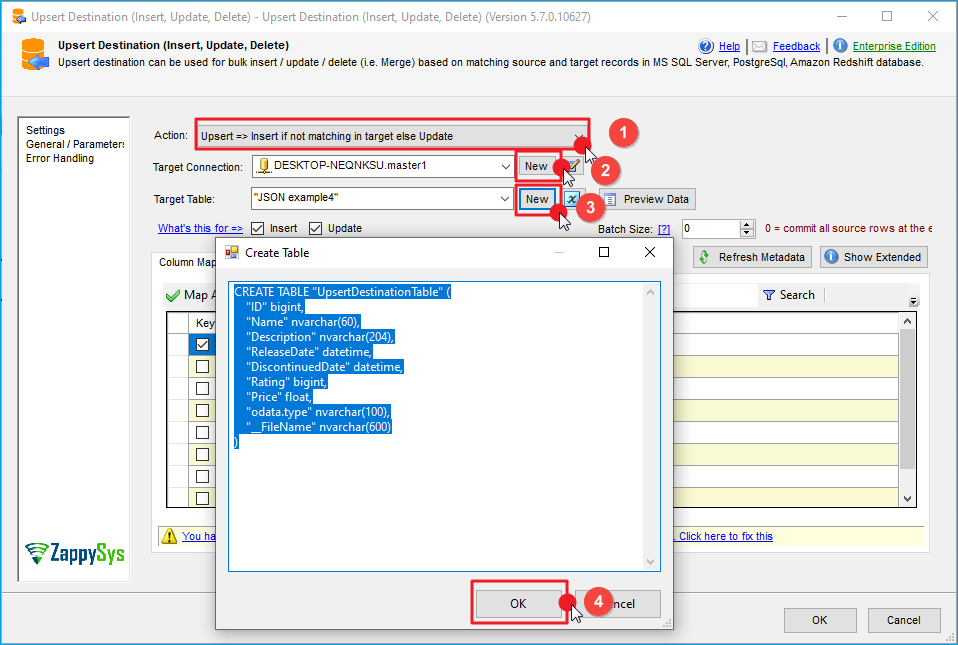
Configure SSIS Upsert Destination Connection - Loading data (REST / SOAP / JSON / XML /CSV) into SQL Server or other target using SSIS
Step 4: Map Columns
- Go to the Mappings tab.
- Click Auto Map to map source columns to target columns by name.
- Ensure you check the Primary key column(s) that will determine whether a record is inserted or updated.
- You can manually adjust the mappings if necessary.

SSIS Upsert Destination - Columns Mappings
Step 5: Save Settings
- Click OK to save the Upsert Destination configuration.
Step 6: Optional: Add Logging or Analysis
- You may add extra destination components to log the number of inserted vs. updated records for monitoring or auditing purposes.
Step 7: Execute the Package
- Run your SSIS package and verify that the data is correctly inserted and updated in the target table.
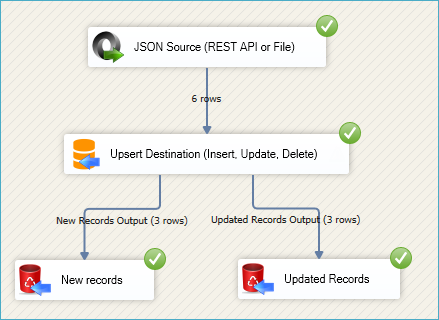
SSIS Upsert Destination Execution
Conclusion
After all, we saw you how to read CSV file data, pivot the data and Similarly, using SSIS JSON Generator and Parser Transform Pivot the CSV Data excluding some columns from pivoting. To explore many other scenarios not discussed in this article download SSIS PowerPack from here (includes 70+ Components).
References
Finally, you can use the following URL for more information.
- Help File: CSV Source