Introduction
![]() In this article we’re going to focus on load data in Salesforce using SSIS (Bulk Insert, Update, Delete and Upsert). If you like to know how to read from Salesforce then refer to previous post here. For Demo purpose we will use AdventuresWorks sample database as our source but you can use your own Database for testing.
In this article we’re going to focus on load data in Salesforce using SSIS (Bulk Insert, Update, Delete and Upsert). If you like to know how to read from Salesforce then refer to previous post here. For Demo purpose we will use AdventuresWorks sample database as our source but you can use your own Database for testing.
Prerequisites
Before we perform the steps listed in this article, you will need to make sure the following prerequisites are met:- SSIS designer installed. Sometimes it is referred to as BIDS or SSDT (download it from the Microsoft site).
- Basic knowledge of SSIS package development using Microsoft SQL Server Integration Services.
- Make sure ZappySys SSIS PowerPack is installed (download it, if you haven't already).
- (Optional step). Read this article, if you are planning to deploy packages to a server and schedule their execution later.
Salesforce developer account
To develop ETLs in Salesforce using SSIS you’ll need a Salesforce developer account. If you don’t have one, don’t worry, you can create a limited version FREE developer account. Click here to Sign up for FREE developer account.
Video Tutorial – Salesforce Insert, Upsert, Delete, Update
Getting Started
In this section, we will see how to perform bulk insert, update delete and upsert operations using ZS Salesforce Destination
Configure Salesforce Connection
First, we’ll need setup a connection to read or write Salesforce data is to make sure we have a working connection in SSIS.
- Create new or open existing SSIS Project in Visual Studio.
- Open SSIS Package and Go to SSIS designer.
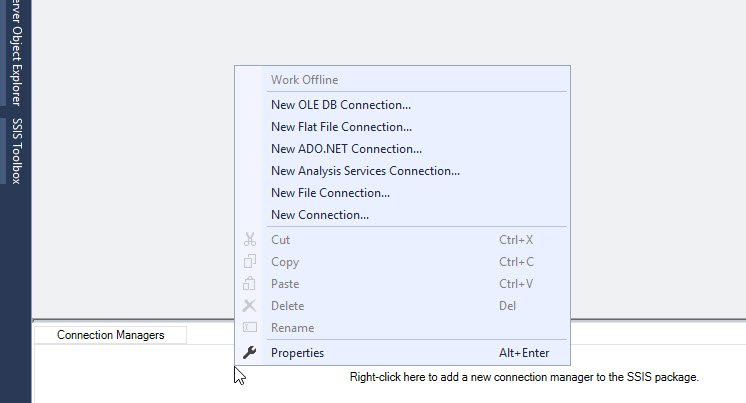
- Right click in the connection manager panel and click New connection
Create a new SSIS Salesforce Connection
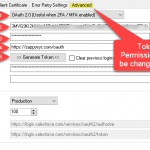
- In the connection type selection, Select the ZS-SALESFORCE Connection.
- We’ll use this information: Username, Password, Security Token (click the link learn how to obtain Salesforce Security Token )
- Click OK to add the connection.

Salesforce using SSIS, Salesforce connection
- Save all changes
Bulk Insert – Import data into Salesforce using SSIS
Let’s start with the a bulk insert in Salesforce using SSIS. On this section, we’re going to generate retrieve data from and OLEDB Source and proceed to Insert the records into Salesforce using ZS Salesforce Destination.
Configure SQL Server Source (OLEDB)
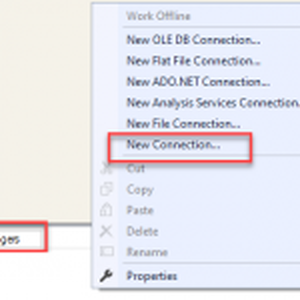
- Open SSIS Package and drag Data Flow task from Control Flow SSIS Toolbox
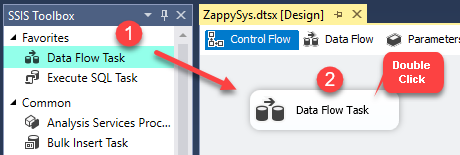
Dragging and dropping Data Flow Task into Control Flow
- Go to data flow designer. Drag and drop an OLE DB Source
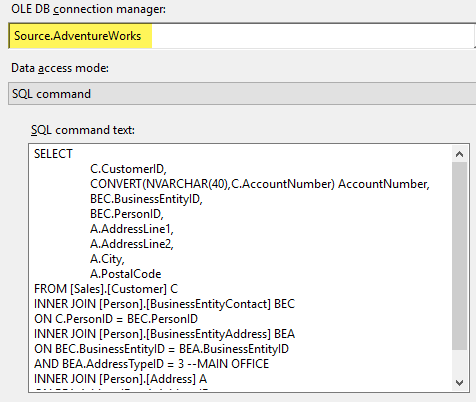
- Open the OLE DB Source and configure as follow:
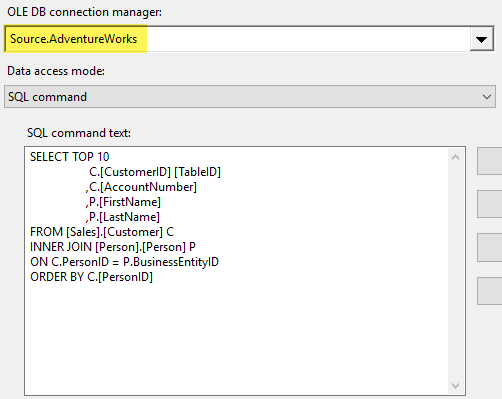
Configure SQL Server Source
Configure SSIS Salesforce Destination for Bulk Insert
Once SQL Server source is configure. Now let’s configure Salesforce Destination for Bulk Insert like below.
- Drag and drop ZS Salesforce Destination
- Open the destination component
- Connection Manager

Salesforce using SSIS, upsert destination connection manager
- Component Properties
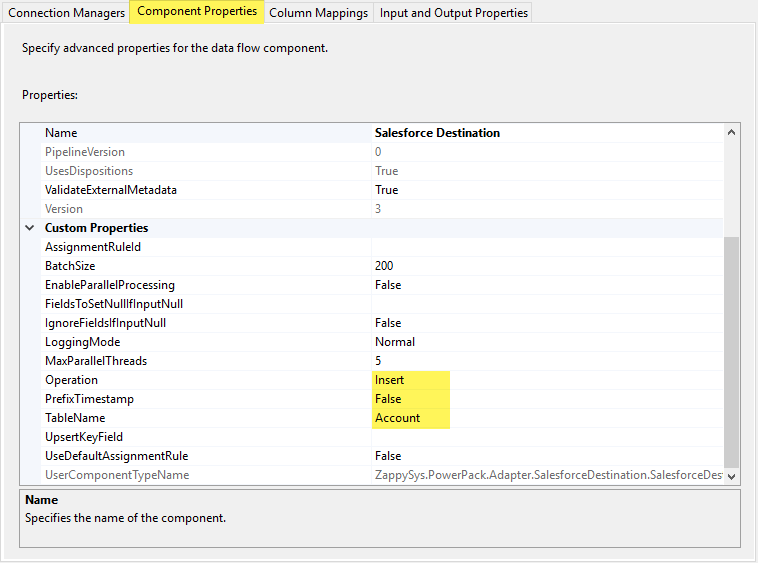
salesforce-using-ssis-insert-properties
- Column Mappings
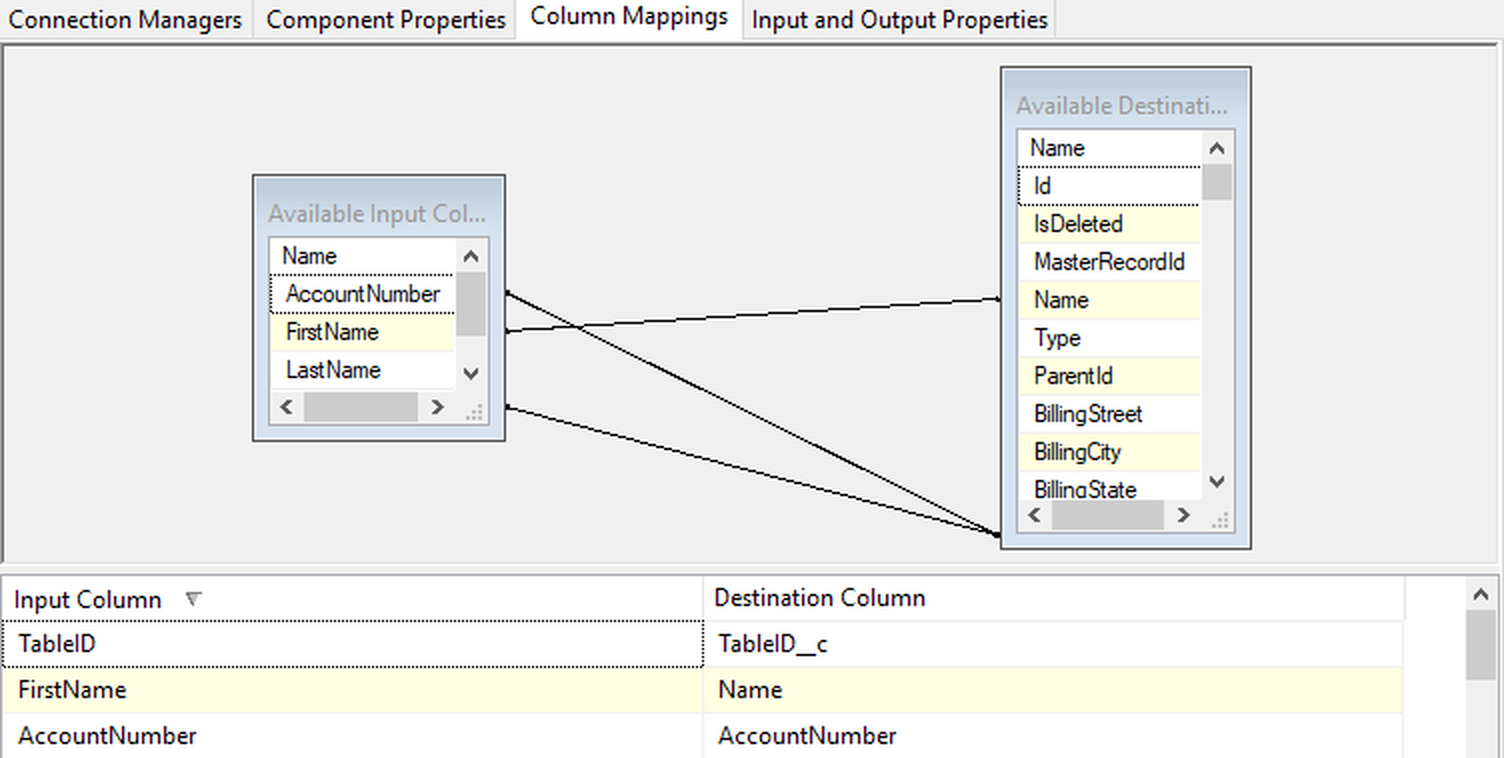
salesforce-using-ssis-insert-mapping
- Click OK
- Drag and drop two Trash Destination components
- Connect ZS Salesforce Destination for: New records Output and Error Output
- Right click on the joining arrows and enable data viewers on all previous connections
- Save all changes
- Right click in the data flow designer, click Execute Task
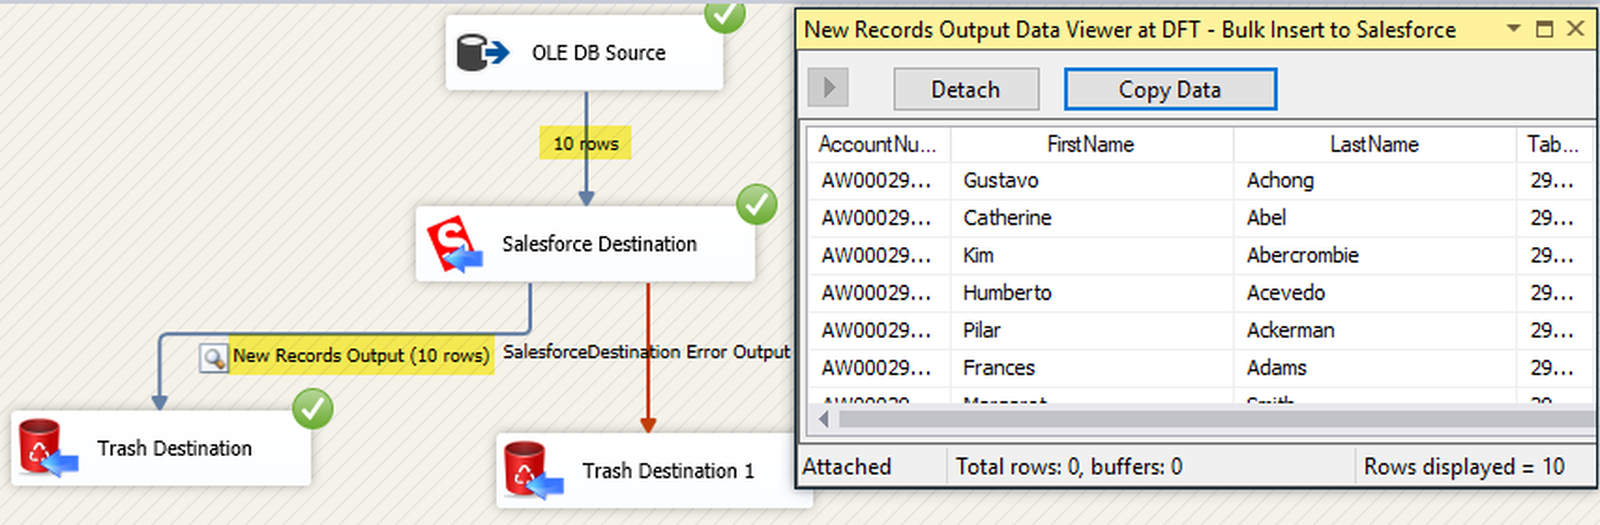
salesforce-using-ssis-insert-results
Bulk Update – Modify data in Salesforce using SSIS
In this section we’re going to perform a bulk update on Salesforce using SSIS. We’re going to list some information from our source, list all our Salesforce Account data, merge it and only update the data we match. In below example what we will do is Find out matching records in Salesforce and our Source System based on some External Key field (e.g. AccountNumber in our case). And then obtain Salesforce Record Id for matching AccountNumber and use it to Update target record.
Configure SQL Server Source (OLEDB Source)
- Open SSIS Package and drag Data Flow task from Control Flow SSIS Toolbox
- Go to data flow designer. Drag and drop OLE DB Source
- Open the OLE DB Source and configure
Salesforce using SSIS, Update OLEDB source
Configure SSIS Salesforce Source
- Now lets Drag and drop ZS Salesforce Source
- Open the ZS Salesforce and configure. You can select Query Mode and enter query like this because we only care about two fields for now. Use query mode whenever possible because it transfers less data.
1select Id,AccountNumber from account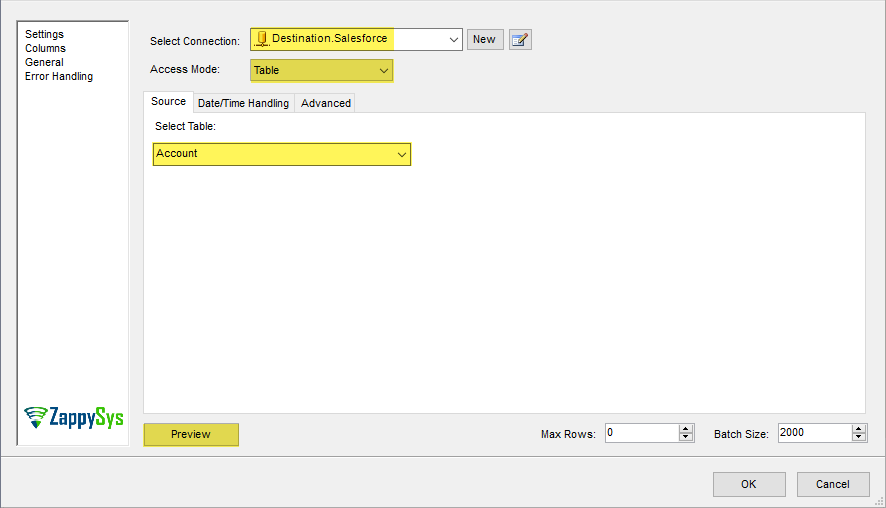
Salesforce using SSIS, Update Salesforce source
Configure Sort Transforms
Now lets sort both previous datasets using Sort Transforms. This is needed to JOIN dataset using Merge Transform (See next section)
- Drag and drop: 2 Sort and 1 Merge Join components
- Connect the OLE DB Source to the first Sort component, and configure
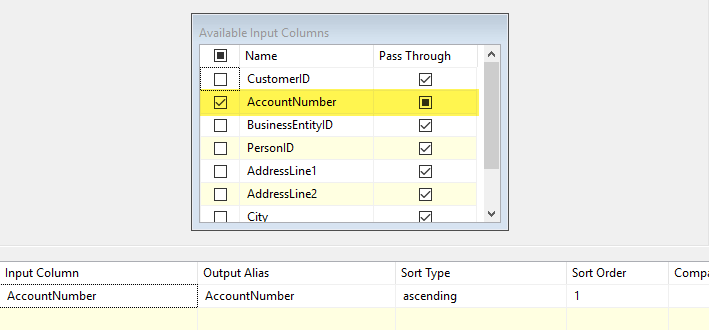
Salesforce using SSIS, Update OLEBD sort
- Connect the Salesforce Source to the second Sort component, and configure
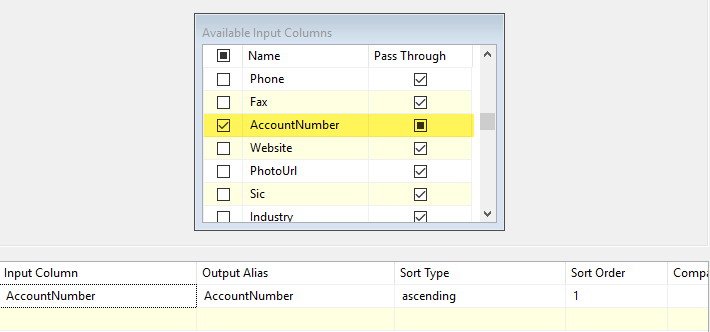
Salesforce using SSIS,update Salesforce sort
Configure Merge Transforms
No next step would be to join previous datasets based on AccountNumber and then we will output Id from Salesforce which is needed for later step.
- Drag and Drop Merge Transform from SSIS Toolbox like below.
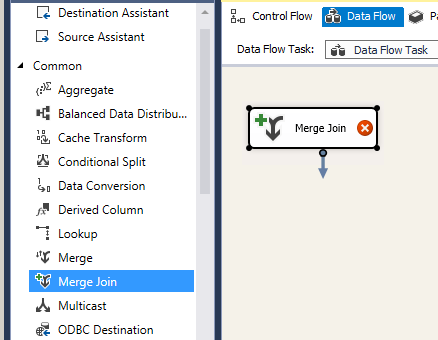
Drag SSIS Merge Join Transform from Toolbox
- Connect Sorts to the Merge component (sort from OLEDB Source most be on the left)
- Configure the Merge component
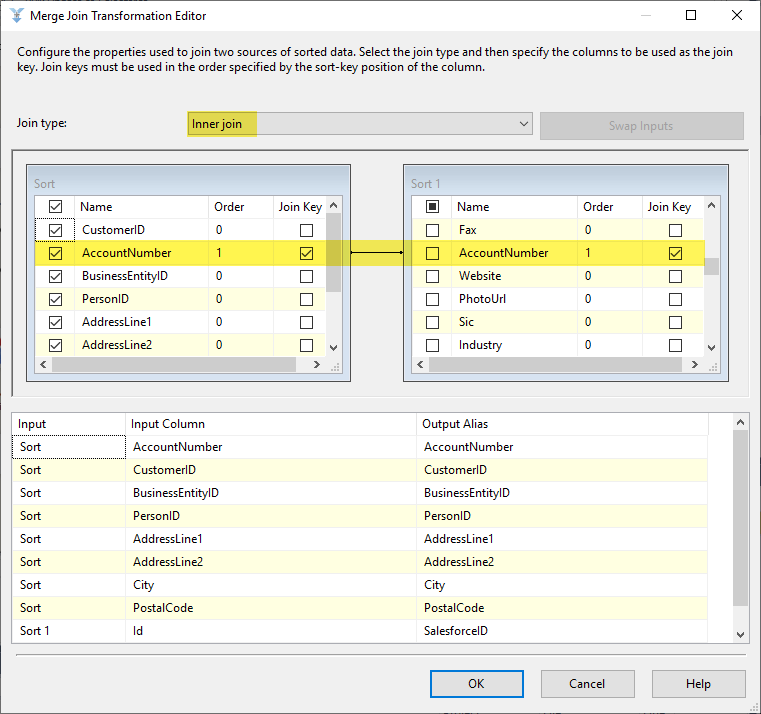
Salesforce using SSIS, update merge
Configure SSIS Salesforce Destination for Bulk Update
- Drag and drop ZS Salesforce Destination
- Open the ZS Salesforce Destination and configure
- Connection Manager tab
Salesforce using SSIS, update destination connection manager
- Component Properties tab
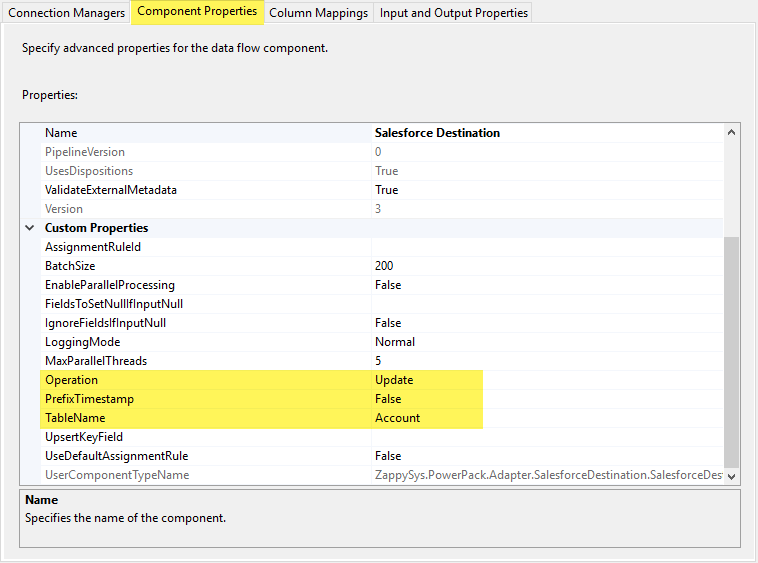
Salesforce using SSIS, update destination component properties
- For Update purposes, Salesforce Destinations needs to map the ID from the Account object. For more information, please use the following link SSIS Salesforce Destination – Update / Insert with Lookup Fields (Text to Id)
- Column Mapping

salesforce using SSIS, update destination column mappings
- Click OK
- Drag and drop three Trash Destination components
- Create two connections from ZS Salesforce Destination as follows: Update records and Error Output
- Right click on the joining arrows and enable data viewers on all previous connections
- Save all changes
- Right click in the data flow designer, click Execute Task
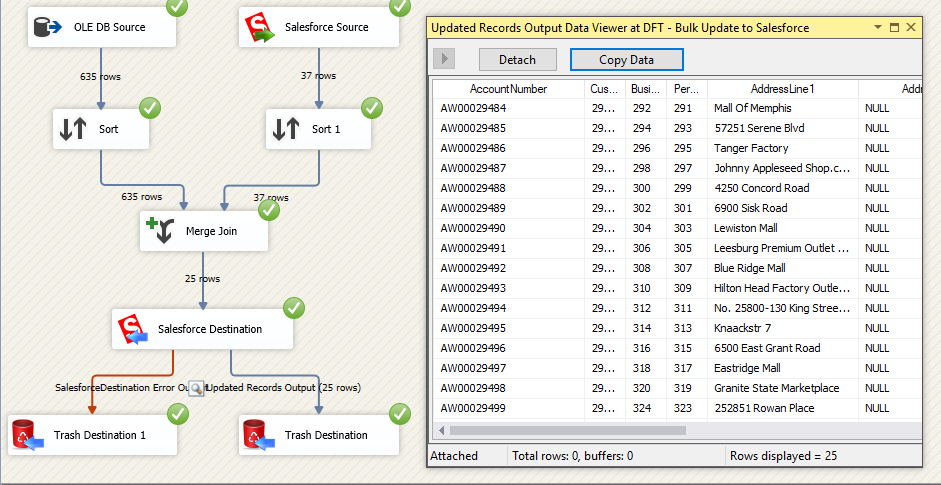
Salesforce using SSIS, update results
Bulk Upsert – Import/Modify data in Salesforce using SSIS
In this section we’re going to perform a bulk upsert of 25 record’s on Salesforce using SSIS. Upsert is an operation that combines both insert an update.
ZS Salesforce Destination allows Upserts operations. You’ll need to select the Upsert as an action and indicate the Key value for the comparison.
Creating External ID field for Salesforce Upsert
For the Upsert action we have to use an Upsert Keyfield (i.e. External ID field). For more information read here External ID. Follow these steps to add a External ID field on Salesforce Accounts object:
- Login to your Salesforce account.
- Click on the configuration icon and select “Service Setup”
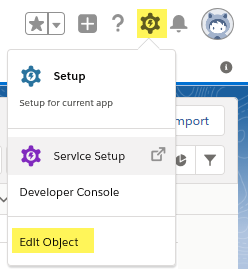
Salesforce using SSIS, Salesforce edit object
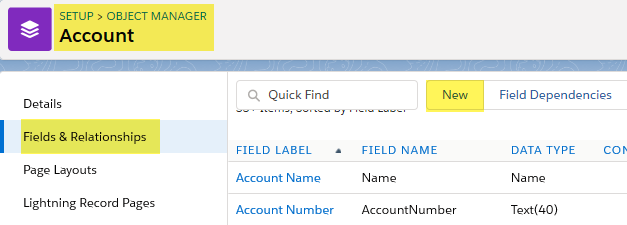
- On the new Tab, look for USER INTERFACE -> Objects And Fields -> Object Manager
- Select Account object
- Select Fields & Relationships
- Click New, to create a field
Salesforce using SSIS, Salesforce Fields & Configuration
- For the field type, choose Number and click next
- For Field Label and Field Name, type TableID. Check Unique and External ID boxes and click next
- Leave field-level security as default, click next
- Leave page layouts as default, click next.
- After finishing the configuration, the field should appear in the Fields & Relationships page
Configure SQL Server Source
- Open SSIS Package and drag Data Flow task from Control Flow SSIS Toolbox
Dragging and dropping Data Flow Task into Control Flow
- Go to data flow designer. Drag and drop OLE DB Source
- Open the OLE DEB Source and configure as follow
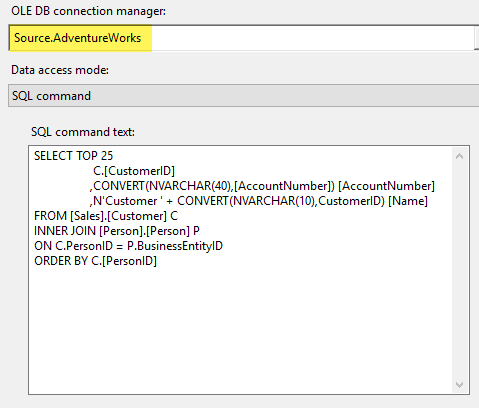
Salesforce using SSIS, Upsert OLE DB source
Configure SSIS Salesforce Destination for Upsert
- Drag and drop ZS Salesforce Destination
- Open the ZS Salesforce and configure
- Connection Manager
Salesforce using SSIS, upsert destination connection manager
- Component Properties
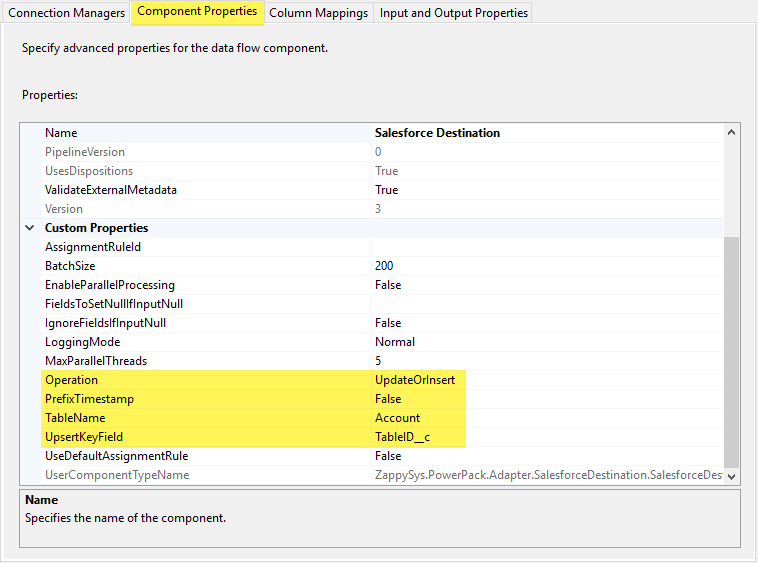
Salesforce using SSIS, upsert destination component properties
- Column Mapping

salesforce using SSIS, upsert destination column mapping
- Click OK
- Drag and drop three Trash Destination components
Configure Error Handling, Outputs for New, Updated, Failed Records
If you like to capture which rows are inserted and which rows are updated then you can drag Blue arrows coming from Salesforce destination component. You can also connect Red arrow to detect failed records and reason for error.
- Connect ZS Salesforce Destination for: New records Output, Updated Records Output and Error Output
- Right click on the joining arrows and enable data viewers on all previous connections
- Right click in the data flow designer, click Execute Task
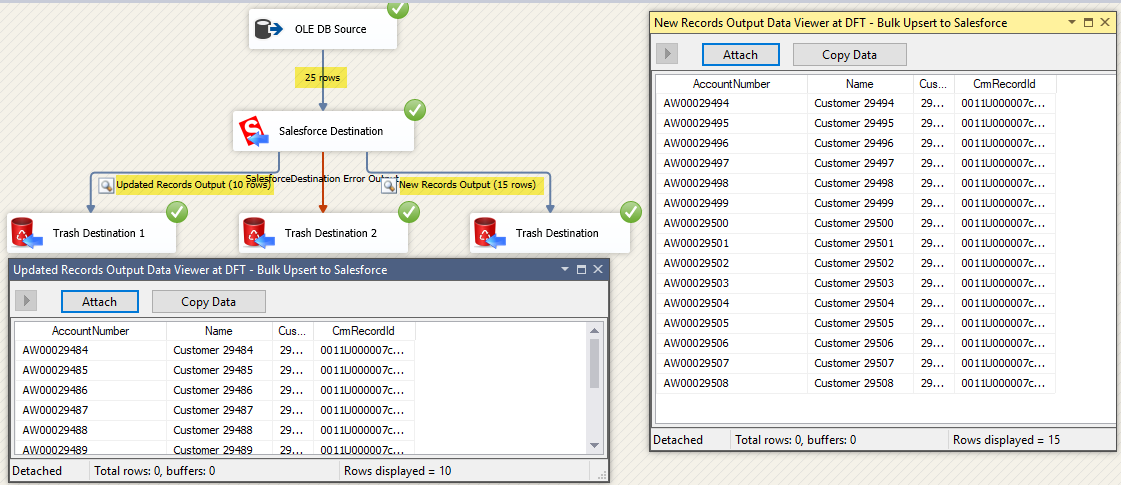
Salesforce using SSIS, upsert results
Bulk Delete – Delete data in Salesforce using SSIS
In this section, we’re going to perform a bulk delete on Salesforce using SSIS ZS Salesforce Destination. In this example we’re going to list all our source customers (from previous sections), merge it wit the Salesforce Account object, retrieve the Salesforce Account Id and delete the rows. Delete Operation also requires to map Id field so we will use similar technique we used for Update.
Configure SQL Server Source (OLEDB Source)
- Go to data flow designer. Drag and drop OLE DB Source
- Open the OLE DEB Source and configure as follow
salesforce-using-ssis-delete-oledb-source
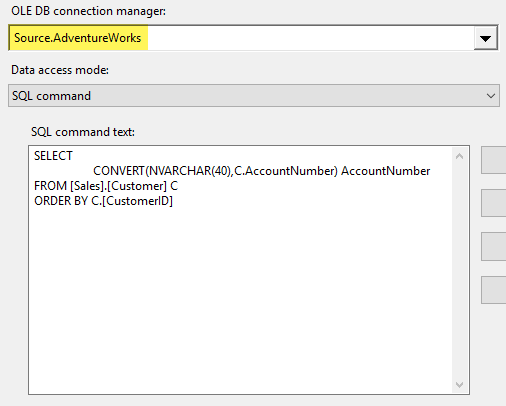
Configure SSIS Salesforce Source
- Drag and drop ZS Salesforce Source
- Open the ZS Salesforce and configure.
- You can select Query Mode and enter query like this because we only care about two fields for now. Use query mode whenever possible because it transfers less data.
1select Id,AccountNumber from account
Configure Sort Transforms
Now lets sort both previous datasets using Sort Transforms. This is needed to JOIN dataset using Merge Transform (See next section)
- Drag and drop: 2 Sort and 1 Merge Join components
- Connect the OLE DB Source to the first Sort component, and configure
Salesforce using SSIS, Update OLEBD sort
- Connect the Salesforce Source to the second Sort component, and configure
Salesforce using SSIS,update Salesforce sort
Configure Merge Transforms
No next step would be to join previous datasets based on AccountNumber and then we will output Id from Salesforce which is needed for later step.
- Now drag Merge Transform from SSIS toolbox
Drag SSIS Merge Join Transform from Toolbox
- Connect both Sort to the Merge component (sort from OLEDB Source most be on the left)
- Configure the Merge component
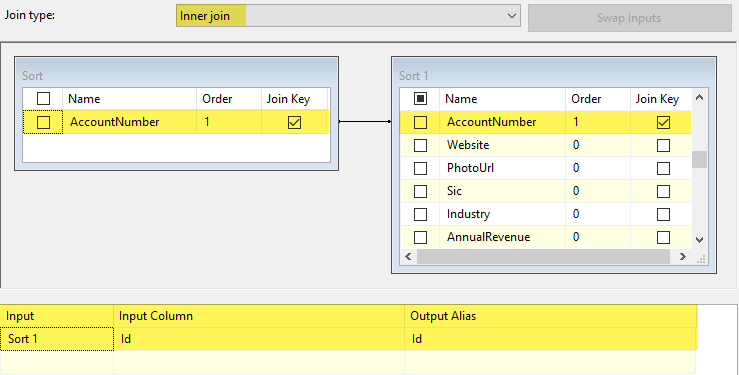
salesforce-using-ssis-delete-merge
Configure SSIS Salesforce Destination for Bulk Delete
- Drag and drop ZS Salesforce Destination
- Connect the Merge and ZS Salesforce Destination components. Right click the arrow and enable data viewer
- Connection Manager tab
Salesforce using SSIS, delete destination connection manager
- Component Properties tab
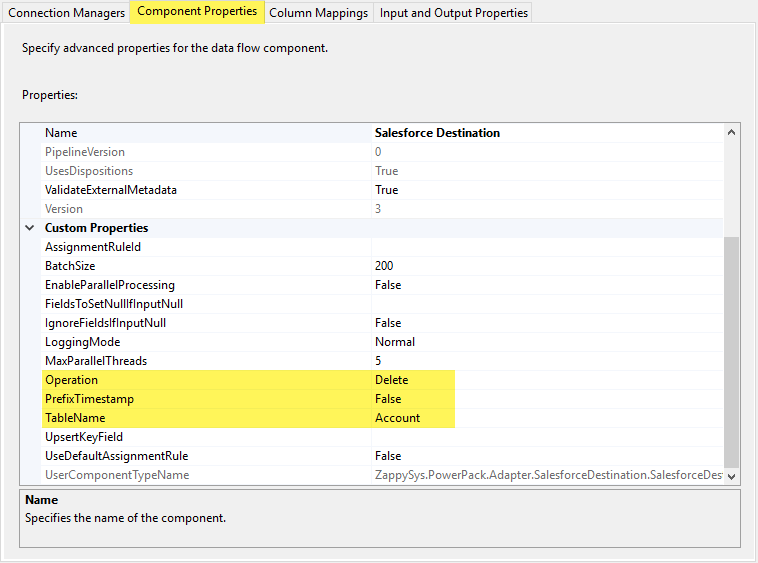
Salesforce using SSIS, delete destination component properties
- For Delete purposes, Salesforce Destinations needs to map the ID from the Account object.For more information, please use the following link SSIS Salesforce Destination – Update / Insert with Lookup Fields (Text to Id)
- Column Mapping
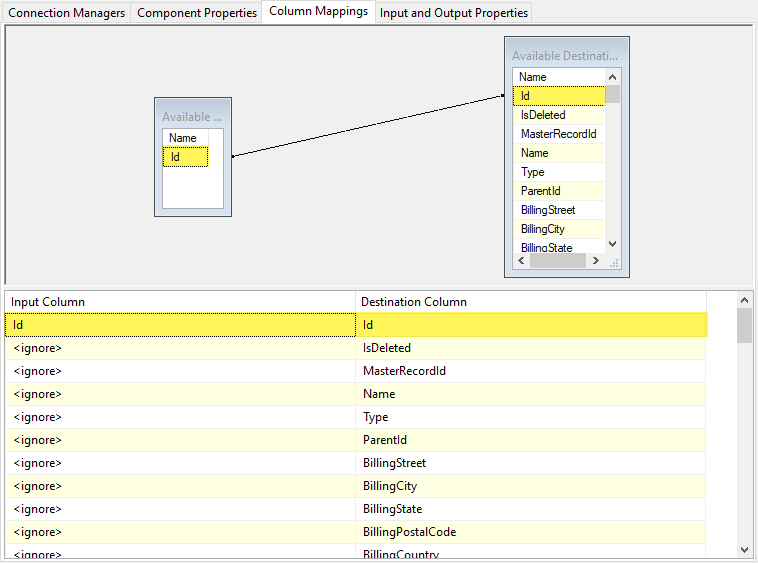
salesforce-using-ssis-delete-destination-column-mapping
- Click OK
- Save all changes
- Right click in the data flow designer, click Execute Task

salesforce-using-ssis-delete-results
Error Handling
When working on Salesforce with SSIS, we recommend Trash Destination component to help debugging outputs without performing DML on destinations.
Main benefits of usage:
- Enable data viewers and get live feedback of the data
- Save the results on different formats (XML, JSON, plain text files).
Conclusion
In this article, We have seen how easy it is to integrate Salesforce using SSIS. Using drag and drop connector you can perform Bulk insert, update, delete and Upsert operations.
Download ZappySys SSIS PowerPack to learn more about other possible scenarios which are not discussed in this article.