Introduction
In this post we will see how to call API which uses HMAC Authentication (MD5 or SHA HASH Signature). Almost everywhere example you search online will talk about writing code (i.e. Python, C#, Java) if you need to use HMAC Authentication to call you REST API, however in this article we will discuss coding-free approach for your Data Integration. We will see example in SSIS and then ODBC Driver (SQL Query approach) to read / write data from REST API with HMAC Authentication (SHA-256 Hashing).
Prerequisites
Before we perform the steps listed in this article, you will need to make sure the following prerequisites are met:- SSIS designer installed. Sometimes it is referred to as BIDS or SSDT (download it from the Microsoft site).
- Basic knowledge of SSIS package development using Microsoft SQL Server Integration Services.
- Make sure ZappySys SSIS PowerPack is installed (download it, if you haven't already).
- (Optional step). Read this article, if you are planning to deploy packages to a server and schedule their execution later.
What is HMAC Authentication
If you are new to HMAC term then please check Wiki description here. Basically in HMAC Authentication you create a unique signature by hashing API Request (i.e. URL, Method, Body) using secret key / password. Once server receives your data it tries to validate signature. Unlike other authentication methods, in HMAC Auth your Secret key is never transmitted so in order to alter message by middle man, attacker has to gain access to your secret key before he can recreate signature to alter your message.
Example APIs which uses HMAC Authentication
Here is a list of few API providers which we tested to support HMAC. There many more APIs out there which should also work but we have not tested.
- Microsoft Azure CosmosDB (formally known as DocumentDB) uses HMAC Signature – See API documentation here
- CSOD uses HMAC (This is 2 steps Dynamic Token approach) – See API documentation here
- Acquia uses HMAC – See API documentation here
- Amazon AWS Cloud uses HMAC Signature – ZappySys uses this approach to call AWS APIs with AWS v4 Signature.
New HMAC Authentication feature of ZappySys HTTP Connection can be used in SSIS connectors / ODBC Drivers for REST. Use HTTP connection for all HMAC scenarios except AWS. For AWS we make it very simple by using dedicated OAuth Provider for AWS v4.
Pros and Cons of HMAC Authentication
Now let’s look at what are some pros and cons of HMAC Authentication.
Advantages of HMAC Authentication
- Unlike other Authentication methods like Basic Authentication or OAuth 2, you dont have to pass Secret Key / Password along with your request
- SSL is optional so you can host your API over HTTP rather than HTTPS (However its strongly suggested that you always use HTTPS when possible)
- You can avoid Replay attack because Requests are Hashed along with some Timestamp, so after few mins most servers will reject the signature if same request is retried again by attacker.
Disadvantages of HMAC Authentication
- It is very complex compared to other approaches. Here is an example (AWS Signature) of how complex it can be :).
- You need to have Cryptography Libraries Access in order to HASH with correct algorithm
Anyways enough said now lets see something in Action.
HMAC Authentication Example for SSIS
So to demo how HMAC Authentication can be implemented in SSIS we will use Azure CosmosDB API which uses HMAC Authentication.
- Open existing SSIS Solution or create new Project
- From SSIS Toolbox drag and drop ZS REST API Task
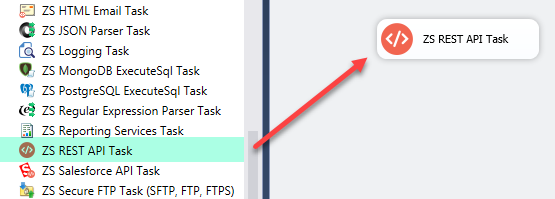
Drag and Drop REST API Task from SSIS Toolbox
- Now let’s, Configure HTTP Connection as below
- Right click on Connection Managers Panel to Create HTTP Connection, Select New Connection from the Context Menu.

- Select ZS-HTTP Connection Manager from the Connection Managers list and Click on Add Button

- Once HTTP Connection UI is visible select HMAC Authentication option, enter User ID and Password or API Key as below. If CosmosDB API example ignore Username and enter master API key. You can enter any valid URL (We will override this in next step anyways). Click on Configure HMAC Signature link.
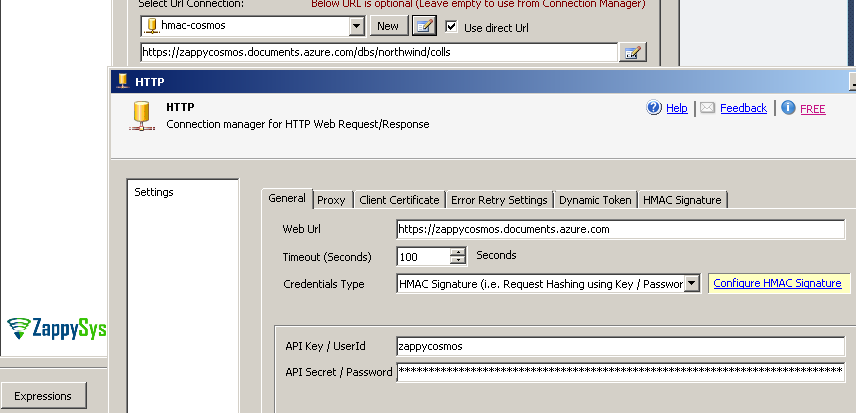
HTTP Connection with HMAC Authentication Option (Azure CosmosDB API Example)
- Enter following 4 pieces to create correct HMAC Signature for Azure CosmosDB API call.

Configure HMAC String To Sign, Headers, Timestamp format, Algorithm
- Select HMAC algorithm as sha256 this is the most common algorithm for hashing and used by many APIs. Few other possible choices would be sha1, sha512, md5 and any other valid name from your system.
- Enter String To Sign. Refer to your API and see how its expecting you to build this string. Each API may have different pieces in different order so be careful to define this else Signature will not match with server signature. In Azure CosmosDB API we use this documentation to understand. Refer to HTTP Connection Manager help file or See next section to learn about all possible placeholders.
Where1[$http-method$]-lc[$lf$][$url-part-right-1$]-lc[$lf$][$url-part-right-2-4$][$lf$][$timestamp$]-lc[$lf$][$lf$]
[$lf$] is new line (i.e. \n)
[$http-method$] is your HTTP Request Method (i.e. GET, POST, DELETE…)
[$url-part-right-1$] will extract first part from right side in URL Path (e.g. colls if URL is https://zappycosmos.documents.azure.com/dbs/northwind/colls)
[$url-part-right-2-4$] will extract string from 2nd part from right till 4th part from left (e.g. dbs/northwind if URL is https://zappycosmos.documents.azure.com/dbs/northwind/colls)
[$timestamp$] will return current time in UTC in specified format (see next)
-lc suffix in some placeholders will return value in lowercase. e.g. [$http-method$]-lc will return get rather than GETExample Request:
12GET https://zappycosmos.documents.azure.com/dbs/northwind/colls HTTP/1.1x-ms-date: Mon, 22 Apr 2019 20:59:20 GMTString To Sign at runtime this may be like below
123456get\ncolls\ndbs/northwind\nmon, 22 apr 2019 20:59:20 gmt\n\n\n - Enter Extra Headers as below to make sure each REST API call includes x-ms-date , x-ms-version and Authorization header. See next section to learn about all possible placeholders. In below format we used [$signature$]-enc which means Base64 Signature string in URL encoded format. Remove -enc if API doesn’t need URL encoded string.
1x-ms-date: [$timestamp$]||x-ms-version: 2015-08-06||Authorization:type%3dmaster%26ver%3d1.0%26sig%3d[$signature$]-enc
- Enter Timestamp format as r this will produce date as Mon, 22 Apr 2019 20:48:26 GMT for example. Refer to API for exact date time format. These are supported format specifiers. r OR R is RFC 1123 standard format.
- That ist now click OK to save HMAC Auth settings and on REST API Task check Use Direct URL option and enter URL like below to Fetch List of all collections. Replace MY-HOST and MY-DATABASE with your own values.
1https://MY-HOST.documents.azure.com/dbs/MY-DATABASE/colls
- Click Test and see it returns status 200 OK
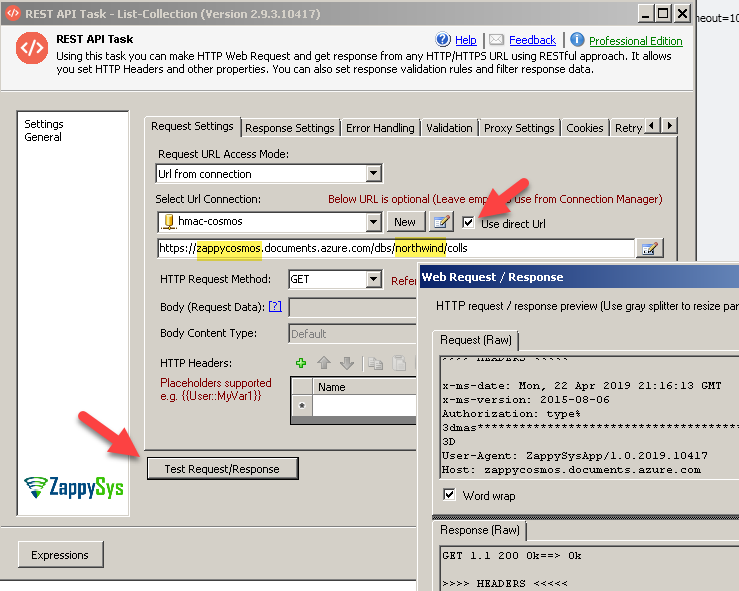
Call Azure CosmosDB REST API in SSIS (List DocumentDB Tables Example)
HMAC Authentication Example for ODBC Drivers
Same example above can be achieved using following SQL Query described in below section using ODBC PowerPack using JSON / REST API Driver
Use below steps to try HMAC feature which calls CosmosDB API. Now lets look at step by step.
- Install ODBC PowerPack (It includes JSON Driver for REST API / Files)
- Type odbc in start menu and select ODBC Data Sources (64-bit)
- Click New to add new DSN and select ZappySys JSON Driver
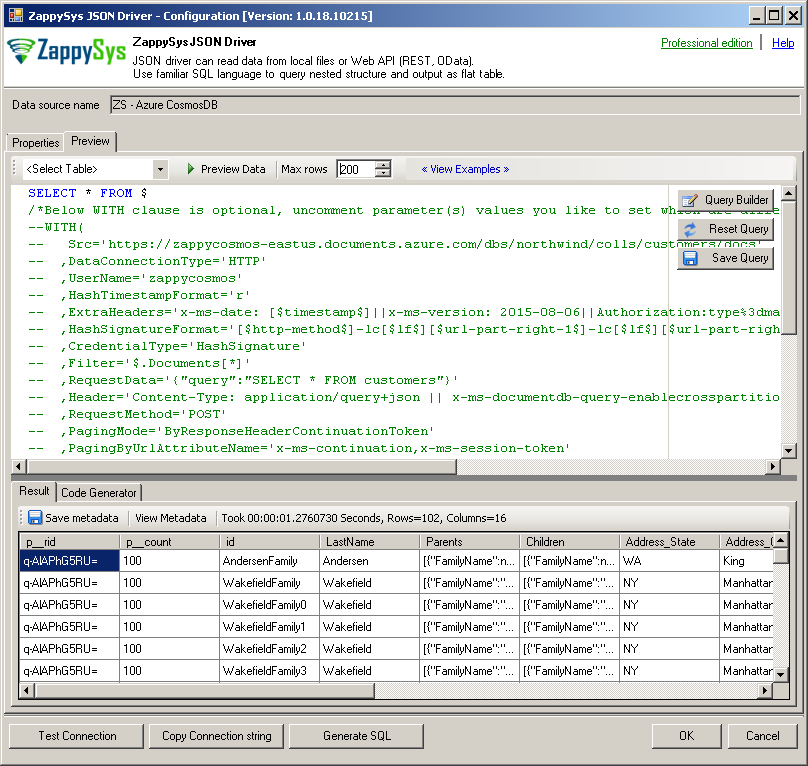
- When JSON Driver UI is visible click on Load Connection String Button and enter below string and click OK. Before you can load you can change DataPath, Password, RequestData properties as per your need. You can also change later on too once loaded.
1DRIVER={ZappySys JSON Driver};DataPath='https://MY-HOST.documents.azure.com/dbs/MY-DATABASE/colls/MY-TABLE/docs';DataConnectionType=HTTP;UserName='MY-HOST';HashTimestampFormat='r';ExtraHeaders='x-ms-date: [$timestamp$]||x-ms-version: 2015-08-06||Authorization:type%3dmaster%26ver%3d1.0%26sig%3d[$signature$]-enc';HashSignatureFormat='[$http-method$]-lc[$lf$][$url-part-right-1$]-lc[$lf$][$url-part-right-2-4$][$lf$][$timestamp$]-lc[$lf$][$lf$]';CredentialType=HashSignature;Password='xxxxxxxxxxxxxxxxxxxxxxxx==';Filter='$.Documents[*]';RequestData='{"query":"SELECT * FROM root"}';RequestMethod='POST';PagingMode=ByResponseHeaderContinuationToken;PagingByUrlAttributeName='x-ms-continuation,x-ms-session-token';RequestHeaders='Content-Type: application/query+json || x-ms-documentdb-query-enablecrosspartition: true || x-ms-documentdb-isquery: true' - Now go to preview tab and click execute to see preview data.
- Here is Full query to override one or more connection attributes per query
In above Query replace Src, Password and RequestData (if you need different SQL).123456789101112131415161718SELECT * FROM $WITH(Src='https://MY-HOST-NAME.documents.azure.com/dbs/MY-DB-NAME/colls/MY-TABLE-NAME/docs',DataConnectionType='HTTP',UserName='MY-HOST-NAME',HashTimestampFormat='r',ExtraHeaders='x-ms-date: [$timestamp$]||x-ms-version: 2015-08-06||Authorization:type%3dmaster%26ver%3d1.0%26sig%3d[$signature$]-enc',HashSignatureFormat='[$http-method$]-lc[$lf$][$url-part-right-1$]-lc[$lf$][$url-part-right-2-4$][$lf$][$timestamp$]-lc[$lf$][$lf$]',CredentialType='HashSignature',Password='Hfs7k5wxxxxxxxxxxxxxxxxxxxxxxxxx4Ue0eucwDHMg==',Filter='$.Documents[*]',RequestData='{"query":"SELECT * FROM root"}',Header='Content-Type: application/query+json || x-ms-documentdb-query-enablecrosspartition: true || x-ms-documentdb-isquery: true',RequestMethod='POST',PagingMode='ByResponseHeaderContinuationToken',PagingByUrlAttributeName='x-ms-continuation,x-ms-session-token'--,PagingByUrlMaxPages='4')- Change Src to correct URL to (first part and Resource Link (MY-HOST-NAME , MY-DB-NAME, and MY-TABLE-NAME)
Example:
https://zappycosmos.documents.azure.com/dbs/northwind/colls/customers/docs
or (using explicite region)
https://zappycosmos-eastus.documents.azure.com/dbs/northwind/colls/customers/docs - Change Password with your Key, change username with something (e.g. instance name) this is ignored for CosmosDB API so enter anything.
- Change RequestData with desired SQL query you like to execute or leave it default to return all.
- Change Src to correct URL to (first part and Resource Link (MY-HOST-NAME , MY-DB-NAME, and MY-TABLE-NAME)
Query CosmosDB Documents using ODBC Driver (JSON / REST API)
Supported Placeholders for String To Sign and Extra Headers
Now let’s look at various placeholders you can use in String to Sign and Extra Headers Setting we saw earlier.
Placeholder Modifiers
-lc : Output as Lower Case ( Example ABCD will be returned as abcd)
-enc : Output as URL Encoded (Example: A=B will be encoded as A%3DB )
Placeholders
| Placeholder | Description |
| [$lf$] | Indicates Newline (same as \n) |
| [$userid$] | Your userid or account id entered in UserName property |
| [$http-method$] | Indicates HTTP Verb for current request (e.g GET, POST, PUT, HEAD, DELETE) |
| [$host$] | Host name part from URL (e.g. www.zappysys.com for https://www.zappysys.com/someapi) |
| [$url-relative$] | Indicates URL path of current request. This part is after host name and before ? if parameters used (e.g /api/v1/customers for http://a.com/api/v1/customers?id=123) |
| [$url-query$] | URL parameters (key and value pairs) (e.g. for http://a.com/api/v1/customers?z=123&a=true it will return z=123&a=true) |
| [$url-query-canonical$] | URL parameters in Canonical Format (key and value pairs are sorted by key. Key is returned as lowercase and both key+value URL encoded) (e.g. for http://a.com/api/v1/customers?Zebra=Good&Apple Cake=Yummy …it will return apple%20cake=Yummy&zebra=Good) |
| [$url-part-[left|right]-N1[-N2]$] | URL part from left or right. N1 is start position, N2 is optional and its end position (e.g. for http://a.com/api/v1/customers?z=123&a=true [$url-part-right-1$] should give you customers and [$url-part-right-2$] returns v1). [$url-part-right-1-1$] should return http://a.com/api/v1/customers and [$url-part-left-3-1$] should return a.com/api/v1/customers (3rd from left till last part) |
| [$timestamp$] | Indicates Current Timestamp in UTC (Use TimestampFormat property to change default Date Format which is ISO. To use Unix based time enter epoch, for custom format use something like yyyy-MM-ddTHH:mm:ss.fffZ for ISO. For custom date format specifiers click here and to see Standard Formats click here |
| [$nounce$] | A unique random string (e.g. nounce). This is sometimes asked by provider to put in signature to avoid replay attack. |
| [$body-hash-ALGORITHM$] [$body-hash-ALGORITHM[-hex][-ke]$] | (example: [$body-hash-sha256-hex$] or [$body-hash-sha256$]) This placeholder is for HASH of supplied body for current request. Replace ALGORITHM with valid name (e.g. md5, sha1, sha256, sha512). Also to Output Hash as lowercase Alphanumeric Hex suffix by -hex (e.g. [$body-hash-sha256-hex$] ). By default this placeholder is not included for GET / HEAD requests (We remove HASH and trailing \n for GET / HEAD requests). To include Body HASH regardless request Method you need to add -ke (Keep Empty) suffix. e.g. [$body-hash-sha256-ke$] |
| [$content-type[-ke]$] | (example: [$content-type$] or [$content-type-ke$]) This placeholder is to indicate request COntent-Type (e.g. application/json). By default this placeholder is not included for GET / HEAD requests (We remove content-type from String Format along with trailing \n for GET / HEAD requests). To include Body content-type regardless request method you need to add -ke (Keep Empty) suffix. e.g. [$content-type-ke$] |
| [$signature$] | Signature in base64 format. This is calculated based on HashSignatureFormat string. |
| [$signature-hex$] | Signature in lowercase Hex format. This is calculated based on HashSignatureFormat string. |
| [$token$] | If you using DynamicToken method to login first and then extract token to call next API then you can use this placeholder for Headers. |
Conclusion
In this article you saw how ZappySys made it possible to call virtually any API using powerful SSIS Connectors for JSON / XML API and also ZappySys ODBC Drivers to integrate in any ODBC compliant apps like Excel, Power BI, Qlik, SSRS and many more. Download FREE Trial of SSIS PowerPack and ODBC PowerPack depending on your use case.