Introduction
![]() In our previous article, we saw how to call REST API in SSIS. Now in let’s use that knowledge and learn how to read/write Shopify data in SSIS. If you are not aware of Shopify then its one of the most popular eCommerce platforms out there for small shops who sell online. Shopify provides a total framework to sell/fulfill orders online including tools to build/customize your own web store.
In our previous article, we saw how to call REST API in SSIS. Now in let’s use that knowledge and learn how to read/write Shopify data in SSIS. If you are not aware of Shopify then its one of the most popular eCommerce platforms out there for small shops who sell online. Shopify provides a total framework to sell/fulfill orders online including tools to build/customize your own web store.
In this article we will see few examples on how to call basic REST API calls to read shopify data, delete shopify data and write shopify data using various SSIS Components.
Prerequisites
Before we perform the steps listed in this article, you will need to make sure the following prerequisites are met:- SSIS designer installed. Sometimes it is referred to as BIDS or SSDT (download it from the Microsoft site).
- Basic knowledge of SSIS package development using Microsoft SQL Server Integration Services.
- Make sure ZappySys SSIS PowerPack is installed (download it, if you haven't already).
- (Optional step). Read this article, if you are planning to deploy packages to a server and schedule their execution later.
Create Shopify Custom App for Shopify Admin API
Before accessing Shopify API you must create Custom App (and then obtain Access Token)
New approach (Custom App) to generate App Credentials for Rest API Call
Before you call Shopify REST API, your first step is to obtain credentials. We will need Access Token or Storefront Access Token. We will use it in later section to call Shopify REST API.
- First, in Shopify, go to sore Settings (Click Gear Icon) > Apps and sales channels > click Develop apps for your Store
OR just navigate to URL
1https://{your-store}.myshopify.com/admin/settings/apps/development
Shopify App and Sales Channel
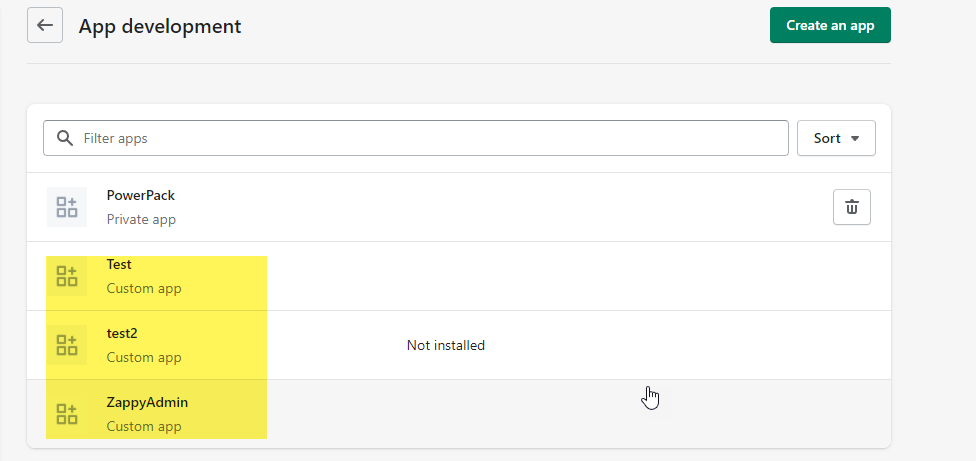
- In App development, click on Create an app
Shopify Create an App
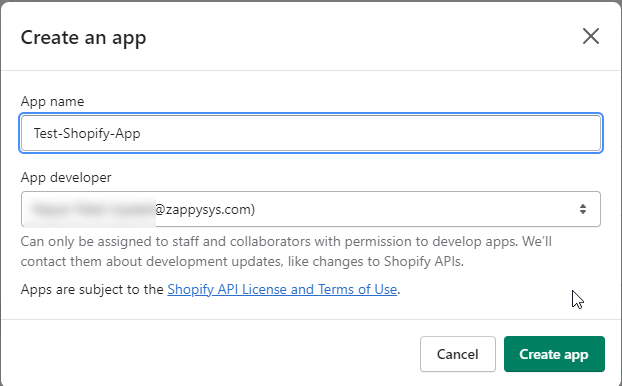
- Provide the appropriate name for your custom app.
Shopify Custom App Name
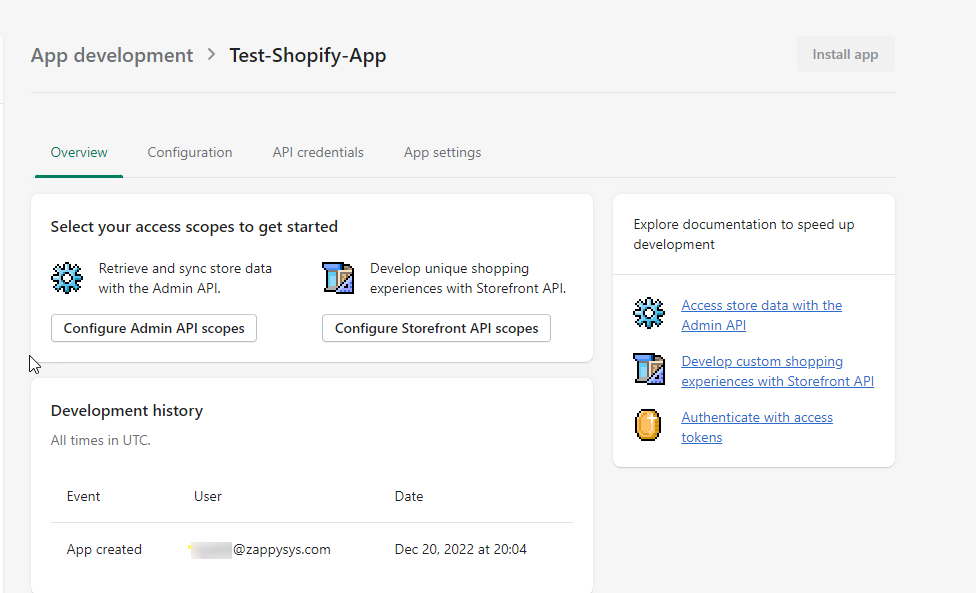
- Once we created the app name, we have 2 options to create Admin API or Storefront API in the Overview tab.
 Shopify App Scopes and Configuration
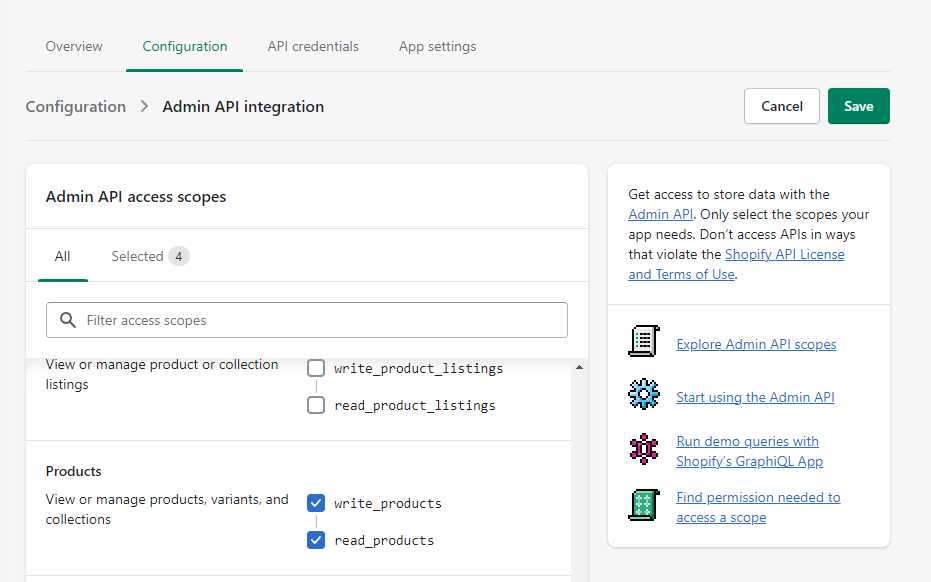
 - Click on Configure Admin API scopes or Configure Storefront API scopes based on your need as shown in the above screenshot.
- If click on Configure Admin API scopes, then select the appropriate scopes for your Admin API.
- Also, change orders, transactions, and fulfilments permissions to read and write if you need to create, update and delete products.
- In addition, change the products, variants, and collections to read and write if you need to create, update and delete products.
Shopify Admin Api Scope
- After saving it, it asks to install app and generate Shopify Access Token for your Admin API.
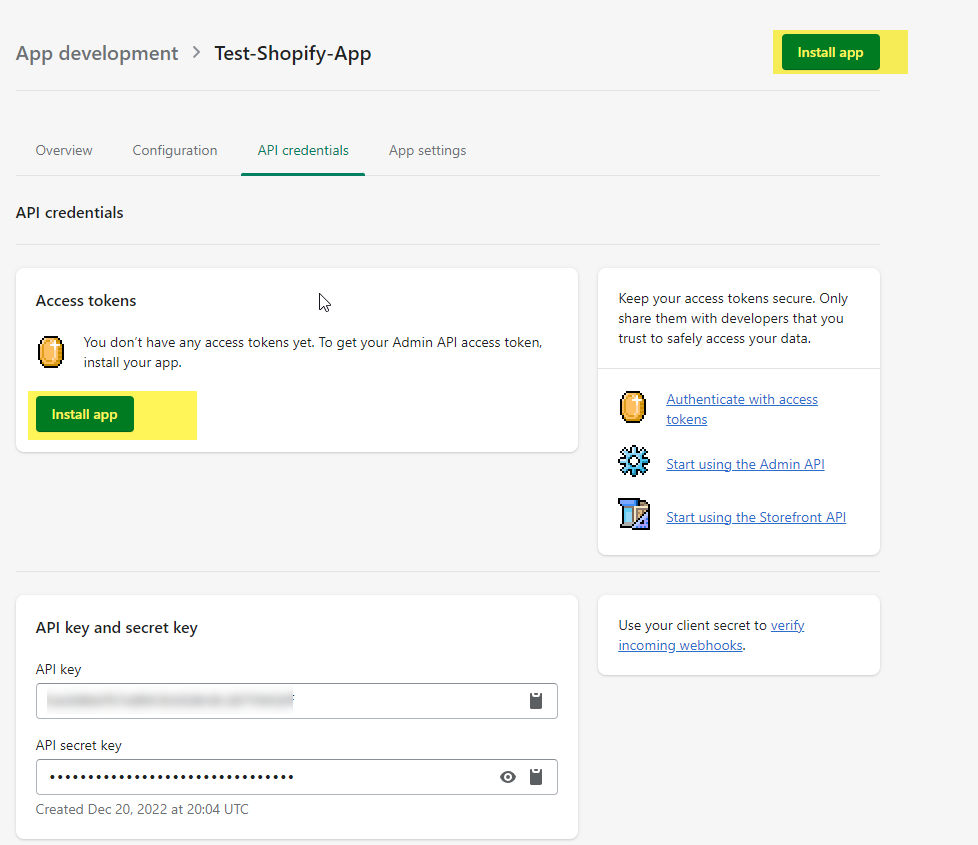
Shopify Admin Install App
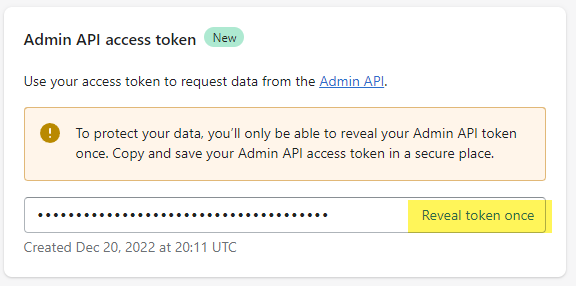
Shopify Admin Access Token
- If click at Configure Storefront API scopes, then select the appropriate scopes for your Storefront API.
- Also, change orders, transactions, and fulfilments permissions to read and write if you need to create, update and delete products.
- In addition, change the products, variants, and collections to read and write if you need to create, update and delete products.

Shopify Storefront API Scope
- After saving it, it asks to install app and generate Shopify Storefront Access Token for your Admin API shown above screenshot.
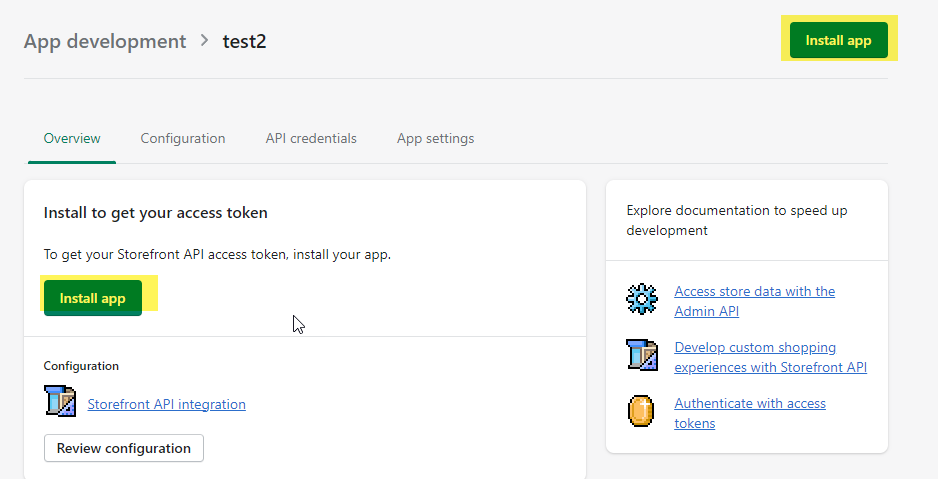
Shopify Storefront Install App
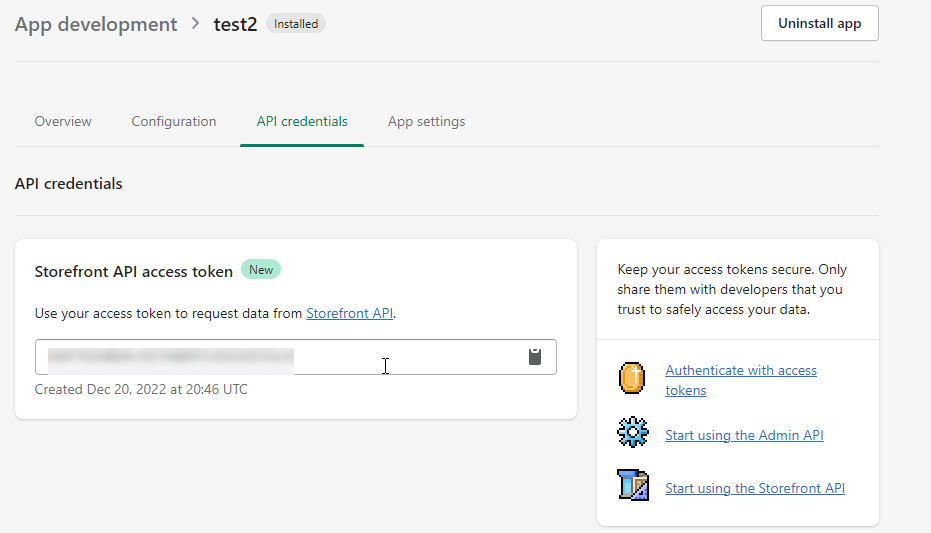
Shopify Storefront Access Token
- We have created Admin API Access Token and Storefront API Access Token to access the Shopify APIs.
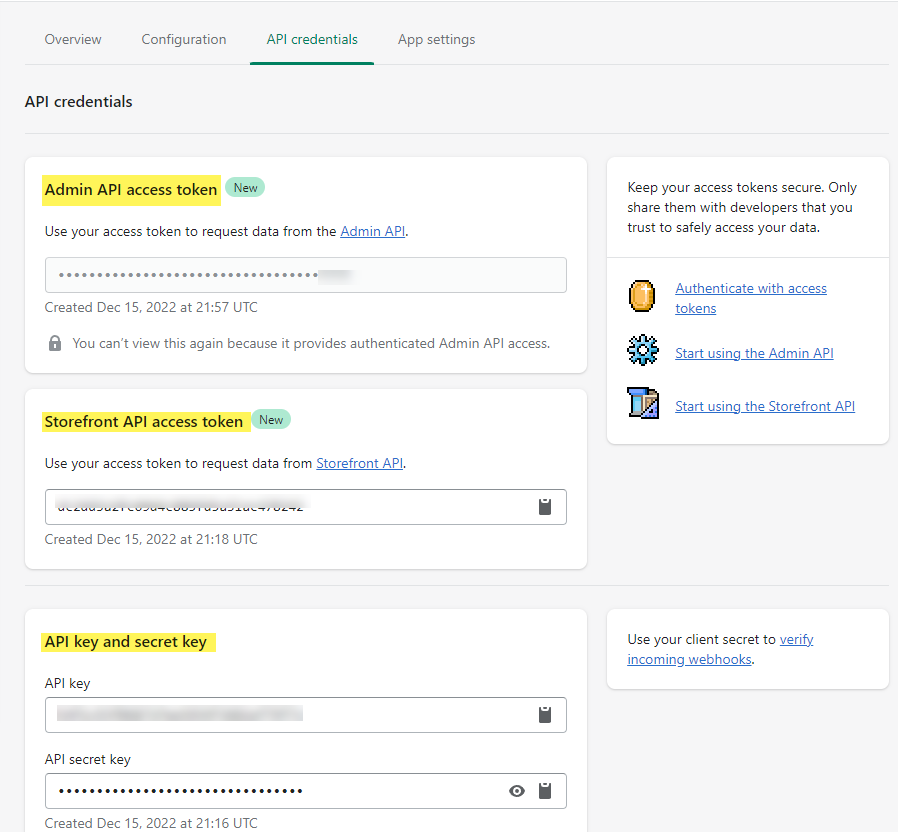
Shopify API Credentials
Old approach (Private App) to generate App Credentials for Rest API Call
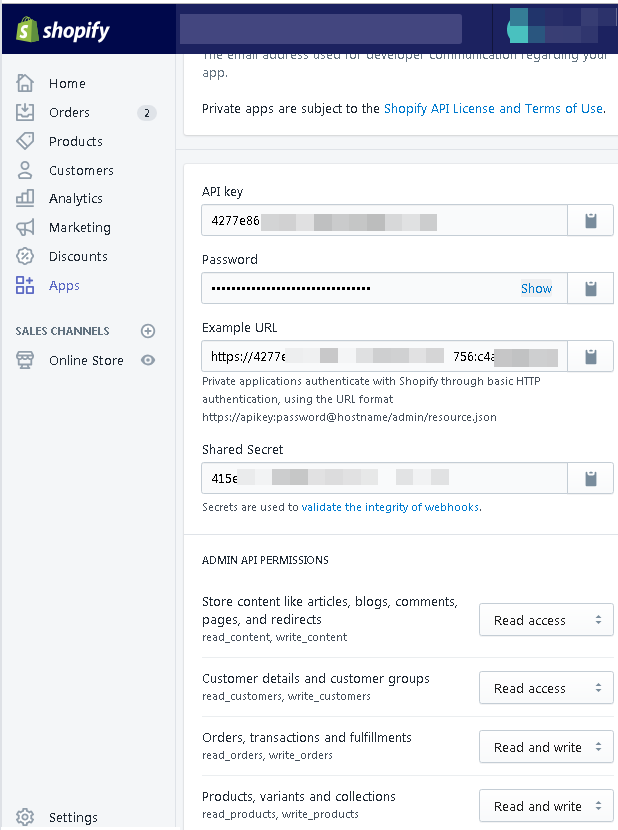
Before you call Shopify REST API, your first step is to obtain credentials. We will need API Key and Password. We will use it in later section to call shopify REST API.
- First, in Shopify, go to Apps and click Manage private apps.
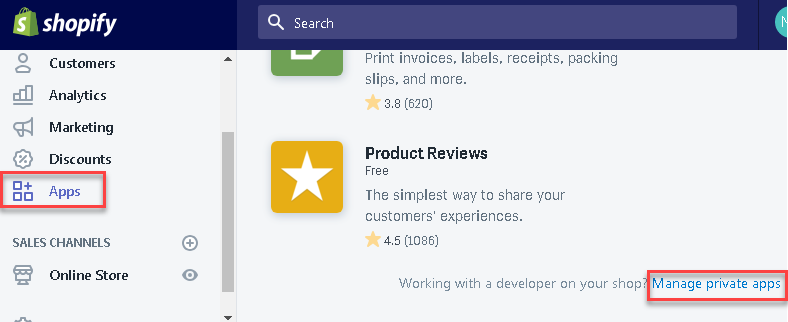
Shopify App – Manager private apps
- Secondly, In Private apps, click the Create a new private app:
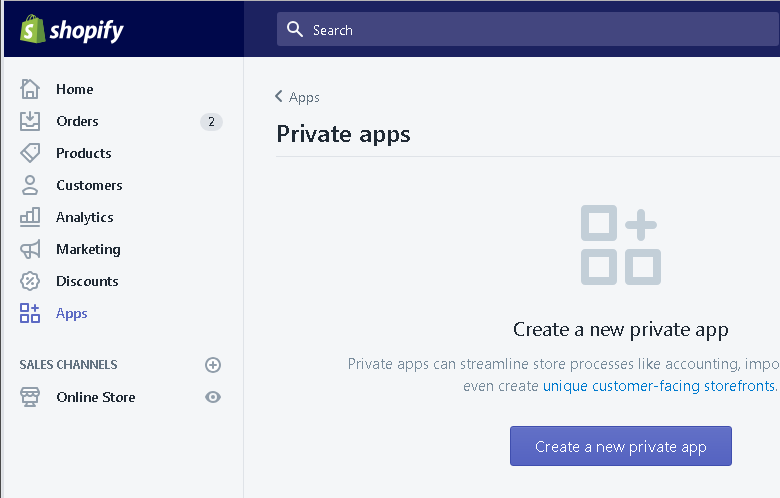
Shopify Private apps
- Also, change orders, transactions, and fulfilments permissions to read and write if you need to create, update and delete products.
- In addition, change the products, variants, and collections to read and write if you need to create, update and delete products.
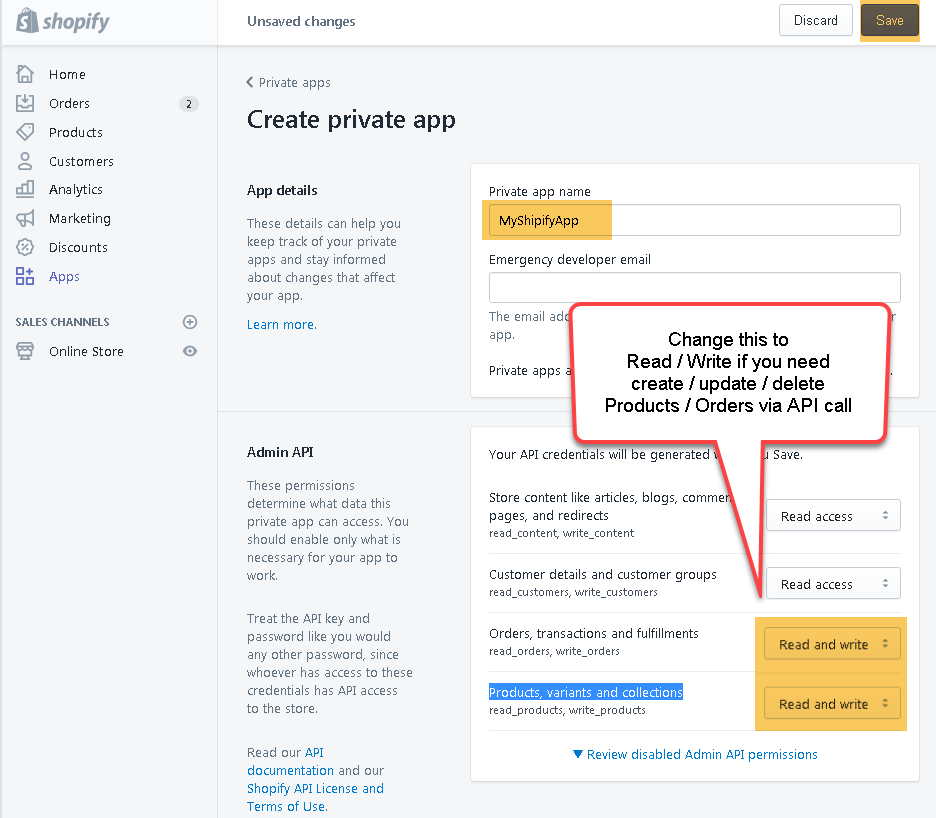
Permission for private apps.
- Finally, you will have an API key, a password, an URL and a shared secret that you will use in the next section:
Shopify API key
Read Shopify data in SSIS (Get Orders Example)
So in this section we will learn how to call Shopify REST API. For example purpose we will call Shopify Orders Endpoint. For all other REST API endpoints check this link. Read carefully which parameters you can pass for each API call. So let’s read shopify orders using sample API call.
Configure SSIS JSON Source to read from Shopify
Now, that we created an App in Shopify, the rest is easy.
- First, in an SSIS project, drag and drop the Data Flow and double click it.
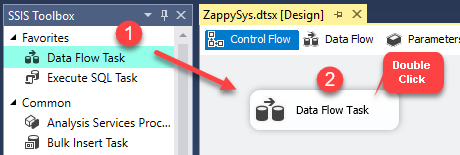
Use the Data Flow
- Secondly, in the Data Flow, drag and drop the ZS JSON Source.

SSIS JSON Source – Drag and Drop
- Double-click on JSON Source to configure it.If you are not familiar with ZS JSON Source, check this link.
New approach to establish the HTTP Connection ManagerUsing Admin API Access token
- Enter URL for the API you like to call. For Example, you can enter
1https://{your-store}.myshopify.com/admin/api/2022-10/products.json - Check Use Credentials and click on NEW-HTTP connection as shown below,
- On HTTP Connection Manager you can enter some URL (it will be ignored and use JSON Source URL above)
- Choose Credentials Type as Static Token / API Key
- In the Token / Key text box enter your Admin API Key (obtained from the previous section)
- In the Auth Header Name enter X-Shopify-Access-Token
- In the Auth Scheme select {none}

SSIS JSON Source Admin API HTTP Connection Manager
- Enter URL for the API you like to call. For Example, you can enter
- Also, press the Select Filter button and press the orders node:
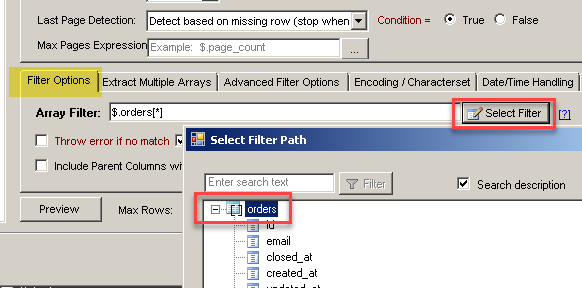
SSIS Shopify filter
- Now go to Pagination Tab and select RFC5988 Pagination mode as below. Check this link for more info on Shopify Paginated API calls.

Link Header Pagination Method (RFC 5988)
NOTE: For Older API use Cursor-based pagination as below (version 2019-07 or older).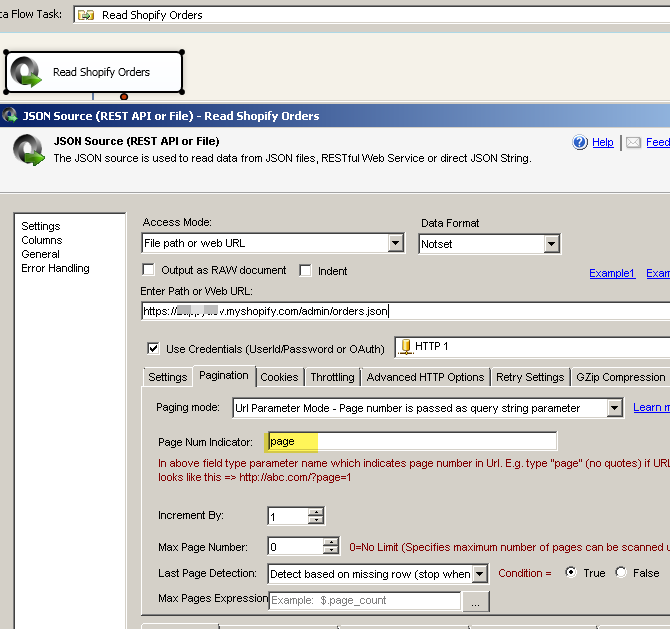
SSIS pagination for Shopify
- Finally, make sure to the Use Credentials option and select the http connection of the step 2 and press the Preview button to see the data:
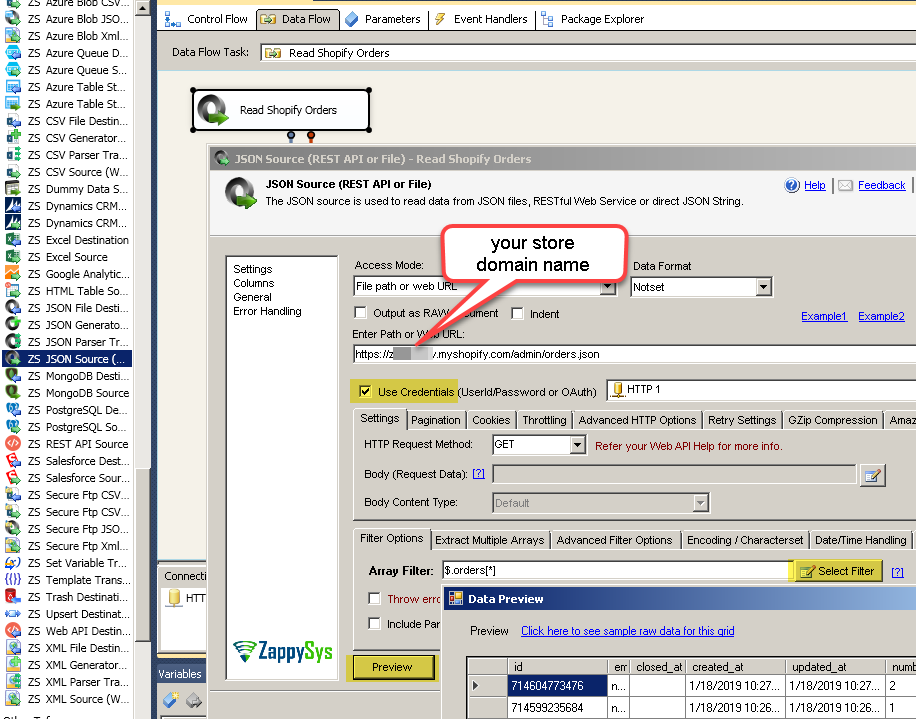
SSIS preview Shopify data
Load Shopify data into SQL Server / Other Target
- Inside Data Flow, Drag and drop Upsert Destination Component from SSIS Toolbox
- Connect our Source component to Upsert Destination
- Double click Upsert Destination to configure it
- Select Target Connection or click NEW to create new connection
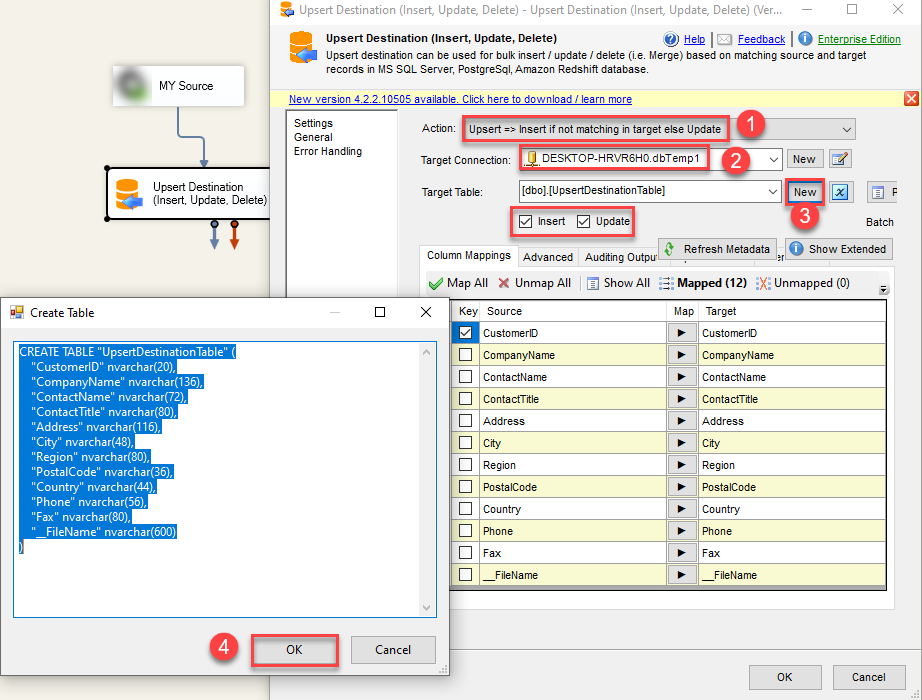 Configure SSIS Upsert Destination Connection - Loading data (REST / SOAP / JSON / XML /CSV) into SQL Server or other target using SSIS
 - Select Target Table or click NEW to create new table based on source columns
- Click on Mappings Tab to Auto map columns by name. You can change mappings as you need
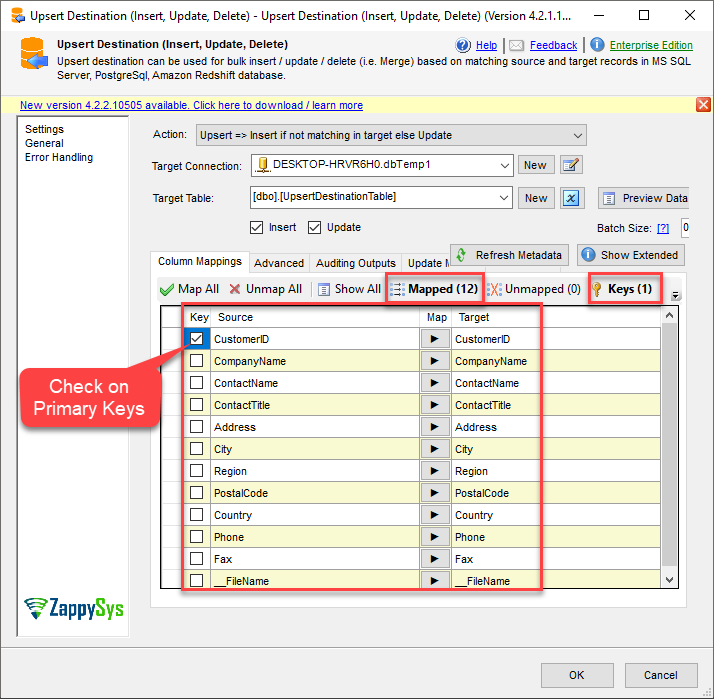 SSIS Upsert Destination - Columns Mappings
 - Click OK to Save Upsert Destination Settings
- That's it, You are now ready to run data flow. NOTE: If you wish to debug data flow and see records when you run, add data viewer by right click on blue arrow > Click Enable Data Viewer
- To execute data flow, Right click anywhere inside Data Flow Surface and click Execute Task
Write Shopify data in SSIS REST API Task
In this new example, we will write Shopify data in SSIS. In addition, we will create a new order using REST API to write Shopify data in SSIS.
- First, use the REST API task in SSDT.
- Secondly, in the REST API use the http connection created on step 2 of the read Shopify data in SSIS. Also, in HTTP Request Method, select POST, in Body (Request Data) write the following:
12345678910111213141516171819202122232425262728{"order": {"line_items": [{"title": "Big Brown Bear Boots","price": 74.99,"grams": "1300","quantity": 3,"tax_lines": [{"price": 13.5,"rate": 0.06,"title": "State tax"}]}],"transactions": [{"kind": "sale","status": "success","amount": 238.47}],"total_tax": 13.5,"currency": "EUR"}}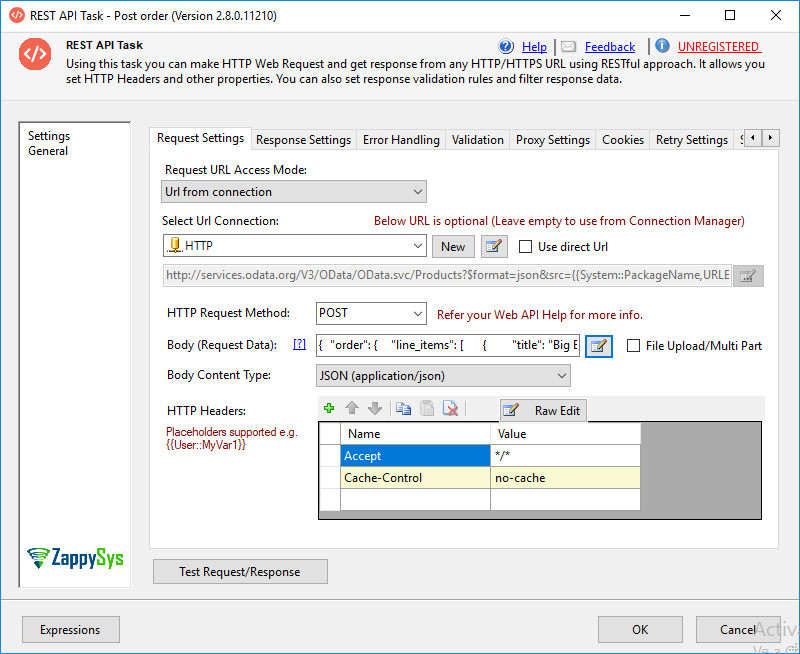
Post JSON order Shopify
- If you dont like to use URL supplied in HTTP Connection manager then just check override URL option and enter URL like below. For this example we used correct URL in HTTP connection manager so we will not override URL.
https://{{your-store}}.myshopify.com/admin/orders.json - Now you can click on Test Request / Response and you will see one sample order created in your admin portal.
- You can supply variables in Body by clicking on Insert Variable dropdown when you edit Body.
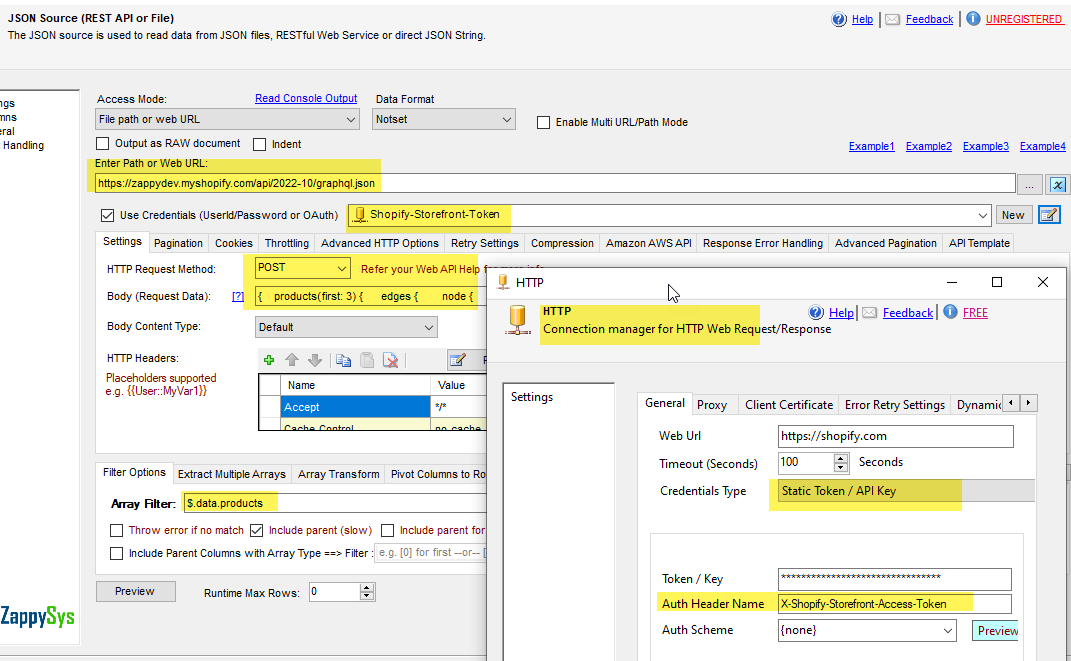
Calling Storefront API
In our previous section, we saw how to call ADMIN API which is the most common API you will use in most cases to read / write store data. However if you have a need to call Storefront API instead then configure HTTP Connection as below
- For Store Front API call you can follow the same steps as the previous section except for few things on HTTP Connection Manager UI
- In API Key enter Storefront API Access Token (rather than Admin Token)
- In the Auth Header Name enter
X-Shopify-Storefront-Access-Token
SSIS JSON Source Storefront HTTP Connection Manager
Legacy Approach – Using Basic Auth
If you created Shopify PrivateApp (before they introduced the new CustomApp approach) then your HTTP Connection needs to be like below. Use Basic Auth for Credentials Type
- Using approaches to establish the HTTP Connection Manager
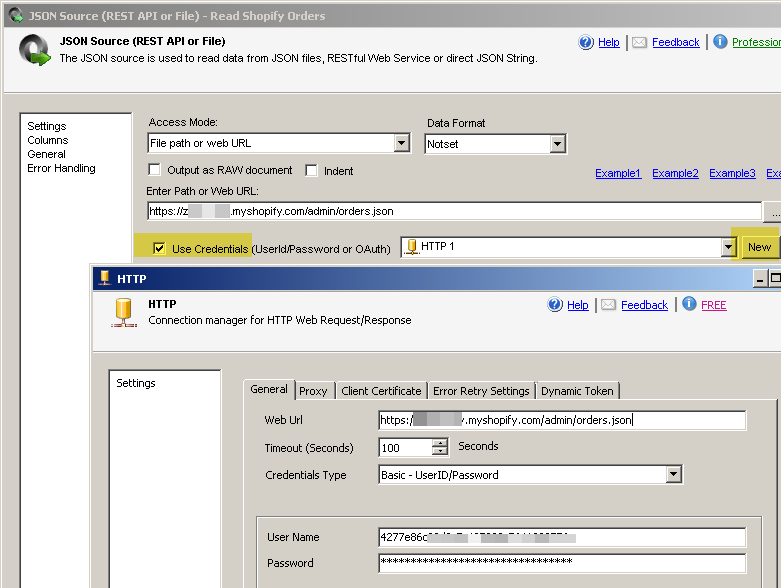
SSIS JSON Source HTTP connection
Create Multiple Shopify records using Web API Destination
With our ZS Web API destination, it is possible to create multiple records at the same time. The following link shows the ZS Web API Destination information:
Here are few useful articles to explain Web API destination use case.
Delete Shopify records using REST API in SSIS
- First, in SSDT, drag and drop the ZS REST API task.
- Secondly, add the HTTP Url Connection. Use the DELETE HTTP Request Method and the URL including the order id as below:
https://{{your-store}}.myshopify.com/admin/orders/{{orderid}}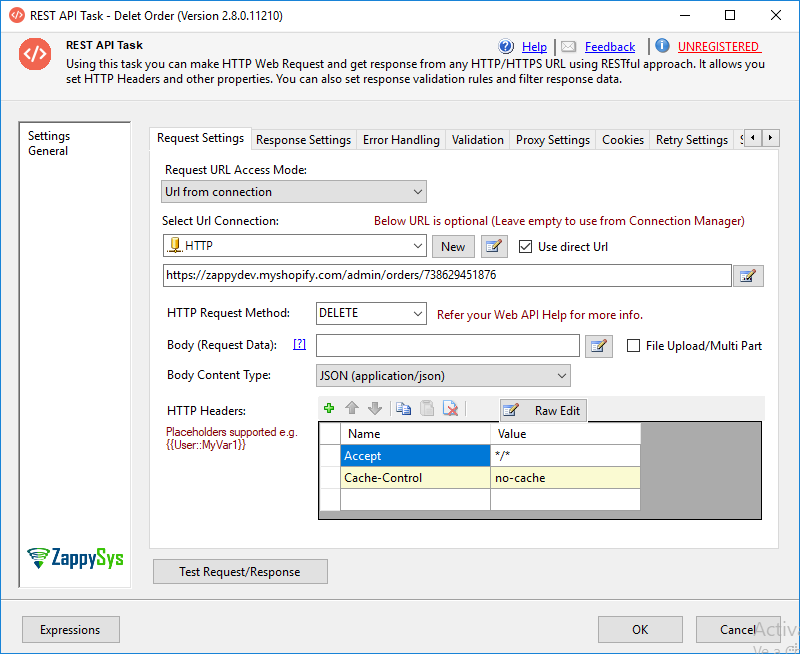
SSIS delete data in Shopify using REST API call
- Now click Test Request / Response to test delete API call.
Conclusion
In this article, we learned how to create a Shopify app. In addition, we learned how to connect to Shopify using SSIS with the ZappySys tools. Also, we learned to use ZappySys tools in SSIS to get, write and delete information.
References
Finally, for more information, refer to these links: