Introduction
 QuickBooks Online is a well-known Cloud-based Accounting Software. In this post, you will learn how to implement QuickBooks Online API Integration with SQL Server or any other RDBMS (e.g. Oracle, MySQL, Postgresql) using ODBC in few clicks. We will use ODBC JSON / REST API Driver to read data from QuickBooks Online and Load into SQL Server / other targets (Using OAuth Connection). We will discuss on How to Create an Intuit Developer Account, How to Create QuickBooks Online App for OAuth.
In nutshell, this post will focus on how to call QuickBooks Online API using ODBC.
So let’s get started.
Prerequisites
Before we look into Step-By-Step section to extract and read data from QuickBooks Online to SQL Server let’s make sure you met the following requirements.
- A first requirement will be to SQL Server Database Engine Installed
- The second requirement will be SSMS installed
- Finally, make sure to have ZappySys ODBC PowerPack installed.
What is QuickBooks Online
QuickBooks is an accounting software package developed and marketed by Intuit. QuickBooks products are geared mainly toward small and medium-sized businesses and offer on-premises accounting applications as well as cloud-based versions that accept business payments, manage and pay bills, and payroll functions.Getting Started
In order to start, we will show several examples. ZappySys includes an ODBC JSON / REST API Driver that will help you to call QuickBooks Online API, read various data from QuickBooks Online with ODBC. To learn more about QuickBooks Online API check this help file. To access QuickBooks Online data using REST API call, you need to create an Intuit Developer Account and then create QuickBooks Online App.Create an Intuit Developer Account
Follow the mentioned steps below to create an Intuit developer account:- you can visit this site developer.intuit.com, and click on Sign up from the menu bar.
- A registration form will be opened in a Popup. you can fill up and then click on Create Account.
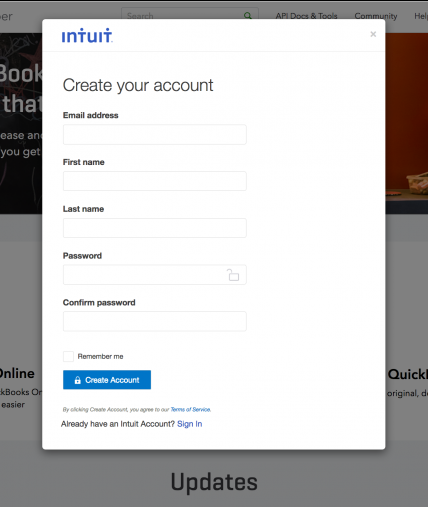
Signup Form: Intuit Developer Account
- Complete the validation check and click Continue.
- On the confirmation dialog, provide a few details to fill out your profile and click All set.
Create a QuickBooks Online App
Follow the steps below to start creating your QuickBooks Online app.- From the developer portal, click on My Apps.
- after that, Click Create a new app.
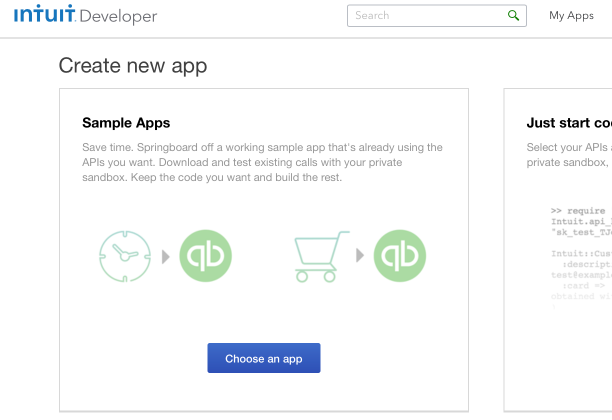
Create a new App: Select APIS
- Click the Select APIs button under Just start coding.
- Select the APIs you wish to use. This selection can always be changed later via your app's settings.
- Your new app opens to its Dashboard tab.
- Click the Keys tab. This is where you can find all keys related to your app.
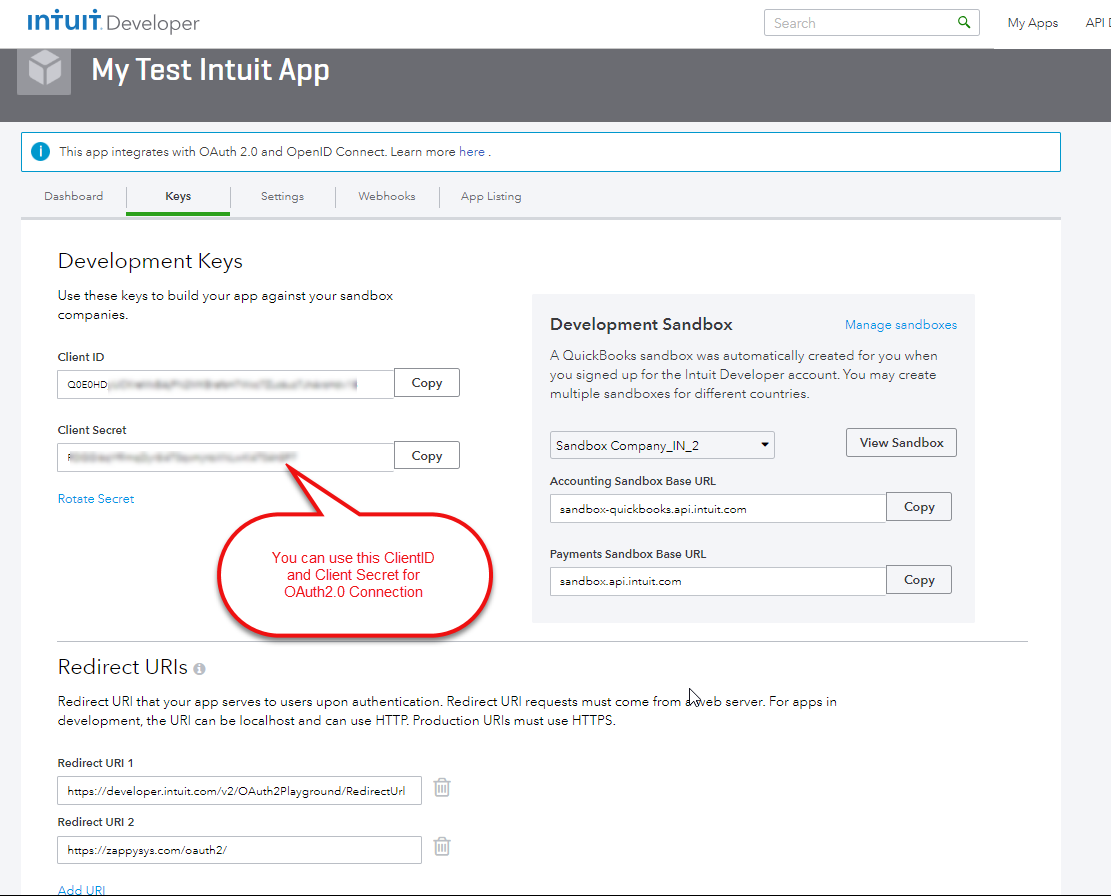
Intuit App: Client Id, Secret Keys for OAuth Connection
- To copy a key or token, click its Copy button.
Create ODBC – Native Zappysys JSON Driver Data Source
- To do this, first of all, we will open the ZappySys Data Gateway Configuration:
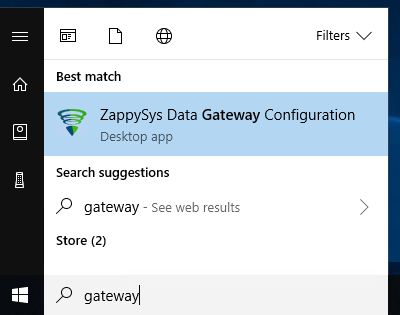
Open ZappySys Data Gateway
- Add the Native – ZappySys JSON Driver Data source.
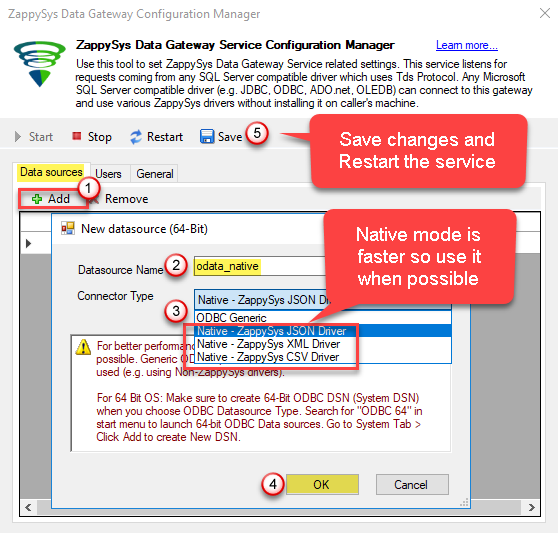
Add Gateway Data Source (Native JSON Driver)
- Now it’s time to connect with QuickBooks. Let’s use JSON Driver Data source with the following URL:
here, We have used 3 placeholders.1https://{RequestURL}/v3/company/{realmID}/query?query={selectStatement}
* {RequestURL}is either a SandBox base URL or Production base URL.
* {realmID} is your QuickBooks Online sandbox/production company ID.12Sandbox Base URL: https://sandbox-quickbooks.api.intuit.comProduction Base URL: https://quickbooks.api.intuit.com
* {selectStatement} can be any query something like Select * From Invoice (*Note: select statement must be URL encoded first)
For more information on Query, an Invoice Request API see this
I am using my sandbox URL like this:
1https://sandbox-quickbooks.api.intuit.com/v3/company/193514799372394/query?query=SELECT * FROM Invoice STARTPOSITION <%startposition%> MAXRESULTS 1000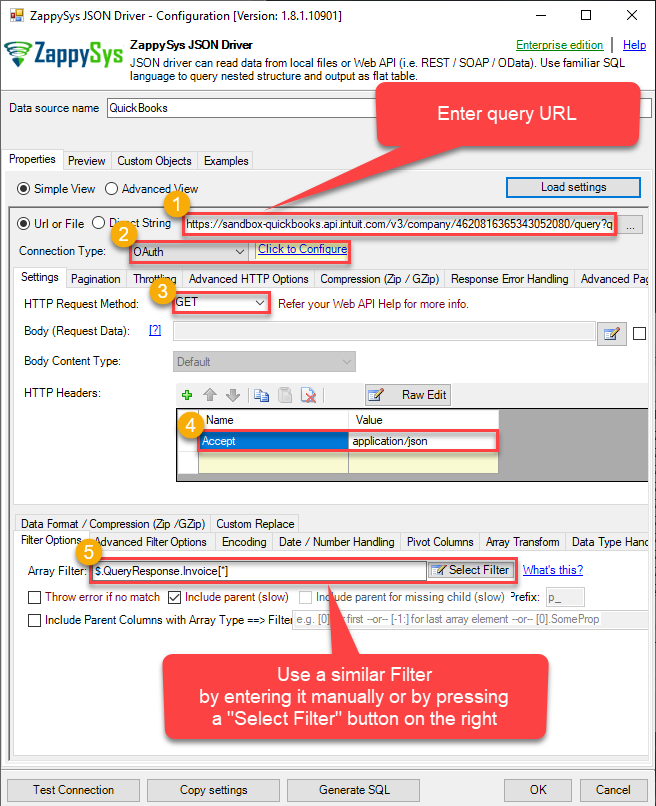
Setup QuickBooks ODBC-based data source configuration
- Configure the new OAuth Connection for QuickBooks Online as below.
Basically, you need to configure the configurations of App on the General tab (i.e. OAuth Provider, Client ID, Client Secret, Scopes, etc.)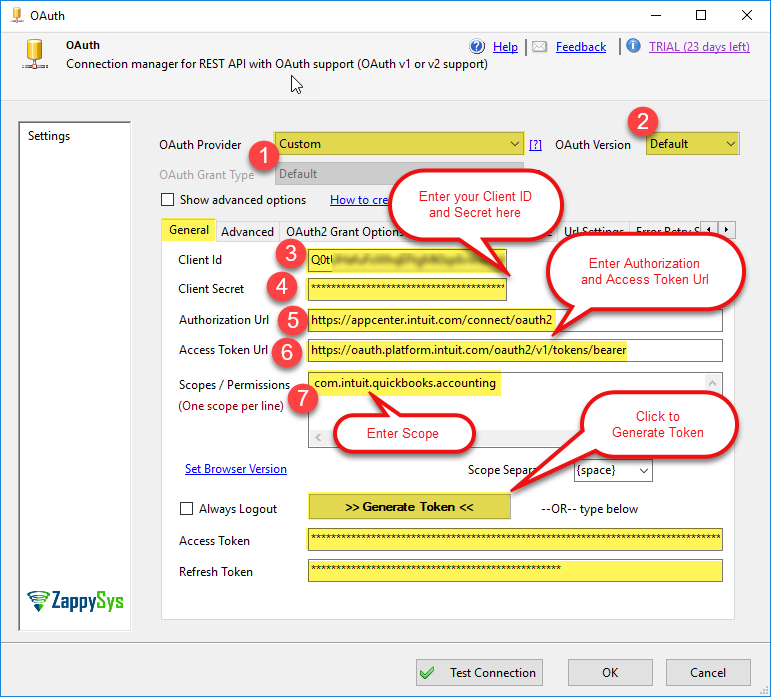
OAuth Connection Manager: General Tab Configurations
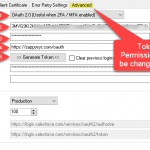
- Most importantly, you also need to Enter your Callback URL in Advanced Tab.
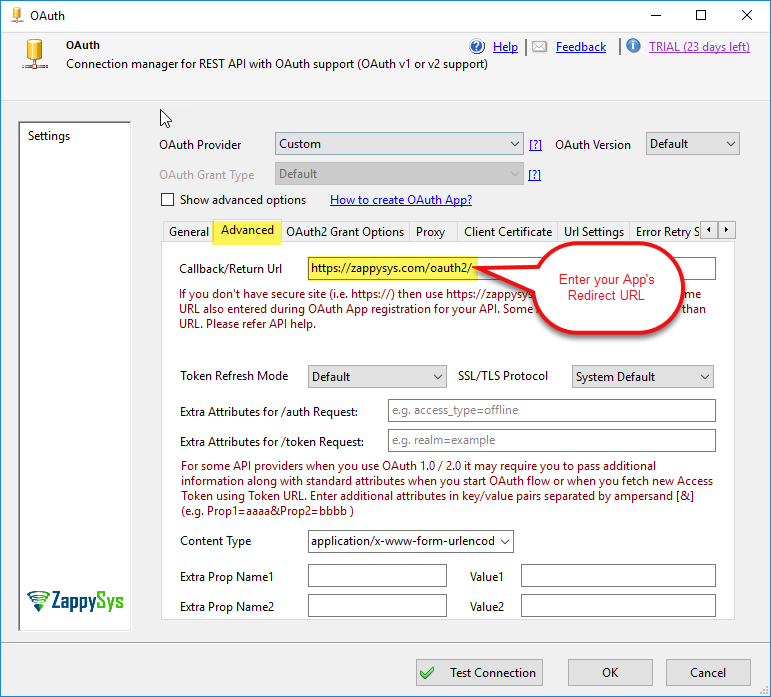
OAuth Connection Manager: Advanced Tab Configurations
- Similarly, you need to check “Do not include credentials in header”
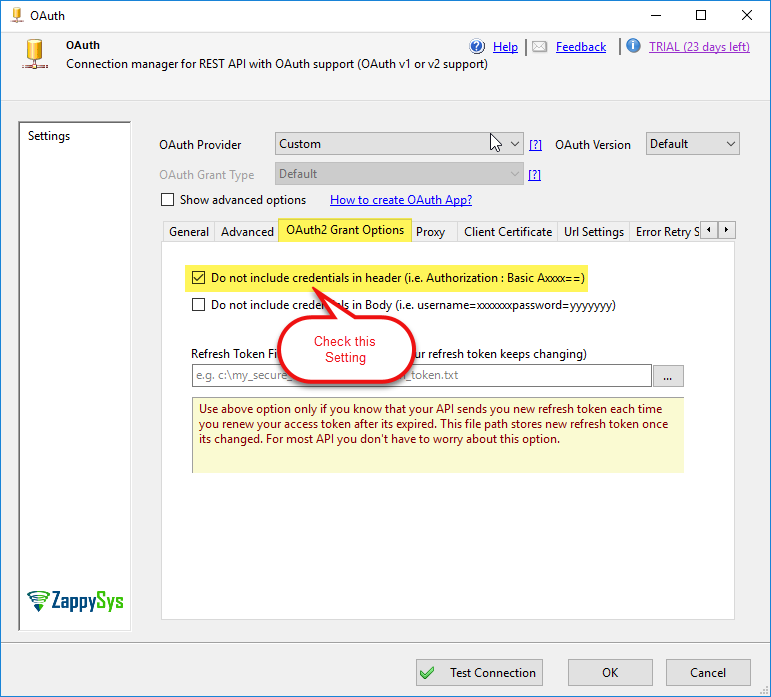
OAuth Connection Manager: OAuth2 Grant Options Tab Configurations
- Click on Generate Token button to Generate token and then click on Test Connection button and click on OK to save the connection manager configurations settings.
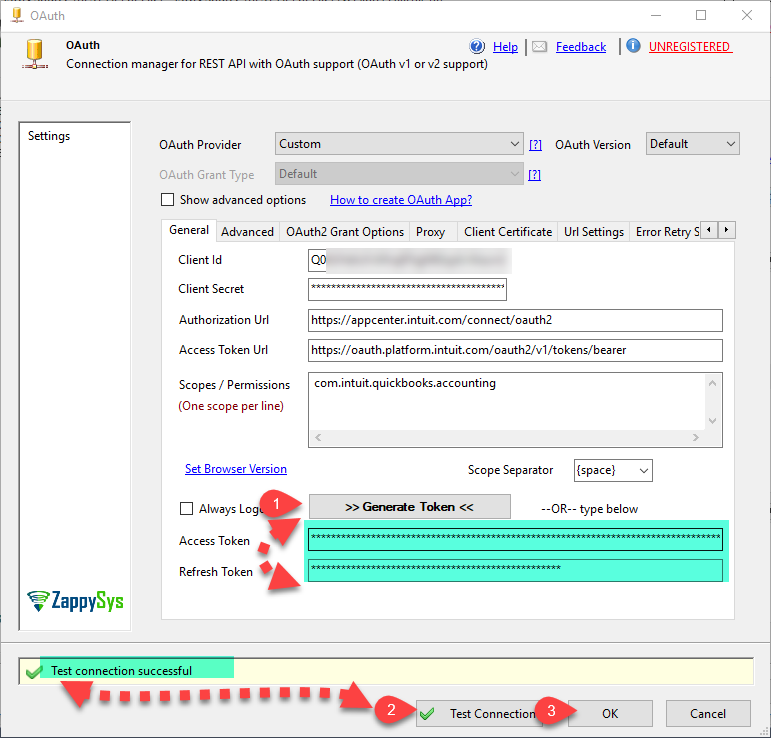
Generate Token and Test Connection
- Let’s continue on, and enable pagination by configuring it like in the image below in the Pagination tab. In the Page Num Indicator field input this value:
<%startposition%>Then set Increment By value to a maximum number of results possible:1000
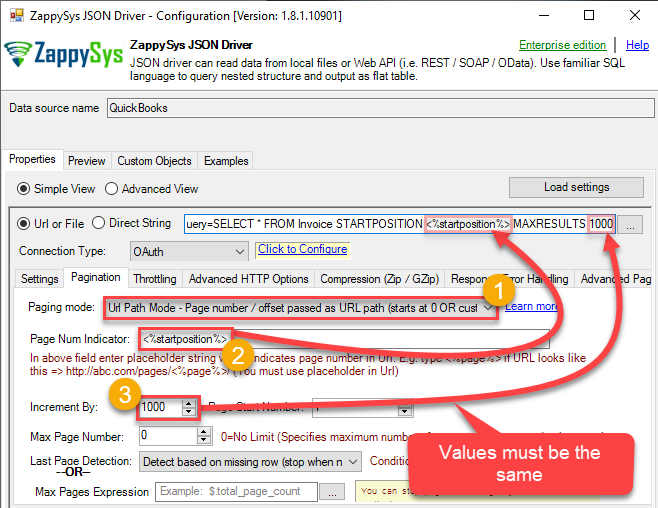
Configuring pagination to get QuickBooks all rows in ODBC JSON-based driver data source
- Finally, now using Code Generator we will generate the query.

Generate Query
Load QuickBooks Invoices data in MS SQL Server
- Assuming you have installed SQL Server and SSMS. If not then get both for FREE from here: Get SQL Server Express and Get SSMS
- Open SSMS and connect to SQL Server.
- Go to Root > Server Objects > Linked Servers node. Right click and click New Linked Server...

Add Linked Server in SQL Server
- Now enter the linked server name, select Provider as SQL Native Client
- Enter data source as GatewayServerName, PORT_NUMBER where server name is where ZappySys Gateway is running (Can be same as SQL Server machine or remote machine). Default PORT_NUMBER is 5000 but confirm on Data gateway > General tab in case its different.
- Enter Catalog Name. This must match name from Data gateway Data sources grid > Name column
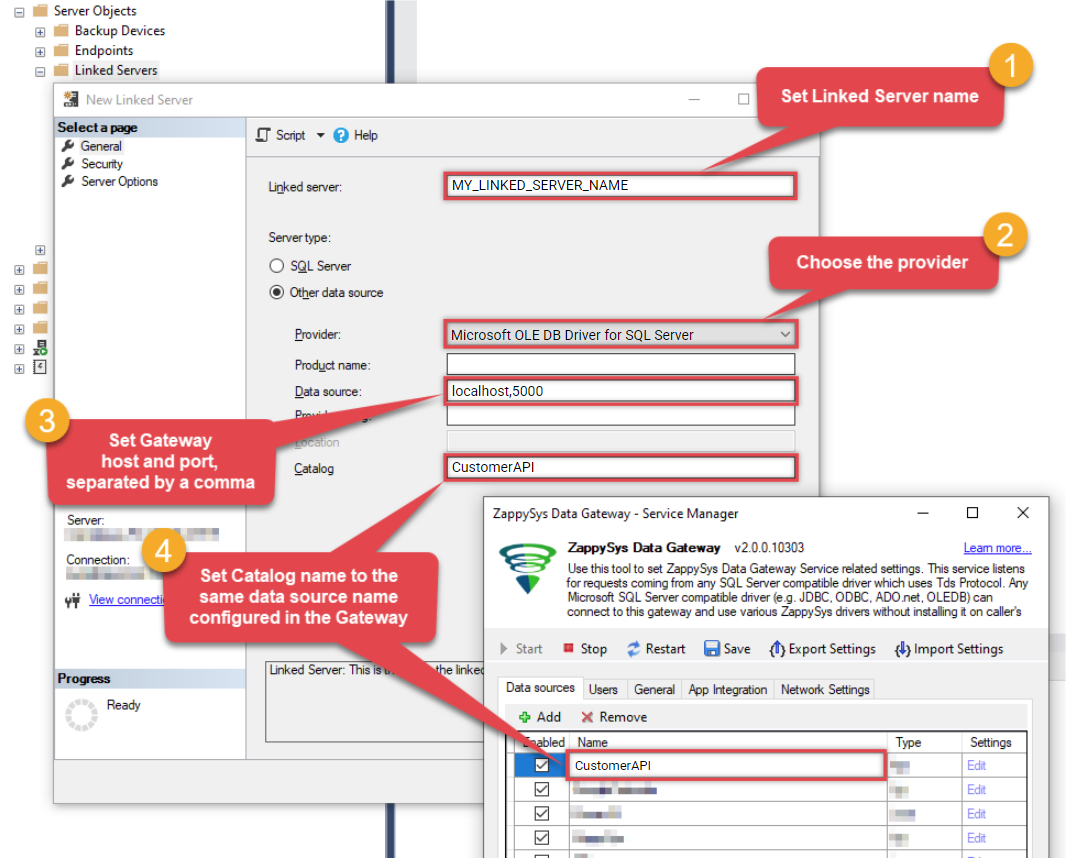
Configure Linked Server Provider, Catalog, Server, Port for ZappySys Data Gateway Connection
INFO:
- For SQL Server 2012, 2014, 2016, 2017, and 2019, use the SQL Server Native Client 11.0 as the Provider.
- For SQL Server 2022 or higher, use the Microsoft OLE DB Driver for SQL Server as the Provider.
- Click on Security Tab and select last option "Be made using this security context". Enter your gateway user account here.
-
Optional: Under the Server Options Tab, Enable RPC and RPC Out and Disable Promotion of Distributed Transactions(MSDTC).

RPC and MSDTC Settings
You need to enable RPC Out if you plan to use EXEC(...) AT [MY_LINKED_SERVER_NAME] rather than OPENQUERY.
If don't enabled it, you will encounter the 'Server "MY_LINKED_SERVER_NAME" is not configured for RPC' error.Query Example:
EXEC('Select * from Products') AT [MY_LINKED_SERVER_NAME]
If you plan to use 'INSERT INTO...EXEC(....) AT [MY_LINKED_SERVER_NAME]' in that case you need to Disable Promotion of Distributed Transactions(MSDTC).
If don't disabled it, you will encounter the 'The operation could not be performed because OLE DB provider "SQLNCLI11/MSOLEDBSQL" for linked server "MY_LINKED_SERVER_NAME" was unable to begin a distributed transaction.' error.Query Example:
Insert Into dbo.Products
EXEC('Select * from Products') AT [MY_LINKED_SERVER_NAME]
- Click OK to save Linked Server
- In SSMS execute below SQL query to test your connectivity.
SELECT * FROM OPENQUERY( MY_LINKED_SERVER_NAME, 'SELECT * FROM $')
- Here is the preview after you run some REST API query in SQL Server. Notice that you can override default configuration by supplying many parameters in WITH clause (second query example in the screenshot).
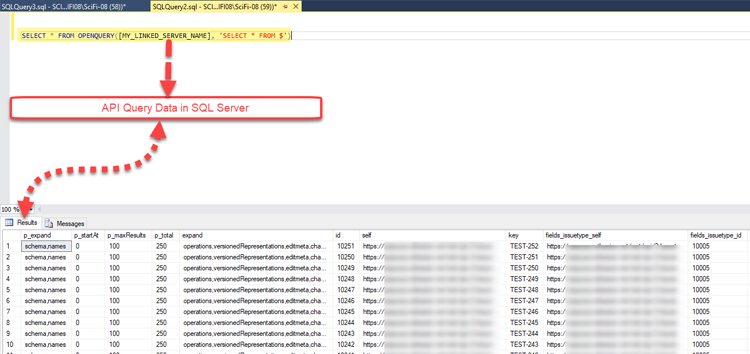
SSMS Output - Query REST API via Linked Server OPENQUERY statement (Connect to ZappySys Data Gateway)
- You can wrap your queries inside View or wrap inside Stored procedure to parameterize. Here is an example of creating the view which calls REST API queries.
CREATE VIEW dbo.vw_MyAPICall_View
AS
/*Call REST API inside SQL Server View*/
SELECT * FROM OPENQUERY( MY_LINKED_SERVER_NAME , 'SELECT * FROM $');

GO
- Notice in above approach if you parameterize Stored Procedure then check this article to understand Dynamic Metadata.
- Now let's insert API data into the new data table "tblMyAPiData" in the SQL server database. For that, we need to execute below SQL query.
Select * into tblMyAPiData FROM OPENQUERY( MY_LINKED_SERVER_NAME , 'SELECT * FROM $')
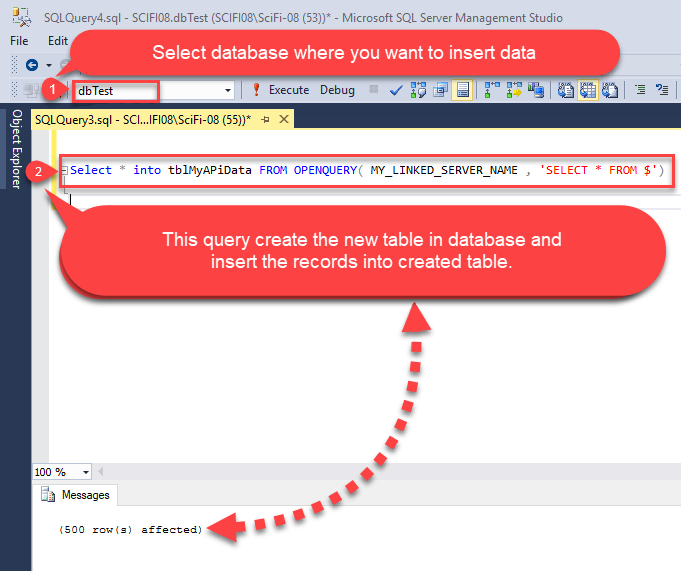
Insert data into the new table
- Let's insert and update records into the already created table "tblMyAPiData"
- To do that first we need to insert the new API data into the "#temp_tblMyAPiData" temporary database table.
- Now let's delete the old records from the database table which are updated.
- At the last insert all new API data into the database table.
- To do that, we need to query like below SQL queries.
SELECT * into #temp_tblMyAPiData FROM OPENQUERY(MY_LINKED_SERVER_NAME, 'SELECT * FROM $')

DELETE FROM [dbo].[tblMyAPiData] WHERE id in (SELECT id FROM #temp_tblMyAPiData)

INSERT INTO tblMyAPiData
SELECT * FROM #temp_tblMyAPiData
- In the upper step, we see how to insert and update new records. Now if you want to update particular fields records only then you need to query like this.
Update dbtbl_1
set dbtbl_1.field1 = dbtbl_2.field1,
    dbtbl_1.field2 = dbtbl_2.field2
FROM tblMyAPiData dbtbl_1
JOIN (SELECT * FROM OPENQUERY(MY_LINKED_SERVER_NAME, 'SELECT * FROM $')) dbtbl_2 on dbtbl_1.id=dbtbl_2.id
*NOTE: If you are getting error like : "Cannot resolve the collation conflict between “Latin1_General_CI_AI” and “SQL_Latin1_General_CP1_CI_AS” in the equal to operation" then you need to query like this :
Update dbtbl_1
set dbtbl_1.field1 = dbtbl_2.field1,
    dbtbl_1.field2 = dbtbl_2.field2
FROM tblMyAPiData dbtbl_1
JOIN (SELECT * FROM OPENQUERY(MY_LINKED_SERVER_NAME, 'SELECT * FROM $')) dbtbl_2
on dbtbl_1.id=dbtbl_2.id
COLLATE SQL_Latin1_General_CP1_CI_AS

Conclusion
So in this blog, we learned how to generate a QuickBooks API Token, Load QuickBooks Invoices data in MS SQL Server table using ODBC JSON / REST API Driver in a very simple way. You can achieve many more functionalities with this tool. Check our blogs/articles on JSON / REST API Driver https://zappysys.com/blog/category/odbc-powerpack/odbc-drivers/json-rest-api-driver/ to find out what this tool is capable of more.
References
Finally, you can use the following links for more information about the use of QuickBooks API with our tools:
- QuickBooks Documentation for API
- Landing Page for ODBC JSON / REST API Driver, you can also find Tutorial Video here.
- Help File: Documentation of JSON Driver.
- Blog/articles link: https://zappysys.com/blog/category/odbc-powerpack/odbc-drivers/json-rest-api-driver/