Introduction
 QuickBooks Online is a well-known Cloud-based Accounting Software. In this post, you will learn how to implement QuickBooks Online API Integration with SQL Server or any other RDBMS (e.g. Oracle, MySQL, Postgresql) using SSIS in few clicks. We will use SSIS XML Source to Read data from QuickBooks Online and Load into SQL Server / other targets (Using OAuth Connection). We will discuss on How to Create an Intuit Developer Account, How to Create QuickBooks Online App for OAuth, We will also discuss reverse scenario to Write data to QuickBooks Online (API POST for Insert or Update in QuickBooks Online) using SSIS REST API Task
In nutshell, this post will focus on how to call QuickBooks Online API using SSIS.
So let’s get started.
Prerequisites
Before we look into Step-By-Step section to extract and load data from QuickBooks Online to SQL Server let’s make sure you met the following requirements.
- SSIS designer installed. Sometimes it is referred as BIDS or SSDT (download it from Microsoft site).
- Basic knowledge of SSIS package development using Microsoft SQL Server Integration Services.
- ZappySys SSIS PowerPack installed. Click on the link to download a FREE trial.
- You have the basic familiarity with REST API concepts and QuickBooks Online API.
What is QuickBooks Online
QuickBooks is an accounting software package developed and marketed by Intuit. QuickBooks products are geared mainly toward small and medium-sized businesses and offer on-premises accounting applications as well as cloud-based versions that accept business payments, manage and pay bills, and payroll functions.
Getting Started
In order to start, we will show several examples. ZappySys includes an SSIS XML Source that will help you to call QuickBooks Online API, read various data from QuickBooks Online with SSIS, create a new Contact on QuickBooks Online with SSIS and do many more actions using REST API. To learn more about QuickBooks Online API check this help file.
To access QuickBooks Online data using REST API call, you need to create an Intuit Developer Account and then create QuickBooks Online App.
Create an Intuit Developer Account
Follow the mentioned steps below to create an Intuit developer account:
- you can visit this site developer.intuit.com, and click on Sign up from the menu bar.
- A registration form will be opened in a Popup. you can fill up and then click on Create Account.
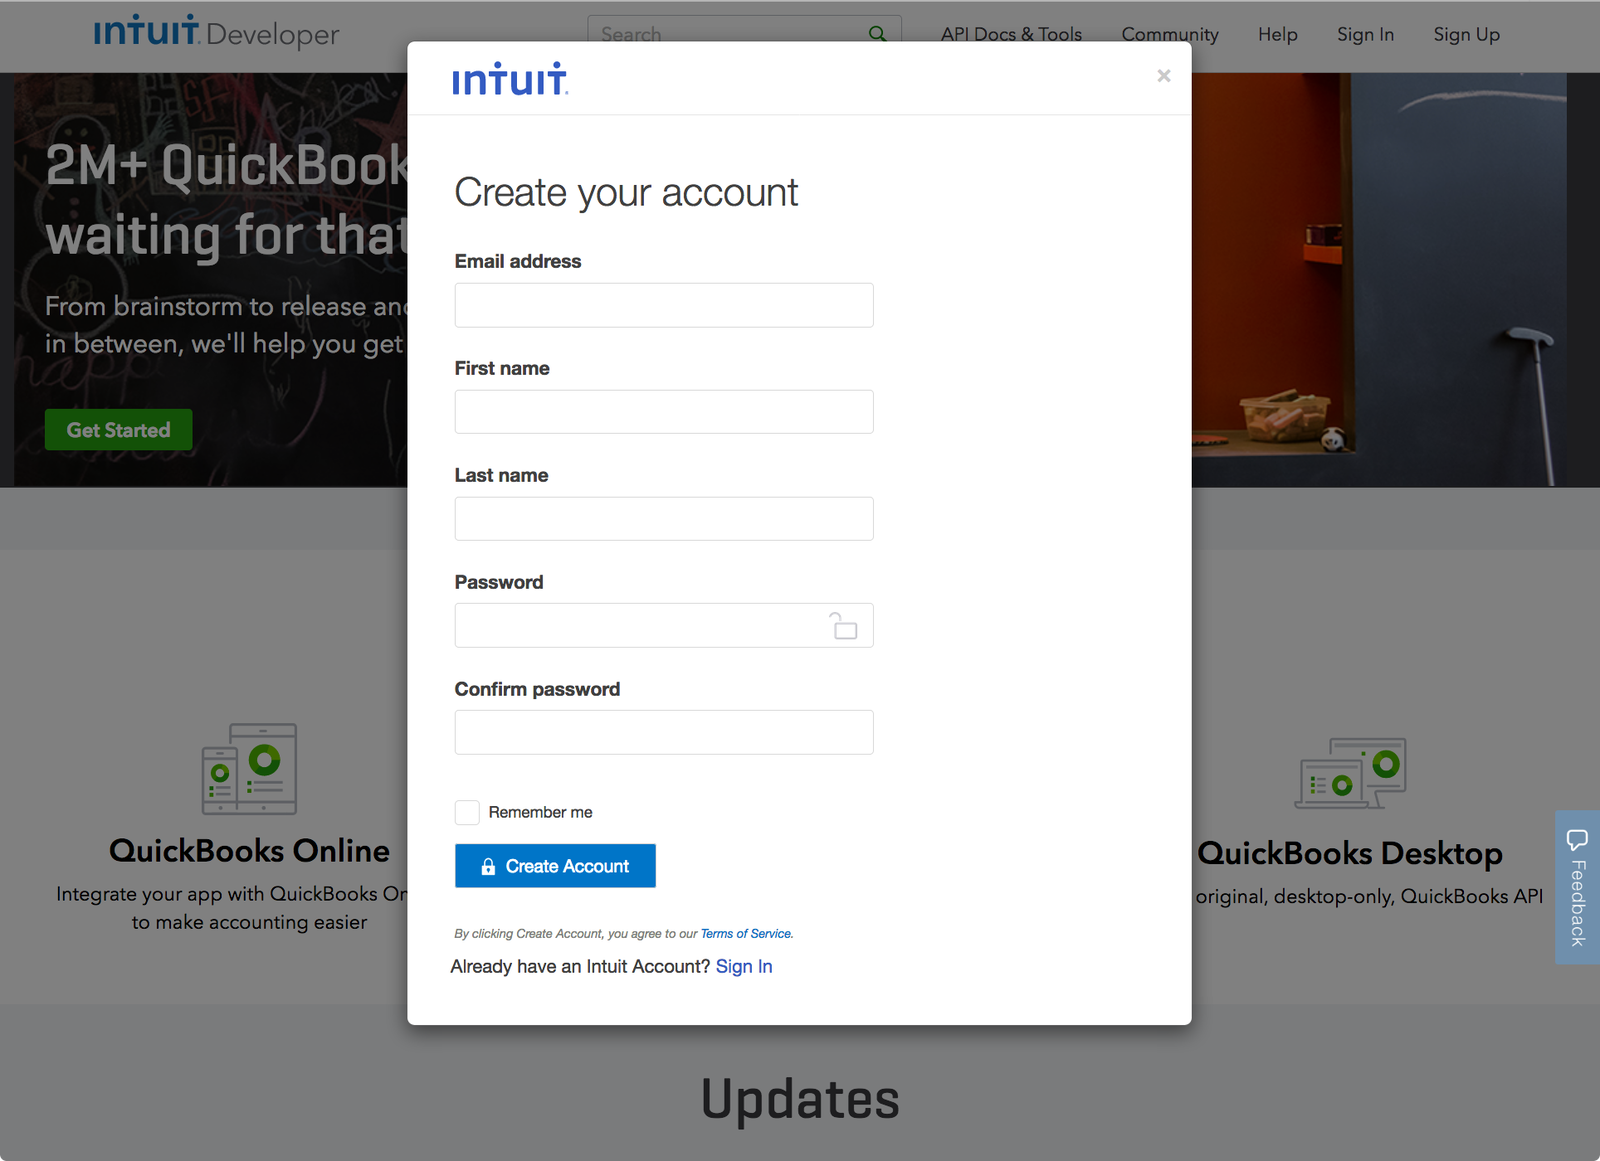
Signup Form: Intuit Developer Account
- Complete the validation check and click Continue.
- On the confirmation dialog, provide a few details to fill out your profile and click All set.
Your account is created! You’ll automatically be redirected to the app creation page to get coding on your app.
Choose the user ID of your account carefully. Once an app is created in a given account it cannot be moved to another account or deleted. If you are building apps for a client, we recommend you create a dedicated account for that client that stays with them, leaving them full access.
Create a QuickBooks Online App
Follow the steps below to start creating your QuickBooks Online app.
- From the developer portal, click on My Apps.
- after that, Click Create a new app.
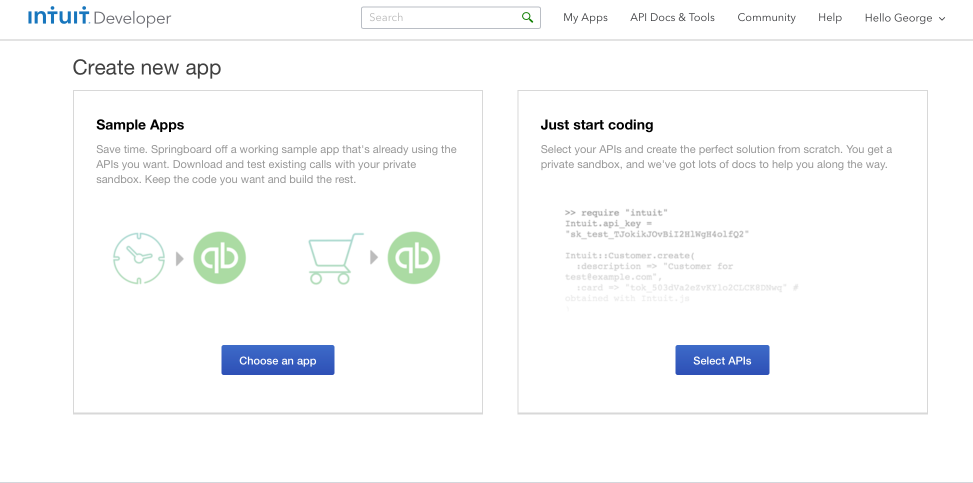
Create a new App: Select APIS
- Click the Select APIs button under Just start coding.
- Select the APIs you wish to use. This selection can always be changed later via your app’s settings.
- Your new app opens to its Dashboard tab.
- Click the Keys tab. This is where you can find all keys related to your app.
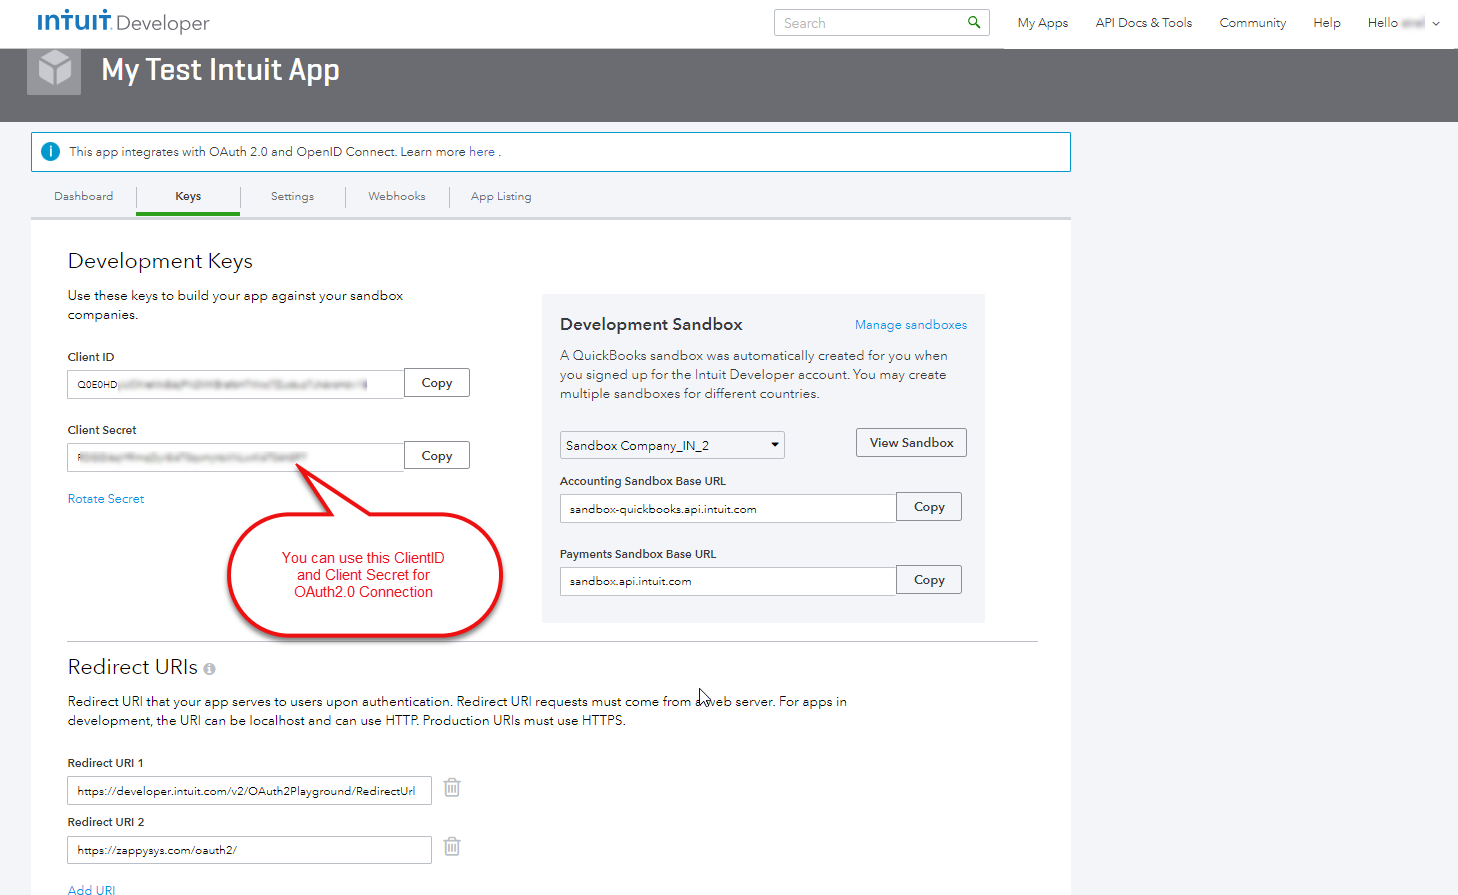
Intuit App: Client Id, Secret Keys for OAuth Connection
- To copy a key or token, click its Copy button.
finally, we are ready with an App. Let´s start with an example. In this example, we will show how to retrieve all Invoices data from QuickBooks Online with SSIS.
Load QuickBooks Online data to SQL Server using SSIS XML Source
Now once you registered OAuth app in the QuickBooks Online website we can move to SSIS Part.
Configure OAuth Connection Manager
- Right click on Connection Managers Panel to Create New OAuth Connection, and Context Menu will appear, Select New Connection from the Context Menu.
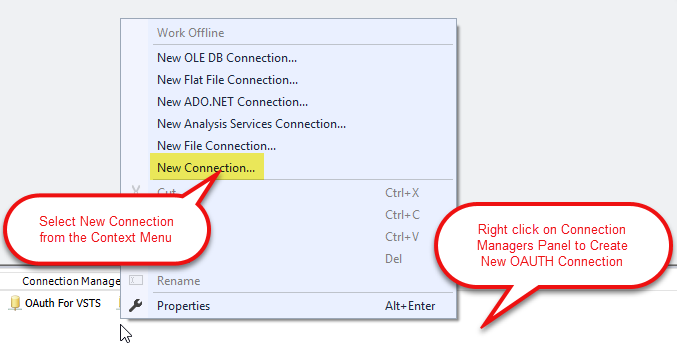
Connection Manager Panel: Select Connection
- Select ZS-OAuth Connection Manager from the Connection Managers list.
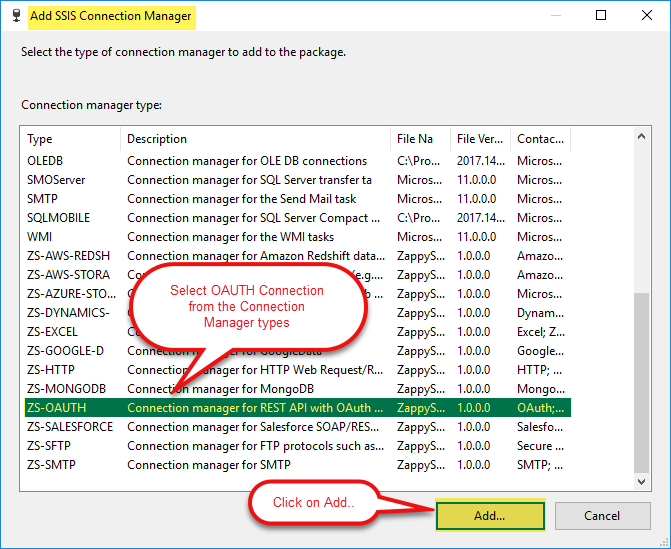
SSIS Connection Managers List: Select O-AUTH Connection Manager
- Configure the new OAuth Connection for QuickBooks Online as below.
Basically, you need to configure the configurations of App on the General tab (i.e. OAuth Provider, Client ID, Client Secret, Scopes, etc.)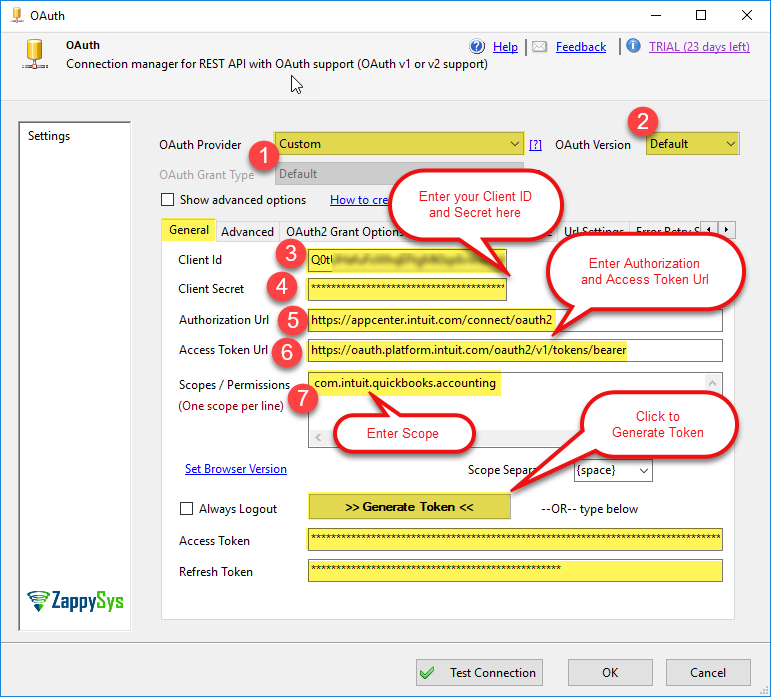
SSIS OAuth Connection Manager: General Tab Configurations
- also, most importantly, you need to Enter your Callback URL in Advanced Tab.
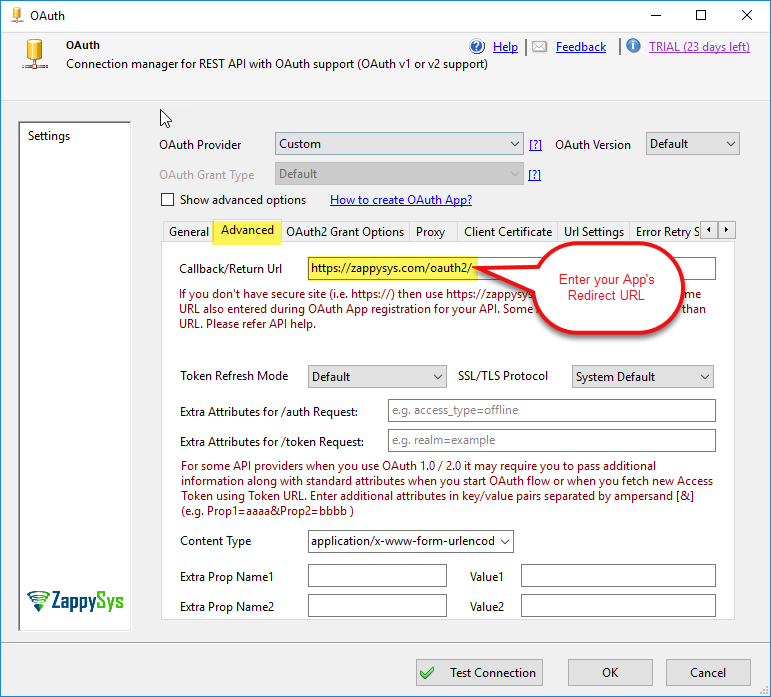
SSIS OAuth Connection Manager: Advanced Tab Configurations
- finally, you need to check “Do not include credentials in header”
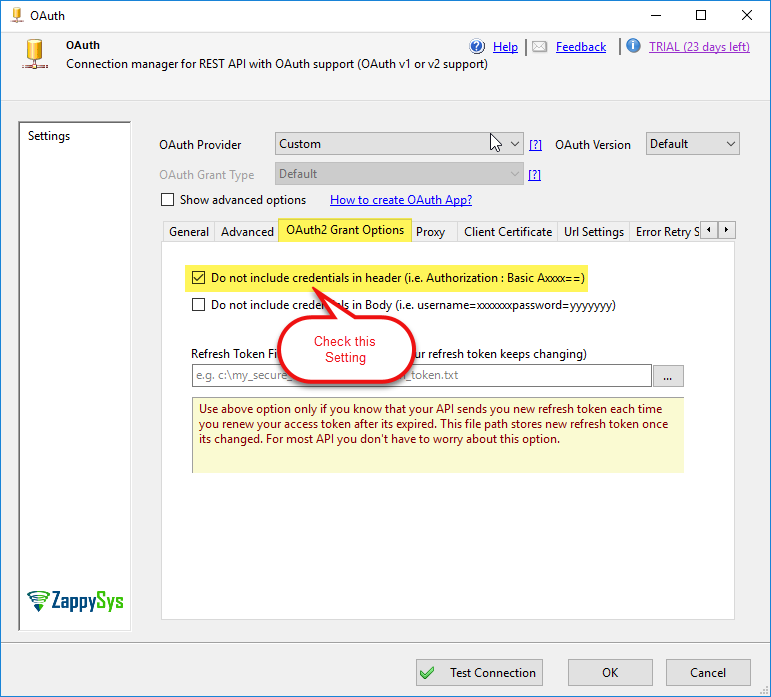
SSIS OAuth Connection Manager: OAuth2 Grant Options Tab Configurations
- finally, you are done with the OAuth Configurations. Click on Generate Token button to Generate token and then click on Test Connection button and click on OK to save the connection manager configurations settings.
Configure XML Source Component to read data from QuickBooks Online
- First of all, Create a new SSIS Project or Open Existing Project in Visual Studio (File > New > Project > Business Intelligence > Integration Services)
- Once SSIS Package is open, Goto Data Flow Section, Drag and Drop ZS XML Source Component from the SSIS Toolbox.
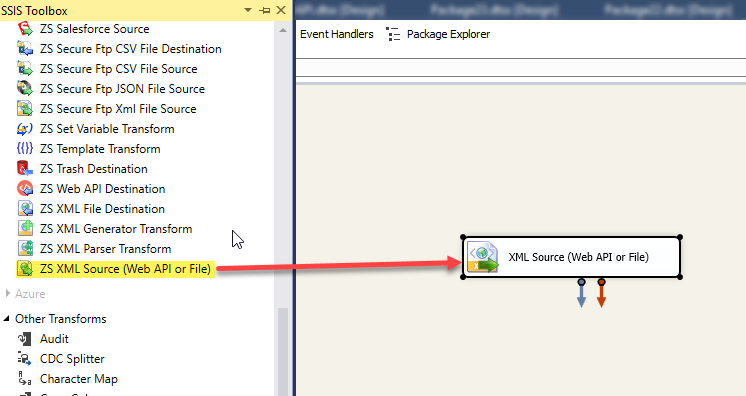
Drag and Drop XML Source Component
- furthermore, Double click on that Component to Edit the Configurations. Select File path or web URL from the Access Mode drop-down.
Enter Web URL like this:
<RequestURL>/v3/company/<realmID>/query?query=<selectStatement>here, We have used 3 placeholders.
* <RequestURL>is either a SandBox base URL or Production base URL.
* <realmID> is your QuickBooks Online sandbox/production company ID.12Sandbox Base URL: https://sandbox-quickbooks.api.intuit.comProduction Base URL: https://quickbooks.api.intuit.com
* <selectStatement> can be any query something like select * from invoice where id = ‘239’ (Select statement must be URL Encoded first, For URL Encode you can use ZappySys’s inbuilt functions for URL Encoding See this)
For more information on Query, an Invoice Request API see this
You can use Variable too in your Request URL, to make URL Dynamic, See the below-attached Screenshot.
To make URL dynamic first create an SSIS variable like below screenshot and then change URL to use Variable Placeholder like this
1https://sandbox-quickbooks.api.intuit.com/v3/company/{{User::CompanyID}}/query?query={{User::SelectQuery,FUN_URLENC}}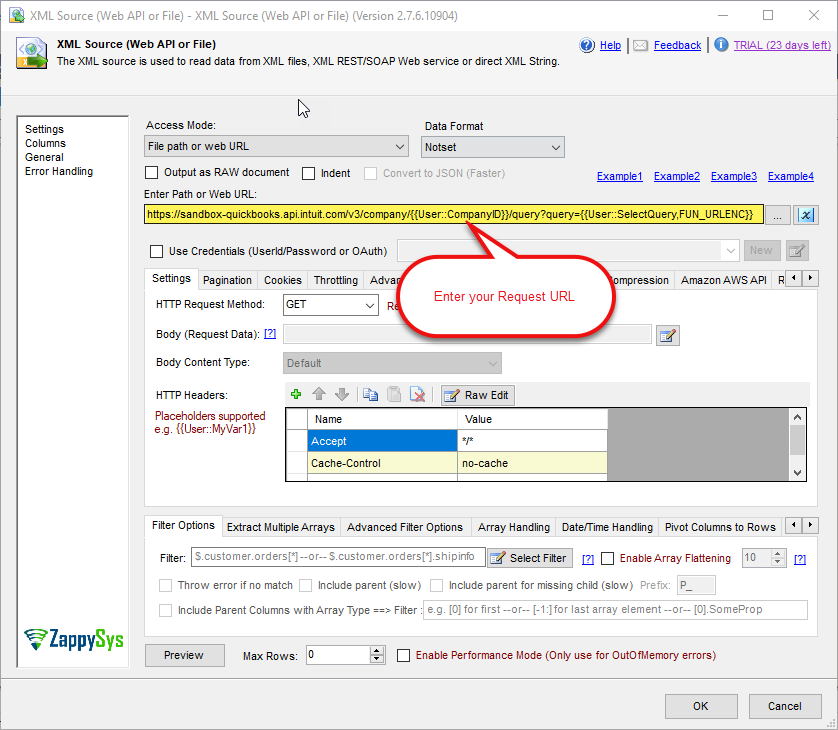
SSIS XML Source Component: Enter Request URL
- After that, Check the Use Credentials checkbox and Select your OAUTH Connection Manager from the drop-down.
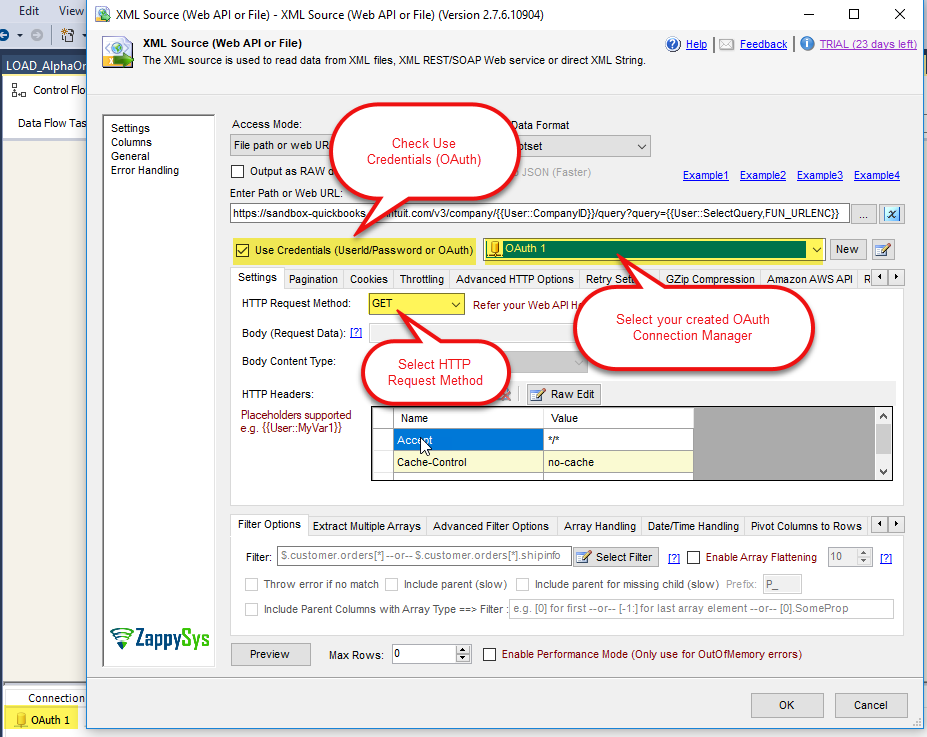
SSIS XML Source Component: Check Use Credentials and Select OAuth Connection Manager
- furthermore, Select the Filter to set the Filter.
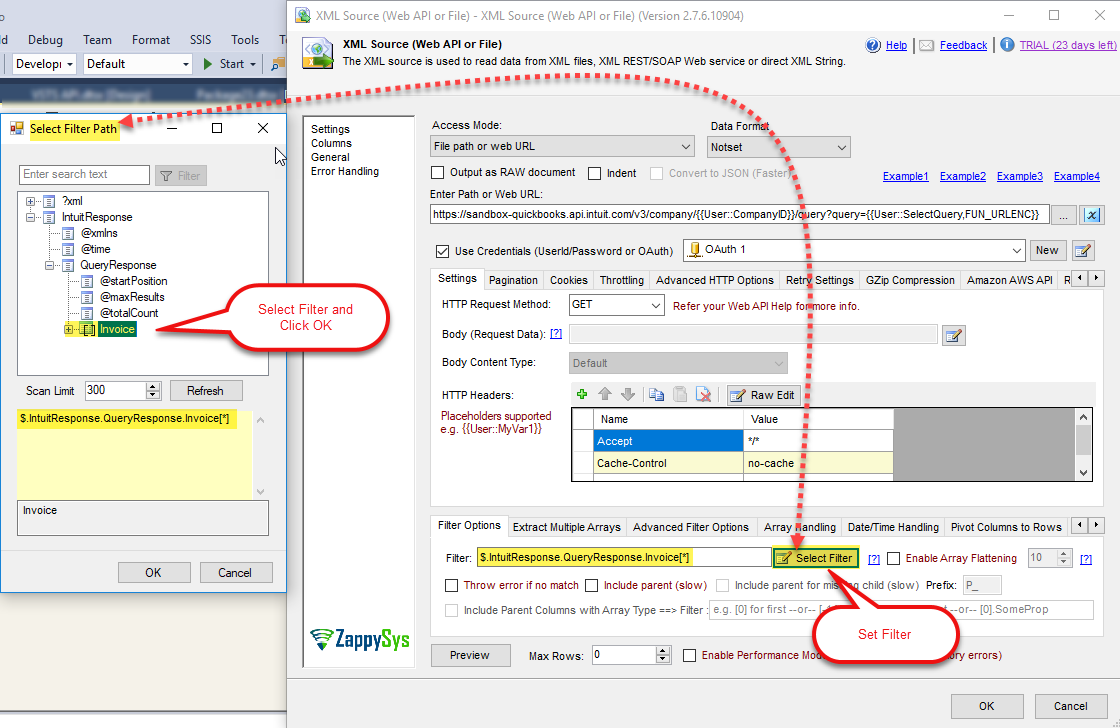
SSIS XML Source Component: Select Filter
- It seems like you are all OK with the configurations, Click on Preview button to see the response data.
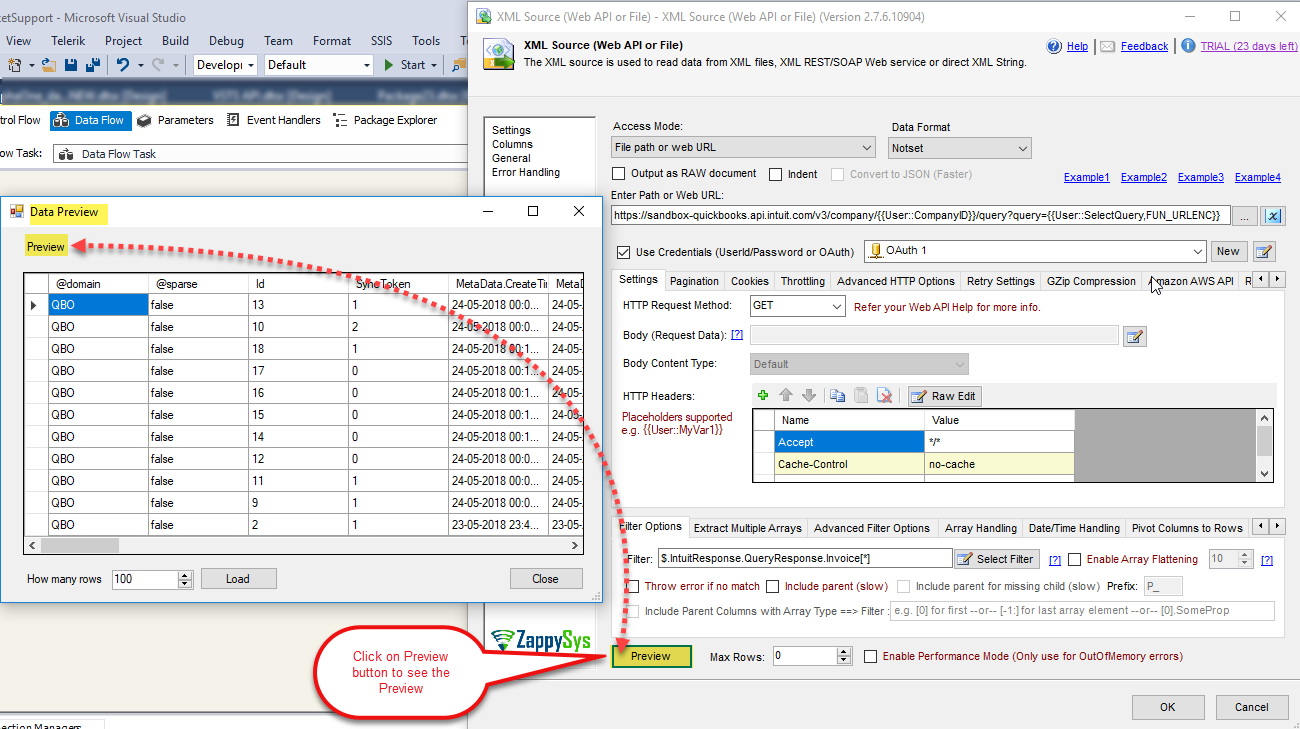
SSIS XML Source Component: See Preview
- finally, Click on OK button to save JSON Source settings.
Configure OLE DB Destination Component for dumping Invoices data into SQL
- first of all, Drag any destination (i.e. OLEDB Destination) from your SSIS toolbox. For demo purpose, we will load QuickBooks Online Invoices data into SQL Server Table.
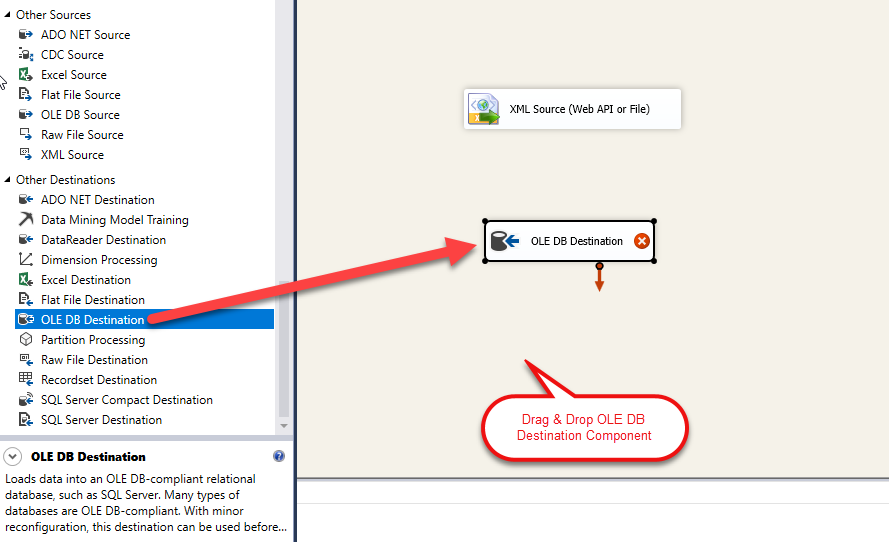
Drag and Drop OLE DB Destination Component
- Configure OLEDB Destination (Select Connection and Target Table). You can Create a new Table for the destination by clicking a NEW button next to Table drop-down.
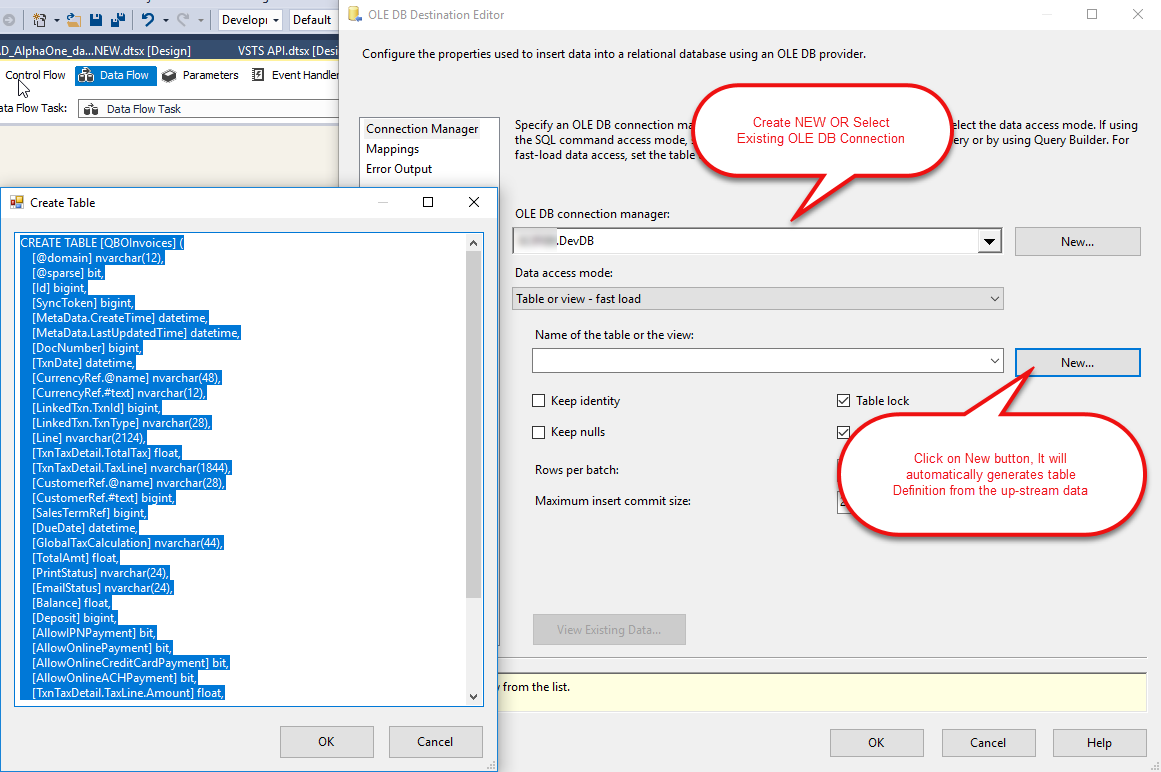
OLE DB Destination Component – Configure for dumping Invoices from QuickBooks Online data in SQL Table
- almost you are done with the configurations, just need to configure mappings, So for that Click on the Columns Tab to configure Mappings. also, Click on OK button to Save the configurations of OLE DB Destination Component.
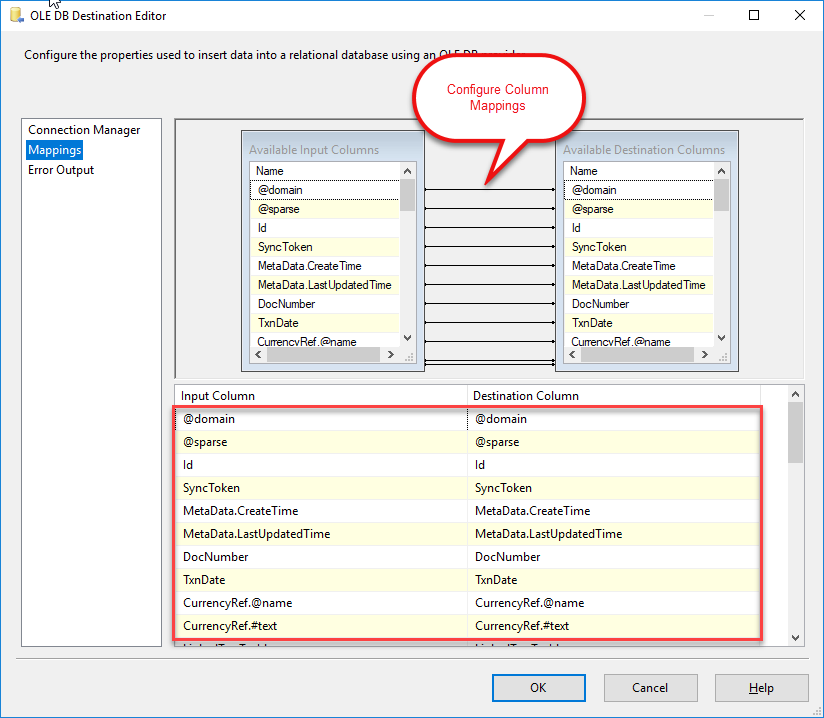
OLE DB Destination – Column Configurations
- finally, Execute your package to Load Invoices data from QuickBooks Online to SQL Server.
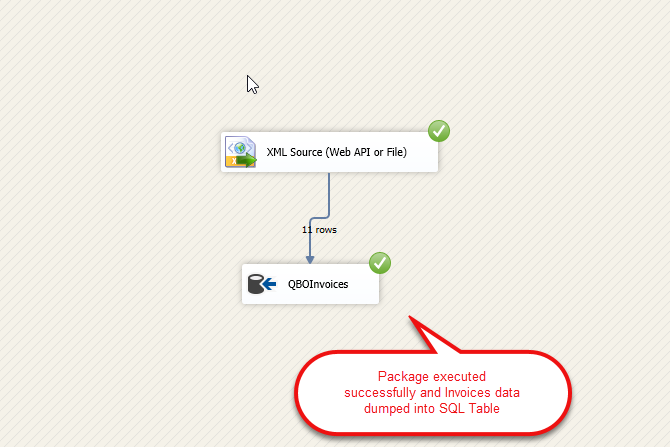
Package executed successfully: Invoices data dumped into SQL
- After that, you can see the dumped records into SQL Table.
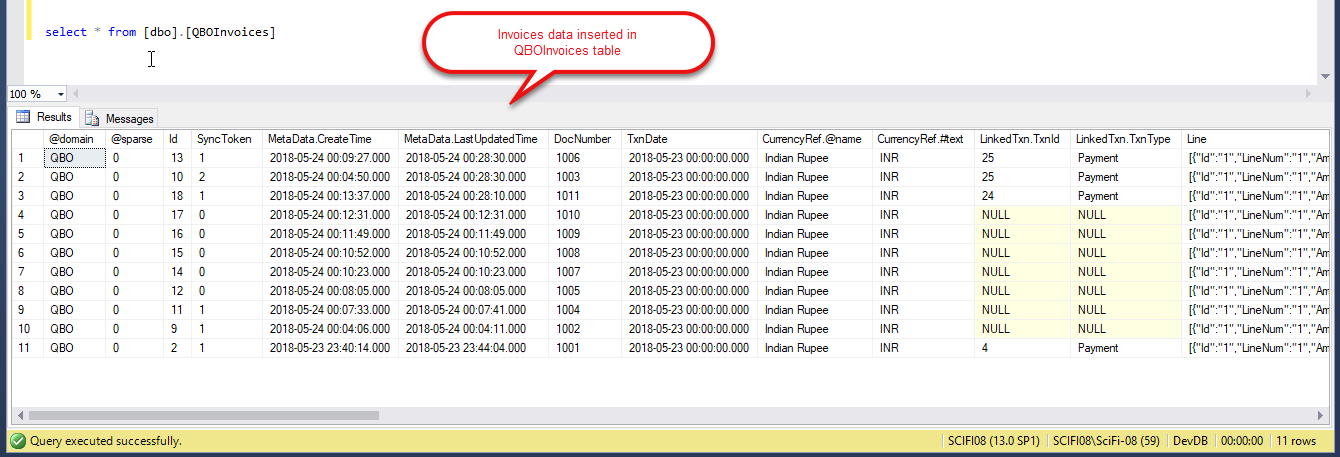
SQL Table: see the inserted records after the complete Package execution
Create a new Invoice on Quick Books Online (Use SSIS REST API Task)
Now let’s look at one more example to call Quick Books Online REST API. This time we will create a new Invoice using REST API call in SSIS. For this, we will use SSIS REST API Task
- First of All, Goto Control Flow Section, Drag and Drop SSIS REST API Task from the SSIS Toolbox.
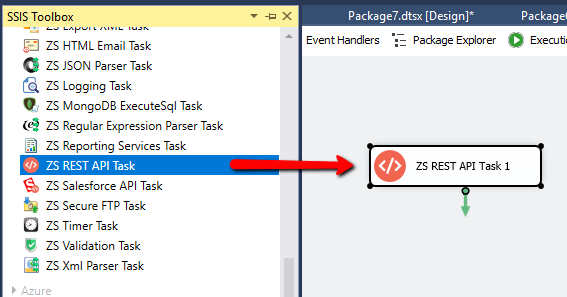
Drag and Drop REST API Task
- furthermore, Double click on that Component to Edit the Configurations and Configure the task like the below-attached screesnshot.
1234567891011121314151617181920212223242526272829303132333435::::: Request Settings :::::* Select Request URL Access Mode to select Url from Connection.* Select Url Connection: Select your created OAUTH Connection Manager.* Enter Reqeust URLRequest URL: POST <RequestURL>/v3/company/<realmID>/invoicehere,<RequestURL> is either a SandBox base URL OR Production base URL.SandBox base URL: https://sandbox-quickbooks.api.intuit.comProduction base URL: https://quickbooks.api.intuit.com<realmID> is your QuickBooks Online sandbox/production company ID.* Select HTTP Request Method as POST method* Enter Request Body.Request Body:{"Line": [{"Amount": 100.00,"DetailType": "SalesItemLineDetail","SalesItemLineDetail": {"ItemRef": {"value": "1","name": "Services"},"TaxCodeRef": {"value":"20"}}}],"CustomerRef": {"value": "1"}}* Select Body Content Type: application/json(For more Information See this QuickBooks Online API Documentation for Creating a new Invoice,https://developer.intuit.com/docs/api/accounting/invoice)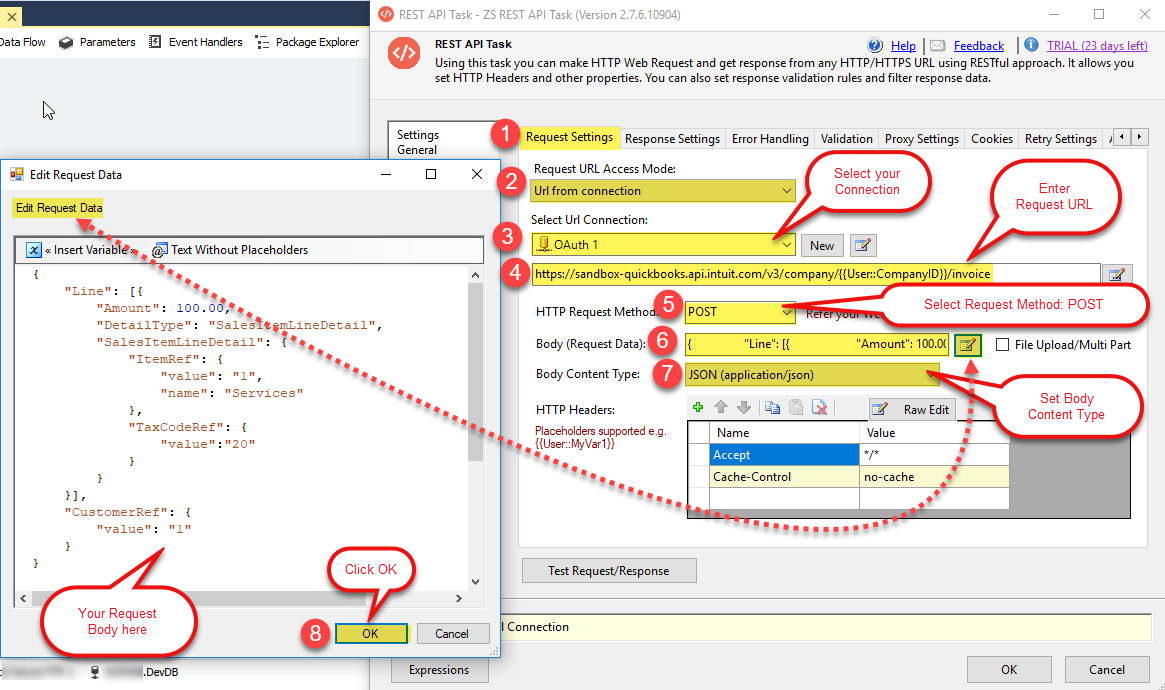
REST API Task: QuickBooks Online REST API Configurations
- So all good with the Configurations let’s do Test Request/Response by clicking on Test Request/Response button. See the below-attached request/response screen.
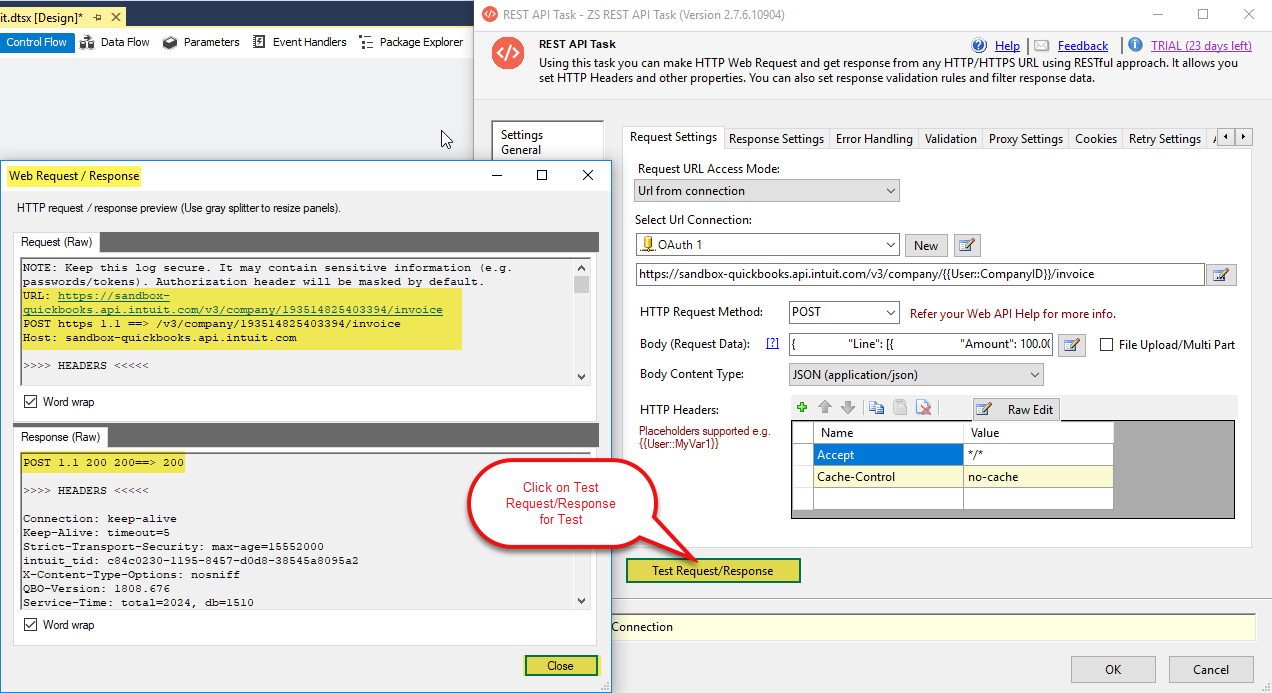
Create New Invoice in QuickBooks Online Account: Do Test Request/Response
- finally, you have created an Invoice in QuickBooks Online successfully using QuickBooks Online’s Intuit REST API and REST API Task, See in QuickBooks Online Site.
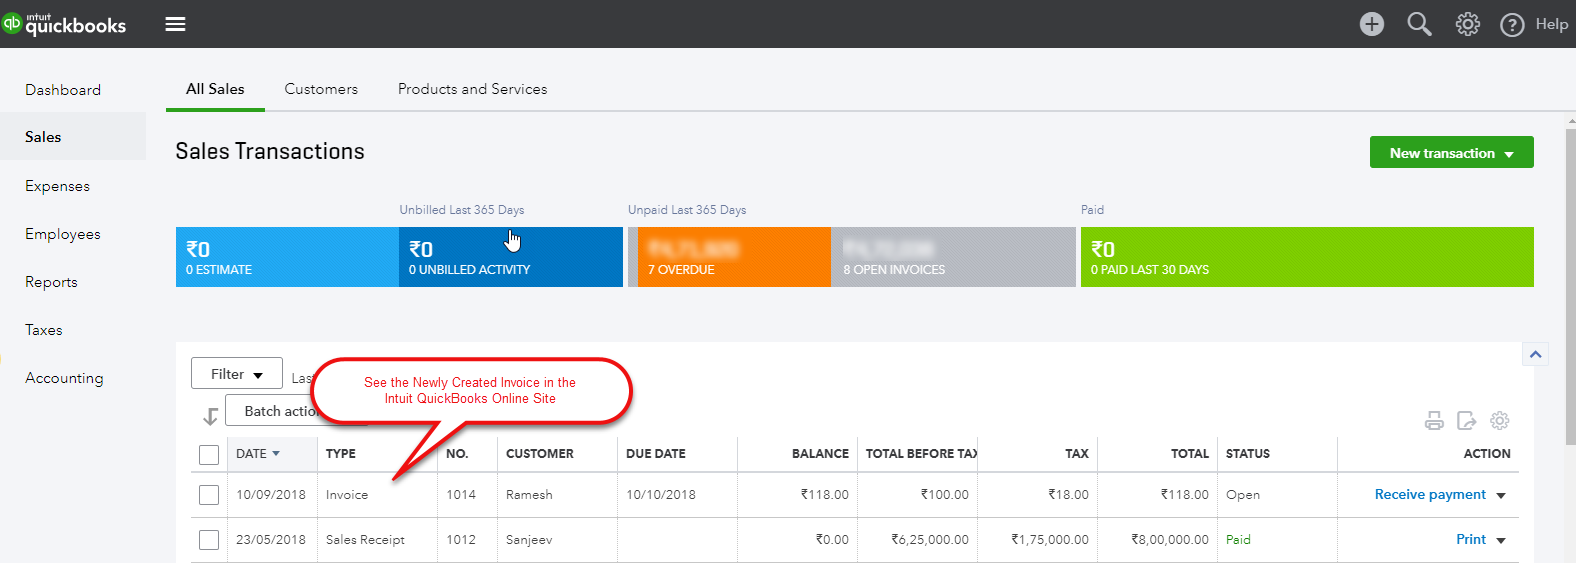
QuickBooks Online Site: See the Newly Created Invoice
- And that’s it. similarly, you can Update/Delete particular Invoice in Invoices List in QuickBooks Online.
Conclusion
In this blog, we learned how to read QuickBooks Online Invoices data in SSIS, How to Create an Intuit Developer Account, How to Create QuickBooks Online App for QuickBooks Online REST API OAuth Connection, How to get all Invoices data from QuickBooks Online and create a new Invoice on QuickBooks Online with SSIS using ZS XML Source Component and SSIS REST API Task in a very simple way. You can achieve many more functionalities with the use of both of these tools. Check our blogs/articles on REST API Task https://zappysys.com/blog/tag/ssis-rest-api-task/ and XML Source Component https://zappysys.com/blog/tag/ssis-xml-source/ to find out what these tools are capable of more.
References
Finally, you can use the following links for more information about the use of QuickBooks Online REST API with our tools:
- QuickBooks Online Documentation for REST API
- Landing Page for REST API Task, you can also find Tutorial Video here.
- Landing Page for XML Source Component, you can also find Tutorial Video here.
- Help File: Documentation of SSIS REST API Task and XML Source Component.