Introduction
In our previous post, we saw how to read Salesforce data using SSIS Salesforce Source (Which uses SOAP API under the hood). This may be slow if you have millions of rows because Salesforce Source paginates every 2000 rows, so it’s not a good option to read millions of rows to iterate on a large Salesforce dataset (Table or Query). To increase the read speed, you can use BULK API. This article explains how to read salesforce data using BULK API and increase read speed.
Prerequisites
Before we perform the steps listed in this article, you will need to make sure the following prerequisites are met:- SSIS designer installed. Sometimes it is referred to as BIDS or SSDT (download it from the Microsoft site).
- Basic knowledge of SSIS package development using Microsoft SQL Server Integration Services.
- Make sure ZappySys SSIS PowerPack is installed (download it, if you haven't already).
- (Optional step). Read this article, if you are planning to deploy packages to a server and schedule their execution later.
NEW Version (v5.5+)
In the new version (v5.5), we have added an option to query in Bulk Mode. This means if you have millions of Salesforce object rows to read, no worries; it may be very fast in the new version. Previously, it used to take a long time because it read in batches of 2000 rows in each request. With the Bulk API, the batch size is really large.
Here is how to set Salesforce Bulk API Mode in SELECT query (Read operation).
- Install new version of SSIS PowerPack. Make sure it is v5.5 or higher.
- Open existing Salesforce Source UI
- Make sure you check [Use Bulk API] option like below. if you do not see this option then most likely you are using older version.
-OR-
Just add #bulkmode prefix in the SQL query like below, it will use Bulk API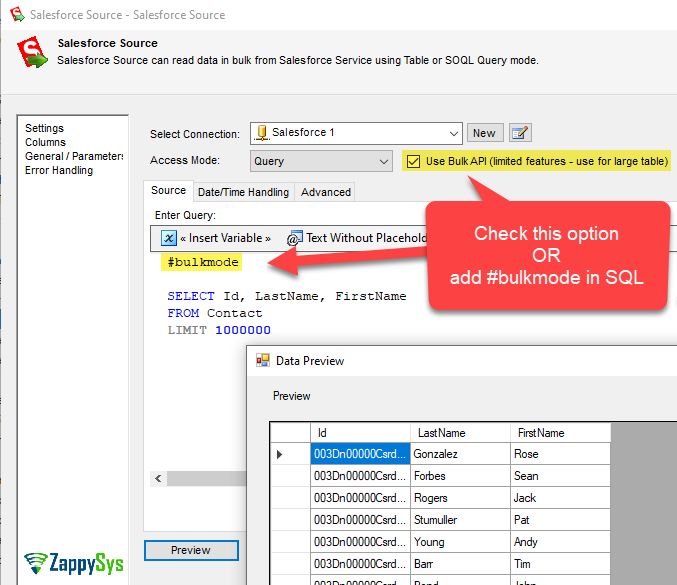
Bulk API mode for SSIS Salesforce Source (Read Large amount of data using SOQL Query)
OLD Version
If you are using an older version of SSIS Power Pack (v5.4.0 or older), you can follow the steps mentioned in the following section.
We will see how to query using Salesforce Bulk API in SSIS. It involves three simple steps like the one below.
- Call BULK API – Submit SOQL Query and receive a JobId back (Use SSIS Salesforce API Task)
1https://{your-instance}.salesforce.com/services/data/v50.0/jobs/query - Keep checking Job Status Until Status is JobComplete (Use SSIS Salesforce API Task)
1https://{your-instance}.salesforce.com/services/data/v50.0/jobs/query/{{User::JobId}} - Read Query Result (Use SSIS CSV Source)
1https://{your-instance}.salesforce.com/services/data/v50.0/jobs/query/{{User::JobId}}/results

Query Salesforce Data using Bulk API in SSIS (read using SOQL query in Bulk mode / large dataset)
Now, let’s look at everything in detail.
Obtain Salesforce Credentials
The first step to call Salesforce API is to obtain credentials (security token or OAuth ClientId /Secret)
Method#1 – Check this article to use UserId/ Password / SecretToken
Method#2 – Check this article to use the OAuth Connection Option
Create Salesforce Connection
Once we have Salesforce Credentials, we can create a new Salesforce Connection (You can do this from Task UI or the below way)
- Open Visual Studio ( Assuming you already have SSIS installed along with ZappySys PowerPack )
- Create a New SSIS Package Project.
- Right-click on the Connection Manager panel and click on New Connection.

- Select ZS-SALESFORCE Connection Manager from the Connection Managers list and Click on the Add Button.

- Now in Connection Manager UI, Enter your SalesForce Credentials (OAuth Client Id/. Secret –or— User Name, Password and Security Token), and leave all other properties as it is.

Call Create Job – Retrieve / Save JobId
Once the connection is created, we can create our first step. Basically, we will call this API to create Job (Bulk Read)
- Here, in Visual Studio, drag and drop the ZS Salesforce API Task on the design surface.

- Double click the Task and configure Request Settings Tab like below
– Select Salesforce Connection (Created in the previous section)
– Check Use direct URL
– Enter URL like below (Replace {your-instance} with your own instance (i.e. na9) . For more information on how to find out my
salesforce instance id check this article
– Request Method POST1https://{your-instance}.salesforce.com/services/data/v50.0/jobs/query
– Enter Body like below (You can use your own SOQL query). Keep in mind SQOL must be encoded for JSON format. This means the entire SQL must be in one line (replace new lines with \r\n , quotes with \” and tabs with \t)
For example, to execute SELECT Id, Name FROM Accounts, you can write something like the one below in BODY.
The above is for below (with a new line)1234{"operation": "query","query": "SELECT Id, Name\r\nFROM Account"}
12SELECT Id, NameFROM Account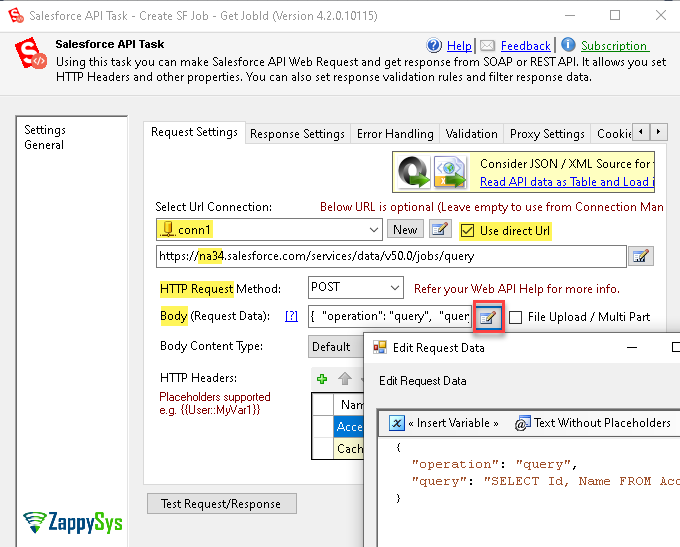
Create Job – Call Bulk API to Read / Query using SOQL
- Now Click Test Request (Copy the JobId which we will use in the Variable for Designtime Testing)
- On the Response Tab, configure it like the below.
– Select Response content Type = Json
– Enter $.id as the expression
– Check Save response option
– Select Save to Variable and click New to create a variable. Name it JobId and enter a sample JobId value (copied from the previous step)
Extract Salesforce JobId save to SSIS Variable
Do Status Check – Look for JobComplete
Once we create a job and store JobId in the variable we have to keep checking Job status every X seconds. Don’t worry you don’t have to use Loop or timer control for that. ZappySys made it so simple to check such thing without Loop /Timer.
- Drag and drop the ZS Salesforce API Task in the design surface.
- Double click and configure like below. URL will be different this time. Use variable as below and replace your instance ID
1https://{your-instance}.salesforce.com/services/data/v50.0/jobs/query/{{User::JobId}}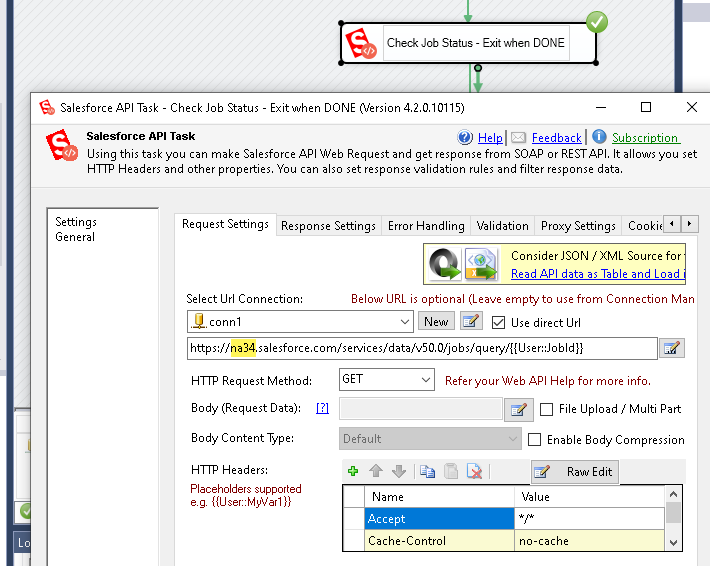
Check Salesforce Job Status Periodically (Without Loop + Timer Controls)
- Now go to the Status Check Tab and configure it, as shown below. It will keep looking for the words below in the response to decide whether it is a Success or Failure. If those words are not found, they will be checked every 5 seconds (Maximum 1200 secs).
– Check Enable Status Check option
– For Success Value – Enter JobComplete
-Check Fail task option
– Enter Cancel|Failed|Abort in the text box
Configure Job Status Check Loop using Salesforce API Task
Read data (Compressed CSV Format)
Last step is read the result from completed Salesforce Job. Its in CSV format so we will use Advanced SSIS CSV Source which supports API connection to Salesforce. For that, we will use the same Salesforce API Task used before.
- Drag and Drop SSIS Data Flow Task from SSIS Toolbox.

- Double click on the DataFlow task to see DataFlow designer surface.
- Here, In Visual Studio, drag and drop the ZS CSV Source (Web API or File) in the design panel
 - Drag and Drop")
- Double click on ZS CSV Source (Web API or File) Configure it like below.
– Enter URL to read result like this (You can supply OPTIONAL maxRecords parameters to control how much data comes in a single response)
– Check Use Credentials and select Salesforce Connection123https://{your-instance}.salesforce.com/services/data/v50.0/jobs/query/{{User::JobId}}/results--OR--https://{your-instance}.salesforce.com/services/data/v50.0/jobs/query/{{User::JobId}}/results?maxRecords=50000
– Click Preview (assuming JobId variable has a valid completed JobId)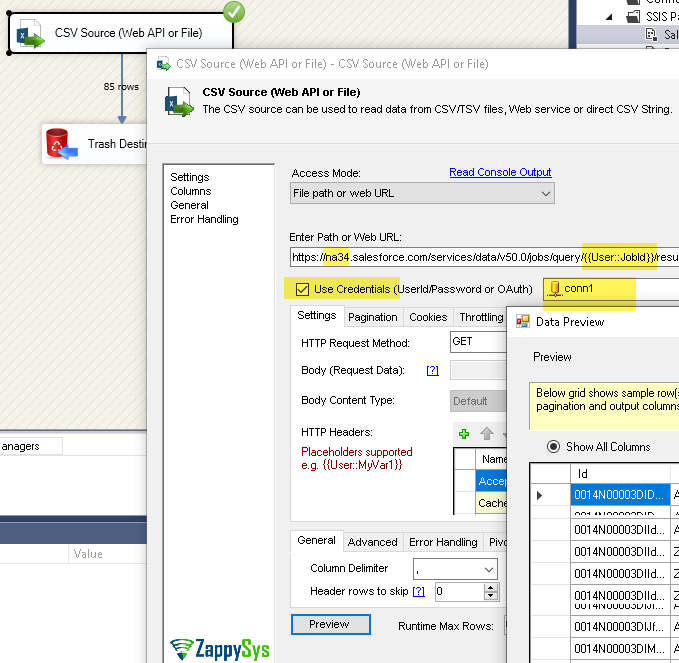
Read Salesforce Bulk API Job Result – Using SSIS CSV / API Source
- Now, set up Pagination as below to read all records using an automated loop. You will need VERSION Released after Jun 20, 2022 to use Regular Expression feature in Header Value extractionBy default, Salesforce doesn’t send all records in response so we need to setup pagination. In below example we are reading Sforce-Locator attribute from Response and sending it to the next URL as locator=<continue-token> value
– Choose Response Header Contains Continue Token
– Enter below expression in Page Num Indicator
Basically, the above expression will keep looping until we find Sforce-Locator : null in the response header.1locator=Sforce-Locator(^((?!null\b).)*$)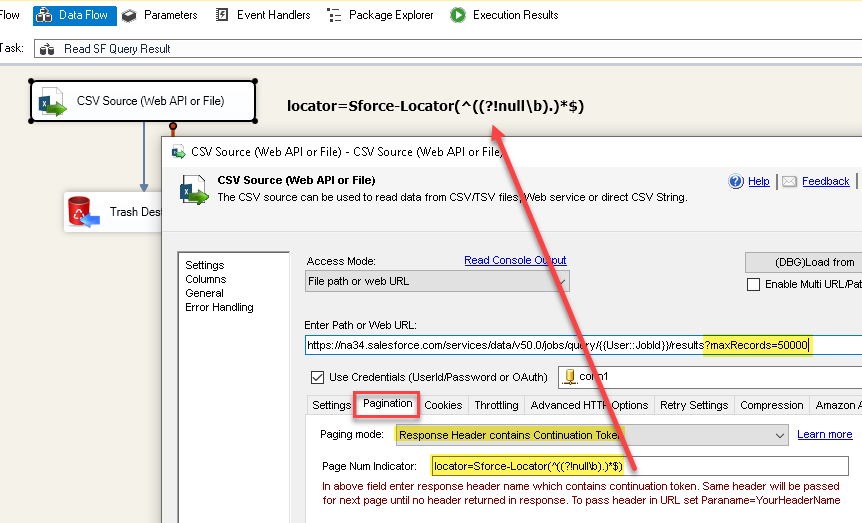
Pagination for Salesforce Bulk Query API (Get Header Value from Sforce-Locator)
- Click OK to save and now run entire package like below.
Query Salesforce Data using Bulk API in SSIS (read using SOQL query in Bulk mode / large dataset)
Conclusion
In this article we saw how to use various ZappySys Components / Task to achieve complex Salesforce API calls to read Query data using Bulk API. Download SSIS PowerPack and try yourself and also explore 70+ other tasks /components not discussed in this article.