Introduction
Please visit this page to see all Pre-Configured ready to use API connectors which you can use in SSIS API Source / SSIS API Destination OR API ODBC Driver (for non-SSIS Apps such as Excel, Power BI, Informatica).
We will go through the steps to read data from JIRA and Load into SQL Server using JSON Driver of ODBC PowerPack
In nutshell, this post will focus on how to call JIRA API using ODBC PowerPack.
So let’s get started.
Requirements
- A first requirement will be to SQL Server Database Engine Installed
- The second requirement will be SSMS installed
- Finally, make sure to have ZappySys ODBC PowerPack installed.
What is JIRA
JIRA is Atlassian’s popular project- and issue-tracking platform used by development and technical support teams to get more work done and faster.
It combines:
issue tracking – a software application that allows to record and follow the progress of every problem or “issue” that user identifies until the problem is resolved.
agile project management – an iterative approach to planning and guiding project processes. customizable workflow, and a pluggable integration – integrates with Freshdesk, GitHub, Zendesk, Zapbook, Asana and so on.
Getting Started
First of all, we will see several examples. ZappySys includes an ODBC JSON Source Connector that will help you to call JIRA API, read various data from JIRA with ODBC and do many more actions using REST API. To learn more about JIRA API check this help file.
Generate API Token
To access JIRA data using REST API call you need to generate an API Token in your Atlassian account. Follow the steps mentioned below to generate API Token:- you can directly login to the JIRA Atlassian Cloud site with your credentials, and redirect to the JIRA Atlassian Cloud Account's Profile Page for generating an API Token.
- Click API tokens, then Create API token.
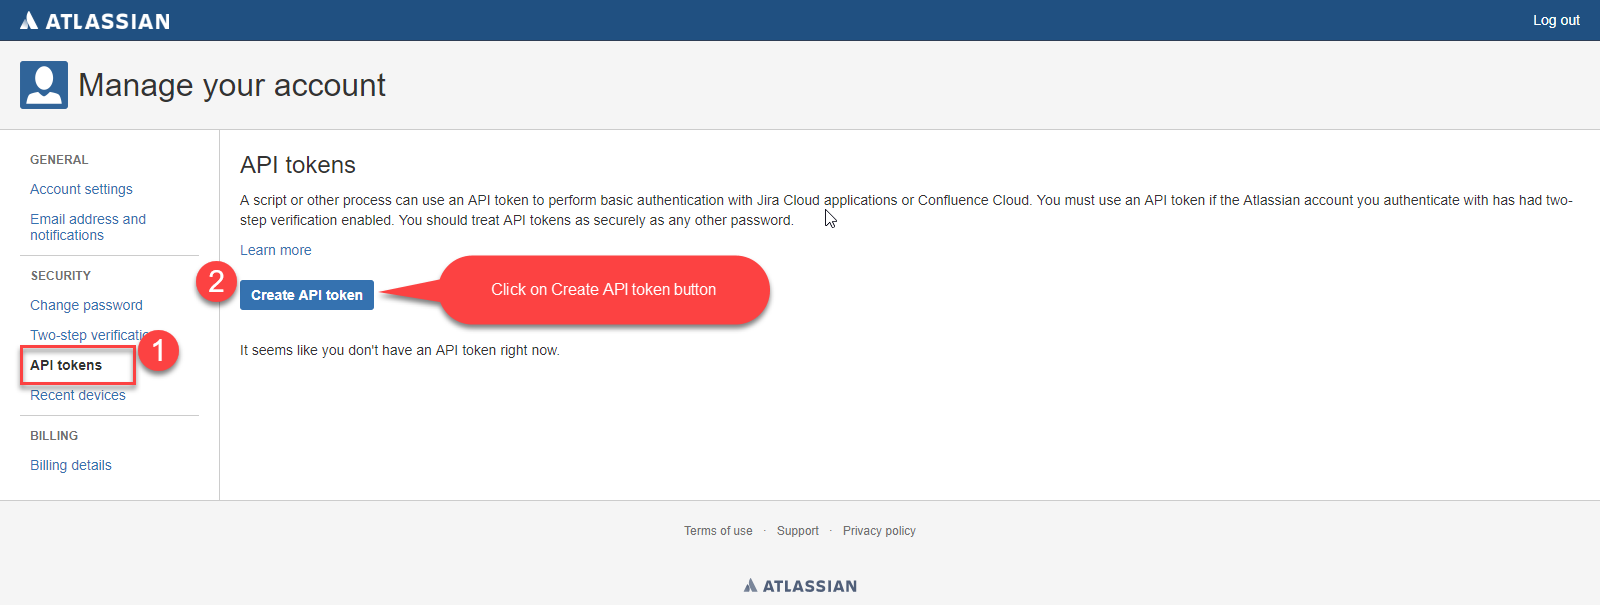
Generate API Token - Step - 1
- Create API Token - Give Label name to your API token which you are generating now
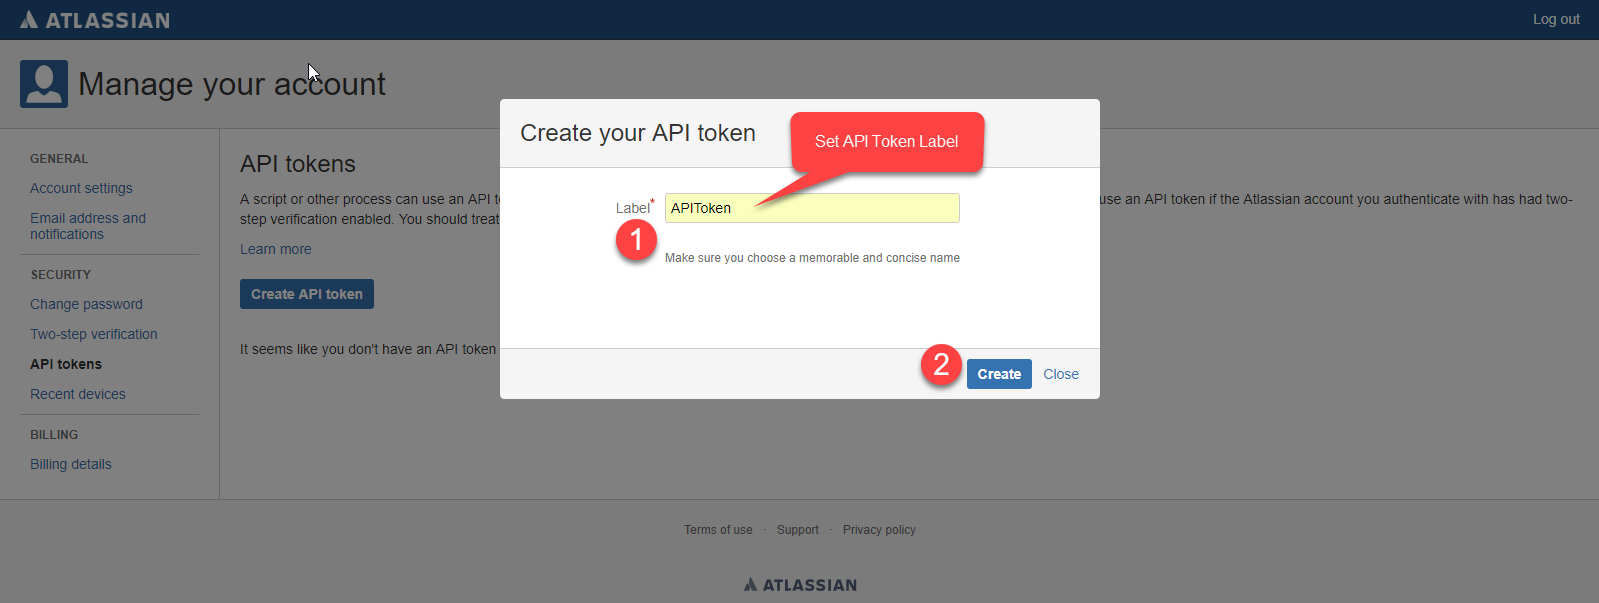
Generate API Token - Step - 2
- Use Copy to the clipboard, and paste the token into your or elsewhere:
Note: * For security reasons it isn't possible to view the token after closing the creation dialog; if necessary, create a new token. * You should store the token securely, just as for any password.

Generate API Token - Step - 3
- If you forgot API token, then you can Revoke your old API token and create new API token OR you can create multiple API tokens too.

Generate API token - Step - 4
About JIRA REST API
JIRA On premises and Cloud Version both offers REST API. Here are some examples of JIRA REST API . For reading JIRA REST API data we will use JIRA REST API Search method which returns data in JSON format. Search API support use of JQL Syntax to filter issues. If you don’t specify JQL parameters in /search endpoint then all issues will be returned. Check this link to learn how to build JQL for JIRA REST API Call. If you don’t have JIRA hosted instance yet but still want to try REST API Examples on public JIRA Server then try below URL (Its official JIRA site which lists their own issues). For example try to copy below URL in browser and hit enter.
|
1 |
https://jira.atlassian.com/rest/api/2/search?jql=project=JRASERVER |
Step-by-Step: Import JIRA data REST API into SQL
Now once you have API token in the JIRA Atlassian Cloud website we can move to ODBC JSON Driver Configuration Part. For this example purpose you can use the following URL:
|
1 |
https://YOUR-DOMAIN.atlassian.net/rest/api/2/search?startAt=0&maxResults=100&jql=project=MYPROJECT |
hence, your-domain is your Atlassian Cloud account’s domain name (we are using zappysys2.atlassian.net).
Therefore startAt is the index of the first item returned in the page of results.
And another maxResults is the maximum number of items that can be returned per page.
Above all, each API endpoint may have a different limit for the number of items returned, and these limits may change without notice. (For more See this JIRA API Documentation for Pagination)
Create ODBC – Native Zappysys JSON Driver Data Source
- To do this, first of all, we will open the ZappySys Data Gateway Configuration:
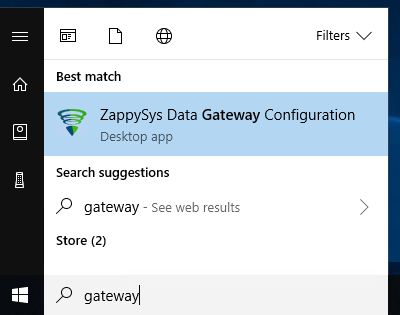
Open ZappySys Data Gateway
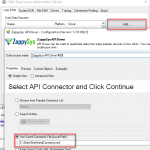
- Add the Native – ZappySys JSON Driver Data source.
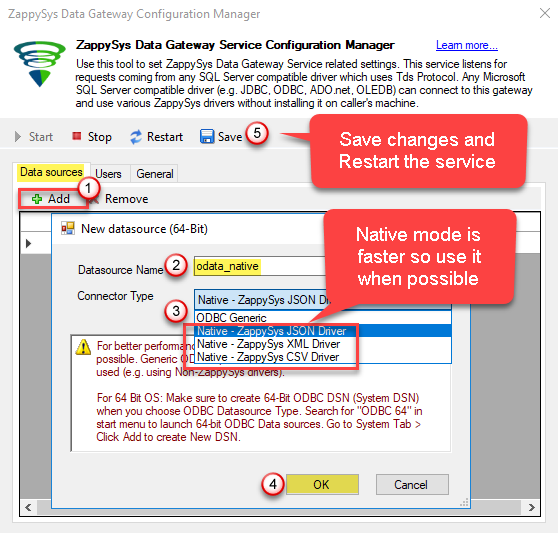
Add Gateway Data Source (Native JSON Driver)
- Now it’s time to connect with JIRA. Let’s use JSON Driver Data source with the following URL:
1https://zappysys2.atlassian.net/rest/api/2/search?startAt=0&maxResults=100
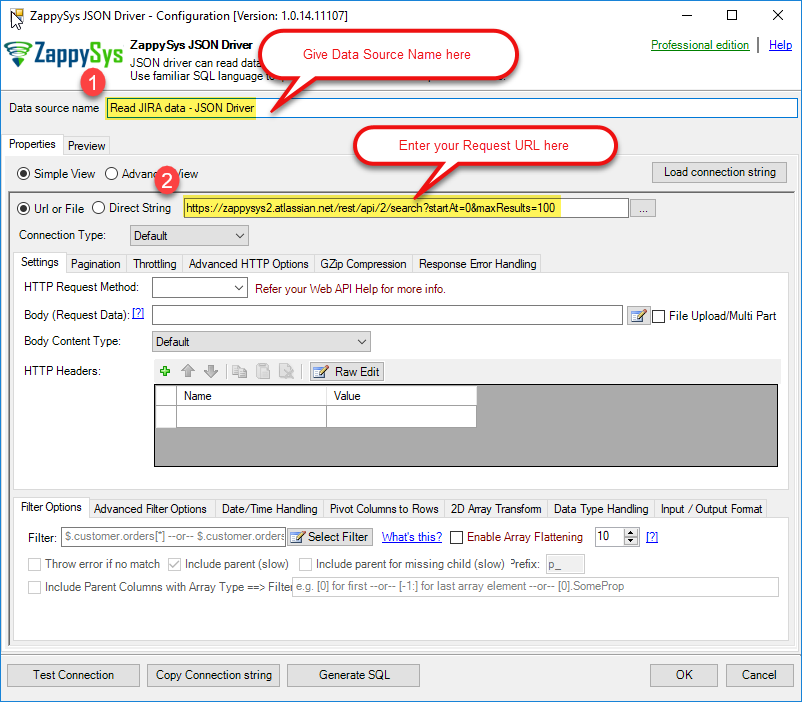
ODBC JSON Driver: Enter Request URL
- It is time to configure the Other Settings. Select HTTP Connection Type from the Connection Type drop-down and Click on Click to Configure Link to Configure the Connection Manager.
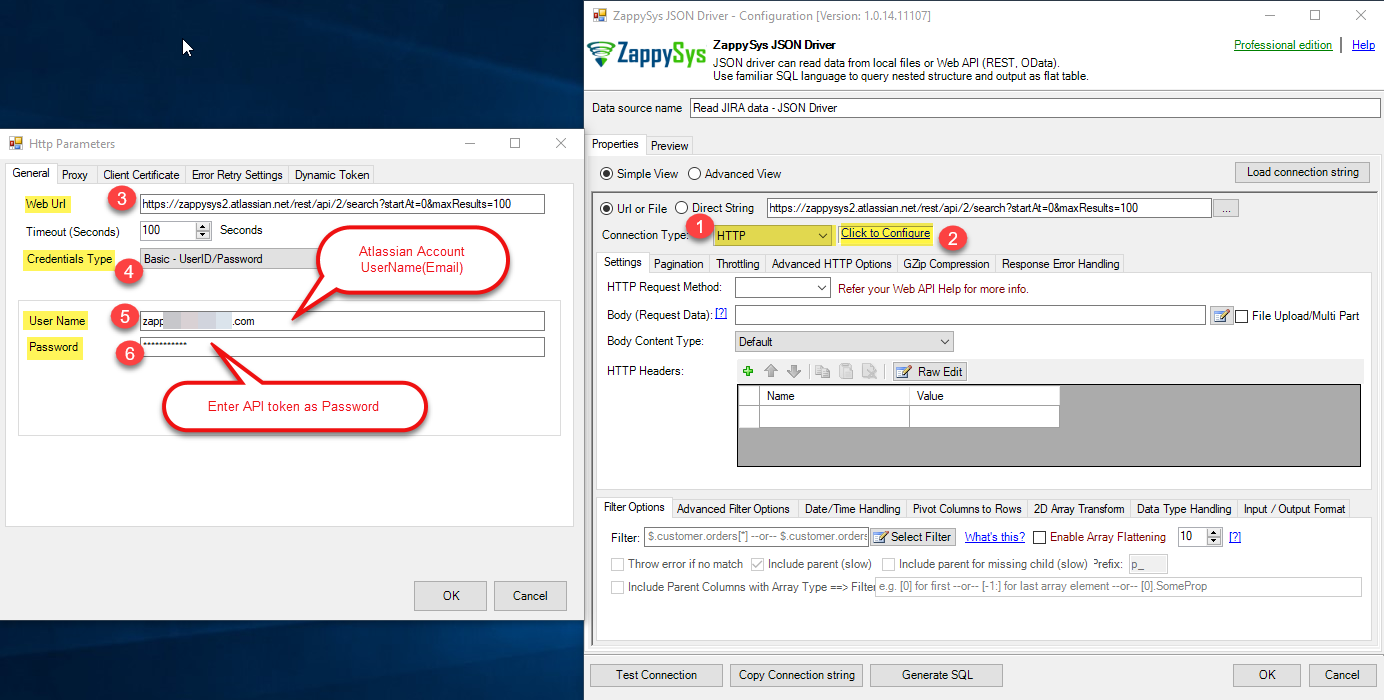
JIRA REST API Connection – Use ZappySys JSON Driver HTTP Connection
- Now, we are going to set Pagination related configurations for JIRA Search request. Page number indicator must be
startAt and
maxResults value in URL must match with Increment By (i.e. 100)
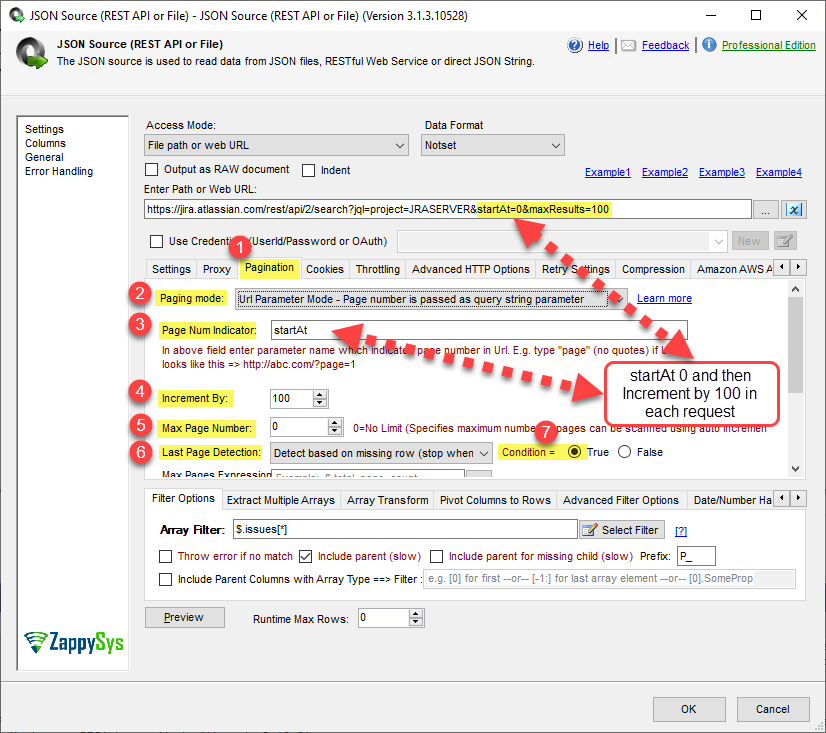
ODBC JSON Driver – JIRA request Pagination Configurations Settings
- After adding pagination parameters let’s add
JQL= search parameter to get specific data. Here we are searching the data by Project name and status. You can find more information about JQL on this link: Search JIRA like a boss with JQL
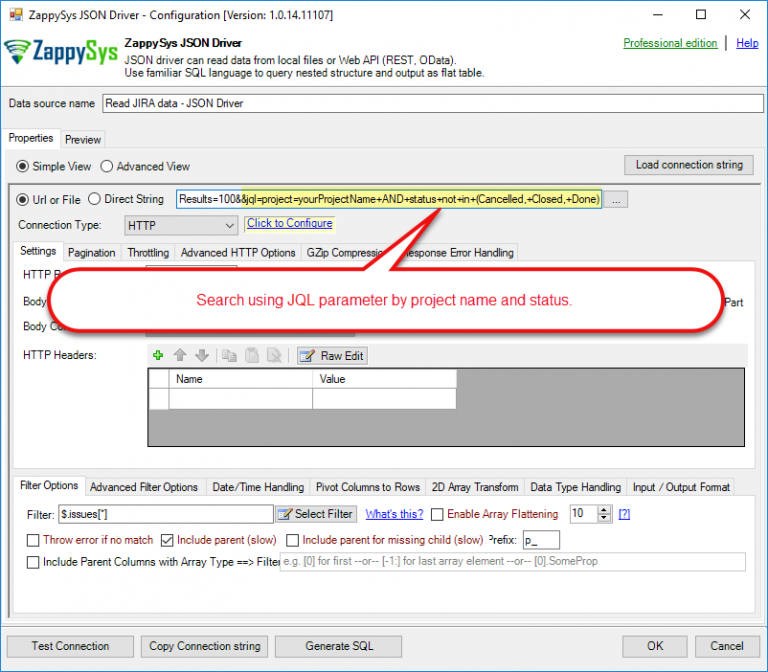
Search using JQL parameter
- Click on Select Filter to set the Filter.
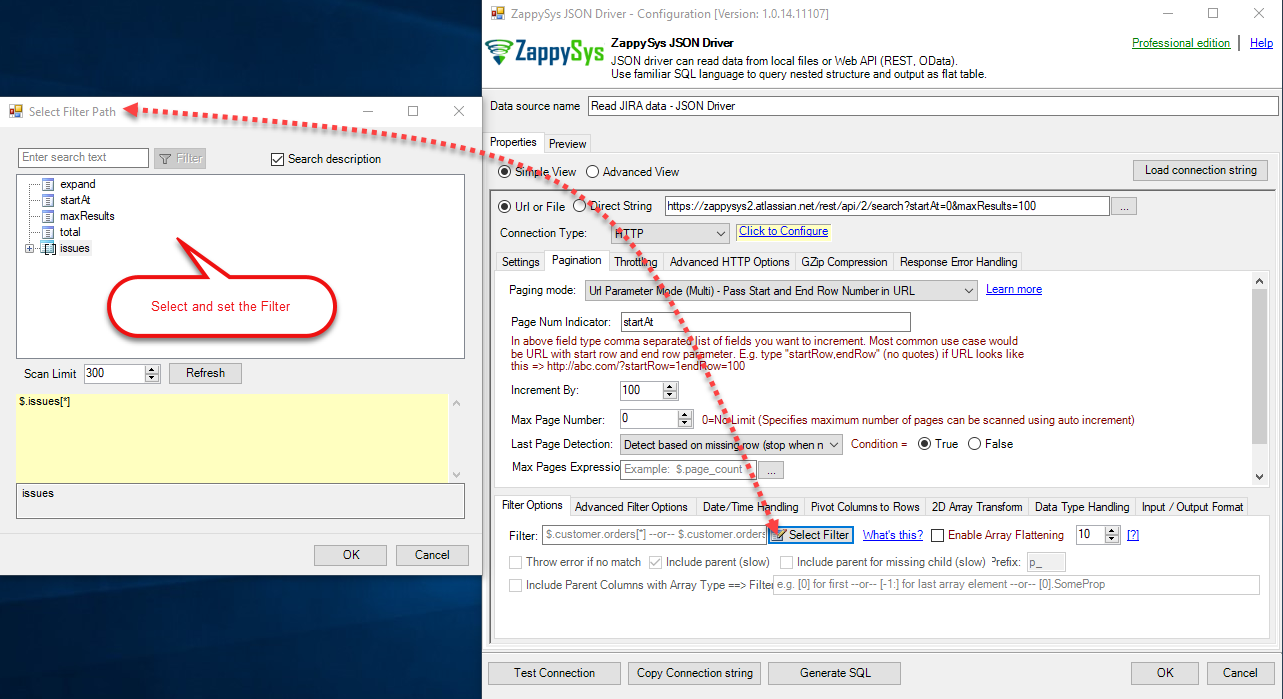
ODBC JSON Driver for JIRA API: Select Filter
- You are done with the Configurations, Click on Test Connection to test the Connection.
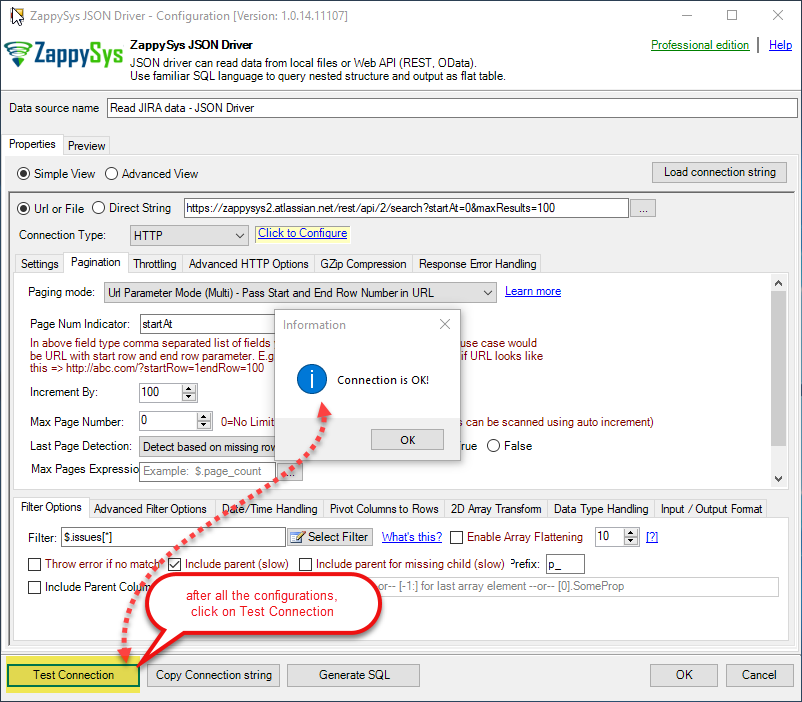
ODBC JSON Driver – Test Connection
- After that select the table from where you want to get data.
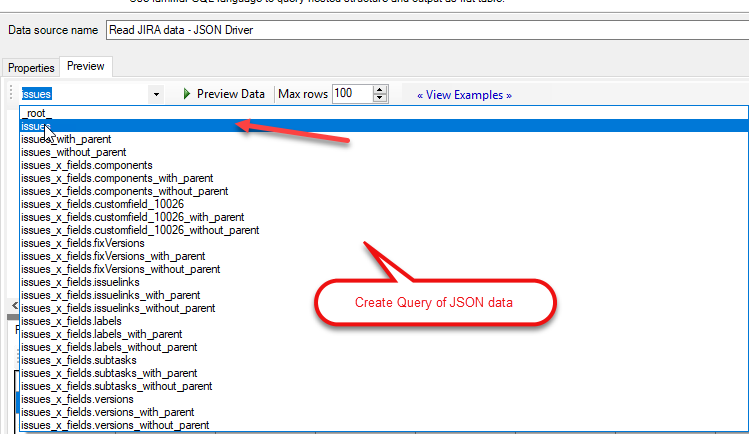
JSON Driver: Create Query of JSON data
- Click on the Preview Data button to preview the data.
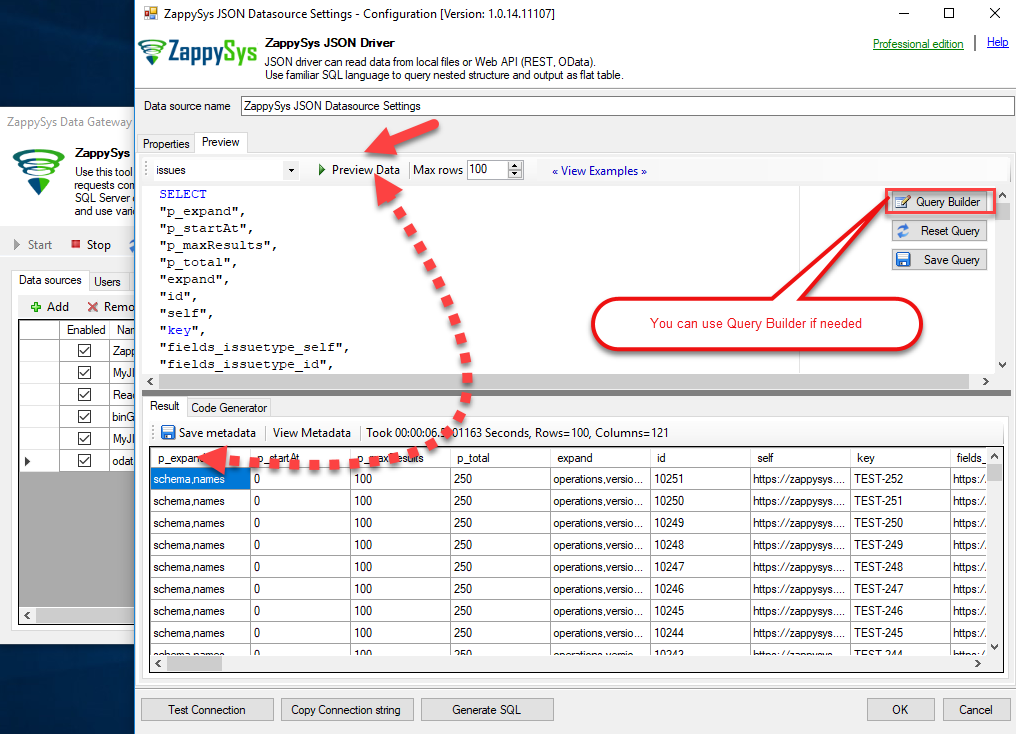
Preview issues table data
- Now using Code Generator we will generate the query.

Generate the query

Load JIRA data in MS SQL Server
- Assuming you have installed SQL Server and SSMS. If not then get both for FREE from here: Get SQL Server Express and Get SSMS
- Open SSMS and connect to SQL Server.
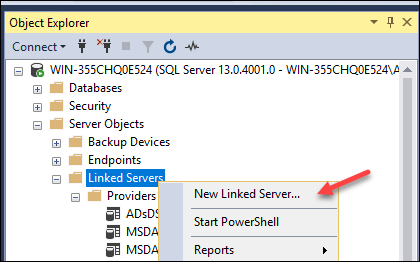
- Go to Root > Server Objects > Linked Servers node. Right click and click New Linked Server...

Add Linked Server in SQL Server
- Now enter the linked server name, select Provider as SQL Native Client
- Enter data source as GatewayServerName,PORT_NUMBER where server name is where ZappySys Gateway is running (Can be same as SQL Server machine or remote machine). Default PORT_NUMBER is 5000 but confirm on Data gateway > General tab in case its different.
- Enter Catalog Name. This must match name from Data gateway Data sources grid > Name column
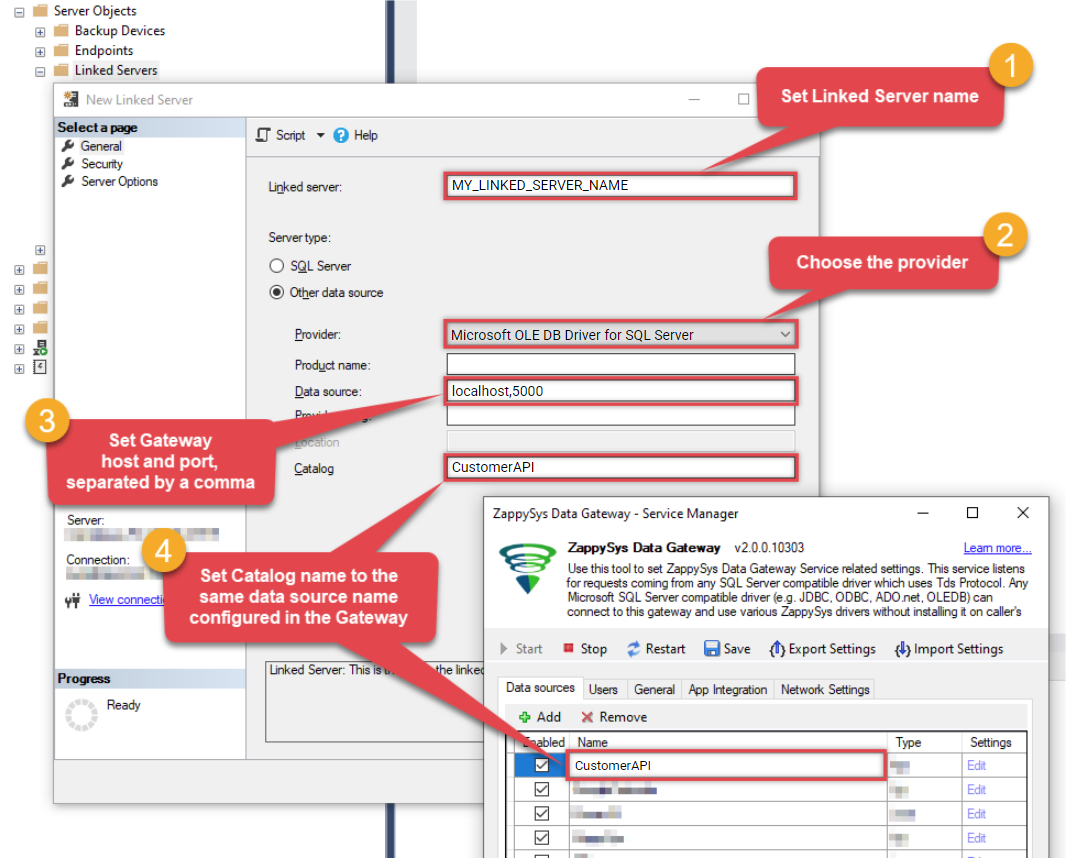
Configure Linked Server Provider, Catalog, Server, Port for ZappySys Data Gateway Connection
INFO:
- For SQL Server 2012, 2014, 2016, 2017, and 2019, use the SQL Server Native Client 11.0 as the Provider.
- For SQL Server 2022 or higher, use the Microsoft OLE DB Driver for SQL Server as the Provider.
- Click on Security Tab and select last option "Be made using this security context". Enter your gateway user account here.
-
Optional: Under the Server Options Tab, Enable RPC and RPC Out and Disable Promotion of Distributed Transactions(MSDTC).

RPC and MSDTC Settings
You need to enable RPC Out if you plan to use EXEC(...) AT [MY_LINKED_SERVER_NAME] rather than OPENQUERY.
If don't enabled it, you will encounter the 'Server "MY_LINKED_SERVER_NAME" is not configured for RPC' error.Query Example:
EXEC('Select * from Products') AT [MY_LINKED_SERVER_NAME]
If you plan to use 'INSERT INTO...EXEC(....) AT [MY_LINKED_SERVER_NAME]' in that case you need to Disable Promotion of Distributed Transactions(MSDTC).
If don't disabled it, you will encounter the 'The operation could not be performed because OLE DB provider "SQLNCLI11/MSOLEDBSQL" for linked server "MY_LINKED_SERVER_NAME" was unable to begin a distributed transaction.' error.Query Example:
Insert Into dbo.Products
EXEC('Select * from Products') AT [MY_LINKED_SERVER_NAME]
- Click OK to save Linked Server
- In SSMS execute below SQL query to test your connectivity.
SELECT * FROM OPENQUERY( MY_LINKED_SERVER_NAME, 'SELECT * FROM $')
- Here is the preview after you run some REST API query in SQL Server. Notice that you can override default configuration by supplying many parameters in WITH clause (second query example in the screenshot).
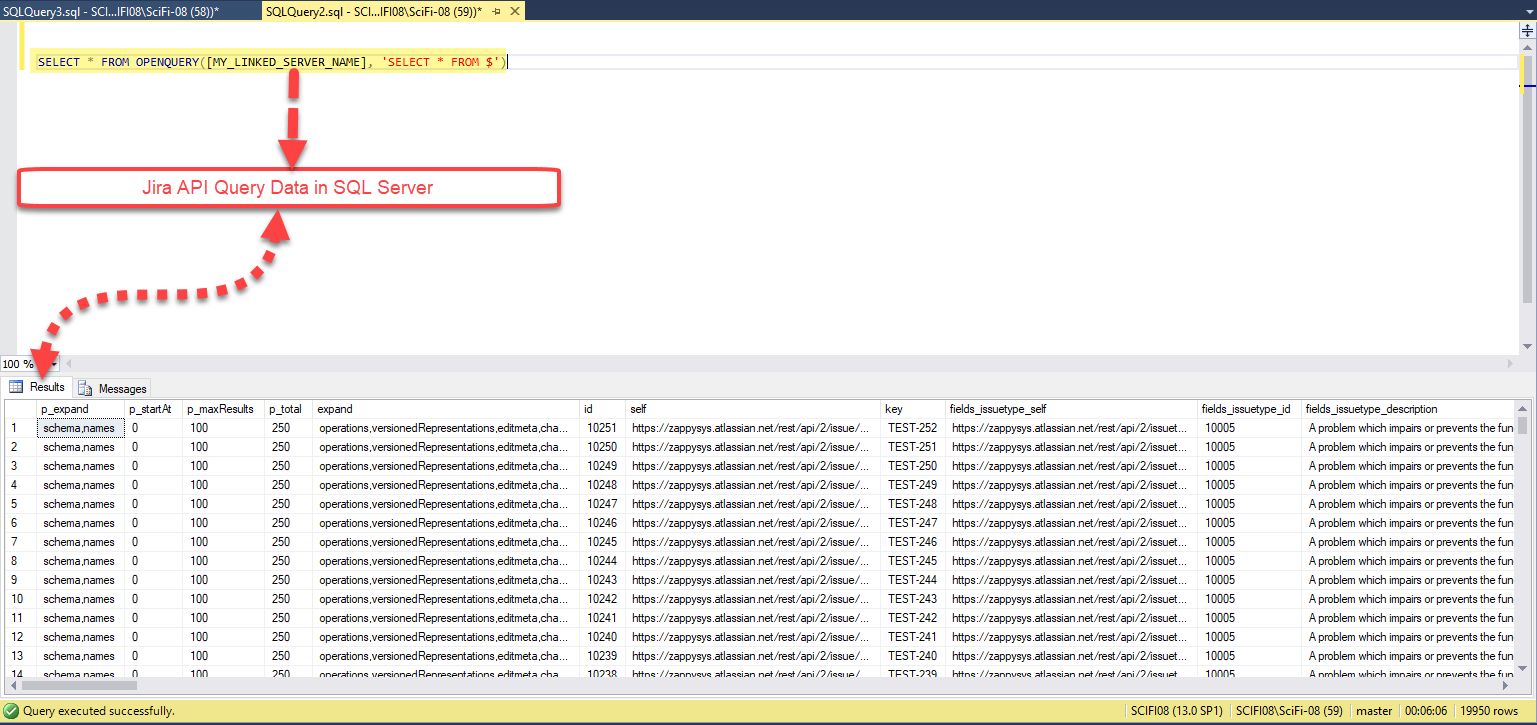 ODBC - Query API Data in SQL Server
SSMS Output - Query REST API via Linked Server OPENQUERY statement (Connect to ZappySys Data Gateway)
- You can wrap your queries inside View or wrap inside Stored procedure to parameterize. Here is an example of creating the view which calls REST API queries. Below View can be consumed like a normal table from any Tools or Programming Language which supports connectivity to SQL Server.
CREATE VIEW dbo.vwApiInvoices
AS
/*Call REST API inside SQL Server View*/
SELECT * FROM OPENQUERY( MY_LINKED_SERVER_NAME , 'SELECT * FROM $');

GO
- Notice in above approach if you parameterize Stored Procedure then check this article to understand Dynamic Metadata.
- Now let's insert JIRA data into the new data table "tblissues" in the SQL server database. For that, we need to execute below SQL query.
SELECT * into tblissues FROM OPENQUERY( MY_LINKED_SERVER_NAME, 'SELECT * FROM $')
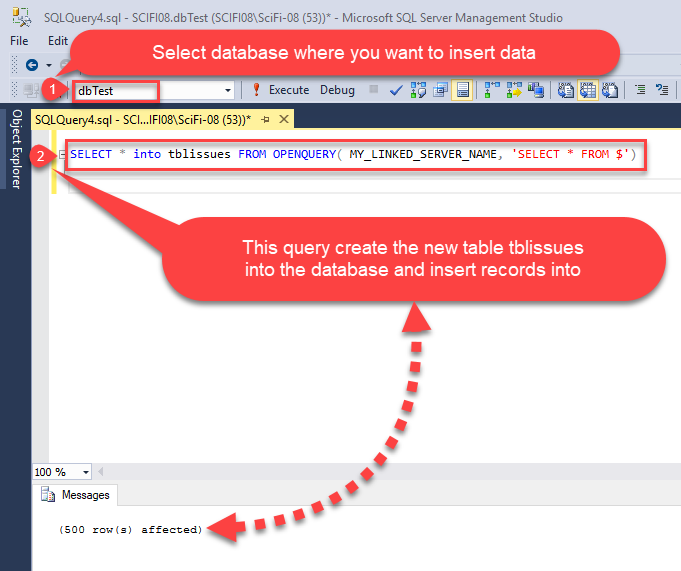 Insert Data into the table
- Let's insert and update records into the already created table "tblissues" .
- To do that first we need to insert the new JIRA data into the "#temp_tblissues" temporary database table.
- Now let's delete the old records from the database table which are updated.
- At the last insert all new JIRA data into the database table.
- To do that, we need to query like below SQL queries.
SELECT * into #temp_tblissues FROM OPENQUERY(MY_LINKED_SERVER_NAME, 'SELECT * FROM $')

DELETE FROM [dbo].[tblissues] WHERE id in (SELECT id FROM #temp_tblissues)

INSERT INTO tblissues
SELECT * FROM #temp_tblissues
- In the upper step, we see how to insert and update new records. Now if you want to update particular fields records only then you need to query like this. In this query, We are updating "fields_duedate" and "fields_issuetype_name" fields only.
Update dbti_1
set dbti_1.fields_duedate = jira_2.fields_duedate,
dbti_1.fields_issuetype_name = jira_2.fields_issuetype_name
FROM tblissues dbti_1
JOIN (SELECT * FROM OPENQUERY(MY_LINKED_SERVER_NAME, 'SELECT * FROM $')) jira_2 on dbti_1.id=jira_2.id
* If you are getting error like : "Cannot resolve the collation conflict between “Latin1_General_CI_AI” and “SQL_Latin1_General_CP1_CI_AS” in the equal to operation" then you need to query like this :
Update dbti_1
set dbti_1.fields_duedate = jira_2.fields_duedate,
dbti_1.fields_issuetype_name = jira_2.fields_issuetype_name
FROM tblissues dbti_1
JOIN (SELECT top 1 * FROM OPENQUERY(MY_LINKED_SERVER_NAME, 'SELECT * FROM $')) jira_2
on dbti_1.id=jira_2.id
COLLATE SQL_Latin1_General_CP1_CI_AS
Conclusion
In this blog, we learned how to generate a JIRA API Token, Load JIRA data of Issues/tickets table using ODBC JSON / REST API Driver in a very simple way. You can achieve many more functionalities with this tool. Check our blogs/articles on JSON / REST API Driver https://zappysys.com/blog/category/odbc-powerpack/odbc-drivers/json-rest-api-driver/ to find out what this tool is capable of more.
References
Finally, you can use the following links for more information about the use of JIRA API with our tools:
- JIRA Documentation for API
- Landing Page for ODBC JSON / REST API Driver, you can also find Tutorial Video here.
- Help File: Documentation of JSON Driver.
- Blog/articles link: https://zappysys.com/blog/category/odbc-powerpack/odbc-drivers/json-rest-api-driver/