Introduction
![]() In our previous article, we talked about how to read from Dynamics CRM / Dataverse (Dynamics 365 / On-Premises CRM / PowerApp). Now let’s look at how to Load data into Dynamics CRM / Dataverse (Dynamics 365 / On-Premises CRM / PowerApp) using SSIS. We will see a few important aspects of loading data into Dynamics CRM / Dataverse Online (i.e. Dynamics 365) and On-premises / IFD (Internet facing hosted instance).
In our previous article, we talked about how to read from Dynamics CRM / Dataverse (Dynamics 365 / On-Premises CRM / PowerApp). Now let’s look at how to Load data into Dynamics CRM / Dataverse (Dynamics 365 / On-Premises CRM / PowerApp) using SSIS. We will see a few important aspects of loading data into Dynamics CRM / Dataverse Online (i.e. Dynamics 365) and On-premises / IFD (Internet facing hosted instance).
We will show you how to use SSIS Dynamics CRM Destination connector for Bulk Insert, Update, Delete and Upsert Operations. This article uses Dynamics 365 Online for CRM Integration Examples but concepts are same for other types of installation (e.g. IFD or On-Premises)
Requirements
- Make sure you have SSIS Designer installed (i.e. SSDT-BI)
- Download and Installed ZappySys SSIS PowerPack which includes an SSIS Dynamics CRM Connectors.
- Finally, make sure you have Microsoft Dynamics CRM / Dataverse credentials handy.
That’s it. So let’s get started.
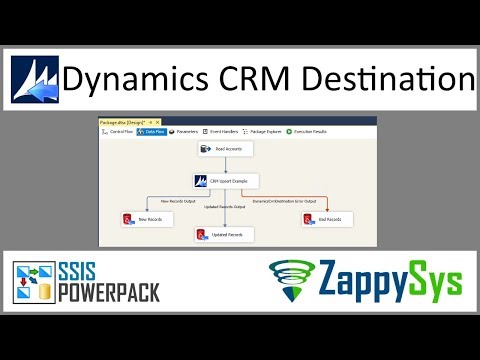
Video Tutorial – CRM Insert, Upsert, Delete, Update
Getting Started
In this section, we will see how to perform bulk insert, update delete and upsert operations using SSIS Dynamics CRM Destination
Configure SSIS Dynamics CRM / Dataverse Connection
The first step to read or write Dynamics CRM / Dataverse data is to make sure we have working Dynamics CRM connection in SSIS.
- Create new or open existing SSIS Project in Visual Studio.
- Open SSIS Package and Go to SSIS designer.
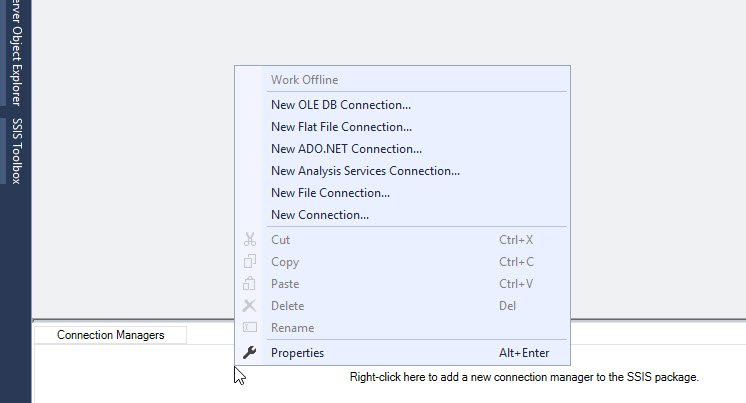
-
Right click in the connection manager panel and click New connection:
Create a new SSIS Dynamics CRM / Dataverse Connection
- In the connection type selection, Select the ZS-DYNAMICS-CRM Connection.
-
We will use a CRM Online (Office 365) connection, region, a username and a password and select organization from the dropdown as below and then click Test connection:
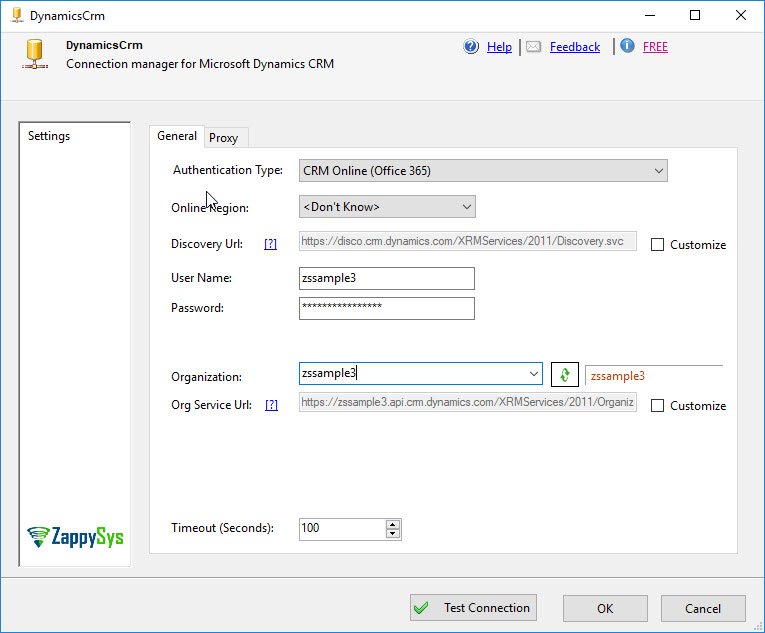
Configure Dynamics CRM / Dataverse Connection in SSIS
Bulk Insert – SQL Server data Import into Dynamics CRM / Dataverse using SSIS
Now, let’s see steps to do SQL Server data Import into Dynamics CRM / Dataverse using SSIS. Below steps assume you already have sample data in some SQL Server Table which will be used to create new CRM accounts. You can enter few account names you like to create in the CRM.
- Open SSIS Package and drag Data Flow task from Control Flow SSIS Toolbox
- Go to data flow designer. Drag and drop OLEDB Source
-
Configure OLEDB Source to read from some sample data table (e.g. dbo.Accounts). If you want to be lazy and just test quickly you can use ZS CSV Source (Direct Value Mode) instead of OLEDB Source.Sample Data May be like below
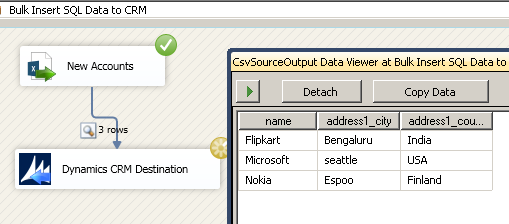
Once you configure Source (Connection, Table Name etc.) click OK to save it.1234name,address1_city,address1_countryFlipkart,Bengaluru,IndiaMicrosoft,seattle,USANokia,Espoo,Finland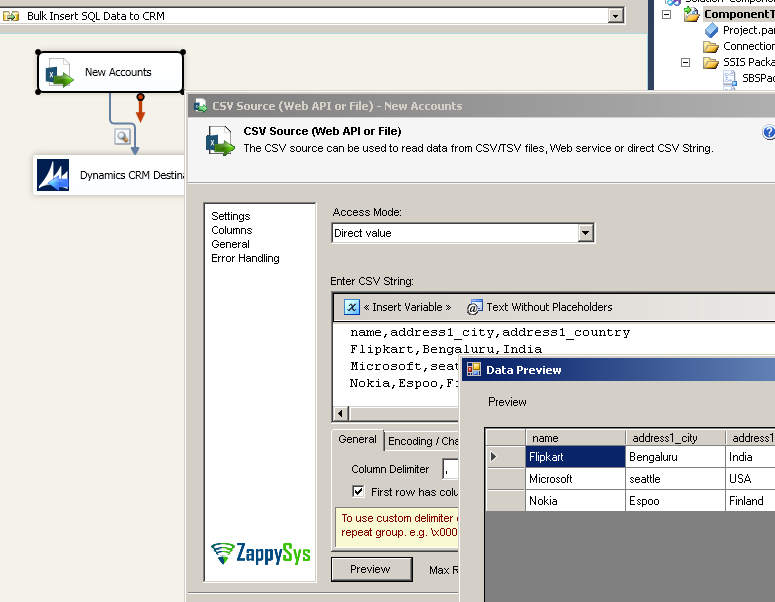
CSV Source – Sample Accounts for CRM Insert Demo
- Drag and drop ZS Dynamics CRM Destination from the toolbox.
- Connect Source to your Destination component.
- Double click CRM destination to configure it.
-
On the Connection Managers tab, Select Dynamics CRM / Dataverse connection we created in the previous section.
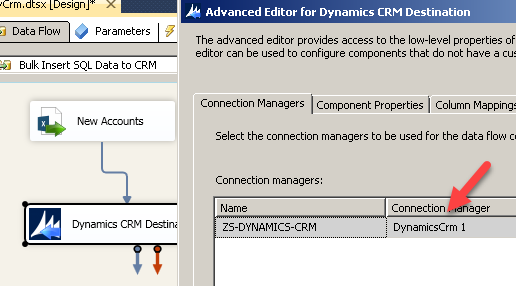
Select Connection for Dynamics CRM / Dataverse Destination
-
On the Component Properties Tab Select Table Name.
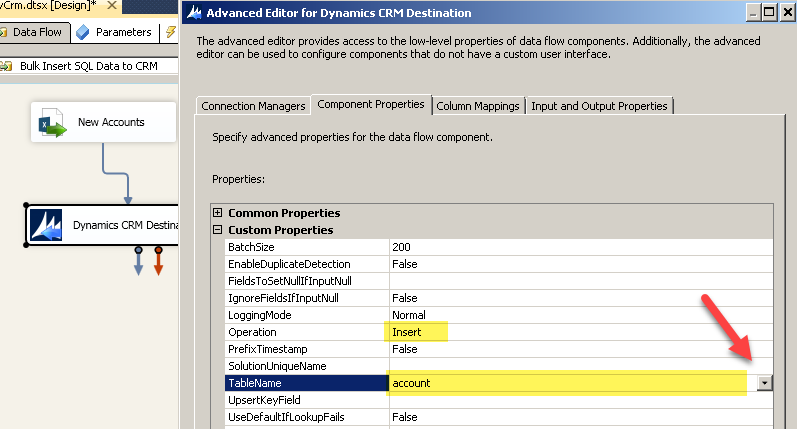
Select Target Table for Dynamics CRM / Dataverse Insert
-
On the Mapping Tab map few columns (e.g. name, address1_city, and address1_country)
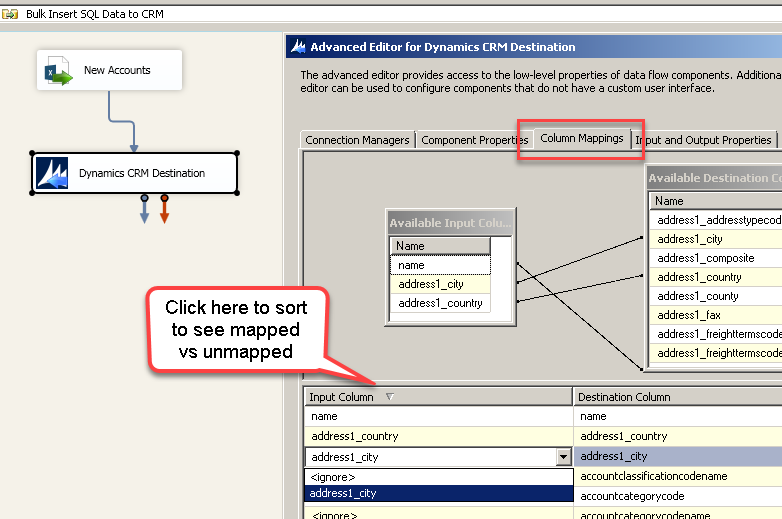
Configure Target Column Mapping for CRM Data Load
- Click OK to save CRM destination.
-
Right click in the data flow designer, click Execute Task
Execute SSIS Package – Loading Data into Dynamics CRM / Dataverse from CSV / SQL Server
Bulk Upsert – Update or Insert Dynamics CRM / Dataverse Records in SSIS
In the previous section we saw how to Insert New records. However sometimes you want to Upsert (Insert or Update). So if record already exists Update else Insert. In order to achieve this you have to set two additional attributes. For CRM Upsert you have to perform few changes to previous steps
Create Alternate Key for CRM Upsert
To perform Upsert operation you can map Table’s Primary Key or Alternate Key. Primary Key usually starts with table name and ends with “id” (e.g. for account table its accountid ).
Many times Source system don’t have CRM Table Primary Key. In such case you may use Alternate Key in the mapping (JOIN Key). To use Alternate key for Upsert you have first define Alternate Key in CRM Portal. Check this link for exact steps.
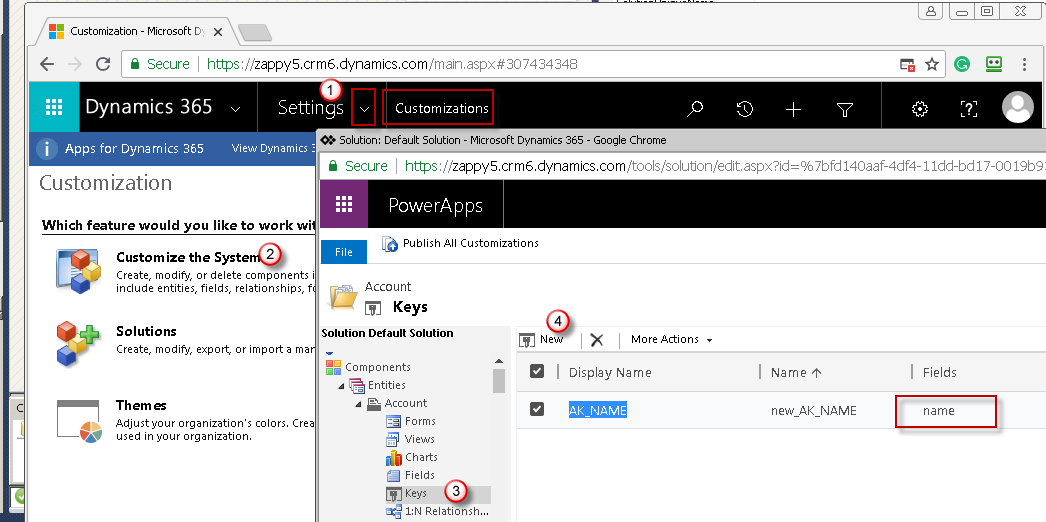
Create Alternate Key for Dynamics CRM / Dataverse Online Table (Useful for Update or Upsert Operation)
Configure SSIS CRM Destination for Upsert
- Double click CRM destination. On the Component Properties Tab, Change Operation to UpdateOrInsert
-
Specify UpsertKeyField to either Table’s Primary Key Column Name or Alternate Key Name.
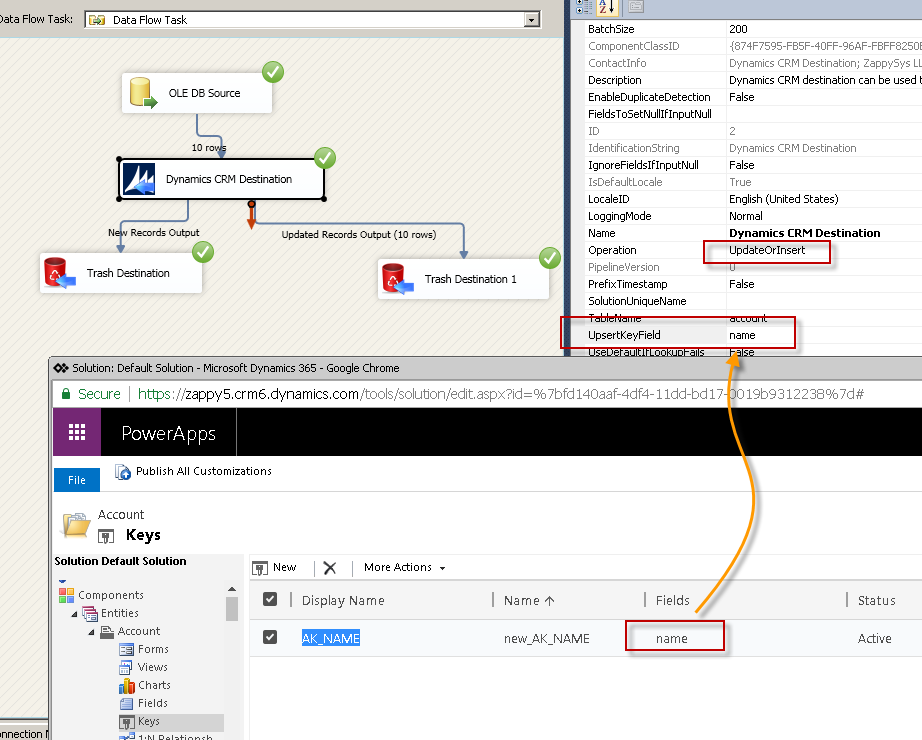
Dynamics CRM / Dataverse Upsert Records using SSIS CRM Destination (Specify Alternate Key / Primary Key)
-
Now go to Mappings tab and confirm Key field is mapped.
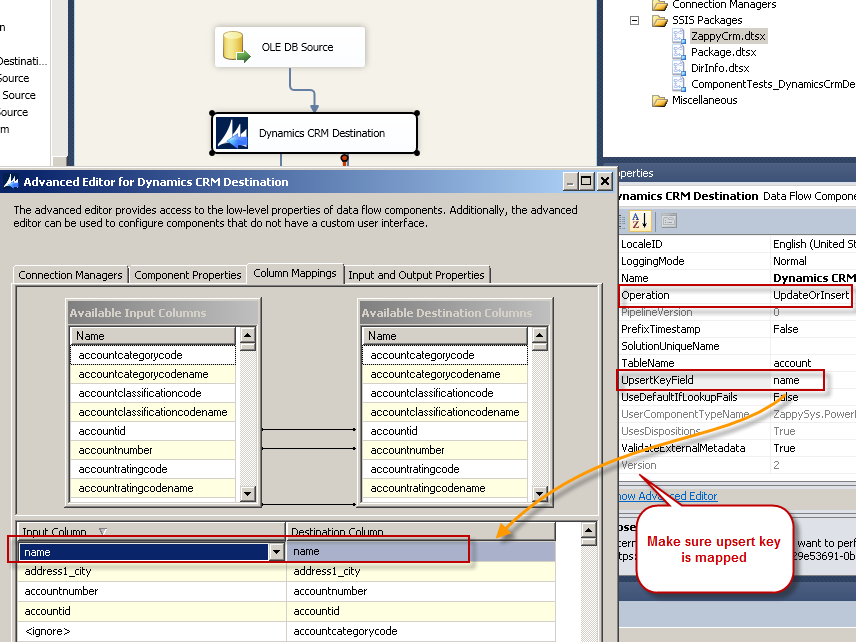
Configure Dynamics CRM / Dataverse Mapping for Upsert in SSIS
- Click OK and Run Package to test CRM Upsert Operation.
Primary Key name usually starts with table name and ends with “id” (e.g. for account table its accountid ).
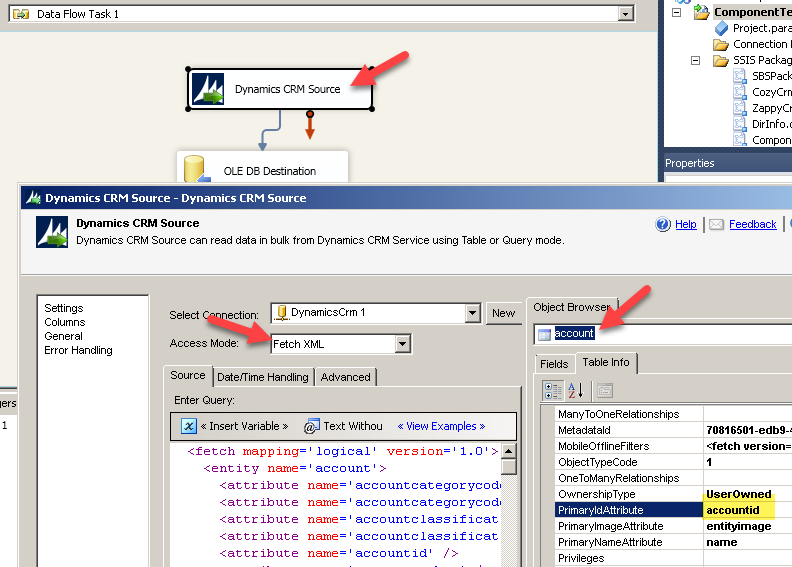
Find Primary Key for Dynamics CRM / Dataverse Table
Handling Inserted / Updated Records Output
Now lets look at how to detect which records got inserted and which records got Update? In Upsert Mode each record can be directed to one of the following three Outputs.
- Inserted Records [Blue Arrow]
- Updated Records [Blue Arrow]
- Records with Error [Red Arrow]
You can select Red or Blue arrow coming out from CRM Destination component. Drag and drop output arrow on any down stream component.
Bulk Update – Modify Dynamics CRM / Dataverse Records in SSIS
If you want to do bulk Update its very same steps as Upsert Operation except you have to set Operation = Update in the properties grid. For Key field you have to set primary key or Alternate Key.
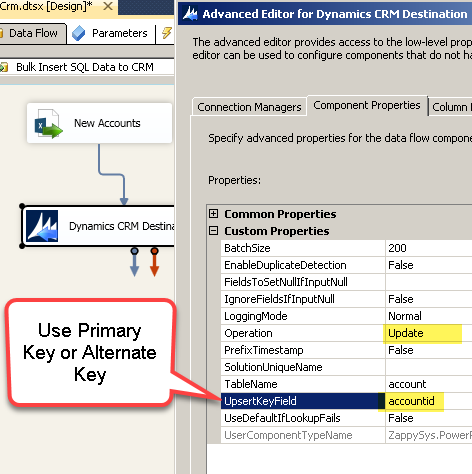
Dynamics CRM / Dataverse Update in SSIS
Bulk Delete – Delete Dynamics CRM / Dataverse Records in SSIS
Bulk delete doesn’t require many settings. All you have to change is Operation = Delete on Component Properties Screen. On the Mapping Screen Map only one column (Primary Key). If you are not sure which one is primary key please refer to the previous section (Upsert Operation).
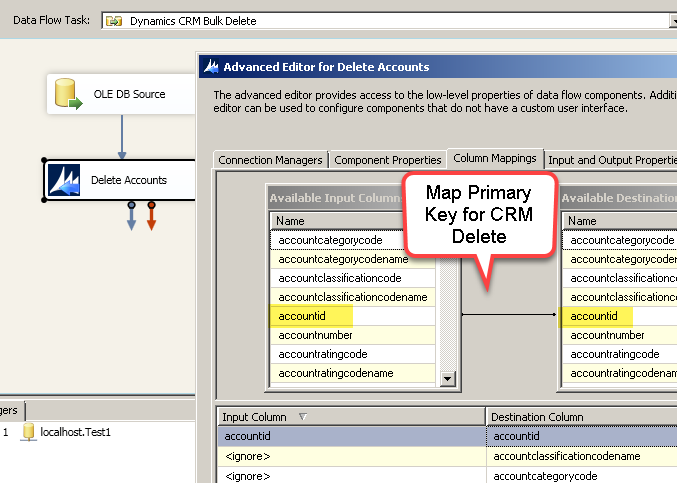
Delete records from Dynamics CRM / Dataverse Online using SSIS (Primary Key mapping for CRM Bulk Delete)
Some times you may get below errors. If you get this error make sure you delete all child records first before deleting parent. For example if you are deleting account then make sure you have to delete leads / contacts for that account or update leads / contacts so they don’t refer to account being deleted.
|
1 2 3 |
Error: 0xC0047062 at Dynamics CRM / Dataverse Bulk Delete, Delete Accounts [2]: System.Exception: Exception: The object you tried to delete is associated with another object and cannot be deleted. Error Details: ApiExceptionSourceKey=Plugin/Microsoft.Crm.Common.ObjectModel.AccountService |
Error Handling
Many times you want to ignore bad records and continue processing good records. In such case you can use Dynamics CRM / Dataverse Error Output. Just grad Red arrow from CRM Destination and Drop on target component. Select Redirect Option for Error , Truncation both and Click OK.
Once you set Error Handling your component will continue to run without failing whole data flow. Later you can review errors (if you saving to destination).
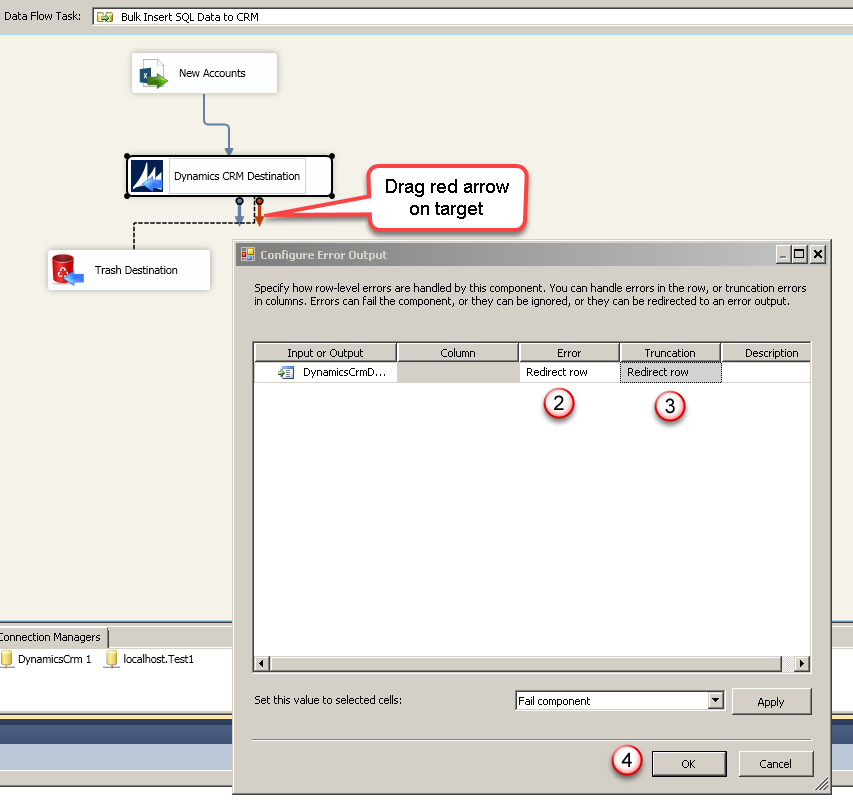
Configure Error Handling in SSIS Dynamics CRM / Dataverse Destination
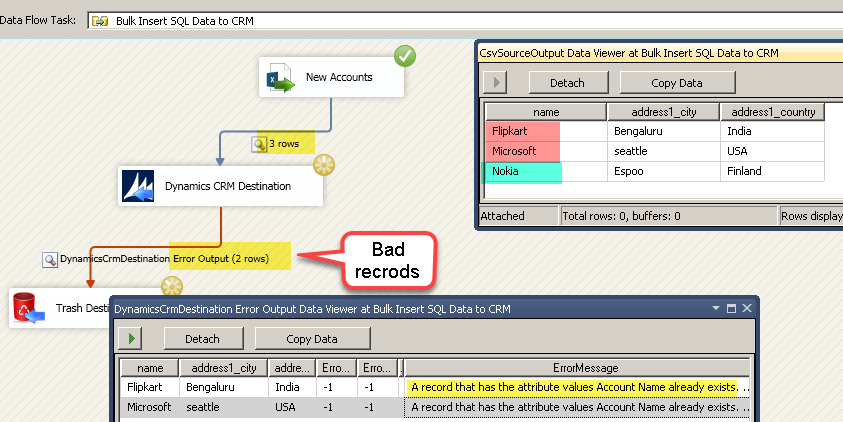
Loading records into Dynamics CRM / Dataverse Table using SSIS . Redirect Bad rows to Error Output.
Handling Special Data Types (PartyList, Lookup, PickList)
Certain datatypes in CRM requires special handling. Check this article to learn more about how to insert data into columns with PartyList, Lookup or PickList field.
Conclusion
In this article, We have seen how easy it is to integrate SQL Server data with Dynamics CRM / Dataverse. Using drag and drop connector you can perform Bulk insert, update, delete and Upsert operations. Download ZappySys SSIS PowerPack to learn more about other possible scenarios which are not discussed in this article.