Introduction
 In this article, you will see few Examples to import REST API in SQL Server Table (Call JSON / XML SOAP API). You will also learn how to load JSON Files into SQL Server Table using T-SQL Stored procedure code. So let’s get ready for fun 🙂
JSON File format and REST API (i.e. RESTful API ) is becoming more and more popular each day. You may already have some data integration scenarios to read/write From REST API services in SQL Server or maybe API integration in other Apps such as Power BI, Tableau, SSIS, Informatica.
REST API integration can be challenging without the right set of tools. Even for highly skilled programmer sometimes its difficult to achieve the desired result. But not to worry at the end of this article you will find out how easy it is to pull data from JSON / XML based web service using familiar SQL Query Language. In the next few sections, you will learn how to call REST API inside SQL Server using familiar T-SQL code.
Steps to Import JSON / XML REST API in SQL Server
Here is the summary of steps to query REST API / JSON File in SQL Server (Using T-SQL code). For detailed steps read the full article and watch the video tutorial.
- Install ZappySys ODBC PowerPack from here (it contains drivers for JSON / XML API)
- Create ODBC DSN for JSON / XML API Source
- Configure ZappySys Data Gateway Service so SQL Server can use ZappySys Drivers in T-SQL code
- Create and Configure Linked Server to connect to JSON / REST API Service
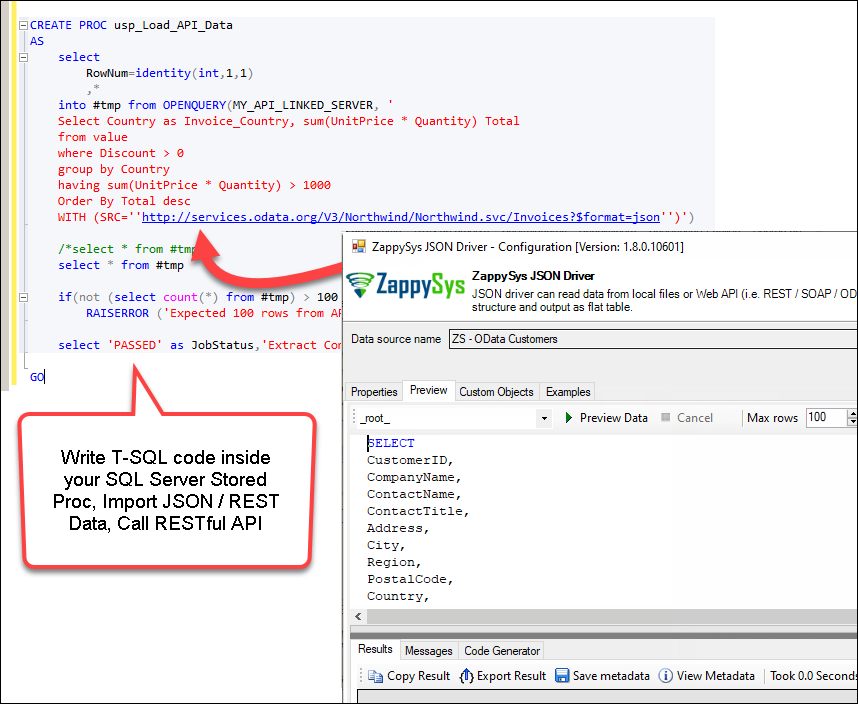
- Write some T-SQL code in your stored procedure like below to import data from JSON / REST Service
Video Tutorial – Read from JSON / XML / REST API in SQL Server (T-SQL code)
If you want to save time and go quick then check out following video tutorial on calling JSON / REST API Service in SQL Server code. Steps The following video will be useful to configure your Linked Server and query REST API. It shows how to configure ODBC DSN, ZappySys Data Gateway Server (Used for Linked Server). To see other use cases of ZappySys Data Gateway click here
[youtube url=”https://www.youtube.com/watch?v=fLx6_C39LOQ”][youtube url=”https://www.youtube.com/watch?v=M_Pm02ZQT8A”]
Requirements
- A first requirement will be to SQL Server Database Engine Installed
- The second requirement will be SSMS installed
- Make sure to have ZappySys ODBC PowerPack installed.
- Another important requirement is the internet connection to connect to REST API information using a URL.
Step-By-Step : Load REST API in SQL Server
In next few sections, you will see step-by-step approach to consume REST API / JSON data in SQL Server using T-SQL code.
Configure ZappySys Data Gateway Service
To call external Drivers (e.g. ZappySys JSON/REST API Driver) in SQL Server we have to use Linked Server feature. We will use ZappySys Data Gateway Service along with SQL Linked Server to call ZappySys Drivers (e.g. JSON / XML API Drivers) using T-SQL Code in Stored Procedures.
Configure Data Gateway User / Port
Now let's look at steps to configure Data Gateway after installation. We will also create a sample data source for ODATA API (i.e. JSON based REST API Service).- Assuming you have installed ZappySys ODBC PowerPack using default options (Which also enables Data Gateway Service)
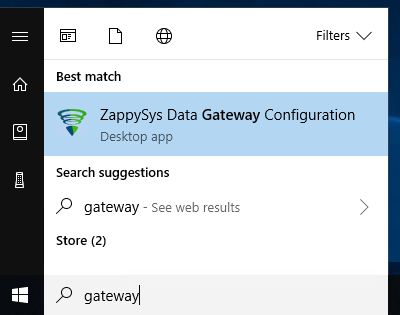
- Search "Gateway" in your start menu and click ZappySys Data Gateway
- First make sure Gateway Service is running (Verify Start icon is disabled)
- Also verify Port on General Tab
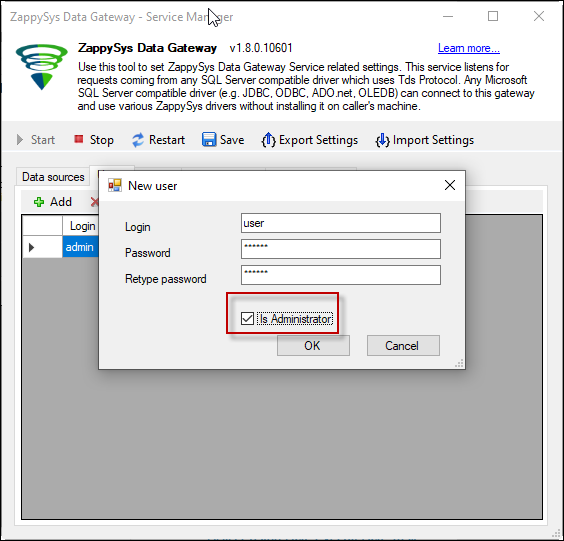
- Now go to Users tab. Click Add icon to add a new user. Check Is admin to give access to all data sources you add in future. If you don't check admin then you have to manually configure user permission for each data source.
Configure Data Source
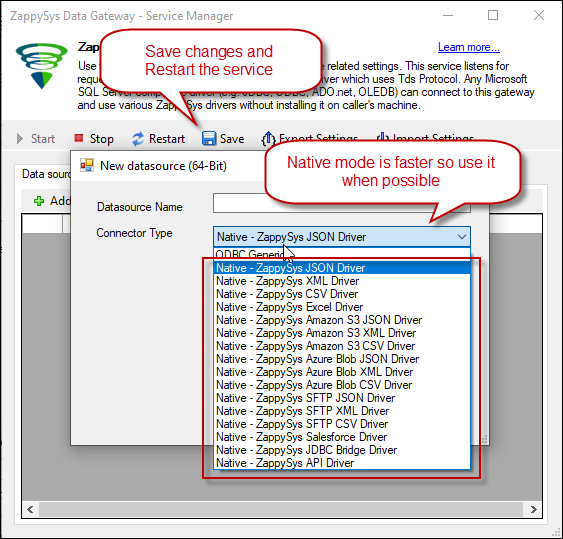
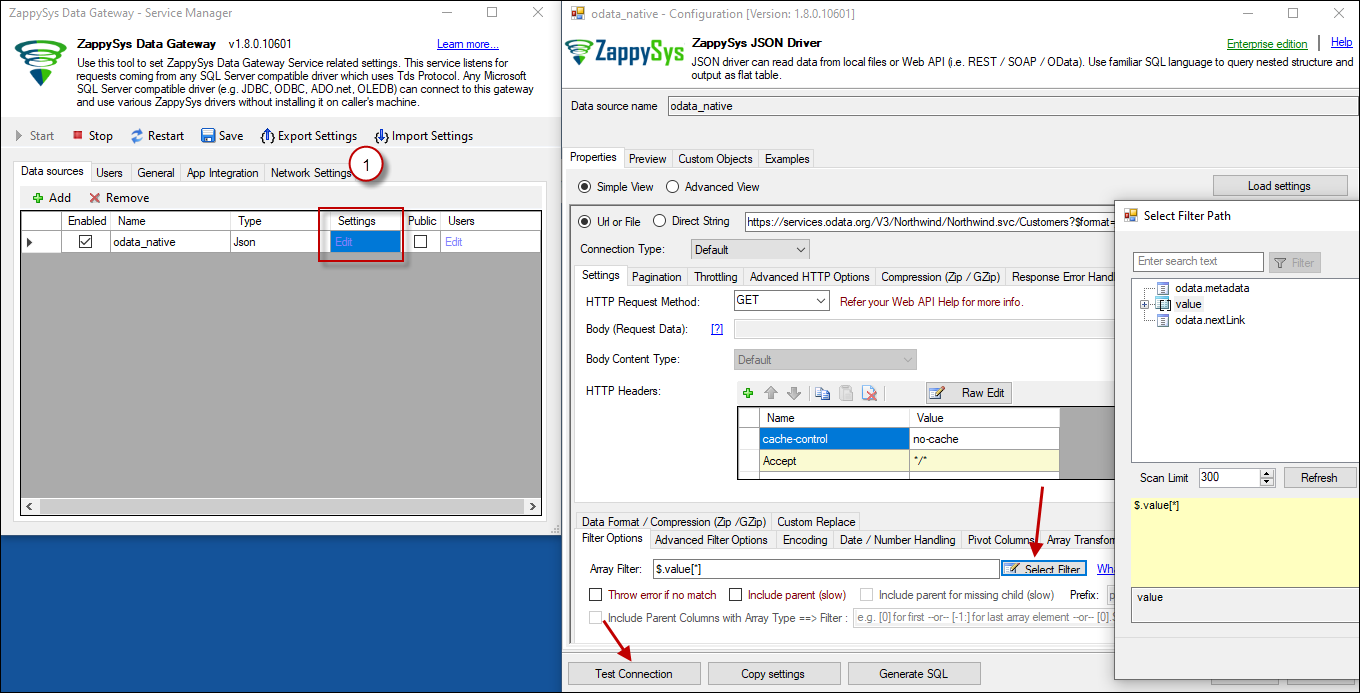
- After user is added, go to Data Sources tab. Click Add icon to create new data source. Select appropriate driver based on your API / File format. You can choose Generic ODBC option to read data from ODBC DSN or use Native Driver option.
NOTE: Whenever possible use native driver option for better performance / security and ease of use.
- Click on "Edit" under Data source and configure as per your need (e.g. Url, Connection, Request Method, Content Type, Body, Pagination etc.). For this demo we are going to pick simple JSON REST API which doesn't need any authentication. Enter following URL.
https://services.odata.org/V3/Northwind/Northwind.svc/Invoices?$format=json
- You can also view response structure and select default hierarchy (i.e. Filter) like below (Select Array Icon) for data extraction.
Test SQL Query / Preview Data
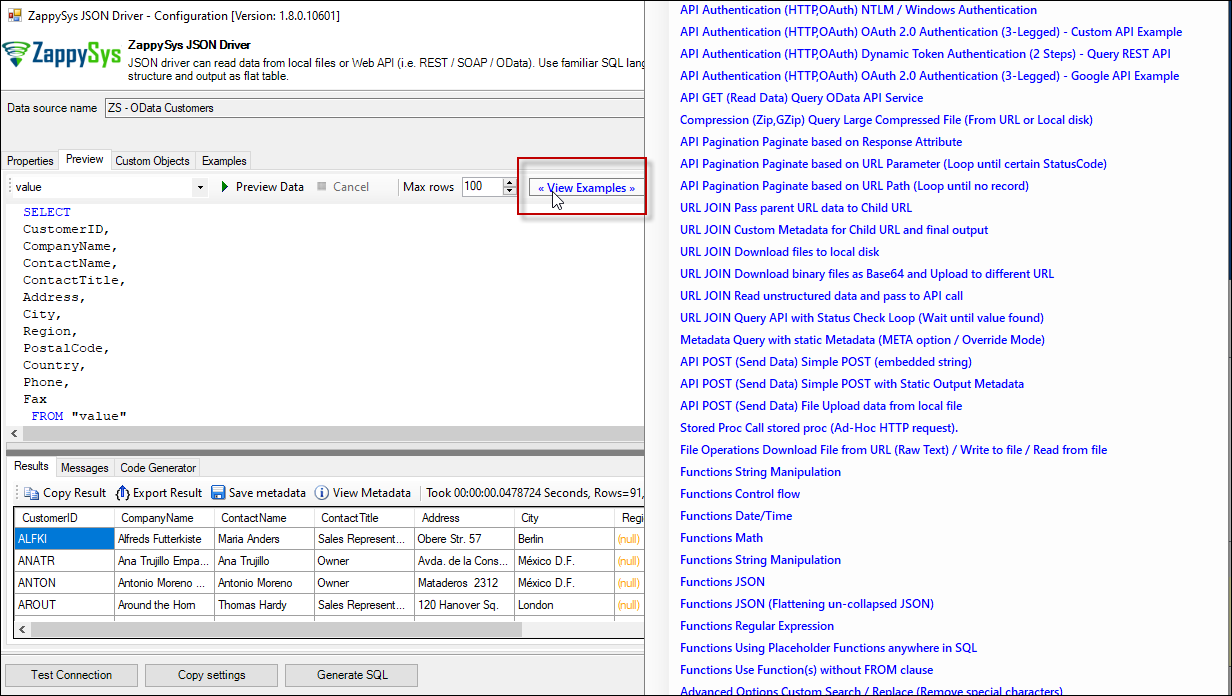
- Now go to Preview Tab. You can click Preview button to execute default query OR Select Table name from dropdown to generate SQL with column names.
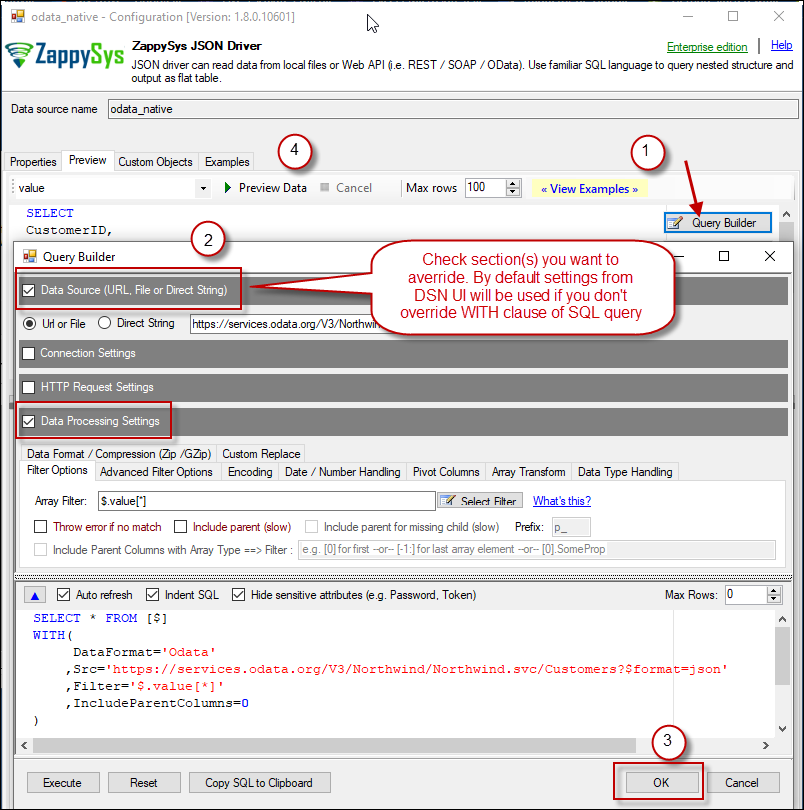
- You can also click Query Builder to generate SQL using different options in WITH clause. ANy setting you specify in WITH clause will override UI settings we applied in previous steps.
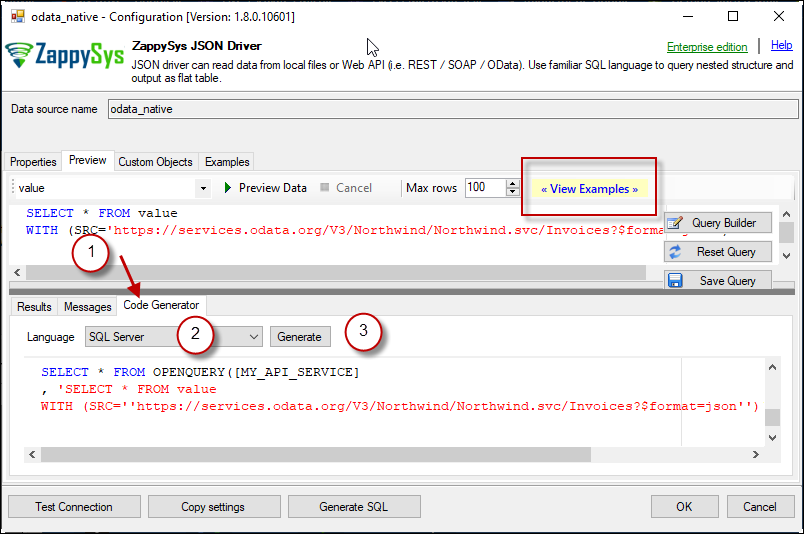
- There is another useful option for code generation. Select your Language and quickly copy code snippet. See below Example of XML Driver Query to call SOAP API.
- Click OK to Close Data Source UI
- Once data source is tested and configured you can click Save button in the Gateway UI toolbar and click Yes for Restart Service.
Why use ZappySys Data Gateway Service?
Gateway Service is useful to call ZappySys driver from any other machine without installing ZappySys driver. For example your Unix server can consume API data by connecting to ZappySys Data Gateway (which can be running on Remote Windows OS). Many times you cannot access remote server but like to Query API data (Google SpreadSheet Use case). To learn more about other use cases click here.
- Unlike other ODBC drivers, our drivers don’t affect SQL Server performance because it’s never loaded in the same SQL Server Process giving you total process isolation.
- ZappySys Data Gateway Service acts like a small SQL Server itself. So any machine or any process can send SQL query to read/write data from API services or JSON files as long as communication happens using TDS Protocol.
- You can connect to ZappySys Data Gateway service using any TDS Protocol compatible driver (e.g. Microsoft native drivers for SQL Server such as ODBC, JDBC, OLEDB, ADO.net) ).
- You can connect from any platform (e.g. Linux, Mac or Windows) using standard SQL Server Driver (many times already installed with OS).
- You don’t have to install ZappySys Driver on the client machine with this approach.
Call REST API in SQL Server (T-SQL Code) using Linked Server
- Assuming you have installed SQL Server and SSMS. If not then get both for FREE from here: Get SQL Server Express and Get SSMS
- Open SSMS and connect to SQL Server.
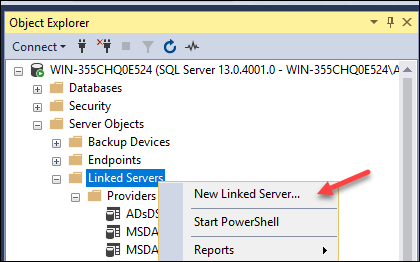
- Go to Root > Server Objects > Linked Servers node. Right click and click New Linked Server...
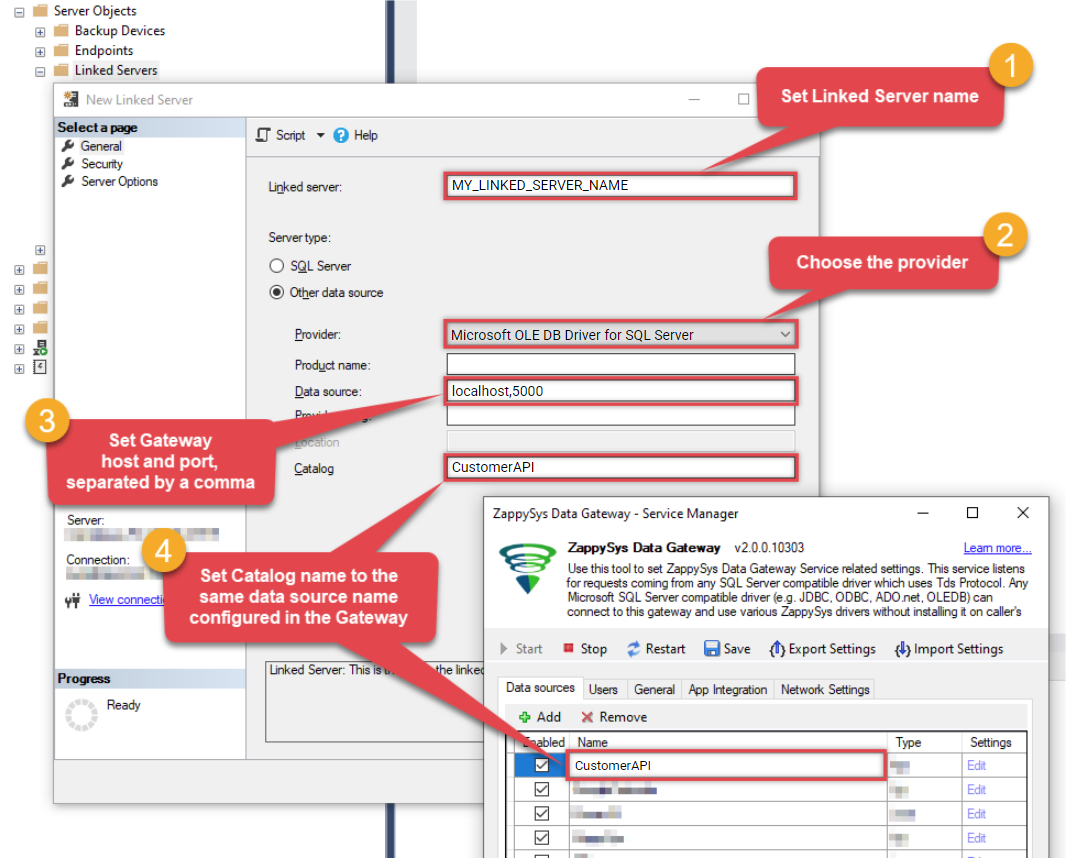
- Now enter linked server name, select Provider as SQL Native Client
- Enter data source as GatewayServerName,PORT_NUMBER where server name is where ZappySys Gateway is running (Can be same as SQL Server machine or remote machine). Default PORT_NUMBER is 5000 but confirm on Data gateway > General tab incase its different.
- Enter Catalog Name. This must match name from Data gateway Data sources grid > Name column
INFO:
- For SQL Server 2012, 2014, 2016, 2017, and 2019, use the SQL Server Native Client 11.0 as the Provider.
- For SQL Server 2022 or higher, use the Microsoft OLE DB Driver for SQL Server as the Provider.
- Click on Security Tab and select last option "Be made using this security context". Enter your gateway user account here.
-
Optional: Under the Server Options Tab, Enable RPC and RPC Out and Disable Promotion of Distributed Transactions(MSDTC).
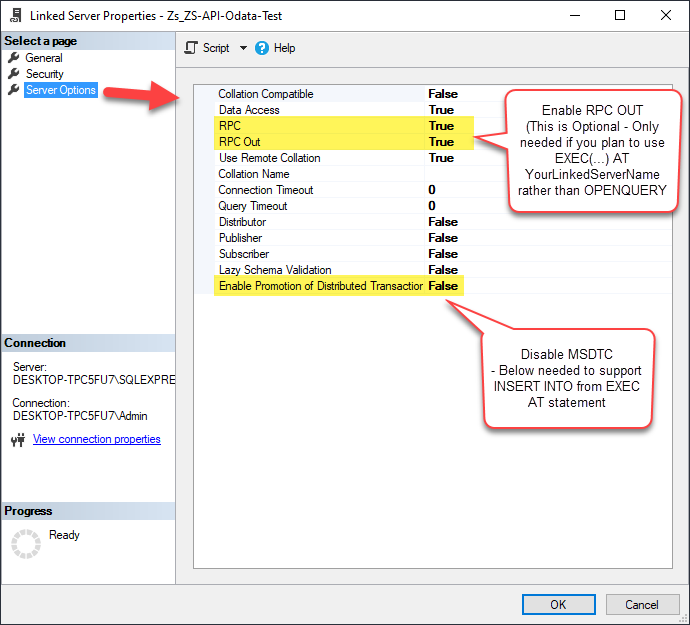
RPC and MSDTC Settings
You need to enable RPC Out if you plan to use EXEC(...) AT [MY_LINKED_SERVER_NAME] rather than OPENQUERY.
If don't enabled it, you will encounter the 'Server "MY_LINKED_SERVER_NAME" is not configured for RPC' error.Query Example:
EXEC('Select * from Products') AT [MY_LINKED_SERVER_NAME]
If you plan to use 'INSERT INTO...EXEC(....) AT [MY_LINKED_SERVER_NAME]' in that case you need to Disable Promotion of Distributed Transactions(MSDTC).
If don't disabled it, you will encounter the 'The operation could not be performed because OLE DB provider "SQLNCLI11/MSOLEDBSQL" for linked server "MY_LINKED_SERVER_NAME" was unable to begin a distributed transaction.' error.Query Example:
Insert Into dbo.Products
EXEC('Select * from Products') AT [MY_LINKED_SERVER_NAME]
- Click OK to save Linked Server
- In SSMS execute below SQL query to test your connectivity.
SELECT * FROM OPENQUERY( MY_LINKED_SERVER_NAME, 'SELECT * FROM $')
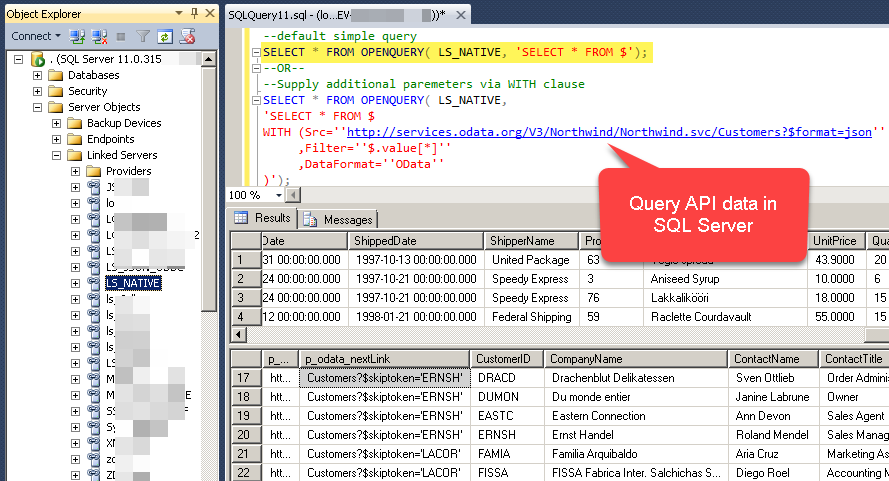
--OR--SELECT * FROM OPENQUERY( MY_LINKED_SERVER_NAME, 'SELECT * FROM $ WITH (Src=''https://services.odata.org/V3/Northwind/Northwind.svc/Customers?$format=json'' ,Filter=''$.value[*]'' ,DataFormat=''OData'' )');
- Here is the preview after you run some REST API query in SQL Server. Notice that you can override default configuration by supplying many parameters in WITH clause (second query example in screenshot).
- You can wrap your queries inside View or wrap inside Stored procedure to parameterize. Here is an example of create view which calls REST API queries. Below View can be consumed like a normal table from any Tools or Programming Language which supports connectivity to SQL Server.
CREATE VIEW dbo.vwApiInvoices
AS
/*Call REST API inside SQL Server View*/
SELECT * FROM OPENQUERY( LS ,
'SELECT * FROM $
WITH (Src=''https://services.odata.org/V3/Northwind/Northwind.svc/Invoices?$format=json''
	 ,Filter=''$.value[*]''
	 ,DataFormat=''OData''
)');

GO
- Notice in above approach if you parameterize Stored Procedure then check this article to understand Dynamic Metadata.
- That's it. We are now ready to move forward with more interesting things in next section.
Optionally, use these lines of code to create the linked server using T-SQL instead of using the UI:
|
1 2 3 4 5 6 7 8 9 10 11 12 13 14 15 16 17 18 19 20 21 22 23 24 25 26 27 28 29 30 31 32 33 34 35 |
/* Add Linked Server called RESTAPI-SV (change if needed) to access REST API via Data Gateway - JSON/REST Driver */ /* customer_api is just an example data source name - created on Data gateway UI */ EXEC master.dbo.sp_addlinkedserver @server = N'RESTAPI-SV', @srvproduct=N'', --- For MSSQL 2012, 2014, 2016, 2017, and 2019 use below (SQL Server Native Client 11.0)--- @provider=N'SQLNCLI11', --- For MSSQL 2022 or higher use below (Microsoft OLE DB Driver for SQL Server)--- --- @provider=N'MSOLEDBSQL', @datasrc=N'localhost,5000', @catalog=N'customer_api' /* Add login for Linked Server - This is same user account and password which you define on Users tab on ZappySys Data Gateway Config Tool */ EXEC master.dbo.sp_addlinkedsrvlogin @rmtsrvname=N'RESTAPI-SV', @useself=N'False', @locallogin=NULL, @rmtuser=N'admin', @rmtpassword='adminP@ss!23' GO --//OTHER IMPORTANT OPTIONS EXEC master.dbo.sp_serveroption @server=N'RESTAPI-SV', @optname=N'rpc', @optvalue=N'true' GO EXEC master.dbo.sp_serveroption @server=N'RESTAPI-SV', @optname=N'rpc out', @optvalue=N'true' GO --Increase default timeout for long running query (default is 600 sec) --EXEC master.dbo.sp_serveroption @server=N'RESTAPI-SV', @optname=N'query timeout', @optvalue=N'1200' GO --Below needed to support EXEC + INSERT (dynamic query) EXEC master.dbo.sp_serveroption @server=N'RESTAPI-SV', @optname=N'remote proc transaction promotion', @optvalue=N'false' GO |
- Now it is time to create some queries. Let’s run a simple query to REST API:
1select * from OPENQUERY([RESTAPI-SV] , 'SELECT * FROM value' ) - The query will show all the data from REST API:
- Also, the following query can be used when you need to use filters (Notice that we escaped single tick with double tick)
1select * from OPENQUERY([RESTAPI-SV] , 'SELECT * FROM value where ContactTitle=''Owner''' )
- Store the data in a temporary table using the following query:
1select * INTO #tmpcustomer from OPENQUERY([RESTAPI-SV] , 'SELECT * FROM value' )
- And now you can query and use the SQL table:
1SELECT * FROM #tmpcustomer t
- You can also check the metadata, values and odata_next link:
1select * from OPENQUERY([RESTAPI-SV] , 'SELECT * FROM $' )
Call REST API in SQL Server (T-SQL Code) using Polybase (For SQL 2019 or higher)
- Assuming you have installed SQL Server, SSMS and Polybase. If not then get both SQL Server and SSMS for FREE from here: Get SQL Server Express and Get SSMS.
- Open SSMS and connect to SQL Server.
- After installing Polybase make sure you have an SSIS Catalog created. If you don't, create it in SSMS:
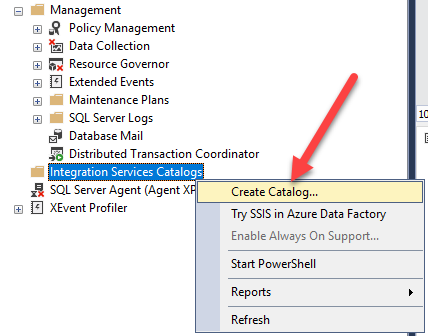
- Configure the required settings:
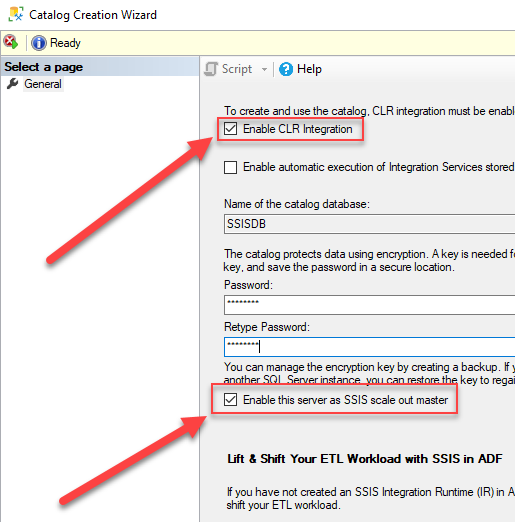
- Also, make sure the SQL Server is configured to support TCP/IP protocol:

- (optional) If in later steps you get a Login error, try connecting to your database using SQL Server Authentication instead of Windows Authentication.
- Now, in SSMS open the new query window and select the desired database in which you want to call an external ODBC data source.
- First, we need to create the MASTER KEY in the database where you are trying to create the External Data Source
--1
CREATE MASTER KEY ENCRYPTION BY PASSWORD = 'My$tr0ngP@$$w0rd';
- Now we need to create a database scoped credential for accessing the ODBC source in the database.
--2
CREATE DATABASE SCOPED CREDENTIAL SqlServerCredentials WITH IDENTITY = 'username', Secret = 'password';
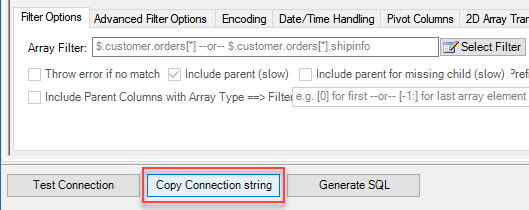
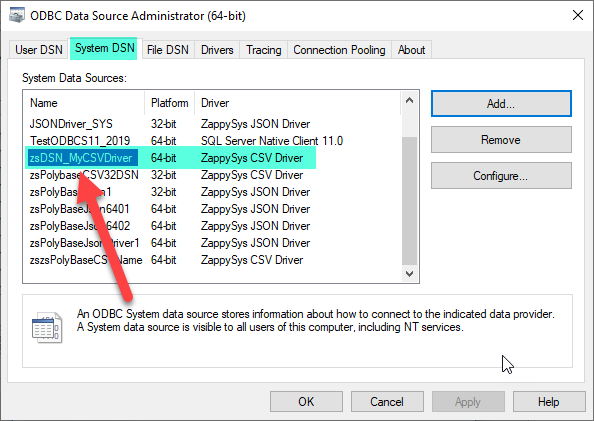
- Now go to our configured ZS Driver data source which one we created using Gateway or ODBC DSN Data Source and copy the connection string from there.
- Now Using that ZS Driver connection string and credentials we need to create the external data source.
CREATE EXTERNAL DATA SOURCE external_data_source_name
WITH (LOCATION = odbc://<ODBC server address>[:<port>],
CONNECTION_OPTIONS = '<zs-driver-conection-string>;
ServerNode = <name of server  address>:<Port>',
CREDENTIAL = <credential_name> );
So that our query looks like this, we need to use the same credentials name which one we created.--3 CREATE EXTERNAL DATA SOURCE [ZappySys_Ext_CSV_Data_source] WITH (LOCATION = N'ODBC://127.0.0.1:5000', CREDENTIAL = [SqlServerCredentials], CONNECTION_OPTIONS= 'DRIVER={ZappySys CSV Driver};DataPath='E:\zsTemp\Mydata.csv'')Or If you have created the ODBC System DSN Data Source We can pass the DSN Name also in the query instead of Zs driver connection string, in that case, we need to query like below to create the external data source--3 CREATE EXTERNAL DATA SOURCE [ZappySys_Ext_CSV_Data_source] WITH (LOCATION = N'ODBC://127.0.0.1:5000', CREDENTIAL = [SqlServerCredentials], CONNECTION_OPTIONS= 'DSN=zsDSN_MyCSVDriver')
- Furthermore, we need to create the External Data Table for that external data source.
--4
CREATE EXTERNAL TABLE extTblPersons (
ID bigint NULL,
Name nvarchar(250) NULL
)
WITH (
LOCATION='_root_',
DATA_SOURCE = [ZappySys_Ext_CSV_Data_source] ,
)
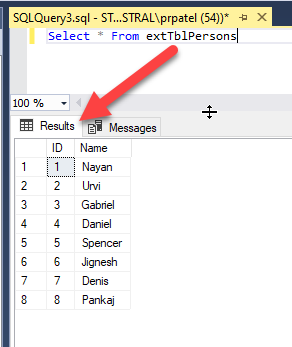
For Location value, we need to pass the table name, from the ZS Driver Preview Tab we can download get the table name. - That's it now execute the query using that external data table, it will retrieve the data from the external ODBC Data source. So here it will read the data from the Mydata.csv csv file and load the query data in the SQL Server.
--5
Select * From extTblPersons
How to use Dynamic SQL with parameters
So far we saw how to use OPENQUERY statement with a static SQL query. Now let’s look at the dynamic Query approach to Read REST API data and Load into SQL Table. For Dynamic SQL you have to use EXEC rather than OPENQUERY.
|
1 2 3 4 5 6 7 8 9 10 11 12 13 14 |
--MSDTC option must be off for INSERT + EXEC pattern (Find Linked Server Properties | Server Options | Enable Promotion of Distributed Transaction - [Set to false] --OR-- run via code like below --EXEC master.dbo.sp_serveroption 'MyLinkedServer', 'remote proc transaction promotion', false; declare @tbl nvarchar(100) = 'value' --Just output the query data (no insert) EXEC('select col1,col2 from ' + @tbl) AT [MyLinkedServer] --Load into table (dont output) insert into _tmp_invoices(col1,col2) EXEC('select col1,col2 from ' + @tbl) AT [MyLinkedServer] --We recommend using column names in the list rather than * (all) to avoid metdata issue --Use Data Source > Preview UI > Table dropdown to generate column names |
How to parameterize API calls in SQL Server
Now you know how to write simple SQL queries to fetch data from API. In real world you will have a need to pass parameters to your API. You can pass parameters to your API following ways. Notice that how we have escaped single tick. In this example we have passed Header, Body and URL using Dynamic approach. In your case you may need to pass only one way (e.g. Pass parameter via URL only)
|
1 2 3 4 5 6 7 8 9 10 11 12 13 14 15 16 17 18 |
declare @url varchar(100)='http://httpbin.org/post' declare @body varchar(100)='{id:1,notes:"Line1\r\nLine2"}' declare @header varchar(100)='Content-Type:text/plain||x-hdr1:AAA' declare @sql varchar(1000) declare @sqlForLs varchar(1000) = 'SELECT * FROM $ WITH ( SRC='''+ replace(@url,'''', '''''') +''' , METHOD=''POST'' , HEADER='''+ replace(@header,'''', '''''') +''' , BODY='''+ replace(@body,'''', '''''') +''' )' set @sql = 'SELECT * into #tmp from OPENQUERY(LS,''' + replace(@sqlForLs,'''', '''''') + ''')' print @sql EXECUTE(@sql); |
How to Import JSON File to SQL Server (Single or Multiple)
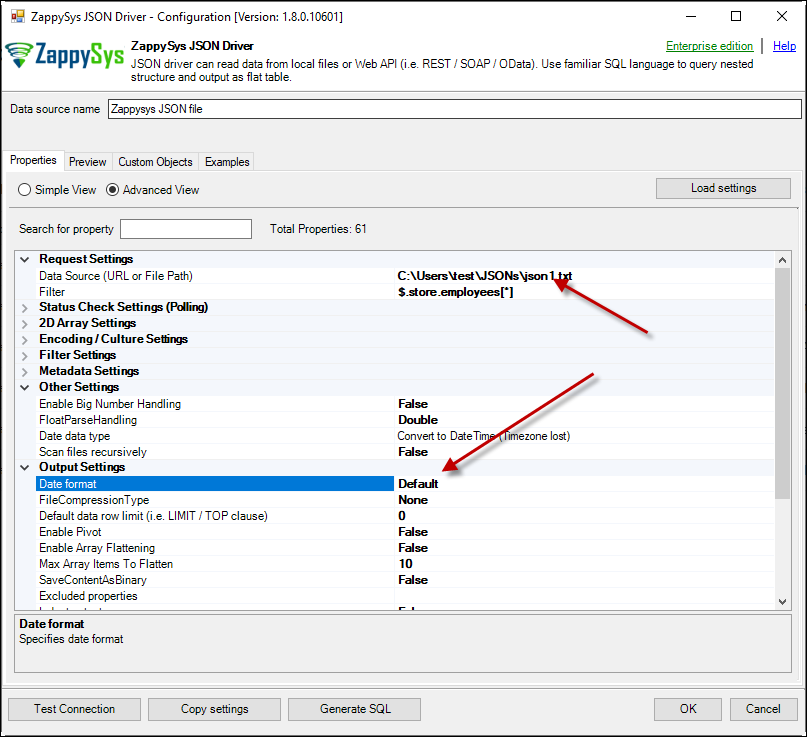
Not only you can query REST API in SQL Server but also you can query a JSON file. The steps are all the same except in one step. Instead of specifying a URL in the ZappySys ODBC driver (see Add the ZappySys driver in the Windows ODBC Administrator section, step 7) and specify the file path and set the format to Default:
If you dont want to hard code file name in the DSN then you can also use following Query syntax to specify URL or File Path inside SQL Query
|
1 |
select * into #tmp from OPENQUERY([JSON-SV], 'SELECT * FROM value WITH (SRC=''C:\test\cust2012.json'')' ) |
How to load multiple JSON files into SQL Server Table
Let’s say that you have multiple JSON files in a folder (similar structure). The file names are customer_2012.json, customer_2013.json, customer_2014.json and they are all in the same folder. Is it possible to query all of them in SQL Server without any extra looping code?
The answer is yes. You just need to create the linked server to a single JSON file and then run this query (JSON-SV is the name of the linked server):
|
1 |
select * into #tmp from OPENQUERY([JSON-SV], 'SELECT * FROM value WITH (SRC=''C:\test\cust*.json'')' ) |
We are just using this code:
|
1 |
(SRC=''C:\test\cust*.json'')' ) |
SRC means source and it will search all the files with json extension starting with the word “cust”.
How to read and parse JSON string in T-SQL
In SQL Server 2016 and later, it is possible to read JSON data. However in older versions, it was not possible. The following example will show how to parse JSON data using a Linked Server named JSON-SV.
-
- We will first store JSON values in a SQL Server table in a column named MyData:
12345678910create table #tmp(MyData nvarchar(max))insert into #tmp values('{rows:[{id:1, name:"Sam''s Club"},{id:2, name:"Walmart"},{id:3, name: "Facebook"}]}') - We just created a temporary table named tmp and in the column MyData, we stored JSON values. In the next step, we will store the values of the temporary table in a variable named json and store and parse the values en the variable sql:
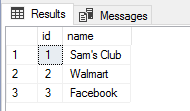
12345678910declare @json nvarchar(max)declare @sql nvarchar(max)select @json = MyData from #tmpset @sql='select * from OPENQUERY([JSON-SV] , ''SELECT * FROM rows WITH(DATA=@'''''+ Replace(@json ,'''','''''''''') +''''')'' );'print(@sql)execute(@sql) - If everything is OK, you will be able to see the JSON values parsed in a nice table format:
- We will first store JSON values in a SQL Server table in a column named MyData:
How to Call REST API from a SQL Stored Procedure
How can we call REST API using a stored procedure? We need to use dynamic queries to pass parameters. The following example will run a query where the city is specified in a variable.
- We will create the stored procedure first:
123456CREATE PROCEDURE getcity@City NVARCHAR(50)ASDECLARE @sql NVARCHAR(500)='select * from OPENQUERY([RESTAPI-SV] ,''SELECT * FROM value where City=''''' + @City + ''''''')'EXECUTE(@sql) - The stored procedure name is getcity. We will call the RESTAPI-SV that calls the REST API and pass the parameter City in the query. We finally execute the query stored in the variable using the Execute statement.
- Finally, we just invoke the stored procedure:
The query will display all the data with the city equal to Berlin.1EXECUTE getcity @City = N'Berlin'
How to POST data to REST API in SQL Server (Send data to URL)
The following example shows how to POST data to API service where data is coming from an embedded string in SQL Server using a Linked Server. I am assuming that you already created a linked server following previews steps explained before.
POST data to URL (embedded Body)
In SSMS run this query:
|
1 2 3 4 5 6 7 8 |
select * from OPENQUERY([RESTAPI-SV] , 'SELECT * FROM $ WITH ( METHOD=''POST'' ,HEADER=''Content-Type: application/json || x-hdr1: AAA'' ,SRC=''http://httpbin.org/post'' ,BODY=''{ id:2, notes2:"Line1\r\nLine2" }'' )' ) |
The query will invoke the Linked Server for REST API, created before and use the POST Method with the embedded strings.
POST data to URL (read body from file)
Here is an example to POST data to URL where Body is read from Local file. Notice two additional attributes in below. We set IsMultiPart=true and also Body has @ symbol before file path.
|
1 2 3 4 5 6 7 8 9 |
select * from OPENQUERY([RESTAPI-SV] , 'SELECT * FROM $ WITH ( METHOD=''POST'' ,HEADER=''Content-Type: application/json || x-hdr1: AAA'' ,SRC=''http://httpbin.org/post'' ,BODY=''@c:\data\api_call_body.json'' ,IsMultiPart='True' )' ) |
Avoiding errors with POST / PUT / DELETE requests to create / modify /delete data
There will be a time you may get error when you issue POST requests because same request sent multiple times and duplicate records got created. To avoid such situation refer to this article (Read Handling POST request section)
Pagination Concepts for REST API / SOAP XML in SQL Server
Paginate by Response Attribute
This example shows how to paginate API calls where you need to paginate until the last page detected. In this example, next page is indicated by some attribute called nextlink (found in response). If this attribute is missing or null then it stops fetching the next page.SELECT * FROM $ WITH( SRC=@'https://zappysys.com/downloads/files/test/pagination_nextlink_inarray_1.json' ,NextUrlAttributeOrExpr = '$.nextlink' --keep reading until this attribute is missing. If attribute name contains dot then use brackets like this $.['my.attr.name'] )
Paginate by URL Parameter (Loop until certain StatusCode)
This example shows how to paginate API calls where you need to pass page number via URL. The driver keeps incrementing page number and calls next URL until the last page detected (401 error). There are few ways to indicate the last page (e.g. By status code, By row count, By response size). If you don't specify end detection then it will use the default (i.e. No records found).SELECT * FROM $ WITH ( SRC=@'https://zappysys.com/downloads/files/test/page-xml.aspx?page=1&mode=DetectBasedOnResponseStatusCode' ,PagingMode='ByUrlParameter' ,PagingByUrlAttributeName='page' ,PagingByUrlEndStrategy='DetectBasedOnResponseStatusCode' ,PagingByUrlCheckResponseStatusCode=401 ,IncrementBy=1 )
Paginate by URL Path (Loop until no record)
This example shows how to paginate API calls where you need to pass page number via URL Path. The driver keeps incrementing page number and calls next URL until the last page is detected. There are few ways to indicate the last page (e.g. By status code, By row count, By response size). If you don't specify end detection then it will use the default (i.e. No records found).SELECT * FROM $ WITH ( SRC=@'https://zappysys.com/downloads/files/test/cust-<%page%>.xml' ,PagingMode='ByUrlPath' ,PagingByUrlAttributeName='<%page%>' ,PagingByUrlEndStrategy='DetectBasedOnRecordCount' ,IncrementBy=1 )
Paginate by Header Link (RFC 5988)
API like GitHub / Wordpress use Next link in Headers (RFC 5988)SELECT * FROM $ LIMIT 25 WITH( Src='https://wordpress.org/news/wp-json/wp/v2/categories?per_page=10' ,PagingMode='ByResponseHeaderRfc5988' ,WaitTimeMs='200' --//wait 200 ms after each request )
Error Handling for REST API / SOAP XML in SQL Server
METHOD 1 - Using Error Handling Options
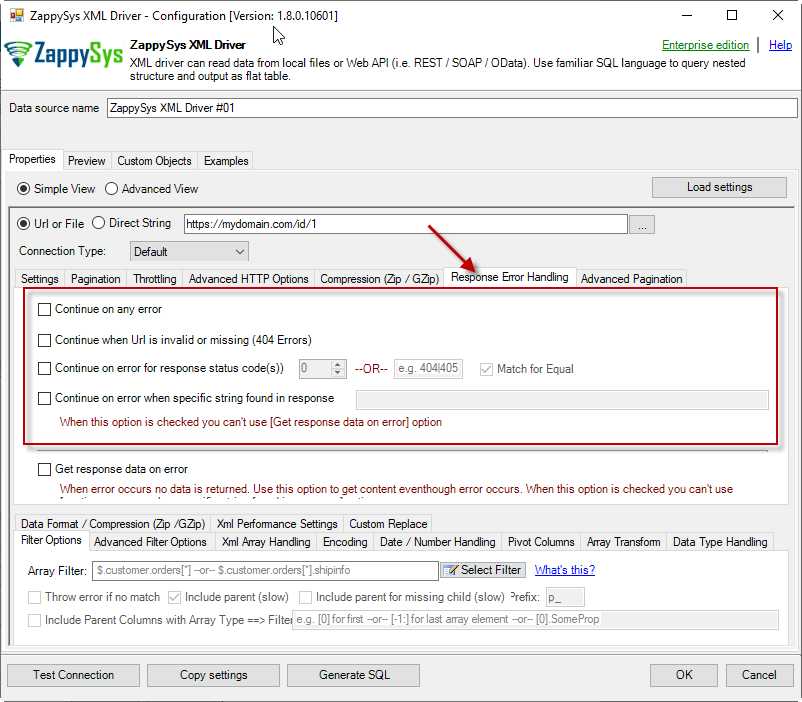
When to use?
You may want to use them when your source is a resource located on the Internet; e.g. a file on a website, a file on an FTP server or just a plain API HTTP response. By default, when a remote server returns an error, data retrieval is stopped, an error is raised and no data is given back to you. This might not be always desirable.Scenario 1
Imagine a scenario, that there is a web server which each day at 12 AM releases a new JSON file with that day's date as filename, e.g. http://www.some-server.com/data/2018-06-20.json. And, of course, you want to download it and use it daily in your Power BI report. But you have a problem: Power BI report data sources are refreshed each hour and you may get HTTP 404 status code (no file was found) when a file is not released yet. Which consequentially means other data sources won't be updated as well and you will see old and cached data on the report. That's where you could use Continue on any error or Continue when Url is invalid or missing (404 Errors) to avoid an error being raised and let other data sources to be updated.Scenario 2
Another scenario is when you expect a web server to raise some kind of HTTP error when accessing a URL. You don't want ODBC Data Source to raise an error but instead, you want to get response data. That's where you can use Continue on any error or alike together with Get response data on error to continue on an error and get the data: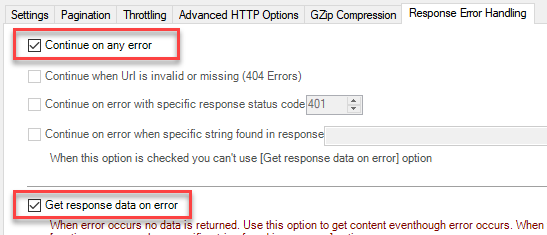
METHOD 2 - Using Connection [Retry Settings]
Another scenario you may run into is a buggy web server. You ask it to give you some file or data and it, like a snotty kid, just doesn't give it to you! You have to ask twice or thrice before it does its job. If that's the case, you have to retry HTTP requests using Connection: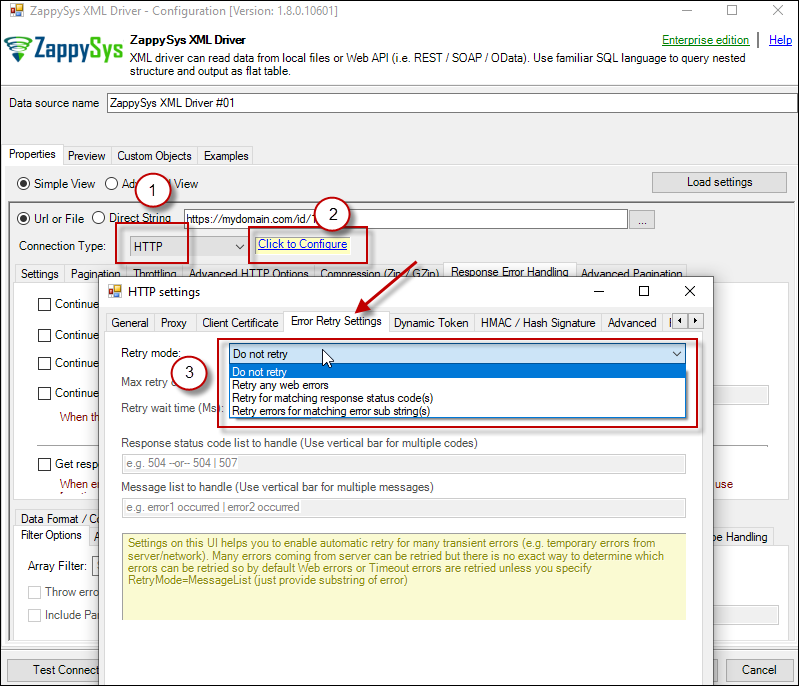
OAuth / HTTP Connection in SQL Server
- HTTP
- OAuth
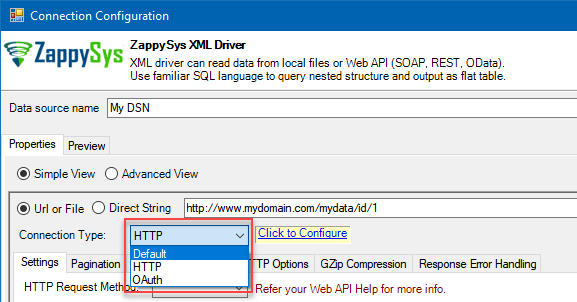
HTTP Connection
- SOAP WSS (when accessing a SOAP WebService)
- Static Token / API Key (when need to pass an API key in HTTP header)
- Dynamic Token (same as Static Token method except that each time you need to log in and retrieve a fresh API key)
- JWT Token (As per RFC 7519)
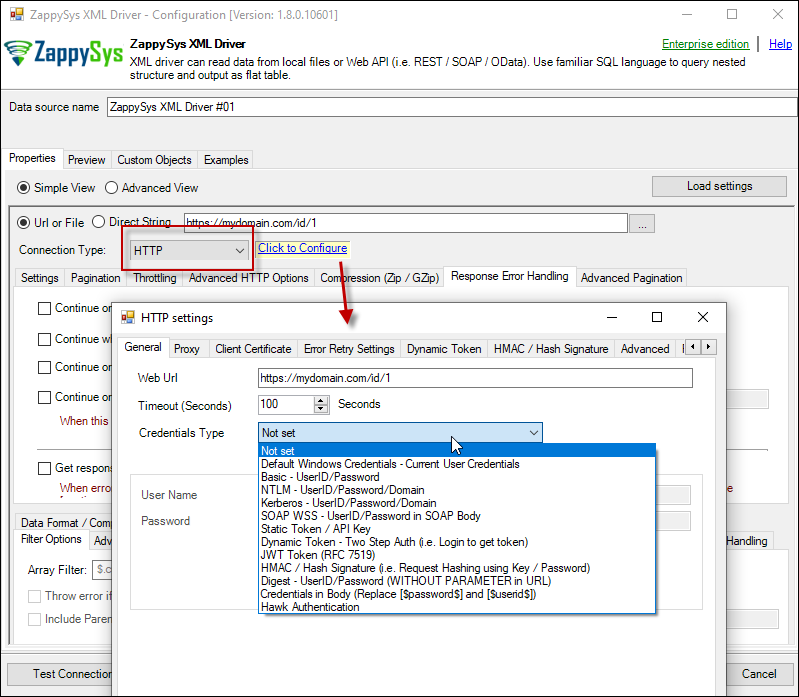
OAuth
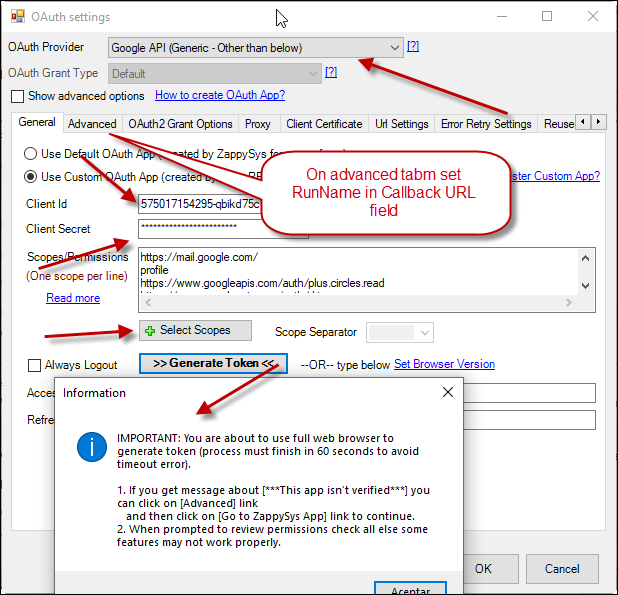
If you are trying to access REST API resource, it is a huge chance, you will need to use OAuth Connection. Read this article to understand how OAuth authentication and authorization works and how to use it (article originally was written for SSIS PowerPack, but the concepts and UI stay the same):https://zappysys.com/blog/rest-api-authentication-with-oauth-2-0-using-ssis/
Performance Tips for REST API / XML SOAP Calls
Use Server-side filtering if possible in URL or Body Parameters
Many API supports filtering your data by URL parameters or via Body. Whenever possible try to use such features. Here is an example of odata API, In the below query the first query is faster than the second query because in the first query we filter at the server.SELECT * FROM value WITH( Src='https://services.odata.org/V3/Northwind/Northwind.svc/Customers?$format=json&$filter=Country eq ''USA''' ,DataFormat='Odata' ) -- Slow query - Client-side filtering SELECT * FROM value WHERE Country ='USA' WITH( Src='https://services.odata.org/V3/Northwind/Northwind.svc/Customers?$format=json' ,DataFormat='Odata' )
Avoid Special features in SQL Query (e.g. WHERE, Group By, Order By)
ZappySys API engine triggers client-side processing if special features are used in Query. Following SQL Features will trigger Client-Side processing which is several times slower than server-side processing. So always try to use simple query (Select col1, col2 .... from mytable )- WHERE Clause
- GROUP BY Clause
- HAVING Clause
- ORDER BY
- FUNCTIONS (e.g. Math, String, DateTime, Regex... )
Consider using pre-generated Metadata / Cache File
Use META option in WITH Clause to use static metadata (Pre-Generated)There are two more options to speedup query processing time. Check this article for details.-
select * from value WITH( meta='c:\temp\meta.txt' ) --OR-- select * from value WITH( meta='my-meta-name' ) --OR-- select * from value WITH( meta='[ {"Name": "col1", "Type": "String", Length: 100}, {"Name": "col2", "Type": "Int32"} ...... ]' ) - Enable Data Caching Options (Found on Property Grid > Advanced Mode Only )
Consider using Metadata / Data Caching Option
ZappySys API drivers support Caching Metadata and Data rows to speed up query processing. If your data doesn't change often then you can enable this option to speed up processing significantly. Check this article for details how to enable Data cache / metadata cache feature for datasource level or query level. To define cache option at query level you can use like below.SELECT * FROM $ WITH ( SRC='https://myhost.com/some-api' ,CachingMode='All' --cache metadata and data rows both ,CacheStorage='File' --or Memory ,CacheFileLocation='c:\temp\myquery.cache' ,CacheEntryTtl=300 --cache for 300 seconds )
Use --FAST Option to enable Stream Mode
ZappySys JSON / XML drivers support --FAST suffix for Filter. By using this suffix after Filter driver enables Stream Mode, Read this article to understand how this works.SELECT * FROM $ LIMIT 10 --//add this just to test how fast you can get 10 rows WITH( Filter='$.LargeArray[*]--FAST' --//Adding --FAST option turn on STREAM mode (large files) ,SRC='https://zappysys.com/downloads/files/test/large_file_100k_largearray_prop.json.gz' --,SRC='c:\data\large_file.json.gz' ,IncludeParentColumns='False' --//This Must be OFF for STREAM mode (read very large files) ,FileCompressionType='GZip' --Zip or None (Zip format only available for Local files) )
Other Considerations for Calling Web API in SQL Server
API Limit / Throttling
While calling public API or other external web services one important aspect you have to check, how many requests are allowed by your API. Especially when you use API pagination options to pull many records you have to slow down based on API limits. For example, your API may allow you only 5 requests per second. Use Throttling Tab on Driver UI to set delay after each request.2D Array Transformation
If you are using JSON or XML API Driver then possible you may have to transform your data using 2D array transformation feature. Check this link for more information.Calling XML SOAP Web Service in SQL Server
So far we have looked at examples to consume data using JSON driver. Now let’s look at an example, to call XML SOAP Web Service.
What is SOAP Web Service?
If you are new to SOAP Web Service sometimes referred as XML Web Service then please read some concept about SOAP Web service standard from this link There are two important aspects in SOAP Web service.- Getting WSDL file or URL
- Knowing exact Web Service URL
What is WSDL
In very simple term WSDL (often pronounced as whiz-dull) is nothing but a document which describes Service metadata (e.g. Functions you can call, Request parameters, response structure etc). Some service simply give you WSDL as xml file you can download on local machine and then analyze or sometimes you may get direct URL (e.g. http://api.mycompany.com/hr-soap-service/?wsdl )Example SQL Query for SOAP API call using ZappySys XML Driver
Here is an example SQL query you can write to call SOAP API. If you not sure about many details then check next few sections on how to use XML Driver User Interface to build desired SQL query to POST data to XML SOAP Web Service without any coding.SELECT * FROM $
WITH(
Src='http://www.holidaywebservice.com/HolidayService_v2/HolidayService2.asmx'
,DataConnectionType='HTTP'
,CredentialType='Basic' --OR SoapWss
,SoapWssPasswordType='PasswordText'
,UserName='myuser'
,Password='pass$$w123'
,Filter='$.soap:Envelope.soap:Body.GetHolidaysAvailableResponse.GetHolidaysAvailableResult.HolidayCode[*]'
,ElementsToTreatAsArray='HolidayCode'
,RequestMethod='POST'
,Header='Content-Type: text/xml;charset=UTF-8 || SOAPAction: "http://www.holidaywebservice.com/HolidayService_v2/GetHolidaysAvailable"'
,RequestData='
<soapenv:Envelope xmlns:soapenv="http://schemas.xmlsoap.org/soap/envelope/" xmlns:hol="http://www.holidaywebservice.com/HolidayService_v2/">
<soapenv:Header/>
<soapenv:Body>
<hol:GetHolidaysAvailable>
<!--type: Country - enumeration: [Canada,GreatBritain,IrelandNorthern,IrelandRepublicOf,Scotland,UnitedStates]-->
<hol:countryCode>UnitedStates</hol:countryCode>
</hol:GetHolidaysAvailable>
</soapenv:Body>
</soapenv:Envelope>'
)
Now let's look at steps to create SQL query to call SOAP API. Later we will see how to generate code for your desired programming language (e.g. C# or SQL Server)
Video Tutorial - Introduction to SOAP Web Service and SoapUI tool
Before we dive into details about calling SOAP API using ZappySys XML Driver, lets first understand what is SOAP API and how to create SOAP requests using SoapUI tool. You will learn more about this process in the later section. The video contains some fragment about using SOAP API in SSIS but just ignore that part because we will be calling Soap API using ZappySys ODBC Driver rather than SSIS Components.Using SoapUI to test SOAP API call / Create Request Body XML
Assuming you have downloaded and installed SoapUI from here, now we are ready to use WSDL for your SOAP Web Service Calls. If you do not have WSDL file or URL handy then contact your API provider (sometimes you just have to add ?wsdl at the end of your Service URL to get WSDL so try that. Example: http://mycompany/myservice?wsdl ). If you don't know what is WSDL then in short, WSDL is Web service Description Language (i.e. XML file which describes your SOAP Service). WSDL helps to craft SOAP API request Body for ZappySys XML Driver. So Let's get started.- Open SoapUI and click SOAP button to create new SOAP Project
- Enter WSDL URL or File Path of WSDLFor example WSDL for our sample service can be accessed via this URL
http://www.dneonline.com/calculator.asmx?wsdl
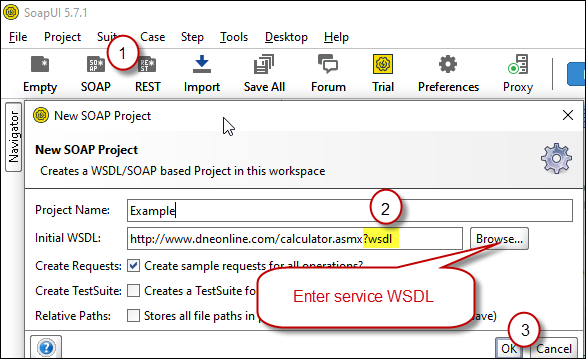 Create new SOAP API Project in SoapUI tool for SOAP API Testing
 - Once WSDL is loaded you will see possible operations you can call for your SOAP Web Service.
- If your web service requires credentials then you have to configure it. There are two common credential types for public services (SOAP WSS or BASIC )
-
To use SOAP WSS Credentials select request node and enter UserId, Password, and WSS-PasswordType (PasswordText or PasswordHash)
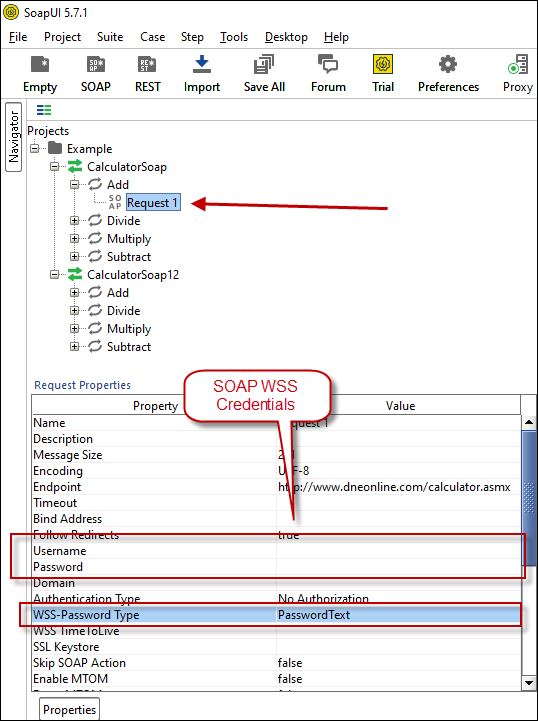 Configure SOAP WSS Credentials for SoapUI (SOAP API Testing Tool)
 - To use BASIC Auth Credentials select request node and double-click it. At the bottom click on Auth (Basic) and From Authorization dropdown click Add New and Select Basic.
 Configure Basic Authorization for SoapUI (SOAP API Testing Tool)
-
- Now you can test your request first Double-click on the request node to open request editor.
- Change necessary parameters, remove optional or unwanted parameters. If you want to regenerate request you can click on Recreate default request toolbar icon.
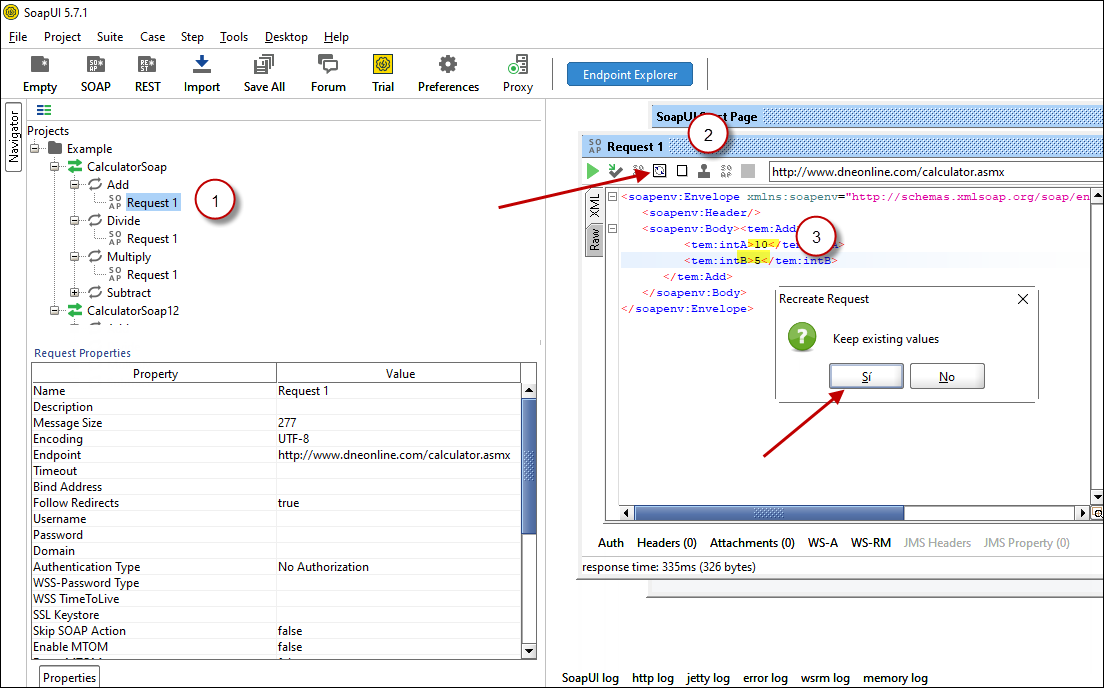 Create SOAP Request XML (With Optional Parameters)
 - Once your SOAP Request XML is ready, Click the Play button in the toolbar to execute SOAP API Request and Response will appear in Right side panel.
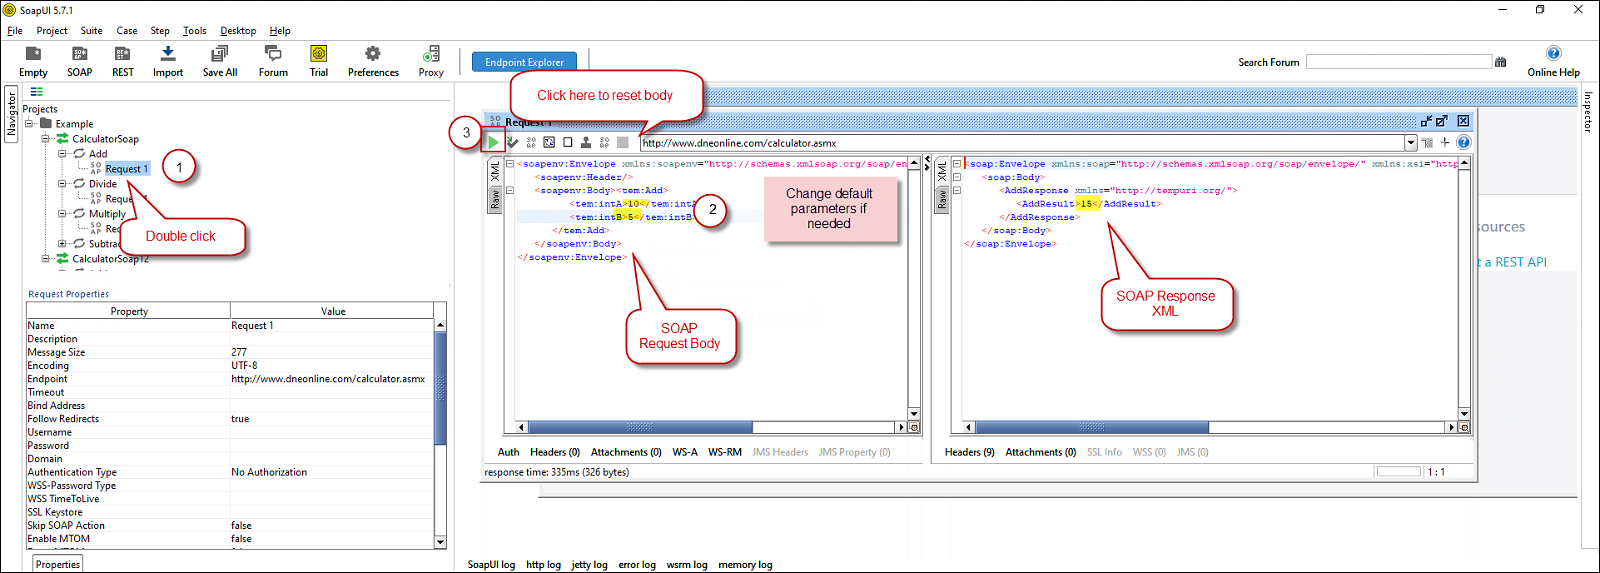 Test SOAP API using SoapUI Tool (Change Default XML Body / Parameters, Execute and See Response)
Create DSN using ZappySys XML Driver to call SOAP API
Once you have tested your SOAP API in SoapUI tool, we are ready to use ZappySys XML driver to call SOAP API in your preferred BI tool or Programming language.- First open ODBC Data Sources (search ODBC in your start menu or go under ZappySys > ODBC PowerPack > ODBC 64 bit)
- Goto System DSN Tab (or User DSN which is not used by Service account)
- Click Add and Select ZappySys XML Driver
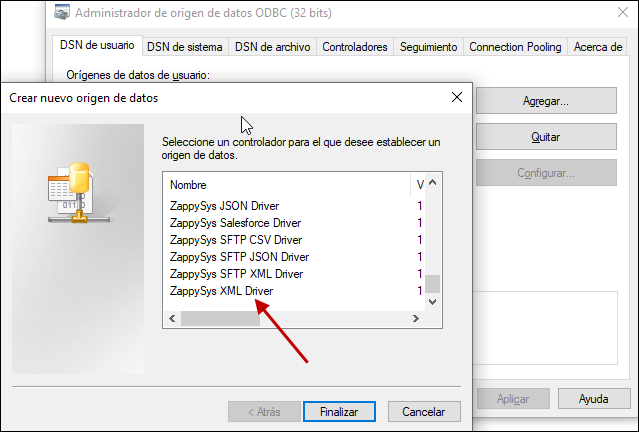 ZappySys ODBC Driver for XML / SOAP API
 - Configure API URL, Request Method and Request Body as below
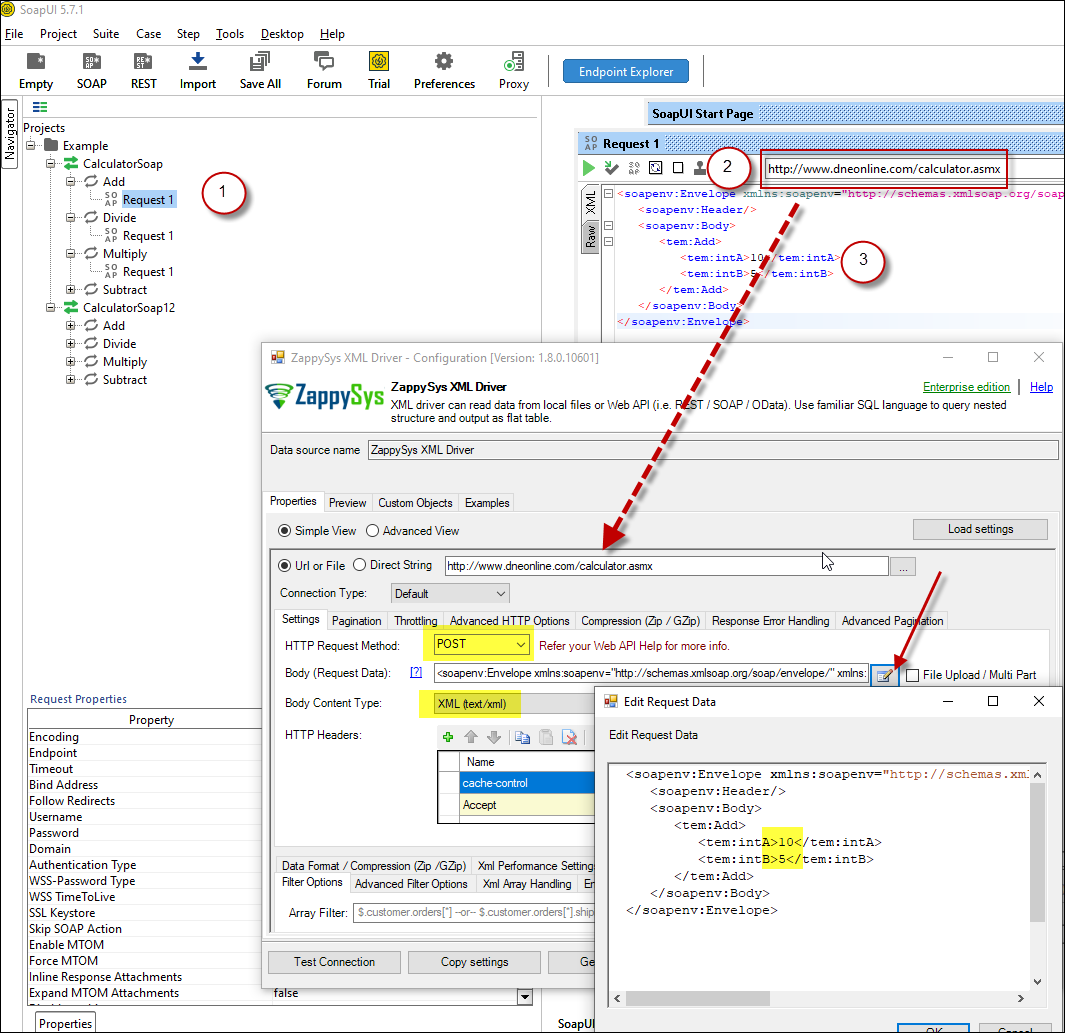 ZappySys XML Driver - Calling SOAP API - Configure URL, Method, Body
 - (This step is Optional) If your SOAP API requires credentials then Select Connection Type to HTTP and configure as below.
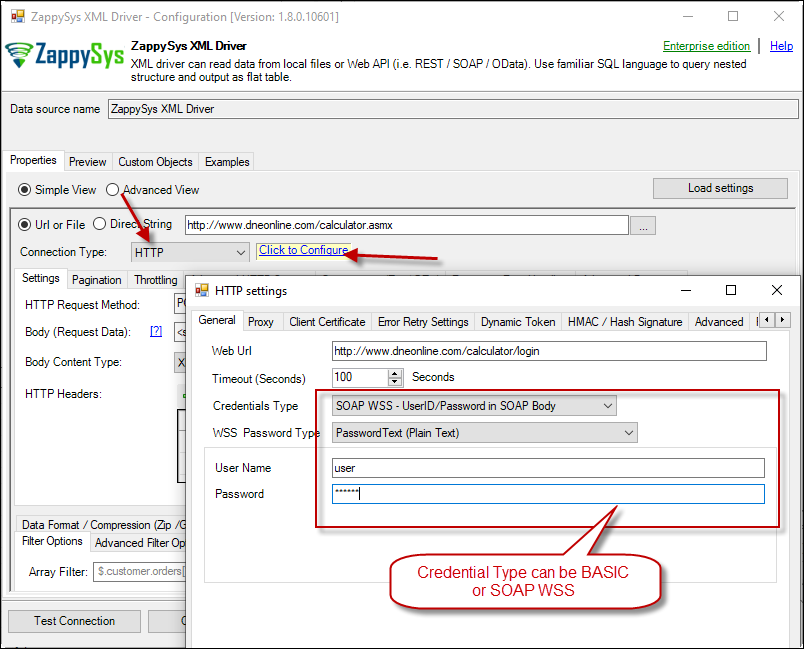 ZappySys XML Driver - Configure SOAP WSS Credentials or Basic Authorization (Userid, Password)
 - Configure-Request Headers as below (You can get it from Request > Raw tab from SoapUI after you test the request by clicking the Play button)
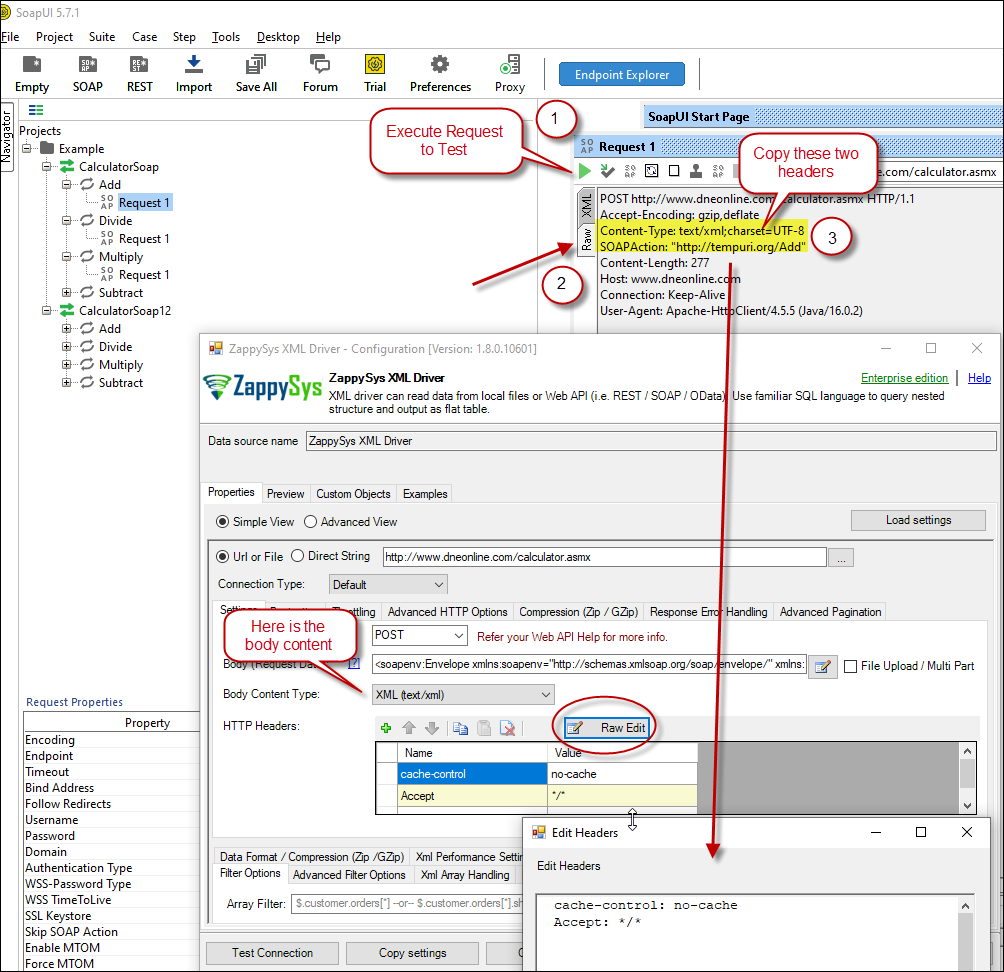 Configure SOAP API Request Headers - ZappySys XML Driver
 - Once credentials entered you can select Filter to extract data from the desired node. Make sure to select array node (see special icon) or select the node which contains all necessary columns if you don't have array node.
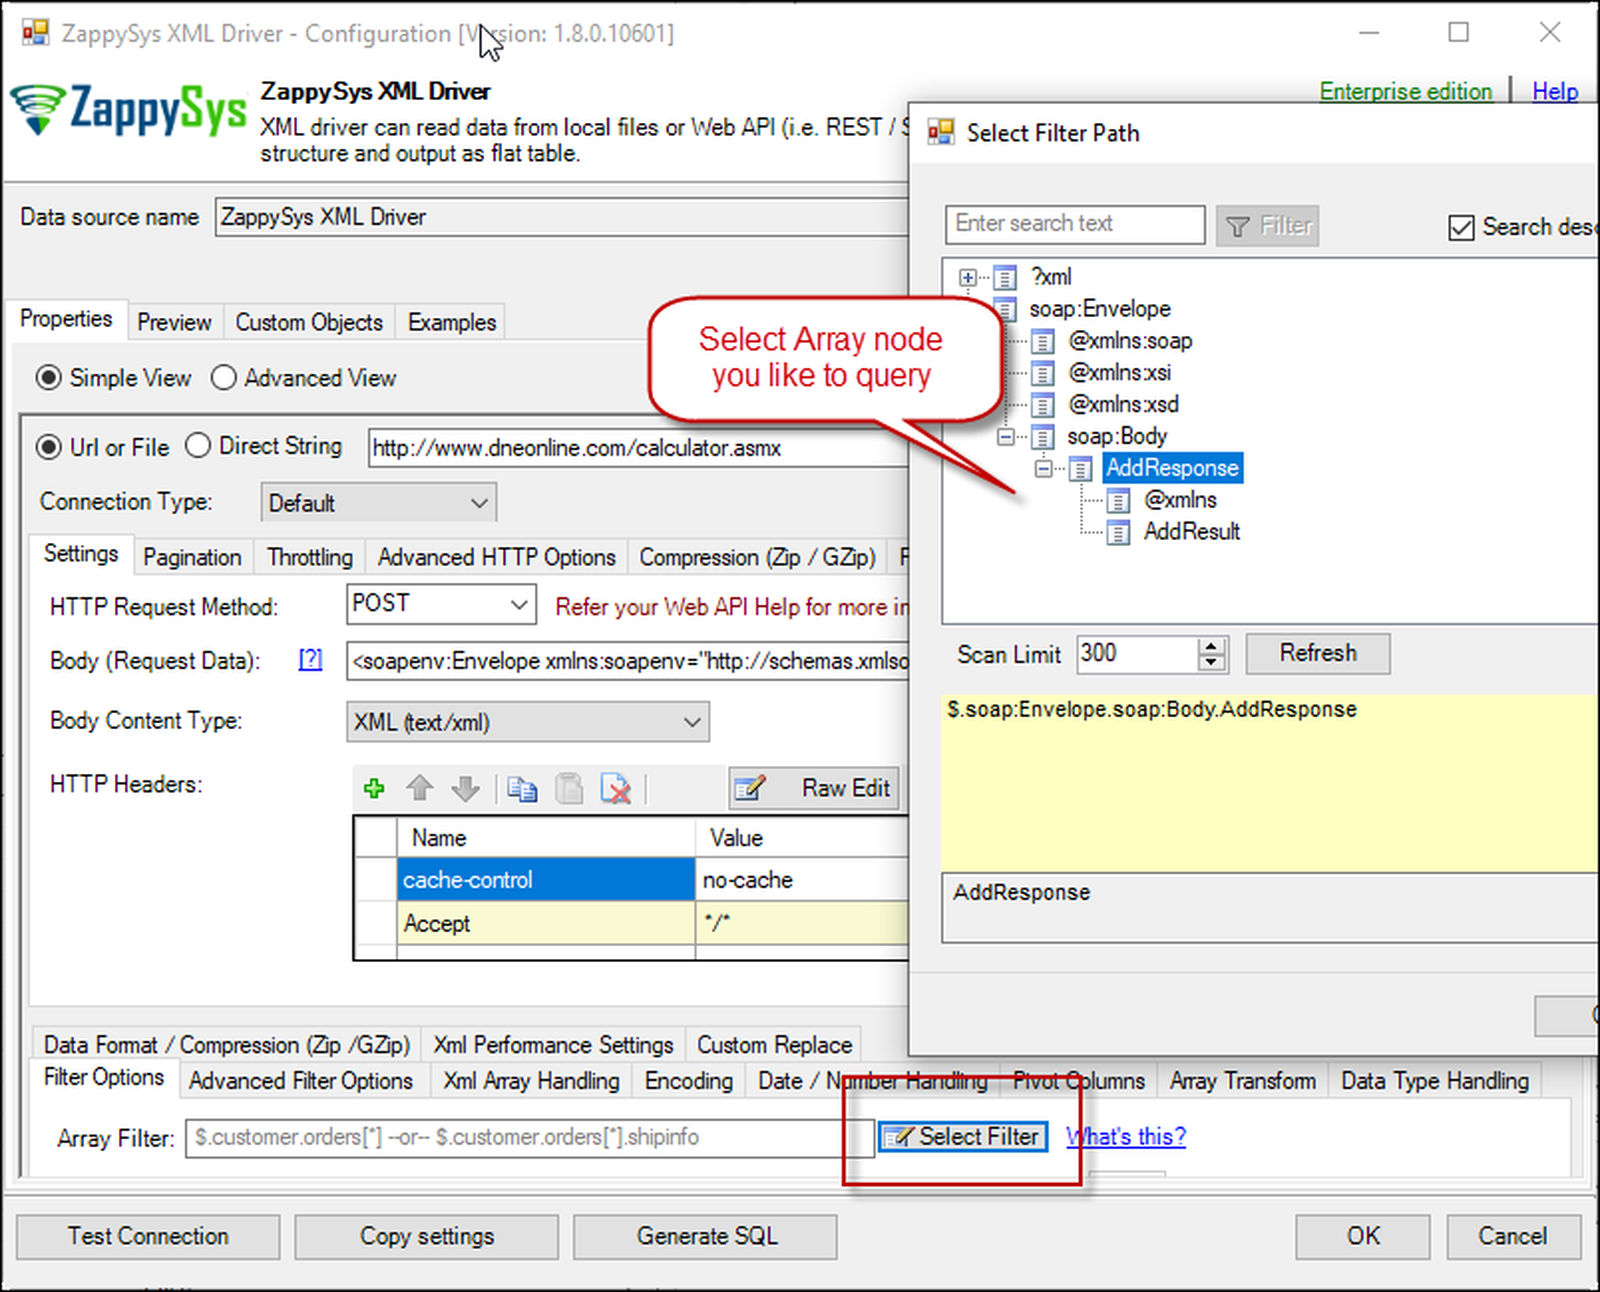 Select Filter - Extract data from nested XML / SOAP API Response (Denormalize Hierarchy)
 - If prompted select yes to treat selected node as Array (This is helpful when you expect one or more record for selected node)
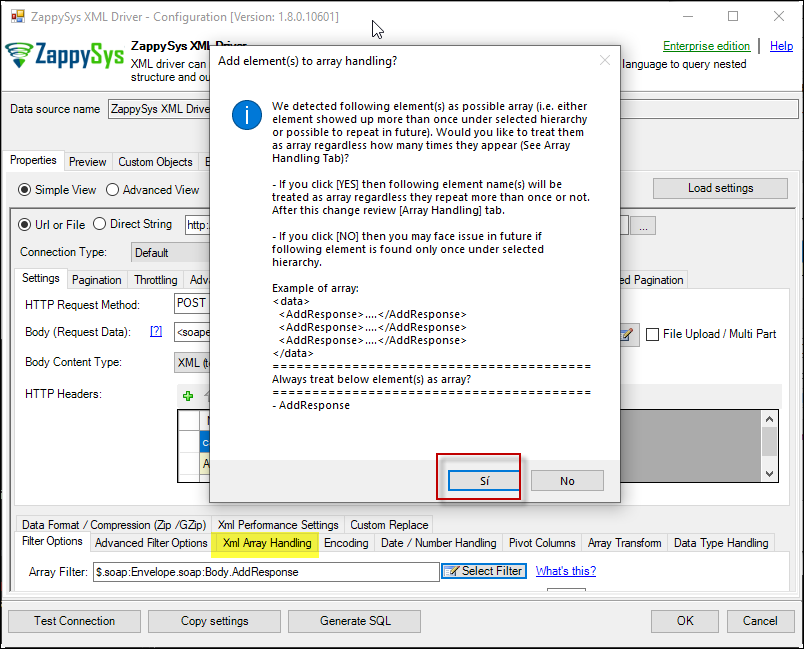 Treat selected node as XML Array Option for SOAP API Response XML
Preview SOAP API Response / Generate SQL Code for SOAP API Call
Once you configure settings for XML Driver now you can preview data or generate example code for desired language (e.g. C#, Python, Java, SQL Server). Go to Preview tab and you will see default query generated based on settings you entered in previous sections. Attributes listed in WITH clause are optional. If you omit attribute in WITH clause it will use it from Properties tab.Preview Data
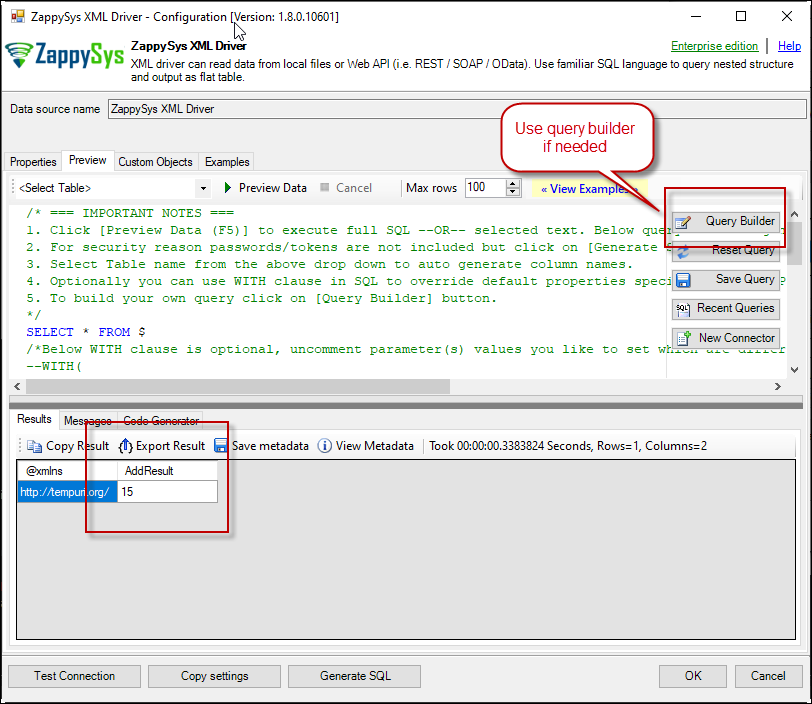 Preview SOAP API Response in ZappySys XML Driver
Generate Code Option
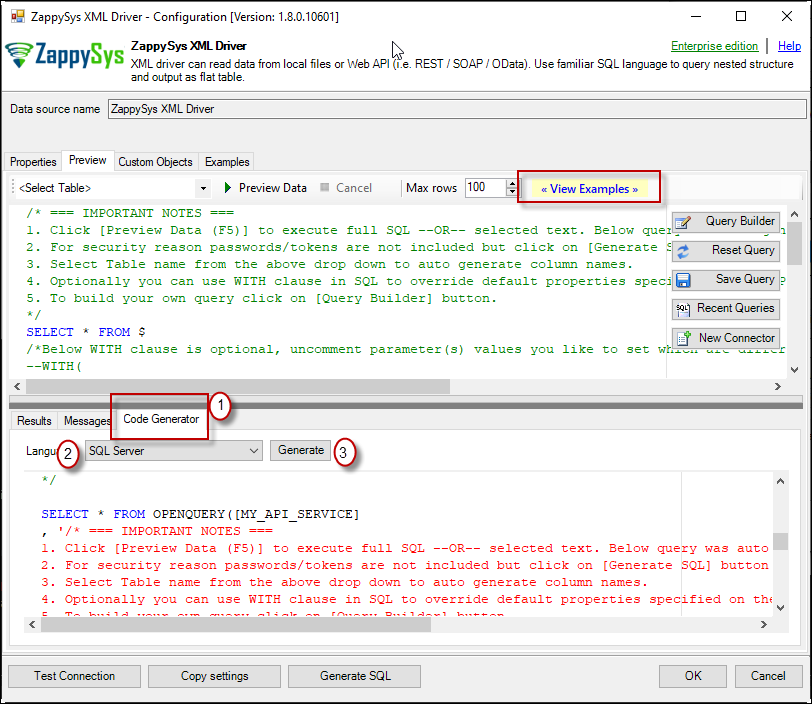
OPENQUERY vs EXEC AT (Handling Larger SQL Text)
So far we have seen examples of using OPENQUERY. It allows us to send pass-through query at remote server. The biggest limitation of OPENQUERY is it doesnt allow you to use variables inside SQL so often we have to use unpleasant looking dynamic SQL (Lots of tick, tick …. and escape hell). Well there is good news. With SQL 2005 and later you can use EXEC( your_sql ) AT your_linked_server syntax .
Disadvantage of EXEC AT is you cannot do SELECT INTO like OPENQUERY. Also you cannot perform JOIN like below in EXEC AT
|
1 2 |
SELECT a.* FROM OPENQUERY(ls_json,'select * from $') a JOIN OPENQUERY(ls_json,'select * from $') b ON a.id=b.id |
However you can always do INSERT INTO MyTable EXEC(…) AT LINKEDSRV. So table must exists when you do that way.
Here is how to use it. To use EXEC AT you must turn on RPC OUT option. Notice how we used variable in SQL to make it dynamic. This is much cleaner than previous approach we saw.
|
1 2 3 4 5 6 7 8 9 10 11 12 |
USE [master] GO EXEC master.dbo.sp_addlinkedserver @server = N'ls_Json', @srvproduct=N'', @provider=N'SQLNCLI', @datasrc=N'localhost,5000', @provstr=N'Network Library=DBMSSOCN;', @catalog=N'JsonApi' EXEC master.dbo.sp_addlinkedsrvlogin @rmtsrvname=N'ls_Json',@useself=N'False',@locallogin=NULL,@rmtuser=N'tdsuser',@rmtpassword='########' GO EXEC sp_serveroption 'ls_Json', 'rpc out', true; go declare @tbl varchar(100)='$' EXEC('select * from ' + @tbl ) AT ls_Json |
Here is the difference between OPENQUERY vs EXEC approaches.
If you decide to use EXEC instead of OPENQUERY then make sure below setting is ON else you will get an error.
Under the Linked Server Options, Enable RPC and RPC Out and Disable Promotion of Distributed Transactions(MSDTC).
Configure Firewall Settings
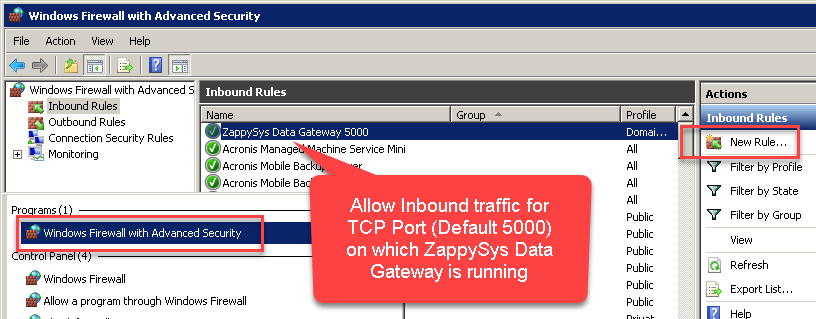
So far we have assumed that Gateway is running on the same machine as SQL Server. However there will be a case when ZappySys ODBC PowerPack is installed on a different machine than SQL Server. In such case you may have to perform additional Firewall configurations. On most computers firewall settings wont allow outside traffic to ZappySys Data Gateway. In such case perform following steps to allow other machines to connect to Gateway.
- Search for Windows Firewall Advanced Security in start menu.
- Under Inbound Rules > Right click and click [New Rule] >> Click Next
- Select Port on Rule Type >> Click Next
- Click on TCP and enter port number under specified local port as 5000 (use different one if you changed Default port) >> Click Next
- Select Profile (i.e. Private, Public) >> Click Next
- Enter Rule name [i.e. ZappySys Data Gateway – Allow Inbound ] >> Click Next
- Click OK to save the rule
Known Issues
In this section we will discuss some known issues when using OPENQUERY / Data Gateway Connectivity
Error: The data is invalid
There will be a time when you start facing odd errors such as below. Possible
|
1 2 3 4 5 |
OLE DB provider "SQLNCLI11/MSOLEDBSQL" for linked server "Zs_Csv" returned message "Deferred prepare could not be completed.". OLE DB provider "SQLNCLI11/MSOLEDBSQL" for linked server "Zs_Csv" returned message "Communication link failure". Msg 13, Level 16, State 1, Line 0 Session Provider: The data is invalid. |
Possible Cause:
There are few reasons for such error but below are two main reasons
- If query length is more than 2000 Characters long such as below then you might get such error
1SELECT * FROM OPENQUERY(LS, '--some really long text more than 2000 chars--') - If query contains multiple OPENQUERY statements for JOIN / UNION like below then also it might fail (Gateway doesnt support parallel queries on a single connection – MARS compatibility issue).
1select a.id, b.name from OPENQUERY(LS, 'select * from tbl1') a join OPENQUERY(LS, 'select * from tbl2') b on a.id=b.id
Possible Fix:
There are few ways to fix above error based on reason why you getting this error (i.e. Query Length issue OR JOIN/UNION in the same statement)
- If your query has long SQL (more than 2000 chars ) then reduce SQL length using different techniques
- e.g. use SELECT * FROM MyTable rather than SELECT col1,col2… FROM MyTable
- Use Meta Option in WITH clause if you must use column name. (e.g. SELECT * FROM MyTable WITH(META=’c:\meta.txt’) this way you can define column in Meta file rather than SELECT query. Check this article
- Consider using EXECT (….) AT [Linked_Server_name] option rather than OPENQUERY so you can use very long SQL (See next section on EXEC..AT usecase)
- Consider using Virtual Table / Stored Proc to wrap long SQL so your call is very small (where usp_GetOrdersByYear is custom proc created on ZappySys Driver UI)
1SELECT * FROM OPENQUERY(LS, 'EXEC usp_GetOrdersByYear 2021')
- If your query uses JOIN / UNION with multiple OPENQUERY in same SQL then use multiple Linked servers (one for each OPENQUERY clause) as below.
1select a.id, b.name from OPENQUERY(LS_1, 'select * from tbl1') a join OPENQUERY(LS_2, 'select * from tbl2') b on a.id=b.id
Error: Unable to begin a distributed transaction (When INSERT + EXEC used)
If you try to use EXEC statement and try to insert data into table (like below) you might get below error unless MSDTC option is turned off.
|
1 |
INSERT INTO MyTable EXEC('select * from tbl') AT MyLinkedServer |
|
1 2 3 4 |
"Protocol error in TDS stream" The operation could not be performed because OLE DB provider "SQLNCLI11" for linked server "ls_Json2" was unable to begin a distributed transaction. --OR-- The operation could not be performed because OLE DB provider "MSOLEDBSQL" for linked server "ls_Json" was unable to begin a distributed transaction. |
Solution:
Method-1: Go to linked server properties | Server Options | Enable Promotion of Distributed Transaction | Change to false (Default is true)
Now your try your INSERT with EXEC AT and it should work
Method-2: Run the below command if you dont want to use UI
|
1 |
EXEC master.dbo.sp_serveroption @server=N'My_Linked_Server', @optname=N'remote proc transaction promotion', @optvalue=N'false' |
Error: Cannot use OPENQUERY with JOIN / UNION
When you perform JOIN / UNION ALL on the same Linked Server it may fail to process sometimes because Datagateway doesnt support parallel query requests on the same connection. Workaround for that would be create multiple linked servers for the same datasource. See above section for the same workaround.
Error: Truncation errors due to data length mismatch
Many time you may receive truncation errors if Table column is length is less than actual column size from query column. To solve this issue use New version of Data gateway ( check – Use nvarchar(max) for string options – Found on General Tab)
Performance Tips
Now lets look at few performance tips
Use INSERT INTO rather than SELECT INTO to avoid extra META request
We discussed some Pros and Cons of OPENQUERY vs EXEC (…) AT in previous section. One obvious advantage of EXEC (….) AT is it reduces number of requests to driver (It sends pass through query). With EXEC you cannot load data dynamically like SELECT INTO tmp FROM OPENQUERY. Table must exist before hand if you use EXEC.
|
1 2 3 4 5 |
INSERT INTO tmp_API_Report_Load(col1,col2) EXEC('select col1,col2 from some_api_table') AT [API-LINKED-SERVER] --OR-- INSERT INTO tmp_API_Report_Load(col1,col2) select col1,col2 from OPENQUERY([API-LINKED-SERVER], 'select col1,col2 from some_api_table') |
Advantage of this method is your Query speed will increase because system calls API only once when you call EXEC AT. In OPENROWSET it needs to call above query twice (Once to obtain metadata and once to get data).
Use Cached Metadata if possible
By default, most of the SQL sent to Data gateway need to invoke two phases. First, get metadata and second fetch data. You can bypass meta API call by supplying static metadata. Use META property in WITH clause as per this article to speed up your SQL.
Conclusion
To conclude, we can say that using ZappySys JSON / XML Drivers we can query JSON / XML Files and call REST API or SOAP Web Service using familiar SQL Language. All you need to do is install ZappySys ODBC Drivers, configure it in the ODBC DSN and use ZappySys Gateway as a Proxy. Finally, you add a Linked Server in SQL Server to connect to ZappySys Data Gateway. Feel free to download ZappySys Drivers here. You can contact ZappySys Team here if you need any API integration help.
References
Keywords: Call REST API, SQL SERVER, JSON

