 Introduction
Salesforce is a popular CRM tool that lets you manage your sales, contacts, products, and other useful things. In this tutorial, you will learn how to call Salesforce REST API via ODBC driver using ZappySys JSON Driver. You can also use ZappySys Salesforce Driver for salesforce data read / write but this article covers more more generic API calling usecase.
You will find out how to register a Connected App in Salesforce, set OAuth authentication and use it for data retrieval. We will cover a topic of how to load leads from Salesforce and use them virtually in any application which supports ODBC. We will not stop with that and touch a possibility of calling any method of any REST API-based Salesforce API; be it insert or simple retrieval.
Prerequisites
Make sure you meet these requirements:
- ZappySys ODBC PowerPack installed.
- Have a registered, working Salesforce account.
Register Salesforce App (for OAuth)
Register Salesforce App
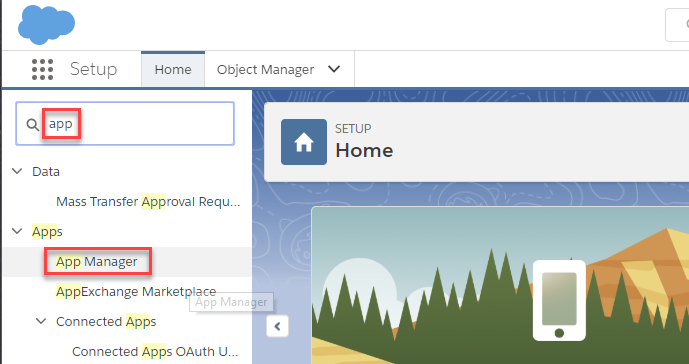
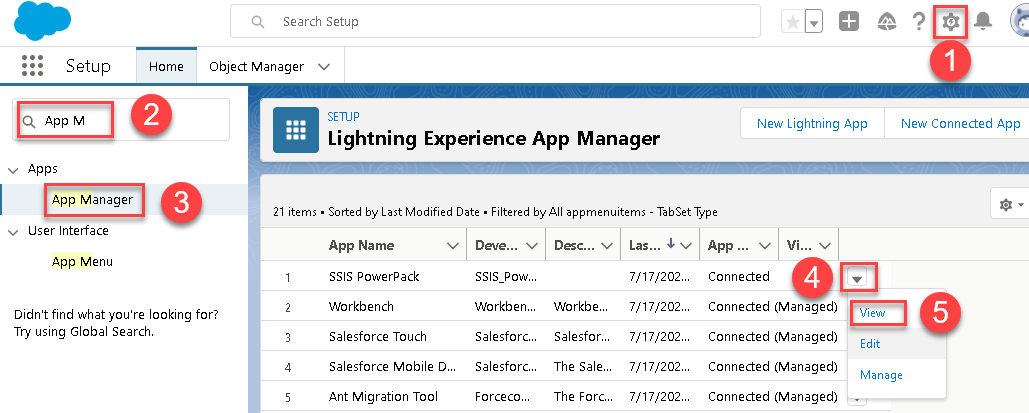
- Login into your account and go to Setup as shown below (click on gear icon at the top right corner):

- Then in the search bar input "app" and open App Manager:
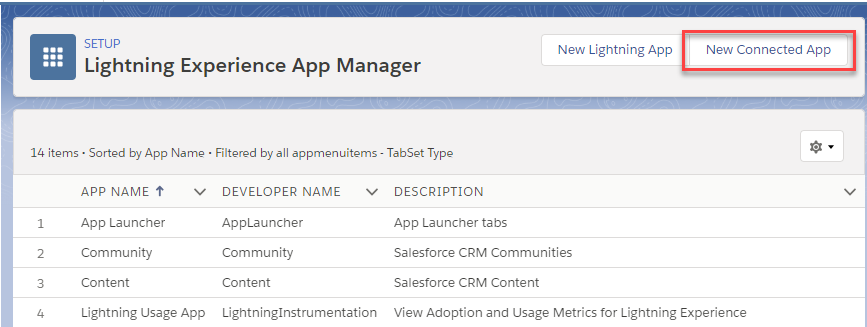
- Then click New Connected App to create a new OAuth App:
- Give your App a name and:
- Enable OAuth Settings
- Set callback URL to following two URLs (one in each line)
https://login.salesforce.com/services/oauth2/success
https://zappysys.com/oauth
- Add an OAuth scope you want or simply add "Full access".
- Add "Perform requests on your behalf at any time (offline_token)" scope to get a refresh token so that you don't have to re-authenticate each time requesting an access token:
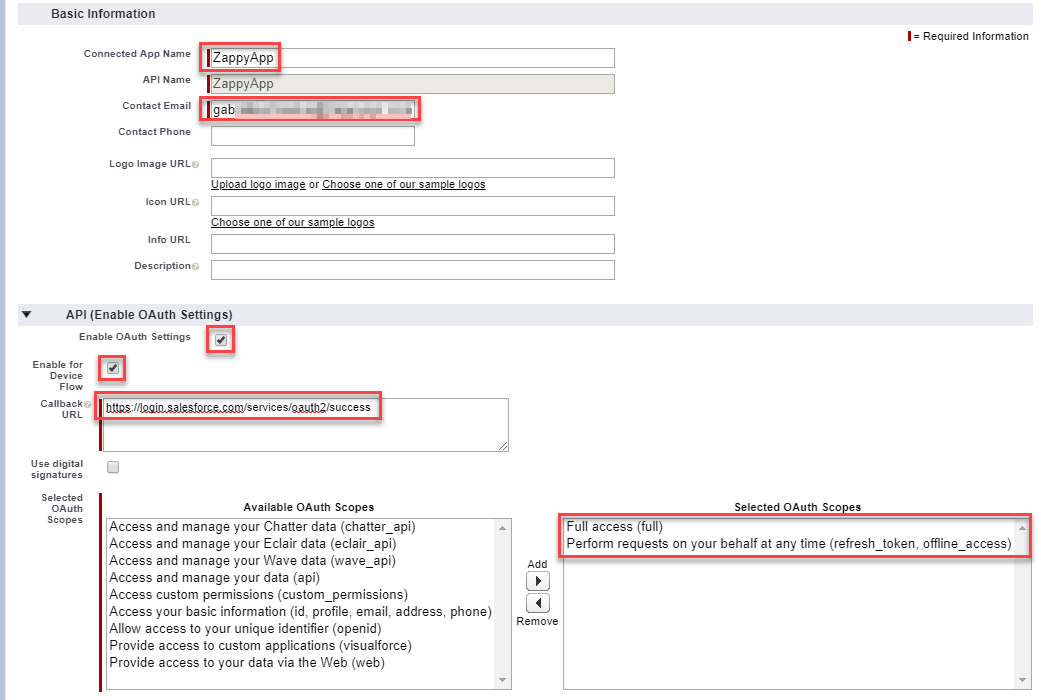
- Click "Save".
Get Client Id and Client Secret for Salesforce App
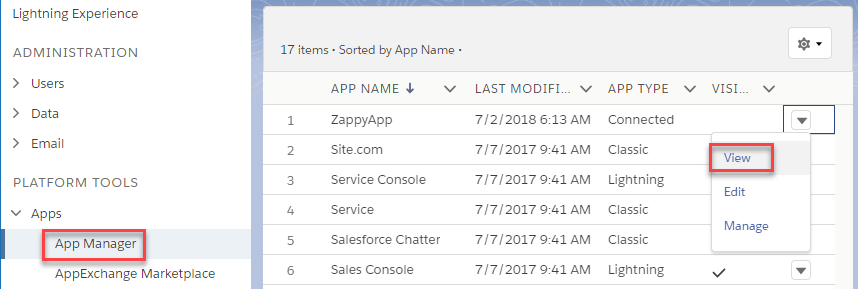
Once App is created we need to find out App Id / Secret so we can use it for API calls.- Go to App Manager
- Find out recently created App and click View (click on the small arrow to the right)
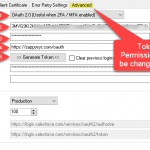
- Once App page is loaded you can Copy Consumer Key and Consumer Secret (click on reveal to see). Also copy anyone Call back URL (We will need this for OAuth Connection > Advanced Tab > Call Back URL or Redirect URL property depending on which ZappySys Product / Driver you are using)
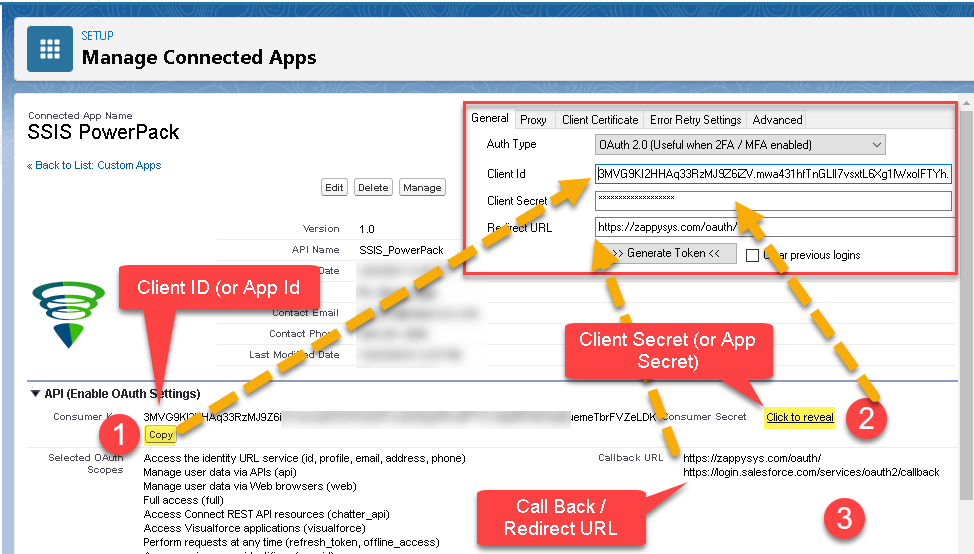
- That's it, you can now use these 3 pieces to ZappySys OAuth connection UI or on Salesforce Connection UI (new version with OAuth support). The above screenshot is showing where to enter these 3 pieces on New Salesforce Connection. For OAuth Connection redirect URL goes to Advanced Tab > Callback URL textbox.
(OPTIONAL) Configure Salesforce OAuth refresh token validity
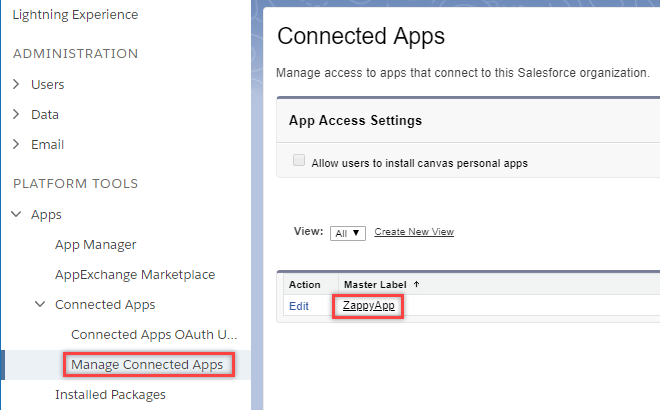
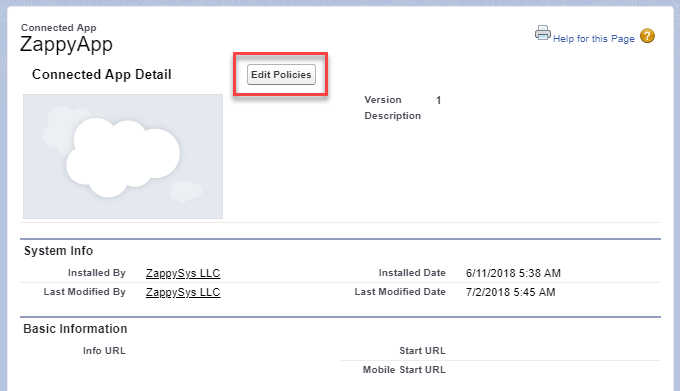
By default, Salesforce Refresh Token doesn't expire once you generate. If you like to change default behavior you can follow these steps.- Go to "Manage Connected Apps" menu item and press on your App name:
- Click "Edit Policies" to configure refresh token validity:
- Set "All users may self-authorize" and "Refresh token is valid until revoked" options:
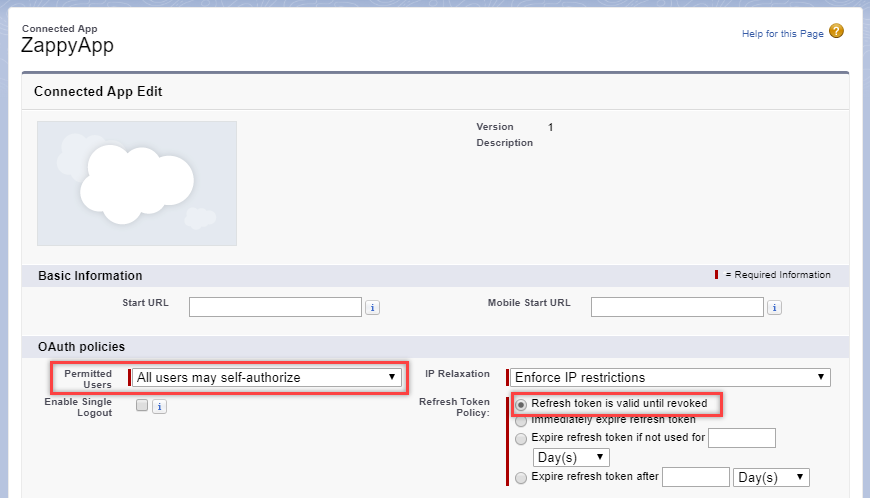
- Click "Save".
Calling Salesforce REST API with ODBC driver
To call Salesforce API, you need to have a Salesforce Connected App with enabled OAuth authentication. It will be used by ODBC Data Source, which we will create in the subsequent step. Then we will configure ODBC Data Source with Salesforce REST API URL and other parameters to access the leads.
How to Find Your Salesforce Instance ID
To call Salesforce API you have to supply Salesforce InstanceID in API Url. If you are not sure what is your Salesforce Instance ID then its very simple. Just look at your Salesforce URL after you login in Browser. First part in Domain would be your InstanceID (e.g. na34 if your URL looks like https://na34.salesforce.com/xxxxxxxxx ). You can also click Setup > Under Administrator > Click Company Profile > Company Information > Look for Instance
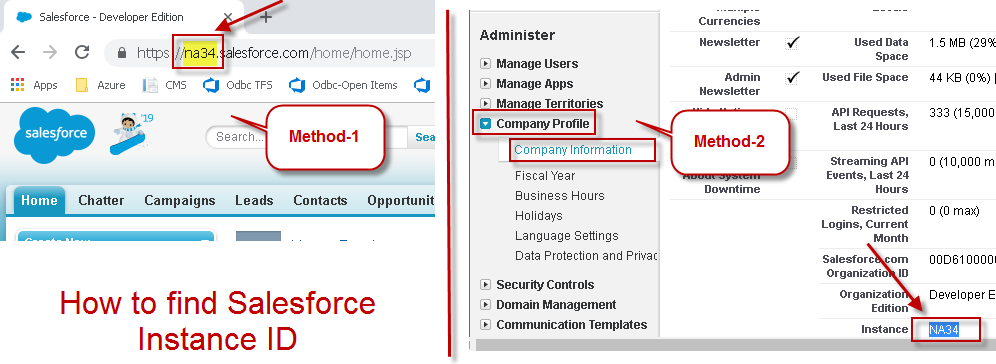
How to find your Salesforce Instance ID
Create an ODBC Data Source using ZappySys JSON Driver
- Open ODBC Data Source Administrator
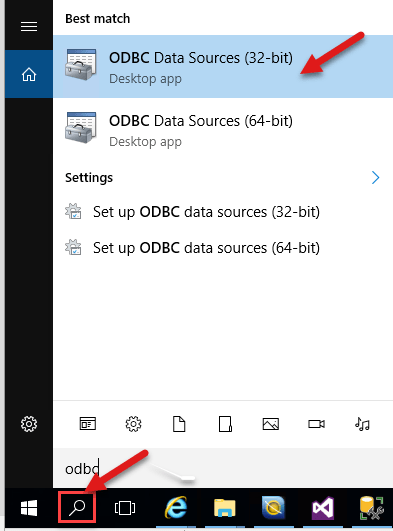
Finding Windows ODBC Data Source Manager
- Add a new ODBC Data Source based on ZappySys JSON Driver:
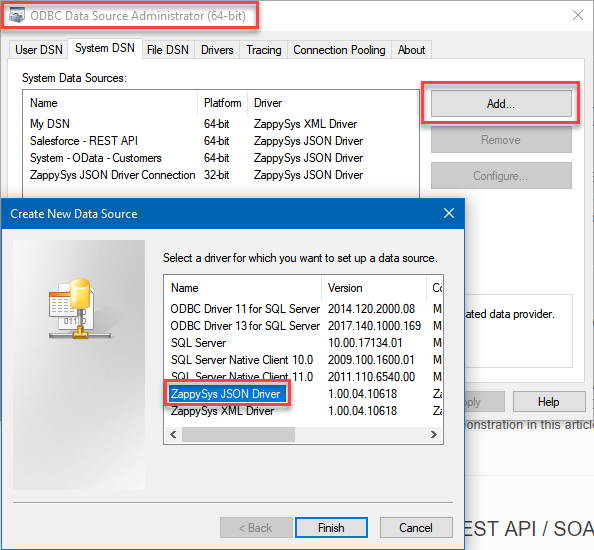
Adding a new ODBC Data Source based on ZappySys JSON Driver
Configure the Data Source
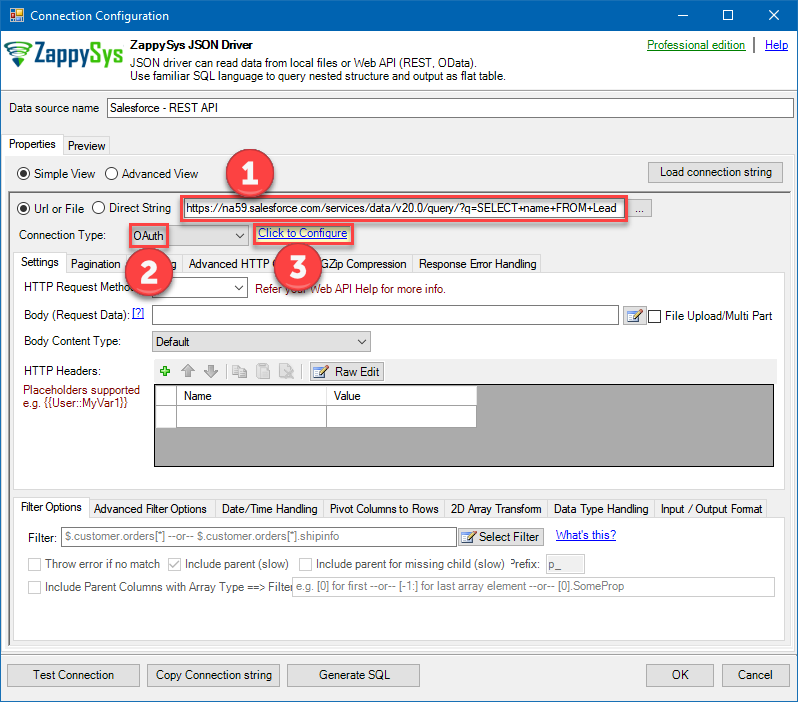
- Start configuring Data Source:
– Enter URL:
https://<your_instance>.salesforce.com/services/data/v20.0/query/?q=SELECT+id,name,email+FROM+Lead
– Select “OAuth” for Connection Type.
– You can set HTTP Request Method to “GET”.
– Continue by clicking “Click to Configure”: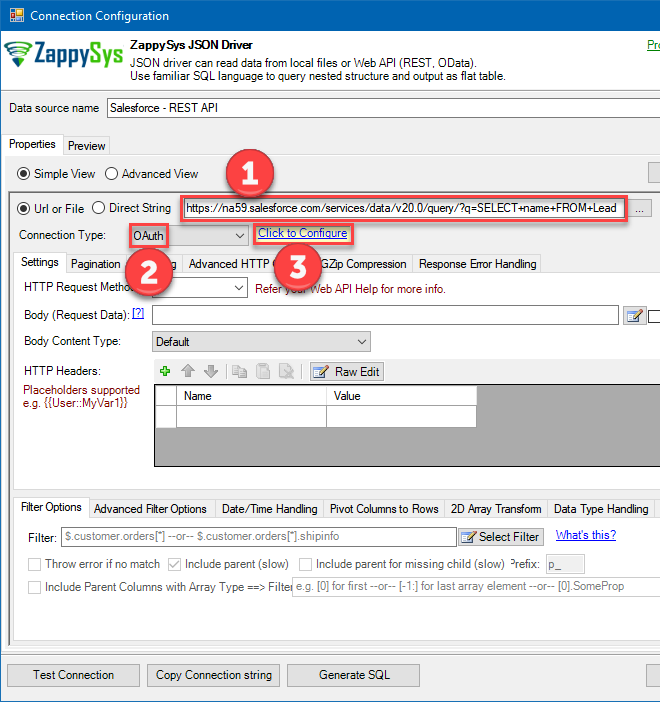
Configuring ODBC Data Source to get leads from Salesforce
- Once a window appears, go to Salesforce App Manager and view your App settings, so that you can use them for Data Source configuration:
Opening Salesforce App OAuth settings to be used in ODBC Data Source
- Then go back to ODBC configuration, select tab Advanced and set Callback/Return Url to “https://login.salesforce.com/services/oauth2/success“:

Configuring Callback Url in ODBC Data Source OAuth options
- Then go back to tab General and configure rest options using Salesforce App settings:
– From Salesforce App settings copy Consumer Key to Client Id
– Then copy Consumer Secret to Client Secret
– Set Authorization Url to “https://login.salesforce.com/services/oauth2/authorize”
– Set Access Token Url to “https://login.salesforce.com/services/oauth2/token”
– Set Scopes to below (For complete list of possible scopes refer this link – scroll to OAuth Scopes section)
12fulloffline_access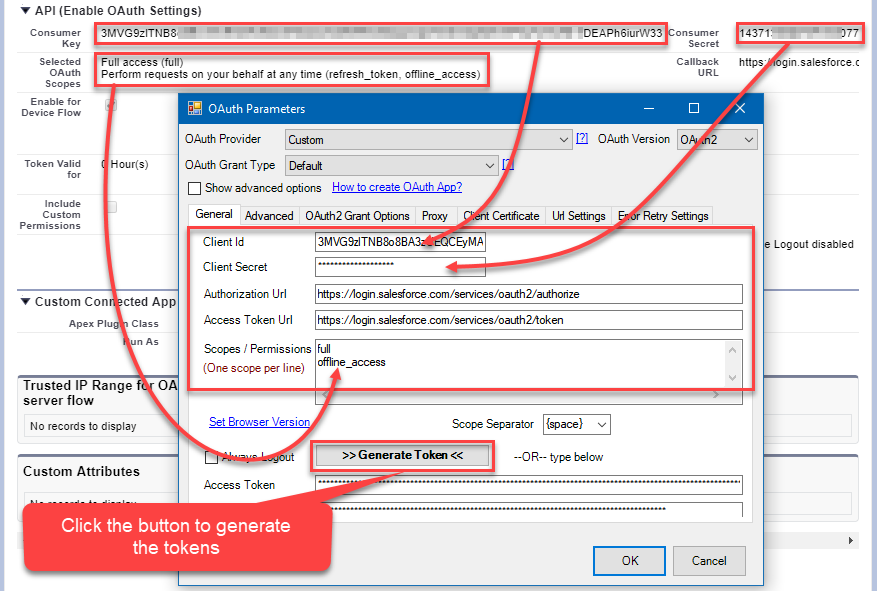
Configuring ODBC Data Source with Salesforce App OAuth settings
- Click “Generate Token” button to generate the tokens. Once Salesforce login window appears, enter your Salesforce credentials and log in.
- Click “OK” to close the window.
Load data from Salesforce using ODBC Data Source
We are ready to retrieve the data. So just open “Preview” tab in Data Source configuration window and hit “Preview Data” button:
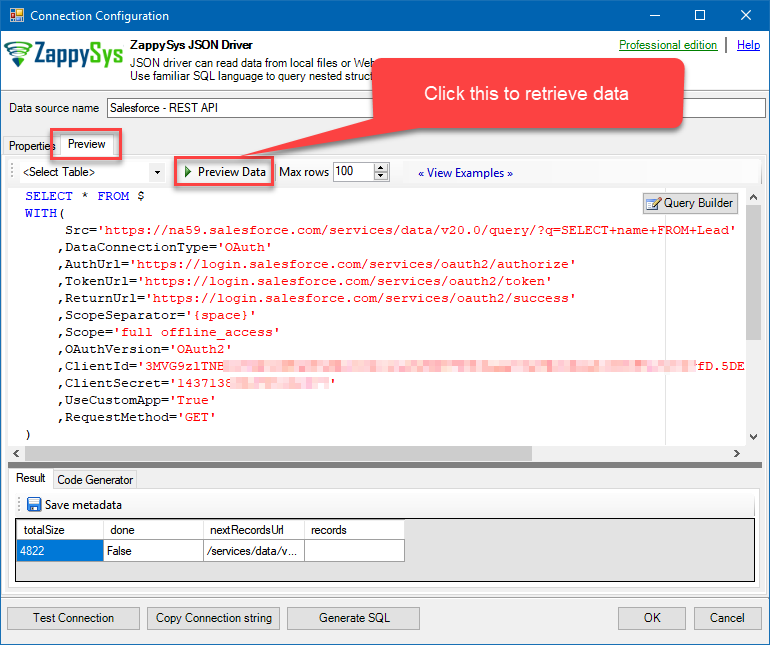
Previewing Salesforce data in ODBC Data Source
As you see we have no actual lead names because they are present in column “records”. So replace “$” with column name “records” in “SELECT * FROM $” query to select actual lead records from JSON property “records” (which denotes a table in ODBC):
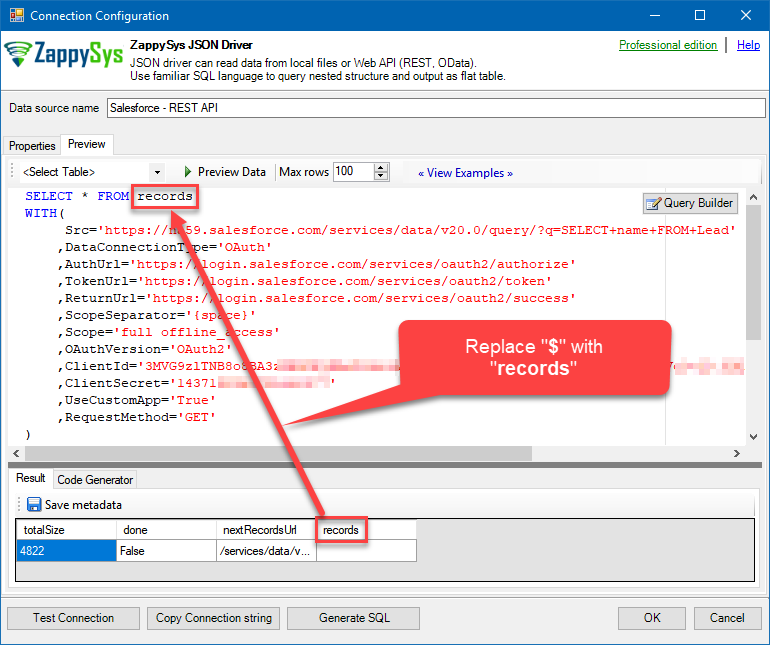
Changing table name in ODBC query to get the actual leads
Then click “Preview Data” again to get the leads:
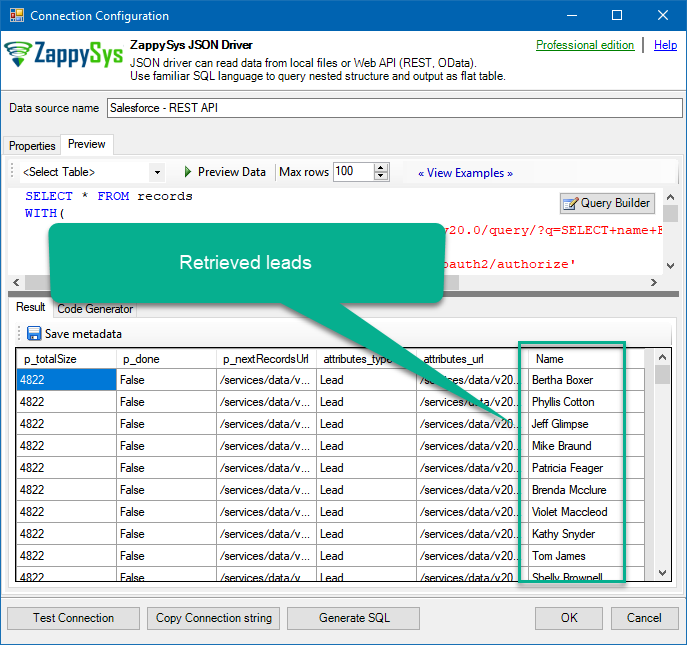
Successfully retrieved Salesforce leads using Salesforce REST API and ODBC Driver
You are ready to use ODBC Data Source in an application!
Pagination in Salesforce REST API
Even you are ready to use the configured ODBC Data Source in an external application, the solution is not yet fully implemented. If you have too many leads or records than Salesforce can give you in one HTTP response you won’t get all the records. Thus you will need to use pagination. For that, go to “Pagination” tab and configure it like this:
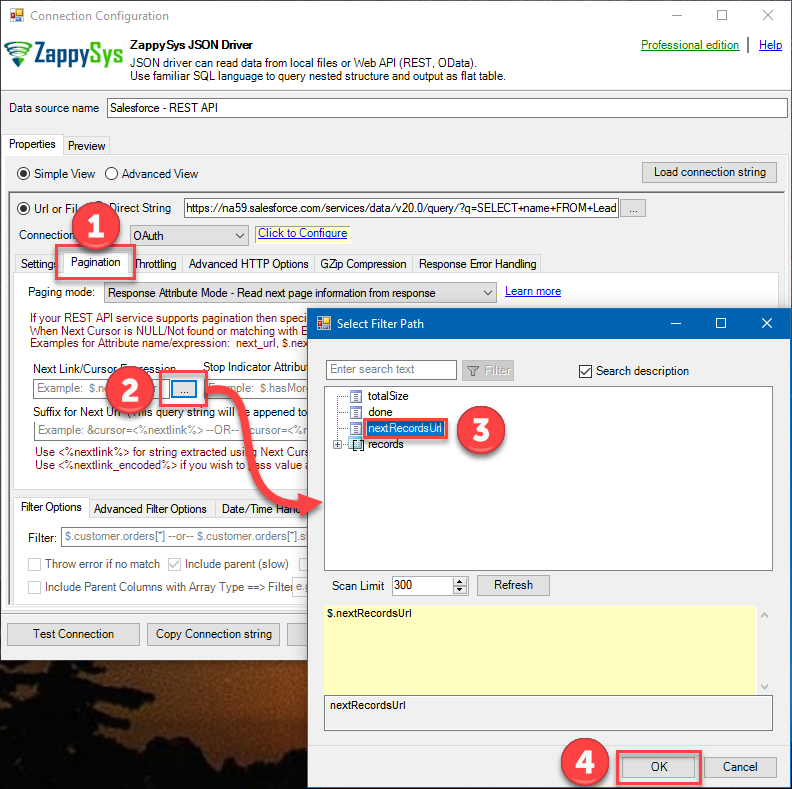
Configuring ODBC Data Source to paginate through Salesforce results
If you need something more sophisticated then check the article about pagination (initially it was written for SSIS PowerPack but UI options and concepts apply to ODBC Driver too).
Using ODBC query in an application
Let’s say you want to access Salesforce Accounts instead of Leads. It seems the most logical thing to do is create another ODBC Data Source and change the URL. However, you can use the same ODBC Data Source and override its properties with ODBC query. Just copy the generated ODBC query, leave the things you want to override and use it in your application:
|
1 2 3 4 |
SELECT * FROM records WITH( Src='https://***yourinstance****.salesforce.com/services/data/v44.0/query/?q=SELECT+Id,name,Email+FROM+Lead' ) |
In the example above, we are overriding “Url” property and accessing Accounts.
Check an article how to import data into Excel using ODBC Data Source with ZappySys to see how to use ODBC Data Source in your application. For more examples, check ODBC PowerPack blog category.
Field names for SELECT Query
One known issue in Salesforce REST API is you cannot use * to fetch all columns in SOQL. So you must specify column names manually. If you like to know all possible column names for given Table name then use below query.
https://na34.salesforce.com/services/data/v20.0/sobjects/Account/describe/
|
1 2 3 4 5 |
SELECT label,name,length,type,nillable,unique FROM $ WITH( Src='https://**YOUR-INSTANCE**.salesforce.com/services/data/v44.0/sobjects/**YOUR-TABLE**/describe/' ,Filter='$.fields[*]' ) |
For example to get fields for Account table in ns34 instance you can use below URL
https://na34.salesforce.com/services/data/v44.0/sobjects/Account/describe/
Error Handling in Salesforce REST API
METHOD 1 - Using Error Handling Options
When to use?
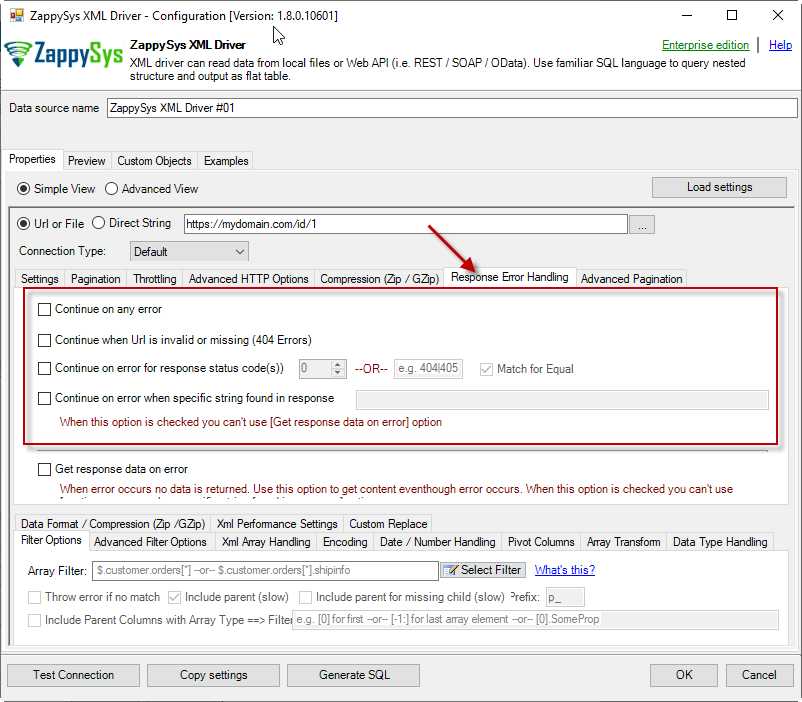
You may want to use them when your source is a resource located on the Internet; e.g. a file on a website, a file on an FTP server or just a plain API HTTP response. By default, when a remote server returns an error, data retrieval is stopped, an error is raised and no data is given back to you. This might not be always desirable.Scenario 1
Imagine a scenario, that there is a web server which each day at 12 AM releases a new JSON file with that day's date as filename, e.g. http://www.some-server.com/data/2018-06-20.json. And, of course, you want to download it and use it daily in your Power BI report. But you have a problem: Power BI report data sources are refreshed each hour and you may get HTTP 404 status code (no file was found) when a file is not released yet. Which consequentially means other data sources won't be updated as well and you will see old and cached data on the report. That's where you could use Continue on any error or Continue when Url is invalid or missing (404 Errors) to avoid an error being raised and let other data sources to be updated.Scenario 2
Another scenario is when you expect a web server to raise some kind of HTTP error when accessing a URL. You don't want ODBC Data Source to raise an error but instead, you want to get response data. That's where you can use Continue on any error or alike together with Get response data on error to continue on an error and get the data: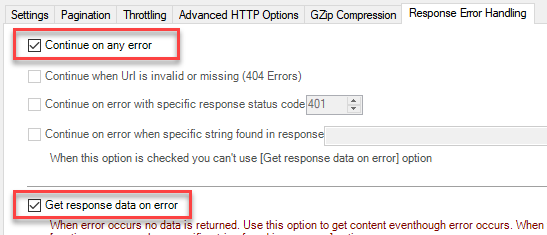
METHOD 2 - Using Connection [Retry Settings]
Another scenario you may run into is a buggy web server. You ask it to give you some file or data and it, like a snotty kid, just doesn't give it to you! You have to ask twice or thrice before it does its job. If that's the case, you have to retry HTTP requests using Connection: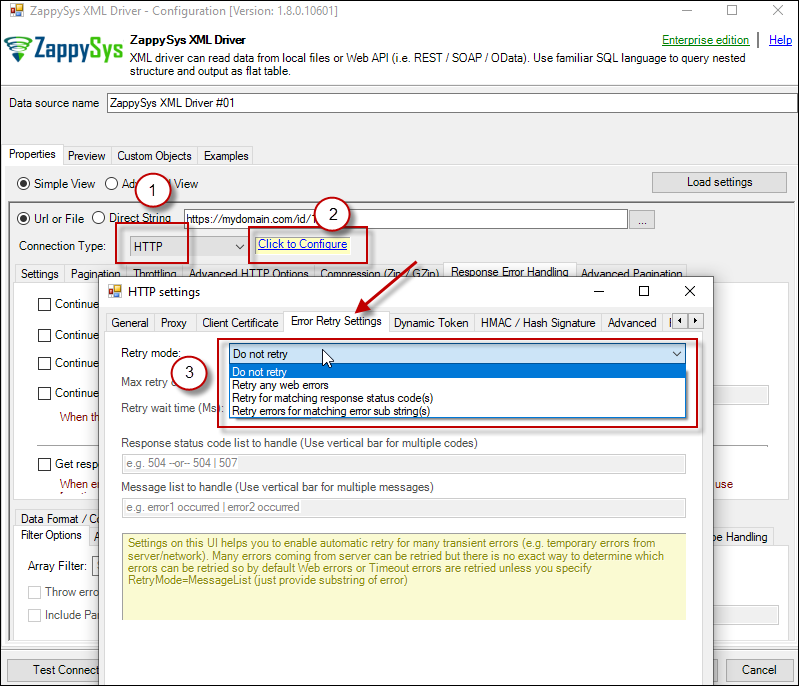
Using various Salesforce APIs
We used Salesforce REST API Search method to access the leads. The SOQL query we used looks identical to SQL in our case, so you can use other table names to access their data too. Or you can even use a more complex SOQL query in the same Search method. The Search method is not the only one that is available in Salesforce REST API, check other REST API methods too (you can even use the ones that insert/update the data).
In addition to Salesforce REST API, Salesforce has many more APIs, such as Salesforce Marketing Cloud API, Salesforce CPQ API, Salesforce IoT REST API, and others. You can use virtually any of them with ZappySys JSON Driver or ZappySys XML Driver since the drivers are highly configurable (you can call any API method with any HTTP method – be it POST, PUT or any other).
Reading data from Salesforce Custom Reports
So far we talked basic query to read data using SOQL / Standard Tables. But what if you have cuCheck this article to findout some techniques to read data from salesforce Custom Reports.
Resources
- Salesforce REST API Search method documentation
- Salesforce REST API methods
- Salesforce Table list
- Salesforce SOQL Documentation
- Salesforce API Explorer
Conclusion
We covered a whole process of how to access Salesforce data: starting from creating a Salesforce application, continuing by authenticating using OAuth and finishing by using an ODBC query in a target application. You learned how to retrieve the fields of Salesforce leads and paginate through the results. Now you are on a good path of using other API methods and even other Salesforce APIs 😉