Introduction
 In our previous article we Read data from Twilio API in SSIS . Now in this article, we will see example of how to Call SurveyGizmo API in SSIS and load into SQL Server. This blog mainly focuses on SSIS approach but steps mentioned to call SurveyGizmo API Call can be useful for any developer regardless of which programming language or tool set you use. we will also see how to store access token and secret in the variable and pass it in the URL using variable.
We will go through the steps to make Survey GetList REST API call which Get a list of all of your surveys and we load it into MS SQL Server.
In nutshell, this post will focus on how to Make SurveyGizmo REST API Call in SSIS.
Prerequisites
Before we perform the steps listed in this article, you will need to make sure the following prerequisites are met:
- SSIS designer installed. Sometimes it is referred to as BIDS or SSDT (download it from Microsoft site).
- Basic knowledge of SSIS package development using Microsoft SQL Server Integration Services.
- Make sure ZappySys SSIS PowerPack is installed (download it).
- Credentials of SurveyGizmo API.
What is SurveyGizmo?
SurveyGizmo takes data out of dashboards and puts it into the hands of people who take action. Through the systems they use every day. SurveyGizmo is an online survey solution that makes it easy for businesses of all sorts to create and conduct surveys, polls, quizzes, and questionnaires. Reaching out to potential and existing customers, managing organizational and employee relationships and conducting academic researches has become convenient through SurveyGizmo.
Call SurveyGizmo REST API using SSIS JSON Source
Let’s start with an example. We use SSIS JSON Source component to make the call to SurveyGizmo API, we will read list of all available temporary lists and load into SQL Server. First of All, Open Visual Studio and Create New SSIS Package Project.
- First of All, Drag and drop Data Flow Task from SSIS Toolbox and double click it to edit.

Drag and Drop : SSIS Data Flow Task from SSIS Toolbox
- From the SSIS toolbox drag and drop JSON Source on the data flow designer surface.
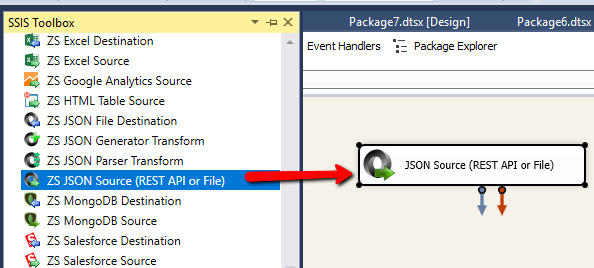
Drag and Drop JSON Source Component
- Now let’s add variable for SurveyGizmo Access Token and Secret and Set it in as a value.
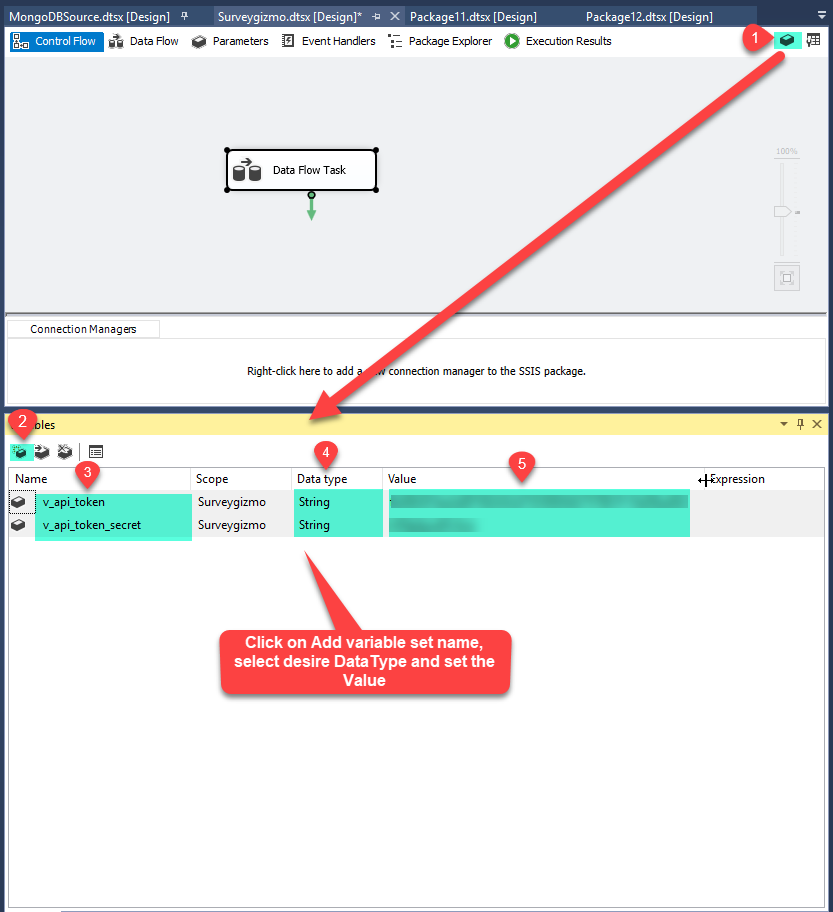
SSIS Add Variable
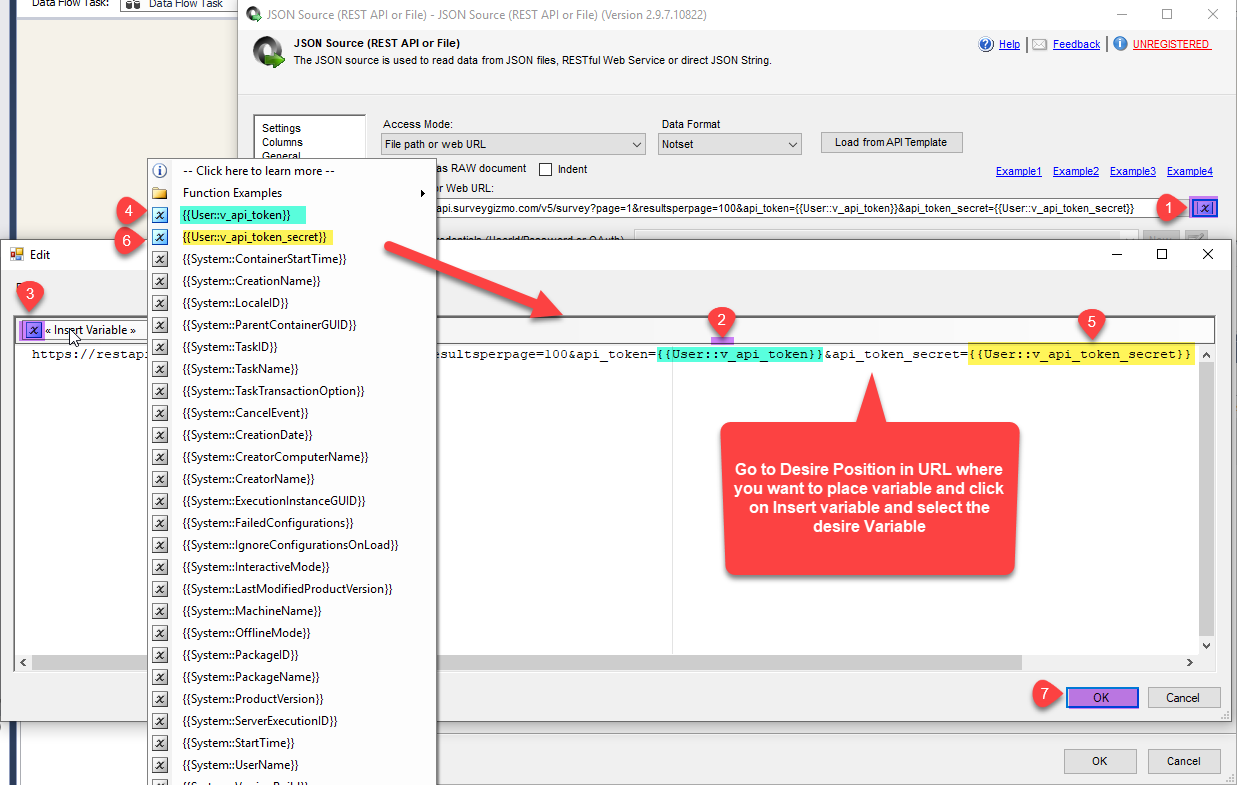
- Now double click on JSON Source and enter the following URL with variable as placeholder to get list of your surveys.
1https://restapi.surveygizmo.com/v5/survey?page=1&resultsperpage=100&api_token={{User::v_api_token}}&api_token_secret={{User::v_api_token_secret}}
JSON Source : URL with variable as placeholder
- Let’s configure the pagination, go to Pagination tab and select mode as URL Parameter and set the indicator as
Page and configure it like below screen.
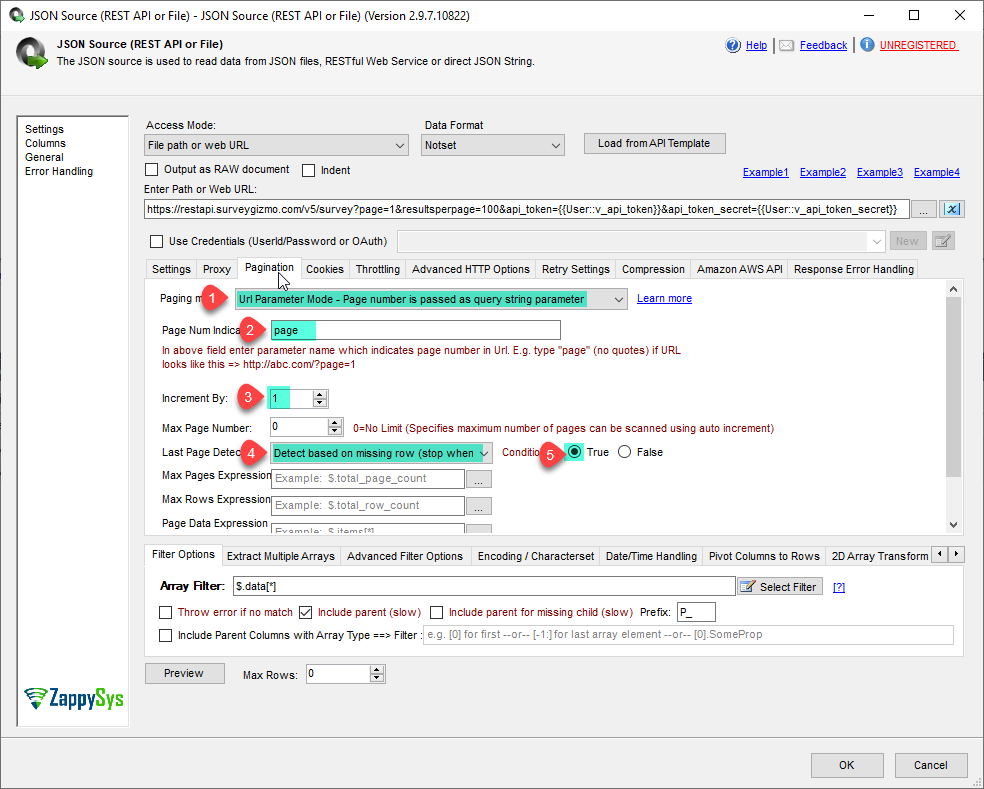
JSON Source Pagination
- You can refer to this article for more details on pagination here Understanding REST API Pagination in SSIS / ODBC Drivers
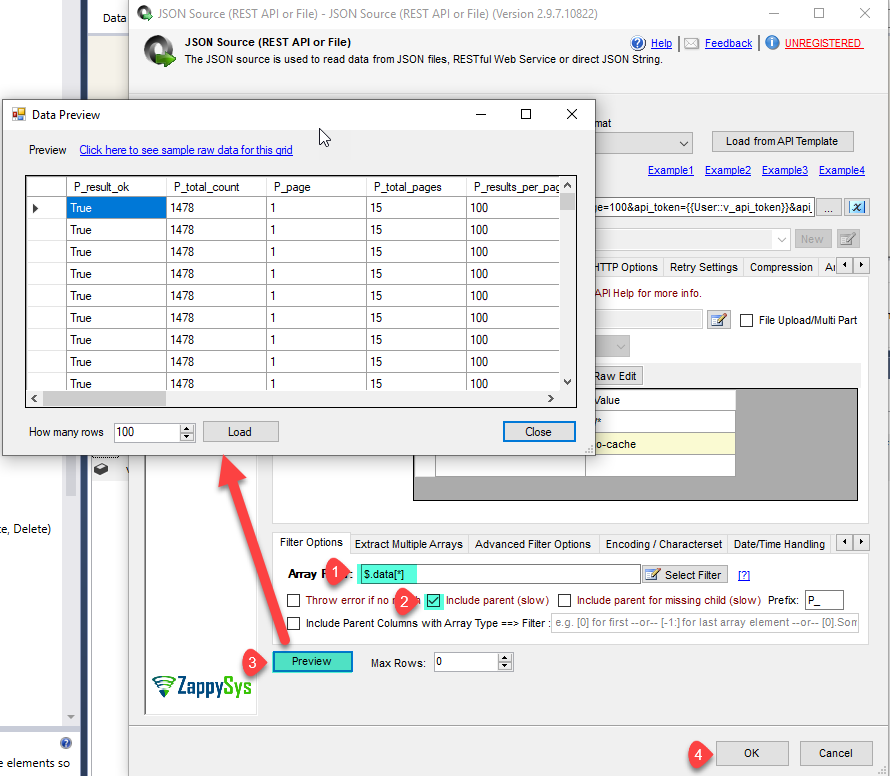
- Now click on Select Filter button and select the desire filter from the window and click on Preview to get the data.
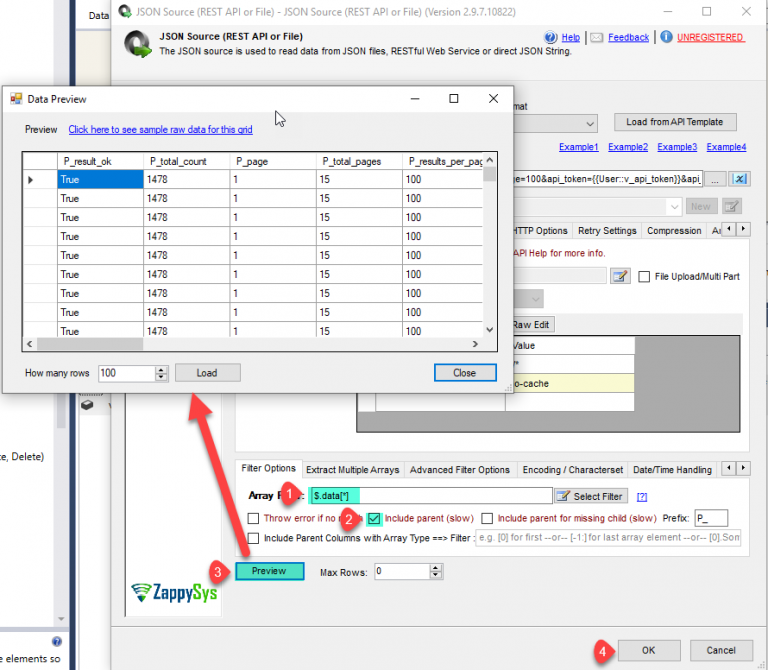
JSON Source Preview
- That’s it we are ready to load all SurveyGizmo Surveys data in SQL Server.
Load SurveyGizmo REST API data into SQL Server
ZappySys SSIS PowerPack makes it easy to load data from various sources such as REST, SOAP, JSON, XML, CSV or from other source into SQL Server, or PostgreSQL, or Amazon Redshift, or other targets. The Upsert Destination component allows you to automatically insert new records and update existing ones based on key columns. Below are the detailed steps to configure it.
Step 1: Add Upsert Destination to Data Flow
- Drag and drop the Upsert Destination component from the SSIS Toolbox.
- Connect your source component (e.g., JSON / REST / Other Source) to the Upsert Destination.
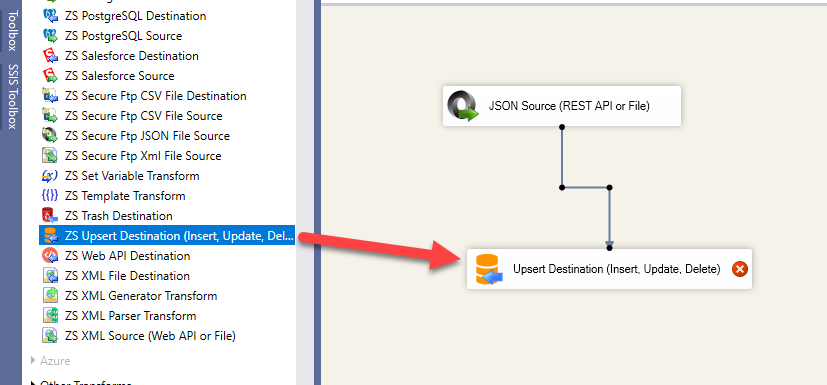
SSIS - Data Flow - Drang and Drop Upsert Destination Component
Step 2: Configure Target Connection
- Double-click the Upsert Destination component to open the configuration window.
- Under Connection, select an existing target connection or click NEW to create a new connection.
- Example: SQL Server, or PostgreSQL, or Amazon Redshift.
Step 3: Select or Create Target Table
- In the Target Table dropdown, select the table where you want to load data.
- Optionally, click NEW to create a new table based on the source columns.
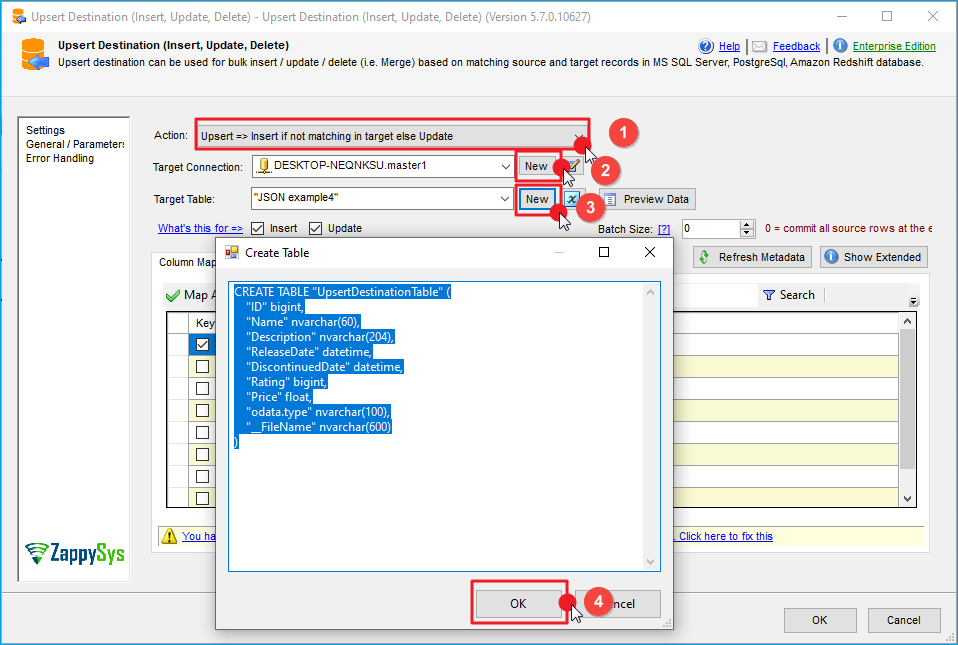
Configure SSIS Upsert Destination Connection - Loading data (REST / SOAP / JSON / XML /CSV) into SQL Server or other target using SSIS
Step 4: Map Columns
- Go to the Mappings tab.
- Click Auto Map to map source columns to target columns by name.
- Ensure you check the Primary key column(s) that will determine whether a record is inserted or updated.
- You can manually adjust the mappings if necessary.

SSIS Upsert Destination - Columns Mappings
Step 5: Save Settings
- Click OK to save the Upsert Destination configuration.
Step 6: Optional: Add Logging or Analysis
- You may add extra destination components to log the number of inserted vs. updated records for monitoring or auditing purposes.
Step 7: Execute the Package
- Run your SSIS package and verify that the data is correctly inserted and updated in the target table.
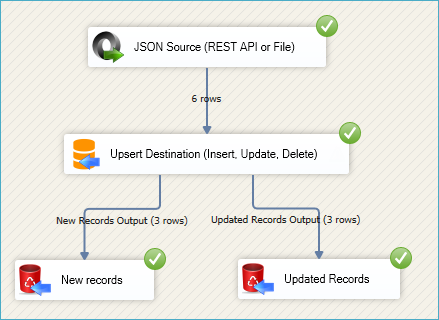
SSIS Upsert Destination Execution
Conclusion
After all, we saw you how to extract information from REST API such as SurveyGizmo and load into SQL Server. We also learned techniques like How to use variable as placeholder in URL and configure the pagination. To explore many other scenarios not discussed in this article download SSIS PowerPack from here (includes 70+ Components).
References
Finally, you can use the following links for more information: