Introduction
In our previous article, we saw how to call a REST API or a SOAP Web Service in SSIS. In this article, we will focus only on how to perform an HTTP POST in SSIS using a RESTful approach.
HTTP Protocol supports many methods, also referred to as verbs (e.g. GET, PUT, POST, HEAD, DELETE). Based on this verb, the target server (API server) can perform the desired action. For example, GET is usually used for read-only data fetch (similar to a select query in SQL). POST is usually used to create a new record or update existing data.
For any HTTP operation, you can submit parameters/data in 3 ways.
via URL query string
via HTTP Headers
via Body (Only valid for operations such as POST, PUT)
HTTP POST in SSIS
Traditionally, when SSIS developers wanted to perform an HTTP POST operation, they had to write C# Code using a Script Task. This is no longer the case after ZappySys developed easy-to-use drag-and-drop REST API Tasks and Connectors. As of now, 4 main connectors/tasks support HTTP POST.
SSIS PowerPack offers two methods to POST data from your database to the target API URL (e.g., SQL Server to API POST in JSON format).
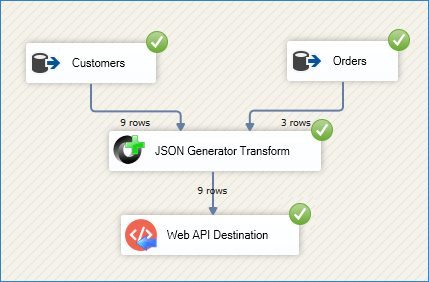
Method-1: HTTP POST using Web API destination (In Data Flow)
This method allows you to read data from any source, generate POST data, and then submit to an API endpoint using the SSIS Web API Destination. Using this destination, you can configure URL and API Body (e.g. JSON/XML document you want to submit) for each request. Check the following screenshot to get an idea of how API POST works
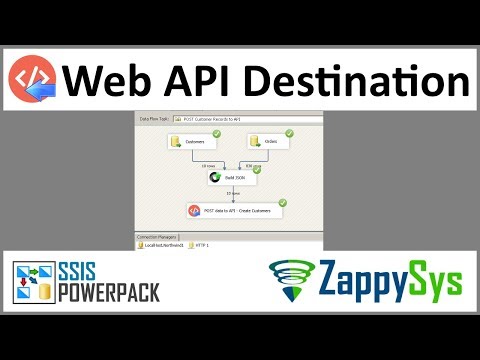
Step-By-Step: Video Tutorial
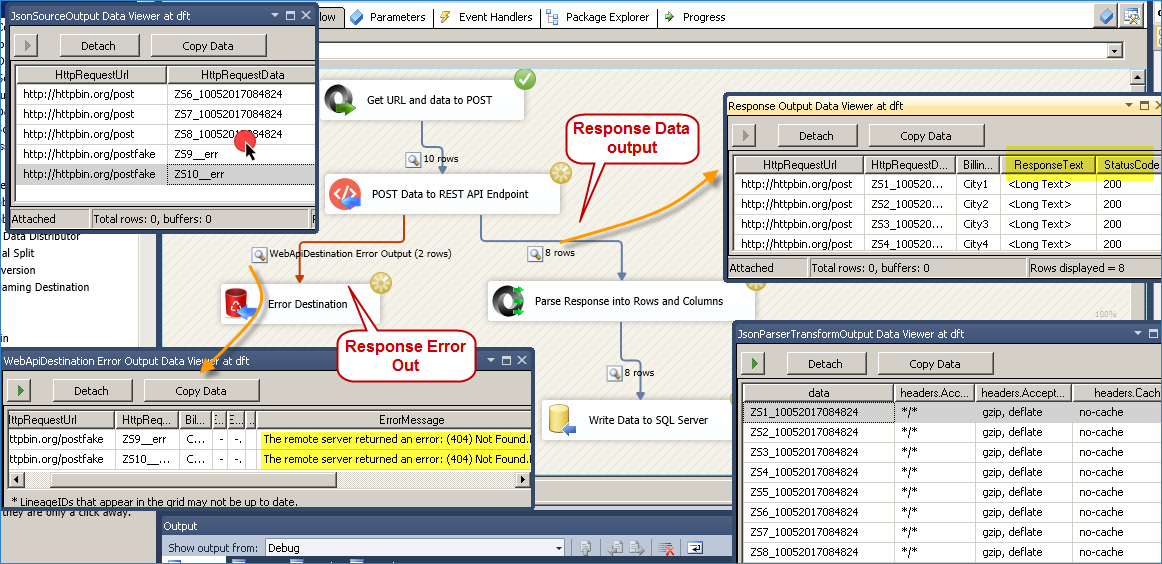
You can also extract HTTP response (i.e. JSON or XML) from Web API Destination and parse it into Rows and Columns using JSON Parser Transform, like below. If you want to handle errors gracefully without stopping execution, use error output (drag the red arrow from the Web API destination and attach it to the downstream). Make sure you set Redirect for Error and Truncate both when prompted on attach)
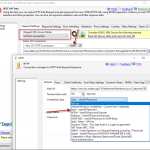
Method-2: HTTP POST using SSIS REST API Task (In Control Flow)
REST API Task supports many advanced options, too, in case you want to tweak certain aspects of your POST request.
Here is the screenshot of HTTP POST in JSON format using the ZappySys REST API Task
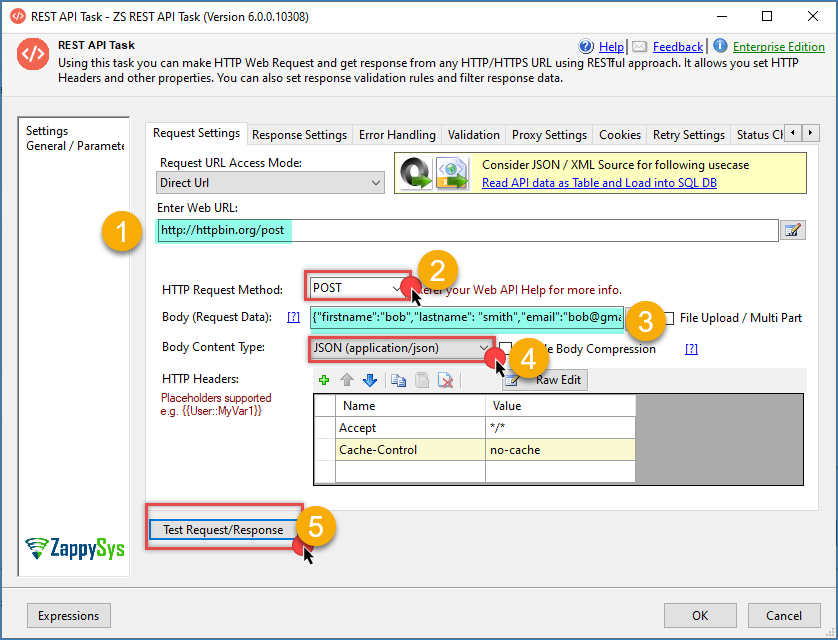
Perform an HTTP POST operation using the SSIS REST API Task – Send data in JSON content type
Parse response into rows/columns using SSIS JSON Source
If you wish to POST data and parse JSON response into rows/columns, then you can use the SSIS JSON Source for this purpose. JSON Source has a great JSON Parser that supports parsing very large JSON (stored in a file, an API URL, or a Direct string) into Rows and Columns. This is useful if you wish to save the response into a target such as SQL Server or a CSV file.
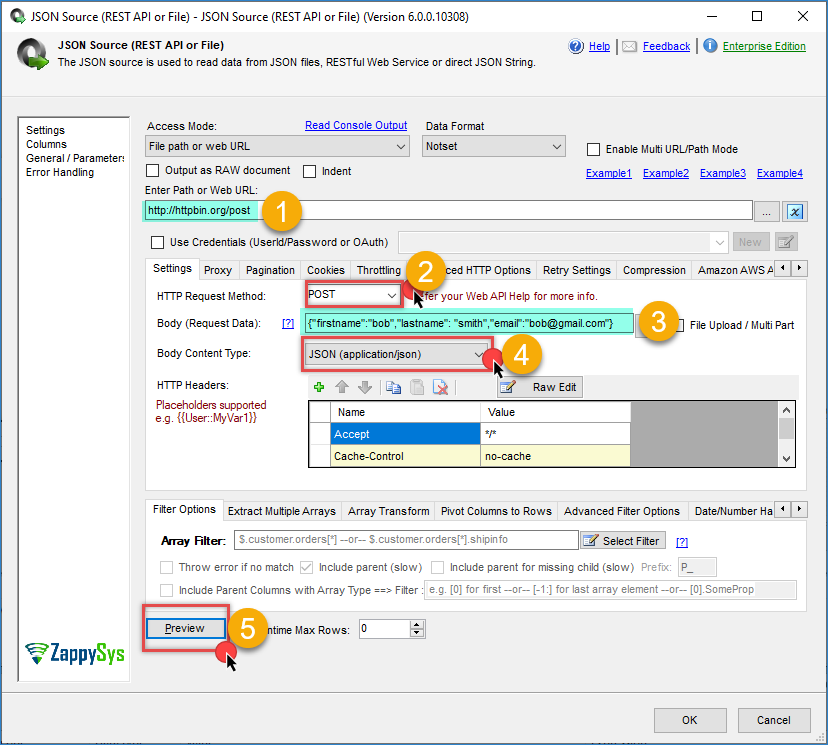
Post JSON data to an HTTP URL and parse the response into columns and rows.
Parse response into rows/columns using SSIS XML Source
If you wish to POST data and parse XML response into rows/columns, then you can use the SSIS XML Source for this purpose. XML Source supports parsing XML data (from a file, an API URL, or a string) into Rows and Columns. This is useful if you wish to save the response into a target such as SQL Server or a CSV file.
Passing credentials for Web Request for HTTP POST
Unfortunately, there is no one standard for passing credentials to the server. Still, the good thing is that ZappySys REST API Task comes with many options to secure your request and pass credentials (Userid/Password or API Key or OAuth Token).
Basic Authentication
The most common approach to passing credentials is user ID/password. Check this article on how to use a URL from a connection if you wish to pass credentials using Basic authentication (i.e. Userid/password).
OAuth Authentication (1.0 or 2.0)
If your API supports the OAuth protocol, then check these articles on how to use OAuth with ZappySys REST connectors.
Passing Parameters in POST Body (Make it dynamic)
SSIS PowerPack supports variable placeholders for many editable text fields (usually indicated by a variable icon or a pencil icon).
If you wish to pass parameters in the data used in the Body, then use a variable placeholder (e.g., {{User::varMyDate}}). When you edit POST Body you will see <<Insert Variable>> option.
Here is the complete list of available placeholder functions
Upload file using Multi-Part POST
If you need to submit data to a server from a file, then check this link (it shows a few ways to upload a file using HTTP POST)
Most common Content-Type for POST operation
There are many data formats you can submit to the server via HTTP POST, but below are the most common ones you will use in most scenarios.
The data format is usually determined by the server based on the Content-Type header you include with your request.
HTTP POST Form data – submit key/value pairs (application/x-www-form-urlencoded)
This is the most common data format for HTTP POST. It’s also famous because whenever you submit a form on any website, it most likely uses this method to send your data to the server. As you see, it’s key/value pairs separated by ampersand [&]. Also, if a special character is found, then it needs to be URL encoded (e.g. @ is replaced by %40)
|
1 2 3 4 |
POST https://myserver.com/submit Content-Type: application/x-www-form-urlencoded firstname=bob&lastname=smith&email=bob%40mycompany.com |
HTTP POST JSON data (application/json content-type)
JSON is becoming a very popular data format, so if you are dealing with a newer API, you will most likely need to submit your POST request using this content type, as shown below. Assume you are creating a new customer record; your request may look like the following.
|
1 2 3 4 5 6 7 8 |
POST https://myserver.com/api/customer Content-Type: application/json { "firstname" : "bob", "lastname" : "smith", "email" : "bob@mycompany.com" } |
HTTP POST CSV data (text/plain content-type)
When a POST request to an API requires CSV data, you have to specify the content type. Below is an example of HTTP POST with CSV data.
|
1 2 3 4 5 |
POST https://myserver.com/api/customer Content-Type: text/plain firstname,lastname,email bob,smith,bob@mycompany.com |
HTTP POST XML data (application/xml content-type)
When an API POST requires data in XML format, you have to specify (application/xml) content type. Below is an example of HTTP POST with XML data.
|
1 2 3 4 5 6 7 8 9 |
POST https://myserver.com/api/customer Content-Type: application/xml <?xml version="1.0"?> <data> <firstname>bob</firstname> <lastname>smith</lastname> <email>bob@mycompany.com</email> </data> |
HTTP POST Binary data (Upload file)
If you are POSTing a large amount of data from a file (i.e. uploading a file) to your API endpoint, then check this article about How to Upload a file using Multi-Part Upload.
HTTP POST Raw data (no content type)
Do not pass any content-type header to send a raw request
Advanced Read / Write Scenarios / API Error Handling
Now let’s look at an advanced scenario where you first call one API (GET or POST) using a JSON or XML Source, and then POST data to another URL using a Web API Destination.
Once you receive a response after a POST/GET, parse the records for further processing and error handling. Such API calls can be achieved using the following pattern.
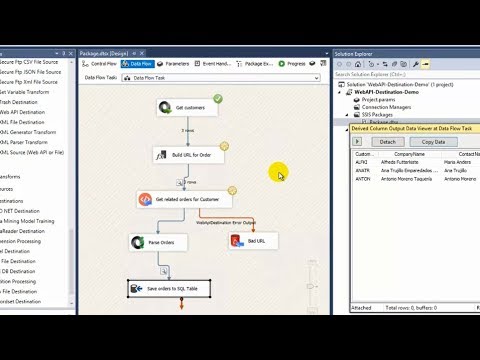
Using Template Transform to build JSON or XML for the POST Body.
Check this article to learn more about some techniques to build JSON or XML for an API POST Call (e.g. SOAP )
Encoding for POST Body
When using application/x-www-form-urlencoded content type (POST Form data), your server may require you to encode certain characters in property name or value using URL Encoding technique. As you see below, key/value pairs are separated by ampersand [&]. Also, if a special character is found, it needs to be URL-encoded (e.g., @ is replaced by %40). There are many online tools available to encode or decode data using URL encoding.
|
1 |
firstname=bob&lastname=smith&email=bob%40mycompany.com |
|
1 |
Troubleshooting / Debugging HTTP POST issues using Fiddler
If you wish to see what’s being passed to the server via any client tool, or when you perform a POST request? Use a tool called Fiddler. Check this article to learn how to use Fiddler for debugging purposes.
Conclusion
As we enter the cloud-first world, you will increasingly need to integrate various RESTful APIs into your ETL workflows.SSIS PowerPack comes with a complete toolset to automate any API calls (Read, Write or Parse). Try it for free here to discover many hidden features not discussed in this article.