
Video tutorial
Watch this quick video to see the integration in action. It walks you through the end-to-end setup, including:
- Installing the SSIS PowerPack
- Configuring a secure connection to Outlook Mail (Office 365)
- Working with Outlook Mail (Office 365) data directly inside SSIS
- Exploring advanced API Source features
Ready to dive in? Download the product to jump right in, or follow the step-by-step guide below to see how it works.
Prerequisites
Before we begin, make sure the following prerequisites are met:
- SQL Server Data Tools (SSDT) designer installed for Visual Studio.
- SQL Server Integration Services Projects 2022+ Visual Studio extension installed.
- SSIS PowerPack is installed.
Send mail in SSIS
-
Open Visual Studio and click Create a new project.
-
Select Integration Services Project. Enter a name and location for your project, then click OK.
-
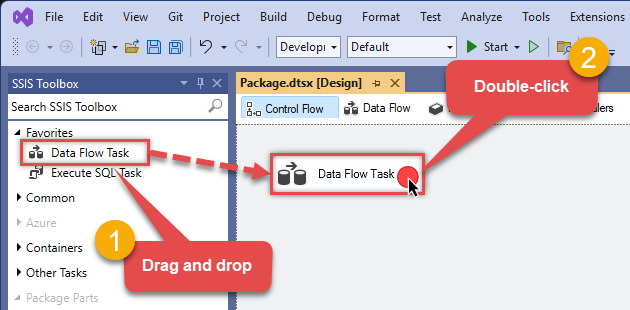
From the SSIS Toolbox, drag and drop a Data Flow Task onto the Control Flow surface, and double-click it:
-
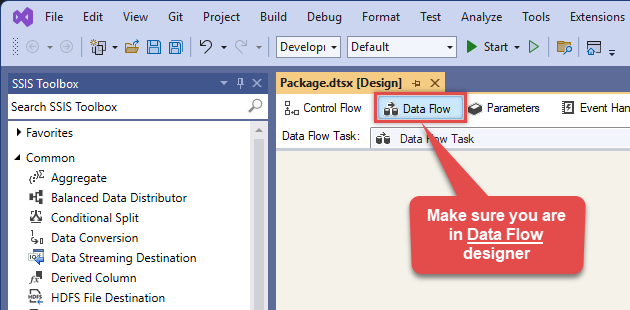
Make sure you are in the Data Flow Task designer:
-
Read the data from the source, using any desired source component. You can even make an API call using the ZappySys JSON/XML/API Source and read data from there. In this example, we will use an OLE DB Source component to read real-time data from a SQL Server database.
-
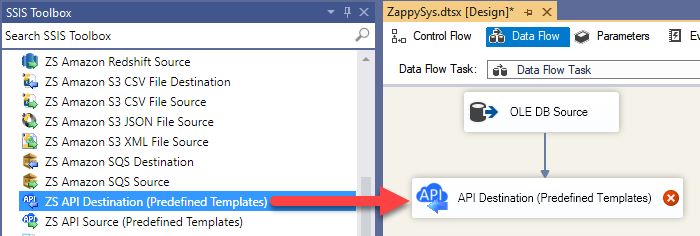
From the SSIS Toolbox drag and drop API Destination (Predefined Templates) on the Data Flow Designer surface and connect source component with it, and double click to edit it.
-
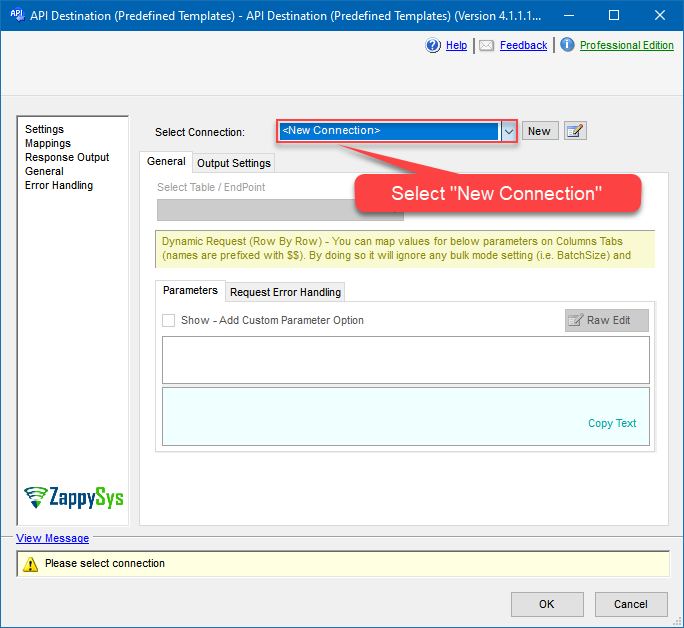
Select New Connection to create a new connection:
API Destination - Outlook Mail (Office 365)Read and write Microsoft Outlook Mail (Office 365) data effortlessly. Send, manage, and sync messages, attachments, and folders — almost no coding required.
-
To configure the Outlook Mail (Office 365) connector, choose one of the following methods:
- Choose from Popular Connector List: Select a pre-installed service directly from the dropdown menu.
- Search Online: Use this to find and download a new connector file to your computer.
- Use Saved/Downloaded File: Once the file is downloaded, browse your local drive to load it into the configuration.
After that, just click Continue >>:
Outlook Mail (Office 365)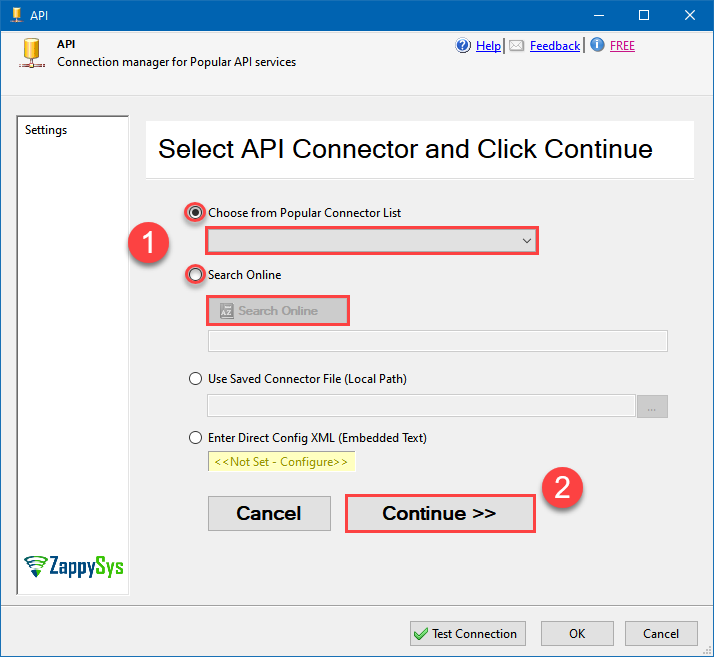
-
Proceed with selecting the desired Authentication Type. Then select API Base URL (in most cases default one is the right one). Finally, fill in all the required parameters and set optional parameters if needed. You may press a link Steps to Configure which will help set certain parameters. More info is available in Authentication section.
User Credentials
Outlook Mail (Office 365) authentication
Use delegated access (User Credentials) whenever you want to let a signed-in user work with their own resources or resources they can access. Whether it's an admin setting up policies for their entire organization or a user deleting an email in their inbox, all scenarios involving user actions should use delegated access. [API reference]
Follow these simple steps below to create Microsoft Entra ID application with delegated access:
WARNING: If you are planning to automate processes, we recommend that you use a Application Credentials authentication method. In case, you still need to use User Credentials, then make sure you use a system/generic account (e.g.automation@my-company.com). When you use a personal account which is tied to a specific employee profile and that employee leaves the company, the token may become invalid and any automated processes using that token will start to fail.- Navigate to the Azure Portal and log in using your credentials.
- Access Microsoft Entra ID.
-
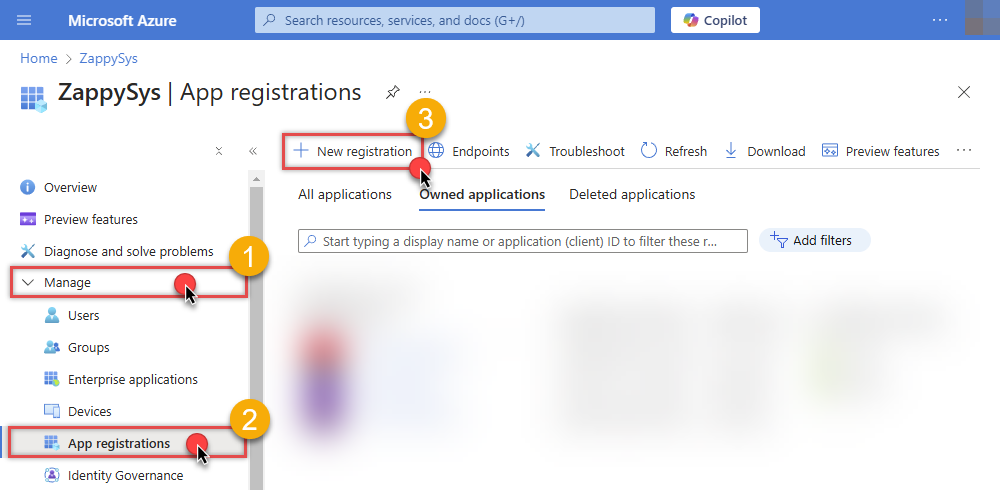
Register a new application by going to App registrations and clicking on New registration button:
 INFO: Find more information on how to register an application in Graph API reference.
 -
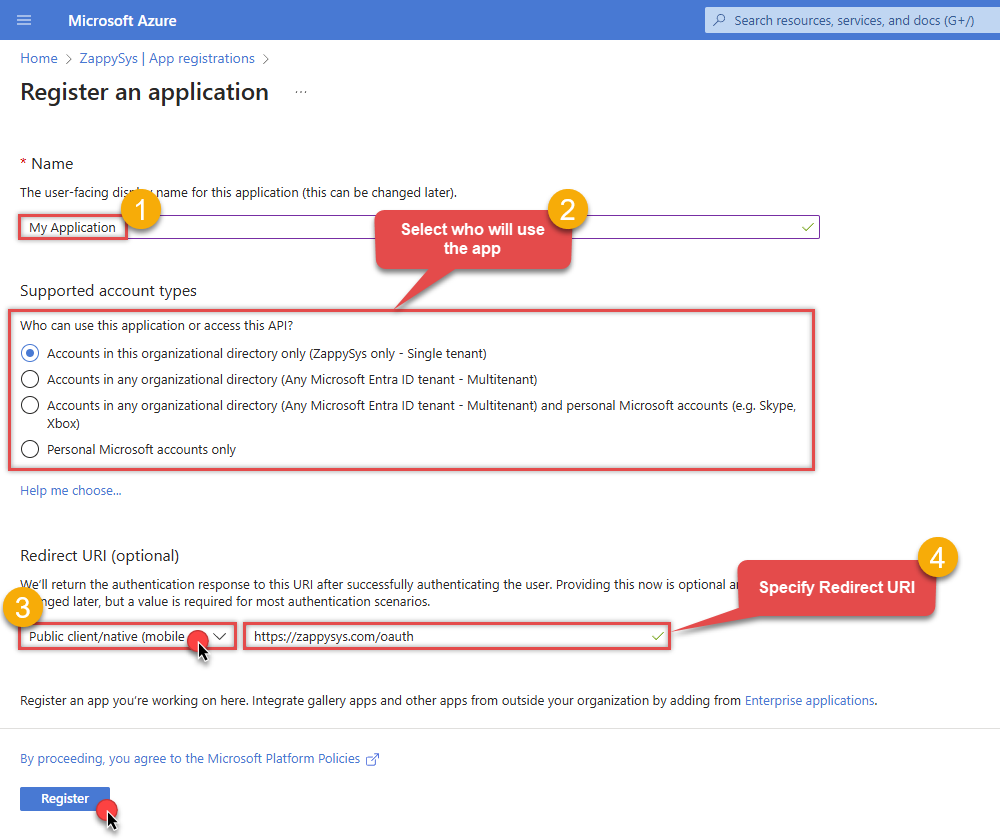
When configuration window opens, configure these fields:
-
Supported account type
- Use
Accounts in this organizational directory only, if you need access to data in your organization only.
- Use
-
Redirect URI:
- Set the type to
Public client/native (mobile & desktop). - Use
https://zappysys.com/oauthas the URL.
- Set the type to
-
Supported account type
-
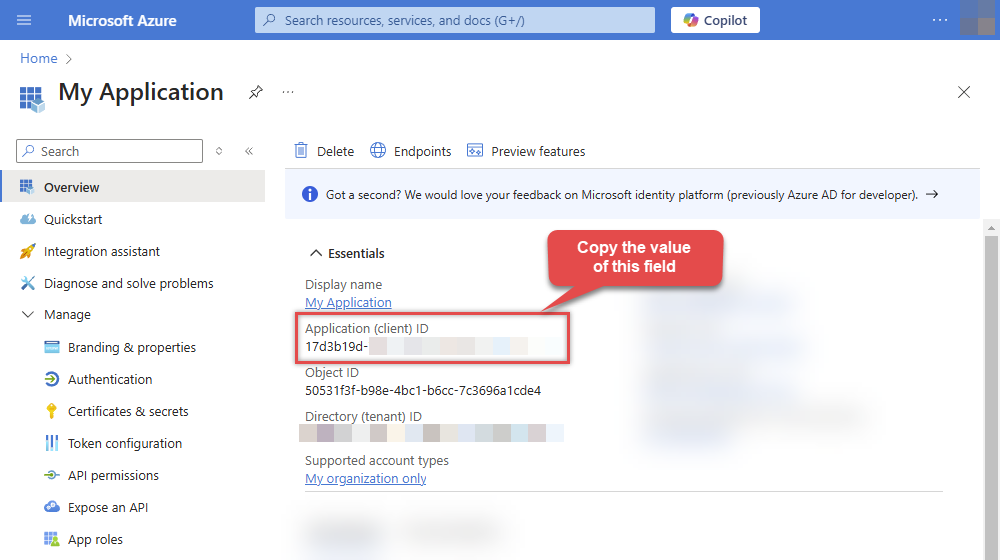
After registering the app, copy the Application (client) ID for later:
-
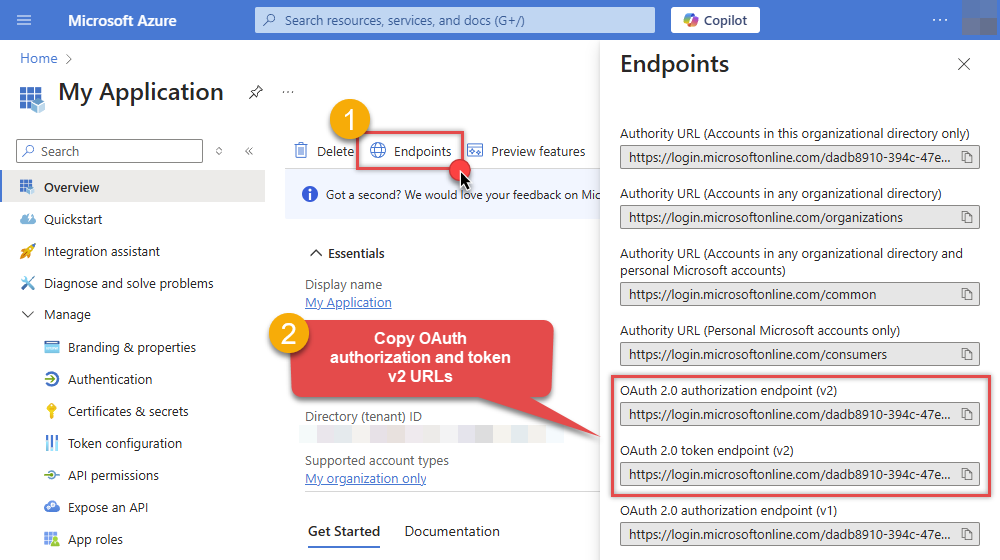
Then copy OAuth authorization endpoint (v2) & OAuth token endpoint (v2) URLs to use later in the configuration:
-
Now go to SSIS package or ODBC data source and use the copied values in User Credentials authentication configuration:
- In the Authorization URL field paste the OAuth authorization endpoint (v2) URL value you copied in the previous step.
- In the Token URL field paste the OAuth token endpoint (v2) URL value you copied in the previous step.
- In the Client ID field paste the Application (client) ID value you copied in the previous step.
-
In the Permissions (Scope) field use the default or pick labeled permissions. [System] covers sign-in and refresh token. [User] is the signed-in user’s mailbox (use
Mail.ReadBasicorMail.Readfor read-only). [Shared] adds shared or delegated mail folders. [Tenant] entries (User.ReadBasic.All,User.Read.All,Group.Read.All) are broad directory permissions that usually need an administrator to approve the app. The default includesUser.ReadBasic.Allfor the Default User Id drop down; addUser.Read.Allonly if you need full user profiles (not required for listing users).-
offline_access,openid,profile,email -
User.Read,Mail.ReadBasic,Mail.Read,Mail.ReadWrite,Mail.Send -
Mail.Read.Shared,Mail.ReadBasic.Shared,Mail.ReadWrite.Shared,Mail.Send.Shared -
User.ReadBasic.All,Group.Read.All(often admin consent; user drop down / group lookups) -
User.Read.All(optional — full user profiles; broader than needed for user drop down)
Admin consent note:- Token generation can still ask for admin approval, even when delegated scopes are listed in API permissions.
- A Global Administrator can allow user consent for selected low-impact delegated permissions.
- Broad mail or directory scopes such as
Mail.ReadWrite,User.ReadBasic.All,User.Read.All, andGroup.Read.Allmay still require admin consent.
-
- Press Generate Token button to generate Access and Refresh Tokens.
-
Choose Default User Id from the drop down menu after token generation. This calls
GET /usersand requiresUser.ReadBasic.Allin your token (included in the default scope list). Regenerate the token if you add or remove this scope later. Keepmefor your own mailbox, or pick another user when accessing a shared or delegated mailbox. You can also type a user id or email manually if listing fails. - Click Test Connection to confirm the connection is working.
- Done! Now you are ready to use the API Connector!
API Connection Manager configuration
Just perform these simple steps to finish authentication configuration:
-
Set Authentication Type to
User Credentials [OAuth] - Optional step. Modify API Base URL if needed (in most cases default will work).
- Fill in all the required parameters and set optional parameters if needed.
- Press Generate Token button to generate the tokens.
- Finally, hit OK button:
Outlook Mail (Office 365)User Credentials [OAuth]https://graph.microsoft.com/v1.0Required Parameters Authorization URL Fill-in the parameter... Token URL Fill-in the parameter... Application (client) ID Fill-in the parameter... Permissions (Scope) Fill-in the parameter... Return URL Fill-in the parameter... Optional Parameters Client Secret Refresh Token File Path Login Prompt Option Default User Id (Select after clicking **Generate Token**) me RetryMode RetryWhenStatusCodeMatch RetryStatusCodeList 429|503 RetryCountMax 5 RetryMultiplyWaitTime True 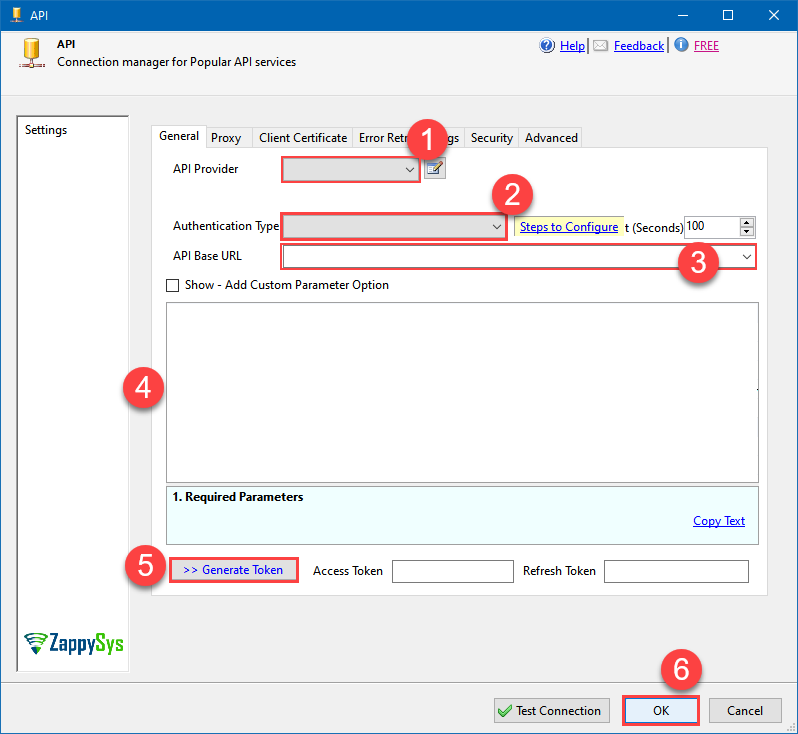 Find full details in the Outlook Mail (Office 365) Connector authentication reference.
Application Credentials
Outlook Mail (Office 365) authentication
Application-only access is broader and more powerful than delegated access (User Credentials), so you should only use app-only access where needed. Use it when: 1. The application needs to run in an automated way, without user input (for example, a daily script that checks emails from certain contacts and sends automated responses). 2. The application needs to access resources belonging to multiple different users (for example, a backup or data loss prevention app might need to retrieve messages from many different chat channels, each with different participants). 3. You find yourself tempted to store credentials locally and allow the app to sign in 'as' the user or admin. [API reference]
Follow these simple steps below to create Microsoft Entra ID application with application access permissions.
- Navigate to the Azure Portal and log in using your credentials.
- Access Microsoft Entra ID.
-
Register a new application by going to App registrations and clicking on New registration button:
INFO: Find more information on how to register an application in Graph API reference. -
When configuration window opens, configure these fields:
-
Supported account type
- e.g. select
Accounts in this organizational directory onlyif you need access to data in your organization only.
- e.g. select
-
Redirect URI:
- Set the type to
Public client/native (mobile & desktop). - Leave the URL field empty.
- Set the type to
-
Supported account type
-
After registering the app, copy the Application (client) ID for later:
-
Then copy OAuth authorization endpoint (v2) & OAuth token endpoint (v2) URLs:
-
Continue and create Client secret:
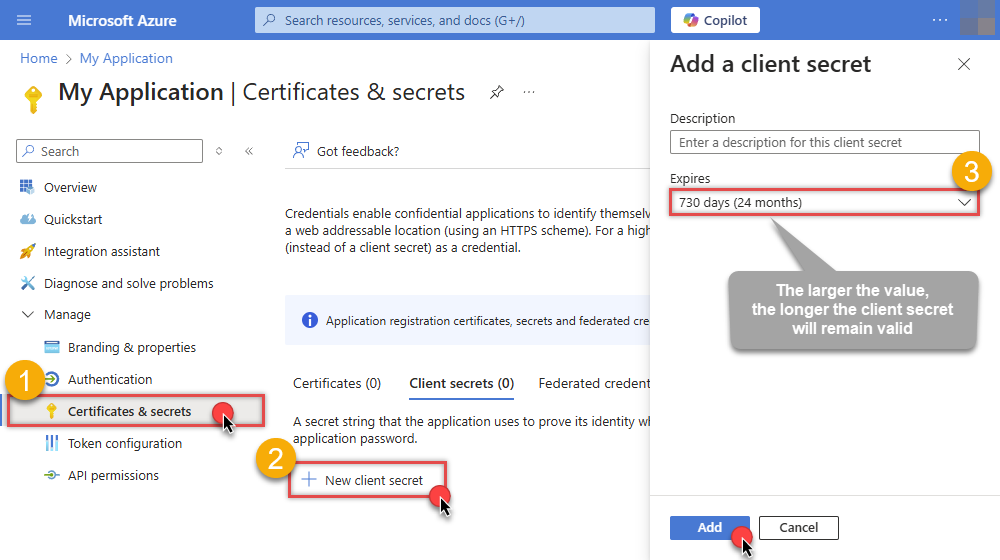
-
Then copy the Client secret for later steps:
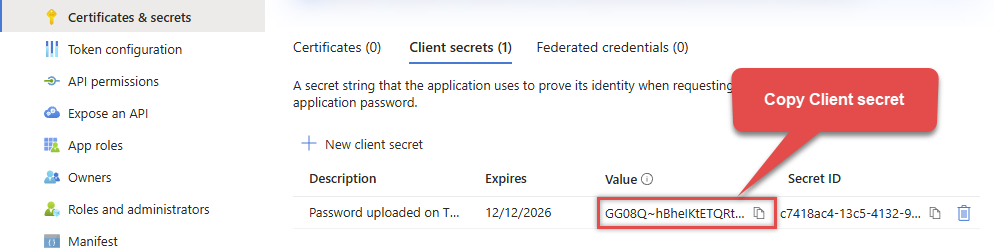
-
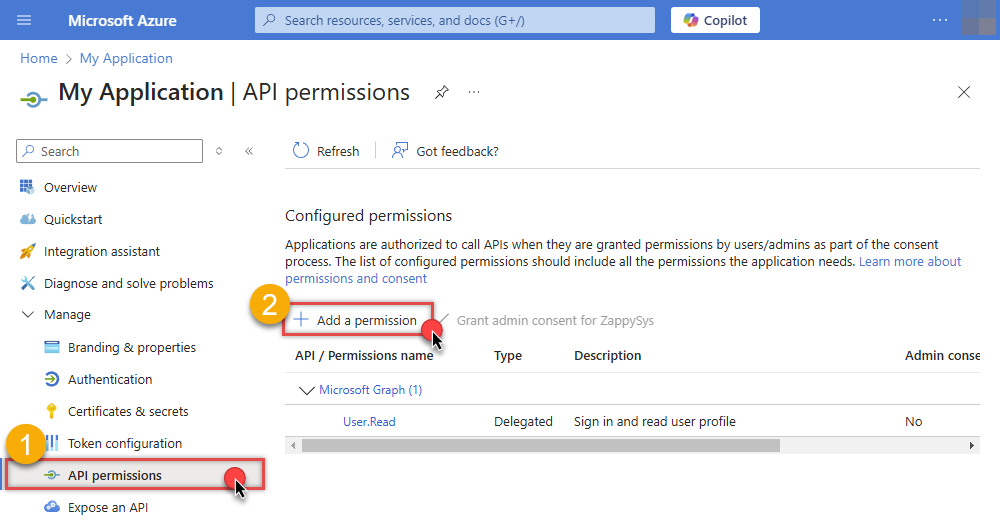
Continue by adding permissions for the app by going to the API permissions section, and clicking on Add a permission:
-
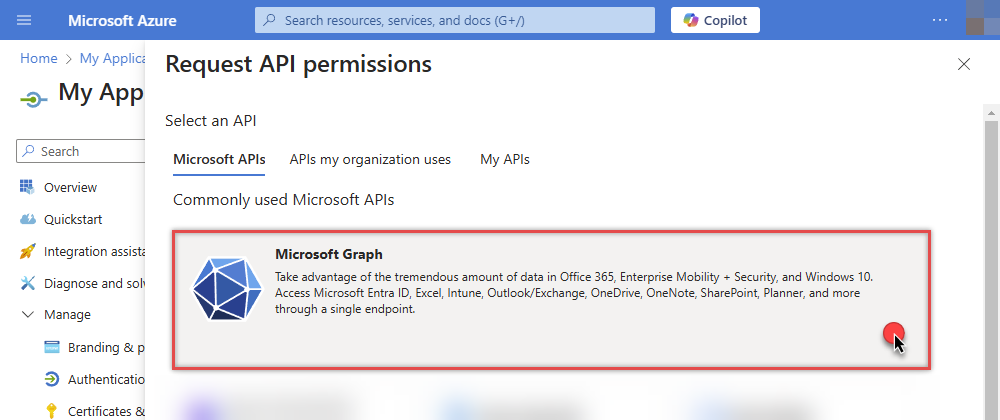
Select Microsoft Graph:
-
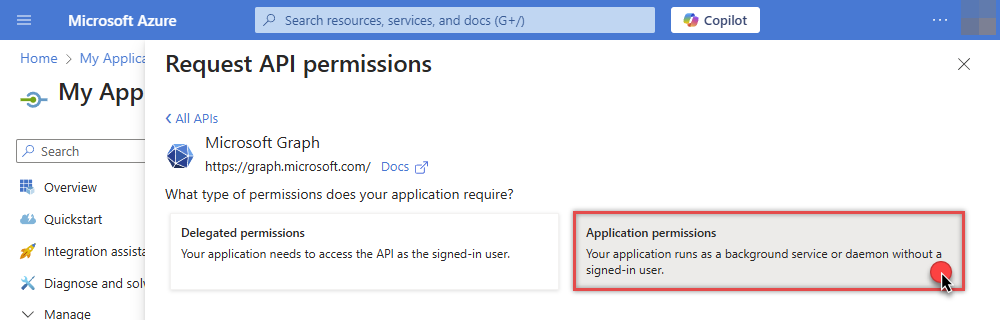
Then choose Application permissions option:
-
Continue by adding these Mail (Outlook) application permissions (for example
Mail.Read,Mail.ReadWrite, orMail.Senddepending on your needs):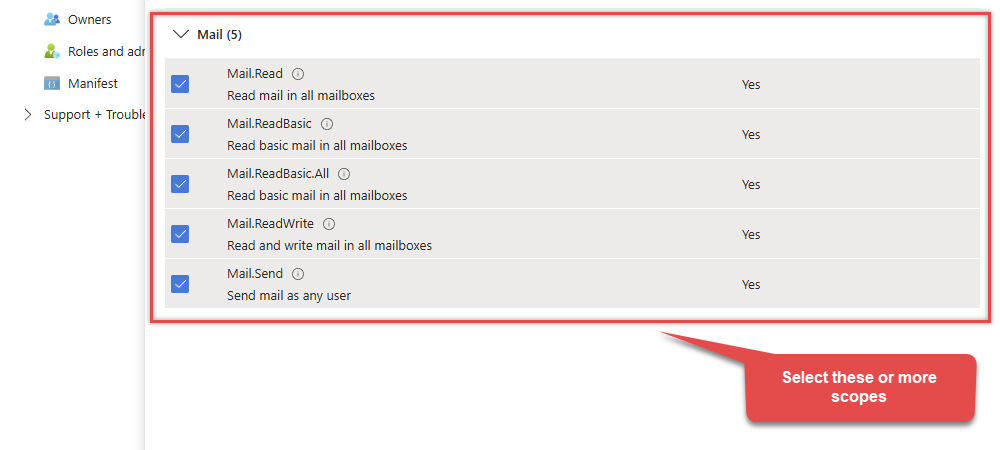
-
If you want the Default User Id drop down to list organization users (calls
GET /users), repeat Add a permission and also add the User.Read.All application permission. Add Group.Read.All if you need group lookups. Search forUserunder Application permissions, select User.Read.All, then click Add permissions. -
Finish by clicking Add permissions button:
-
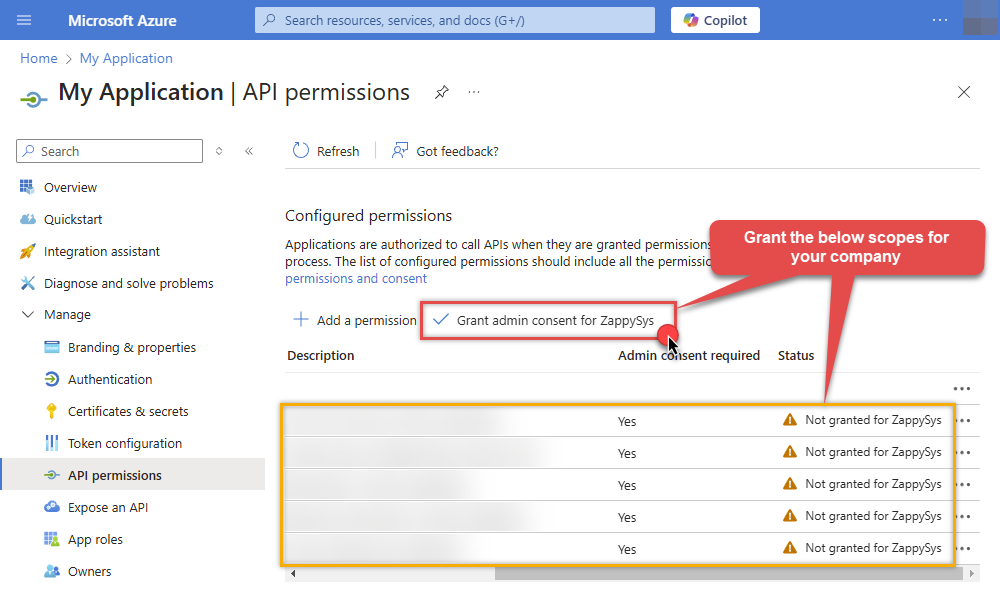
Now it's time to Grant admin consent for your application:
-
Confirm all the permissions are granted (Mail scopes plus
User.Read.Allwhen using the user drop down):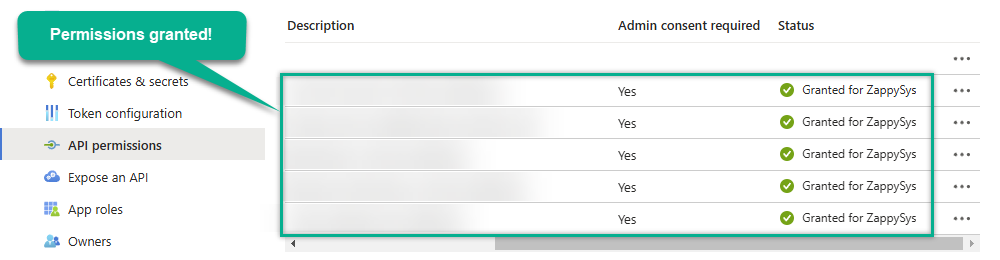
-
Now go to SSIS package or ODBC data source and use the copied values in Application Credentials authentication configuration:
- In the Token URL field paste the OAuth token endpoint (v2) URL value you copied in the previous step.
- In the Client ID field paste the Application (client) ID value you copied in the previous step.
- In the Client Secret field paste the Client secret value you copied in the previous step.
- Choose Default User Id from the drop down menu (requires
User.Read.Allapplication permission and admin consent), or type a user id or email manually.
- Click Test Connection to confirm the connection is working.
- That's it! Now you can use the connector.
API Connection Manager configuration
Just perform these simple steps to finish authentication configuration:
-
Set Authentication Type to
Application Credentials [OAuth] - Optional step. Modify API Base URL if needed (in most cases default will work).
- Fill in all the required parameters and set optional parameters if needed.
- Finally, hit OK button:
Outlook Mail (Office 365)Application Credentials [OAuth]https://graph.microsoft.com/v1.0Required Parameters Token URL Fill-in the parameter... Application (client) ID Fill-in the parameter... Client Secret Fill-in the parameter... Scope Fill-in the parameter... Default User Id Fill-in the parameter... Optional Parameters RetryMode RetryWhenStatusCodeMatch RetryStatusCodeList 429|503 RetryCountMax 5 RetryMultiplyWaitTime True 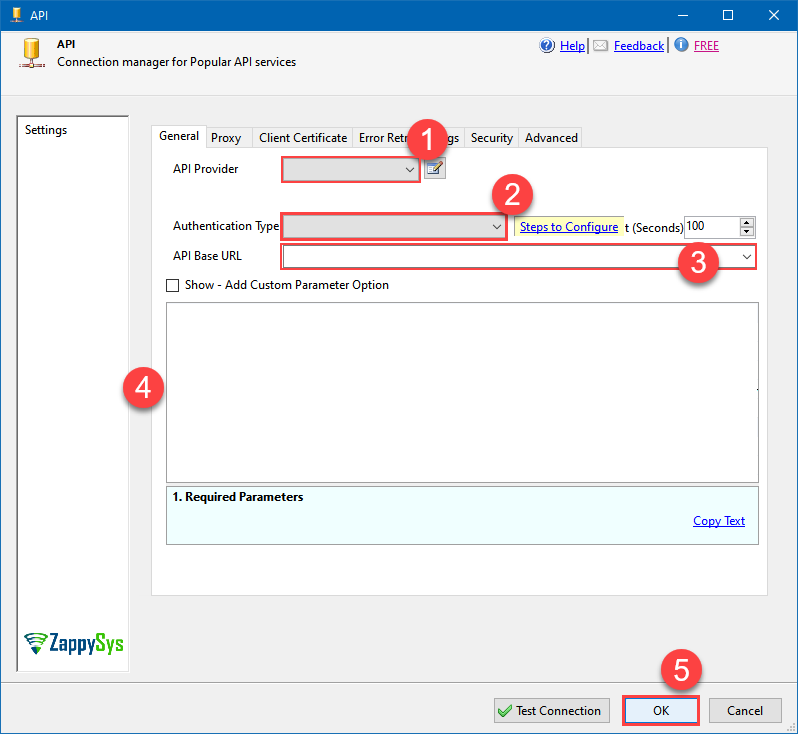 Find full details in the Outlook Mail (Office 365) Connector authentication reference.
 -
Select MyMessages table from the dropdown, then select Insert as operation, and hit Preview Data:
 API Destination - Outlook Mail (Office 365)Read and write Microsoft Outlook Mail (Office 365) data effortlessly. Send, manage, and sync messages, attachments, and folders — almost no coding required.Outlook Mail (Office 365)MyMessagesInsert
Required Parameters User ID or Email Fill-in the parameter... Optional Parameters DoNotOutputEmptyNestedProperty True DoNotOutputEmptyArrayProperty True RawOutputDataRowTemplate {} EnableRawOutputModeSingleRow True 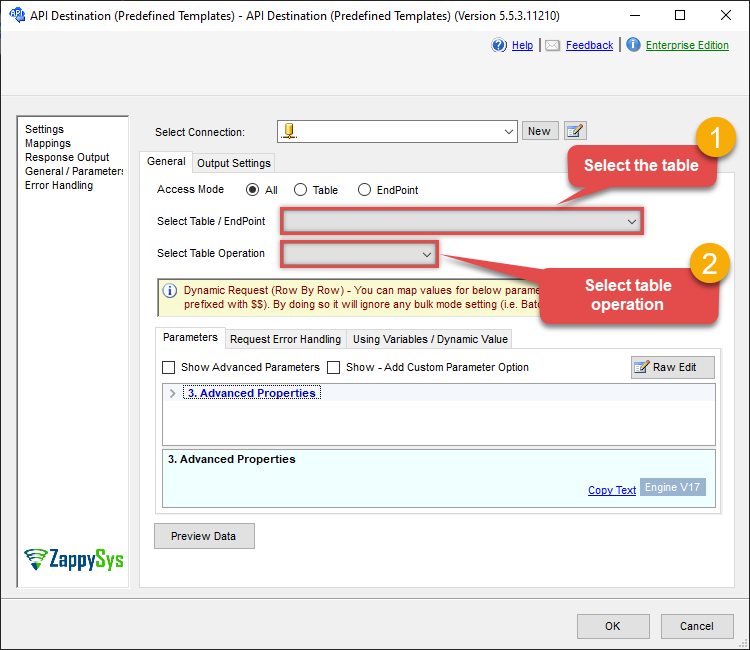
-
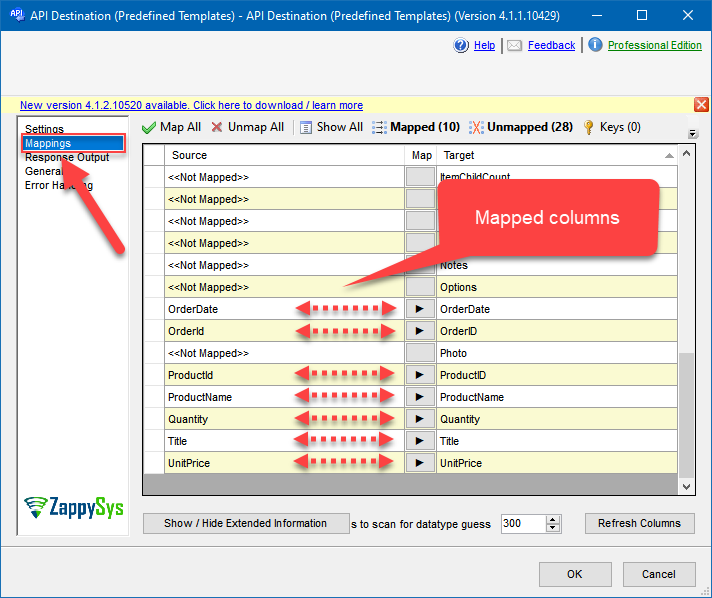
Finally, map the desired columns:
API Destination - Outlook Mail (Office 365)Read and write Microsoft Outlook Mail (Office 365) data effortlessly. Send, manage, and sync messages, attachments, and folders — almost no coding required.
-
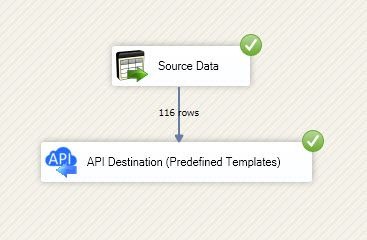
That's it; we successfully configured the POST API Call. In a few clicks we configured the Outlook Mail (Office 365) API call using ZappySys Outlook Mail (Office 365) Connector
Outlook Mail (Office 365) Connector actions
Need another use case? Pick the next Outlook Mail (Office 365) action in SSIS below.
- Delete Message by Id (Single)
- Delete Messages - Using Search Condition (Bulk Delete)
- Download Message Attachment (Single File)
- Download Message Attachments (Multiple Files) - Using Search Condition
- Download Message by Id (Single *.EML File RFC 822 / MIME)
- Download Messages by Search Condition (Multiple *.EML Files RFC 822 / MIME)
- Get Group by Id
- Get Groups
- Get Mail Folder by Id [only works with User Credentials]
- Get Mail Folders
- Get Message Attachment
- Get Message Attachments
- Get Message by Id (Single) - Output binary data (EML RFC 822 / MIME)
- Get Messages
- Get Messages by Search Filters - Output binary data (EML RFC 822 / MIME)
- Get My Information
- Get My Mail Folders [only works with User Credentials]
- Get My Message by Id [only works with User Credentials]
- Get My Messages [only works with User Credentials]
- Get Table Columns
- Get Tables
- Get User by Id
- Get Users
- Make Generic REST API Request
- Make Generic REST API Request (Bulk Write)
Conclusion
You now know how to send mail in SSIS without writing complex code. Outlook Mail (Office 365) SSIS Connector handled pagination and authentication automatically.
Ready to get started? Download the trial or ping us via chat if you need help: