Introduction
In this article, we will show you step by step approach on how to register an Azure AD (Active Directory) app to access Dynamics CRM 365 API (also same for CDS / Dataverse API). You might have heard that Microsoft is deprecating an older way of authenticating (i.e. User ID / Password-based WS-Trust Authentication) on April 2022. You must update your jobs / code to use OAuth 2.0 by April 2022 for any CRM related API calls.
In other words rather than User Id / password now you can use more secure way by using OAuth rather than WS-Trust.
Going forward Microsoft wants you to use OAuth Token rather than user name/password to call Dynamics CRM 365 API programmatically.
Here is the official link which describes the dates for WS-Trust sunset
Register App for CRM / CDS / Dataverse in Azure / Active Directory
The first step is to register your app in Azure Portal under Active Directory using the below steps.
- Ask your Active Directory Admin to login to Azure Portal and navigate to > Active Directory Blade.
OR
You can access it by searching “Azure Active directory” like below.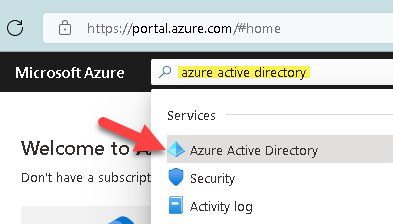
Open Azure Active Directory
- Now click on the App Registrations icon and click New App Registration
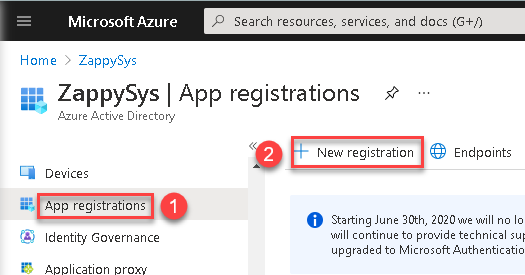
New App Registrations under Azure Active Directory
- Now next step is to give your App name to identify easily. Select App is used for your Org only option (Default) and last enter Redirect URL as below (This URL is used for 3-legged Authorization Code Grant only). We prefer you enter a URL which is OAuth friendly (If you don’t know one Use
https://zappysys.com/oauth this is recommended URL if you working with ZappySys Products)
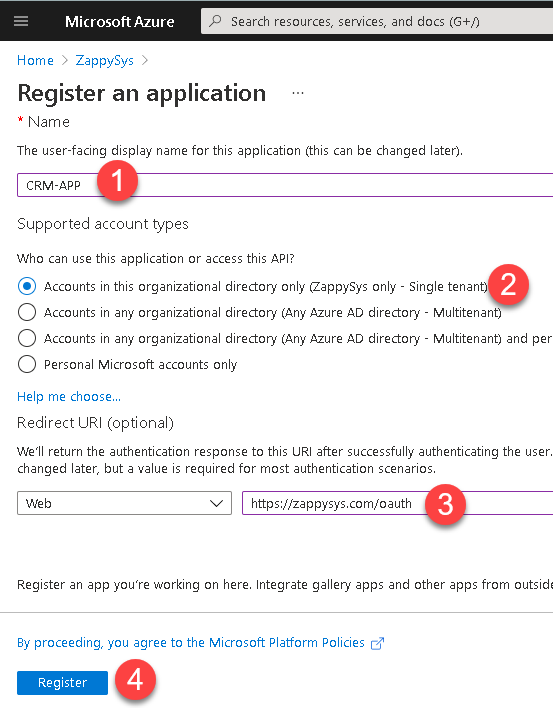
Azure AD App Registration – Single / Multi-Tenant with Redirect URL (i.e. Call back)
- Now once App is created you can find the Application (Client) Id from overview page
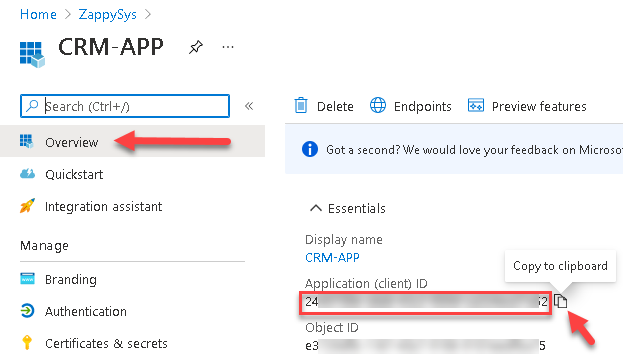
Azure AD App – Find Application / Client Id on overview page
Add API Permissions for the App
Once App is created we need to Add Permission. Basically, we will set which style of APIs can be called by this App and what Actions can be performed.
- To add API Permissions for this AD App click on API Permissions and then click on Add Permission
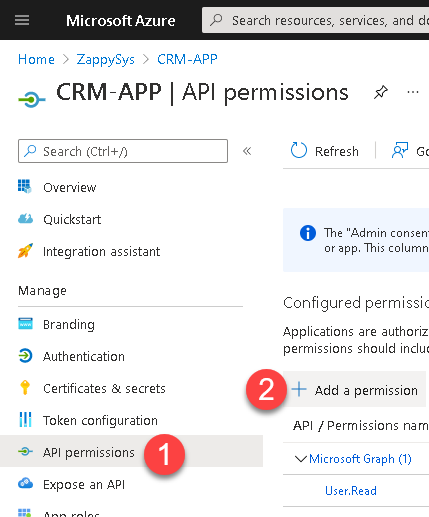
Add API Permissions for Azure AD App
- Find the Dynamics CRM icon and click on it
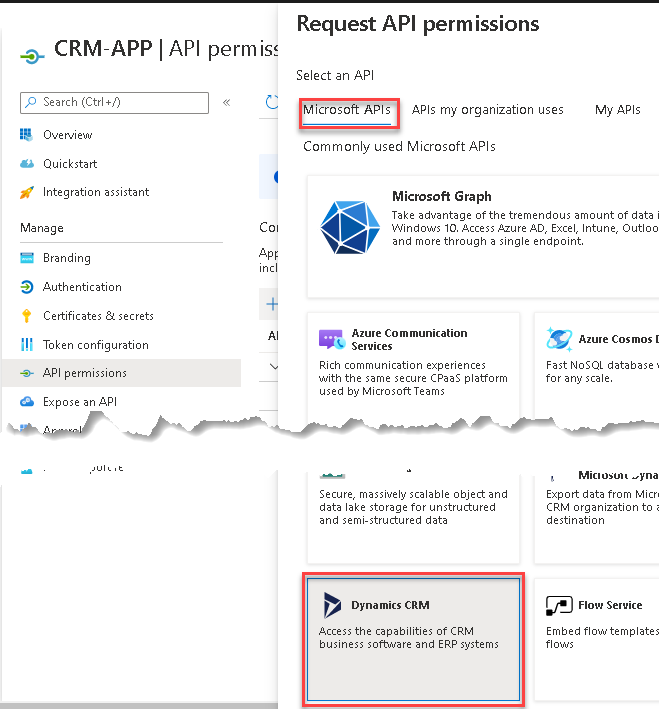
Add API Permission for Dynamics CRM API access (Azure AD App)
- Now you will see just one permission for Dynamics CRM (user_impersonation). As we said earlier for Dynamics CRM API security is controlled by User Roles in CRM Portal itself which will see in the next section. For now, just choose Delegated Permissions, check user_impersonation and click Add Permissions
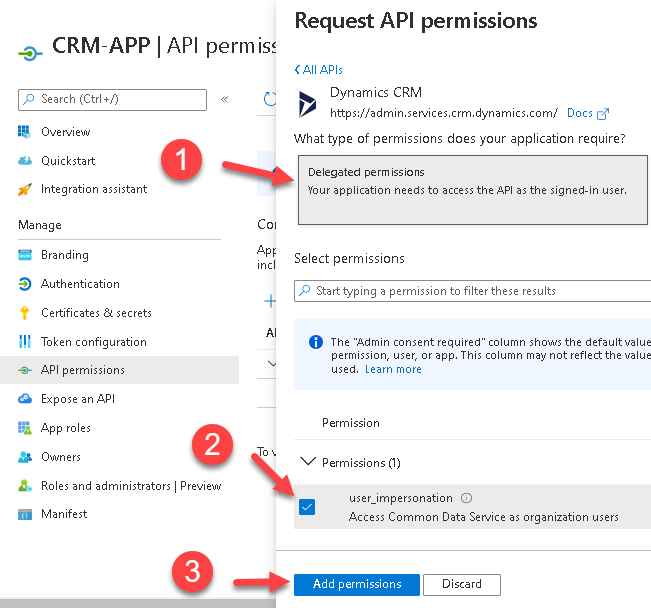
Select API Permissions for Dynamics CRM App (Azure AD App)
- Now the last step in Adding API permissions is Grant Admin Consent. If you are logged in as an Azure AD User with the correct admin role then no worries else you have to ask your Azure AD admin to consent for you so this App can be used to read/write data from CRM.
Create Client Secret
Once App is created next step is to generate a Client Secret. Perform the following steps to create a secret that you can use when you call API
- Click on Certificates and Secrets and then New Secret
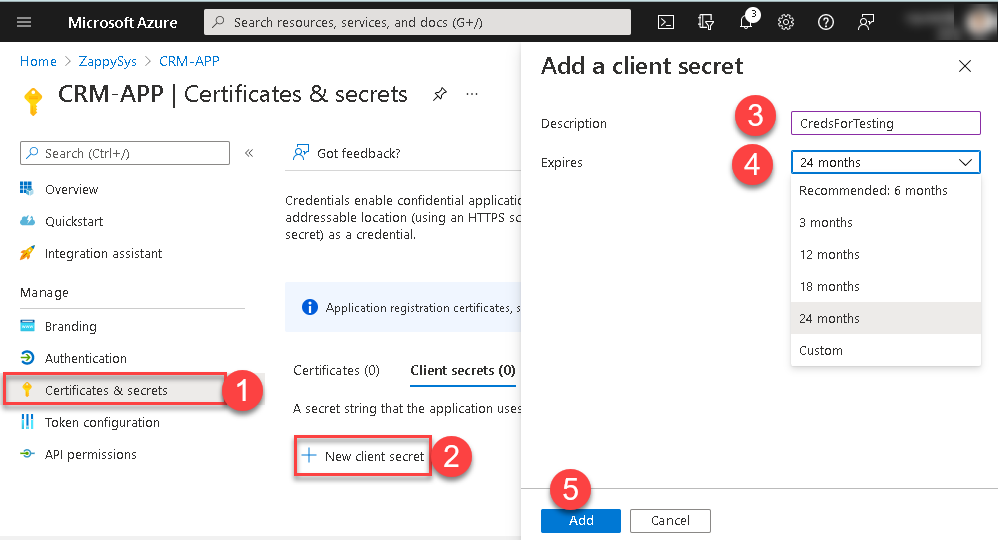
Azure AD App Create Client Secret / Set Name, Expiration Date
- Enter Name for Secret (You can give some friendly name if you create multiple secrets to control multiple processes). For example SecretForTesting, SecretForProduction etc.Select a longer expiration date (i.e. 24 months) if you don’t like to change secret often in production jobs else choose shorter expiration (i.e. 6 Months or Custom).
- Once you Create a Secret make sure you copy it to a secure location. Once the page is closed it won’t appear again.
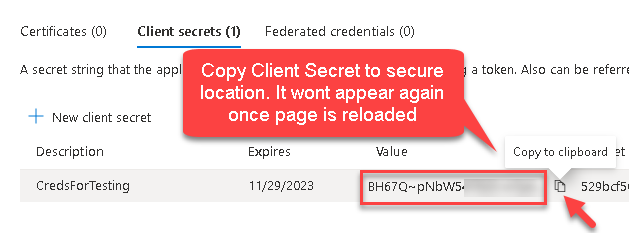
Copy Client Secret for Azure AD App
Associate App User / Set Roles in CRM 365 / Dataverse Environment
Once we have App Id and Client Secret we can go to CRM Portal to add our App as a valid CRM User. And the last step will be to attach some role(s) to App User (See Next section).
Method-1 (New way)
Here are the steps to configure User / Security Roles in New account. Below steps will give you access to Dataverse Entities via API Call. To see all Dataverse Entity you can log in to https://make.powerapps.com/ and click Tables
- Click on the below link to login to new portal to manage CRM /Dataverse environment
https://admin.powerplatform.microsoft.com/environments - Create an Application User using these steps (When prompted choose the same App we created in the previous section)
- Now Go to App Users Screen and Edit Security Roles using the below steps
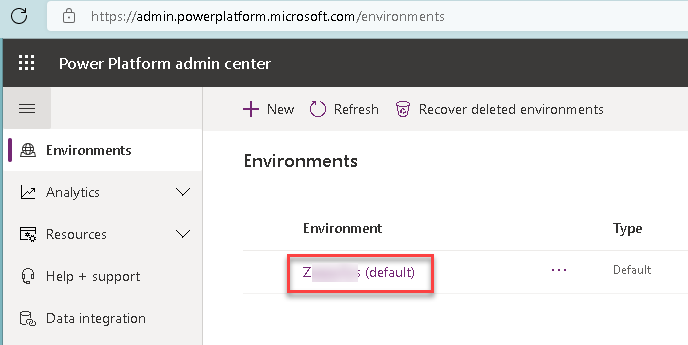
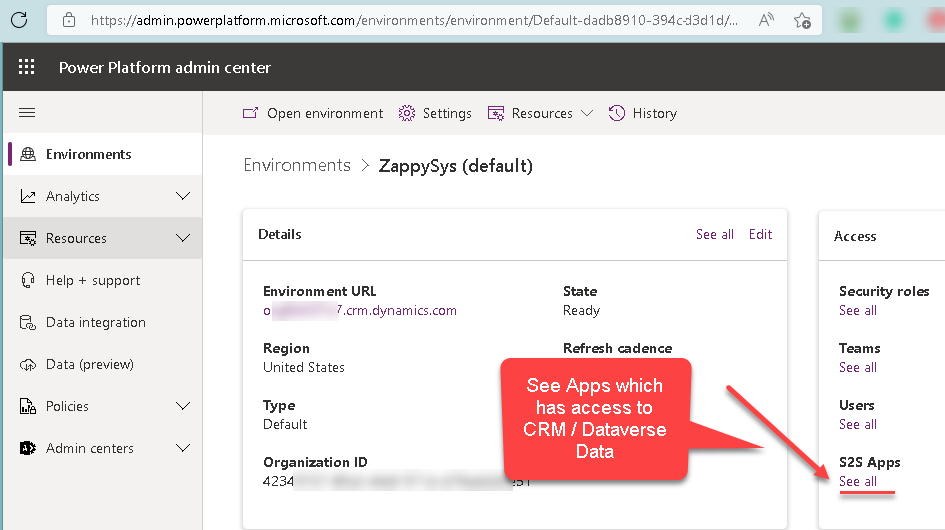
See available CRM 365 Online / Datavese Environments
See available CRM 365 Online / Datavese Application Users
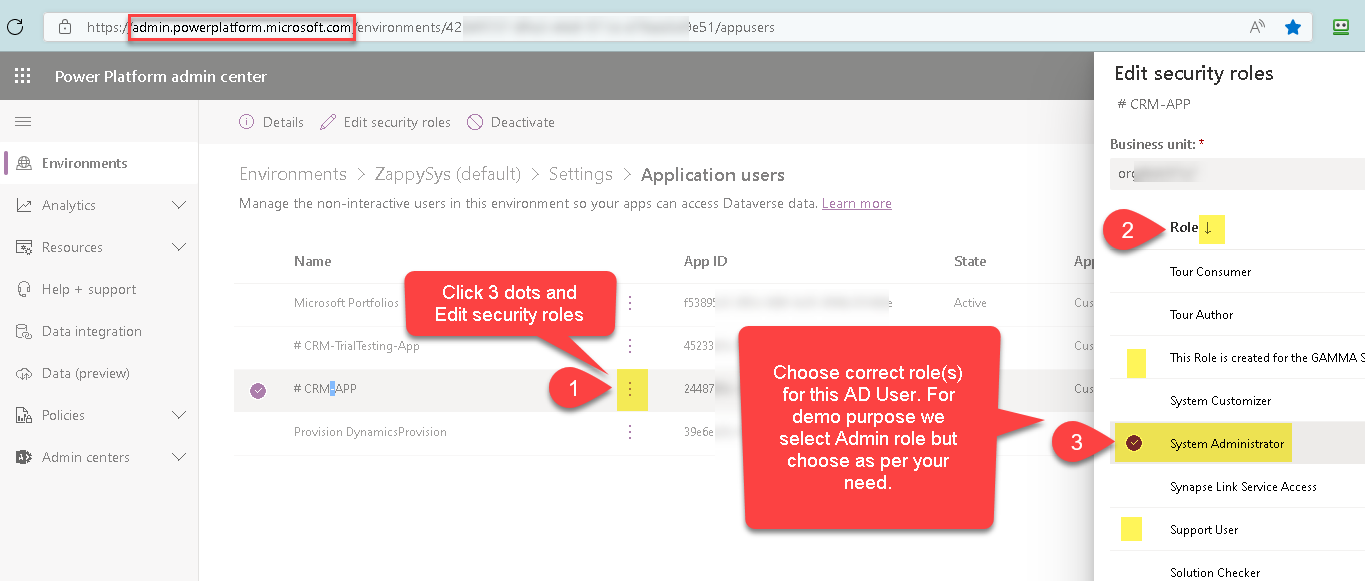
Edit Security Roles for CRM 365 Online / Datavese Application Users
Method-2 (Legacy)
If you prefer to use an older interface (and it’s still available to you) then you can use the below steps to perform the same thing we described in the previous section.
NOTE: Microsoft may soon retire the older interface and force to use the previous way only.
- To Add our Azure AD App as CRM Application user goto your CRM Portal. Click on Gear icon for Settings > Advanced Settings
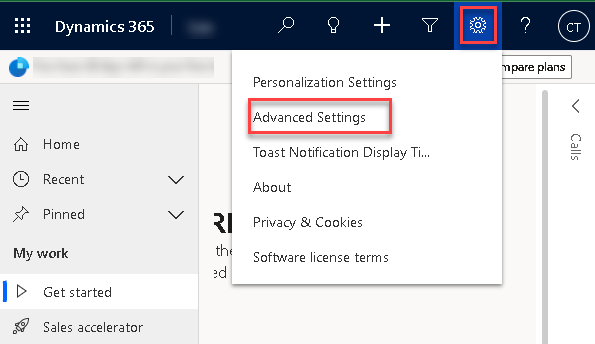
Dynamics CRM Advanced Settings
- Click on Settings dropdown > Security (Under System Column)
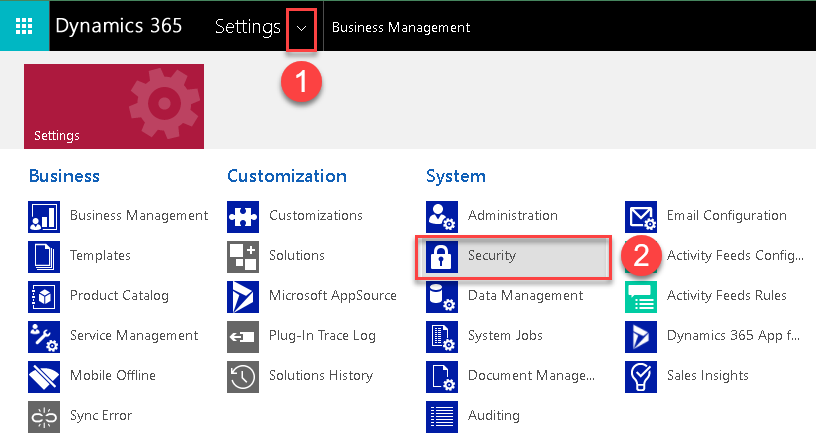
Dynamics CRM Security Settings (Under Advanced Settings – System)
- On the security, screen click on the Users icon
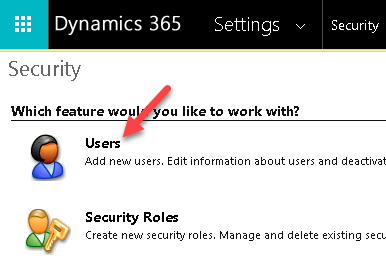
Manage Dynamics CRM Users (Add, Edit, Delete)
- Once User Screen shows up click on the User Type Dropdown and choose Application Users and click New
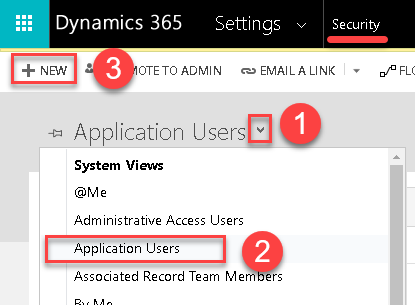
Add new Application User in Dynamics CRM
- Once User screen shows up. Enter your Application Id (obtained from the Azure AD App > Overview screen – app created earlier). Click Save and you will notice all other fields auto populates.
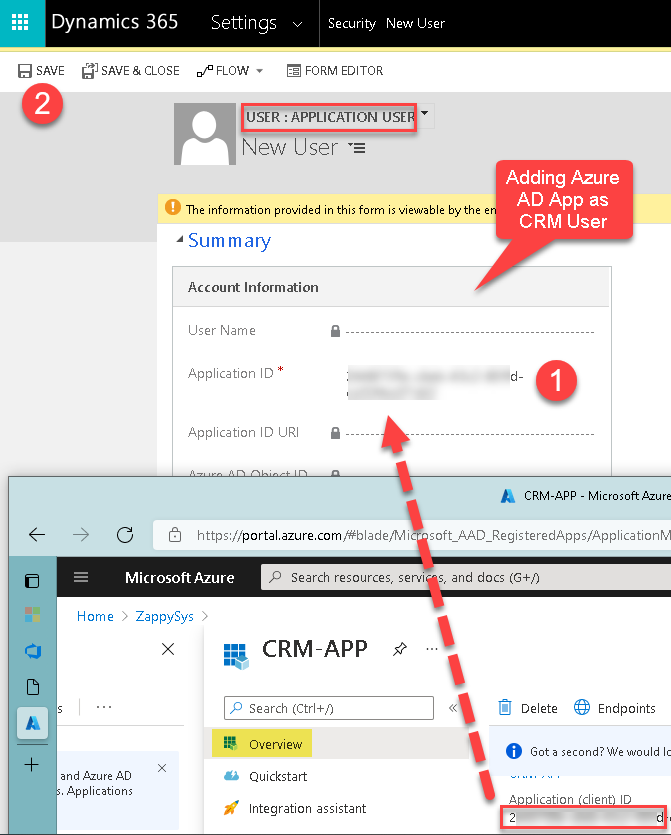
Adding Azure AD App as Dynamics CRM 365 – Application User
- And the last step is to Attach some CRM Role to the new Application User.For demo purposes we will choose “System Admin” but for production use, you should grant correct permission carefully. There are many inbuilt roles you can choose from.
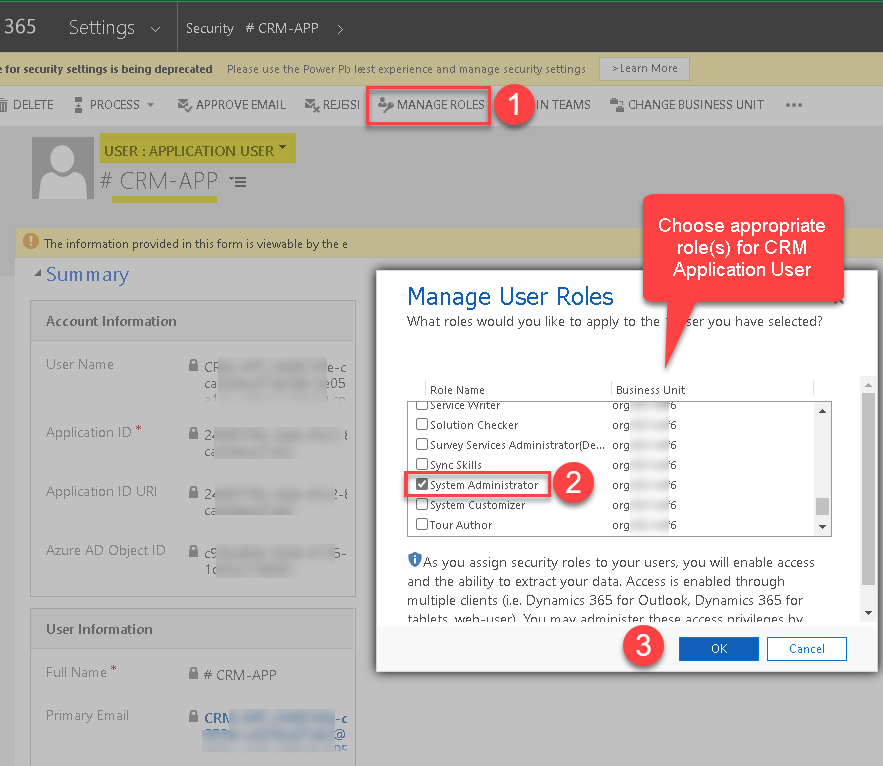
Associate Security Role(s) for Dynamics CRM Application User
Find your Organization Id for CRM / Dataverse API calls
Now find your Org Id before we can call CRM / Dataverse APIs in the next section.
To find your Org Id you can perform the following steps.
Method-1 (New way – Dataverse Portal)
- Go to https://admin.powerplatform.microsoft.com/
- Click on the Environment you like to access
- On the Details, page copy your Org Id from the Environment URL For example URL might look like below… You just need to copy the first part (Use this on CRM Connection > Organization Field)
org8640f7e7.crm.dynamics.com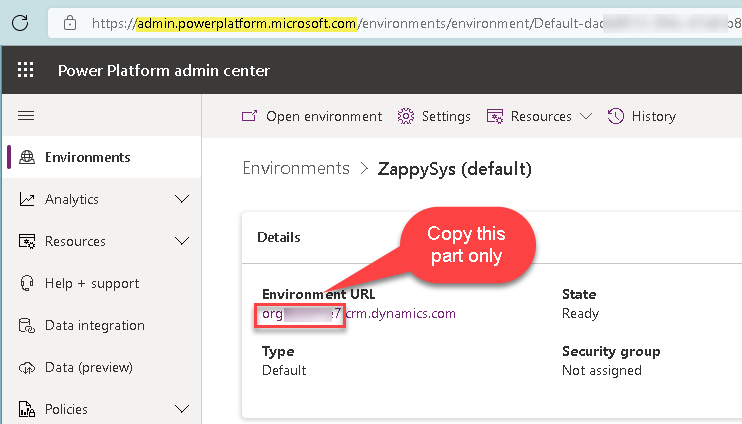
How to find Organization Id for Microsoft Dataverse / CDS / CRM 365 API calls
Method-2 (Old way)
Another way to find your Organization Id is from CRM Portal
If you have multiple environments (i.e. Prod, Sandbox) then each environment might have its own unique URL)
- To find your API Service URL, Click on Gear Icon
- Choose Advanced Settings
- Click down arrow on Settings
- Click Customization
- Click Developer Resource Link
- On this page now you can see various URLs. For examples used in this article, we need to get is Service Root URL for Web API

How to Find Organization Id / Web API URL / SOAP API Service URL (Unique Environment Instance URL)

Using Client ID (i.e. App Id) and Client Secret to Call Dynamics CRM 365 API / CDS / Dataverse
That’s it now we are ready to use this App Id and Client Secret to make CRM API calls.
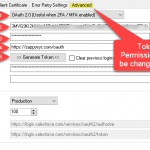
To confirm if it’s working you can create a Dynamics CRM Connection (using SSIS PowerPack ). Choose OAuth option on Dynamics CRM Connection
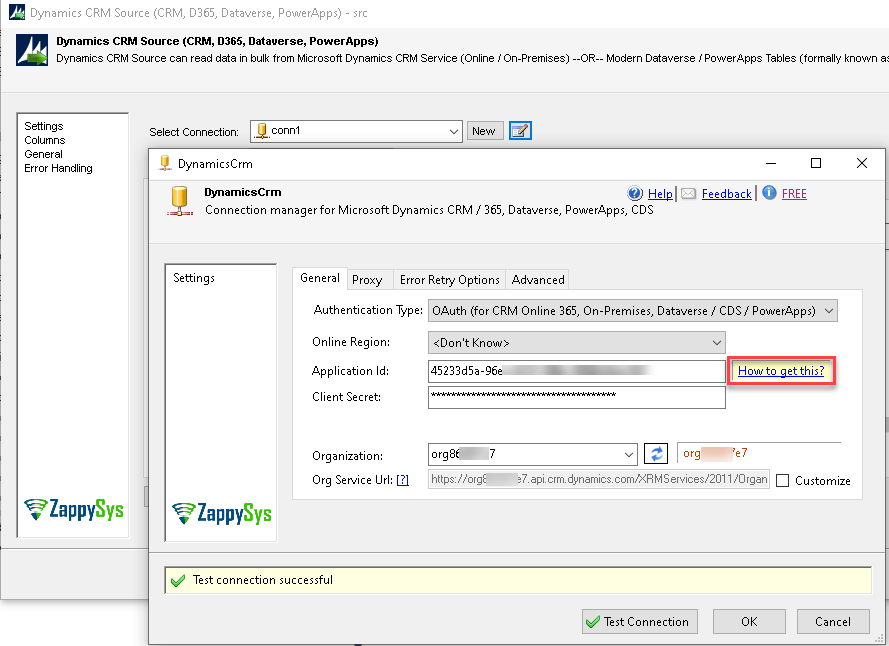
Connect to Dynamics CRM / Dataverse / PowerApps API using OAuth (Client ID /Secret)
Conclusion
In this article, we saw how to Register Azure AD App to call various Microsoft APIs (for this article we focused mainly on Dynamics CRM 365 API only)