Introduction
![]() Firebase is a popular cloud platform that provides real-time databases, cloud storage, and various backend services. Many organizations use Firebase to store application data and need to integrate it with their SQL Server databases for reporting, analytics, and business intelligence. Using Zappysys SSIS PowerPack, you can easily insert or extract data from Firebase Realtime Database or Firestore using REST APIs without writing custom code.
Firebase is a popular cloud platform that provides real-time databases, cloud storage, and various backend services. Many organizations use Firebase to store application data and need to integrate it with their SQL Server databases for reporting, analytics, and business intelligence. Using Zappysys SSIS PowerPack, you can easily insert or extract data from Firebase Realtime Database or Firestore using REST APIs without writing custom code.
This tutorial demonstrates how to connect SSIS to Firebase and load data into SQL Server tables using the Zappysys REST API Source component.
Prerequisites
- SQL Server Integration Services (SSIS) is installed.
- Visual Studio with SSIS extension or SQL Server Data Tools (SSDT).
- A Firebase project with Realtime Database or Firestore enabled.
- Zappysys SSIS PowerPack is installed on your system.
Set Up Your Firebase Project
- Go to the Firebase Console.
- Select a project; if you do not have one, click on “Create a new project”.
- Enter your project name and click “Continue.”
- Enable Google Analytics if desired, and complete project creation.
- Navigate to Security > Authentication.
- In the Sign-in method tab, enable Email/Password authentication.
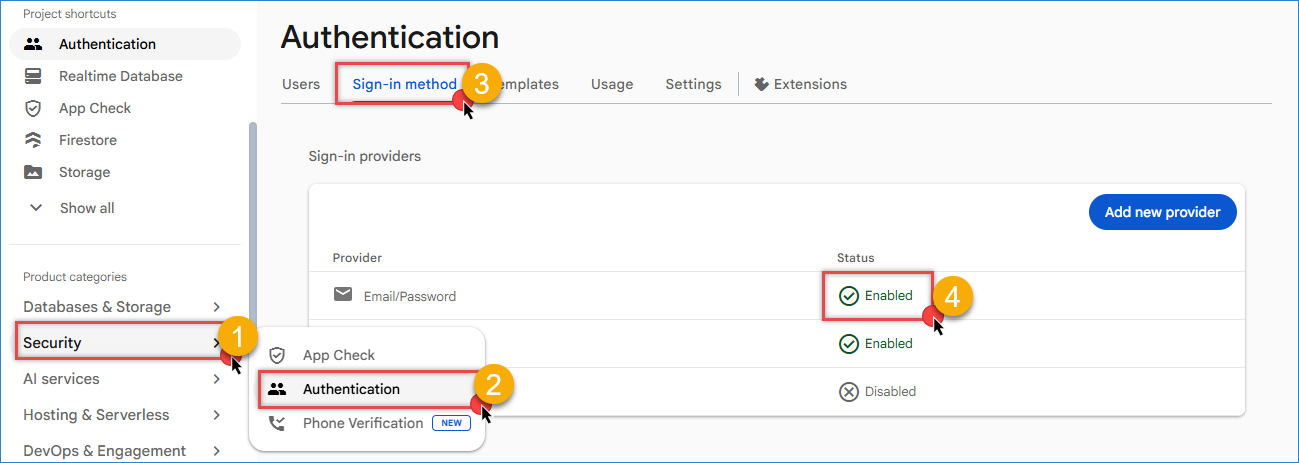
Firebase – Enable email-password provider
- Go to the Users tab and create a new user, enter an email and a password.
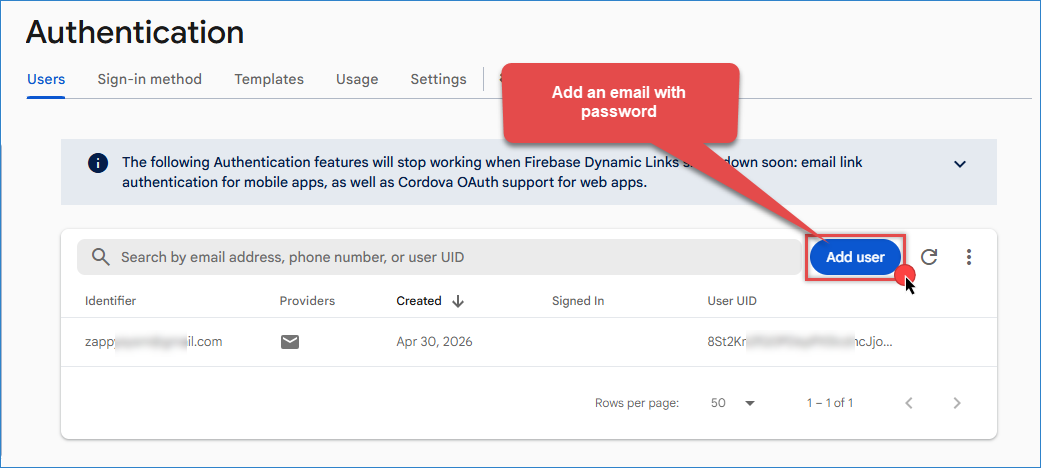
Firebase – Enter a new email
- Go to Settings > General.
- Under the Your apps section, create a new app and select the Web option.
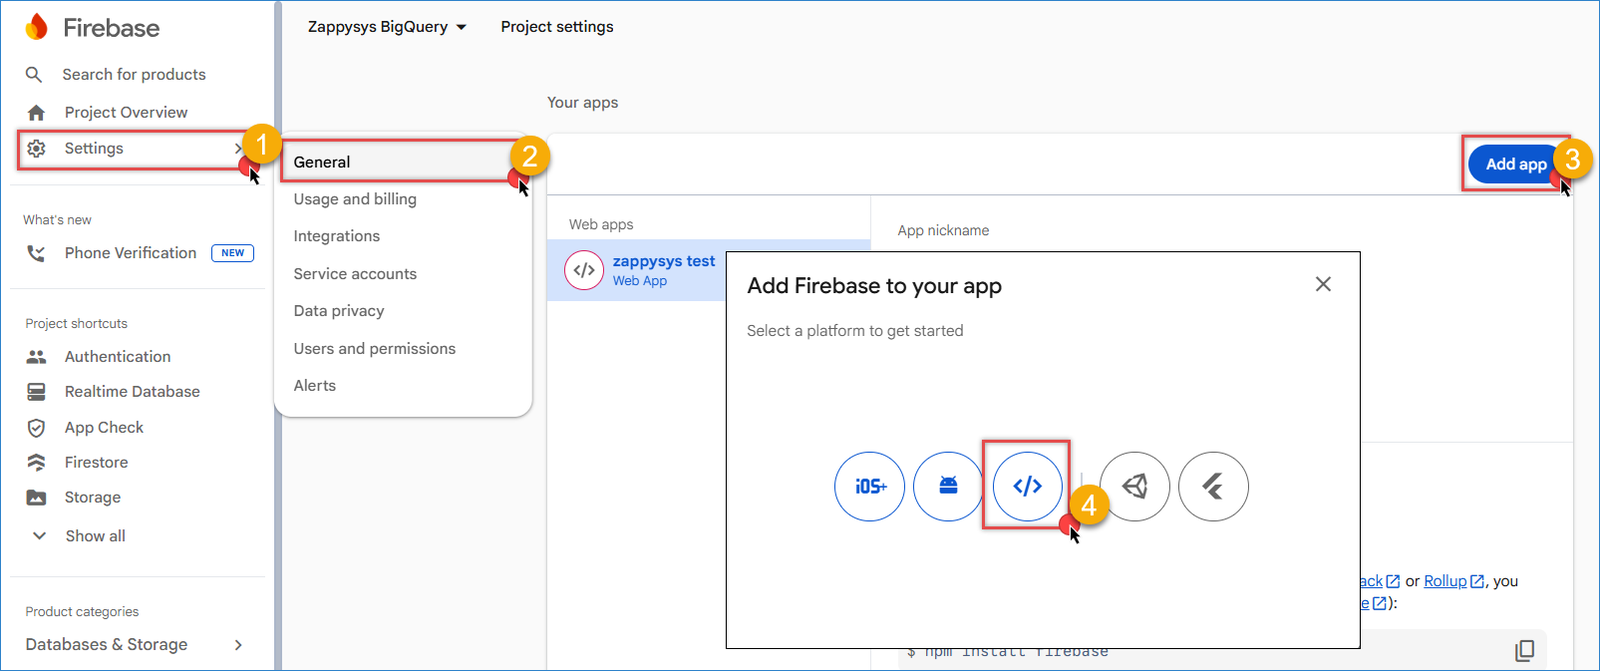
Firebase – Create a new App
- Enter the name for your app, and you will receive a configuration object with your app’s credentials:
- Use this as the body:
123456789const firebaseConfig = {apiKey: "AIzaSyC2EYUliXXXXXXXXXXXXX",authDomain: "my-project.firebaseapp.com",databaseURL: "https://my-project.firebaseio.com",projectId: "my-project",storageBucket: "my-project.firebasestorage.app",messagingSenderId: "5750XXXXXXXXX",appId: "1:5750171XXXXXXXX:web:4404eca49b20XXXXXXXX"};
- In the Firebase Console, navigate to Realtime Database or Firestore Database.
- Click Create Database and select your region.
- Set security rules. For development and testing, use
"auth!=null" for read and write access.
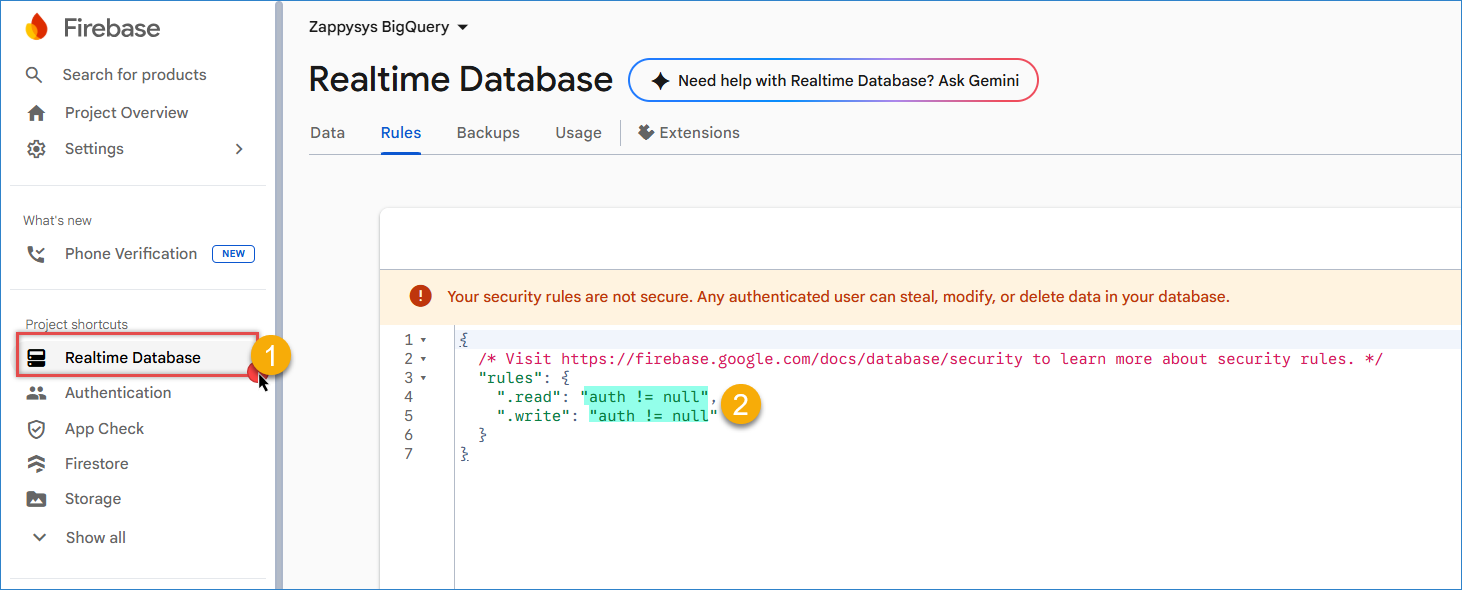
Firebase – change rules
- From the Database tab, copy your database URL (e.g., https://my-project.firebaseio.com)
Configure the token for Firebase
- In your SSIS package, navigate to the Variables section and create the following variables:
- Api_Key (String) — Enter the API key from Step 1.
- Token (String) — Stores the authentication token generated by Firebase.
- Drag and drop the REST API Task component onto your SSIS package canvas and double-click to open it.
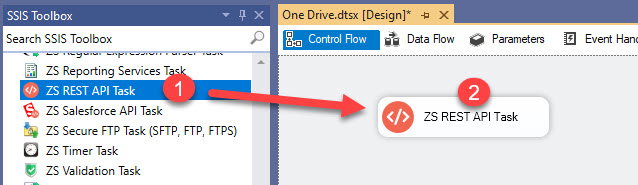
Add a REST API Task in SSIS
- Navigate to the Response Settings tab and set Response Content Type to JSON.
- In the JSONPath field, enter:
$.idTokento extract the session token from the API response. - Enable Save Response Content, select the Variable option, and choose your Token variable.
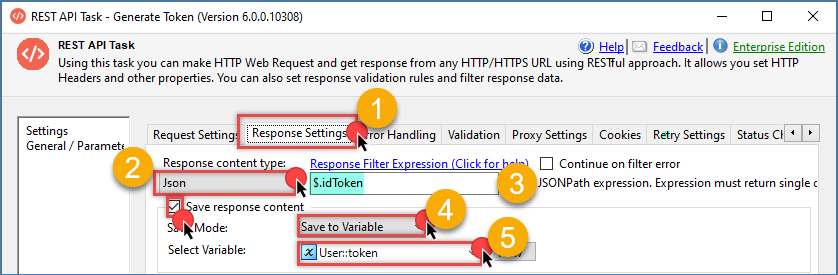
Firebase – save token in a variable
- Go back to the Request tab and enter the following URL. For testing, use:
1https://identitytoolkit.googleapis.com/v1/accounts:signInWithPassword?key={{User::api_key}} - Set the HTTP Request Method to POST.
- Use the following JSON in the body with your credentials:
12345{"email": "test@gmail.com","password": "testpassword","returnSecureToken": true}
- Use JSON (application/json) as Body Content Type
- Test the connection. If successful, you will see the generated token in the response.
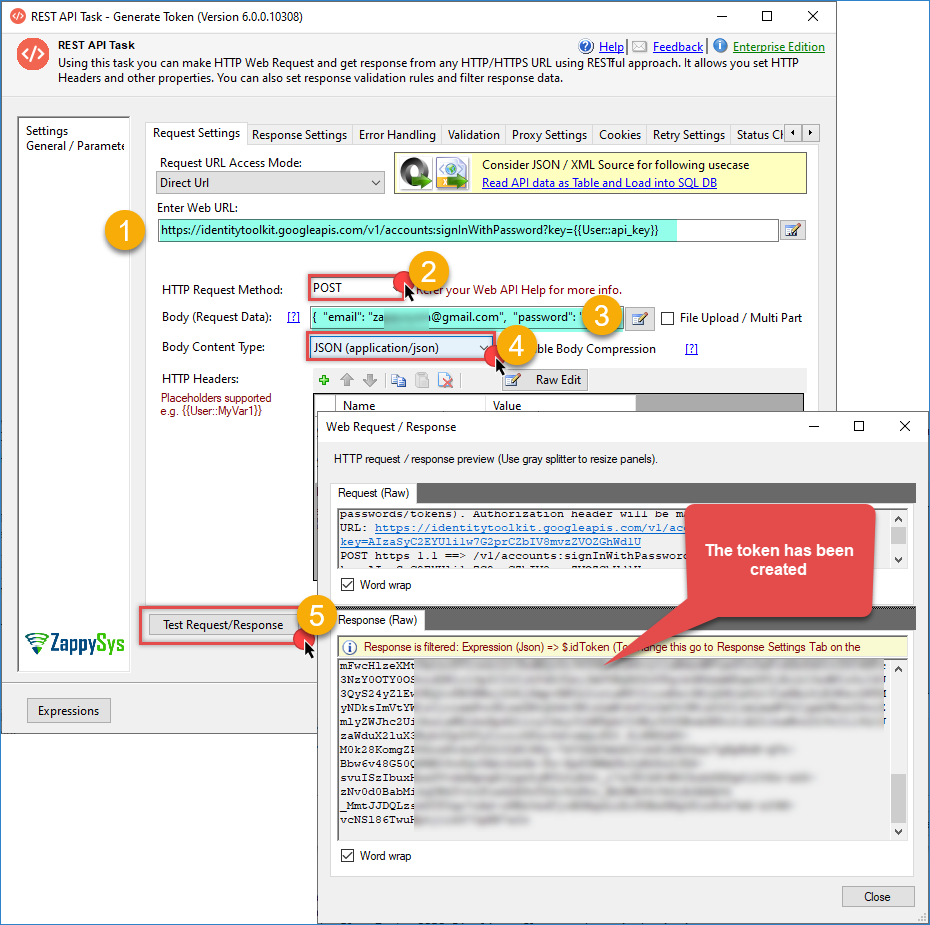
Firebase – generate token
Create and Configure the JSON Source
- Add a new Data Flow Task to your SSIS package. Connect it downstream from the REST API task you created before.
- Double-click the Data Flow Task to enter the Data Flow design surface.
- Drag a ZappySys JSON Source component from the toolbox onto the canvas.
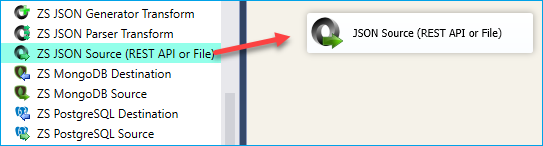
SSIS JSON Source – Drag and Drop
- Double-click the ZappySys JSON Source to open its editor.
- Enter the following URL to the Firebase endpoint. Replace “users” with the database path where you want to send data:
1https://zappysys-bigquery.firebaseio.com/users.json?auth={{User::token}} - Set the HTTP Request Method to POST.
- Configure the JSON payload to insert your data. Since Firebase is a NoSQL database, structure the JSON according to your data schema:
1234{"user001": { "nombre": "Ana García", "email": "ana@test.com" },"user002": { "nombre": "Luis Pérez", "email": "luis@test.com" }}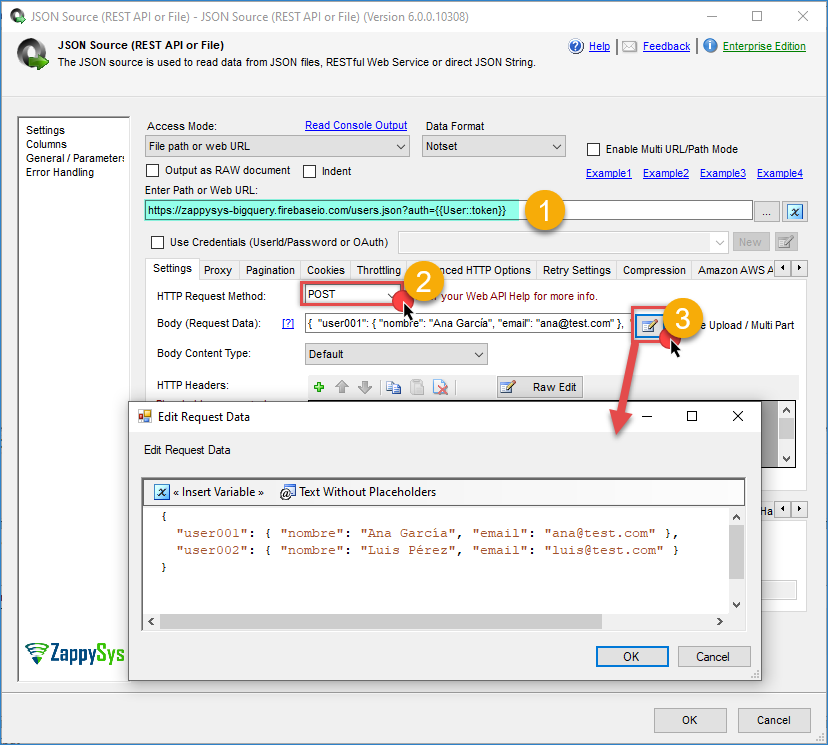
Firebase – send data
- Click Preview Data, using a valid token in the variable, to test the connection and verify the data.
- You can change the method to GET to check the data from the database
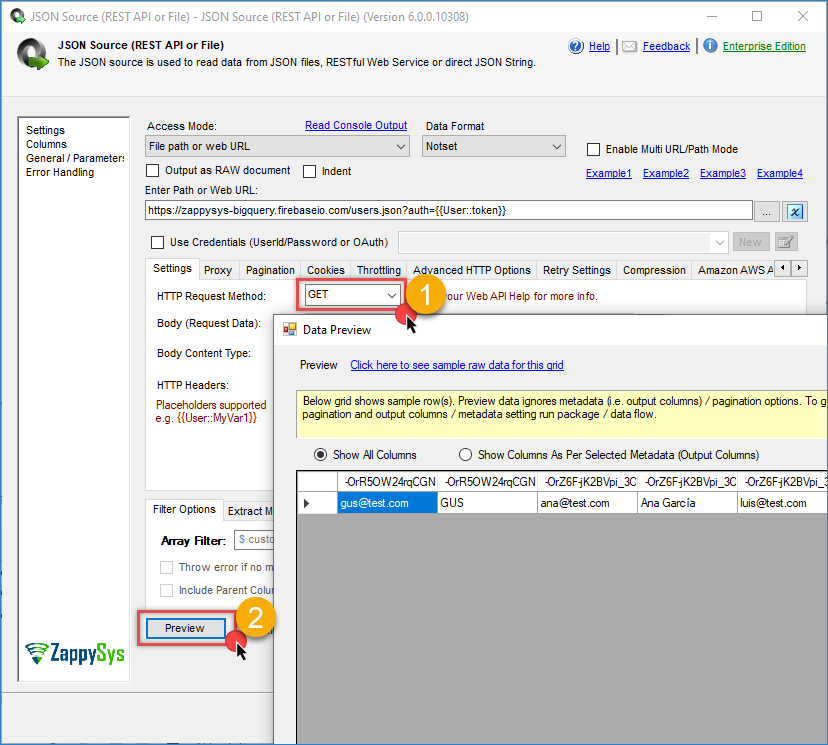
Firebase – get data from the database
- Click OK to save the configuration.
Configure the Data Destination
- Drag and drop a destination component (such as OLE DB Destination, Flat File Destination, or Trash Destination) into the Data Flow.
- Connect the output arrow from the JSON Source component to the destination component.
- Double-click the destination component to open its configuration dialog.
- Configure the destination to point to your target table or file where Firebase data will be stored.
- In the Mappings section, map the columns from the JSON response to the corresponding destination columns.
- Click OK to save the destination configuration.
- Execute the package and verify that the data extraction is working correctly.
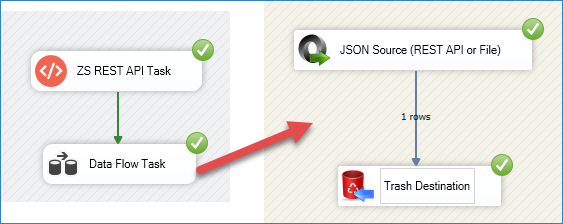
Firebase – Final Result
Conclusion
Connecting SSIS to Firebase using Zappysys REST API Source simplifies the integration of cloud database data without custom development. By following the steps outlined in this tutorial, you can build reliable SSIS packages that automatically transfer data between Firebase and SQL Server for analytics, reporting, and business intelligence purposes. The REST API approach works seamlessly with both Firebase Realtime Database and Firestore, giving you the flexibility to work with your preferred cloud database structure.
Explore the full capabilities of the ZappySys SSIS PowerPack to optimize your data integration tasks. By applying this pattern, you can extend your solution to include additional transformations, data validation, error handling, and scheduling through SQL Server Agent.
Need Help?
If you encounter any issues, our support team is here to help:
- Live Chat — Use the chat widget (bottom-right corner of this page)
- Email — support@zappysys.com
- Support Center — Visit the ZappySys Support Portal