Introduction
![]() If you are using SSIS for your ETL needs and looking to reduce your overall cost then, there is a good news. Microsoft recently announced support to run SSIS in Azure Data Factory (SSIS as Cloud Service). Yes – that’s exciting, you can now run SSIS in Azure without any change in your packages (Lift and Shift). SSIS Support in Azure is a new feature of Azure Data Factory V2 (i.e. ADF). This article also explains how to deploy SSIS Packages to Azure which use 3rd party components (e.g. SSIS PowerPack v2.6.13 or Higher). There are few additional steps involved if you wish to install Custom SSIS Components in Azure Data Factory (explained later in this article).
If you are using SSIS for your ETL needs and looking to reduce your overall cost then, there is a good news. Microsoft recently announced support to run SSIS in Azure Data Factory (SSIS as Cloud Service). Yes – that’s exciting, you can now run SSIS in Azure without any change in your packages (Lift and Shift). SSIS Support in Azure is a new feature of Azure Data Factory V2 (i.e. ADF). This article also explains how to deploy SSIS Packages to Azure which use 3rd party components (e.g. SSIS PowerPack v2.6.13 or Higher). There are few additional steps involved if you wish to install Custom SSIS Components in Azure Data Factory (explained later in this article).
What is Microsoft Azure Data Factory (i.e. ADF)
Azure Data Factory (i.e. also referred as “ADF”) is a fully managed cloud service by Microsoft for your ETL needs. ADF comes with two completely different ETL approaches (referred as Integration Runtimes).
- Default Runtime (Copy Activity)
- SSIS Runtime
Both runtimes offer their own Authoring tools and they have completely different authoring, execution, and pricing models. Check later in this article for some tips to save Cost by automating Start / Stop of SSIS IR based on your limited execution need (Only Start SSIS-IR when you need to run package).
Choose ADF SSIS Runtime when:
- You are planning to leverage existing ETL (i.e. SSIS Packages) in Azure without significant changes
- You like to use 3rd party SSIS components in ADF (e.g. SSIS PowerPack) which are not found in Copy Activity
- You want more predictable pricing model (Fixed Monthly cost regardless number of executions )
- You find certain key features or performance of SSIS better than ADF Copy Activity
- You don’t want to invest in learning new technologies for now but want to shift your workloads in the cloud to reduce cost.
- You like SSIS Package designer (i.e. SSDT) better than ADF (Maybe due to ease of Use in Disconnected mode on the client side or Visual Debugger)
Choose ADF Default Runtime (Copy Activity) when:
- Your data movement which is more Azure-cloud focused. For example, Move data from CosmosDB to Azure SQL Data Warehouse. Or Move Data from Azure Data Bricks to Blob Storage.
- You like certain features/connectivity options in Copy-Activity are better than SSIS
- You like to pay per execution rather than Fixed SSIS Runtime cost.
- You don’t have expertise in SSIS and you like to start using ETL (Pay as you go)
Advantages of running SSIS on Azure Data Factory
There few obvious advantages if you decide to run SSIS Package in Azure Data Factory (ADF) compared to running on your own dedicated server (on-premises or VM running in Cloud).
- Reduced Cost – This can be one big advantage why you may choose to run SSIS in Azure. Traditionally to run SSIS Packages in-house you needed SQL Server License (which can be very expensive). Microsoft does not sell SSIS License independently. But now with ADF you can get going with your ETL need without SQL Server license and fraction of the cost.
- Managed Service – ADF is managed service means you don’t have to worry about hardware, OS, Licensing or ongoing maintenance/patches. Azure infrastructure will take all these for you.
- DevOps – Time to setup new server is significantly less with Azure Cloud approach. You can set up your SSIS ETL infrastructure in less than 30 mins with Azure.
- Isolation of Compute and Database Storage – In Azure Data Factory when you provision SSIS runtime your Compute Node (Where SSIS service runs) is totally isolated than your SSISDB (DB where SSIS Packages / Settings / Execution Log stored). Which means if your compute node is offline for some reason you can still deploy packages and view execution log.
Anyway’s enough said now let’s see how to provision and deploy SSIS packages in Azure Data Factory (ADF).
How to deploy and run SSIS Packages in Azure with 3rd party components
Before we deep dive to learn how to run packages in Azure Data Factory. Here are high-level steps to deploy SSIS Packages in Azure Data Factory. Here is another tutorial link from Microsoft (It doesn’t mention deploying third-party SSIS components but good to check anyway). Some steps are optional and only needed if you planning to run SSIS Packages with third-party components such as SSIS PowerPack
- Create Azure Data Factory instance- Check this article
- Create Azure SQL DB Instance (Used to store SSISDB) – Check this article
- (3rd party SSIS) Create Azure Blob Storage Container and Upload 3rd party SSIS component setup files
- (3rd party SSIS) Create SAS URL for Azure Blob Container which has necessary 3rd party component setup files (SAS URL must have Read/Write/List/Create permission)
- Create a new SSIS Runtime in Azure Data Factory
- (3rd party SSIS) During setup enter SAS URL which points to a container with custom setup files.
- Use SSDT BI for VS 2015 or Higher to Author/Test SSIS Packages locally (Change Project TargetServerVersion to SQL 2017 Format)
- Use the latest version of SSMS (v17.x or Higher) to deploy SSIS Packages to Azure SQL DB (SSISDB)
- Execute Package via SSMS and Monitor Package Executions
In the following sections, we will see each step in detail.
Important things to know about SSIS Runtime in ADF
There are a few important facts you should know about how Azure Data Factory (ADF) Hosts, Runs your SSIS Packages
- ADF uses Windows Server VM nodes to run your SSIS Packages in Azure.
- It uses SSIS 2017 Format so make sure any Packages using 3rd party components must be targeted to the correct SSIS version
- Each time you start and stop SSIS Runtime in ADF you will get a fresh VM node so nothing is persistent in ADF SSIS Node (Microsoft Azure will allocate any random node from VM Pool)
- If you wish to persist files/values then do not save on ADF VM (Use external storage such as Blob Storage or SQL DB)
Choosing Between Azure Virtual Machine (Azure VM) and Azure Data Factory (ADF) for Running SSIS Packages
Many customers ask whether they should run their SSIS packages on an Azure Virtual Machine (VM) or inside Azure Data Factory (ADF) using the Azure-SSIS Integration Runtime (IR). Both deployment options are supported by ZappySys, but the best choice depends on your workload characteristics, cost model, and operational requirements.
Running SSIS packages in ADF with Azure-SSIS IR is fundamentally different from running them on an Azure VM. ADF provides a fully managed environment with automatic scaling, built-in scheduling, and native integration with other Azure services, while VMs offer more control over the operating system and custom configurations.
For a deeper comparison of these two approaches, refer to our detailed guide here:
Choosing Between Azure Virtual Machine (Azure VM) and Azure Data Factory (ADF) for Running SSIS Packages
Getting Started – Setup SSIS Runtime in Azure
Now let’s look at how to create your first Azure Data Factory Instance and then configure to run SSIS Packages with Custom Components such as SSIS PowerPack.
Prerequisite
Before we move forward with our steps to Deploy and Run SSIS Package in Azure Data Factory let’s confirm that you meet the following prerequisite.
- You have a valid Azure Subscription. If you don’t have it then you can try for FREE here.
- Download and Install Azure Storage Explorer for FREE (Used to upload setup files and create SAS Url for 3rd party SSIS components setup)
- Download and Install SSMS v17.x or Higher for FREE. This is not same SSMS which comes with SQL Server Setup (This new version is independent download and support connecting to Azure SQL DB for SSISDB
- Download and Install SSDT BI for VS 2015 or higher (Used to design and test SSIS Packages with SQL Server 2017 support).
- You have downloaded setup files for SSIS PowerPack (To obtain setup file – For FREE Trial Click Here, For Paid Customer Click Here)
Create a new Azure Data Factory (ADF)
Using your valid Azure Subscription create new Azure Data Factory Instance (Thi will host your SSIS Runtime). Click here to learn more how to create a new Azure Data Factory Instance.
Create a new Azure SQL Database (i.e. new SQL Instance)
Once you have a valid ADF Instance, next step is to make sure you have a valid Azure SQL Server Instance to host SSISDB (Catalog Database for SSIS). If possible choose the same region for both ADF and SQL Instance. ). Click here to learn more on how to create a new Azure SQL Server Instance.
Create and Setup Azure Blob Storage Container (Only for 3rd party SSIS setup)
Once you have provisioned ADF instance and Azure SQL Server instance, Now it’s time to prepare setup files for custom SSIS components. Behind the scene, ADF uses VM instances to run your SSIS Packages so you can install pretty much anything you want just like a regular VM. However, there is no Remote Desktop Option for SSIS node in ADF, in other words, it’s pretty locked down. The only way you can install custom components is through Custom Setup Option provided during your SSIS Runtime creation. This custom script is executed only once after SSIS VM is created in ADF. It also executed once you stop and start SSIS Runtime. You have no way to execute the custom script on demand while SSIS Runtime is running (Maybe Microsoft can change this in the future but no option for now).
Prepare custom setup files for ADF – SSIS Runtime
During SSIS Runtime setup you can instruct ADF to perform a custom setup (e.g. Run the custom installer, copy files, execute PowerShell scripts etc). Your custom setup files are downloaded in the SSIS node (i.e. VM) at some point during SSIS Runtime setup. This is done using SAS URL (i.e. URL with Shared Access Signature). Treat SAS URL like a Password if you have some sensitive data in your container. For an additional read on the custom component setup, you can refer this link.
Before we create SAS URL, you need to gather setup files on your local disk and then you can upload to Azure Blob Container. SSIS PowerPack needs the following 2 files to be uploaded in your blob container (root level).
- main.cmd [See below Section] – This is the entry point of Custom Setup in ADF-SSIS
- SSISPowerPackSetup_64bit_Trial.msi (Trial version, download it) OR SSISPowerPackSetup_64bit.msi (Paid Customer version, download it)
Each file listed above has download link next to it so download locally (except main.cmd which we will discuss next).
Create a new file and name it as “main.cmd“. Enter content like below.
Few things you should change as per your need
- Change the Example License Key to your own License Key in Activate PowerPack license Step.
- Change SSISPowerPackSetup_64bit.msi if your downloaded file has a different name
- Comment Activate PowerPack license Step if you are using Trial (To comment just add :: in front of the line)
Other than the above three changes you can leave everything default. Save the file and upload to your setup blob container. Once ADF executes main.cmd it will generate new Log folder in your Blob container (You will see a new folder. Example main.cmd.log\tvm-325613345_1-20180503t144850z##2018-05-03T145334Z ).
main.cmd – For Trial Users
See below example script file which you have to create if you are a trial user (you don’t have a license key). The file must be named as main.cmd.
|
1 2 3 4 5 6 7 8 9 10 11 12 13 14 15 16 17 18 19 20 21 |
set DIR=%CUSTOM_SETUP_SCRIPT_LOG_DIR% echo Calling Step 1 : %TIME% >> "%DIR%\steps_log.txt" dir /s /b > "%DIR%\file_list.txt" echo Calling Step 2 : %TIME% >> "%DIR%\steps_log.txt" ::Install SSIS PowerPack msiexec /i "SSISPowerPackSetup_64bit_Trial.msi" ADDLOCAL=ALL /q /L*V "%DIR%\powerpack_trial_install_log.txt" echo Calling Step 3 : %TIME% >> "%DIR%\steps_log.txt" ::Activate SSIS PowerPack Trial Extension Key (Optional) -- Uncomment below line to apply the trial extension key. ::"C:\Program Files (x86)\ZappySys\SSIS PowerPack (64 bit)\LicenseManager.exe" -p SSISPowerPack --register "lgGAAO0-----REPLACE-WITH-YOUR-TRIAL-EXTENSION-KEY-----czM=" --logfile "%DIR%\powerpack_register_log.txt" dir "C:\Program Files\Microsoft SQL Server\*Zappy*.*" /s /b >> "%DIR%\installed_files.txt" dir "C:\Program Files (x86)\Microsoft SQL Server\*Zappy*.*" /s /b >> "%DIR%\installed_files.txt" echo DONE : %TIME% >> "%DIR%\steps_log.txt" echo complete |
main.cmd – For Paid Customers
See below example script file which you have to create if you are a paid customer and wish to apply license key. The file must be named as main.cmd. Make sure:
- You uploaded the installer with the name SSISPowerPackSetup_64bit.msi.
- Replaced the parameter’s –register argument with your real license key.
|
1 2 3 4 5 6 7 8 9 10 11 12 13 14 15 16 17 18 19 20 21 22 23 24 25 26 |
set DIR=%CUSTOM_SETUP_SCRIPT_LOG_DIR% echo Calling Step 1 : %TIME% >> "%DIR%\steps_log.txt" dir /s /b > "%DIR%\file_list.txt" echo Calling Step 2 : %TIME% >> "%DIR%\steps_log.txt" ::Install SSIS PowerPack msiexec /i "SSISPowerPackSetup_64bit.msi" ADDLOCAL=ALL /q /L*V "%DIR%\powerpack_install_log.txt" echo Calling Step 3 : %TIME% >> "%DIR%\steps_log.txt" ::Activate PowerPack license (Optional) "C:\Program Files (x86)\ZappySys\SSIS PowerPack (64 bit)\LicenseManager.exe" -p SSISPowerPack --register "lgGAAO0-----REPLACE-WITH-YOUR-LICENSE-KEY-----czM=" --logfile "%DIR%\powerpack_register_log.txt" ::Show System Info echo Calling Step 4 : %TIME% >> "%DIR%\steps_log.txt" "C:\Program Files (x86)\ZappySys\SSIS PowerPack (64 bit)\LicenseManager.exe" -i -l "%DIR%\sysinfo_log.txt" echo Calling Step 5 : %TIME% >> "%DIR%\steps_log.txt" dir "C:\Program Files\Microsoft SQL Server\*Zappy*.*" /s /b >> "%DIR%\installed_files.txt" dir "C:\Program Files (x86)\Microsoft SQL Server\*Zappy*.*" /s /b >> "%DIR%\installed_files.txt" echo DONE : %TIME% >> "%DIR%\steps_log.txt" echo complete |
Create SAS URL of Azure Blob Container (Only for 3rd party SSIS setup)
Once you have prepared setup files now let’s upload them to your blob container and generate SAS URL using the below steps.
- Install and Launch Azure Storage Explorer
- Right-click on the Storage Accounts node > Click Connect to Azure storage …
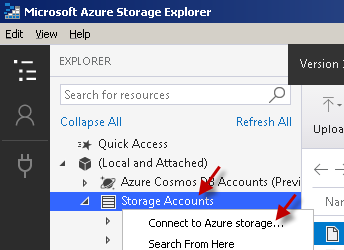
Connect to Azure Storage Account in Azure Storage Explorer
- Once your account added > Expand to Blob Containers node > Right click > Create Blob Container…
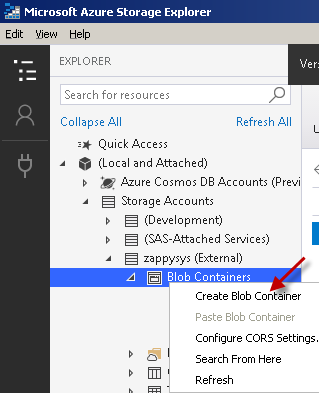
Create new Azure Blob Container in Azure Storage Explorer
- Select newly created container and upload files we prepared in the previous section.
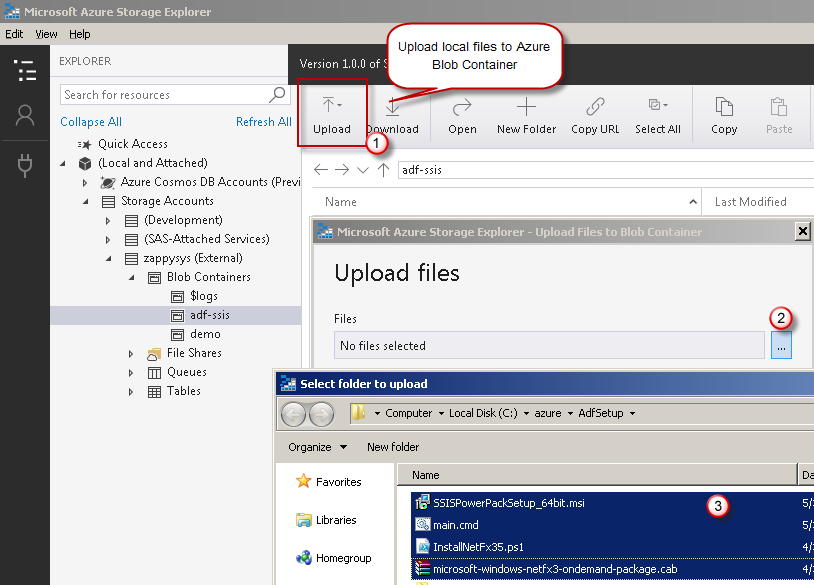
Upload Custom Setup File for Azure Data Factory – SSIS Runtime
- Right-click on the container node and click Get Shared Access Signature
.Generate SAS URL from Azure Storage Explorer (Desktop Version)Make sure you adjust the expiration date to a long enough; otherwise, you may need to generate a new SAS URL often and restart your ADF SSIS Node to apply the new SAS URL. Also, select Write permission along with Read, List, and Create. If you do not select Write, then ADF setup cannot write log files back to your Blob Container. We also recommend Delete permission in case Microsoft adds a new feature to delete older log files.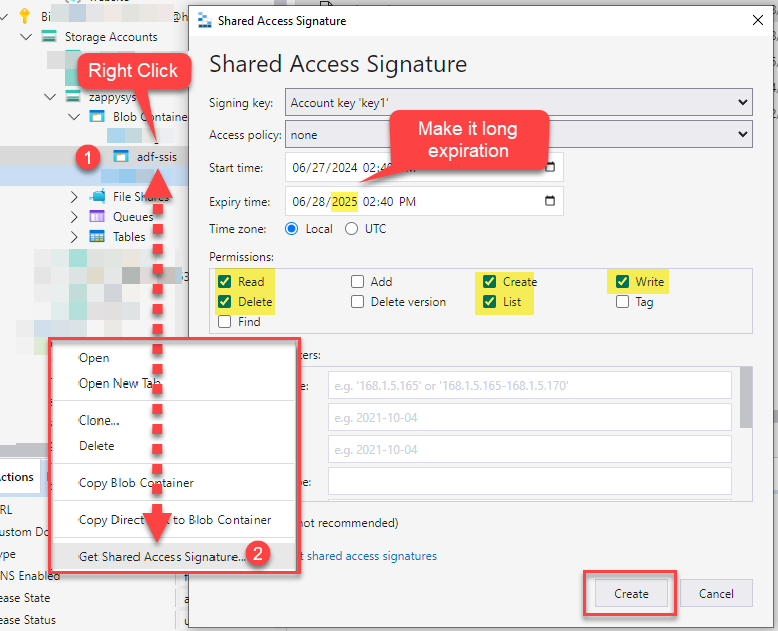
Create SAS URL in Azure Storage Explorer for Azure Data Factory (ADF) – SSIS Runtime Custom Setup (3rd party component installation)
Generate SAS URL from Azure Portal Online
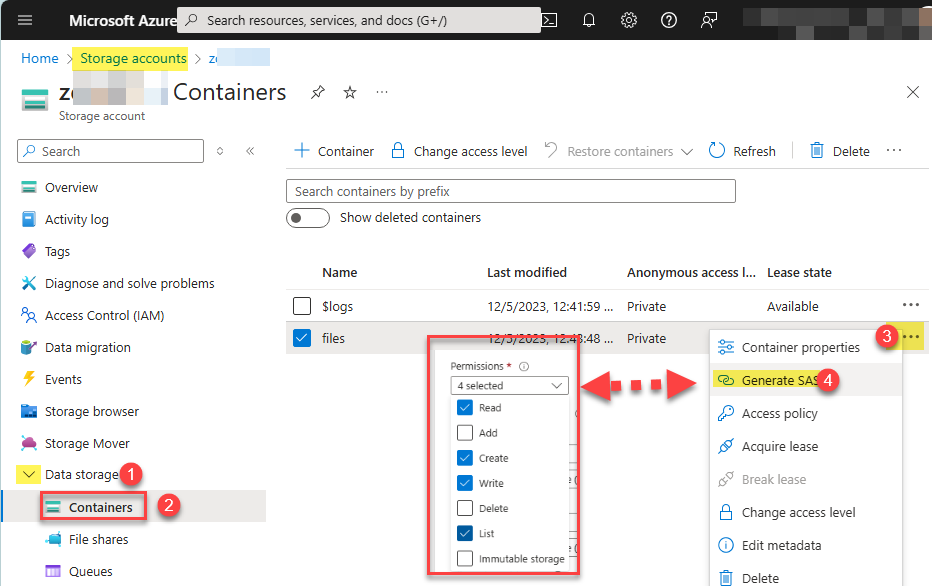
Create SAS URL in Azure Portal for Azure Data Factory (ADF) – SSIS Runtime Custom Setup (3rd party component installation)
- Copy SAS URL to clipboard and save somewhere (we will use that user later in this article)
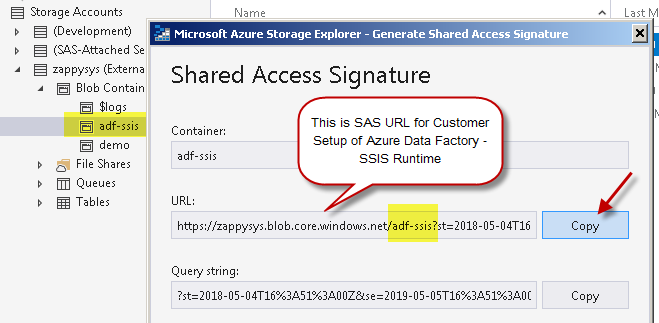
Get SAS URL for Azure SSIS Runtime – Custom setup
Create a new SSIS – Integration Runtime for SSIS
Once you upload setup files for custom SSIS components and generated SAS URL for container we are ready to move on to our final step (Create SSIS Integration Runtime in Azure Data Factory)
Steps for Creating SSIS Runtime in Azure are clearly documented here except one change (see below).
Follow all steps as per this Microsoft Tutorial (Skip creating ADF step if you already did in the previous section). However Microsoft Tutorial does not mention about Custom SAS URL (again this is still in preview so screenshot may update later). However In the Advanced Settings page during SSIS Runtime Setup (see below), Where you set Maximum Parallel Executions Per Node you will have to enter Custom Setup URL. Enter SAS URL we generated in the previous section.
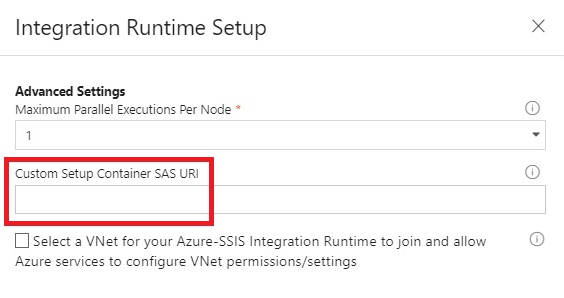
Enter Custom Setup SAS URL during SSIS RUntime Creation in Azure Data Factory
Once your SSIS Runtime setup is done you can see your Node running in Dashboard (Status must be Green checkbox with Running ).
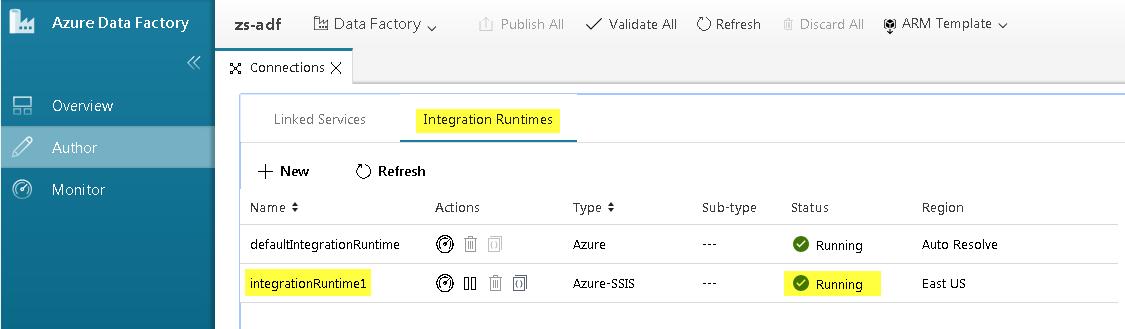
Verify SSIS Runtime Node Status in Azure Data Factory Portal
Unregister / Move ZappySys License
There will be a time when you no longer use ADF instance or you like to use your license on a different ADF Instance. As of now there is no Customscript option for Stop action in ADF so perform the following work around to fire Unregister License command. Basically you have to restart your IR (the one which is holding your license) once to fire custom script which should contain license register action first and then unregister command right after it.
Here is full script to unregister your license. Make sure to use this script for old ADF instance which is being deleted or from where you like to unregister ZappySys license .
Use below code in main.cmd
|
1 2 3 4 5 6 7 8 9 10 11 12 13 14 15 16 17 18 19 20 21 22 23 24 25 26 27 28 29 |
set DIR=%CUSTOM_SETUP_SCRIPT_LOG_DIR% echo Calling Step 1 : %TIME% >> "%DIR%\steps_log.txt" dir /s /b > "%DIR%\file_list.txt" echo Calling Step 2 : %TIME% >> "%DIR%\steps_log.txt" ::Install SSIS PowerPack msiexec /i "SSISPowerPackSetup_64bit.msi" ADDLOCAL=ALL /q /L*V "%DIR%\powerpack_install_log.txt" echo Calling Step 3 : %TIME% >> "%DIR%\steps_log.txt" ::Activate PowerPack license "C:\Program Files (x86)\ZappySys\SSIS PowerPack (64 bit)\LicenseManager.exe" -p SSISPowerPack --register "lgGAAO0QmCxxxxxxxxxxxxxxxxWSxczM=" --logfile "%DIR%\powerpack_register_log.txt" ::De-Activate same license -- This is the work around to unregister license from ADF "C:\Program Files (x86)\ZappySys\SSIS PowerPack (64 bit)\LicenseManager.exe" -p SSISPowerPack --unregister --logfile "%DIR%\powerpack_un_register_log.txt" ::Show System Info echo Calling Step 4 : %TIME% >> "%DIR%\steps_log.txt" "C:\Program Files (x86)\ZappySys\SSIS PowerPack (64 bit)\LicenseManager.exe" -i -l "%DIR%\sysinfo_log.txt" echo Calling Step 5 : %TIME% >> "%DIR%\steps_log.txt" dir "C:\Program Files\Microsoft SQL Server\*Zappy*.*" /s /b >> "%DIR%\installed_files.txt" dir "C:\Program Files (x86)\Microsoft SQL Server\*Zappy*.*" /s /b >> "%DIR%\installed_files.txt" echo DONE : %TIME% >> "%DIR%\steps_log.txt" echo complete |
Author SSIS Packages to Run in Azure Datafactory
Once your SSIS Runtime is set up and running your next step is to Author and Deploy SSIS Packages.
- To create SSIS Packages which can run in Azure Data Factory you must need SSDT BI for VS 2015 or higher
Change SSIS Project TargetServerVersion
Before you deploy package to ADF you must change to to the supported Runtime by ADF. As of now 2017 (i.e. SQL Server 2017) is supported runtime so choose that one.
- Make sure packages are set to SQL 2017 Compatibility mode (This is a must if you are using ZappySys SSIS PowerPack)
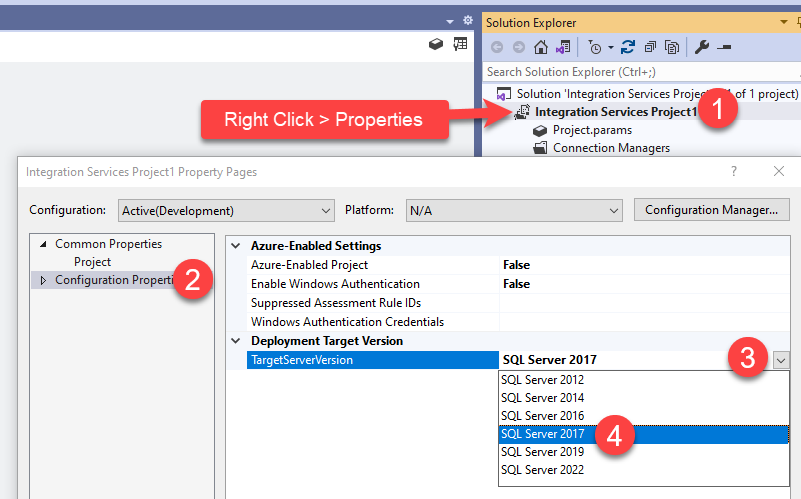
Change SSIS TargetServerVersion Property
Using Visual Studio to Deploy SSIS Packages to Azure (i.e. ADF SSIS-IR)
If you are using latest version of Visual Studio (VS2017 or Higher) then you can also deploy SSIS Project right from Visual Studio (See below).

Deploy SSIS Packages to Azure Data Factory from Visual Studio 2017 / 2019
Using SSMS to Deploy / Execute SSIS Packages to Azure (i.e. ADF SSIS-IR)
Now let’s talk how to deploy SSIS Packages from your local machine to SSISDB in Azure. The process is pretty same just like how you do when deploying SSIS to On-Premises SQL Server Instance except for few steps.
- One important thing to remember is to deploy SSIS Packages to Azure Data Factory you must use SSMS v17.x or Higher (Older version of SSMS doesn’t support ADF SSIS Deployment)
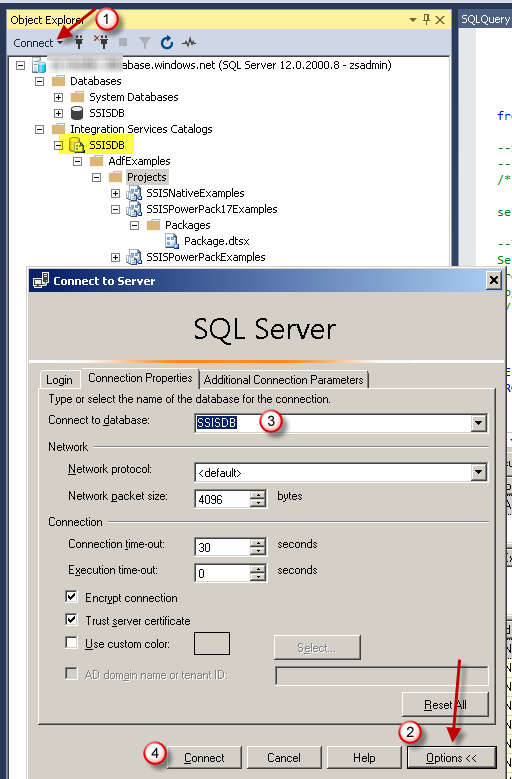
- Another important thing is when you connect to SQL Server Instance in Azure make sure you Click on Options on the Connect dialogbox and enter SSISDB in the Connect to database
Other than those two things all steps to deploy SSIS your packages to Azure Data Factory are listed here.
Here are the steps to connect to SSISDB Catalog for ADF SSIS-IR
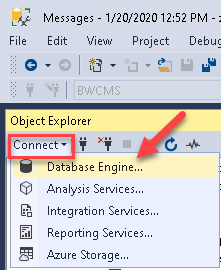
- Launch SSMS and click Connect -> Database Engine
- Now on connection dialog box, Enter your Azure SQL Server FullyQualified Domain Name , UserID and Password
- Go to Connection Properties Tab like below and enter SSIS Catalog DB as SSISDB
- Click OK and thats it. You will see Integration Services Catalog node in SSMS. If you didnt enter Catalog name as previous step then this special node is not visible in SSMS.
Connect to Database from SSMS
Connect to Azure Data Factory – SSISDB via SSMS 17.x Or Higher ( Deploy / Monitor SSIS Packages)
Deploy SSIS Package to Azure Data Factory using SSMS UI (Wizard mode)
Test / Execute and Monitor SSIS Package via SSMS UI
To execute SSIS Package via SSMS UI you can use below steps.
- Connect to SSISDB server using the technique listed in the previous section
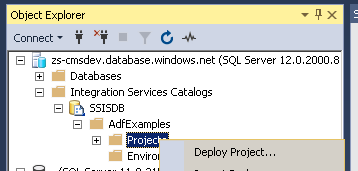
- Navigate to Integration Services Catalog > Your Folder > Your Project > Your Package > Right Click and execute
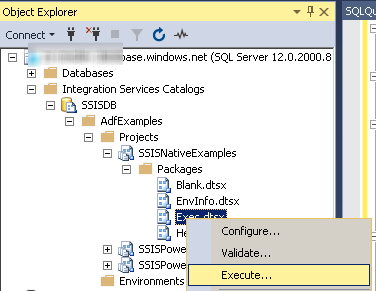
Execute SSIS Package using SSMS UI
- To monitor or view past execution, Navigate to Integration Services Catalog > Your Folder > Your Project > Your Package > Right Click and Reports > Standard Reports > View All Executions
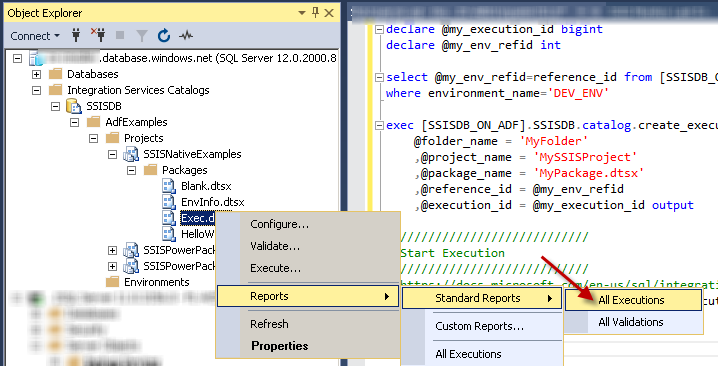
Monitor SSIS Package Execution using SSMS UI
Schedule SSIS Package in Azure Data Factory
In Azure there is no SQL Agent like feature we have for on-premises SQL Server so how do you schedule packages when you deploy to ADF ? Well there is slightly different approach in ADF. You need to use feature called Trigger. Check this article to learn how to schedule SSIS Package in Azure (Use Trigger)
Here are few more approaches to to schedule SSIS Packages deployed in Azure Data Factory
If you want to schedule SSIS Package stored in Azure Data Factory on your On-Premises server then you can use Linked Server approach mentioned in the next section. You can create a new T-SQL Job Step and call a user-defined stored procedure which can trigger SSIS package execution as per next T-SQL code.
Execute and Monitor SSIS Package via T-SQL Code in Azure Data Factory
In a real-world scenario, you have to execute SSIS Packages in an automated way from code or trigger execution on certain schedule. Microsoft has documented this scenario here but below section will add few more details which you may find very useful. Basically, if you wish to call or schedule Azure Data Factory SSIS packages from your remote server job (i.e .Calling SSIS from On-Premises Agent Job via Job > Job Step > Integration Services Step ) then there are few caveats you should know. SQL Server Agent Job doesn’t allow Mixed Mode Authentication for SSISDB to call SSIS Packages (If you check Job Step UI in SQL Agent supports only Windows Authentication).
Well, not to worry solution is not too hard. There is an easy way you can trigger remote SSIS package execution by using Linked Server approach (i.e .Call SSIS Packages stored in Azure Data Factory SSISDB).
So let’s look at how to execute and monitor ADF SSIS Packages using Linked Server.
Create a Linked server for SSISDB (Azure SQL DB)
To execute and monitor SSIS Package execution from a remote machine first step is to create a Linked Server which points to a remote server which contains SSISDB catalog. This way you can call T-SQL Step in your Agent Job to trigger SSIS execution on the remote machine (e.g. Azure Data Factory SSISDB). When you create linked server make sure to enable rpc property as below.
|
1 2 3 4 5 6 7 8 9 10 11 12 13 14 15 16 17 18 19 20 21 22 23 24 25 26 27 |
USE [master] GO --DROP Linked Server --EXEC master.dbo.sp_dropserver @server=N'SSISDB_ON_ADF', @droplogins='droplogins' --CREATE Linked Server EXEC master.dbo.sp_addlinkedserver @server = N'SSISDB_ON_ADF', @srvproduct=N'', --- For MSSQL 2012, 2014, 2016, 2017, and 2019 use below (SQL Server Native Client 11.0)--- @provider=N'SQLNCLI11', --- For MSSQL 2022 or higher use below (Microsoft OLE DB Driver for SQL Server)--- --- @provider=N'MSOLEDBSQL', @datasrc=N'my-azure-db-server001.database.windows.net,1433', @catalog=N'SSISDB' EXEC master.dbo.sp_addlinkedsrvlogin @rmtsrvname=N'SSISDB_ON_ADF', @useself=N'False', @locallogin=NULL, @rmtuser=N'zsadmin', @rmtpassword='MyAdminUserPass@123' GO EXEC master.dbo.sp_serveroption @server=N'SSISDB_ON_ADF', @optname=N'rpc', @optvalue=N'true' GO EXEC master.dbo.sp_serveroption @server=N'SSISDB_ON_ADF', @optname=N'rpc out', @optvalue=N'true' GO |
Once you have linked server created for SSISDB you can call it from your Agent Job Step. Use T-SQL step to call user-defined stored procedure which can call SSIS package execution mentioned in next few sections.
Execute SSIS Package via T-SQL Code (Set Parameters, Environment)
Now connect to your server where linked server is created (i.e. your On-Premises server). There are mainly 3 steps to trigger SSIS package execution via code.
- Create execution instance, Optionally you can supply SSIS Environment ID (grab execution id and store into some variable for later use)
- Set System, User Parameters
- Start package execution
You can set some SYSTEM variables for your execution or set Package level or Project level User defined SSIS Variables for your execution. You can also set SSIS environment ID (@reference_id when you create execution)
|
1 2 3 4 5 6 7 8 9 10 11 12 13 14 15 16 17 18 19 20 21 22 |
declare @my_execution_id bigint exec [SSISDB_ON_ADF].SSISDB.catalog.create_execution @folder_name = 'MyFolder' ,@project_name = 'MySSISProject' ,@package_name = 'MyPackage.dtsx' ,@reference_id = null ,@execution_id = @my_execution_id output --/////////////////////////// --Set Parameters --/////////////////////////// --https://docs.microsoft.com/en-us/sql/integration-services/system-stored-procedures/catalog-set-execution-parameter-value-ssisdb-database?view=sql-server-2017 exec [SSISDB_ON_ADF].SSISDB.catalog.set_execution_parameter_value @my_execution_id, 50, 'FilePath', 'C:\Temp\Dump.json' exec [SSISDB_ON_ADF].SSISDB.catalog.set_execution_parameter_value @my_execution_id, 50, 'TargetServerName', 'Server001' --/////////////////////////// --Start Execution --/////////////////////////// --https://docs.microsoft.com/en-us/sql/integration-services/system-stored-procedures/catalog-start-execution-ssisdb-database?view=sql-server-2017 exec [SSISDB_ON_ADF].SSISDB.catalog.start_execution @my_execution_id |
To wait until package execution is done, you can set SYNCHRONIZED=1 like below
|
1 2 3 4 5 6 7 8 9 10 11 12 13 14 15 16 17 18 19 20 21 22 23 24 25 26 |
declare @my_execution_id bigint exec [SSISDB_ON_ADF].SSISDB.catalog.create_execution @folder_name = 'MyFolder' ,@project_name = 'MySSISProject' ,@package_name = 'MyPackage.dtsx' ,@reference_id = null ,@execution_id = @my_execution_id output --/////////////////////////// --Wait until execution is done --/////////////////////////// -- IF You want to wait until execution is done. If you enable this then no need for status check loop --https://docs.microsoft.com/en-us/sql/integration-services/system-stored-procedures/catalog-set-execution-parameter-value-ssisdb-database?view=sql-server-2017 EXEC [SSISDB_ON_ADF].[SSISDB].[catalog].[set_execution_parameter_value] @my_execution_id, @object_type=50, @parameter_name=N'SYNCHRONIZED', @parameter_value=1 --/////////////////////////// --Start Execution --/////////////////////////// --https://docs.microsoft.com/en-us/sql/integration-services/system-stored-procedures/catalog-start-execution-ssisdb-database?view=sql-server-2017 exec [SSISDB_ON_ADF].SSISDB.catalog.start_execution @my_execution_id |
If you are using SSIS Environment to specify parameter set at runtime then use below approach to first get correct environment reference id and set for your execution.
|
1 2 3 4 5 6 7 8 9 10 11 12 13 14 15 16 17 18 |
declare @my_execution_id bigint declare @my_env_refid int select @my_env_refid=reference_id from [SSISDB_ON_ADF].[SSISDB].[catalog].environment_references where environment_name='DEV_ENV' exec [SSISDB_ON_ADF].SSISDB.catalog.create_execution @folder_name = 'MyFolder' ,@project_name = 'MySSISProject' ,@package_name = 'MyPackage.dtsx' ,@reference_id = @my_env_refid ,@execution_id = @my_execution_id output --/////////////////////////// --Start Execution --/////////////////////////// --https://docs.microsoft.com/en-us/sql/integration-services/system-stored-procedures/catalog-start-execution-ssisdb-database?view=sql-server-2017 exec [SSISDB_ON_ADF].SSISDB.catalog.start_execution @my_execution_id |
Monitor SSIS Package Execution via Code (view Log / Errors)
Here is the query to find out execution status of your SSIS package. Notice how each numeric code maps to the status description.
|
1 2 3 4 5 6 7 8 9 10 11 12 13 |
select folder_name,project_name,package_name,status_text=case when status=1 then 'Created' when status=2 then 'Running' when status=3 then 'Cancelled' when status=4 then 'Failed' when status=5 then 'Pending' when status=6 then 'Ended Unexpectedly' when status=7 then 'Succedded' when status=8 then 'Stopping' when status=9 then 'Completed' else 'Not Sure' end from [SSISDB_ON_ADF].SSISDB.catalog.executions where execution_id=@my_execution_id |
To view SSIS package execution log you can use below query. Notice how we have used XML datatype. This is a workaround to see the long string in SSMS result grid. If you have more than 8000 characters in your log record then SSMS cant display by default.
|
1 2 3 4 5 6 7 8 9 10 11 12 13 14 15 16 17 18 19 20 21 |
--/////////////////// --Full Log --/////////////////// --SELECT cast('<![CDATA[' + message + ']]>' as XML) SELECT top 1000 event_message_id as id , datalength(message) message_length , message , try_cast('<![CDATA[' + message + ']]>' as XML) as message_xml , message , package_name, event_name, message_source_name,@my_execution_id execid,message_time FROM (SELECT event_message_id, operation_id, message_time, message_type, message_source_type, message, extended_info_id, package_name, event_name, message_source_name, message_source_id, subcomponent_name, package_path, execution_path, threadID, message_code FROM [SSISDB_ON_ADF].SSISDB.catalog.event_messages AS em WHERE (operation_id =@my_execution_id) AND (event_name NOT LIKE '%Validate%') --and event_message_id=20303352 ) AS q --Where q.event_name='OnError' ORDER BY event_message_id DESC |
To view only errors for SSIS Package execution use below query (replace @my_execution_id with your own value)
|
1 2 3 4 5 6 7 8 9 10 11 12 13 14 |
--/////////////////// ----Show Just Errors --/////////////////// SELECT top 100 @my_execution_id ExecID,message, package_name, event_name, message_source_name,message_time as start_time FROM (SELECT event_message_id, operation_id, message_time, message_type, message_source_type, message, extended_info_id, package_name, event_name, message_source_name, message_source_id, subcomponent_name, package_path, execution_path, threadID, message_code FROM [SSISDB_ON_ADF].SSISDB.catalog.event_messages AS em WHERE (operation_id =@my_execution_id) AND (event_name NOT LIKE '%Validate%') ) AS q Where q.event_name='OnError' ORDER BY message_time DESC |
Full T-SQL Code
Here is the full source code of all steps we discussed.
|
1 2 3 4 5 6 7 8 9 10 11 12 13 14 15 16 17 18 19 20 21 22 23 24 25 26 27 28 29 30 31 32 33 34 35 36 37 38 39 40 41 42 43 44 45 46 47 48 49 50 51 52 53 54 55 56 57 58 59 60 61 62 63 64 65 66 67 68 69 70 71 72 73 74 75 76 77 78 79 80 81 82 83 84 85 86 87 88 89 90 91 92 93 94 95 96 97 98 99 100 101 102 103 104 105 106 107 108 109 110 111 112 113 114 115 116 117 118 119 120 121 122 123 124 125 126 127 128 129 130 131 132 133 134 135 136 137 138 139 140 141 142 143 144 145 146 147 148 149 150 151 152 153 154 155 156 157 158 159 160 |
/* Author: ZappySys Description: Execute, Monitor, run SSIS on Azure Data Factory - This script demonstrates few aspects of SSIS package execution via code (call system stored procedures) >> How to execute SSIS package via sa tored procedure call >> How to set package parameters via code >> How to set environment via code >> How to monitor SSIS package execution via T-SQL code >> How to check SSIS package execution status / error and execution log - Feel free to modify and comment uncomment certain sections to meet your need. - We used Linked server approach with 4 parts naming in objects e.g. [SSISDB_ON_ADF].SSISDB.catalog.objectnamHere - If you are running this script directly on the server where SSISDB is stored then no need for 4 parts. (just use 3 parts SSISDB.catalog.objectnamHere) we are outputting message column in xml format too so you get na ice hyper link to see the full message. This technique is needed to overcome string length limitation of SSMS USE below script to create linked server -- Needed for Azure Data Factory - SSIS Runtime (Remote execution and Monitoring) USE [master] GO --DROP Linked Server --EXEC master.dbo.sp_dropserver @server=N'SSISDB_ON_ADF', @droplogins='droplogins' --CREATE Linked Server --For MSSQL 2012, 2014, 2016, 2017, and 2019 use below (SQL Server Native Client 11.0)--- EXEC master.dbo.sp_addlinkedserver @server = N'SSISDB_ON_ADF', @srvproduct=N'', @provider=N'SQLNCLI11', @datasrc=N'my-azure-db-server001.database.windows.net,1433', @catalog=N'SSISDB' --For MSSQL 2022 or higher use below (Microsoft OLE DB Driver for SQL Server)--- --EXEC master.dbo.sp_addlinkedserver @server = N'SSISDB_ON_ADF', @srvproduct=N'', @provider=N'MSOLEDBSQL', @datasrc=N'my-azure-db-server001.database.windows.net,1433', @catalog=N'SSISDB' EXEC master.dbo.sp_addlinkedsrvlogin @rmtsrvname=N'SSISDB_ON_ADF',@useself=N'False',@locallogin=NULL,@rmtuser=N'zsadmin',@rmtpassword='MyAdminUserPass@123' GO EXEC master.dbo.sp_serveroption @server=N'SSISDB_ON_ADF', @optname=N'rpc', @optvalue=N'true' GO EXEC master.dbo.sp_serveroption @server=N'SSISDB_ON_ADF', @optname=N'rpc out', @optvalue=N'true' GO --Below needed to support EXEC + INSERT (dynamic query) EXEC master.dbo.sp_serveroption @server=N'SSISDB_ON_ADF, @optname=N'remote proc transaction promotion', @optvalue=N'false' GO */ declare @my_folder_name varchar(255)= 'AdfExamples' declare @my_project_name varchar(255) = 'SSISNativeExamples' declare @my_package_name varchar(255) = 'HelloWorld.dtsx' declare @my_environment_name varchar(255) = null --e.g. This is SSIS Environment to attach with this execution (e.g. ENV_DEV , ENV_PROD) --declare @my_environment_name varchar(255) = 'ENV_DEV' declare @my_execution_id bigint=null --declare @my_execution_id bigint=1200 --enter execid to see log declare @starttime datetime declare @statusLoop bit --/////////////////////// --UN-COMMENT THIS if you just want to see last execution log rather than execute new one --IF you just need to query status of last execution --/////////////////////// if(@my_execution_id is null) Select @statusLoop=0, @my_execution_id=Max(execution_id), @startTime = Max(start_time) From [SSISDB_ON_ADF].SSISDB.catalog.executions if(@my_execution_id is null) begin set @statusLoop=1 declare @my_env_refid int select @my_env_refid=reference_id from [SSISDB_ON_ADF].[SSISDB].[catalog].environment_references where environment_name=@my_environment_name --First create Execution and get ExecutionID in a variable --https://docs.microsoft.com/en-us/sql/integration-services/system-stored-procedures/catalog-create-execution-ssisdb-database?view=sql-server-2017 exec [SSISDB_ON_ADF].SSISDB.catalog.create_execution @folder_name = @my_folder_name ,@project_name = @my_project_name ,@package_name = @my_package_name ,@reference_id = @my_env_refid ,@execution_id = @my_execution_id output --/////////////////////////// --Wait until execution is done --/////////////////////////// -- IF You want to wait until execution is done. If you enable this then no need for status check loop --https://docs.microsoft.com/en-us/sql/integration-services/system-stored-procedures/catalog-set-execution-parameter-value-ssisdb-database?view=sql-server-2017 EXEC [SSISDB_ON_ADF].[SSISDB].[catalog].[set_execution_parameter_value] @my_execution_id, @object_type=50, @parameter_name=N'SYNCHRONIZED', @parameter_value=1 set @statusLoop=0 --if you enable this option no need for statucheck --/////////////////////////// --Set Parameters --/////////////////////////// --https://docs.microsoft.com/en-us/sql/integration-services/system-stored-procedures/catalog-set-execution-parameter-value-ssisdb-database?view=sql-server-2017 --exec [SSISDB_ON_ADF].SSISDB.catalog.set_execution_parameter_value @my_execution_id, 50, 'FilePath', 'C:\Temp\Dump.json' --exec [SSISDB_ON_ADF].SSISDB.catalog.set_execution_parameter_value @my_execution_id, 50, 'TargetServerName', 'Server001' --/////////////////////////// --Start Execution --/////////////////////////// --https://docs.microsoft.com/en-us/sql/integration-services/system-stored-procedures/catalog-start-execution-ssisdb-database?view=sql-server-2017 exec [SSISDB_ON_ADF].SSISDB.catalog.start_execution @my_execution_id end --/////////////////////////// --Status check loop for wait --/////////////////////////// ---comment these two lines if set SYNCHRONIZED = 1 if(@statusLoop = 1) WHILE @my_execution_id IN (1,2,5,8) WAITFOR DELAY '00:03' -- select folder_name,project_name,package_name,status_text=case when status=1 then 'Created' when status=2 then 'Running' when status=3 then 'Cancelled' when status=4 then 'Failed' when status=5 then 'Pending' when status=6 then 'Ended Unexpectedly' when status=7 then 'Succedded' when status=8 then 'Stopping' when status=9 then 'Completed' else 'Not Sure' end from [SSISDB_ON_ADF].SSISDB.catalog.executions where execution_id=@my_execution_id --/////////////////// ----Show Just Errors --/////////////////// SELECT top 10 @my_execution_id ExecID,message, package_name, event_name, message_source_name,message_time as start_time FROM (SELECT event_message_id, operation_id, message_time, message_type, message_source_type, message, extended_info_id, package_name, event_name, message_source_name, message_source_id, subcomponent_name, package_path, execution_path, threadID, message_code FROM [SSISDB_ON_ADF].SSISDB.catalog.event_messages AS em WHERE (operation_id =@my_execution_id) AND (event_name NOT LIKE '%Validate%') ) AS q Where q.event_name='OnError' ORDER BY message_time DESC --/////////////////// ----Full Log --/////////////////// --SELECT cast('<![CDATA[' + message + ']]>' as XML) SELECT top 1000 event_message_id as id , datalength(message) message_length , message , try_cast('<![CDATA[' + message + ']]>' as XML) as message_xml , message , package_name, event_name, message_source_name,@my_execution_id execid,message_time FROM (SELECT event_message_id, operation_id, message_time, message_type, message_source_type, message, extended_info_id, package_name, event_name, message_source_name, message_source_id, subcomponent_name, package_path, execution_path, threadID, message_code FROM [SSISDB_ON_ADF].SSISDB.catalog.event_messages AS em WHERE (operation_id =@my_execution_id) AND (event_name NOT LIKE '%Validate%') --and event_message_id=20303352 ) AS q --Where q.event_name='OnError' ORDER BY event_message_id DESC |
Creating ADF SSIS – IR using PowerShell
You can also create Azure Data Factory – SSIS Integration Runtime using PowerShell Code. Check this article. Make sure you enter SAS URL for $SetupScriptContainerSasUri parameter.
Save Cost – Run SSIS-IR on demand (Start / Stop Runtime from Pipeline Activity)
There will be a time when you like to execute package once a day or once a week. Which means you will pay Cost of your SSIS-IR for unused time too. If you like to save cost on your SSIS runtime unused time you can check below links for similar topic.
https://docs.microsoft.com/en-us/azure/data-factory/how-to-schedule-azure-ssis-integration-runtime
https://andyleonard.blog/2019/02/start-azure-ssis-execute-package-stop-azure-ssis/
http://microsoft-ssis.blogspot.com/2018/04/start-and-stop-integration-runtime-in.html
Basically idea is to Start SSIS Runtime just before you need to execute SSIS Package and Stop SSIS Runtime when you are done so you don’t incur any charges of unused SSIS-IR hours. This technique can save you huge amount of $$$ if you are executing SSIS Packages occasionally in ADF.
Access On-Premises Files in ADF-SSIS IR node
Utilize the serverless capabilities of Azure Data Factory to seamlessly interact with an Access file system. By configuring your ADF pipelines, you can perform operations on Access files while taking advantage of serverless computing resources. At some point, you may encounter the need to interact with a file system through SSIS Tasks, such as Excel Source or File System Task, while your jobs are executing in a cloud environment. Wondering how to address this challenge? Explore the article below to discover effective workarounds for implementing these solutions.
Open and save files on-premises and in Azure with SSIS packages deployed in Azure
Using Static IP for ADF Cluster (VNet) – For External System Firewall Whitelisting
There will be a time when your ADF SSIS-IR needs to access an external system (e.g., AWS RDS-SQL Server) where only whitelisted IPs are allowed to access resources. In such a case, you must assign a static IP to ADF so other systems can allow that IP address in the Firewall White list.
For this purpose you have to join your ADF into VNet (Virtual Network) and then assign Static IP as explained in this article.
Troubleshooting Common Errors
Cannot find custom setup script (main.cmd) in your Azure blob container
When you face the below error, make sure you regenerate the SAS URL with “Create” permission along with “Read,” “Write,” and “List.” In some cases, Create permission is needed, and Cluster start fails.
Conclusion
New features in Microsoft Azure Data Factory V2 gives you truly managed option at low cost to Deploy, Execute and Monitor SSIS Packages. Using ZappySys SSIS PowerPack you can add 70+ new tasks/connectors to your Azure Data Factory SSIS Runtime. Download and try SSIS PowerPack to find out many new API / Cloud focused features for a connected world.