Introduction
 In this article, we will get Office 365 data in Power BI using Microsoft Graph API and ODBC drivers. Specifically, we will get Excel file data in OneDrive, events from a Calendar and finally, a list in a note in OneNote and then load that data into a Power BI report. We will achieve that by creating an ODBC data source using ZappySys ODBC PowerPack and then querying corresponding Microsoft Graph API methods. ODBC PowerPack allows to query REST/SOAP APIs in an easy way and lets to view responses in a tabular format, which will be perfect to accomplish our goal.
Prerequisites
- A Power BI account.
- Wield basic Power BI skills.
- Power BI Desktop installed.
- ZappySys ODBC PowerPack installed.
Step By Step – Get Office 365 data in Power BI using Microsoft Graph API and ODBC
Register Application (OAuth2 App for Graph API)
The first step to access any Office 365 API / Graph API is to register an OAuth App in the Azure Portal. After following these steps, you will get the following two items to use in the next section:
- Application Id
- Application Secret
In this section, you will learn how to register a custom app in Microsoft Azure portal that will allow access to the OneDrive. So, let's get started -
- Log into Microsoft Azure portal to register a custom app.
- Register a new application by clicking New Registration link.
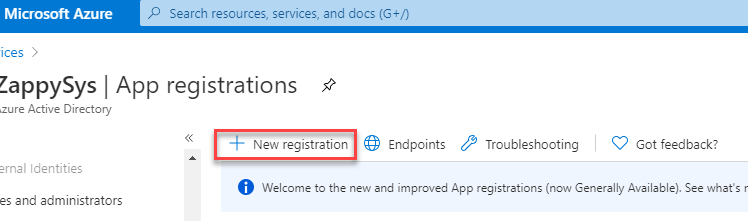
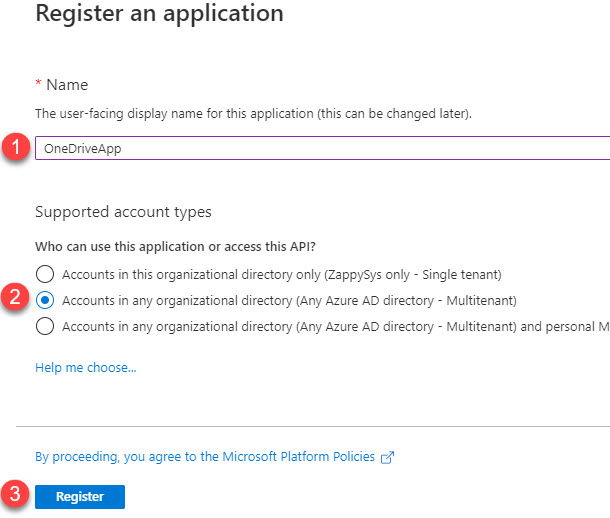
- Provide the name of the custom app and who can access the app in the organization.
- Go to the App overview and add a Redirect URL.

- Click on "Add a Platform" under Platform Configuration section and then select "Web" under Web applications
section to enter a Redirect URL.
https://zappysys.com/oauth

- Create a Client Secret key which will be used to Authenticate the custom Azure app.

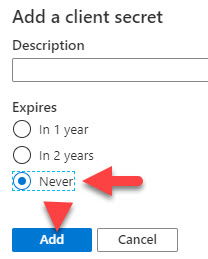
 Note - Take a note of Client Secret, it will be required while configuring OAuth connection in the SSIS later
 - Add API Permissions.

- Select following permissions from the Delegated Permissions section.
User.ReadBasic.All
Files.Read
offline_access

- Take a note of Client ID, it will be required while configuring OAuth connection in the SSIS later.

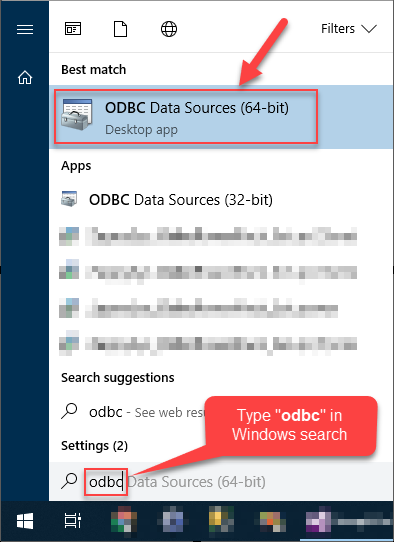
Open ODBC Data Source Administrator
- Hit Windows Start button and search for "odbc".
- You will see two versions of ODBC Data Source administrator: 64-bit and 32-bit. Choose:
-
- 64-bit if your client application is a 64-bit program and you plan to create a System DSN.
- 32-bit if your client application is a 32-bit program and you plan to create a System DSN.
- 32-bit or 64-bit version if you plan to create a User DSN.
Windows ODBC Data Sources
-
- Once you open, you should see a similar window:
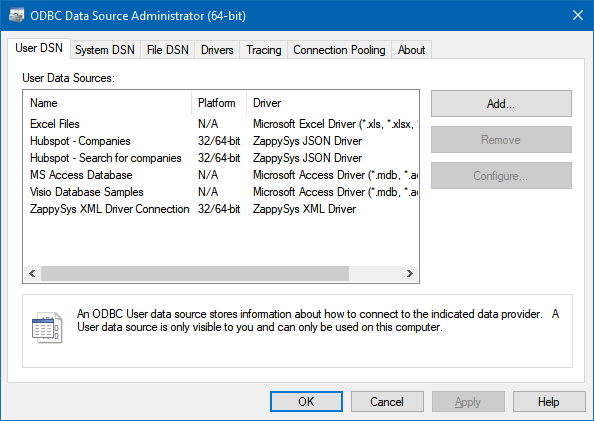
ODBC Data Source Administrator
Set up an ODBC data source based on ZappySys JSON Driver
Add a data source
- Go to System DSN and press Add to add a system DSN. If you use apps like Power BI which needs access only your User account then you can create User DSN.
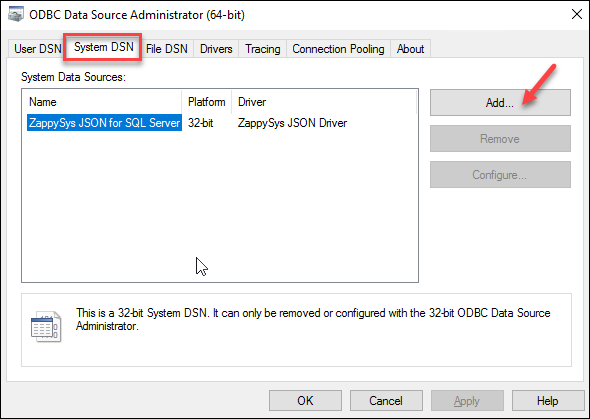
- Add a data source based on ZappySys JSON Driver:
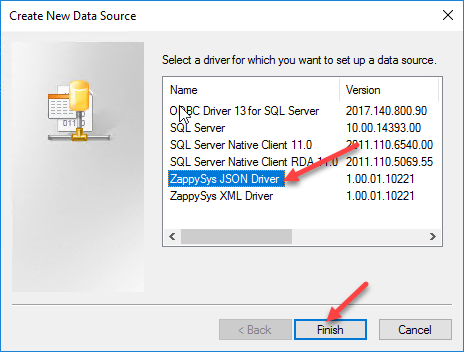
Configure the data source
- Once a window appears, give a name to the data source, e.g. System - JSON:

- Then input https://graph.microsoft.com/v1.0/me in the URL field.
- Select OAuth as the Connection Type.
- Click Click to Configure button/link to open OAuth configuration window.
- Select Custom as OAuth Provider.
- Then input Client Id, Client Secret which we got when created the Graph API application.
- Set https://login.microsoftonline.com/common/oauth2/v2.0/authorize as Authorization Url.
- Set https://login.microsoftonline.com/common/oauth2/v2.0/token as Access Token Url.
- In Scopes / Permissions section set these scopes, separated by a new line. E.g. offline_access, Files.Read.All, Calendars.Read, Notes.Read, User.Read
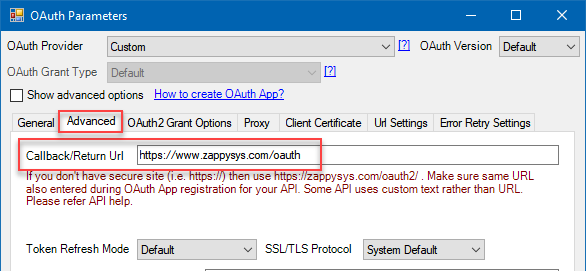
- In Advanced tab configure Callback/Redirect Url and set it to the one we configured in Graph API app:
- Finally, click Generate Token button to generate a token.
- Click OK to close the window.
Set up an ODBC data source based on ZappySys XML Driver
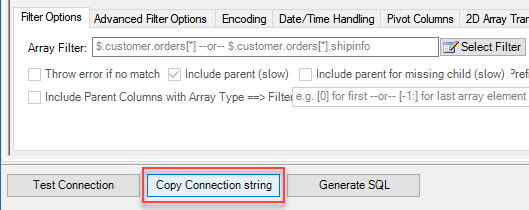
- Before adding another data source based on ZappySys XML Driver, copy the connection string of the data source we just created:
- Close the window and then add a new data source, but this time based on ZappySys XML Driver.
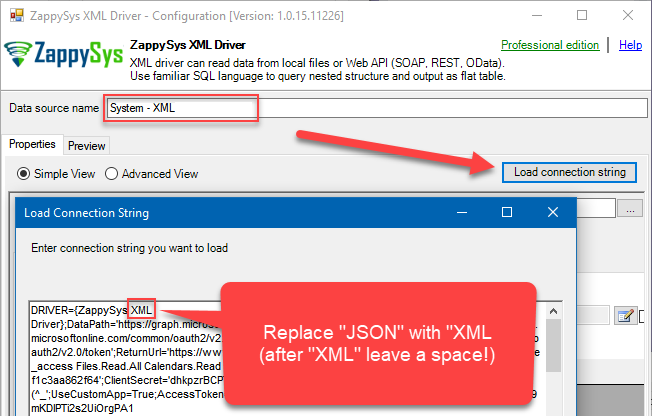
- Once a window is opened, give it a name, e.g. System - XML.
- Then press Load connection string button to load the connection string.
- Paste the copied connection string and replace JSON text to XML, so that you have { ZappySys XML Driver } in DRIVER property.
- Close the window.
Create a Power BI report
Reading files from OneDrive (getting Excel data)
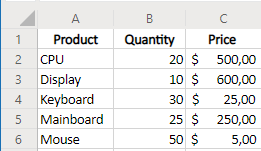
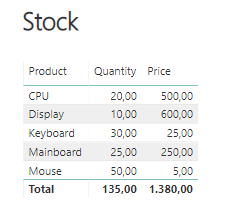
Let’s say you have Stock.xlsx stored in Sample Documents folder, OneDrive with this kind of data and you want to show it in a Power BI report:
To have that data in a Power BI report, perform these steps:
- Open Power BI Desktop and create a new Power BI report.
- Create a data source based on System – JSON DSN (since we get a JSON response):
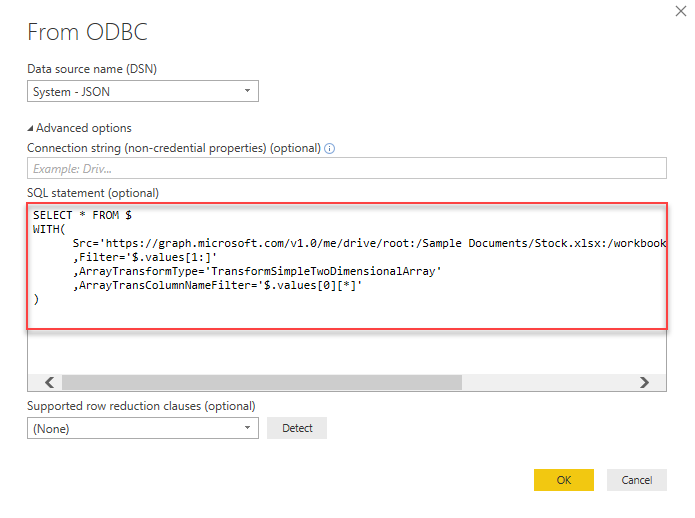
- Then in SQL statement area enter this query:
SELECT * FROM $Using WITH clause lets us override the properties. You can generate the query above using the Query Builder:
WITH(Src='https://graph.microsoft.com/v1.0/me/drive/root:/YOUR FOLDER/Stock.xlsx:/workbook/worksheets/SHEET NAME/usedRange'
,Filter='$.values[1:]'
,ArrayTransformType='TransformSimpleTwoDimensionalArray'
,ArrayTransColumnNameFilter='$.values[0][*]'
)
 In this step we are overriding Url, Filter and array transformation fields you configured in JSON DSN. The Src value overrides the URL. The Filter property enables us to select the data we want to see in the report. We use [1:] in $.values[1:] to skip the first row because the first row contains the headers and we want only the data. You can configure this option in the Filter Options tab (read more about JSON path).We also have to make the transformation on the JSON and turn JSON arrays into rows. To accomplish that, we override ArrayTransformType. With ArrayTransColumnNameFilter property and [0][*] text, we specify that the first array of parent array will be the headers of the columns. You can read more about transformations in Parse multi-dimensional JSON array article.Note: Use Microsoft Graph API Explorer to make a call and see what response you get. You can try calling other OneDrive endpoints.
 - Click OK.
- Drag a table into the report, select the columns and you should see a similar view:
Reading calendar entries
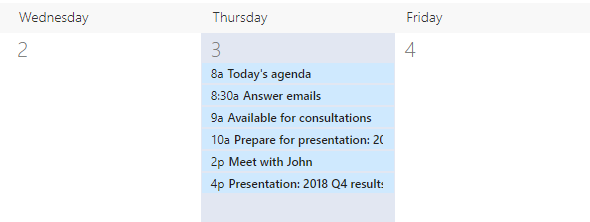
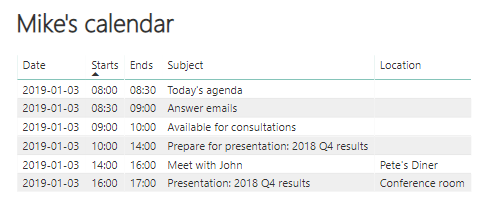
Now, let’s say you use a calendar in Office 365 and you want your appointments to be visible in a Power BI report:
- To start, create a new Power BI report.
- Then add a data source based on System – JSON DSN (again, we get the response in JSON):
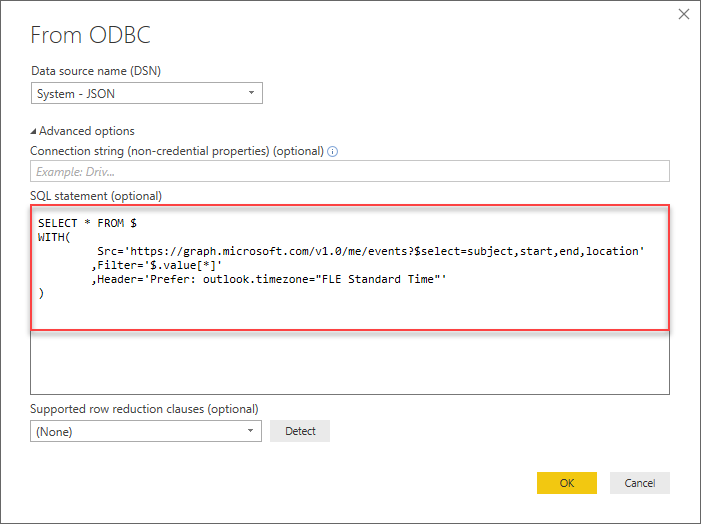
- In SQL statement section enter this query:
SELECT * FROM $Here we also are overriding HTTP Header so that we get the event times not in UTC/GMT but for the specified timezone. It must be specified in Prefer: outlook.timezone=”{time-zone-string}” format (check an article on how to get a list of supported time zones).
WITH(Src='https://graph.microsoft.com/v1.0/me/events?$select=subject,start,end,location'
,Filter='$.value[*]'
,Header='Prefer: outlook.timezone="FLE Standard Time"'
)Note: Use Microsoft Graph API Explorer to make a call and see what response you get. You can try calling other Calendar endpoints. - Click OK.
- Drag a table control into the report, select several columns and you should see a similar view:
Reading notes from OneNote
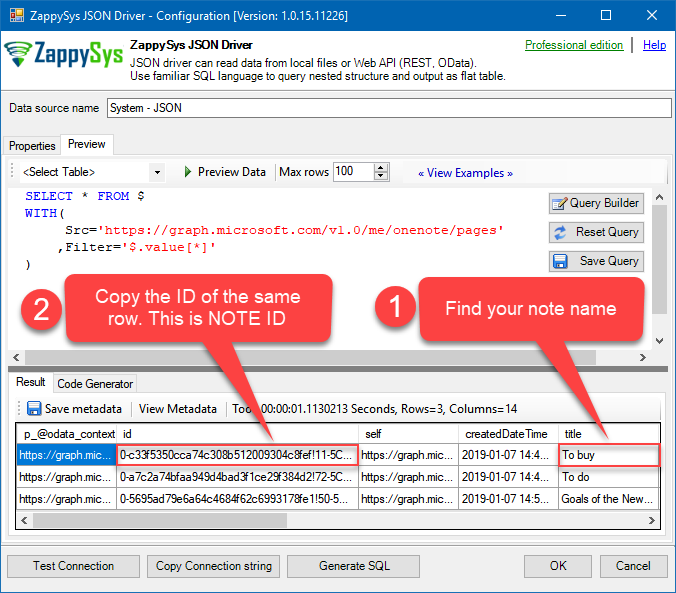
Suppose, you have these notes in OneNote and you want “Groceries list” to be shown in a Power BI report:

- First, we will need to find NOTE ID we are trying to get. To do that, open ODBC Administrator, find System – JSON data source and hit Configure.
- Then go to the Preview tab, and input this SQL query and hit Preview Data:
SELECT * FROM $

WITH (Src='https://graph.microsoft.com/v1.0/me/onenote/pages'

,Filter='$.value[*]'

) - Once you get a result set, find your note name and copy its ID:
- Then create a new Power BI report.
- Create a new data source based on System – XML DSN (we are using XML-based DSN because the response will be in HTML):
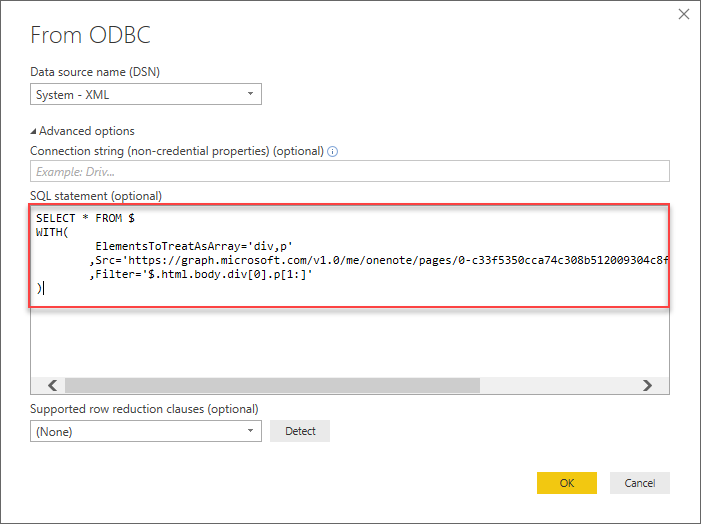
- In SQL statement section enter this query (use the NOTE ID you retrieved in the previous step):
SELECT * FROM $

WITH(ElementsToTreatAsArray='div,p'

,Src='https://graph.microsoft.com/v1.0/me/onenote/pages/NOTE ID/content'

,Filter='$.html.body.div[0].p[1:]'

)
Note: Use Microsoft Graph API Explorer to make a call and see what response you get. You can try calling other OneNote endpoints. - Click OK.
- Drag and drop Multi-row card visual, select #text column and you should see a similar view:

- We finished! Now you can publish your Power BI reports to Power BI service.
Working with Gateways in Power BI (Schedule Import)
If the data needs to be updated, it is necessary to create a gateway on-premises. In this new section, we will install a Power BI Gateway and in the next section schedule it to update the REST API information.- In the last section, we Published the report. Power BI may ask you to SIGN IN.
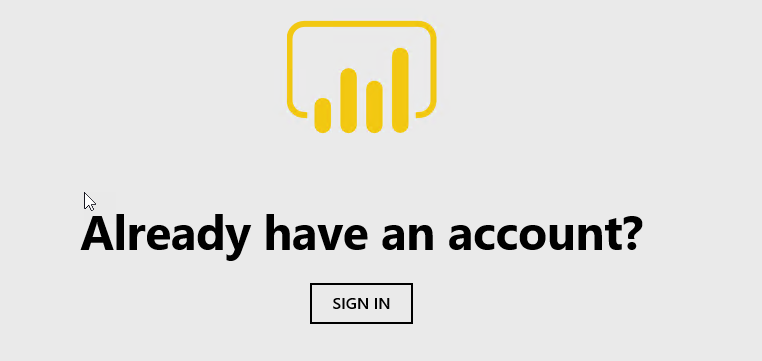
Sign in in Power BI
- Select the Workspace and select Datasets
[caption id="attachment_10110" align="alignnone" width="702"]
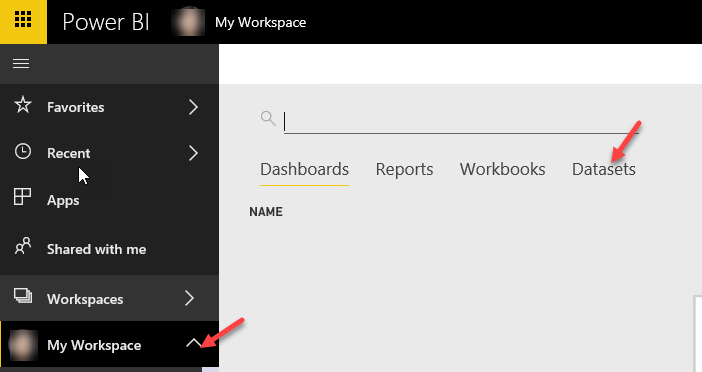 Go to workspace and dataset[/caption]
Go to workspace and dataset
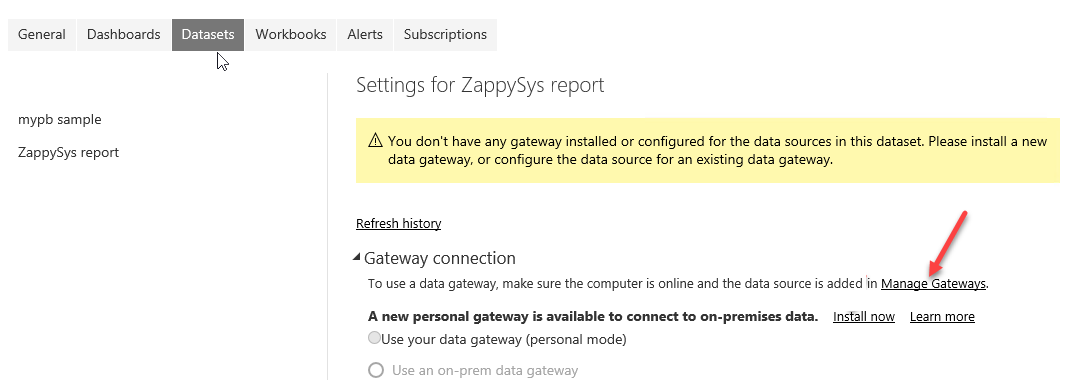
- Right-click the report and select Settings.
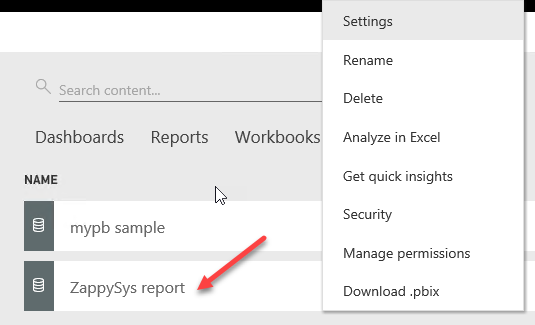
Specify settings for the report
- The system will ask for a Gateway. Stay here.
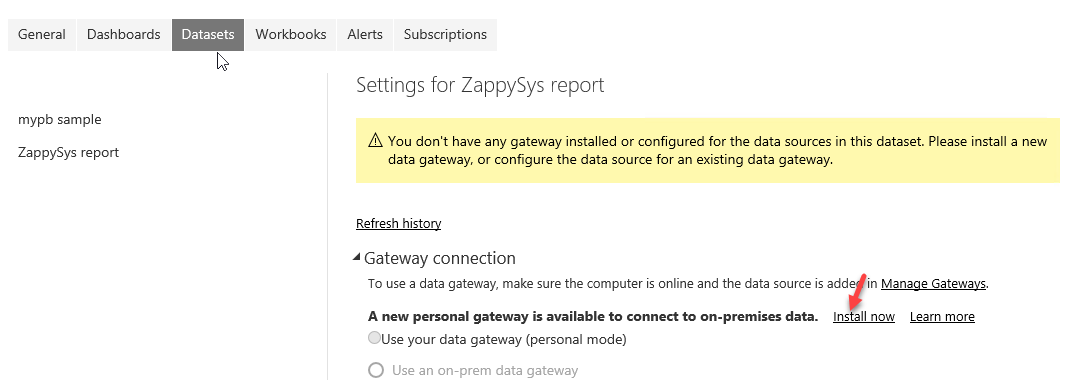
Add Power BI Gateway
- Use the following link to install a Data Gateway:
https://docs.microsoft.com/en-us/power-bi/service-gateway-onprem
- Run the installer and press Next
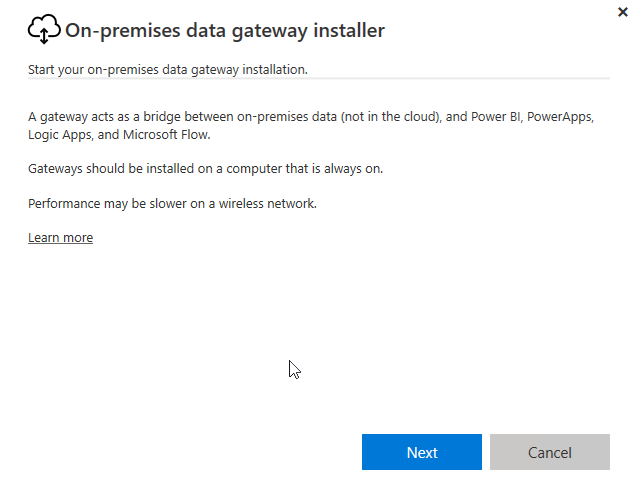
Gateway installer
- Select the option On-premises data gateway (recommended). This option allows access to multiple users and can be used by more applications than Power BI.
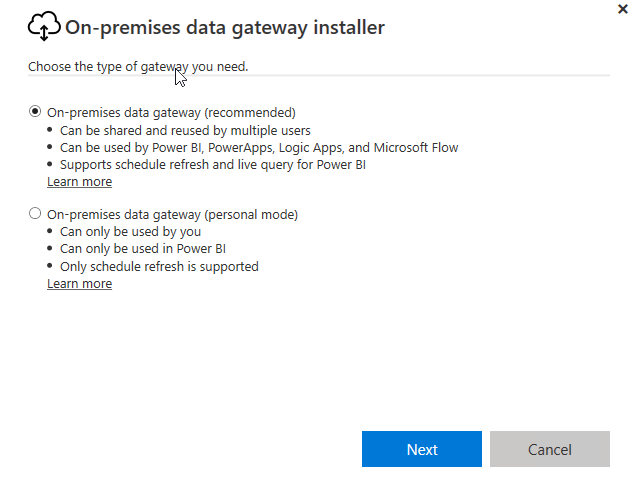
Choose Power BI option
- The installer will show a warning message.
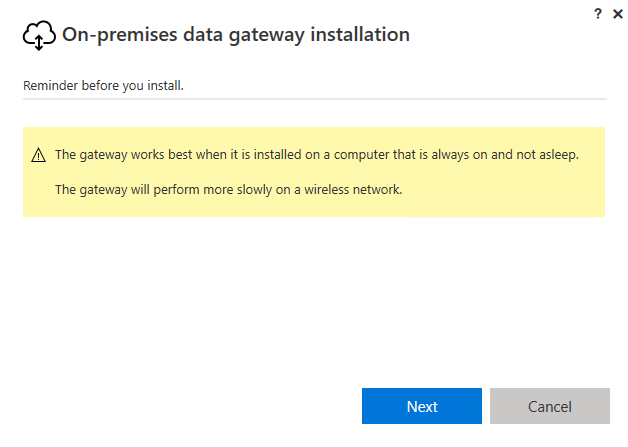
Warning message during installation
- Select the path to install and check the I accept the terms.
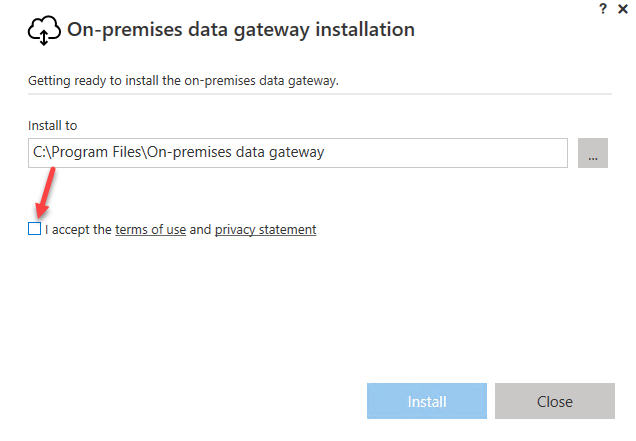
Accept terms
- Specify the email address to use the gateway.
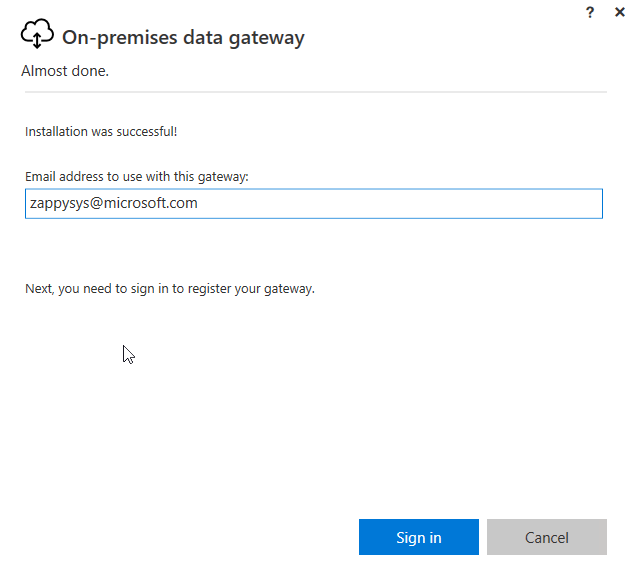
Register email address
- After entering the email, write the gateway name and a recovery key. Make sure to confirm the recovery key.
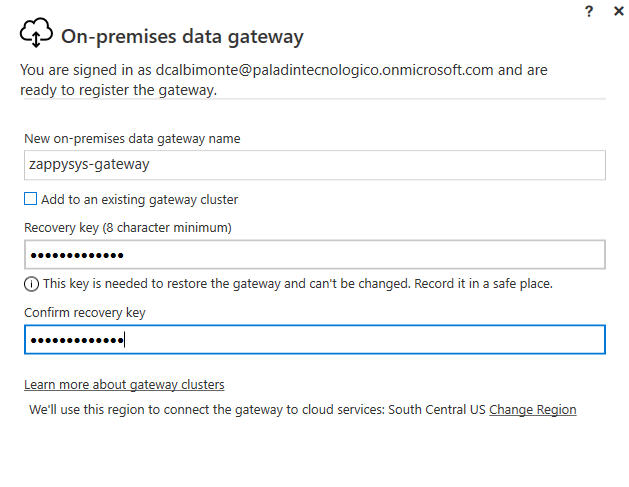
Enter recovery key
Manage gateways and configure the schedule
Once that the gateway is installed we will configure it and add the connection strings.- The next step is to go to manage gateway
Power BI - Manage Gateway Setting
- In order to get the connection string, we will need the connection string of the ZappySys JSON Driver. In the first section of this post, we explained how to configure it. Press Copy Connection String
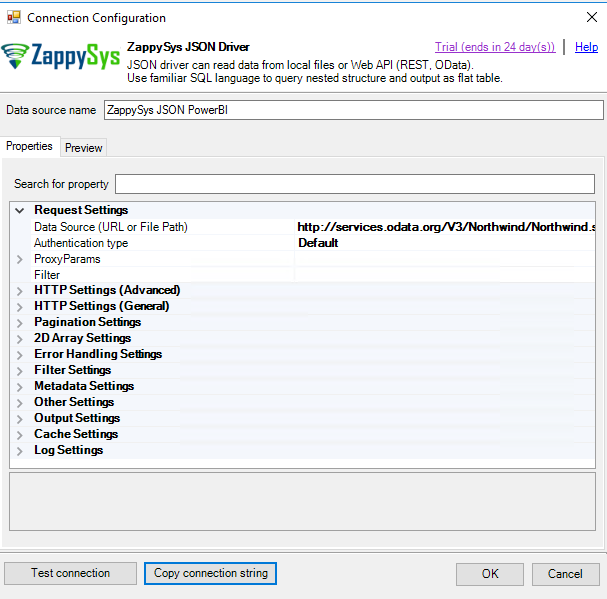
Connection properties
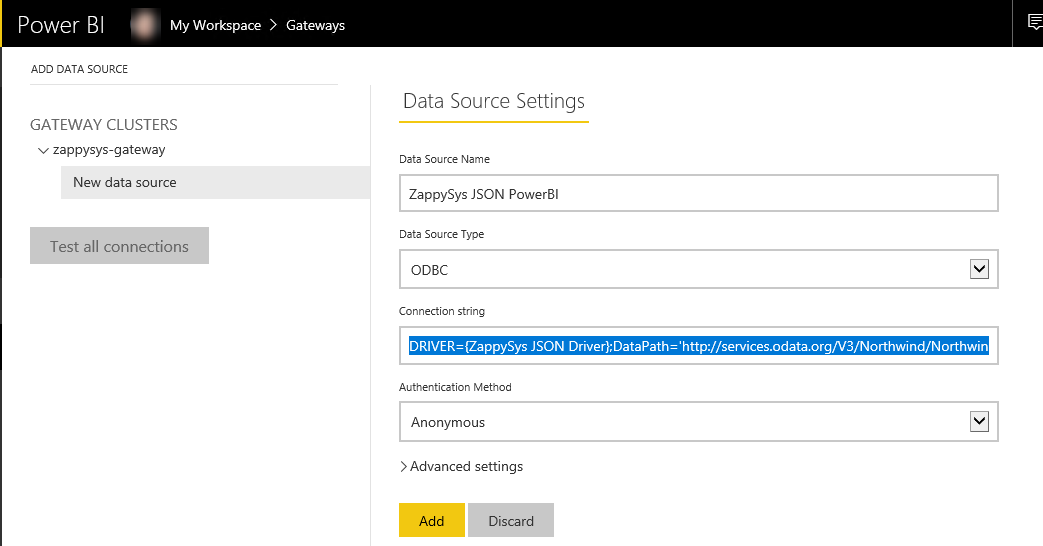
- Once that the data is copied, add a New data Source. In Data Source Name, enter the Data Source Name of the ZappySys JSON driver in step 13 and in Data Source Type, select ODBC. In connection string copy and paste from the clipboard of the step 13 and press Add.
[caption id="attachment_10113" align="alignnone" width="720"]
 ZappySys connection properties in Power BI[/caption]
ZappySys connection properties in Power BI
- Once added the gateway. You can see the schedule refresh to On and Add another time to add the time where you want to refresh the data.
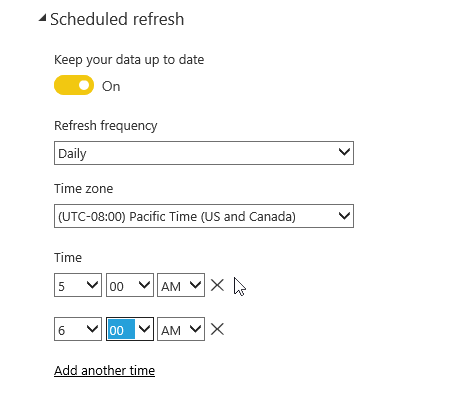
Schedule gateway
Conclusion
Today we learned how to call Microsoft Graph API methods using ZappySys ODBC PowerPack and load response data into Power BI without any ETL procedures. Particularly, we used OneDrive, Calendar and OneNote Graph API endpoints to achieve that. We created two ODBC data sources based on JSON and XML ODBC Driver to query those endpoints, which let us read data directly in a Power BI report. Finally, we examined how to refresh data source on Power BI using on-premises Power BI gateway.
References
https://powerbi.microsoft.com/en-us/
https://apps.dev.microsoft.com/
https://developer.microsoft.com/en-us/graph/graph-explorer/
https://docs.microsoft.com/en-us/graph/overview
https://docs.microsoft.com/en-us/graph/onedrive-concept-overview
https://docs.microsoft.com/en-us/graph/outlook-calendar-concept-overview
https://docs.microsoft.com/en-us/graph/integrate-with-onenote