Introduction
Imagine this situation, you or users of your product wants to consume some REST API in ETL / BI / Programming Tools using ODBC / JDBC Driver interface but there are no ODBC / JDBC Driver available for that API and you dont even know coding? If you are in a situation No Problem !!! In this post you will learn how to create a custom ODBC Driver for API (i.e. REST / SOAP / OData) without writing code… and access in most BI / ETL / Reporting tools using Industry Standard such as ODBC Interface….. Yes you heard it right… 🙂
Generally speaking, creating an ODBC Driver requires a lot of coding effort and that’s why most vendors don’t invest in providing ODBC Driver and let you consume their API using code only. They assume that your company / team has really sharp C# / JAVA / C++ coders available 🙂 …. but we all know that coding is not cheap and not easy to maintain in long run.
Basically, the approach mentioned in this article requires you to create an XML File (or call it Connector File) and then consume it using API Driver (ODBC) So let’s get started!
Requirements
In order to access API data inside your App using ODBC Driver you will need to make sure following requirements are met.- Download and Install ZappySys ODBC PowerPack (This includes XML / JSON / REST API and few other drivers for SQL Server and ODBC connectivity in tools like Excel, Power BI, SSRS)
API Connector File – The Concept
ZappySys has developed a highly flexible API Connector Framework which you can use to build API Connector Files which can be used by API ODBC Driver in different apps. This API Connector Framework is so flexible that it can handle pretty much any API out there.
Here are a few example connector files we built using the same framework. Don’t worry about various parts in those connector files for now, you might not need to implement all those. We will start simple and explain to you advanced use cases later.
Example Connector Files
Basic Example of API Connector File
Here is a very simple example of some API to read Customers and Orders. Keep in mind most features are omitted for simplicity.
Below connector file shows few concepts which we will discuss later in this article. Such as API Base URL (i.e. Service URL), Authetication, Pagination, EndPoints, Metadata, Parameters, Templates, Tables so on.
- Open Notepad
- Copy / Paste below XMl in notepad and save as NorthwindConnector.xml
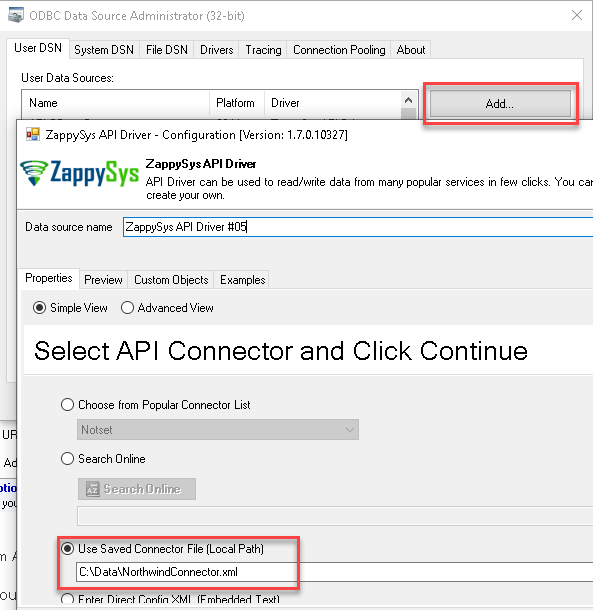
- Then you can Create a new ODBC DSN as mentioned here and use our connector file for Testing (Use Saved Connector File Option on new DSN wizard).
NorthwindConnector.xml
|
1 2 3 4 5 6 7 8 9 10 11 12 13 14 15 16 17 18 19 20 21 22 23 24 25 26 27 28 29 30 31 32 33 34 35 36 37 38 39 40 41 42 43 44 45 46 47 48 49 50 51 52 |
<?xml version="1.0"?> <ApiConfig Name="Northwind" Slug="northwind-api" Desc="Sample connector for Northwind OData Service" Logo="https://www.odata.org/assets/ODataLogo-96.png"> <ServiceUrls> <ServiceUrl Name="V3_API" Url="https://services.odata.org/V3/Northwind/Northwind.svc"/> <ServiceUrl Name="V4_API" Url="https://services.odata.org/V4/Northwind/Northwind.svc"/> </ServiceUrls> <!-- Implement supported way to Authenticate API calls --> <Auths> <Auth Name="ApiKeyAuth" Type="Http" TestEndPoint="get_customers" ConnStr="CredentialType=Token;TokenAuthHeader=X-APIKEY;Password=[$ApiKey$]"> <Params> <Param Name="ApiKey" Label="Enter your API Key" Secret="True"/> </Params> </Auth> </Auths> <!-- Reusable Templates (i.e. API Pagination Properties) --> <Template> <EndPoint Name="PaginatedCall"> <Params> <Param Name="NextUrlAttributeOrExpr" Type="Property" Value="$.['odata.nextLink']"/> </Params> </EndPoint> </Template> <!-- EndPoints --> <EndPoints> <EndPoint Name="get_customers" Template="PaginatedCall" Url="/Customers?$format=json" Filter="$.value[*]" Method="GET"> <OutputColumns> <Column Name="CustomerID" Label="Id" DataType="DT_WSTR" Length="20"/> <Column Name="CompanyName" DataType="DT_WSTR" Length="100"/> </OutputColumns> </EndPoint> <EndPoint Name="get_orders" Template="PaginatedCall" Url="/Orders?$format=json" Filter="$.value[*]" Method="GET"> <OutputColumns> <Column Name="OrderID" Label="Id" DataType="DT_I4"/> <Column Name="OrderDate" DataType="DT_DBTIMESTAMP"/> <Column Name="CustomerID" DataType="DT_WSTR" Length="20"/> <Column Name="Notes" DataType="DT_NTEXT"/> </OutputColumns> </EndPoint> </EndPoints> <!-- Tables (with SELECT, LOOKUP UPDATE, INSERT, DELETE operations. For Demo we have used just SELECT EndPoint) --> <Tables> <Table Name="Orders" SelectEndPoint="get_orders"/> <Table Name="Customers" SelectEndPoint="get_customers"/> </Tables> </ApiConfig> |
Using API Connector File in Apps
Once API connector file is created
Use in ODBC Apps
Click here to see an example – Using API connector file in ODBC Apps (ODATA). For other popular apps check this page and click on desired app.
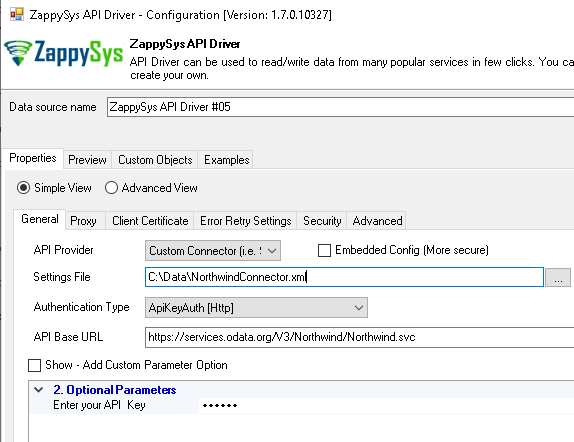
Here is how it may look like if we import the previous connector file in API Driver UI. Notice how we selected the V3 Base URL as API. Also, see how various connector file elements translated to Driver UI…. very cool right ?
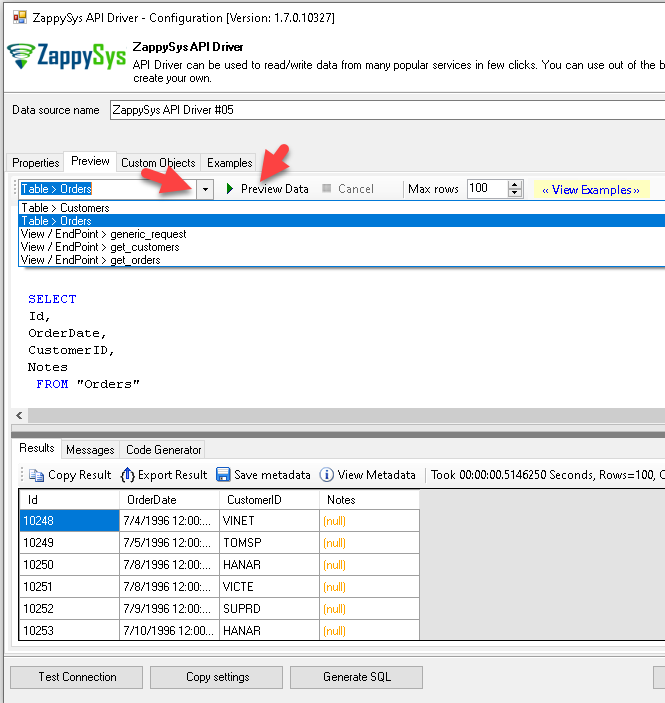
Here is the output from Preview Tab
Use in JAVA Apps
Click here to see an example – Using API connector file in JAVA based Apps (It uses ZappySys Data Gateway as Bridge rather than direct ODBC call in Java becuase JAVA doesnt support ODBC directly)
Use in SQL Server (T-SQL code)
Click here to see an example – Using API connector file in SQL Server (It uses ZappySys Data Gateway as Bridge rather than direct ODBC call in SQL Servr becuase of some known issues of direct ODBC)
Use in SSIS Package
Click here to see an example – Using API connector file in SSIS Packages. It uses native API Source / API Destination components.
Create / Edit Connector file using Wizard from API Driver UI
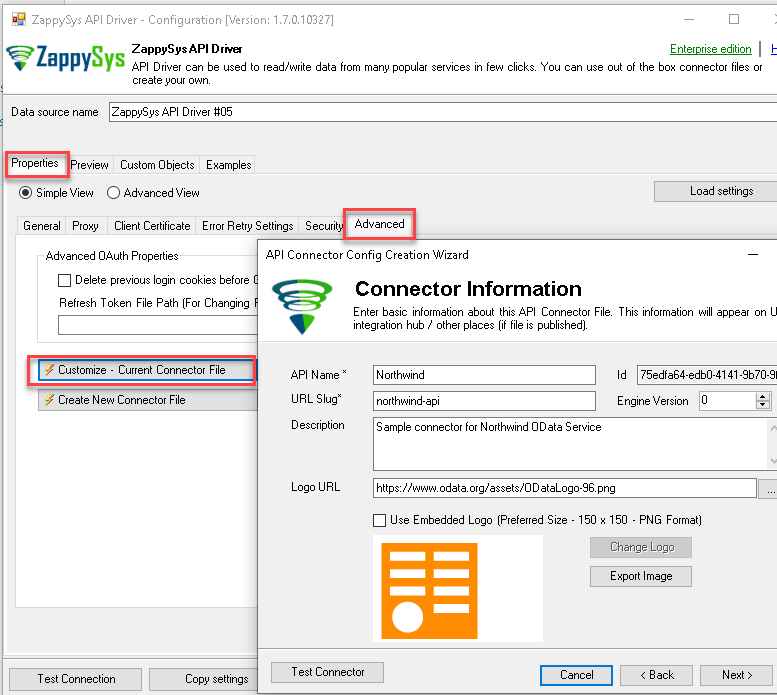
If you like to edit your file previously created using Wizard then you can do the following steps.
- Assuming you have already setup ODBC DSN for API Connector File we previously created.
- Open Odbc UI (search for “ODBC” in the start menu and select “ODBC Administrator”)
- Double-click on the Data source you like to edit
- On the Properties Tab > Go to Advanced Tab
- Click on Customize – Current Connector File (If you wish to create a new API connector file then you can click on Create New Connector File Button instead)
Create Connector file from SSIS JSON / XML Source UI Settings
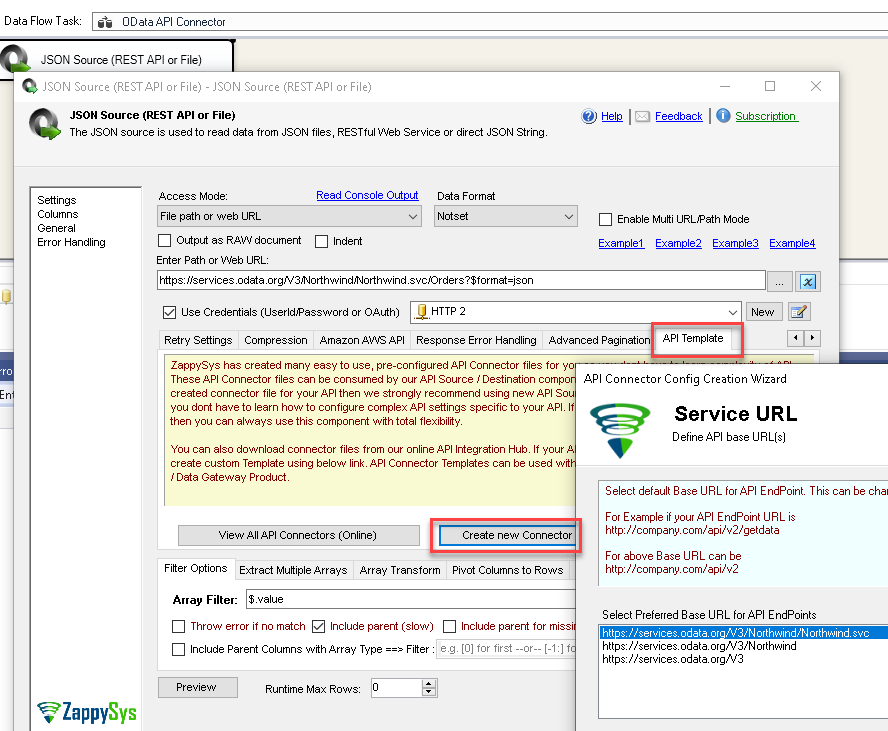
If you are an SSIS user and you have configured JSON Source or XML Source then you convert those UI settings into a basic API connector file by going on API Template and clicking on Create New Connector File button like below.
Create API Connector file from scratch
So far you have understood the basic ideas about connector files. Also explored creating / editing API Connector File using Wizard in ODBC / SSIS.
Now let’s look at concepts of creating connector file in detail.
Basic Properties (Name, Slug, Logo)
Coming Soon
Service URL (API Base URL)
Coming Soon
Authentication
Coming Soon
Templates
Coming Soon
Parameters
Coming Soon
EndPoints
Coming Soon
Metadata / OutputColumns
Coming Soon
Tables
Coming Soon
Contact Us – We will build Custom API Driver for you
If you are still not sure how to use all these on your own or you do not have time/experience… no worries. Contact us and we will provide you an estimate for building a custom API Driver / connector.
In the contact form above provide us following details (or as much as you can provide)
- Which connector do you like to build?
- How are you planning to consume that data (i.e. which apps e.g. Power BI, Tableau)?
- Your use case (e.g. read customer data from Zoho Invoice System)
- Include table / data feed names you prefer to read from (e.g. Read Invoices, Read/Write Customers)
Conclusion
In this article, we explored how easy it is to create your custom ODBC Driver for API using a powerful API Connector Framework. Download ODBC PowerPack and build your own API Driver in a few clicks.

